
<< Building Views with IBM Engineering Lifecycle Optimization – Engineering Insights (ENI) Part Two – Building a Traceability View
In the previous article we built out a simple traceability view – as a reminder here is where we ended up:
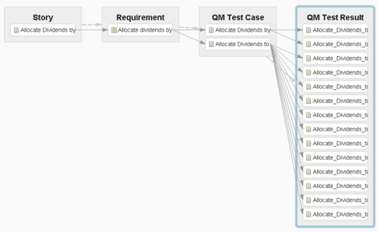
While functional it isn’t particularly appealing visually. In this article, we will apply some formatting to improve its consumability.
Formatting Resources
It’s probably worth mentioning straight away that formatting for Artifacts differs slightly from formatting for Custom Artifact Elements. In this article, we’ll focus solely on Artifacts (which we used to create the traceability view in the previous article).
Nodes
The formatting of resources displayed on the view is done primarily through Nodes. We can open the Node definition for any type of Artifact by right-clicking (any) resource displayed inside an Artifact Container and then selecting Edit Node:
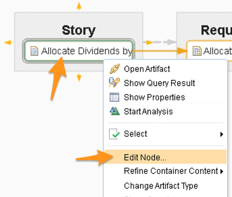
Note that editing the Node for a particular Artifact (e.g. Story) affects all containers of that type on this view.
UI Types
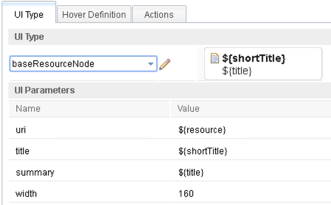
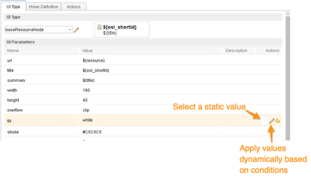
Nodes are based on UI Types that define the basic display characteristics of an element such as its shape (for example it’s a rectangle that is 160 wide and 30 high), its content (for example it has one line of text), its colors and so on.

These characteristics (parameters) have default values which may then be overridden by the Node that uses them. In the screenshot above you can see that the Story Node is based on the simpleResourceNode UI Type – which is a rectangle with a single line of text. By default, the rectangle is 160 wide and 30 high, and the single line of text is populated by the title property of the underlying resource when it appears on the view.
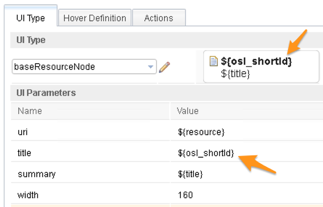
If we select a different UI Type – for example the baseResourceNode UI Type; this one is slightly different in that it has two lines of text, populated by the shortTitle and title properties respectively:
Note that the preview at the top-right displays the current value setting of the parameter, not the name. Rather confusingly, for example, the UI Type has a parameter called title, which by default uses the shortTitle property of the resource. It also has a parameter called summary, which uses the title property of the underlying resource. Don’t worry too much about this – just change the values in the table and then look at the preview for the effect. For example, if we modify the title row to use the id property instead of the shortTitle:
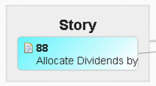
Then the view updates so that Stories display their ID as well as their title:

Another simple change we can make to improve the look and feel is to change the fill color of a Node:
Fill colors may be solid, gradients, or patterns and it doesn’t take very long to create a more pleasant looking view. Don’t overdo this of course and you will find that lighter colors work better than darker ones.

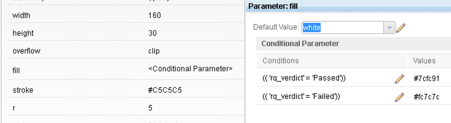
Conditional Properties
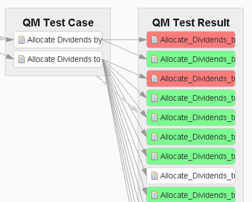
Any value defined in a Node may be set statically (for example width=30 and fill color=yellow) or conditionally. This is particularly useful for applying properties like coloring, for example, the Test Result container could color its display based on the verdict (passed, failed and so on) of the underlying test result:
Want to change the width of the displayed artifacts on a diagram so you can read them? Change the width property in the Node definition. Resizing a container will do just that (resize the container) not the displayed elements inside it.
Note that UI Types may be customized and new ones added – but this is beyond the scope of this article.
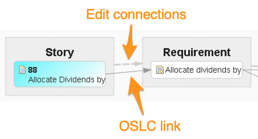
Line Styles
Aside from the elements in the containers, the other thing we may want to customize on our view is the connections. Note that in edit mode, there is a dashed line between containers. This line only appears in edit mode and is there to allow you to customize the display of the actual OSLC connections between the resources:
Right-clicking the dashed line will give the following options:
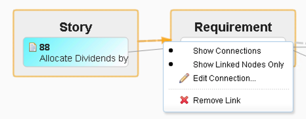
- Show Connections: This is a toggle to show/hide the actual OSLC links (between the resources in these containers) on the view. It is sometimes useful to hide these links – for example, if you have a DOORS Next module, with a linked container showing the requirements used by that module, the links are not only superfluous but make the view unnecessarily busy, so we can simply hide them.
- Show Linked Nodes Only: When we create a container using Show Links To, we are doing two things: (a) Adding a container of elements (for example Requirements) and then (b) filtering that container by only showing ones that have incoming links from elements in the previous container. Show Linked Nodes Only is the second part of this equation. Disabling it will remove the filter and instead show ‘all’ elements (of course any other filters on the container would still be applied)
- Edit Connection: This is where we can edit the look and feel of the OSLC links between these containers, and the dialog is similar to the one for Nodes:
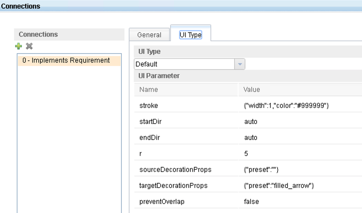
The most useful setting is the UI Type combo box:
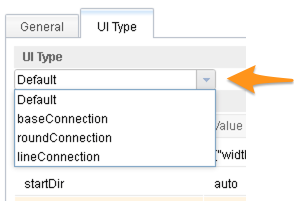
- baseConnection = rectilinear
- roundConnection = spline
- lineConnection = straight line
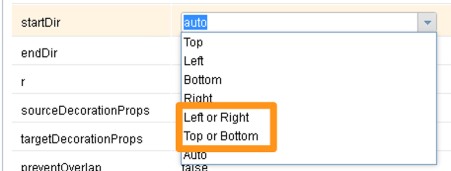
Also very useful are the startDir and endDir properties (although these are set to ‘auto’ – this is unfortunately far from automatic and it is much better to select either “Left or Right” or “Top or Bottom”:
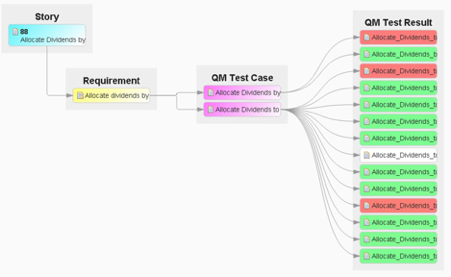
There is no capability (at least at the time of writing) to annotate a connection (perhaps with the type of relationship it represents). Although one can imagine if there are many OSLC links such annotations would quickly cause the view to become unreadable, still the option would be nice. Here is what our sample view looks like after applying a few of the properties described above.
That’s all for now; in the next article, we’ll see how to make this view dynamic so that consumers of the view can easily select a Story with a single click and instantly see the traceability view change.
Building Views with IBM Engineering Lifecycle Optimization – Engineering Insights (ENI) Part Four – Building Dynamic Views >>
Andy Lapping
Technical Enablement Specialist
Watson IoT & Engineering Lifecycle Management
 (1 votes, average: 5.00 out of 5)
You must be logged in to post a comment.
Authors
 Adam Archer (1)
 Adam Neal (1)
 Adrian Cho (15)
 Alice Connors (3)
 Amy Silberbauer (24)
 Andrew Hans (1)
- Andy Lapping (15)
 Anindita Basu (3)
 Anthony Hunter (1)
 Benjamin Pasero (5)
 Benjamin Williams (3)
 Bernie Coyne (6)
 Beth Zukowsky (2)
 Bhawana Gupta (10)
 Bianca Jiang (3)
 Bill Higgins (2)
 Boris Kuschel (2)
 Brent Barkman (2)
 Brian Bryson (1)
 Brian King (4)
 Brian Lang (2)
 Brian Massey (3)
 Brian Sanders (2)
 Bruce MacIsaac (2)
 Carlos Ferreira (1)
 Carolyn Pampino (10)
 Catherine Burrows (1)
 Chandra Venkatapathy (1)
 Chris Daly (1)
 Chris Trobridge (1)
 Christophe Cornu (3)
 Christophe Elek (5)
 Christophe Telep (14)
 Clara Forero (1)
 Clare Carty (4)
 Dan Barbour (1)
 Dan Griffin (5)
 Dan Leroux (2)
 Daniel Berg (2)
 Daniel Moul (27)
 Daniel Toczala (4)
 Darin Swanson (1)
 Darrel Rader (1)
 Dave Thomson (7)
 David Brauneis (1)
 David Hodges (1)
 Dejan Glozic (2)
 Denise Cook (1)
 Derek Baron (8)
 Dibbe Edwards (3)
 Dirk Baeumer (1)
 Don Yantzi (1)
 Doron Ben-Ari (3)
 ELM Engineering (42)
 Eran Gery (1)
 Erich Gamma (5)
 Erik Craig (1)
 Ernest Mah (1)
 Evan Hughes (3)
 Fariz Saracevic (16)
 Frederic Fusier (1)
 Gary Cernosek (1)
 George DeCandio (4)
 Gili Mendel (1)
 Ginny Ghezzo (1)
 Graham Bleakley (5)
 Grant Covell (1)
 Greg Gorman (1)
 Guy Slade (1)
 Hadar Hawk (2)
 Heidi Stadel (1)
 James Branigan (2)
 James Moody (2)
 Jan Wloka (2)
 Jared Pulham (7)
 Jean-Michel Lemieux (23)
 Jeanette Deupree (1)
 Jim Amsden (1)
 Jim D'Anjou (2)
 Jim Ruehlin (1)
 Johannes Rieken (2)
 John Kellerman (2)
 John Vasta (1)
 John Whitfield (2)
 John Wiegand (1)
 Jozef deVries (1)
 Kai-Uwe Maetzel (6)
 Kalena Kelly (1)
 Karen Gosciminski (1)
 Kate Draper (2)
 Kate Hauser (1)
 Kevin Williams (2)
 Kim Peter (10)
 Kiran M N (1)
 Kit Lo (1)
 Kourken Aroyan (1)
 Kumaraswamy Gowda (15)
 Lauren Hayward Schaefer (15)
 Lawrence Mandel (2)
 Linda Watson (3)
 Liz Bonesteel (1)
 Luc Hatlestad (1)
 Lucinio Santos (1)
 Maneesh Mehra (3)
 Manoj Panda (1)
 Mario Maldari (1)
 Mark Guertin (2)
 Martha Andrews (3)
 Mary Yost (1)
 Masabumi Koinuma (1)
 Mats Gothe (1)
 Matt Lavin (1)
 Michael Fiedler (1)
 Michael Halder (2)
 Michael Valenta (3)
 Millard Ellingsworth (3)
 Miran Badzak (1)
 Monica Luke (5)
 Moshe Cohen (1)
 Nadra Rafee (1)
 Nathan Bak (5)
 Neil Leblanc (3)
 Nick Crossley (3)
 Nithya Rajagopalan (3)
 Palak Sheth (1)
 Patrick Streule (1)
 Paul Ellis (1)
 Paul Strachan (1)
 Paul Tasillo (2)
 Peter Haumer (1)
 Peter Steinfeld (1)
 Phil Vogel (3)
 Priyadarshini Gorur (3)
 Rahul Choudhary (4)
 Reuben Varzea (12)
 Richard Bone (3)
 Richard Watson (13)
 Rishikesh Agam (2)
 Robbie Minshall (1)
 Robin Bater (5)
 Roger LeBlanc (1)
 Rolf Nelson (16)
 Rosa Naranjo (1)
 Rosalind Radcliffe (1)
 Ryan Manwiller (4)
 Sandeep Kohli (1)
 Sandeep Somavarapu (1)
 Sanjesh Nair (1)
 Scott Rich (13)
 Sean Babineau (1)
 Seth Packham (11)
 Sharoon Shetty Kuriyala (1)
 Sreerupa Sen (5)
 Sridevi Sangaiah (1)
 Steve DiCamillo (2)
 Steven Beard (1)
 Subramanya Pilar (6)
 Sujan Surendrananitha (2)
 Suneel Santharam (2)
 Susan Yeshin (1)
 Tim Feeney (7)
 Tod Creasey (1)
 Tom Hollowell (4)
 Ubaidu Peediakkal (3)
 Vaibhav Srivastava (1)
 Vandana Shenoy (1)
 Vatsalkumar Parmar (2)
 Virginia Lovering (1)
 Will Streit (1)
Very impressive article thank you so much.