Part 2b of “Using Rational Engineering Lifecycle Manager to answer hard Systems Engineering questions” blog series
Preamble: Our users have been asking us for more practical examples about how to unleash the power of linked lifecycle data in Rational Engineering Lifecycle Manager (RELM), so we have decided to kick off a blog series on the Jazz Team Blog to answer some of your most pressing questions! All of the examples that we will be providing in this blog series were created with problems IBM System Engineering domain users encounter, so many SSE customers will find these examples very relevant to their own process, and will be able to easily adapt the proposed solutions to their own needs. In previous blogs and postings related to RELM, members of our team explained the conceptual value of linked data, as well as provided overview of the Systems & Software Engineering (SSE) solution along with deployment tips, so you may want to start there if you are new to RELM and SSE.
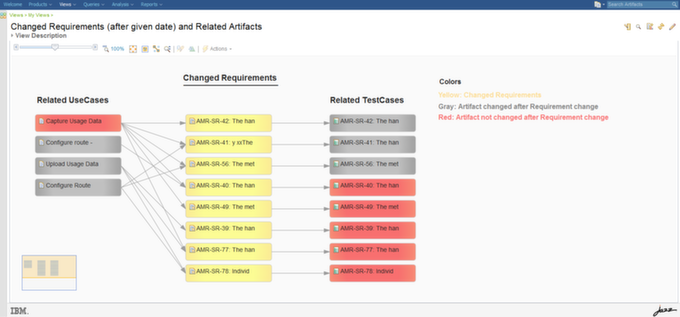
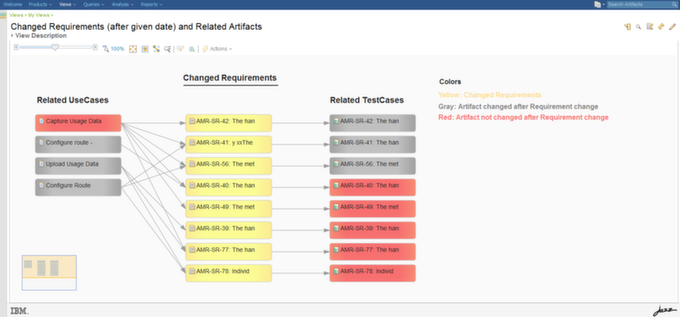
The goal of this exercise is to create a RELM view showing requirements which have changed after a given date, and their associated use cases and test cases, with some indication of whether they were updated after the requirement change occurred. You can find background information on this by reading the posting, “View downstream change propagation over time using Rational Engineering Lifecycle Manager“.
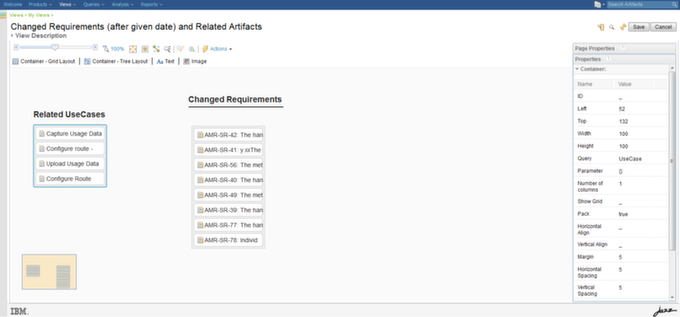
We will start with a blank view in RELM and add several containers, one for each type of element we want to display. We will use the Container – Grid Layout type container, as we want a simple list of nodes as opposed to a collapsible list. For a collapsible list, use Container – Tree Layout. We will change Number of Columns for the container to 1 so that we get the nodes stacked in a single column as seen in the picture above.
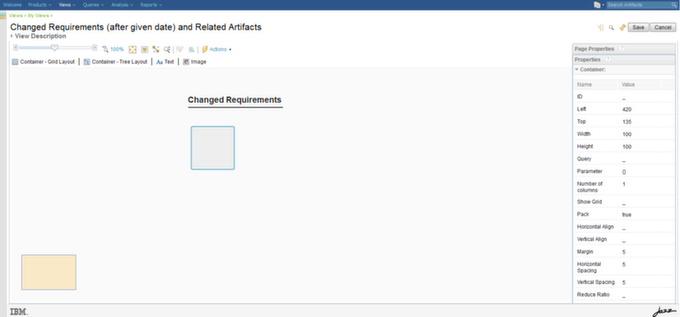
After adding the first container and a Text title to the view, it should look like the screen below.
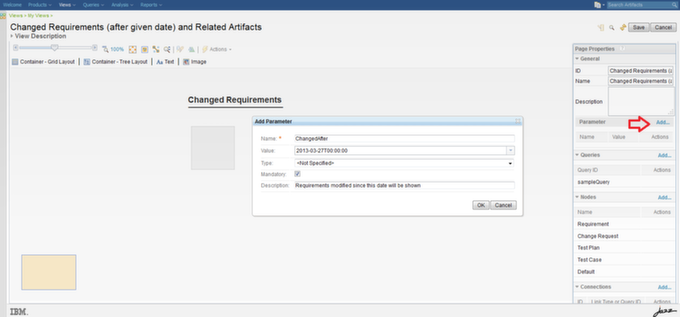
The container requires a query. Here we want to create a query that will give us a list of requirements which are changed after some date. Since we do not want to hardcode a date in our query, the parameter capability of RELM views comes handy.
Now, here is the query to get requirements which have changed after given date.
PREFIX dcterms: <http://purl.org/dc/terms/>
PREFIX rm: <http://open-services.net/ns/rm#>
PREFIX linktype: <http://jazz.net/ns/dm/linktypes#>
PREFIX xsd: <http://www.w3.org/2001/XMLSchema#>

SELECT DISTINCT ?resource  ?title ?shortTitle ?type
WHERE {
	?resource
		a rm:Requirement;
		a ?type;
		dcterms:title ?title  ;
		dcterms:modified ?reqmodified .

	?usecase
		linktype:satisfy ?resource ;
		dcterms:modified ?ucmodified .

	?resource
		rm:validatedBy ?testcase .

	?testcase
		dcterms:modified ?tcmodified .

	BIND( SUBSTR(str(?title), 1, 50) AS ?shortTitle )

	FILTER (?reqmodified > ?ucmodified || ?reqmodified > ?tcmodified)
	FILTER (?reqmodified >= "${ChangedAfter}"^^xsd:dateTime)
}
Notice “${ChangedAfter}” in the query. This will get replaced with the parameter provided to the view.
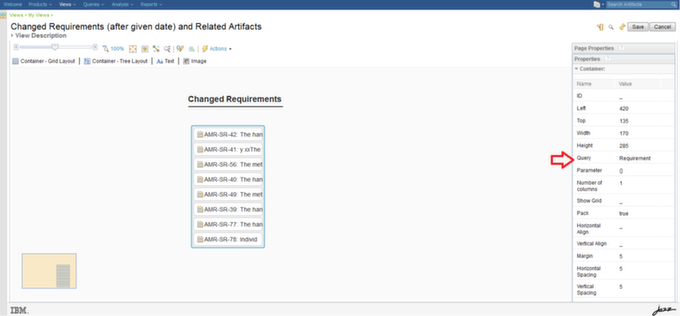
Add the query to the view and select the query for our container. This should display the physical block in the view. If you hover on the node, you will get the OSLC preview.
Note: In the previous posting, “View downstream change propagation over time using Rational Engineering Lifecycle Manager“, we talked about the sample data we are using for these exercises. Needless to say, the output you see here is from that data on our server.
Now let’s display any related use cases. Use the following query.
PREFIX dcterms: <http://purl.org/dc/terms/>
PREFIX rm: <http://open-services.net/ns/rm#>
PREFIX linktype: <http://jazz.net/ns/dm/linktypes#>
PREFIX xsd: <http://www.w3.org/2001/XMLSchema#>

SELECT DISTINCT ?resource  ?title ?shortTitle ?highlight
WHERE {
	?resource
		linktype:satisfy ?requirement ;
		dcterms:title ?title  ;
		dcterms:modified ?ucmodified .

	{
		?requirement
			a rm:Requirement;
			dcterms:modified ?reqmodified .

		?usecase
			linktype:satisfy ?requirement ;
			dcterms:modified ?ucmodified .

		?requirement
			rm:validatedBy ?testcase .

		?testcase
			dcterms:modified ?tcmodified .

		FILTER (?reqmodified > ?ucmodified || ?reqmodified > ?tcmodified)
		FILTER (?reqmodified >= "${ChangedAfter}"^^xsd:dateTime)
	}

	BIND( SUBSTR(str(?title), 1, 50) AS ?shortTitle )
	BIND (if( ?reqmodified > ?ucmodified, "yes", "no") AS ?highlight)
}
Notice in the query I set a property called Highlight to ‘Yes’ if the requirement modification date is greater than that of the related use case. In a moment, we’ll see this in action.
The view should look like this one now.
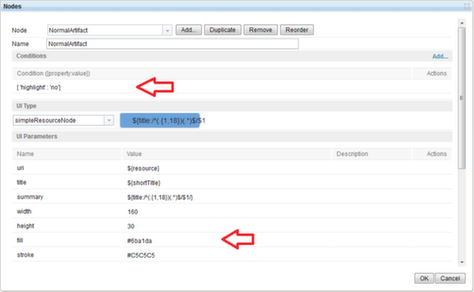
Although we have the data showing which use cases have been modified/not modified after requirements, we are not doing anything yet to highlight them. Let’s create two node types and call them ‘HighlightedArtifact’ and ‘NormalArtifact’. Add a condition for the nodes and use the same property from the query (recall in our query above, we set a property, named Highlight, and set its value to yes/no).
Also, set an appropriate fill color.
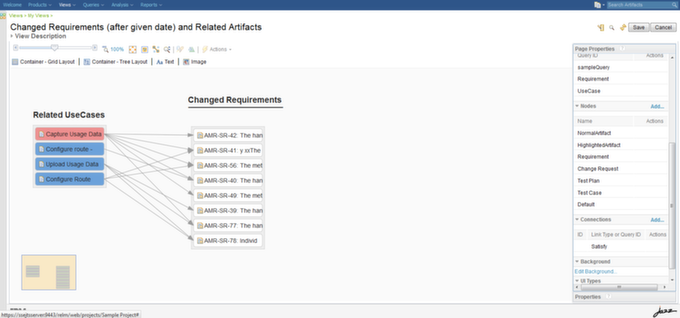
Our next goal is to display the links between the nodes. The link used between use case and requirement is ‘Satisfy’. Select the ‘Satisfy’ link type from Connections section of the Page Properties.
At this point the view should look like this:
Let’s display related test cases now. Use the following query.
PREFIX dcterms: <http://purl.org/dc/terms/>
PREFIX rm: <http://open-services.net/ns/rm#>
PREFIX linktype: <http://jazz.net/ns/dm/linktypes#>
PREFIX xsd: <http://www.w3.org/2001/XMLSchema#>

SELECT DISTINCT ?resource  ?title ?shortTitle ?type ?highlight
WHERE {
	?requirement
		rm:validatedBy ?resource .

	?resource
		a ?type;
		dcterms:title ?title ;
		dcterms:modified ?tcmodified .

	{
		?requirement
			a rm:Requirement;
			dcterms:modified ?reqmodified .

		?usecase
			linktype:satisfy ?requirement ;
			dcterms:modified ?ucmodified .

		?requirement
			rm:validatedBy ?testcase .

		?testcase
			dcterms:modified ?tcmodified .

		FILTER (?reqmodified > ?ucmodified || ?reqmodified > ?tcmodified)
		FILTER (?reqmodified >= "${ChangedAfter}"^^xsd:dateTime)
	}

	BIND( SUBSTR(str(?title), 1, 50) AS ?shortTitle )
	BIND (if( ?reqmodified > ?tcmodified, "yes", "no") AS ?highlight)
}
The link type used between requirements and test cases is ‘Validated By’. Add the link type to the view. After that, the view should look something like this:
Look and Feel
RELM allows you to use different types of nodes and UI types in your view. Basically, with UI type you define the shape you want to display and specify what text to appear where. A node uses a UI Type. Nodes allows you to specify a condition that determines when the node will be used in the view.
As you saw earlier in the article, ‘HighlightedArtifact’ and ‘NormalArtifiact’ are two examples of nodes. The property/value combination we specified there determines when those nodes will be used in the view.
You can override many of the settings in the node that you inherit from the UI type.
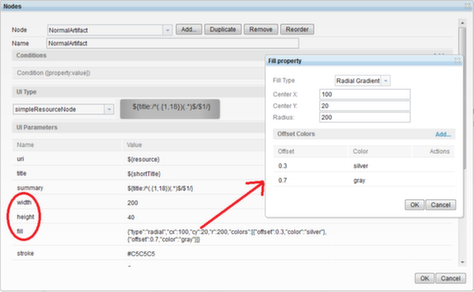
In the screen below, I changed the width and height to 200 and 40 respectively. Then I changed the fill property as seen in the inset. That gives a grayish gradient box for ‘NormalArtifiact’.
Using these same principals, I updated the other nodes in the view to get the final look and feel.
Ubaidu Peediakkal
Systems and Software Engineering (SSE) Solution Architect
Sorry, the comment form is closed at this time.





thanks a lot for this great examples