In this article, we’ll build our first template. We will start by reporting on a single requirement in IBM Engineering Requirements Management – DOORS Next. In a real template, we would usually report on something like all the requirements in a module, but our focus here is on linked lifecycle data. We’ll see how other linked resources appear in the reportable REST interface and then we’ll extend the template to report on the linked model elements in IBM Engineering Systems Design – Rhapsody Model Manager (RMM), the linked test cases in IBM Engineering Test Management (ETM), and linked work items in IBM Engineering Workflow Management (EWM). I’m going to assume you have a working knowledge of Document Studio – the tool we’ll be using to design the template.
Reporting on a Single Requirement
Adding a DOORS Next Requirement Schema
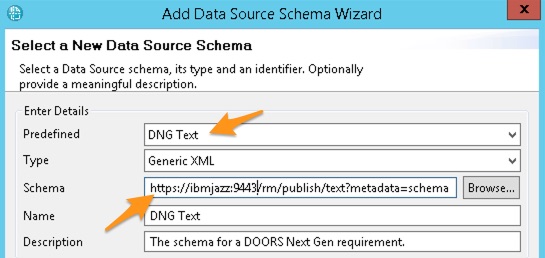
The first thing we need is a data source schema for a DOORS Next requirement. Fortunately, that is one of the predefined schemas you can add from the menu Data > Add Data Source. Note that once you have selected DNG Text you will need to modify the Schema field with the correct server name and port for your Jazz Team Server. You will of course also need to provide your authentication credentials.
Reporting the Requirement Title
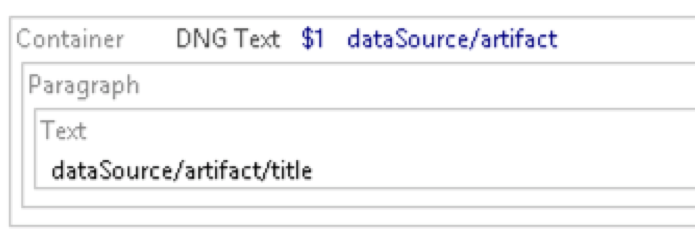
We can then report the title of the requirement by iterating over dataSource/artifact:
Configuring the DSX
After saving the template we can switch to the Launcher perspective and configure the data source to point at the requirement we want to report on using the OSLC Resource Selection menu, which will invoke an OSLC Picker:

Note: if this is the first time you have invoked this picker then you will need to supply the rootservices URI which is simply the address to the RM server followed by /rootservices:

Note that the picker inserts the following information into the properties:
- The URI of the requirement
- The POX header (This will become important again later when we start adding Data Source Configurations)
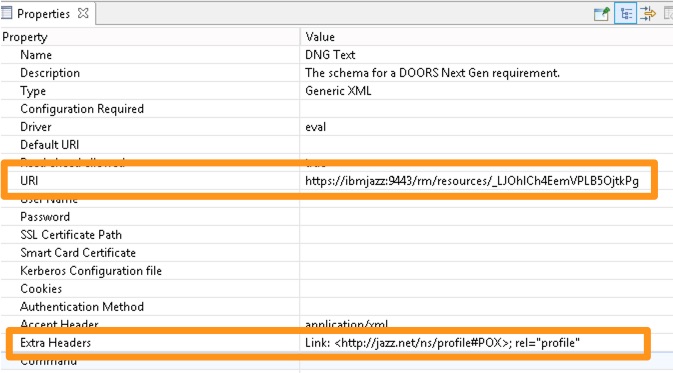
It does not enter authentication credentials or any context. We must enter our credentials and, if our data source is configuration aware then use the OSLC Configuration Selection menu to select a configuration:

Note: Again if this is the first time you have used the picker you will need to enter the rootservices address of the Global Configuration tool (yourserver/gc/rootservices)

Once we have entered these details we can go ahead and test our template by generating a document (I’ll assume you can do that on your own)
Querying the Requirement Using REST
As described in part two of this series, we can query the requirement ourselves using a REST client (we can copy the relevant URI, POX, and context from the properties in the Launcher perspective)

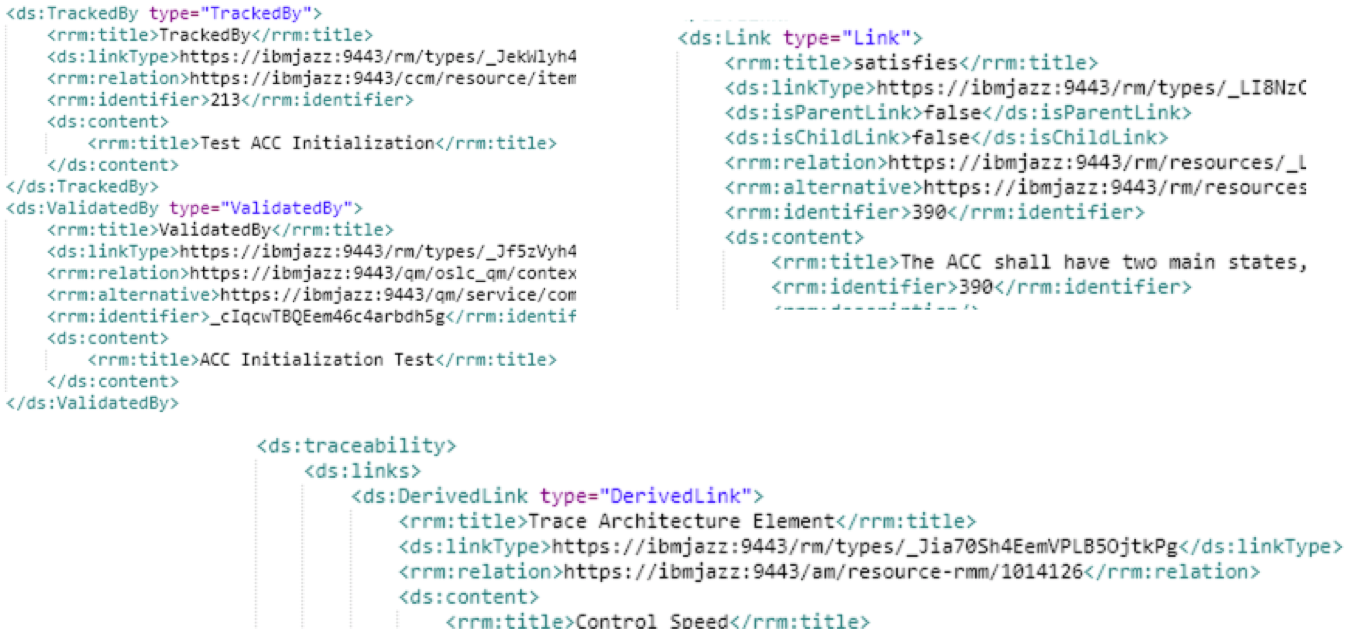
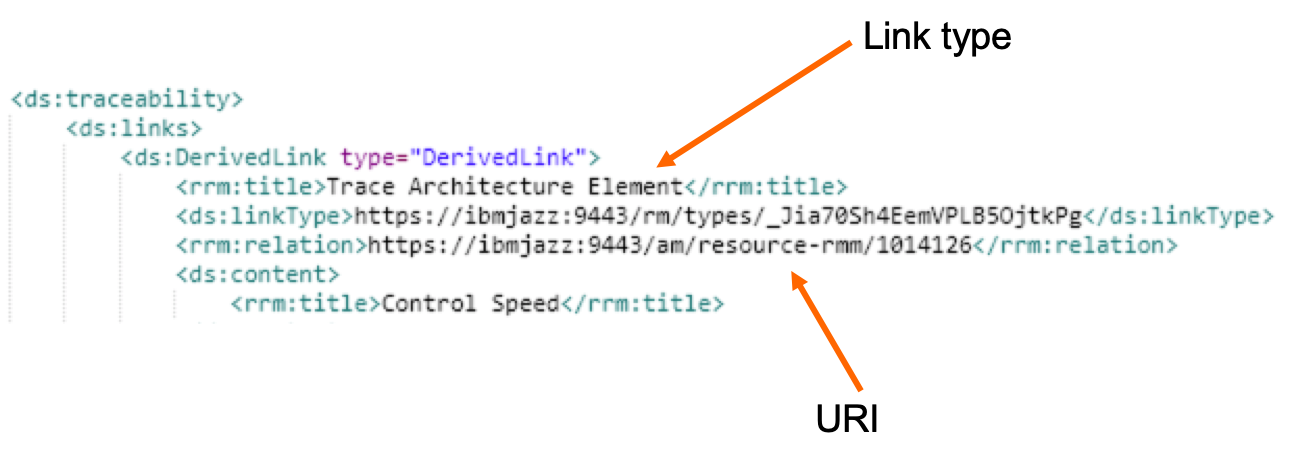
If we examine the returned XML we can see that all traceability links appear under a traceability/links node, but then internal links appear under Link, links to model elements appear under DerivedLink and links to ETM / EWM appear under the relevant link type:
Let’s now see how to report on the various types of a linked artifact, starting with model elements.
Reporting on Linked Model Elements
Iterating Over Links
As seen above, links to model elements in RMM appear underneath DerivedLink, so we can first add that iteration to our template:

Adding an RMM Schema
Next, we need a schema for an RMM model element. Fortunately (aside from a new reportable API specifically for traceability statistics) RMM has a single schema (unlike the other data sources which have multiple different schemas for different types of resource). However, at the time of writing this is not one of the predefined schemas in Document Studio so we must interrogate the data source to retrieve it. Fortunately, this is very easy. First, open any model element in the RMM web client. The breadcrumb at the top has ‘chain’ symbols for each artifact. Clicking any one of them will give you that element’s URI. Since there is a single schema – it doesn’t matter which one you click. What does matter is you remove the context information – which can be done easily using a checkbox:
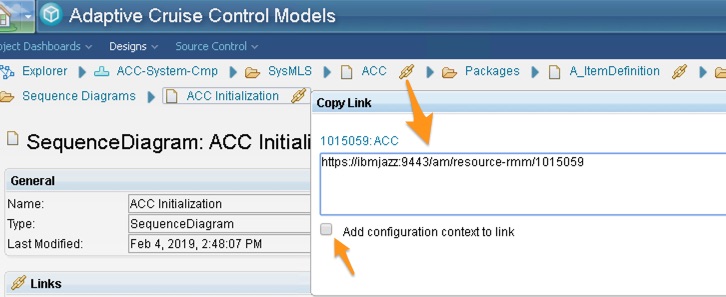
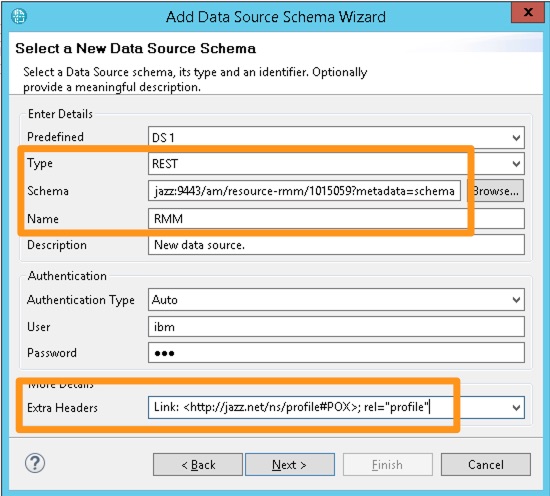
In Document Studio, Add a new REST data source. Enter the URI of the model element you copied above and append it with the text ?metadata=schema (which retrieves the schema for the resource rather than the data itself). In the Extra Headers field, select the POX header:
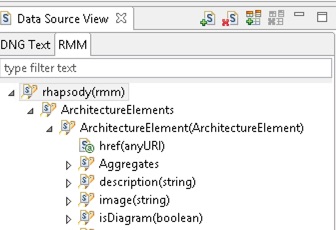
We should now have a second data source schema we can use to report on model elements (ArchitectureElements)
Adding a Data Source Configuration
Next, we can add a Data Source Configuration from the palette into our DerivedLink container:

Configuring the Data Source Configuration – Data tab
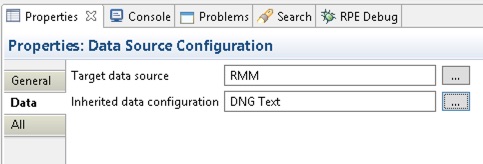
In the properties for the Data Source Configuration we can set the:
- Target data source to the new RMM data source schema
- Inherited data configuration to the DNG Text data source schema
Configuring the Data Source Configuration – Dynamic configuration tab
First, we need to click away from the Data Source Configuration and then re-select it to make the Dynamic Configuration tab appear. The first field we need is the URI of the linked model element. If we examine the XML we obtained in our REST client again we can see that the URI for the linked model element is found under the relation attribute of the DerivedLink – pasting that into a browser will take us to the model element (that is – the link is non-reportable and so requires POX to be able to report on it).
We can now use the picker to choose the relation attribute of the DerivedLink:
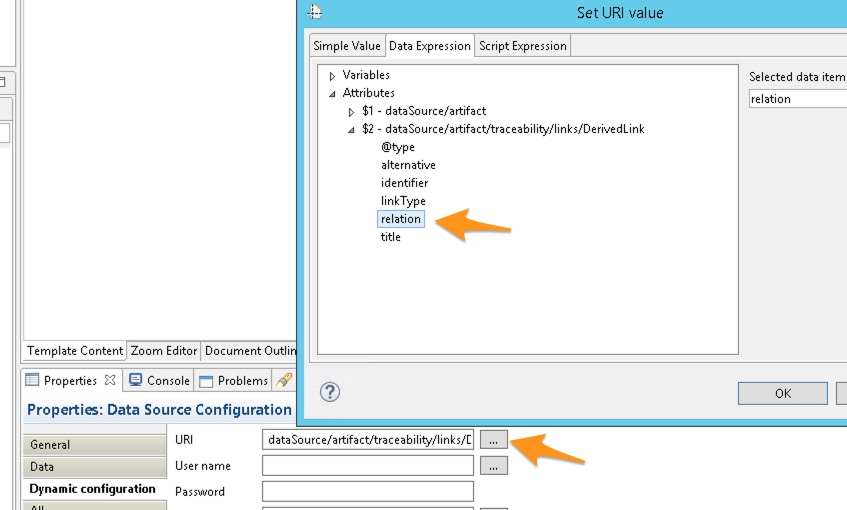
We know we also need POX, but in this case, the Data Source Configuration is inheriting from the DNG Text data source – which is configured in the dsx (Launcher perspective) – and that has POX already set so we don’t need to set it again here since, in addition to the credentials, it will inherit the POX header.
Hiding the Data Source
The RMM data source has now been fully configured in the template and so does not require any further information in the dsx – so we can hide it by selecting it in the Outline panel and setting its Configuration required property to hidden. This keeps the dsx clean and avoids red data sources which the launcher would otherwise consider ‘unconfigured’.
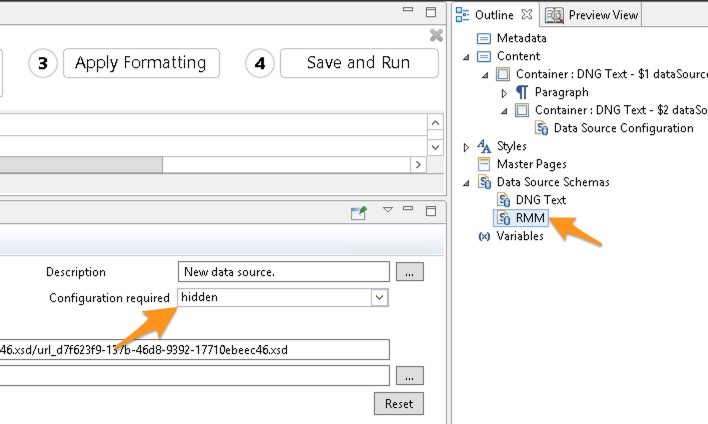
Reporting on Linked Model Data
All that remains is to add a container to our template that iterates over Architecture Elements and reports their details. Of course, we could also report/filter on the type of link if we wished (the XML shows us that is the title of the DerivedLink).

Reporting on Linked Work Items
If we examine the XML for a linked work item we can see that:
- The type of link dictates the node in the schema where we will find that link
- The relation attribute holds the URI of the work item

So we can start by iterating over the specific link type node in the schema:

Unfortunately, this is where things get more complex.
- This URI in the relation attribute is non-reportable
- The URI points at a specific work item
- The EWM reporting schema does not support POX or indeed reporting on a single artifact in this way – instead, it has a feed-like schema which expects a query
Ultimately this means we will have to manually transform the URI into a reportable version using JavaScript. By way of example:
Here is a URI as it appears in the DOORS Next reportable REST API:
https://ibmjazz:9443/ccm/resource/itemName/com.ibm.team.workitem.WorkItem/213
Here is a sample reportable URI in EWM for the same artifact:
https://ibmjazz:9443/ccm/rpt/repository/workitem?fields=workitem/workItem[id=123]/(summary|id|state/name)
Adding an EWM Schema
We can start by adding a schema for EWM Work Items – this is at least one of the predefined schemas in Document Studio – we will, however, have to provide the server, port, and credentials:


Adding a Data Source Configuration
Next, we can add a Data Source Configuration from the palette into our link container (in this case we are iterating over TrackedBy links):

Configuring the Data Source Configuration – Data tab
In the properties for the Data Source Configuration we can set the:
- Target data source to the new RTC WorkItems data source schema
- Inherited data configuration to the DNG Text data source schema (so we can at least inherit the credentials)

Hiding the Data Source
We will fully configure the data source here in the template, so just like with the RMM data source, we can set its Configuration required property to Hidden

Configuring the Data Source Configuration – Dynamic configuration tab
In the Dynamic configuration tab we can specify our JavaScript to transform the relation attribute into a reportable URI:
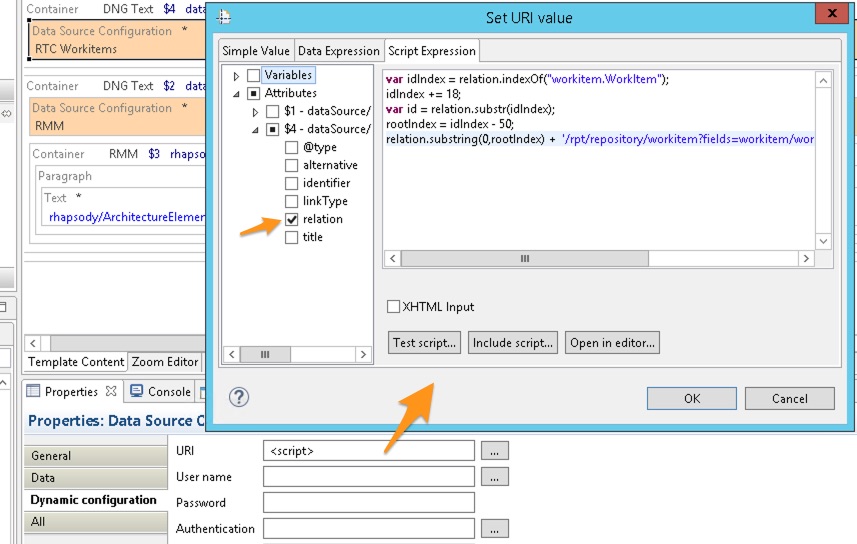
Here is the JavaScript we are using in this example:
var idIndex = relation.indexOf("workitem.WorkItem");
idIndex += 18;
var id = relation.substr(idIndex);
rootIndex = idIndex - 50;
relation.substring(0,rootIndex) +  '/rpt/repository/workitem?fields=workitem/workItem[id=' + id + ']/(summary | id | state/name)';
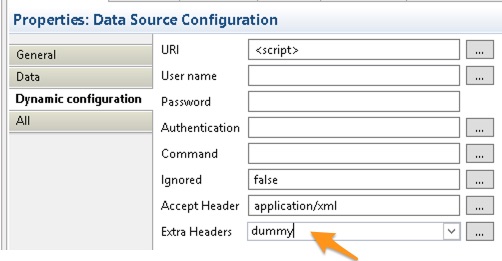
Lastly, since we are inheriting from the DNG Text data source, we are also inheriting its POX header – which in this case we do not want (and will cause an error if we don’t remove it). We can add some dummy text into the Extra Headers field to prevent the POX inheritance:
Reporting on Linked Work Item Data
All that remains is to add a container to our template that iterates over workitem/workitem and reports the data we want to see:

Reporting on Linked Test Cases
Much like linked work items, linked test cases appear under the relevant link type:

So we can start by iterating over that node:

The URI is reportable in that it points at one of ETM’s two reportable APIs – in this case, the OSLC QM V2 API. That API does support POX however so it is far easier to take that link and add POX, redirecting it to the reportable REST API. This also avoids the need to use an OSLC QM V2 schema.
Adding a Data Source Schema
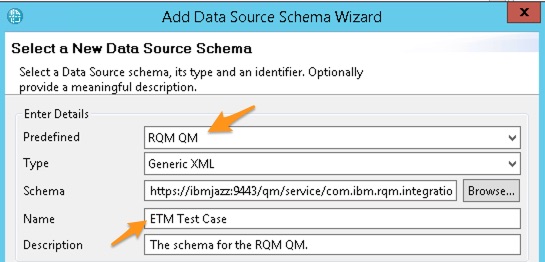
The ETM REST schema for individual artifacts is one of the predefined schemas (as before you supply server, port, and credentials). Note that this schema is generic in that you can use it to report on test cases, test scripts and so on. However in PUB, schemas are not re-usable so if you do want to report on multiple types of artifact (for example the test script connected to this test case) then add the same schema multiple times, and give them different names to make them easily identifiable. In this case, we’ll call it ETM Test Case.
Adding a Data Source Configuration
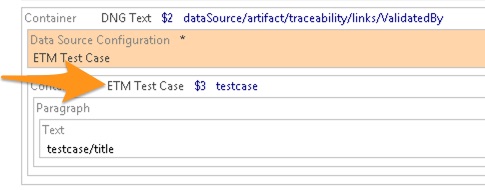
Now we can add a Data Source Configuration, using the ETM Test Case schema and the relation attribute of the ValidatedBy node. We do need POX of course but since we are inheriting the DNG Text data source – which already uses it – we do not need to add it again.


And now we can iterate over the ETM Test Case data source and report on the linked test case
That’s all for now – but in this post, you have learned most of what you will need to report on linked data across the Jazz Platform. You have seen how to start a report at a requirement and how to report on links that point at test cases, work items or model elements. In the subsequent posts, we will fill in the gaps such as how to report on links that point at requirements and how to start the report from a test case, a work item or a model element.
Check out Part Four in this series: Reporting from Rhapsody Model Manager
Andy Lapping
Technical Enablement Specialist
Watson IoT & Engineering Lifecycle Management


You must be logged in to post a comment.