r13 - 2017-12-12 - 18:56:56 - Main.tompYou are here: TWiki >  Deployment Web > DeploymentInstallingUpgradingAndMigrating > IBMQuickDeployer > IBMQuickDeployerSetupAndRun > IBMQuickDeployerExampleDeployment
Example of end to end deployment on Windows using Quick Deployer
Authors: ClareCartyBuild basis: CE/CLM 6.0.4+.
Page contents
This article describes the end to end process for using IBM Quick Deployer 2.0 to install and deploy an example IBM Continuous Engineering 6.0.4 topology on Websphere Application Server with a DB2 backend on Windows servers.
There are three main steps to this process: - 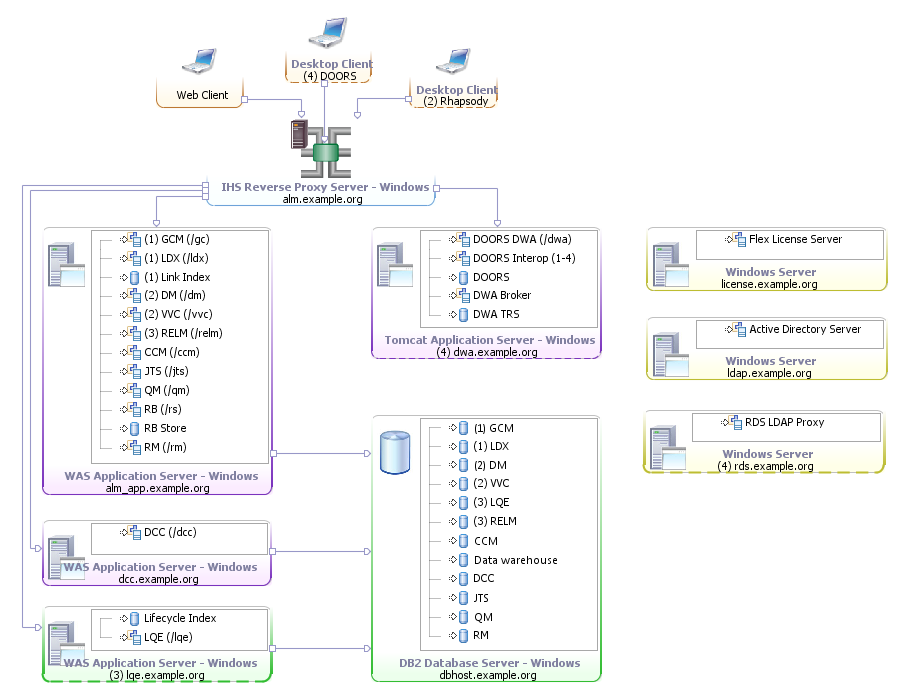 This is a Windows topology with a DB2 database. It is modified to remove the DOORS/DWA piece since Quick Deployer doesn’t install DOORS/DWA and it's not needed for this demonstration. A Tivoli LDAP server is also used and DCC is installed on the same server as the JTS. [Note that this image is a bit out of date and VVC is no longer a separate app].
This nets out to four server VMs:
  The token should be given a meaningful expiration date and the other settings should be defaults.
 Let's take stock and see what has been assembled so far:-
 Before running the QD installer, the properties files must be edited.
There are four properties files:-
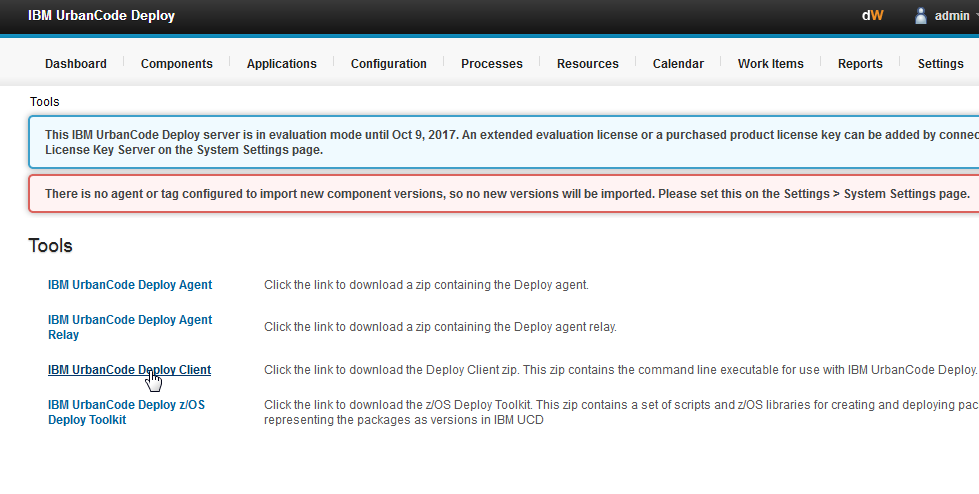 The client file is a zip and you must extract the udclient.jar from it and make sure you put the extracted udclient.jar file into the same Quick Deployer folder level as the install.jar file.
 Click on the Components tab: -
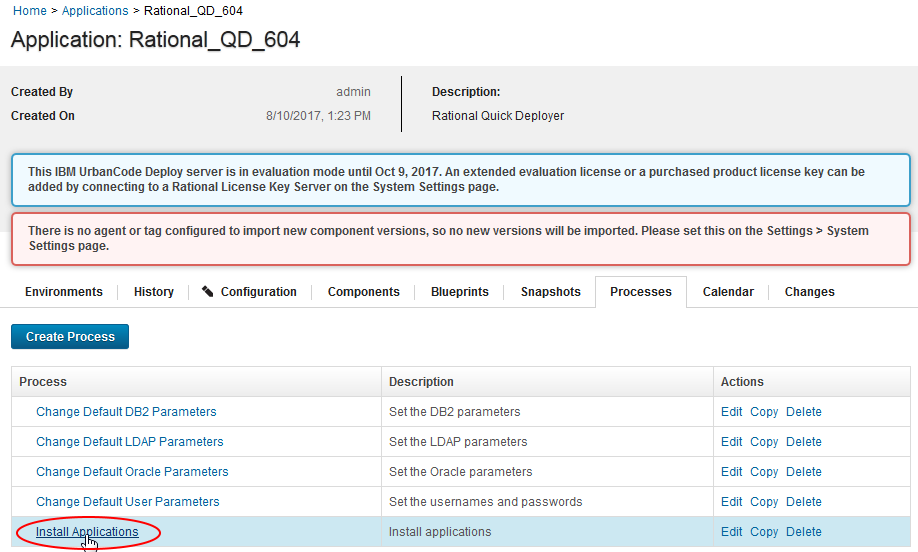 On the process Configuration tab, select Basic Settings and set all 5 components to a specific version. Typically, you would select the latest version of each component from the version drop-down list.
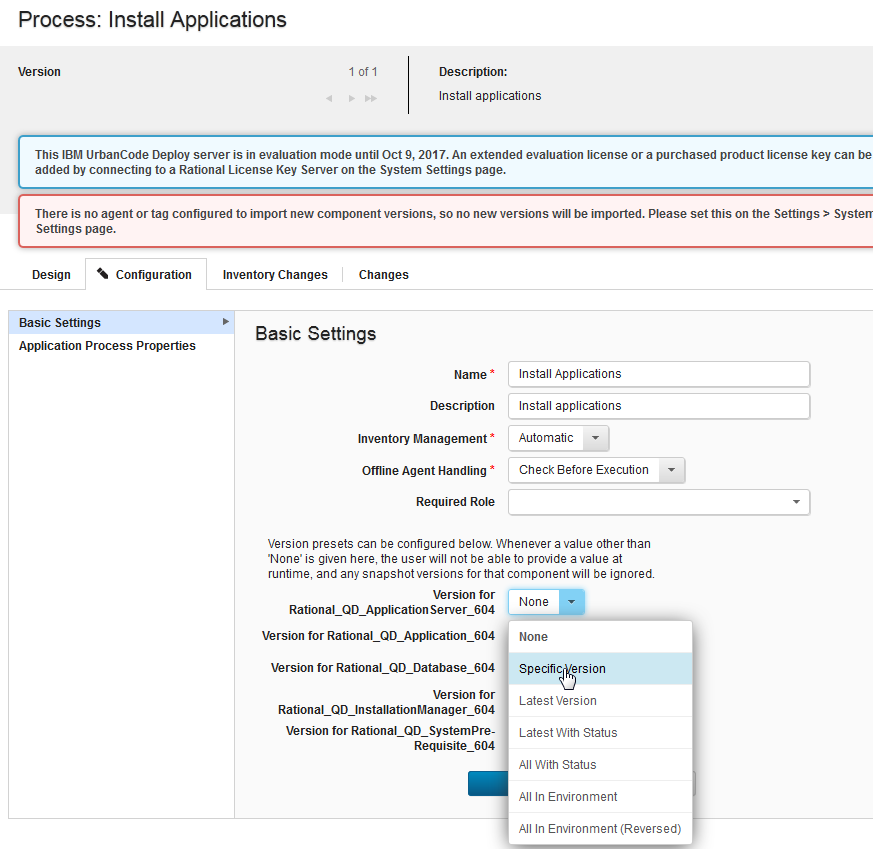 Once all versions are set, select save.

 Double click on the install agent batch file to install it with these settings.
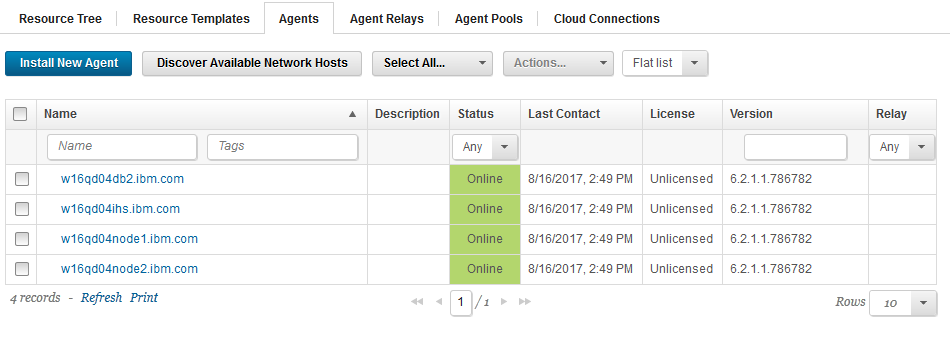
  Now go into UCD (Resources>Agents) and verify the agent is online.
 Once you've completed these preparation steps for all the target VMs, all four of the agents should be online.
 Take a snapshot of all the VMs in case anything goes wrong and now you are ready to create the Quick Deployer Application environment.
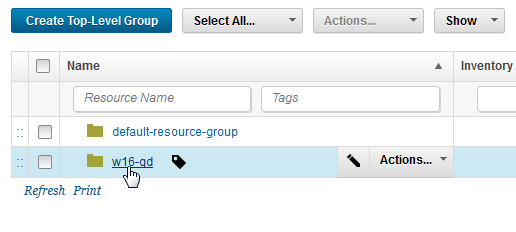
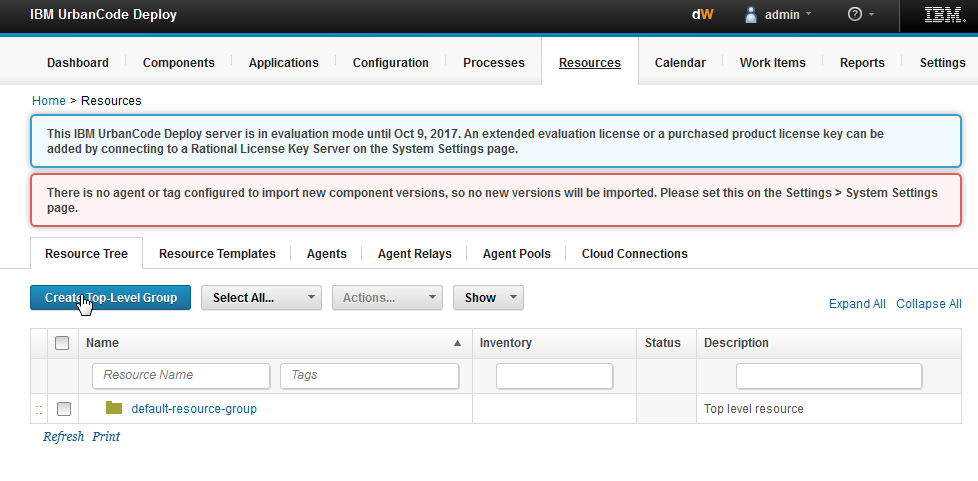 Create one called w16-qd.

 Which gives you:
 The final component mapping looks like this:

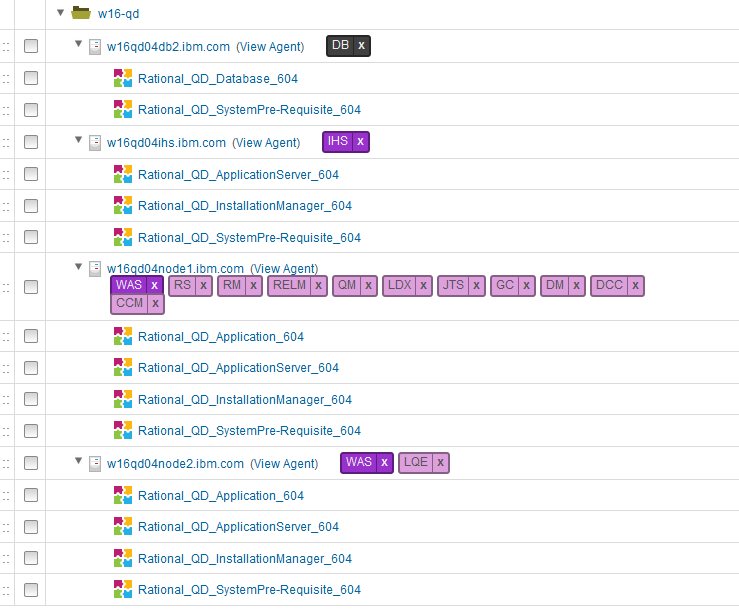 And that’s it – the environment is all prepared and now you're ready to install CE/CLM.
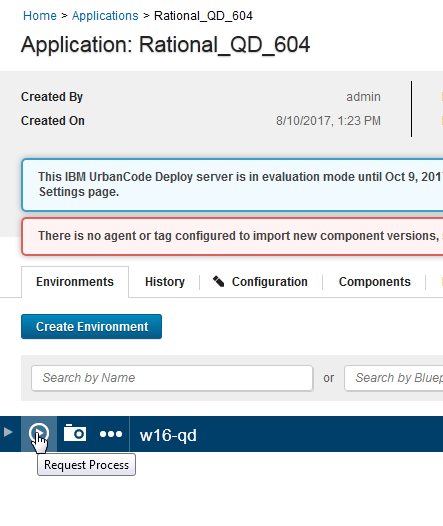
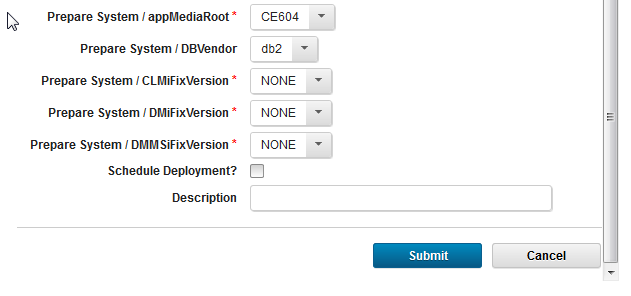
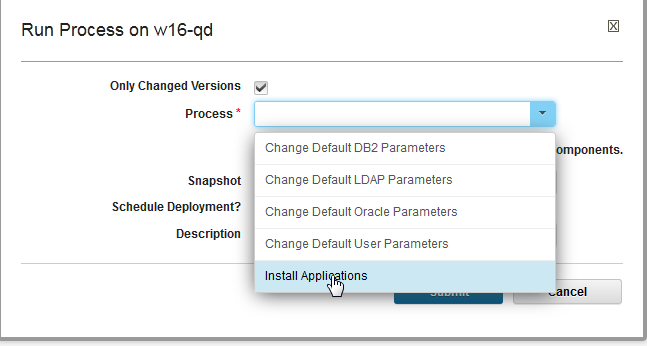 Make your selections in the wizard and click ‘submit’ to start the installation. Note that the MTM sample will not be deployed when Design Manager is present, even if Run JTS Setup/ MTM sample is selected in the wizard – the Quick Deployer code checks before trying.
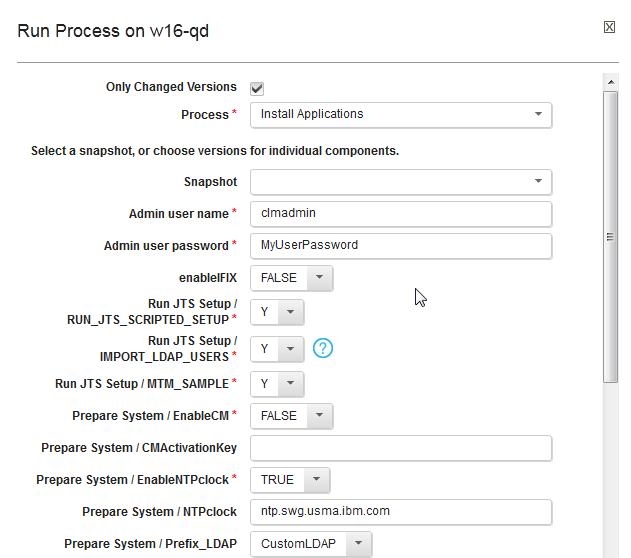
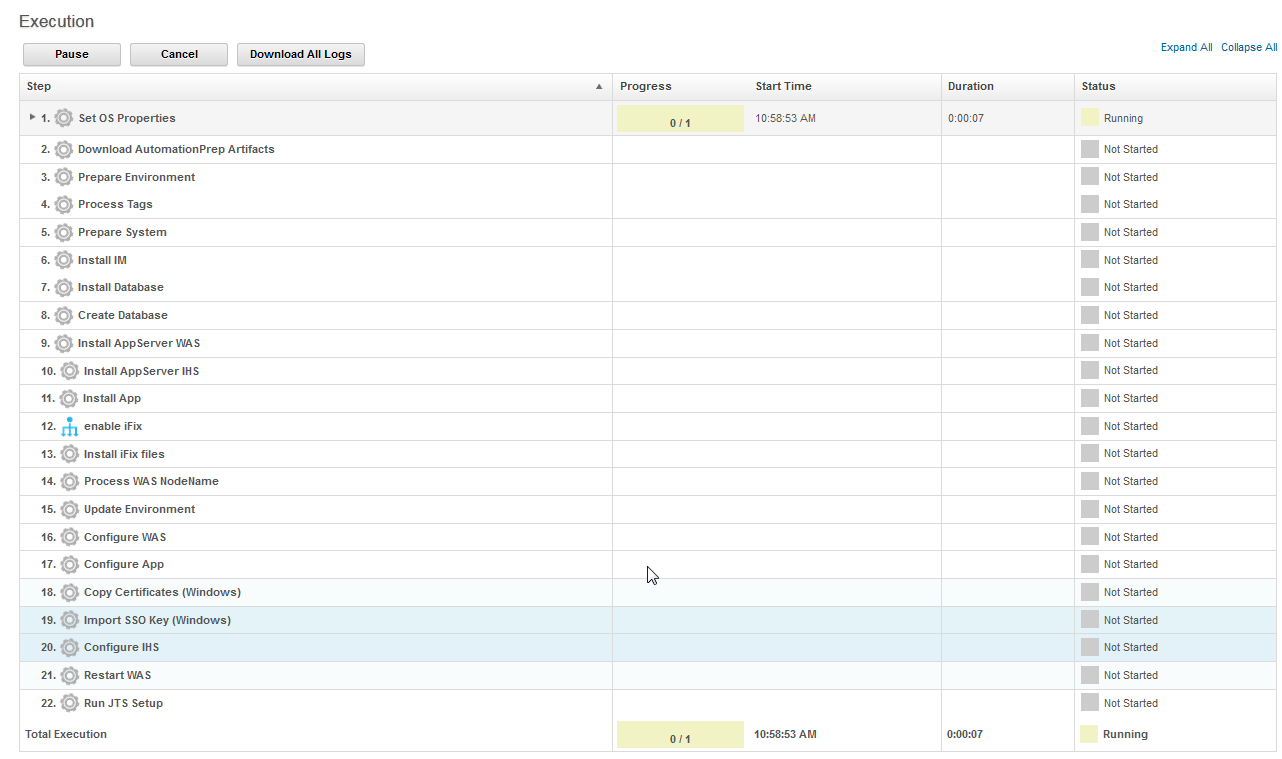
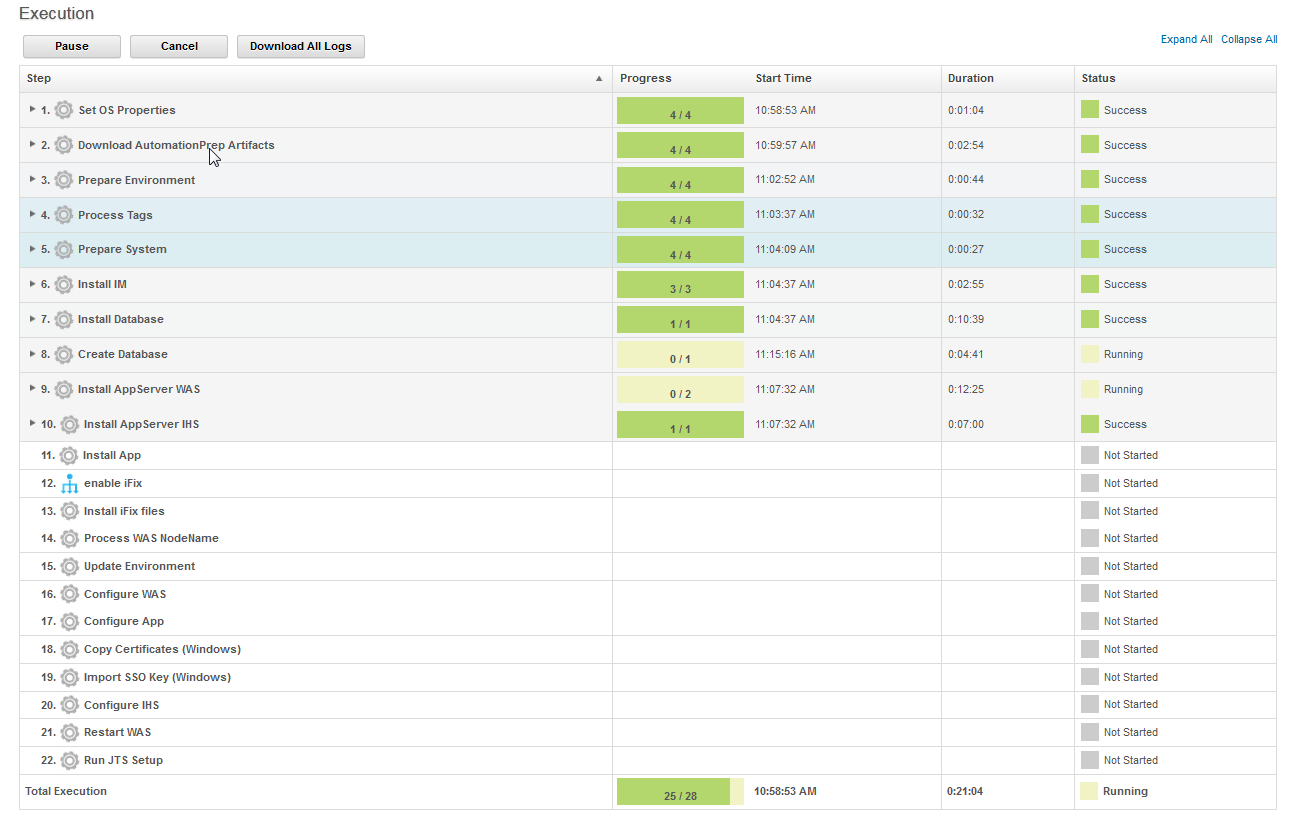
 Now watch Quick Deployer go through the CE/CLM install and deployment process….
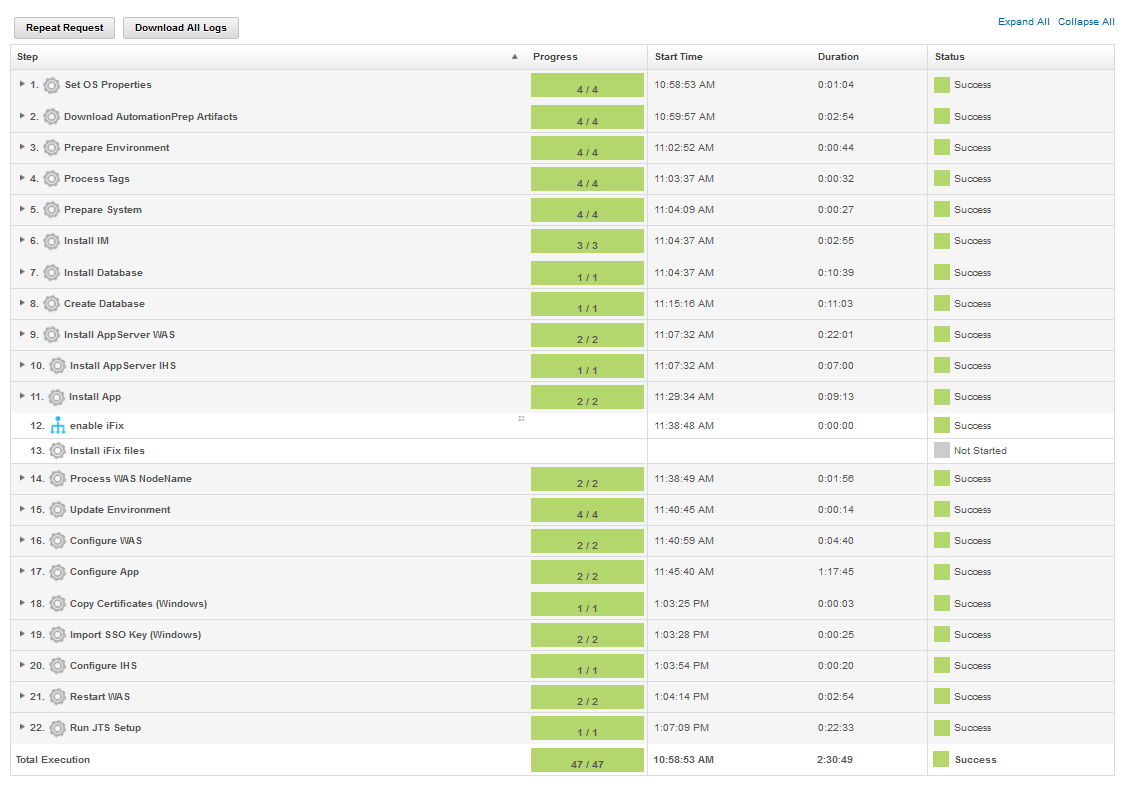
 Eventually, the deployment completes:
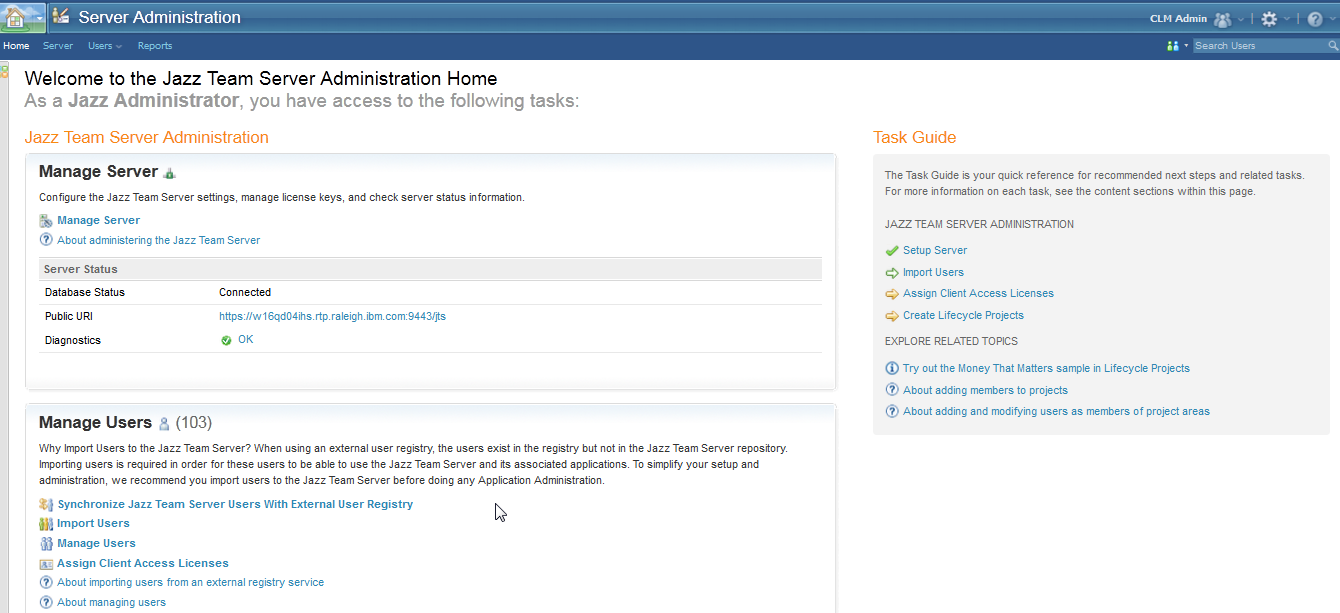
 Now you can go to the web UI of your CE/CLM deployment and see the apps:
The web apps can be accessed via the IHS server: https://w16qd04ihs.ibm.com:9443/jts/admin
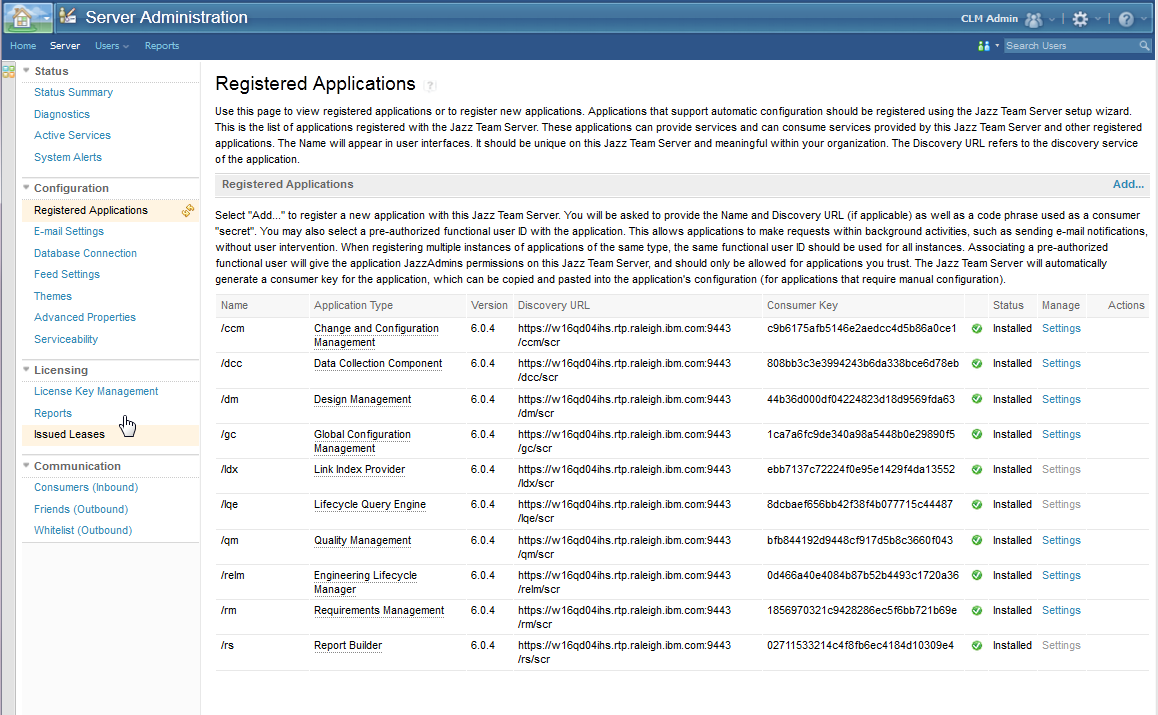
 If you select Server>Registered Applications you can see all the CE apps.
 And you're done - the deployment is ready to use.
You can find more information on the Quick Deployer wiki including other options such as installing iFixes and enabling Configuration Management.
- Prepare: Decide what you are going to deploy and plan and assemble your bits and accounts.
- Setup: Setup your systems including installing Quick Deployer into Urban Code Deploy (UCD), set up your media server (if used) with all the install bits, and set up your target VMs.
- Run: Run install Applications on Quick Deployer to install CE/CLM onto your target VMs.
Prepare
This example deploys a small topology from the Standard ALM topologies - (ALM-D1) Departmental - Single application server / Windows / DB2: This is a Windows topology with a DB2 database. It is modified to remove the DOORS/DWA piece since Quick Deployer doesn’t install DOORS/DWA and it's not needed for this demonstration. A Tivoli LDAP server is also used and DCC is installed on the same server as the JTS. [Note that this image is a bit out of date and VVC is no longer a separate app].
This nets out to four server VMs:
 - One IBM HTTP reverse proxy server,
- One DB2 server,
- One Websphere application server (WAS) with LQE and
- One Websphere application server with all the other applications including JTS, CCM, QM, RM, RS, DCC, GC, LDX, RELM and DM.
- Where the media – the zips and bits to be installed - are.
- What LDAP server and accounts are to be used.
- What Urban Code Deploy server Quick Deployer will be installed on.
Media Server
For media, you need the bits for Websphere application server, DB2 install, IBM Installation Manager, IHS (IBM HTTP Server) and the install bits for CE/CLM. There are a couple of options here. You can choose to download the media locally – that means downloading all the middleware and CE install zips on to each target VM. Or you can use an FTP media server that contains all the installers. [Note that mapped network drives aren’t supported for Quick Deployer on Windows]. For further details on the media server requirements you can check the Quick Deployer wiki. For simplicity, this example uses an ftp server with all the install bits: ftp://tompw7-qd-ftp01.ibm.com:2121/604/LDAP Server
You would normally have your own LDAP server set up to use with CE/CLM. The server used for this example is https://clmpipeline.ibm.com.Urban Code Deploy Server
This example uses a new UCD server (https://ucd-15.ibm.com:8443/) and installs Quick Deployer into it. The steps to install UCD are out of scope for this article but you can consult the UCD documentation for help. Quick Deployer is pushed into UCD using an installer script but there are some properties files that need to be edited before the installer is run and those are touched on in the Setup section.Setup
First, prepare the UCD Server for installing Quick Deployer.Urban Code Deploy Server Setup
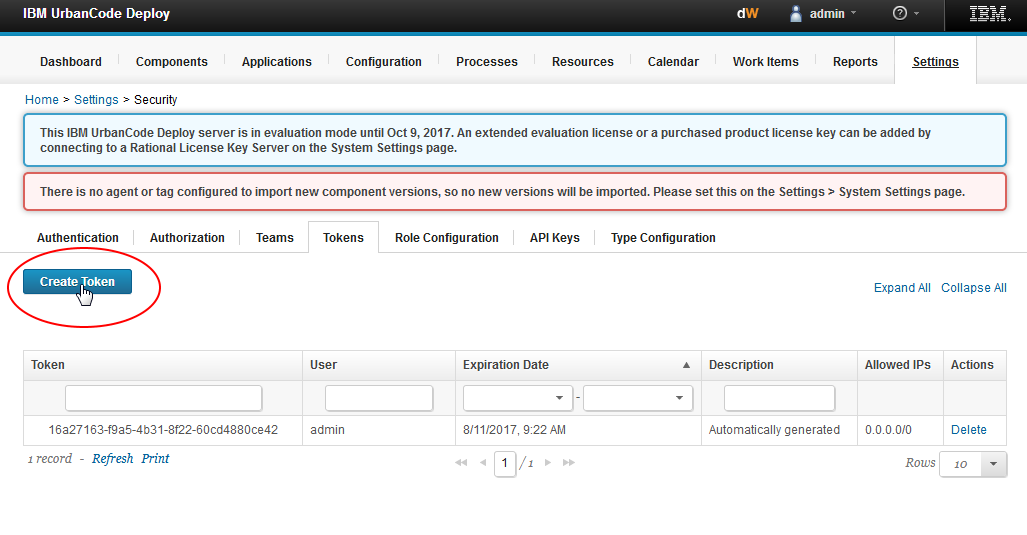
The UCD Server should have a recent version of Urban Code Deploy installed. This demo uses UCD 6.2.1.1.x. The default admin account on UCD is used for this example. An authentication token is created using the admin account from UCD’s Settings tab. Quick Deployer’s installer jar uses this token. The token should be given a meaningful expiration date and the other settings should be defaults.
 Let's take stock and see what has been assembled so far:-
- UCD server: https://ucd-15.ibm.com:8443/ with admin token: 6be42c13-32e9-4091-9946-3753e6f7394f
- ftp server: ftp://tompw7-qd-ftp01.ibm.com:2121/604/ and anonymous ftp is enabled
- LDAP server: clmpipeline.ibm.com port: 389 account: clmadmin password: MyUserPassword
Get the Quick Deployer package and configure the properties files
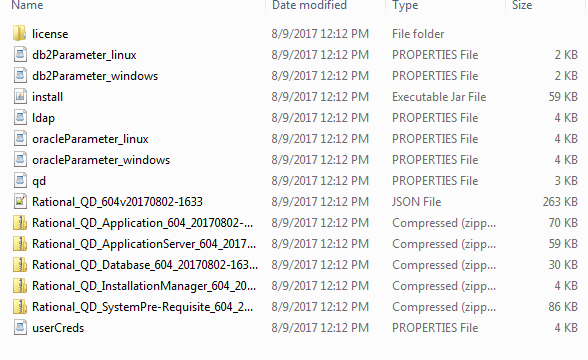
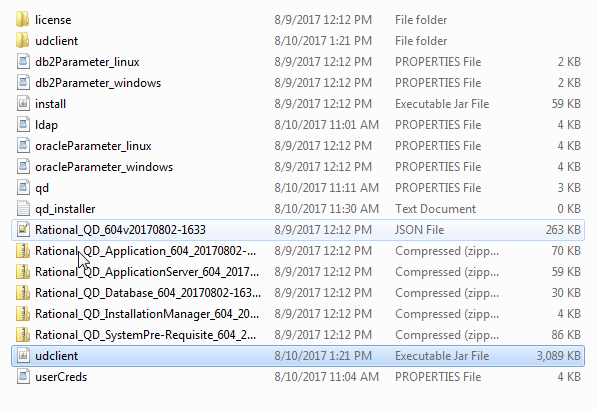
The QD 2.0 package is downloaded from the deployment wiki and unzipped it into a folder on a local machine or laptop which has java 1.8.x installed. Java is needed to run the Quick Deployer installer. Here’s what the contents of the Quick Deployer package look like:- Before running the QD installer, the properties files must be edited.
There are four properties files:-
 - qd.properties
- usercreds.properties
- ldap.properties
- db2Parameter_windows.properties
qd.properties
This is the main properties file used by the QD installer. This is one you must edit before running the Quick Deployer installer. Some of the fields to be changed in qd.properties include:-- #URL to the IBM UrbanCode Deploy server to which Quick Deployer will be installed.
- ucdUrl=https://ucd-15.ibm.com:8443
- #An authentication token that can be used to authenticate to the IBM UrbanCode Deploy server specified by the ucdUrl property.
- ucdToken= 6be42c13-32e9-4091-9946-3753e6f7394f
- #The URL of the media server that contains the product artifacts. This should not be set if localPath is being used.
- mediaUrl=ftp://tompw7-qd-ftp01.ibm.com:2121/604/
- #Administrator user name as defined on the LDAP server.
- wasUserName=clmadmin
- #Administrator password as defined on the LDAP server.
- wasPassword=MyUserPassword
- Remove comment marker on next line to specify full or relative path to LDAP properties.
- ldapProperties=./ldap.properties
- Remove comment marker on next line to specify full or relative path to user credentials properties.
- #userCredsPropertiesLinux=./userCreds.properties
- userCredsPropertiesWindows=./userCreds.properties
- Remove comment marker on next line to specify full or relative path to database properties.
- databaseProperties=./db2Parameter_windows.properties
A short word on accounts and URLs
The server URLs used here are not real and the accounts and passwords are also fictional but they are representative of real accounts and are used to give realistic examples.- For user accounts in this example use MyUserPassword as the password, where needed it will be Base64 encoded as TXlVc2VyUGFzc3dvcmQ=
- For database accounts in this example use MyDatabasePassword as the password, Base64 encoded as TXlEYXRhYmFzZVBhc3N3b3Jk
userCreds.properties
This is where you set up the credentials for QD to use, with passwords in Base64 format. You can encode your passwords into Base64 using an online tool or you can skip this step and run the Change user properties process (which will do the encoding for you) once Quick Deployer is installed. Here we set it all up now using the Base64 encoded values. Some of the fields to be changed include:-- # Password for the IHS certificate keystore
- IHSServerKeyStorePassword= TXlVc2VyUGFzc3dvcmQ=
- # Password for DB2InstanceUser
- ibmQseInst_PW= TXlEYXRhYmFzZVBhc3N3b3Jk
- # OSUserName
- # User used to install and run IM, WAS, IHS & jazzApps
- OSUserName=clmadmin
- # OSUserGroup
- # Group to contain the OSUserName
- OSUserGroup=users
- # OSUserPassword
- # Password for OSUserName
- OSUserPassword= TXlVc2VyUGFzc3dvcmQ=
ldap.properties
You may need to consult with your local LDAP expert for the correct settings for your LDAP server. Some of the fields to be changed include:-- # LDAP fully qualified hostname
- jazz_ldap_host="clmpipeline.ibm.com"
db2Parameter_windows.properties
Finally, the db2 properties, specific to windows. Make sure for windows that each DB being created (where application is 'xx') has an entry that looks something like this:-- createdxxDBOption="ON 'C:\IBMQD\db2fs' DBPATH ON 'C:' USING CODESET UTF-8 TERRITORY EN PAGESIZE 16384"
Download and unzip the ucdclient.jar (QD 2.0 ONLY)
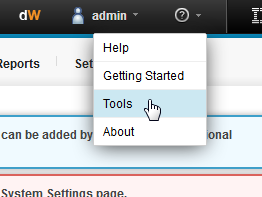
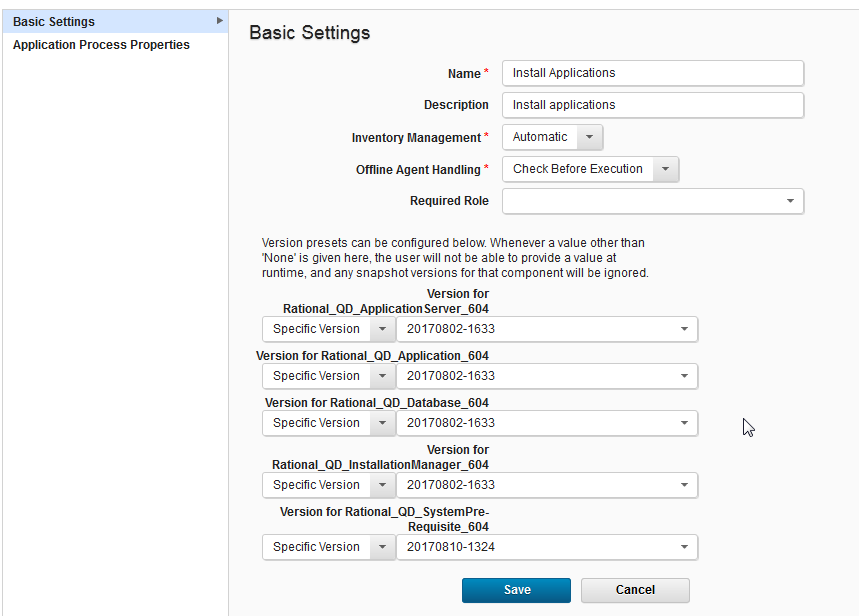
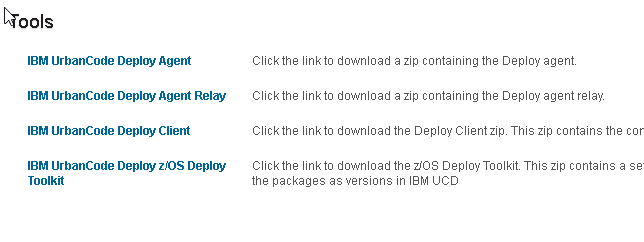
This is not required for QD 2.1. For QD 2.0 installs, you must download and unzip the ucdclient.jar file from the UCD server and place it in the package folder with the install.jar. Download the client from the UCD server's tools menu.
 The client file is a zip and you must extract the udclient.jar from it and make sure you put the extracted udclient.jar file into the same Quick Deployer folder level as the install.jar file.

Install Quick Deployer on the Urban Code Deploy Server
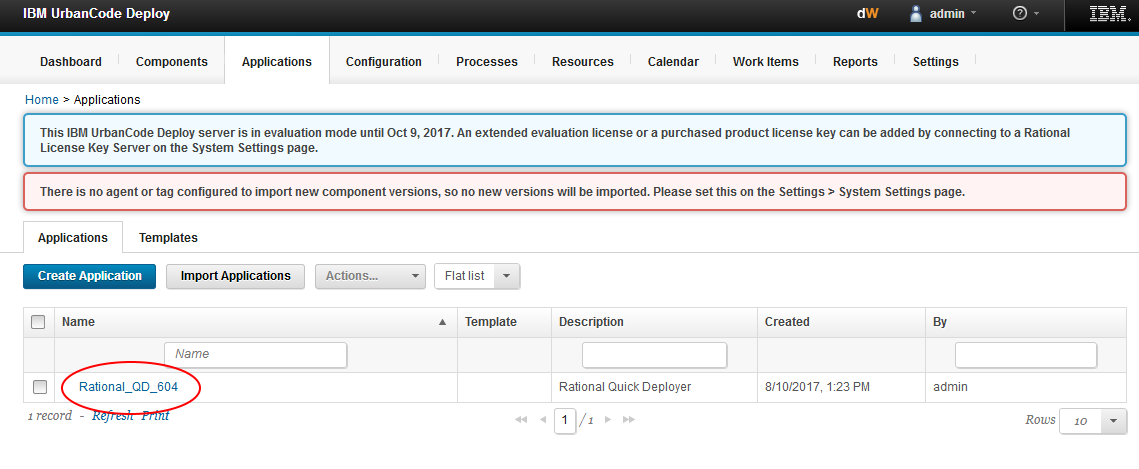
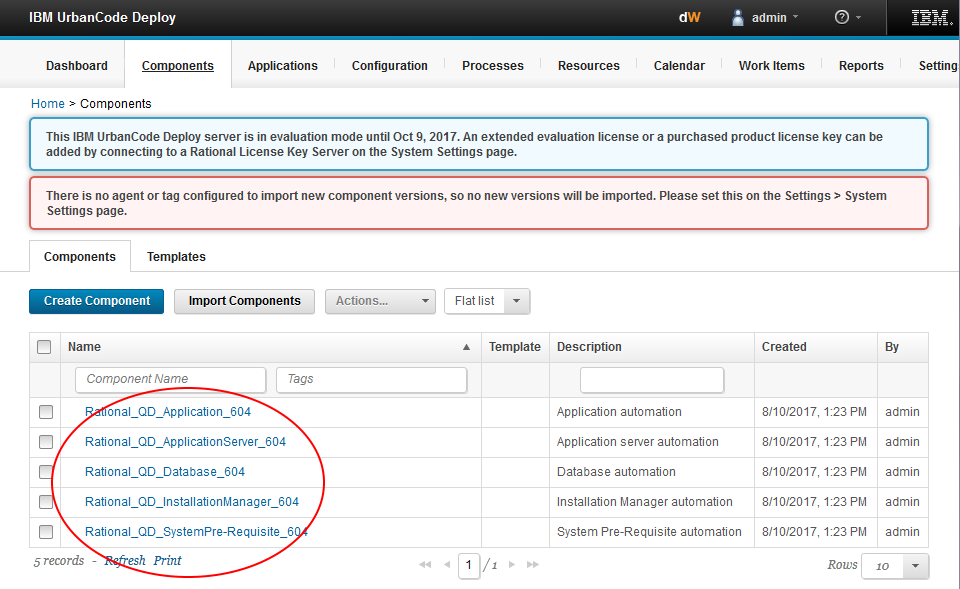
So now the properties files are all set and UCD prepped, the next step is to install Quick Deployer into UCD. In the machine where the QD bits are unzipped, open a cmd window, change directory to the folder containing the install.jar and run the install jar with qd.properties java -jar install.jar qd.properties Take a look in UCD now and see the application has been created: - Click on the Components tab: -

QD Post-install tasks
You can do several configuration tasks now including:-- Updating the permissions granted to the Team Member role.
- Setting fixed component versions on application processes - Set fixed component versions.
- Enabling installation of iFix releases.
- Securing the administrator and user passwords. Securing user passwords.
Set fixed component versions on the Install Application process
Navigate to the Applications page and select the Rational_QD_604 application, switch to the Processes tab and select the Install Applications process. On the process Configuration tab, select Basic Settings and set all 5 components to a specific version. Typically, you would select the latest version of each component from the version drop-down list.
 Once all versions are set, select save.

Target VM Setup
Quick Deployer is installed and ready. Now target VMs to deploy the CE/CLM applications onto must be prepared. The 4 Windows VMs must be set up with some pre-requisites. These are listed in https://jazz.net/wiki/bin/view/Deployment/IBMQuickDeployerSystemRequirements. Log into each of the VMs as The Administrator and do the following:- Check that the operating system is at least Windows Server 2012 R2 Standard (64-bit)
- Check the Windows Management Instrumentation Service is running (use services.msc and check the service is running)
- Check that the VMs are all in the same domain and that the fully qualified domain name of each VM contains only lower case characters.
- Check that all VMs are set to the same time zone.
- Create a C:\etc folder if one does not exist (this is not required with Quick Deployer 2.1+)
- Download and install python (python 2.7.9 is used in this example) and add python.exe to the system path
- Download and install java 1.8 and add java to the system path
- Create a user account called clmadmin with password MyUserPassword
- Give the clmadmin account remote desktop access and ensure the local security policy is amended so that ‘log on as a service’ is enabled for the clmadmin account. Login to each VM using remote desktop with the clmadmin account to verify everything is setup correctly.
- As a final step, using a web browser, access the UCD server from each VM and download the UCD agent.
- Get the UCD agent from the UCD server’s tools menu. Download the zip and extract it.

 Double click on the install agent batch file to install it with these settings.
 - Use the default install directory,
- Default agent home directory,
- Don’t use an agent relay,
- Enter ucd-15.ibm.com as the hostname of the server,
- Use the default port,
- Don’t use a failover port,
- Use the defaults for two-way authentication and end-to-end encryption
- Don’t enable the agent to verify the https certificate,
- Skip entering the full url of the ucd server,
- Use the default agent name,
- Enter Rational QD CLM as the team,
- Say yes to installing the agent as a windows service,
- Leave the unique service name for the agent at the default,
- Enter the user account name as .\Administrator and
- Enter the password,
- And finally, opt to start the agent service automatically.
 Now go into UCD (Resources>Agents) and verify the agent is online.
 Once you've completed these preparation steps for all the target VMs, all four of the agents should be online.
 Take a snapshot of all the VMs in case anything goes wrong and now you are ready to create the Quick Deployer Application environment.
Create the Application Environment
The application environment in UCD is how we tell the Quick Deployer application where to install the CE/CLM apps on our VMs.Create top-level resource group
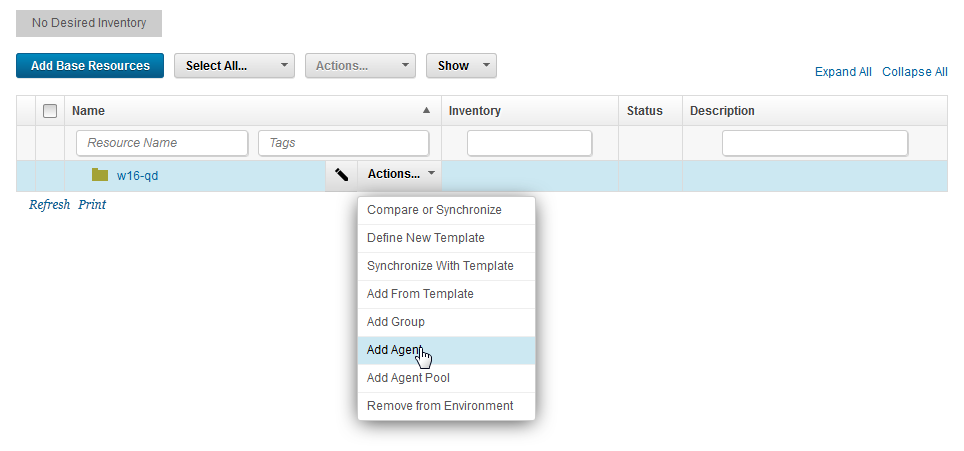
The first thing to do is create a top-level resource group in UCD. Create one called w16-qd.

Create Environment
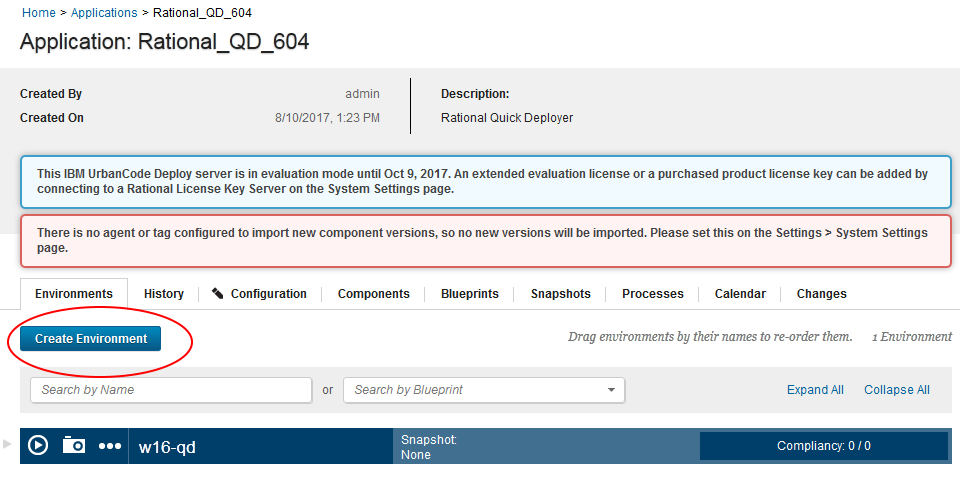
Open the Rational_QD_604 application and select Create Environment, naming it w16-qd and press Save.
Add the top-level resource to the environment
Open the environment and add the top-level resource just created.
Add the agents to the base resource in the environment
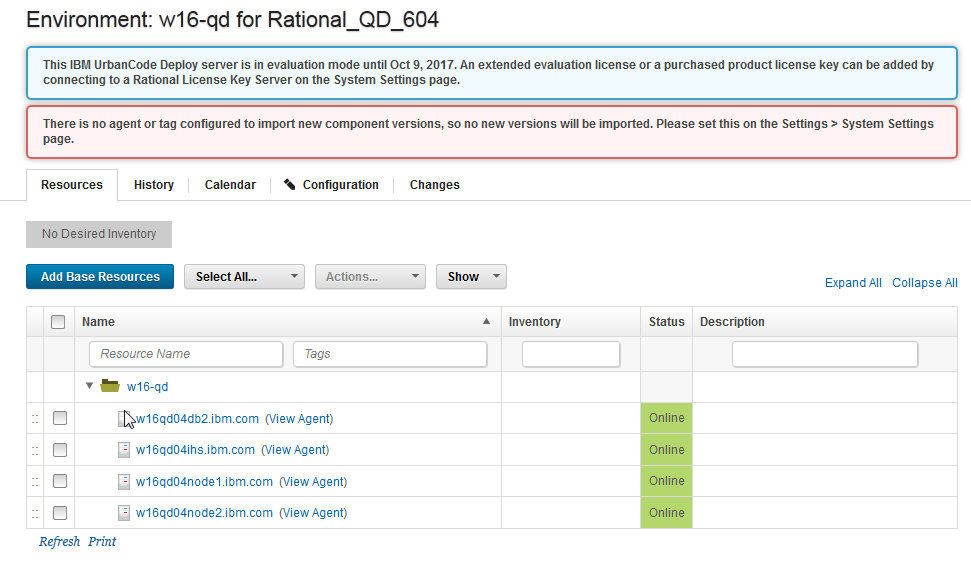
Now, add the 4 UCD agents that were installed on the target VMs to the base resource in the new environment. Which gives you:

Map the components to the agents
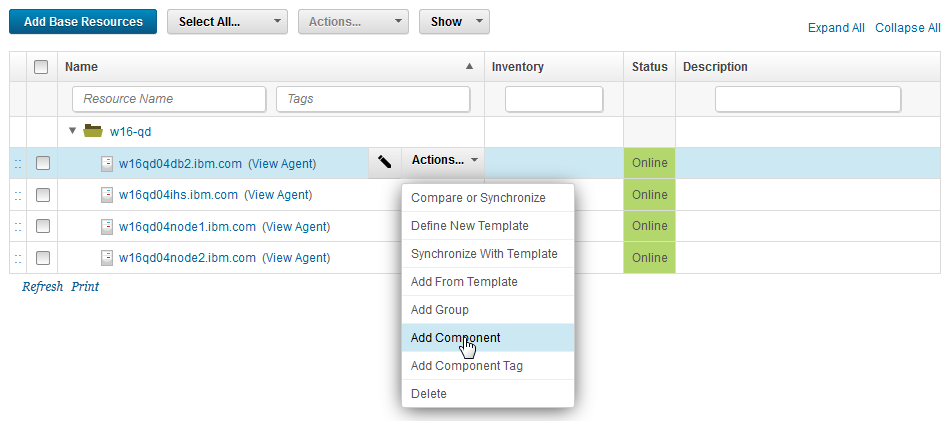
Now, map components to the agents as follows: Select a resource, then click Actions > Add Component. This is the list of components you need to map:- Rational_QD_Application_604
- Rational_QD_ApplicationServer_604
- Rational_QD_Database_604
- Rational_QD_InstallationManager_604
- Rational_QD_SystemPre-Requisite_604
- DB2 server
- IHS Server
- Node 1 – WAS application server with JTS, CCM, QM, RM, RS, DCC, GC, LDX, RELM and DM.
- Node 2 – WAS application server with LQE
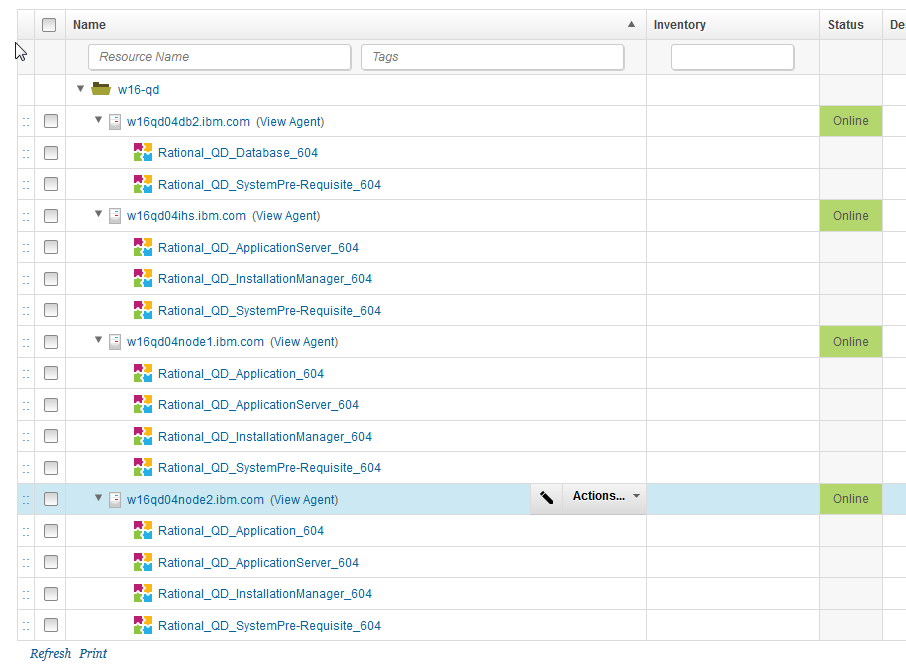
- DB2 Server : Rational_QD_SystemPre-Requisite_604 + Rational_QD_Database_604
- IHS Server : Rational_QD_SystemPre-Requisite_604 + Rational_QD_InstallationManager_604 + Rational_QD_ApplicationServer_604
- Nodes 1 & 2 : Rational_QD_SystemPre-Requisite_604 + Rational_QD_InstallationManager_604 + Rational_QD_ApplicationServer_604 + Rational_QD_Application_604
 The final component mapping looks like this:

Add the tags to the agents
The final step is to add the UCD tags to the agents to tell Quick Deployer which applications to install on which agent.
 And that’s it – the environment is all prepared and now you're ready to install CE/CLM.
Run the Install Applications process
Since this process can’t be restarted, make sure you have a snapshot of the target VMs before you start the run. To run the Install Applications process, open the application and click request process against the application environment.
 Make your selections in the wizard and click ‘submit’ to start the installation. Note that the MTM sample will not be deployed when Design Manager is present, even if Run JTS Setup/ MTM sample is selected in the wizard – the Quick Deployer code checks before trying.

 Now watch Quick Deployer go through the CE/CLM install and deployment process….

 Eventually, the deployment completes:
 Now you can go to the web UI of your CE/CLM deployment and see the apps:
The web apps can be accessed via the IHS server: https://w16qd04ihs.ibm.com:9443/jts/admin
 If you select Server>Registered Applications you can see all the CE apps.
 And you're done - the deployment is ready to use.
You can find more information on the Quick Deployer wiki including other options such as installing iFixes and enabling Configuration Management.
Miscellaneous
Notes:
- Throughout the IBM Quick Deployer wiki the screen captures are for reference only.
In some cases if the functionality they display has not changed in the latest release they will be from a previous release
Related topics:
External links:
Additional contributors: MichelleCrane, NathanBak, ChristianLopez
-
 Deployment web
-
 Planning and design
-
 Installing and upgrading
-
 Migrating and evolving
-
 Integrating
-
 Administering
-
 Monitoring
-
 Troubleshooting
-
 To do
To do
-
 Under construction
-
 New
New
-
 Updated
-
 Constant change
- None - stable page
- Smaller versions of status icons for inline text:
-


Contributions are governed by our Terms of Use. Please read the following disclaimer.
Dashboards and work items are no longer publicly available, so some links may be invalid. We now provide similar information through other means. Learn more here.