Expedite your WAS configuration to minimize down time for a CLM upgrade
Authors: MikeDelargy, ShradhaSrivastav, DineshKumarBuild basis: CLM Versions 3.x and later, up to and including ELM 7.0.2.
Note: Support removed for IBM WebSphere Application Server (Traditional WAS) with ELM version 7.0.3. Use WebSphere Liberty, either embedded and installed with ELM applications, or separately installed
Upgrading your CLM environment can be a time consuming process when properly done. The process typically begins with good planning and testing which can be used to help find challenges and minimize down time during a production system upgrade. A clm upgrade may involve upgrading a combination of things:
- The CLM Applications
- Operating Systems
- Browsers
- Database Versions
- WebSphere versions
Typical war file steps during an upgrade.
- From our CLM upgrade guide:
Alternate route to minimize the down time of your application server during an upgrade:
An alternate approach to preparing for and implementing an upgrade is to create a second Profile / jvm in WebSphere that can be used specifically for your upgraded solution. The benefits of using a second jvm for your upgraded solution:- It can be prepared well in advance of your actual upgrade and your system can be up and running while the new jvm is being configured.
- You do not need to uninstall the old war files, clean up the old cache, nor remove the old logs.
- in the unlikely event that you need to abort the upgrade, you can easily revert to the pre-upgrade deployment.
Creating a second profile / jvm in WebSphere
- You can use the WebSphere Profile Management Tool to create your new profile.
- When you create the new profile, the tool will automatically increment the ports being used by one. Therefore, if your original deployment is using ports 9080 and 9443, your new profile will use ports 9081 and 9443. (These must be changed at a later time when you are ready to do the upgrade.)
- You can follow the steps outlined in the Configuring CLM on WebSphere Application Server with LDAP to configure your new jvm. (You want to make sure your custom property settings match your current production settings.)
- Depending on the resources available on the Operating System you may have to minimize the initial settings for the min heap (-xms), max heap (-xmx), and nursery (-xmn) until it is time to switch over to the new jvm. If you have sufficient resources available, then you can set these custom settings to match your current deployment.
- After installing each of the new war files, you can manually set the security to user/group mapping, or you can run the python scripts to do this for you. More information on these can be found here: Automatically deploying the Collaborative Lifecycle Management applications on WebSphere Application Server
Changing port numbers for your new jvm
- To change ports in WebSphere, go to the ibm admin console and select Servers / Server Types / WebSphere application server then click on your server. (my server is server1)
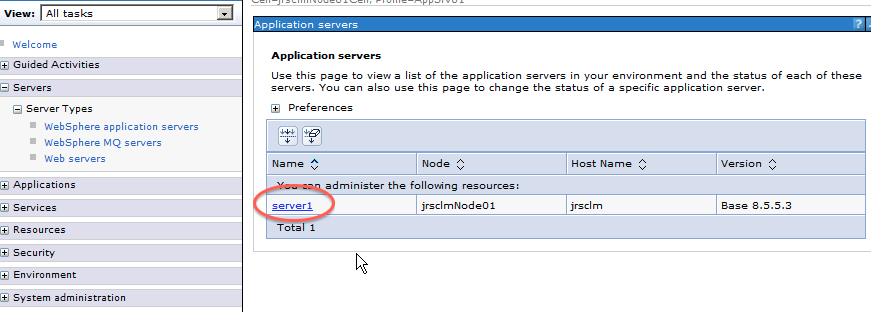
- Next, on the right, select Ports
-

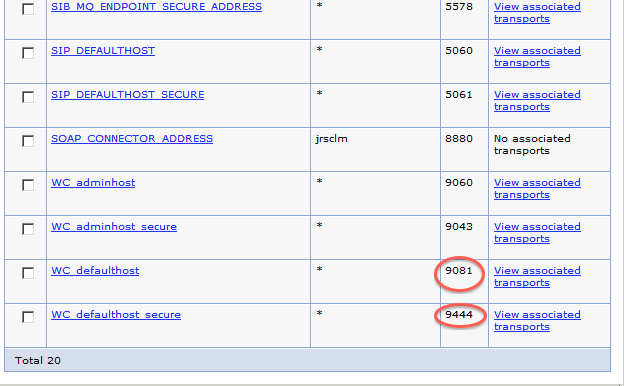
- The port numbers from my 'new profile are 9444 and 9081
-
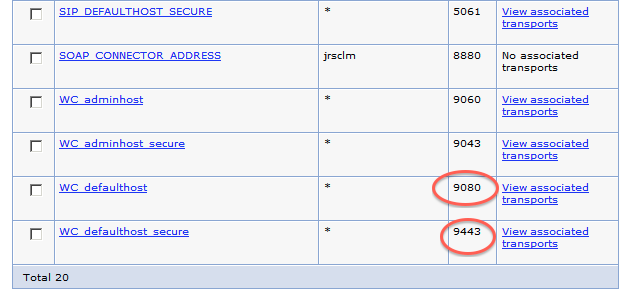
- but my current deployment uses 9443 and 9080 so I need to change the values.
-
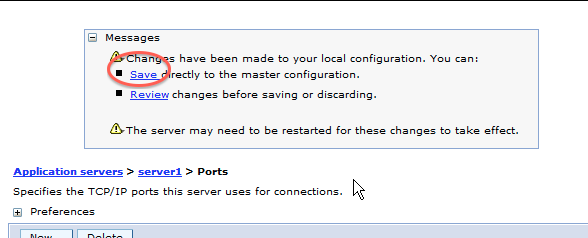
- When done, I need to save my changes and restart the profile
-
Related topics: Deployment web home, Deployment web home
External links:
Additional contributors: TWikiUser, TWikiUser
Contributions are governed by our Terms of Use. Please read the following disclaimer.
Dashboards and work items are no longer publicly available, so some links may be invalid. We now provide similar information through other means. Learn more here.