Configuring CLM on WebSphere Application Server with LDAP
Authors: MikeDelargy, MirkoHartwigBuild basis: CLM Versions 3.x, 4.x, 5.x, 6.x and 7.x(up to 7.0.2)
Note: Support removed for IBM WebSphere Application Server (Traditional WAS) starting with ELM version 7.0.3. Use WebSphere Liberty, either embedded and installed with ELM applications, or separately installed Configure WAS Environmental Variables
1.If WebSphere is not running, go ahead and start it at this time. _- Windows:
- c:\IBM\WebSphere\AppServer\profiles\CLMAppsrv01\bin>startServer.bat server1 (Your path may be different.)
- Linux:
- /opt/ibm/WebSphere/Appserver/profiles/CLMAppsrv01/bin/startServer.sh server1 (Your path may be different.)

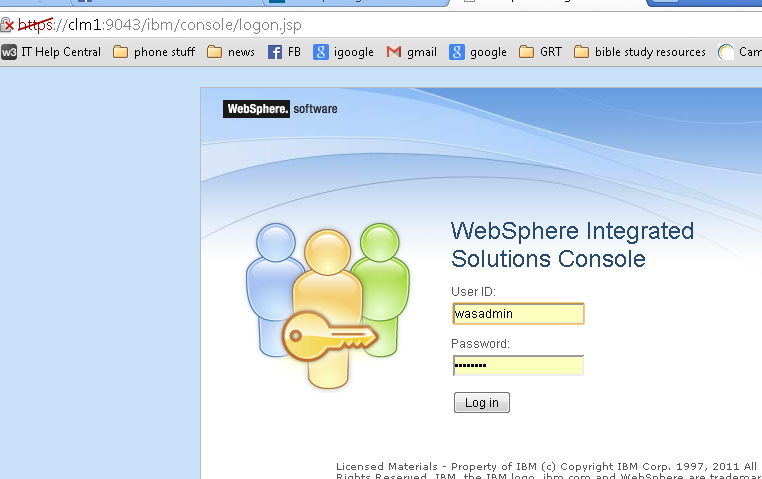
2.Login into the IBM WebSphere Admin console (this WAS installation was configured with the user / pw wasadmin / wasadmin yours will probably be different)
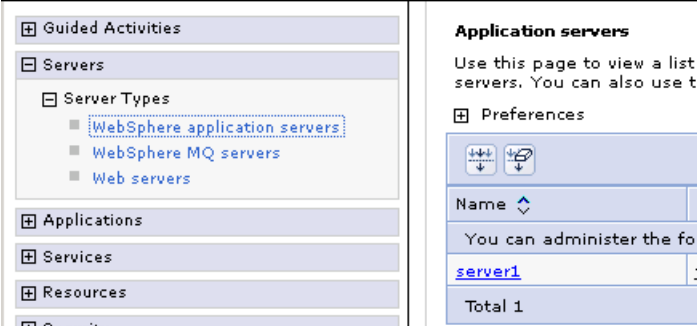
3.Navigate to the Server / Server Types / WebSphere Application Servers and click server1
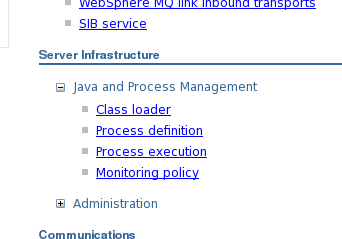
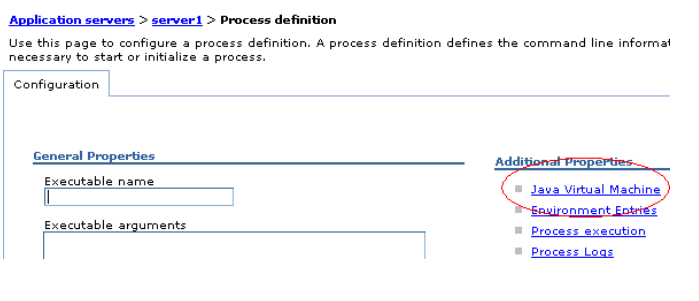
4.On the right hand side, select Server Infrastructure then select Java and Process Management and click Process definition
5. Under Additional Properties, select "Java Virtual Machine"
6.Enter:
- Initial Heap: 8196
- Maximum Heap: 8196
- Enable the Verbose GC checkbox
(These are minimum settings - Consult your local rep or Techline for more appropriate settings.)
Additionally, since you are setting your Max and Min heap here, you do not need to set them in the Generic JVM Arguments.
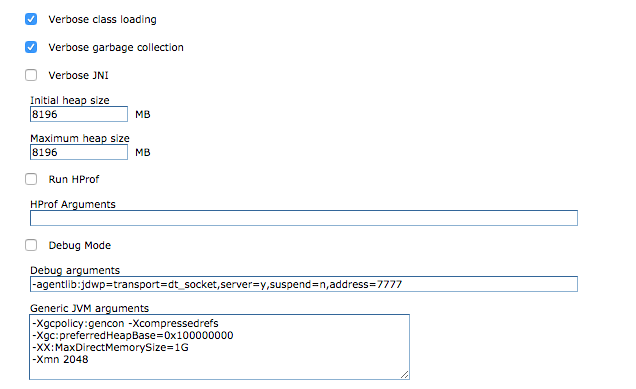
Enter the following in for the Generic JVM Settings
These are generic recommendations, your numbers may vary depending on your max heap and may need to be tuned. As a guide, set your nursery [*-Xmn*] to 1/4 of your heap [*-Xmx*] for JTS, RTC, and RQM. For RNDG, set your Nursery [*-Xmn*] to 1/3 of your max heap [*-Xmx*].
-Xgcpolicy:gencon -Xcompressedrefs
-Xgc:preferredHeapBase=0x100000000
-XX:MaxDirectMemorySize=1G
-Xmn2048M
7.Click Apply 8.Click Custom Properties on the upper right side

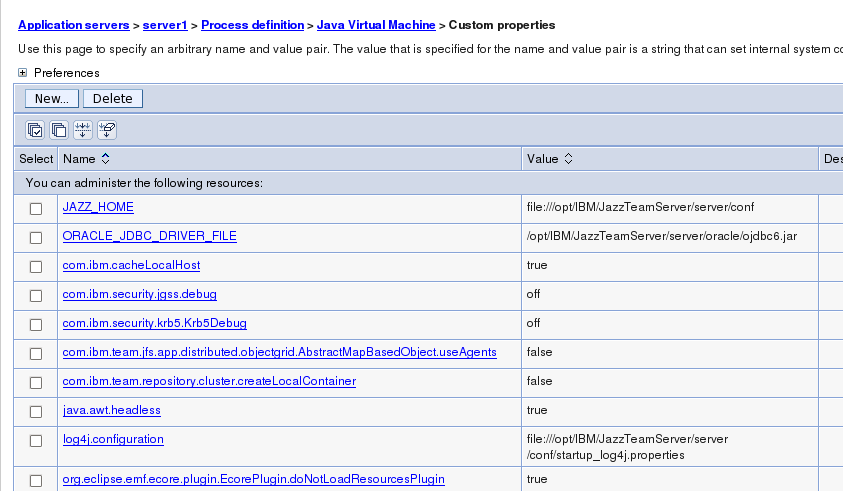
9.Click New

10.Enter the following new values: (Verify your paths before setting the values. If the path to JAZZ_HOME (or any of the custom properties) has spaces, specify the short form of the path name. For example, if the path is C:\Program Files, type the path name as C:\Progra1)
- Linux:
-
- JAZZ_HOME Value file:///opt/IBM/JazzTeamServer/server/conf
- SQLSERVER_JDBC_DRIVER_FILE Value /opt/IBM/JazzTeamServer/Server/SQLServer/sqljdbc4.jar (only if using SQL Server to host your application databases)
- ORACLE_JDBC_DRIVER_FILE Value /opt/IBM/JazzTeamServer/server/ORACLE/ojdbc6.jar (only if using Oracle to host your application database files)
- org.eclipse.emf.ecore.plugin.EcorePlugin.doNotLoadResourcesPlugin Value true
- java.awt.headless Value true Prior to versions 7.0.1 SR1 / 7.0.2 SR1
- log4j.configuration Value file:///opt/IBM/JazzTeamServer/server/conf/startup_log4j.properties Versions 7.0.1 SR1 / 7.0.2 SR1 and beyond
- log4j.configuration Value file:///opt/IBM/JazzTeamServer/server/conf/startup_log4j2.xml
-
- Windows:
-
- JAZZ_HOME Value file:///C:/IBM/JazzTeamServer/server/conf
- SQLSERVER_JDBC_DRIVER_FILE Value C:\IBM\JazzTeamServer\Server\SQLServer\sqljdbc4.jar (only if using SQL Server to host your application databases)
- ORACLE_JDBC_DRIVER_FILE Value C:\IBM\JazzTeamServer\server\ORACLE\ojdbc6.jar (only if using Oracle to host your application database files)
- java.awt.headless Value true
- org.eclipse.emf.ecore.plugin.EcorePlugin.doNotLoadResourcesPlugin Value true Prior to versions 7.0.1 SR1 / 7.0.2 SR1
- log4j.configuration Value file:///C:/IBM/JazzTeamServer/server/conf/startup_log4j.properties Versions 7.0.1 SR1 / 7.0.2 SR1 and beyond
- log4j.configuration Value file:///C:/IBM/JazzTeamServer/server/conf/startup_log4j2.xml
-
 11. Click Save directly to master configuration
Configure LDAP for WAS
Go to Security \ Global Security 1.Under Java 2 security, clear the check box for Use Java 2 security to restrict application access to local resources.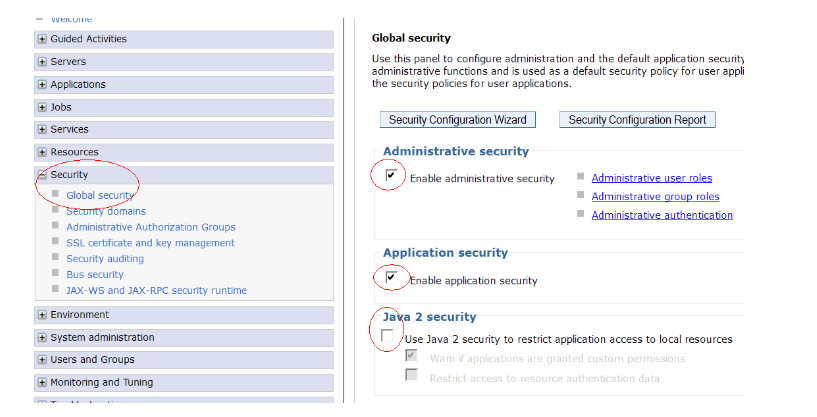
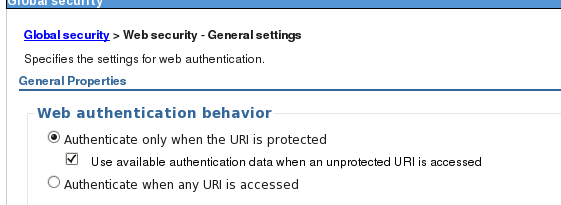
2.Ensure that the Enable administrative security and Enable application security check boxes are selected and click Apply 3. Click Security > Global security > Web and SIP security > General settings.
 4.Ensure Use available authentication data when an unprotected URI is accessed is checked and click OK
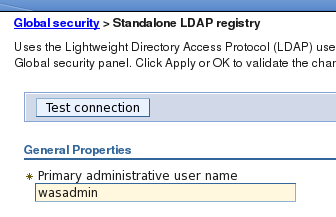
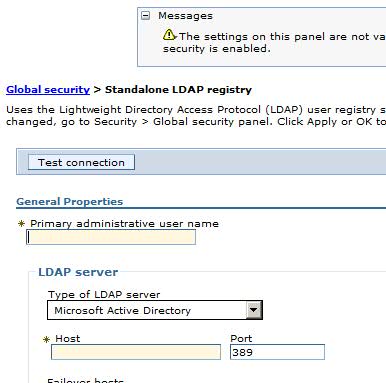
6.Enter data similar to the following: (Your ldap admin will need to supply you with this information) Primary administrative user name: wasadmin Type of LDAP server: Custom Host: jazzapacheds Port: 10389 (default port is 389 verify your port with your ldap admin) Base distinguished name (DN): dc=upgrade,dc=ws Search timeout: 120 (default)
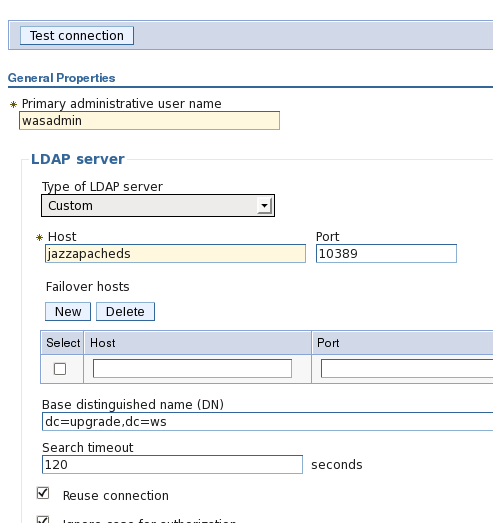
Note: If you are using another LDAP provider, such as Microsoft AD, start with the default settings provided by selecting Microsoft AD, in the dropdown for Type of LDAP server. 7. Click Apply
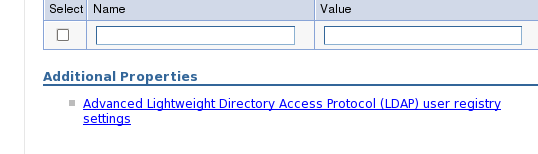
8. click Advanced Lightweight Directory Access Protocol (LDAP) user registry settings
9. Enter data similar to the following: (Your ldap admin will need to supply you with this information) User filter: (&(uid=%v)(objectclass=inetOrgPerson)) Group Filter: (&(cn=%v)(objectclass=groupOfUniqueNames)) Group member ID map: groupOfUniqueNames:uniquemember Worth noting. The Group member ID map value is the object class name from the Group filter section in congunction with the group unique identifier.
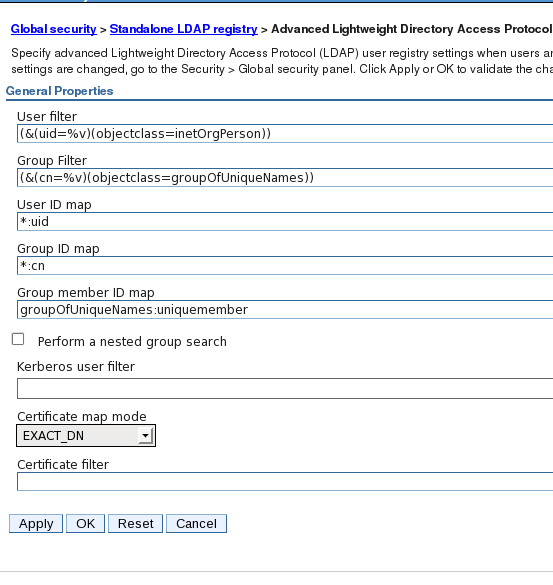
10. Click OK
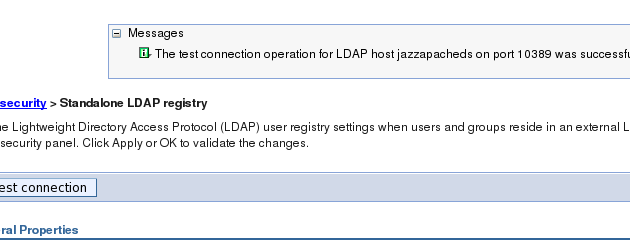
11. Click Test Connection
You should receive a message the the test was successful
12. Click Save directly to the master configuration.

13. Click OK (bottom of page)
15. Click Apply
16. Click Save directly to the master configuration.
Configure WAS for JTS and CLM war files
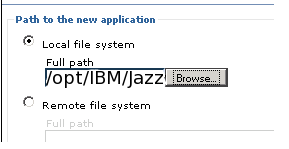
1. Go to Applications \ New Application then click New Enterprise Application. 2. Select Local file system and click Browse
Drill down to /opt/IBM/JazzTeamServer/server/tomcat/webapps
(This is the path for a default installation; your path may be different)
2. Select Local file system and click Browse
Drill down to /opt/IBM/JazzTeamServer/server/tomcat/webapps
(This is the path for a default installation; your path may be different) (On Windows, your path may look similar to C:\IBM\JazzTeamServer\server\tomcat\webapps)
 These war files need to be added one at a time:
For the JTS server:
These war files need to be added one at a time:
For the JTS server: - jts.war,
- clmhelp.war,
- admin.war
- ccm.war
- rqm.war
- rm.war,
- converter.war (The converter.war can only be installed on windows or linux)
 Click Next
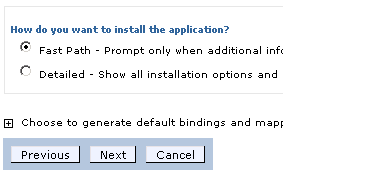
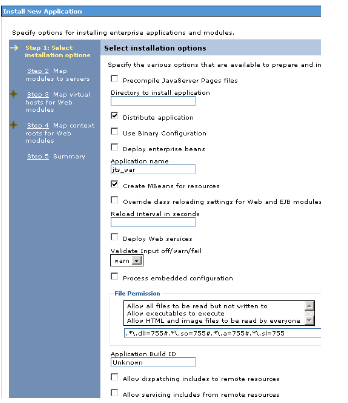
5 .Accept the default installation options and click Next
Click Next
5 .Accept the default installation options and click Next
 6. Map Modules to servers
 Click Next
7. Check the box for to map the war file to the default host and click Next
Click Next
7. Check the box for to map the war file to the default host and click Next
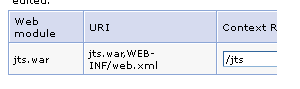
 8. Add the context root for the war file (If you have upgraded from 2.x versions, your context roots may be different)
jts.war = /jts
8. Add the context root for the war file (If you have upgraded from 2.x versions, your context roots may be different)
jts.war = /jts
 Click Next
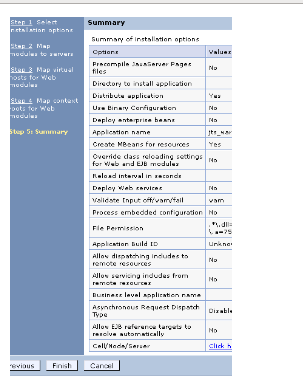
9. Review the summary page and click Finish
Click Next
9. Review the summary page and click Finish
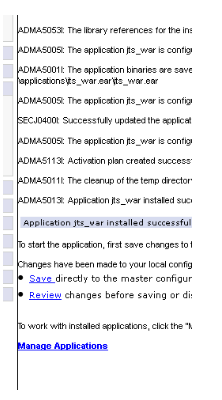
 10. When this completes, click Save directly to the master configuration.
 11. When this is done, repeat the process for the other war files that you will be installing on this server.
(Here is a list of the war files and their associated context roots:)
* admin.war /admin
11. When this is done, repeat the process for the other war files that you will be installing on this server.
(Here is a list of the war files and their associated context roots:)
* admin.war /admin * ccm.war /ccm
* clmhelp.war /clmhelp
* converter.war /converter
* jts.war /jts
* qm.war /qm
* rm.war /rm
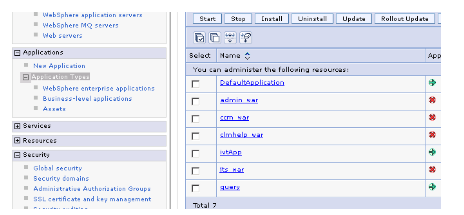
12. When you have completed configuring each of these war files, go to: Applications / Application types / WebSphere enterprise applications and you should see each of your applications listed __
 Enable security
(Security only needs to be enabled for the jts.war, ccm.war, and the qm.war files.)
13. To enable security for the jts.war, click on the jts.war link in the Applications / Application types / WebSphere enterprise applications section (shown above)
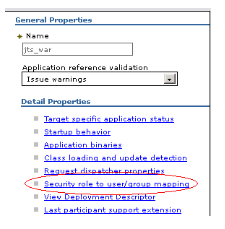
14. Click on Security role to user/group mapping
Enable security
(Security only needs to be enabled for the jts.war, ccm.war, and the qm.war files.)
13. To enable security for the jts.war, click on the jts.war link in the Applications / Application types / WebSphere enterprise applications section (shown above)
14. Click on Security role to user/group mapping
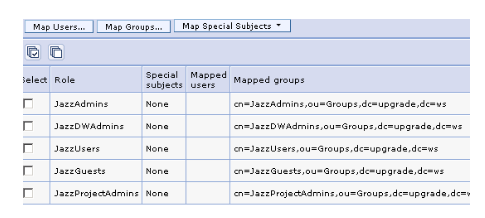
 15. For each of the listed Roles we will need to map groups.
Check the JazzAdmins role and click Map Groups...
15. For each of the listed Roles we will need to map groups.
Check the JazzAdmins role and click Map Groups... 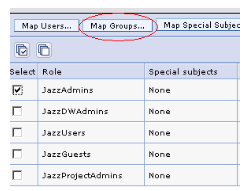 16. Click the Search button (It is possible to 'filter' this list when you have a large ldap community)
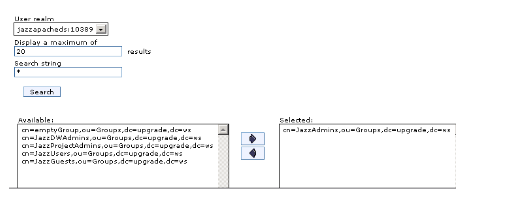 17. You should see a list of available Groups (from our ldap server .. your groups will probably be different, Consult your LDAP Admin)
18. For JazzAdmn, highlight cn=JazzAdmins,ou=Groups,dc=upgrade,dc=ws and click the right button (your groups will match the values in your ldap server)
19. Click OK _
Repeat for each of the other groups listed
17. You should see a list of available Groups (from our ldap server .. your groups will probably be different, Consult your LDAP Admin)
18. For JazzAdmn, highlight cn=JazzAdmins,ou=Groups,dc=upgrade,dc=ws and click the right button (your groups will match the values in your ldap server)
19. Click OK _
Repeat for each of the other groups listed
 20. When you have finished, click OK
21. Click Save directly to the master configuration.
22. Repeat this for the ccm.war, and the qm.war (if you are using ccm and qm) (You do NOT have to do it for the rm, admin, clmhelp, nor the converter war files.)
23. Logout of the admin console
24. We need to restart WebSphere (Command line option)
Stop the server
20. When you have finished, click OK
21. Click Save directly to the master configuration.
22. Repeat this for the ccm.war, and the qm.war (if you are using ccm and qm) (You do NOT have to do it for the rm, admin, clmhelp, nor the converter war files.)
23. Logout of the admin console
24. We need to restart WebSphere (Command line option)
Stop the server
- Windows:
- c:\IBM\WebSphere\AppServer\profiles\CLMAppsrv01\bin>stopServer.bat server1
- Linux:
- /opt/ibm/WebSphere/Appserver/profiles/CLMAppsrv01/bin/stopServer.sh server1
- Windows:
- c:\IBM\WebSphere\AppServer\profiles\CLMAppsrv01\bin>startServer.bat server1
- Linux:
- /opt/ibm/WebSphere/Appserver/profiles/CLMAppsrv01/bin/startServer.sh server1
You have completed the configuring Websphere for CLM
OPTIONAL - Setting up a Windows Service when using LDAP
The following shows how to setup the Windows service to use an LDAP user. You will need to do this when you enable Standalone LDAP user authentication with Websphere. This section is a supplement to the Websphere technote on Using WASServiceCmd to create Windows services for WebSphere Application Servers.In this example we will use an Active Directory user and show how to fix the problem of a service that will not shutdown.
- Stop the service. This will fail with a 1053 error that the service did not respond to the stop attempt. You will need to kill 3 processes if you created a service already
- WASService.exe
- Java x2 processes to stop the service.
- Then run the following command from the {path to IBM}\WebSphere\AppServer\bin directory
where username corresponds to the Primary administrative user name.
where was1Node01 is the node name appended to the service name .
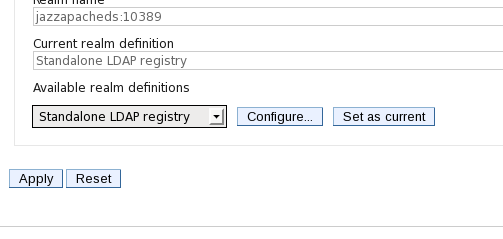
Tip 1: To find the Primary administrative user name, in Websphere go to:
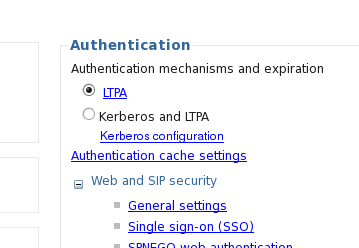
Security -> Global Security -> Available realm definition {It will state Standalone LDAP }
Configure -> Type of LDAP will be Microsoft Active Directory
 See "Primary administrative user name" - this is the user that needs to start and stop the service. This must be an active directory user.
Tip 2: To find the Node name perform the following: Run services.msc -> {search for} IBM Websphere Application Server -> {right-click Properties} select the node information suffixed to the Service Name
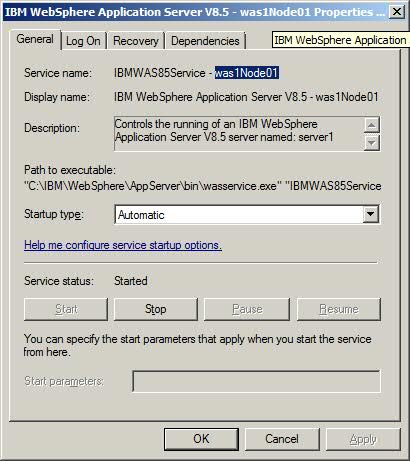
The above picture highlights text which will be needed for the WASService command above.
Related topics: Deployment web home, Managing users on WebSphere Application Server, LDAP configuration parameters
Additional contributors: PaulEllis, ChristianGlockner, RosaNaranjo


| I | Attachment | Action | Size | Date | Who | Comment |
|---|---|---|---|---|---|---|
| |
primaryadminuserinwas.jpg | manage | 26.1 K | 2016-10-06 - 10:09 | PaulEllis | Primary Admininistrative User screenshot |
| |
wasnodeinfo.jpg | manage | 39.9 K | 2016-10-06 - 10:10 | PaulEllis | Showing where to get the WAS node information |
Contributions are governed by our Terms of Use. Please read the following disclaimer.
Dashboards and work items are no longer publicly available, so some links may be invalid. We now provide similar information through other means. Learn more here.