Register Custom Automation As a Resource-intensive Scenario
Authors: Shubjit Naik, Dinesh Kumar B, Ralph SchoonBuild basis: CLM 6.0.5 or Higher
There are specific user and system scenarios across the CLM portfolio that can potentially drive higher load on a Jazz application. Starting with CLM 6.0.3 IBM has identified a set of known resource-intensive scenarios in each application and are exposing them as JMX MBeans. Refer to Known Resource-intensive Scenarios.
However there are cases where a custom functionality could be a potential resource-intensive scenario, for example a custom Java script or a plugin making REST API calls to a CLM application. Such custom functionality needs to be monitored as well when looking at the overall application performance. This article focuses on a method to record and publish such custom functionality as resource-intensive scenario to help tracking their usage.
Let us first look at the workflow of registering a Resource Intensive Scenario MBean using a REST client including monitoring via RepoDebug. We will then present different examples using APIs and Scripts
The POST body must contain the scenario name in the following JSON format.
The POST body must contain the scenario information from the start response in JSON format. Example:
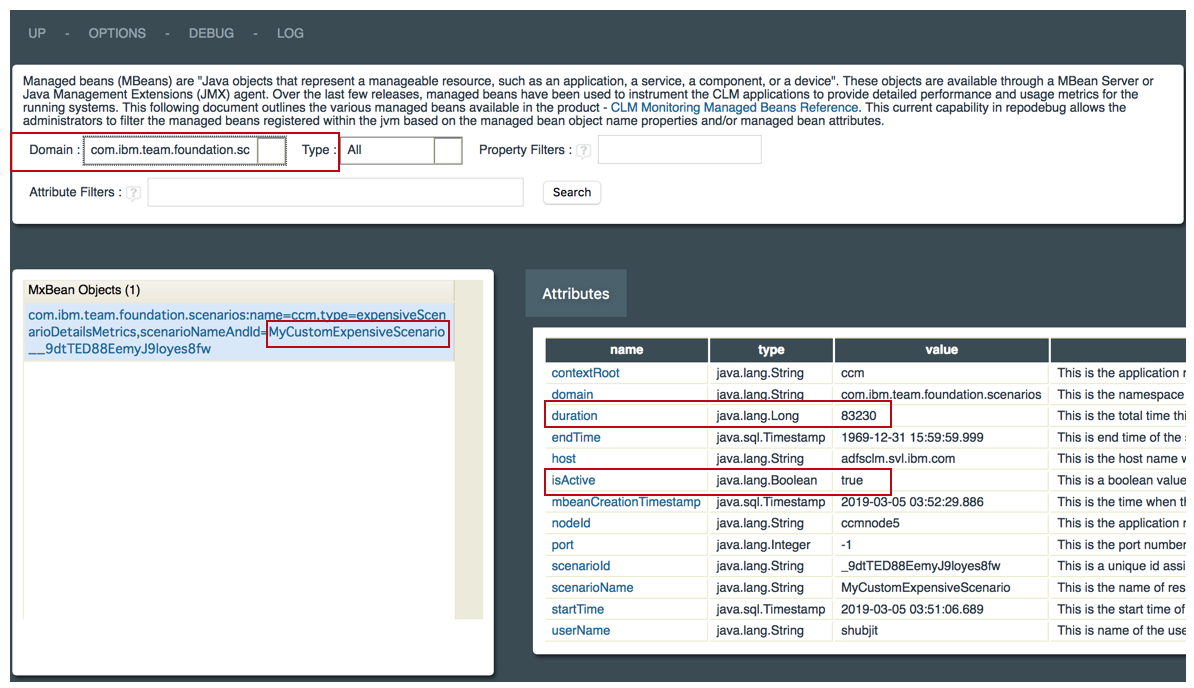
Once the Custom Resource Intensive Scenario MBean (Example MyCustomExpensiveScenario) has been started and with the MBeans enabled, you should be able to see the MBean via RepoDebug under the domain com.ibm.team.foundation.scenarios
Please see the article CLM Monitoring in section 6. Resource-Intensive Scenarios Summary bean for more information.

a. Using a JSON file representing the scenario object
Stop Scenario
Counters get updated after the scenario stops.
Updated scenario and instance counts can be seen in the “scenarios” section of the application admin counters page, here is the URL:
About Starting and Stopping Custom Resource-Intensive Scenarios
The workflow is to first register a JMX MBean stating that a Resource Intensive Scenario is about to start before any Script/API first accesses the targeted application Server. At the end of the script , once the operation is complete, update the MBean stating the specific Resource Intensive Scenario has completed. This MBean has several attributes like Start, End, isActive, Username, Elapsed time and invocation Count. These MBean attributes can be monitored/tracked and relevant notifications/thresholds can be configured against them.Let us first look at the workflow of registering a Resource Intensive Scenario MBean using a REST client including monitoring via RepoDebug. We will then present different examples using APIs and Scripts
Workflow of Registering a Resource-Intensive Scenario using REST Client
To perform any of the activities below, you must be logged in to the applicationhttps://<servername>:<port>/<APP>/web
Starting a Scenario
To start a Scenario MBean make a POST request to the URLhttps://<servername>:<port>/<APP>/service/com.ibm.team.repository.service.serviceability.IScenarioRestService/scenarios/startscenarioProvide the following headers:
Content-Type=application/json
Accept=application/json
X-Jazz-CSRF-Prevent=JSESSIONID
Where
JSESSIONID is the value of the JSESSIONID cookie of the logged-in session. If this header is not provided the call will not succeed. You will instead see a permission denied error.
The POST body must contain the scenario name in the following JSON format.
{"scenarioName":"<your scenario name here>"}
Example:
{"scenarioName":"MyCustomExpensiveScenario"}
If the call succeeds, the response returns 200 as HTTP status. The response body contains the scenario registration information required to register the end of the scenario later. In the example the scenario name used was MyCustomExpensiveScenario.
{
"scenarioName":"MyCustomExpensiveScenario",
"scenarioInstanceId":"_Jbe94DaQEempFf7xSdsBAQ",
"scenarioHeaderKey":"x-com-ibm-team-scenario",
"scenarioHeaderValue":"_Jbe94DaQEempFf7xSdsBAQ%3Bname%3DMyCustomExpensiveScenario"
}
Note The above has been testing using Curl commands and REST client on Firefox using ELM 7.0.2. It works.
Postman has proven unreliable in testing so use of Postman for API investigation is not recommended.
Stopping the Scenario
To stop a Scenario MBean once the scenario has ended, make a POST request as belowhttps://<servername>:<port>/<APP>/service/com.ibm.team.repository.service.serviceability.IScenarioRestService/scenarios/stopscenarioProvide the following headers:
Content-Type=application/json
Accept=application/json
X-Jazz-CSRF-Prevent=JSESSIONID
Where
JSESSIONID is the value of the JSESSIONID cookie of the logged-in session. If this header is not provided the call will not succeed. You will instead see a permission denied error.
The POST body must contain the scenario information from the start response in JSON format. Example:
{"scenarioName":"MyCustomExpensiveScenario",
"scenarioInstanceId":"_Jbe94DaQEempFf7xSdsBAQ",
"scenarioHeaderKey":"x-com-ibm-team-scenario",
"scenarioHeaderValue":"_Jbe94DaQEempFf7xSdsBAQ%3Bname%3DMyCustomExpensiveScenario"}
If the call succeeds, the response returns 200 as HTTP status. The response body contains the scenario ID. Example:
"_Jbe94DaQEempFf7xSdsBAQ"
Monitoring or Viewing the Scenario MBean
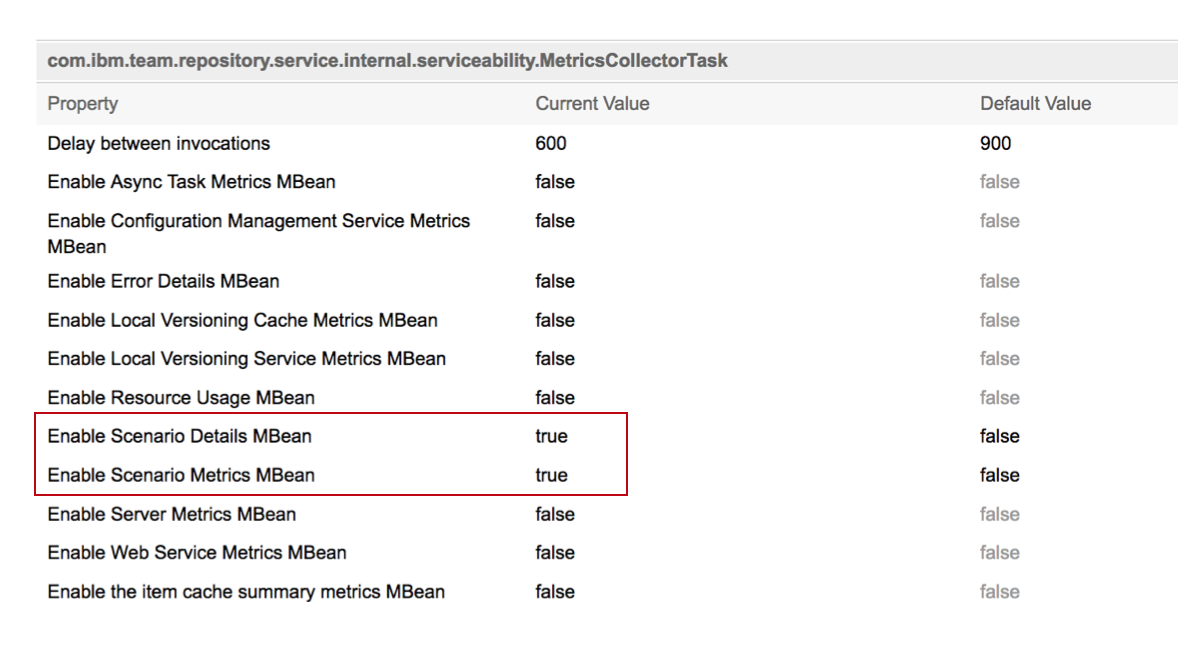
You must first enable specific MBeans so as to be able to Monitor it. To enable the MBeans, Login to the application admin page as a Jazz Admin User viahttps://<servername>:<port>/<APP>/adminClick on Application > Advanced Properties and enable the following MBeans value to "true"
- Enable Scenario Details MBean
- Enable Scenario Metrics MBean

Once the Custom Resource Intensive Scenario MBean (Example MyCustomExpensiveScenario) has been started and with the MBeans enabled, you should be able to see the MBean via RepoDebug under the domain com.ibm.team.foundation.scenarios
https://<servername>:<port>/<APP>/repodebug/mxBeans

Please see the article CLM Monitoring in section 6. Resource-Intensive Scenarios Summary bean for more information.
Viewing the Custom Scenario Statistics
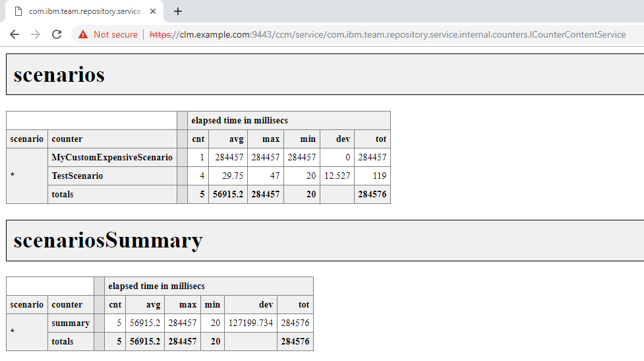
Once the Resource Intensive Scenario MBean has been stopped the Counters will be updated. To view these Scenario Statistics open the following URL.https://<servername>:<port>/<APP>/service/com.ibm.team.repository.service.internal.counters.ICounterContentServiceThe Scenarios counters can be found in the section
scenariosThe Scenarios summary information can be found in the section
scenariosSummaryCustom scenario counter and scenario summary.:

Viewing existing Scenario Details
To view details of the running(both custom and OOTB) scenarios make a GET request to the following URL:https://<servername>:<port>/<APP>/service/com.ibm.team.repository.service.serviceability.IScenarioRestService/scenariosBelow is a sample output showing the scenarios list JSON output:
{
  "scenarioList": [{
    "advancedLoggingEnabled": false,
    "componentName": "Project Metrics ",
    "scenarioId": "_4vrUYLbkEeuH5ZDJLe9zfA",
    "scenarioName": "Collect_Project_Metrics",
    "description": "This operation collects different project area specific metrics from the repository which help understand data growth and data distribution patterns"
  }, {
    "advancedLoggingEnabled": false,
    "componentName": "Data Validation",
    "scenarioId": "_4wa7QrbkEeuH5ZDJLe9zfA",
    "scenarioName": "Run_Data_Validation",
    "description": "This operation is a scheduled background task which performs data integrity checks against the database to identify inconsistencies"
  }]
}
Examples of Registering a Resource-Intensive Scenario
Using Curl Script
RESTClient allows using JSESSIONID from existing session, as a value to “X-Jazz-CSRF-Prevent” header. For Curl, below command line can be used to create a valid session. Below sample further, captures the session in a variable for use with other commands Declare a USER, PWD and COOKIES variables to begin with:
$ USER=JazzUser

$ PWD=JazzUserPassword

$ COOKIES=cookies.txt
Perform the authentication and capture the cookies
$ curl -k -c $COOKIES https://<servername>:<port>/ccm/authenticated/identity

$ curl -k -L -b $COOKIES -c $COOKIES -d j_username=$USER -d j_password=$PWD https://<servername>:<port>/ccm/authenticated/j_security_check
Start Scenario
POST to startscenario url results in marking the beginning of a new instance of the scenario. Curl provides two ways for passing the JSON contenta. Using a JSON file representing the scenario object
$ echo {scenarioName: \"curlScenario01\"} > scenarioName.json
$ curl -X POST -k -b $COOKIES -H 'Content-Type: application/json' -H 'Accept: application/json' 'https://<servername>:<port>/ccm/service/com.ibm.team.repository.service.serviceability.IScenarioRestService/scenarios/startscenario' -d @scenarioName.json > scenarioResponse.json
b. Using a JSON Object data directly in command line$ curl -X POST -k -b $COOKIES -H 'Content-Type: application/json' -H 'Accept: application/json' 'https://<servername>:<port>/ccm/service/com.ibm.team.repository.service.serviceability.IScenarioRestService/scenarios/startscenario' --data "{\"scenarioName\": \"curlScenario01\"}" > scenarioResponse.json
Every post creates a newer instance of the Scenario. The RESPONSE from the POST has the details of the instance.
Response from the POST above looks like this : {"scenarioName":"curlScenario01","scenarioInstanceId":"_4fTGABQTEemlX9f2gd8Dpw","scenarioHeaderKey":"x-com-ibm-team-scenario","scenarioHeaderValue":"_4fTGABQTEemlX9f2gd8Dpw%3Bname%3DcurlScenario01"}
scenarioHeaderValue in the above response shows which scenario this instance belongs to.
Run Scenario
Invoke the requests that are part of this scenario Here is an example request that invokes a work item query :$ curl -X GET -k -b $COOKIES https://<servername>:<port>/ccm/oslc/contexts/_kEYLgAUhEemlX9f2gd8Dpw/workitems -H 'Accept: application/rdf+xml'
Stop Scenario
$ curl -X POST -k -b $COOKIES -H 'Content-Type: application/json' -H 'Accept: application/json' -i 'https://<servername>:<port>/ccm/service_/com.ibm.team.repository.service.serviceability.IScenarioRestService/scenarios/stopscenario' -d @scenarioResponse.json
Counters get updated after the scenario stops.
Updated scenario and instance counts can be seen in the “scenarios” section of the application admin counters page, here is the URL:
https://<servername>:<port>/ccm/admin?internal#*action=com.ibm.team.repository.admin.viewCounters*
Example Scripts
- Resource_Intensive_Scenario_Windows_cURL_Batch_Examples_V2.zip: Example cURL scripts to login and to register a custom scenario
Using Java OSLC
Open source Java code is available in the Jazz Community project custom-expensive-scenario-notifier-oslc4j. The code can be deployed as application ESNOJ with executable JAR file esnoj.jar and comes with scripts to start and stop an expensive scenario. The scenario information is persisted in a file which allows to run any code required for the scenario. To deploy the code as executable JAR file follow the Filecom.ibm.js.team.monitoring.custom.oslc4j.expensivescenario/ReadMe - HowToRelease.txt.
The source code can be used in other Java Based applications. This is the primary purpose of this source code.
Considerations
The code in this project is based on OSLC4J and independent of libraries shipped with the CLM products. The time it takes to execute one of the commands from a command line is short compared to the next solution based on the Plain Java Client libraries. This solution is best used in build scripts or other occasions, where the code is called from a command line. The overhead is relatively minor and the tool is easily packaged in a jar file.- Consider using this, or the CURL based solution above in command line solutions.
- Consider using this code in Java applications that are based on OSLC4J and not based on RTC Plain Java Client Library code.
- This code works against the application CCM, RM, QM, other applications that are supported by OSLC4J can be added.
- The code works against systems with Jazz Authentication Server enabled.
- The code works against a clustered CCM server.
Syntax
The syntax is as follows-command expensiveScenario -url https://<server>:port/<context>/ -user <userId> -password <password> -scenarioName <scenarioName> -mode <mode>
Start Scenario
To start a scenario use parameter-command expensiveScenario -url https://clm.example.com:9443/ccm/ -user ADMIN -password **** -scenarioName MyCustomExpensiveScenario -mode start
Stop Scenario
To stop a scenario use parameter-command expensiveScenario -url https://clm.example.com:9443/ccm/ -user ADMIN -password **** -scenarioName MyCustomExpensiveScenario -mode stop
How the code works
Here are the details how to use the code in an application based on OSLC4J. The code provides the ClassExpensiveScenarioService that implements the interface IExpensiveScenarioService which basically manage the scenario registration information as string. The start command returns the JSON information about the registered expensive scenario as string. This string needs to be passed to the stop command as parameter to stop the expensive scenario.
The Class FilePersitentExpensiveScenarioService that implements the interface IPersistedExpensiveScenarioService handles the management of the scenario registration information and persists the information as a JSON file. The start command starts the scenario and stores the JSON information about the registered expensive scenario as file. This file is read by the stop command to stop the expensive scenario.
The main functionality is implemented in the class
com.ibm.js.team.monitoring.custom.oslc4j.expensivescenario.service.ExpensiveScenarioService.ExpensiveScenarioService(String, String)implementing the interface
com.ibm.js.team.monitoring.custom.oslc4j.expensivescenario.service.IExpensiveScenarioServiceTo register a resource intensive scenario instance, you need a client of type
org.eclipse.lyo.client.oslc.jazz.JazzFormAuthClient that is logged into the server.
It is neccessary to pass the scenario instance information received when starting the scenario to stop the instance. This is done by passing the string scenarioInstance. The following code sequence performs the instantiation, starts and stops the scenario instance using the conext URI "https://clm.example.com:9443/ccm/" and the scenarioname "MyScenario".
IExpensiveScenarioService expensiveScenarioService = new ExpensiveScenarioService(client, "https://clm.example.com:9443/ccm/", "MyScenario");
String scenarioInstance = expensiveScenarioService.start();
expensiveScenarioService.stop(scenarioInstance);
The code contains an implementation that persists the information in a local file. The implementation is in the class
com.ibm.js.team.monitoring.custom.oslc4j.expensivescenario.service.FilePersitentExpensiveScenarioService.FilePersitentExpensiveScenarioService(IExpensiveScenarioService)implementing the interface
com.ibm.js.team.monitoring.custom.oslc4j.expensivescenario.service.IPersistedExpensiveScenarioServiceThe class uses the interface
com.ibm.js.team.monitoring.custom.oslc4j.expensivescenario.service.IExpensiveScenarioService. To create an instance, pass an implementation, e.g. the one created above. The Interface provides start() and stop() methods. The methods also use the client of type org.eclipse.lyo.client.oslc.jazz.JazzFormAuthClient that is logged into the server. The class FilePersitentExpensiveScenarioService performs the scenario instance information handling by persisting it in a file.
IPersistedExpensiveScenarioService filePersistedExpensiveScenario = new FilePersitentExpensiveScenarioService(expensiveScenarioService);
filePersistedExpensiveScenario.start();
filePersistedExpensiveScenario.stop();
Also see the code in
com.ibm.js.team.monitoring.custom.oslc4j.expensivescenario.service.RegisterScenarioExample
Using the Plain Java Client Libraries
Open source Java code is available in the Jazz Community project custom-expensive-scenario-notifier-plainjava. Although the code can be deployed as standalone application and used in batch files, use one of the other available solutions mentioned here. The reason is that starting the Team Platform is relatively costly and comes with a penalty of several seconds. For demonstration purposes, the code can be deployed as application ESNPJ with executable JAR file esnpj.jar and comes with scripts to start and stop an expensive scenario. The scenario information is persisted in a file which allows to run any code required for the scenario. To deploy the code as executable JAR file follow the Filecom.ibm.js.team.monitoring.custom.expensivescenario/ReadMe - HowToRelease.txt.
The source code can be used in other Java Based applications. This is the primary purpose of this source code.
Considerations
The code in these projects is based on the RTC Plain Java Client Libraries shipped with the CLM products. The solution can work against all applications based on Jazz Foundation. The time it takes to execute one of the commands from a command line is approximately twice as long as the OSLC4J based solution. The reason is the initialization of the TeamPlatform. But in a situation where the TeamPlatform is already loaded and the user login has already been performed, only the code in com.ibm.js.team.monitoring.custom.service.expensivescenario has to be run which will be very fast. This solution is best used in Java server extensions or in Plain Java Client Libraries based automation, where the login into the team repository has already been performed, the TeamPlatform is already up and the ITeamRepository object is already available. It can be seamlessly integrated into such a scenario.- Consider using this, in Plain Java Client Library based extensions or automation.
- This code supports Open ID Connect or OIDC authentication and works against systems with Jazz Authentication Server enabled.
- The code seems to work against a clustered CCM server, but test have shown that the custom expensive scenarios are not shown. This is quite surprising and requires investigation.
Syntax
The syntax is as follows<publicURI> <userId> <password> mode <scenarionName>
Where mode is start or stop.
Start Scenario
To start a scenario use parameterhttps://clm.example.com:9443/ccm/ ADMIN **** start MyCustomExpensiveScenario
Stop Scenario
To stop a scenario use parameterhttps://clm.example.com:9443/ccm/ ADMIN **** stop MyCustomExpensiveScenario
How the code works
Here are the details how to use the code in an application based on the Plain Java Client Libraries. The code provides the ClassExpensiveScenarioService that implements the interface IExpensiveScenarioService which basically manages the scenario registration information as string. The start command returns the JSON information about the registered expensive scenario as string. This string needs to be passed to the stop command as parameter to stop the expensive scenario.
The Class FilePersitentExpensiveScenarioService that implements the interface IPersistedExpensiveScenarioService handles the management of the scenario registration information and persists the information as a JSON file. The start command starts the scenario and stores the JSON information about the registered expensive scenario as file. This file is read by the stop command to stop the expensive scenario.
The main functionality is implemented in the class
com.ibm.js.team.monitoring.custom.service.expensivescenario.ExpensiveScenarioService.ExpensiveScenarioService(ITeamRepository, String, String)implementing the interface
com.ibm.js.team.monitoring.custom.service.expensivescenario.IExpensiveScenarioService. To instanciate a resource intensive scenario instance, you need a teamRepository of type
com.ibm.team.repository.client.ITeamRepository that is logged into the server, the conext URI and a scenarioname.
It is neccessary to pass the scenario instance information received when starting the scenario to stop the instance. This is done by passing the string scenarioInstance. The following code sequence performs the instantiation, starts and stops the scenario instance using the conext URI "https://clm.example.com:9443/ccm/" and the scenarioname "MyScenario".
IExpensiveScenarioService expensiveScenarioService = new ExpensiveScenarioService(teamRepository,"https://clm.example.com:9443/ccm/", "MyScenario");
String scenarioInstance = expensiveScenarioService.start(client);
expensiveScenarioService.stop(client, scenarioInstance);
The code contains an implementation that persists the information in a local file. The implementation is in the class
com.ibm.js.team.monitoring.custom.service.expensivescenario.FilePersitentExpensiveScenarioService.FilePersitentExpensiveScenarioService(IExpensiveScenarioService)implementing the interface
com.ibm.js.team.monitoring.custom.service.expensivescenario.IPersistedExpensiveScenarioServiceThe class uses the interface
com.ibm.js.team.monitoring.custom.service.expensivescenario.IPersistedExpensiveScenarioService. To create an instance, pass an implementation, e.g. the one created above. The Interface provides start() and stop() methods. The class FilePersitentExpensiveScenarioService performs the scenario instance information handling by persisting it in a file.
IPersistedExpensiveScenarioService filePersistedExpensiveScenario = new FilePersitentExpensiveScenarioService(expensiveScenarioService);
filePersistedExpensiveScenario.start();
filePersistedExpensiveScenario.stop();
Also see the code in
com.ibm.js.team.monitoring.custom.service.expensivescenario.RegisterScenarioExample
Related topics: Deployment web home, CLM Managed Beans Reference, CLM Monitoring
External links:
- Resource_Intensive_Scenario_Windows_cURL_Batch_Examples_V2.zip: Example cURL scripts to login and to register a custom scenario
| I | Attachment | Action | Size | Date | Who | Comment |
|---|---|---|---|---|---|---|
| |
Enable_Mbean.png | manage | 255.4 K | 2019-03-05 - 12:35 | ShubjitNaik | |
| |
Repodebug_mbean.png | manage | 362.4 K | 2019-03-05 - 12:44 | ShubjitNaik | |
| |
Resource_Intensive_Scenario_Windows_cURL_Batch_Examples_V2.zip | manage | 1.9 K | 2019-04-01 - 08:41 | UnknownUser | Example cURL scripts to login and to register a custom scenario |
Contributions are governed by our Terms of Use. Please read the following disclaimer.
Dashboards and work items are no longer publicly available, so some links may be invalid. We now provide similar information through other means. Learn more here.

