Setting up a CCM and QM Applications Clustered Environment version 6.0.5 and later
Authors: MichaelAfshar, AlexBernstein, ChrisAustin, PrabhatGupta, YanpingChen, BreunReedBuild basis: CCM 6.0.5 to 6.0.6.1, 7.0.0 and later, QM 7.0.0 and later
Page contents
- Approach to clustering
- Modifying the MQTT advanced properties
- Configure HAProxy server as load balancer for clustered application / IoT MessageSight cluster
- A Note about configuring multiple clusters / clustered applications
- Configure high availability for HAProxy clusters
- Configure high availability for IoT MessageSight cluster
- Configuring IBM MessageSight and Clustered application in ELM for making SSL connections
- Configure IHS as Reverse Proxy
- Configure IHS for load balancing
- Clustering and DynaCache
- Distributed Cache Microservice (DCM) for clustered applications
- Cluster Node URLs (Release 7.0 or later)
- Troubleshooting the cluster
You can set up a clustered environment to host a Jazz Team Server and multiple Change and Configuration Management (CCM) and/or multiple Quality Management (QM) nodes.
For instructions on setting up a clustered environment in version 6.0.4, see Change and Configuration Management clustered environment version 6.0.4
Clustering for QM application is available from ELM v7.0.
Note:
1. Examples in this document refer to CCM application but they also apply to the QM application.
2. For instructions on upgrading clustered applications, see Upgrading clustered applications
Approach to clustering
Clustered application such as CCM and QM must be installed on multiple servers and connected by using an MQTT broker, which enables synchronization across the nodes.A load balancer is used as a front-end URL, which accepts connections and distributes the requests to one of the back-end nodes.
The host name of the load balancer is used as public URL for the CCM or QM applications during setup.
Distributed Cache Microservice provides data-sharing capabilities for the application running on multiple cluster nodes.
- The following diagram (from EWM clustering pattern) illustrates the approach to clustering:
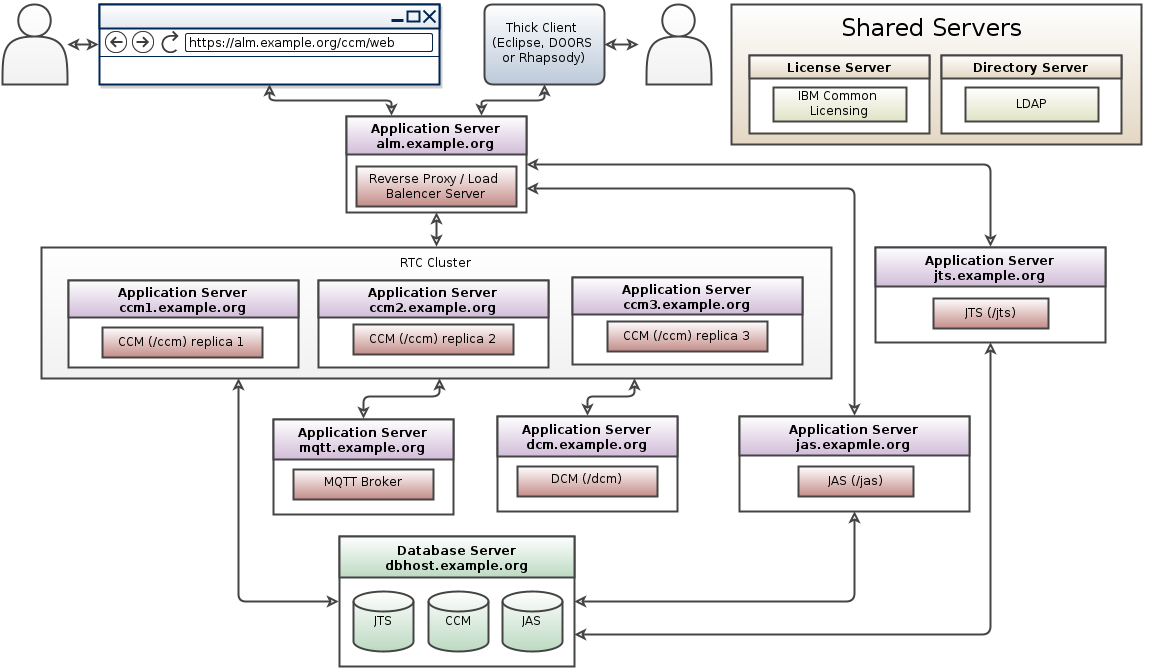
- To ensure proper operation (to preserve session affinity) of clustered application, users must never access the application on individual nodes directly (with the exception of "repodebug" service). Only application's public URL must be used.
- The topology diagram specifically calls out that when adopting Clustering, the following applications are running in a WebSphere Liberty Profile; (a) Jazz Team Server (b) each CCM or QM Node (c) Authorization Server. This is the supported configuration.
- It is always recommended that at the very minimum you provide process isolation (separate profiles) for the applications. Placing all of the applications in a single Liberty profile (for example) means they share the Java Virtual Machine, and it is very difficult to determine what is causing you to run out of resources. Further, you can't individually tune the different parts of the system based on your use cases. To give yourself maximum flexibility, you should consider deploying each application on its own server. This allows you to size the individual machines according to the load you are putting on them. With virtualization, this becomes much easier to do. Take the Distributed Cache Microservice (DCM), it can be deployed on the same server as the Jazz Team Server and for some use cases, this might work for you, but there are some user loads that will require DCM to consume more server resources and in that case, you might want to consider putting it on its own server. Remember, even with separate profiles, you are still competing for resources on an individual machine. You can carve up RAM but not Disk or CPU. To ensure that each application has what it needs, you must monitor the applications and consider dedicated (real or virtual) machines for each. See our article on how to monitor your RTC cluster for some additional information.
Modifying the MQTT advanced properties
You can set or modify the default MQTT related service properties on the application's Advanced Properties page:- Log in to the application (CCM or QM) server as an administrator.
- Click Application > Advanced Properties.
- Search for
com.ibm.team.repository.service.mqtt.internal.MqttService. - Click Edit in the title bar and modify each entry. Click Preview in the title bar to exit the edit mode and save your changes. The following table list all MQTT properties:
| Property | Description |
|---|---|
| MQTT Broker address | The address of the MQTT (MQ Telemetry Transport) broker. If not provided, clustering support will be disabled. |
| Session persistence location | The location (the folder) where the "in-flight" messages will be stored if file-persistent location is enabled. Default is mqtt sub-folder under server folder. |
| Unique cluster name | This property can be used to uniquely name your cluster. This property must be set when there are more than one clusters communicating through the same MQTT message broker, or when there are more than one cluster-enabled application on the same cluster. If not provided, the port number of MQTT message broker will be used, but that may not be adequate. |
| Maximum size of a single MQTT message | Maximum size, in KB, of a single MQTT message. This value must be smaller by several Kilobytes than the Max Message Size specified by the endpoint of MQTT Broker in use. |
| Enable file-based persistence | Enabling file-based persistence will cause published MQTT messages to be saved, until the message is confirmed to be delivered. If a node goes down and restarted, or failed connection to MQTT broker is restored, persisted messages with QoS 1 and 2 will be resent. |
| Block when broker is not available | When the service cannot connect to the MQTT Broker for any reason, all service calls will be blocked and not return until the broker becomes available. |
| Enable in-memory MQTT message | Message logging causes the last received message for each topic to be retained in memory for debug access. |
| MQTT message log size | Number of messages to store in the MQTT message log. |
| Maximum callback processing | Maximum number of concurrent background threads to use for processing incoming MQTT messages. Must be greater than minimum. |
| Minimum callback processing | Minimum number of concurrent background threads to use for processing incoming MQTT messages. |
| Queue size | This queue will hold background tasks submitted to process the incoming MQTT messages until a callback processing thread becomes available. |
JAVA_OPTS="$JAVA_OPTS -Dclient.pool.size=N"
| Property | Description |
|---|---|
| File path of TrustStore which contains entry for IoT MessageSight Server Certificate | The absolute path of the file that contains the KeyStore object that you want the TrustManager to use. User can also specify this value in JVM system property 'javax.net.ssl.trustStore' if not specified here. System will first give priority to the value specified here. |
| SSL Protocol for MQTT connections | SSL Protocol to use for connection. Example TLSv1, TLSv1.1, TLSv1.2. |
| TrustManager Algorithm for TrustStore | Sets the algorithm that will be used to instantiate a TrustManagerFactory object instead of using the default algorithm available in the platform. Example values: "PKIX" or "IBMJ9X509". User can also specify this value in JVM system property 'ssl.TrustManagerFactory.algorithm' if not specified here. System will first give priority to the value specified here. If not specified anywhere, the platform will try to pick the best possible value on its own. |
| TrustStore Password | The password for the TrustStore object that you want the TrustManager to use. User can also specify this value in JVM system property 'javax.net.ssl.trustStorePassword' if not specified here. System will first give priority to the value specified here. |
| TrustStore Provider | The TrustStore provider, for example "IBMJCE" or "IBMJCEFIPS". If not specified, the platform will try to pick the best possible value on its own. |
| TrustStore Type | The type of KeyStore object that you want the default TrustManager to use. Possible values: "PKCS12", "JKS", or "JCEKS". User can also specify this value in JVM system property 'javax.net.ssl.trustStoreType' if not specified here. System will first give priority to the value specified here. |
Configure HAProxy server as load balancer for clustered application / IoT MessageSight cluster
Installation and setup instruction for HAProxy server can be found in the Interactive Installation Guide. In the SVT Single JTS topology, HAProxy server connects to CCM or QM cluster and JAS cluster in http mode, and connects to IoT MessageSight cluster in tcp and http (6.0.6 and later only) mode. The connection information need to be configured in HAProxy_Install_Dir/haproxy.cfg file. The following example shows how to define http connection and tcp connection in haproxy.cfg file. While a single IoT MessageSight server can also be fronted by HAProxy, this is usually only needed if IoT MessageSight runs in High Availability mode.
HAProxy_Install_Dir/haproxy.cfg

  # connect JAS cluster in http mode
  frontend jas-proxy
    bind  *:80
    bind  *:9643 ssl crt /etc/haproxy/ssl/proxy.pem no-sslv3
    log   global
    option httplog
    mode  http
    capture  cookie SERVERID len 32
    redirect scheme https if !{ ssl_fc }
    maxconn 2000 # The expected number of the users of the system.
    default_backend jas
  backend jas
    option forwardfor
    http-request set-header X-Forwarded-Port %[dst_port]
    http-request add-header X-Forwarded-Proto https if { ssl_fc }
    fullconn 1000         # if not specified, HAProxy will set this to 10% of 'maxconn' specified on the frontend
    balance leastconn
    cookie SERVERID insert indirect nocache secure attr "SameSite=Strict"
   server jas1 [JAS server 1 URI]:9643 minconn 100 maxconn 500 ssl check cookie jas1 verify none
   server jas2 [JAS server 2 URI]:9643 minconn 100 maxconn 500 ssl check cookie jas2 verify none

  # connect MessageSight cluster in tcp mode (N servers if HA mode, or a single server if IoT MessageSight just must be fronted by proxy)
  listen MessageSight
    bind *:1883
    mode tcp
    balance leastconn
    option tcplog
    server MessageSight1 [MessageSight server 1 URI]:1883 check
    server MessageSight2 [MessageSight server 2 URI]:1883 check

  # connect MessageSight cluster in HTTP mode to allow gathering of MQTT statistics (6.0.6 and newer only) (N servers if HA mode, or a single server if IoT MessageSight just must be fronted by proxy)
  listen MessageSight_REST
    bind *:9089 ssl crt /etc/haproxy/ssl/msigh.pem no-sslv3     # Port (9089) must match that configured in MessageSight, and the same port needs to be specified in MQTTStatsService advanced property
    mode http
    option tcp-check     # Must tell HAProxy to use TCP port to do health checks
    balance leastconn
   # Same number of entries and same servers as in the section above:
    server MessageSight_REST1 [MessageSight server 1 URI]:9089 check port 1883          # Same ports (1883 and 9089) as used elsewhere in this file.
    server MessageSight_REST2 [MessageSight server 2 URI]:9089 check port 1883          # Same ports (1883 and 9089) as used elsewhere in this file.
After HAProxy server is restarted, HAProxy Stats for HAProxy Cluster1 and HAProxy Cluster2 in SVT Single JTS topology should be like the following:
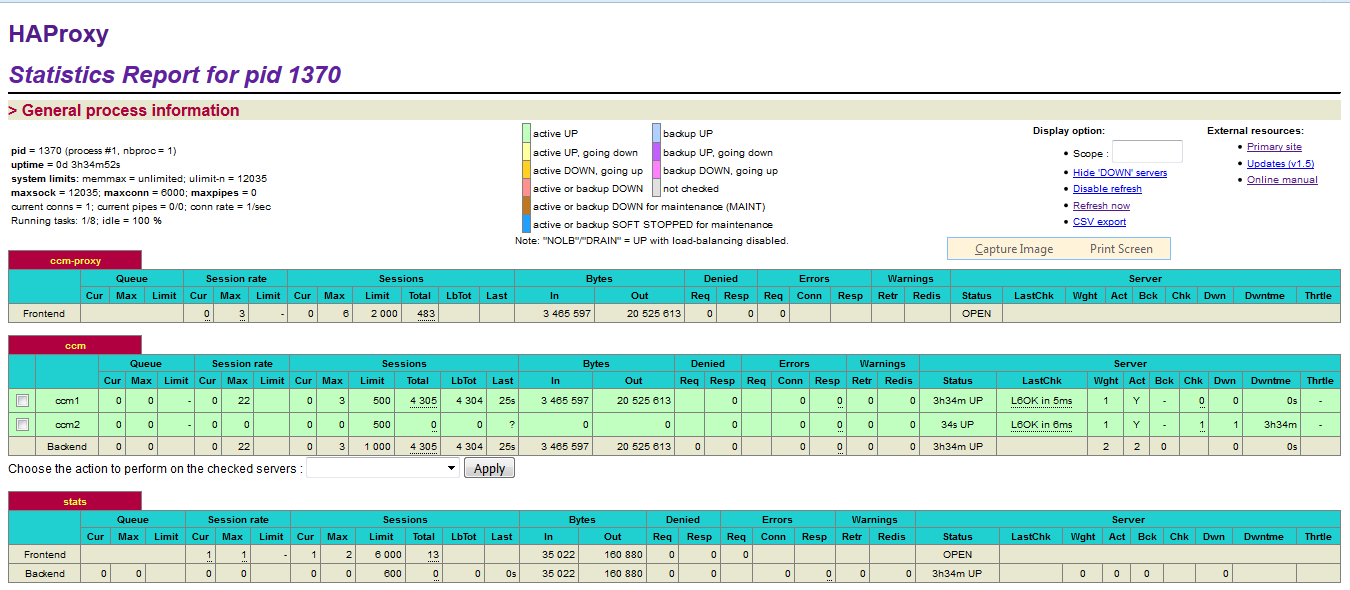
 Note: The MessageSight1 instance is online. Therefore, MessageSight2 is offline since it serves as non-primary standby message server in our HA configuration. On failure of the active appliance, the standby appliance activates itself by constructing the IBM MessageSight server state from the data in the store.
Note: The screenshots do not show the MessageSight_REST section.
Note: The MessageSight1 instance is online. Therefore, MessageSight2 is offline since it serves as non-primary standby message server in our HA configuration. On failure of the active appliance, the standby appliance activates itself by constructing the IBM MessageSight server state from the data in the store.
Note: The screenshots do not show the MessageSight_REST section.
A Note about configuring multiple clusters / clustered applications
If more than one application is to be clustered, few additional configuration changes are required.- The
"Unique cluster name"property (see above) must be explicitly set for each cluster.
HAProxy
If a single instance of HAProxy is to manage traffic to more than one application/cluster, the configuration file must have several backend sections (one per application/cluster). Incoming traffic needs to be diverged to the appropriate backend based on some conditions such as context root part of the URL of an incoming request. For example, in the "frontend" section:
    acl ccm1AppPrefix  path_beg  /ccm1
    acl ccm1AppDir      path_dir    /ccm1
    acl ccm2AppPrefix  path_beg  /ccm2
    acl ccm2AppDir      path_dir    /ccm2

    use_backend ccm1_cluster     if ccm1AppPrefix  ccm1AppDir
    use_backend ccm2_cluster     if ccm2AppPrefix  ccm2AppDir
[...]
And in the backend sections:
backend ccm1_cluster
[...]
http-response set-header X-Cluster-SA CCM1_SERVERID
cookie CCM1_SERVERID insert indirect nocache secure attr "SameSite=Strict"

 server ccm1_node1 ccm1host1.company.com:9443 maxconn 500 minconn 100 ssl check cookie ccm1_node1 verify ...
 server ccm1_node2 ccm1host2.company.com:9443 maxconn 500 minconn 100 ssl check cookie ccm1_node2 verify ...
[...]

backend ccm2_cluster
[...]
http-response set-header X-Cluster-SA CCM2_SERVERID
cookie CCM2_SERVERID insert indirect nocache secure attr "SameSite=Strict"

 server ccm2_node1 ccm2host1.company.com:9443 maxconn 500 minconn 100 ssl check cookie ccm2_node1 verify ...
 server ccm2_node2 ccm2host2.company.com:9443 maxconn 500 minconn 100 ssl check cookie ccm2_node2 verify ...
[...]
Notice how each backend uses its own session identification cookie, and how the cookie name must be inserted into X-Cluster-SA header.
Configure high availability for HAProxy clusters
We use the Keepalived service and a virtual IP address that would be shared between the primary and secondary HAProxy nodes to setup high availability. We use a script master_backup.sh to check status of HAProxy server nodes and to do the switch between the primary and secondary nodes. Example of Keepalived_Install_Dir/keepalived.conf and Keepalived_Install_Dir/master_backup.sh are as following:
Keepalived_Install_Dir/keepalived.conf

  ! Configuration File for keepalived
  vrrp_script chk_haproxy {
   script "killall -0 haproxy"
   interval 2
   weight 2
  }
  vrrp_instance VI_1 {
    state MASTER  # BACKUP on the stand-by node
    interface eno192 # To be replaced by real interface number
    virtual_router_id 11
    priority 101  # 100 on the stand-by node
    virtual_ipaddress {
       10.10.10.20/24 # To be replaced by real cluster ViP
    }
    notify_master "/etc/keepalived/master_backup.sh MASTER"
    notify_backup "/etc/keepalived/master_backup.sh BACKUP"
    notify_fault "/etc/keepalived/master_backup.sh FAULT"
    track_script {
   chk_haproxy
    }
  }

Keepalived_Install_Dir/master_backup.sh

  #! /bin/bash
  STATE=$1
  NOW=$(date)
  KEEPALIVED="/etc/keepalived"
  case $STATE in
   "MASTER") touch $KEEPALIVED/MASTER
        echo "$NOW Becoming MASTER" >> $KEEPALIVED/COUNTER
        /bin/systemctl start haproxy
        exit 0
        ;;
   "BACKUP") echo "$NOW Becoming BACKUP" >> $KEEPALIVED/COUNTER
        /bin/systemctl stop haproxy || killall -9 haproxy
        exit 0
        ;;
   "FAULT") echo "$NOW Becoming FAULT" >> $KEEPALIVED/COUNTER
        /bin/systemctl stop haproxy || killall -9 haproxy
        exit 0
        ;;
   *)      echo "unknow state" >> $KEEPALIVED/COUNTER
        echo "NOW Becoming UNKNOWN" >> $KEEPALIVED/COUNTER
        exit 1
        ;;
  esac
Configure high availability for IoT MessageSight cluster
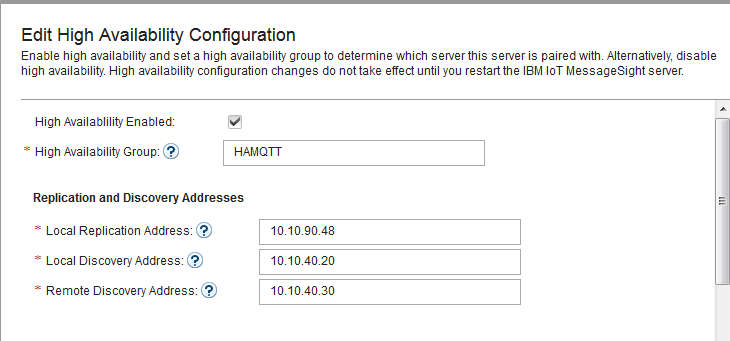
Before configure high availability for IoT MessageSight servers, we need to add two additional vNICs to each IoT MessageSight node. One for discovery interface, and the other one for replication interface. The discovery IP should be in the same subnet as the hosts IP, and the replication IP should be in a different subnet. For example, we can have additional vNICs like this:| Address | Hostname |
|---|---|
| 10.10.40.1 | MessageSight1 |
| 10.10.40.20 | MessageSight1-discover |
| 10.10.90.48 | MessageSight1-replicate |
| 10.10.40.2 | MessageSight2 |
| 10.10.40.30 | MessageSight2-discover |
| 10.10.90.49 | MessageSight2-replicate |
- For each IoT MessageSight node, install the non-Dockerized version of IoT MessageSight and configure it according to the Interactive Installation Guide using IoT MessageSight Web UI.
- Disable all existing endpoints.
- In IoT MessageSight Web UI, do the following on MessageSight1 node (the primary node):
- Select Server > High Availability, then click Edit in Configuration section.
- Configure the server as follows, then Save.
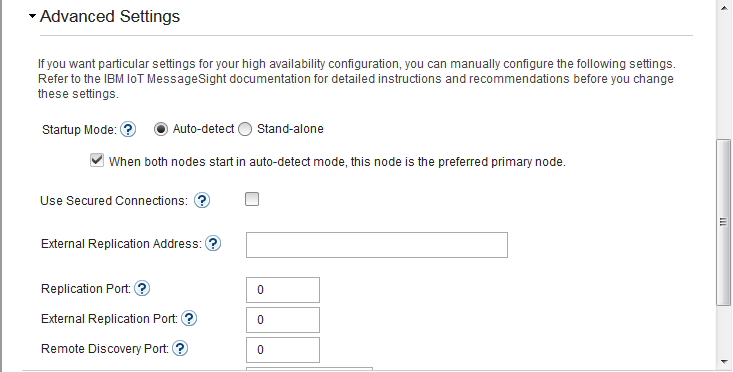
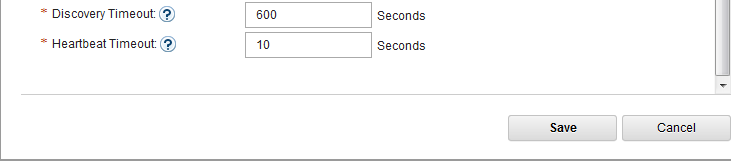
-
- Switch to MessageSight2(the standby node).
- Select Server > High Availability, then click Edit in Configuration section.
- Configure the server as follows, then Save.


-
- Switch to MessageSight1, restart the server in Clean store mode: select Server > Server Control, then click Clean store in the IoT MessageSight Server section
- Switch back to MessageSight2 and restart the server in Clean store mode. Make sure there is no error in node synchronization.
- Switch to MessageSight1, enable endpoints then restart the server in Clean store mode again.
* Configuring your system for high availability
* Configuring MessageSight by using the Web UI
* Configuring MessageSight by using REST Administration APIs
To setup communication between the application cluster and IoT MessageSight cluster, add the following lines to APP_Install_Dir/server/server.startup file:
APP_Install_Dir/server/server.startup

  JAVA_OPTS="$JAVA_OPTS -Dcom.ibm.team.repository.cluster.nodeId="To be replaced by a unique CCM or QM node id""
  JAVA_OPTS="$JAVA_OPTS -Dcom.ibm.team.repository.service.internal.db.allowConcurrentAccess=true"
  JAVA_OPTS="$JAVA_OPTS -Dretry.count=0"
  JAVA_OPTS="$JAVA_OPTS -Dretry.wait=10"
Add the following line to APP_Install_Dir/server/conf/app/teamserver.properties file (where app is CCM or QM):
APP_Install_Dir/server/conf/appwork/teamserver.properties

  com.ibm.team.repository.mqtt.broker.address=tcp\://[HAProxy cluster 2 visual IP]\:1883
Configuring IBM MessageSight and Clustered application in ELM for making SSL connections
This section will help you configure IBM MessageSight and clustered application like CCM or QM for making SSL connections between them. Note: It is important that you setup the clustered application first for specifying the SSL configuration for MQTT and then only you need to make changes on IBM MessageSight for specifying security profile. If you try to setup clustered application after setting up IBM MessageSight, it will not get initialized properly and user will not be able to login to application. Certificates: For setting up SSL connections between IBM MessageSight and clustered application, you would need a PEM file for IBM MessageSight and a TrustStore file for clients (clustered CCM or QM nodes in this case). The client TrustStore will have the server certificate details. For generating these files, refer the steps below (Sample as executed on Linux machine):- Create the server certificate and key by specifying your new passphrase:
openssl req -x509 -newkey rsa:4096 -keyout server.key -out server.crt -days 365
- Generate PEM file from the server key and certificate.
cat server.key server.crt >> server.pem
- Create the TrustStore using keytool command for the server certificate. You will be required to enter the server passphrase.
[Java Bin Path]/keytool -import -file server.crt -alias <MQTT Server alias> -keystore mqttTrustStore.ks
For example:keytool -import -file server.crt alias mqttServer -keystore mqttTrustStore.ks
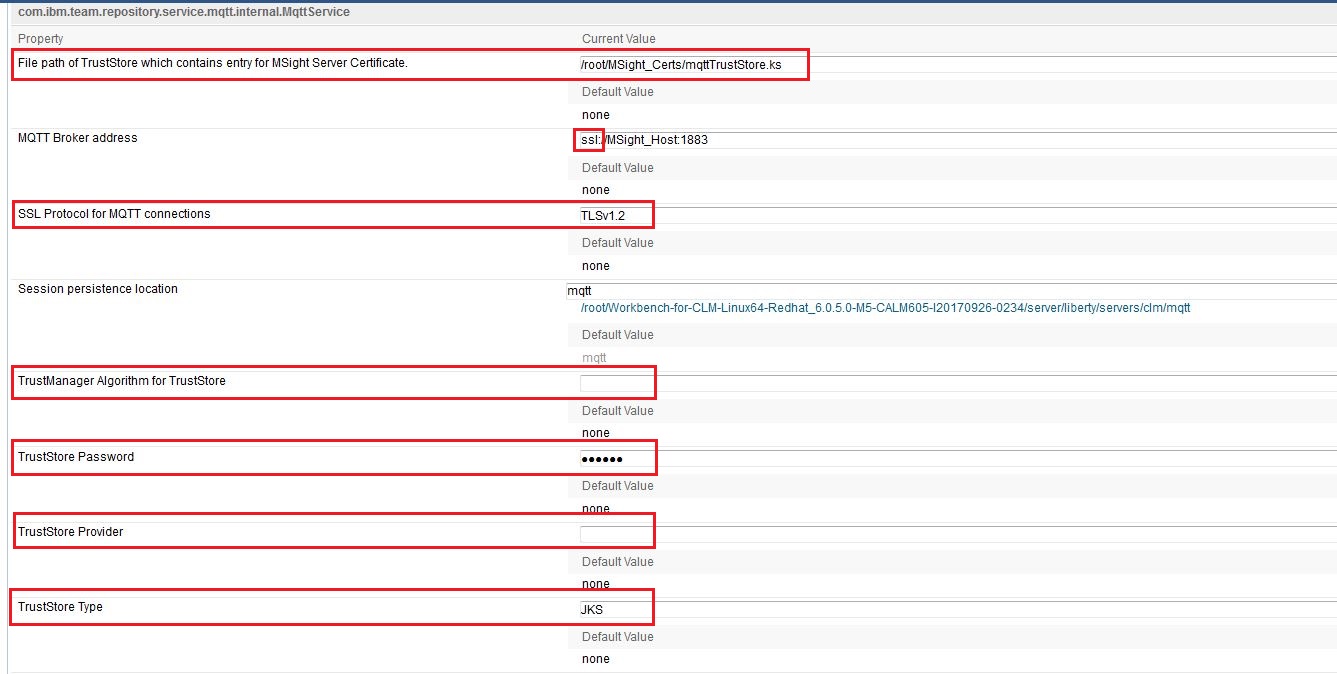
- SSL Protocol for MQTT connections: SSL Protocol to use for connection. Example TLSv1, TLSv1.1, TLSv1.2. Please note that this value should match with the protocol which user will specify on IBM MessageSight console while configuring security profile.
- File path of TrustStore which contains entry for MSight Server Certificate: The absolute path of the file that contains the KeyStore object that you want the TrustManager to use. User can also specify this value in JVM system property 'javax.net.ssl.trustStore' if not specified here. System will first give priority to the value specified here.
- TrustStore Type: The type of KeyStore object that you want the default TrustManager to use. Possible values: "PKCS12", "JKS", or "JCEKS". User can also specify this value in JVM system property 'javax.net.ssl.trustStoreType' if not specified here. System will first give priority to the value specified here.
- TrustStore Password: The password for the TrustStore object that you want the TrustManager to use. User can also specify this value in JVM system property 'javax.net.ssl.trustStorePassword' if not specified here. System will first give priority to the value specified here.
- TrustStore Provider: The TrustStore provider, for example "IBMJCE" or "IBMJCEFIPS". If not specified, the platform will try to pick the best possible value on its own.
- TrustManager Algorithm for TrustStore: Sets the algorithm that will be used to instantiate a TrustManagerFactory object instead of using the default algorithm available in the platform. Example values: "PKIX" or "IBMJ9X509". User can also specify this value in JVM system property 'ssl.TrustManagerFactory.algorithm' if not specified here. System will first give priority to the value specified here. If not specified anywhere, the platform will try to pick the best possible value on its own.
- Advanced properties for MQTTService:
- Create a Certificate Profile and then create a Security Profile by linking the created Certificate Profile.
* Creating Certificate Profile:
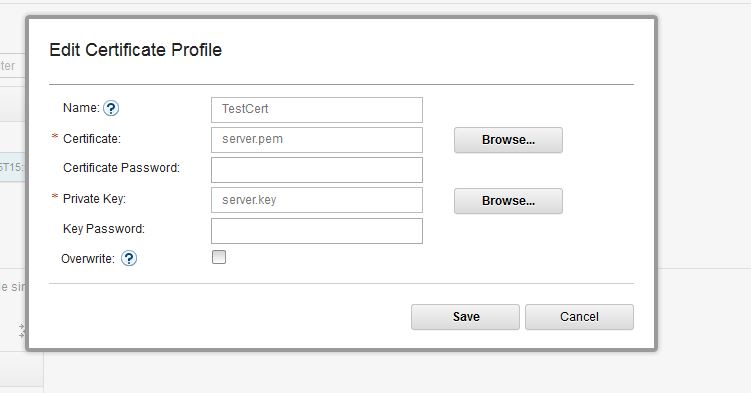
* Creating Security Profile:
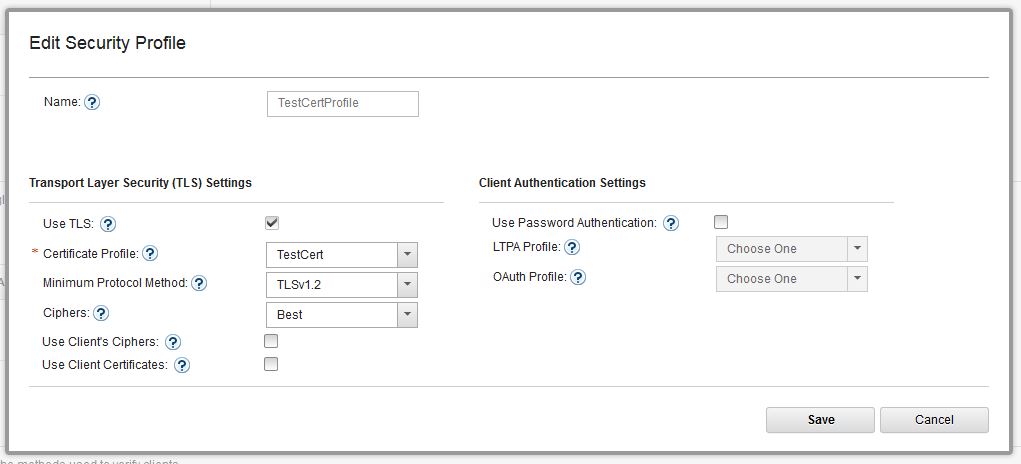
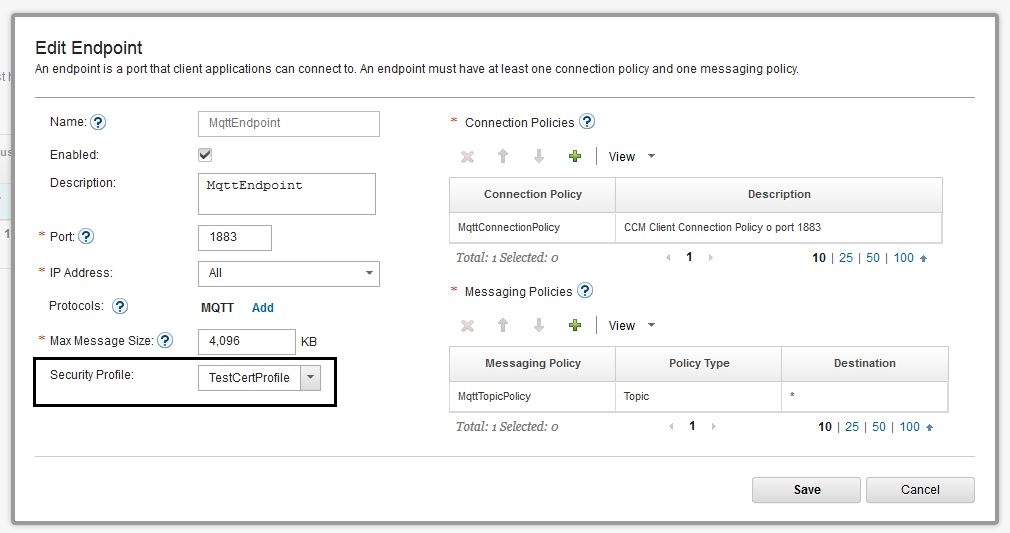
- Finally link the security profile to endpoint.
* Endpoint with Security Profile:
Configure IHS as Reverse Proxy
Note: This section describes about configuring IHS only as a reverse proxy and not for load balancing between clustered nodes. You can also configure IHS to load balance between clustered nodes along with reverse proxy which will be described in next section.- Setup IHS proxy server on a remote web server.
- Configure ELM Plugins for each WAS based ELM applications.
- Configure IHS for all Liberty based Apps, and for both HAProxy clusters.
- In case that the non WAS based applications require different ports, define the ports in HTTPServer_Install_Dir/conf/httpd.conf file and WebSphere_Plugins_Install_Dir/config/webserver1/plugin-cfg.xml. For example, to define port 9643, add the following into httpd.conf file and plugin-cfg.xml files:
HTTPServer_Install_Dir/conf/httpd.conf Listen 0.0.0.0:9643 <VirtualHost *:9643> SSLEnable </VirtualHost> KeyFile HTTPServer_Install_Dir/ihskeys.kdb SSLStashFile HTTPServer_Install_Dir/ihskeys.sth SSLDisable WebSphere_Plugins_Install_Dir/Plugins/config/webserver1/plugin-cfg.xml <VirtualHostGroup Name="default_host"> <VirtualHost Name="*:9443"/> <VirtualHost Name="*:9444"/> <VirtualHost Name="*:9643"/> </VirtualHostGroup> - In the plugin-cfg.xml file, add access information for each of the non WAS based applications/clusters. For a cluster, only one entry is required. In the SVT Single JTS topology, we need entries for JTS, HAProxy cluster1, and HAProxy cluster2. An example is as following:
WebSphere_Plugins_Install_Dir/Plugins/config/webserver1/plugin-cfg.xml <ServerCluster Name="JTS" ServerIOTimeoutRetry="-1" CloneSeparatorChange="false" LoadBalance="Round Robin" GetDWLMTable="false" PostBufferSize="0" IgnoreAffinityRequests="false" PostSizeLimit="-1" RemoveSpecialHeaders="true" RetryInterval="60"> <Server Name="jts" ConnectTimeout="0" ExtendedHandshake="false" ServerIOTimeout="900" LoadBalanceWeight="1" MaxConnections="-1" WaitForContinue="false"> <Transport Protocol="https" Port="9443" Hostname="To be replaced by JTSs URL" > <Property name="keyring" value="HTTPServer_Install_Dir/ihskeys.kdb"/> <Property name="stashfile" value="HTTPServer_Install_Dir/ihskeys.sth"/> </Transport> </Server> </ServerCluster> <UriGroup Name="jts_URIs"> <Uri Name="/jts/*" AffinityURLIdentifier="jsessionid" AffinityCookie="JSESSIONID"/> <Uri Name="/clmhelp/*" AffinityURLIdentifier="jsessionid" AffinityCookie="JSESSIONID"/> </UriGroup> <Route VirtualHostGroup="default_host" UriGroup="jts_URIs" ServerCluster="JTS"/> <ServerCluster Name="ccm_cluster_server1" ServerIOTimeoutRetry="-1" CloneSeparatorChange="false" LoadBalance="Round Robin" GetDWLMTable="false" PostBufferSize="0" IgnoreAffinityRequests="false" PostSizeLimit="-1" RemoveSpecialHeaders="true" RetryInterval="60"> <Server Name="ccm_cluster_server1" ConnectTimeout="0" ExtendedHandshake="false" ServerIOTimeout="900" LoadBalanceWeight="1" MaxConnections="-1" WaitForContinue="false"> <Transport Protocol="https" Port="9443" Hostname="To be replaced by the visual IP that defined for HAProxy cluster1" > <Property name="keyring" value="HTTPServer_Install_Dir/ihskeys.kdb"/> <Property name="stashfile" value="HTTPServer_Install_Dir/ihskeys.sth"/> </Transport> </Server> </ServerCluster> <UriGroup Name="ccm_server_Cluster_URIs"> <Uri Name="/ccmwork/*" AffinityURLIdentifier="jsessionid" AffinityCookie="JSESSIONID"/> </UriGroup> <Route VirtualHostGroup="default_host" UriGroup="ccm_server_Cluster_URIs" ServerCluster="ccm_cluster_server1"/> <ServerCluster Name="haproxy_server1_status" ServerIOTimeoutRetry="-1" CloneSeparatorChange="false" LoadBalance="Round Robin" GetDWLMTable="false" PostBufferSize="0" IgnoreAffinityRequests="false" PostSizeLimit="-1" RemoveSpecialHeaders="true" RetryInterval="60"> <Server Name="haproxy_server1" ConnectTimeout="0" ExtendedHandshake="false" ServerIOTimeout="900" LoadBalanceWeight="1" MaxConnections="-1" WaitForContinue="false"> <Transport Protocol="https" Port="9444" Hostname="To be replaced by the visual IP that defined for HAProxy cluster1" > <Property name="keyring" value="HTTPServer_Install_Dir/ihskeys.kdb"/> <Property name="stashfile" value="HTTPServer_Install_Dir/ihskeys.sth"/> </Transport> </Server> </ServerCluster> <UriGroup Name="haproxy_server1_Cluster_URIs"> <Uri Name="/haproxy1_stats" AffinityURLIdentifier="jsessionid" AffinityCookie="JSESSIONID"/> </UriGroup> <Route VirtualHostGroup="default_host" UriGroup="haproxy_server1_Cluster_URIs" ServerCluster="haproxy_server1_status"/> <ServerCluster Name="jas_cluster_server1" ServerIOTimeoutRetry="-1" CloneSeparatorChange="false" LoadBalance="Round Robin" GetDWLMTable="false" PostBufferSize="0" IgnoreAffinityRequests="false" PostSizeLimit="-1" RemoveSpecialHeaders="true" RetryInterval="60"> <Server Name=" jas_server1" ConnectTimeout="0" ExtendedHandshake="false" ServerIOTimeout="900" LoadBalanceWeight="1" MaxConnections="-1" WaitForContinue="false"> <Transport Protocol="https" Port="9643" Hostname="To be replaced by the visual IP that defined for HAProxy cluster2" > <Property name="keyring" value="HTTPServer_Install_Dir/ihskeys.kdb"/> <Property name="stashfile" value="HTTPServer_Install_Dir/ihskeys.sth"/> </Transport> </Server> </ServerCluster> <UriGroup Name=" jas_cluster_server1_URIs"> <Uri Name="/oidc/*" AffinityURLIdentifier="jsessionid" AffinityCookie="JSESSIONID"/> <Uri Name="/jazzop/*" AffinityURLIdentifier="jsessionid" AffinityCookie="JSESSIONID"/> </UriGroup> <Route VirtualHostGroup="default_host" UriGroup=" jas_cluster_server1_URIs" ServerCluster="jas_cluster_server1"/> <ServerCluster Name="haproxy_server2_stats" ServerIOTimeoutRetry="-1" CloneSeparatorChange="false" LoadBalance="Round Robin" GetDWLMTable="false" PostBufferSize="0" IgnoreAffinityRequests="false" PostSizeLimit="-1" RemoveSpecialHeaders="true" RetryInterval="60"> <Server Name="haproxy_server2_stats" ConnectTimeout="0" ExtendedHandshake="false" ServerIOTimeout="900" LoadBalanceWeight="1" MaxConnections="-1" WaitForContinue="false"> <Transport Protocol="https" Port="9444" Hostname="To be replaced by the visual IP that defined for HAProxy cluster2" > <Property name="keyring" value="HTTPServer_Install_Dir/ihskeys.kdb"/> <Property name="stashfile" value="HTTPServer_Install_Dir/ihskeys.sth"/> </Transport> </Server> </ServerCluster> <UriGroup Name="haproxy_server2_stats_Cluster_URIs"> <Uri Name="/haproxy2_stats" AffinityURLIdentifier="jsessionid" AffinityCookie="JSESSIONID"/> </UriGroup> <Route VirtualHostGroup="default_host" UriGroup="haproxy_server2_stats_Cluster_URIs" ServerCluster="haproxy_server2_stats"/> - Import certificates for each of the non WAS based applications/clusters/haproxy into IHSs keystore.
- Restart IHS.
- In case that the non WAS based applications require different ports, define the ports in HTTPServer_Install_Dir/conf/httpd.conf file and WebSphere_Plugins_Install_Dir/config/webserver1/plugin-cfg.xml. For example, to define port 9643, add the following into httpd.conf file and plugin-cfg.xml files:
Configure IHS for load balancing
This section provides information on how we can configure and use IHS for load balancing in a clustered environment. It will illustrate the configurations considering Liberty based ELM applications. It is important to note that if IHS is planned to be used for load balancing clustered application, then HAproxy should not be used for the same. Either of the one should be present in the topology for load balancing but not both.- Update the Liberty server.xml configuration file on each clustered node with the unique cloneId. Update the httpSession tag in server.xml file in all the clustered nodes to add cloneId field as shown below. Its the clone identifier of the cluster member. Within a cluster, this identifier must be unique for each node to maintain session affinity. When set, this name overwrites the default name generated by the server. The same cloneId will then be used in the Web Plugin configuration to identify affinity requests.
<httpSession invalidateOnUnauthorizedSessionRequestException="true" cookieSecure="true" cloneId="ccm1" useContextRootAsCookiePath="true"/>If the other ELM applications (apart from this clustered ELM application) are fronted by the same IHS, then you must update the server.xml file for each application (clustered and non-clustered) that is going to be fronted by this IHS to add theuseContextRootAsCookiePath="true"attribute in the "httpSession" tag. This is used to ensure that the session affinity identifier does not get over-written in JSESSIONID by other applications with the same hostname (that is, IHS/ proxy hostname in this case). For non-clustered applications, the tag in the server.xml looks like:<httpSession invalidateOnUnauthorizedSessionRequestException="true" cookieSecure="true" useContextRootAsCookiePath="true"/> - Update the Web Plugin plugin-cfg.xml to
- Specify Cluster servers and the load balancing algorithm
- Specify the cloneId for each server as mentioned in their server.xml in liberty respectively for managing session affinity.
<ServerCluster CloneSeparatorChange="false" LoadBalance="Round Robin" IgnoreAffinityRequests="false" Name="ccm_server_Cluster" PostSizeLimit="-1" RemoveSpecialHeaders="true" RetryInterval="60" PostBufferSize="64">
   <Server CloneID="ccm1" ConnectTimeout="5" ExtendedHandshake="false" LoadBalanceWeight="500" MaxConnections="100" Name="ccm1_node" WaitForContinue="false" ServerIOTimeout="600">
      <Transport Hostname="To be replaced by hostname of the clustered node1" Port="9443" Protocol="https">
         <Property Name="keyring" Value="HTTPServer_Install_Dir/ihskeys.kdb"/>
         <Property Name="stashfile" Value="HTTPServer_Install_Dir/ihskeys.sth"/>
      </Transport>
   </Server>
   <Server CloneID="ccm2" ConnectTimeout="5" ExtendedHandshake="false" LoadBalanceWeight="499" MaxConnections="100" Name="ccm2_node" WaitForContinue="false" ServerIOTimeout="600">
      <Transport Hostname="To be replaced by hostname of the clustered node2" Port="9443" Protocol="https">
         <Property Name="keyring" Value="HTTPServer_Install_Dir/ihskeys.kdb"/>
         <Property Name="stashfile" Value="HTTPServer_Install_Dir/ihskeys.sth"/>
      </Transport>
   </Server>
   <PrimaryServers>
      <Server Name="ccm1_node"/>
      <Server Name="ccm2_node"/>
   </PrimaryServers>
</ServerCluster>
<UriGroup Name="ccm_server_Cluster_URIs">
   <Uri AffinityCookie="JSESSIONID" AffinityURLIdentifier="jsessionid" Name="/ccm/*"/>
</UriGroup>
<Route ServerCluster="ccm_server_Cluster" UriGroup="ccm_server_Cluster_URIs" VirtualHostGroup="default_host"/>
To get more information about configuration parameters used in IHS and liberty, see the following documents: * Understanding IBM HTTP Server plug-in Load Balancing in a clustered environment
* WebSphere Plug-in Session Affinity and Load Balancing
* Recommended values for web server plug-in config
* Configuration elements in plugin-cfg.xml file
* Configuration elements in the server.xml file
Clustering and DynaCache
Clustered applications running on Liberty Profile can benefit from enabled DynaCache. See Configuring WebSphere DynaCache for Rational Team Concert serverDistributed Cache Microservice (DCM) for clustered applications
For ELM applications that support clustering, such as Change and Configuration Management and Quality Management, the distributed data is now managed by a standalone web application known as the Distributed Cache Microservice. The Distributed Cache Microservice (DCM) is a small Java application that consists of a main JAR file (distributedCache.jar) and its dependencies in the lib directory. The microservice provides a centralized management and storage location for distributed data for clustered ELM applications. The DCM itself is not a ELM Application and may have different configuration nuances from ELM Applications.Setup considerations
The microservice must be installed and run on a machine that is accessible by all nodes of the clustered application. By default, the microservice is installed on the Jazz Team Server (JTS) machine under theserver/clustering/cache directory and is started as part of the JTS startup sequence (on demand, only when a clustered application asks for it). If the Distributed Cache Microservice URL advanced property has not been set, a clustered application calls the JTS to discover the status of the microservice. The JTS attempts to locate a running DCM process and starts the DCM if it is not running. Often in production environments, the JTS is a back end server behind a proxy, such as IBM HTTP Server, or is installed on a separate, dedicated machine, for performance reasons. In these cases the DCM needs to be started manually, and the clustered application Distributed Cache Microservice URL service property must be set.
Note: For optimal performance, the DCM should be moved to a dedicated machine. The size of this machine will depend on the number of users in your application cluster and their usage. DCM can be deployed on a machine as small as 2 core, 4gb RAM and 100GB disk, but you will need to monitor the system and increase its size based on your load. We found that a 4 core, 8gb ram, 200gb disk virtual machine handled 500 users (but it will vary based on what your users do with the system).
Follow these steps to move the DCM, or to reconfigure the URL:
- Determine the URL to access the DCM. It is important to recognize that the URL here depends on a few factors. It can start with http or https depending on whether SSL is enabled in your distributedCache.cfg file. If fronted by a proxy, use the proxy URL. If the port is masked, then the port should be omitted from this URL. Otherwise, 10001 is the default port, and it is also configurable in the distributedCache.cfg file. A context path at the end of the URL is not required. For example:
   https://myproxy.company.com/
   https://myserver.company.com:10001/
- Type the new DCM url into
Distributed Cache Microservice URLproperty ofcom.ibm.team.repository.service.internal.distributed.DistributedRestClientServicein Advanced Properties Admin UI of your clustered application(s). You can also do this before clustering is turned on for the application by replicating its first node. Or, you can specify the value directly in the application's teamserver.properties file. Any of these methods will require a server restart. The important thing is to have the new property on all nodes.com.ibm.team.repository.distributedRestClient.cacheURL = <URL from step 1>
- Stop DCM and the clustered application(s) if there are any already configured.
- If using a dedicated machine, copy the server/clustering/cache directory, as well as any subdirectories, to a location on the new host.
- If there is no JVM 8 (or higher), then install one on the new host. Refer to TLSExtendedMasterSecretForWASandLiberty for extra details about security and performance.
- Edit the distributedCache.cfg file to reflect the same URL so it can register properly with the Jazz Auth Server. In the
AuthServersection, modify theas_trusted_url property:as_trusted_url = <URL from step 1>
- Start the DCM using a startup script according to the operating system of the new host. A JVM 1.7 'bin' path must be passed into the script as the first argument. Alternatively, the script can be modified with the JVM 'bin' path so it does not require an argument each time it is run.
- (Re-)start any clustered applications configured to use the new DCM location. If none of applications is yet clusterered, continue with cluster setup.
Configuration properties checklist
The configuration properties and their documentation are mentioned in the distributedCache.cfg file. Please go through the below checklist and update the distributedCache.cfg accordingly if its applicable to your topology.- If you install the microservice in a read-only location, you must change
logDirproperties to point to a writable location. By default, the logs folder is created in the cache folder, which is where the startup script is located. Make sure files and folders have permissions set correctly for DCM process to be able to access them. - Please check whether any update is required for properties in
RESTsection for carrying out DCM REST communications. - Make sure to update the
AuthServerproperties if authentication is set as OIDC for DCM. NOTE: The URL used foras_trusted_urlhas to match the URL used forcom.ibm.team.repository.distributedRestClient.cacheURLin ccm's teamserver.propeties file. The context root (/dcm) should not be appended to this property. - If authentication is done through LDAP server make sure to update the
UserRegistryproperties in the configuration file. Note that these settings are not exactly the same as settings used during JTS setup, because the DCM is a microservice and not a full ELM application. The format for each setting is specified in the comments of the distributedCache.cfg file. For example, thegroup_roles_mappingproperty in JTS would be set as:JazzProjectAdmins=LDAPJazzAdmins,JazzAdmins=LDAPJazzAdmins,JazzUsers=LDAPJazzUsers,JazzDWAdmins=LDAPJazzAdmins,JazzGuests=LDAPJazzUsersHowever, in the DCM it is set differently:{"LDAPJazzAdmins":"JazzProjectAdmins,JazzAdmins,JazzDWAdmins","LDAPJazzUsers":"JazzUsers,JazzDWAdmins"}In short in JTS we specify Jazz roles to LDAP group mapping but in DCM we specify LDAP group to Jazz roles mapping. Tip: If these properties are set incorrectly, the DCM will complain about it in its console log:The user registry settings may be set incorrectly. Please refer to the cfg file UserRegistry section. - If you plan to monitor the performance counters that the microservice publishes, you must enable counters and counter publishing in the configuration file, and also point broker to an MQTT broker URL. DCM publishes its counters via a MQTT Broker. When this is enabled, counters can be seen in the cluster application's Web Admin UI internal Counters Page. Alternatively, when counters are enabled in the configuration file, the following URL displays counter data on demand:
http://[DCM_HOST_NAME][:10001]/dcm/counters(Port is applicable only if it is not masked). Publishing frequency is controlled bysnapshotFrequencyproperty. It is also possible to locally log the usage statistics of DCM. To do this, setlogSnapshotStatsto true.
distributedCache.cfg file for more details about its properties.
Running DCM in secure mode
By default, Distributed Cache Microservice runs in SSL mode. This is controlled byuseSsl property in [REST] section. Additional SSL related configuration is specified in [REST-SslContextFactory] section. You may need to change the key store path and name specified in keyStorePath.
List of properties that can be configured in [REST-SslContextFactory] section. For the meaning of these, and general details on configuring SSL, please refer to
Oracle documentation.
allowRenegotiate = boolean
certAlias = String
crlPath = String
enableCRLDP = boolean
enableOCSP = boolean
excludeCipherSuites = String [, String, ...]
excludeProtocols = String [, String, ...]
includeCipherSuites = String [, String, ...]
includeProtocols = String [, String, ...]
keyManagerPassword = String
keyStore = String
keyStorePassword = String
keyStorePath = String
keyStoreProvider = String
keyStoreType = String
maxCertPathLength = int
needClientAuth = boolean
ocspResponderURL = String
protocol = String
provider = String
secureRandomAlgorithm = String
sessionCachingEnabled = boolean
sslKeyManagerFactoryAlgorithm = String
sslSessionCacheSize = int
sslSessionTimeout = int
trustAll = boolean
trustManagerFactoryAlgorithm = String
trustStore = String
trustStorePassword = String
trustStoreProvider = String
trustStoreType = String
validateCerts = boolean
validatePeerCerts = boolean
wantClientAuth = boolean
Configuration Samples
For reference, here are some sample configurations. Note that these samples point out only a few important parameters and not entire configurations. Sample 1: DCM is:- Running from its default location on the JTS host.
- Not fronted by any proxy.
- Using OSLC authentication with a LDAP server.
#============================================================================
# REST settings
#============================================================================
[REST]

port = $E{CACHE_PORT, 10001}

stylesheet = styles/devops.css

saveConfigAction = RESTART_SERVER

useSsl = true

authType = OIDC

#============================================================================
# AuthServer settings
#============================================================================
[AuthServer]

auth_url = $S{AuthServer.auth_url, https://JAS_HOST:9643/oidc/endpoint/jazzop}

client_id = dcm

client_name = Distributed Cache Microservice

as_admin_id = $S{AuthServer.as_admin_id, ADMIN}

as_admin_pass = $S{AuthServer.as_admin_pass, ADMIN}

as_trusted_url = $S{AuthServer.as_trusted_url, https://JTS_HOST:10001}

#============================================================================
# LDAP UserRegistry settings.
#============================================================================
[UserRegistry]

base_group_DN = dc=jazz,dc=domain

group_name_property = cn

group_roles_mapping = {"LDAPJazzAdmins":"JazzProjectAdmins,JazzAdmins,JazzDWAdmins","LDAPJazzUsers":"JazzUsers,JazzDWAdmins"}
Sample 2: DCM is: - Configured to run from another machine and NOT from its default location in JTS host.
- Fronted by a proxy and port is masked for DCM in proxy.
- Authenticated by non LDAP server.
#============================================================================
# REST settings
#============================================================================
[REST]

port = $E{CACHE_PORT, 10001}

stylesheet = styles/devops.css

saveConfigAction = RESTART_SERVER

useSsl = true

authType = OIDC

#============================================================================
# AuthServer settings
#============================================================================
[AuthServer]

auth_url = $S{AuthServer.auth_url, https://JAS_HOST:9643/oidc/endpoint/jazzop}

client_id = dcm

client_name = Distributed Cache Microservice

as_admin_id = $S{AuthServer.as_admin_id, ADMIN}

as_admin_pass = $S{AuthServer.as_admin_pass, ADMIN}

as_trusted_url = $S{AuthServer.as_trusted_url, https://IHS_HOST}
IHS Environments
If the Jazz Team Server is fronted by a proxy server, it must be configured to forward DCM requests to the appropriate host and port where the DCM is running. By default, an ELM cluster expects the DCM to be running on the same host machine that the JTS runs on, configured securely on port 10001. To modify an IHS configuration, make changes to the following files: a) httpd.conf - Add the following entry to listen on the default DCM port (10001). The default DCM port can be changed in distributedCache.cfg. Please note that below change is only required if you plan to have port as part of DCM URL. If you plan to mask the DCM port from its URL, then no change is required in httpd.conf.Listen 10001 <VirtualHost *:10001> SSLEnable SSLServerCert <IHS server cert alias> </VirtualHost>b) plugin-cfg.xml - Add the following entry to forward requests on port 10001 to the appropriate DCM machine. Note that the DCM only requires /jsa and /dcm contexts to be forwarded.
<ServerCluster CloneSeparatorChange="false" GetDWLMTable="false" IgnoreAffinityRequests="true" LoadBalance="Round Robin" Name="microservice_Cluster" PostBufferSize="64" PostSizeLimit="-1" RemoveSpecialHeaders="true" RetryInterval="60">
   <Server ConnectTimeout="0" ExtendedHandshake="false" MaxConnections="-1" Name="microservice" ServerIOTimeout="9000" WaitForContinue="false">
      <Transport Hostname="<JTS_HOSTNAME>" Port="10001" Protocol="https">
         <Property Name="keyring" Value="<File Path of keystore file (kdb)>"/>
         <Property Name="stashfile" Value="<File Path of stash file file (sth)>"/>
      </Transport>
   </Server>
</ServerCluster>

<UriGroup Name="microservice_Cluster_URIs">
   <Uri AffinityCookie="JSESSIONID" AffinityURLIdentifier="jsessionid" Name="/jsa/*"/>
   <Uri AffinityCookie="JSESSIONID" AffinityURLIdentifier="jsessionid" Name="/dcm/*"/>
</UriGroup>

<Route ServerCluster="microservice_Cluster" UriGroup="microservice_Cluster_URIs" VirtualHostGroup="default_host"/>
c) Update the keystore database files to add an entry for the DCM certificate i.e. based on the keystore updates to the plugin-cfg.xml mentioned above.
Running the Distributed Cache Microservice
All the required files and scripts to start and stop the microservice are present in the directoryserver/clustering/cache. To run the microservice, the JVM version must be 1.7 or later. You can start the microservice by using the included script, OR you can start it directly by using below command:
java Xms2G Xmx3G -jar distributedCache.jar
Note:
The amount of memory allocated to DCM (as Java argument) in the script is likely to be too low for large production environments and is only adequate for the out-of-box setups and/or small installations. Edit the startup script to give DCM's JVM more RAM. Logging and counters can be used to find out actual memory requirements.
If started by other means, make sure the program can find its dependencies such as keystore files and others. Please note that user can change the values of JVM arguments Xms and Xmx in the above command as per their requirements.
For the best performance, copy the Distributed Cache Microservice from the Jazz Team Server location and run it on a separate machine that is independent from Jazz Team Server.
The samples shown below illustrates how user can start or stop the distributed cache microservice using start/ stop scripts.
Note: - The startup script will change the current folder to that of the DCM. This allows the DCM to find SSL keystore file and other required dependencies. If the DCM is started by some other means, not all configurations may work.
- When the DCM starts, it will create a
service.lckfile under DCM home directory (server/clustering/cachedirectory by default). Similarly the stop script deletes this service.lck file when the DCM is shutdown gracefully. If you are using other means to shut down the DCM, service.lck file may still be present in that directory. And if you follow the default DCM setup in your topology (Distributed Cache Microservice URL advanced property has not been set in clustered nodes), make sure to delete the service.lck file before restarting the DCM; otherwise the DCM may not start properly. Similarly it is also important not to rely on this lck file for monitoring the DCM process.
cd Path_To_DCM_Folder
start distributedCache.start.bat JRE_Bin_Path
Linux:
cd PATH_To_DCM_Folder
./distributedCache.start.sh JRE_Bin_Path > /dev/null &
Where Path_To_DCM_Folder is where the Distributed Cache Microservice is installed and JRE_Bin_Path is the location of the
JRE/Bin folder. The JRE_Bin_Path is optional. If it's not specified, the system considers that DCM is running from its default location and uses the JRE that is provided by the ELM application.
Stopping the microservice (For 605):
Windows:
cd Path_To_DCM_Folder
distributedCache.stop.bat -j JRE_Bin_Path -h Hostname
Linux:
cd Path_To_DCM_Folder
./distributedCache.stop.sh -j JRE_Bin_Path -h Hostname
Where
- Path_To_DCM_Folder is where the Distributed Cache Microservice is installed and -j JRE_Bin_Path is the location of the
JRE/Binfolder. The -j JRE_Bin_Path parameter is optional. If it's not specified, the system considers that DCM is running from its default location and uses the JRE that is provided by the ELM application. - The -h Hostname parameter is optional. If it's not specified, by default,
localhostis used. You must specify this parameter if DCM is registered with Jazz Authorization server as localhost, but not registered as a trusted URL for DCM.
If this option is specified, its value depends on the condition whether DCM is registered with Jazz Authorization server or not.- If DCM is registered with JAS: Hostname should be taken from the
as_trusted_urlparameter indistributedCache.cfg(Just the hostname should be extracted from this value). - If DCM is not registered with JAS: Hostname should be the actual hostname where DCM is running.
- If DCM is registered with JAS: Hostname should be taken from the
cd Path_To_DCM_Folder
distributedCache.stop.bat JRE_Bin_Path
Linux:
cd Path_To_DCM_Folder
./distributedCache.stop.sh JRE_Bin_Path
Where Path_To_DCM_Folder is where the Distributed Cache Microservice is installed and JRE_Bin_Path is the location of the
JRE/Bin folder. The JRE_Bin_Path is optional. If it's not specified, the system considers that DCM is running from its default location and uses the JRE that is provided by the ELM application.
Running DCM as a service on Windows (For 7.0.1 and later):
Starting from 7.0.1, DCM can be configured to run as a Windows service if running on a Windows machine. More details about this can be found at Running ELM applications as Windows services.
Unregistering Distributed Cache Microservice from JAS
The Distributed Cache Microservice can (and should) be made to authenticate with Jazz Authentication Server (JAS). To register the microservice, several parameters need to be setup in the distributedCache.cfg file underAuthServer and UserRegistry section. The DCM will be registered to the JAS automatically once it is started for the first time. Once the DCM is registered with the JAS, the following properties are updated in the distributedCache.cfg: "client_secret" and "registration_completed = true". DCM will be registered on JAS with client_id as dcm by default.
If the JAS registration for DCM needs to be updated, you can do so by deleting the existing JAS registration and registering DCM again with JAS. Follow the steps mentioned below: - Stop the Distributed Cache Microservice.
- Edit the distributedCache.cfg.
- Reset client_secret to default value.
client_secret = $S{AuthServer.client_secret} - Remove or comment out property registration_completed = true in the configuration file.
- Review the other properties mentioned in
[AuthServer]and[UserRegistry]sections in configuration file and update them accordingly if required.
- Reset client_secret to default value.
- Un-register DCM from JAS using the
rmclientutility provided by JAS. This utility is present underclidirectory in JAS home directory. To unregister the DCM, pass the DCM client id (dcmby default) and JAS admin credentials tormclient. - Start the DCM. It will re-register itself with the JAS using updated properties.
Cluster Node URLs (Release 7.0 or later)
The URLs for individual cluster nodes are normally not directly used by clients or applications, but they are used by the nodes themselves (for example, to get the server diagnostic results for each node, or to provide node-specific entry points for the "repodebug" service). Nodes are registered with URLs using the hostname as configured for the node server itself. Under most circumstances, such URLs present no problem, but in certain environments it may be preferred to use alternate hostnames, or aliases, for the node hostnames. When that is required, starting with release 7.0, mappings can be defined using the URL Alias Mapping Service so that the default node URLs are mapped to the desired alternate URLs. Mappings are defined by setting a value for the "URL Aliases" configuration property of the com.ibm.team.repository.service.internal.UrlAliasMappingService service in the Advanced Properties page of the administration UI. The general syntax isorig-url=alt-url[;orig-url=alt-url...]That is, a semicolon-separated list of "orig-url=alt-url" pairs. For example, if there are two nodes in a CCM cluster with the default URLs "https://vm01.example.com:9443/ccm" and "https://vm02.example.com:9443/ccm", but there is a requirement to address the nodes using the hostnames "ccm-node1.example.com" and "ccm-node2.example.com" instead, then this value can be used for the URL Aliases property:
https://vm01.example.com:9443/=https://ccm-node1.example.com:9443/;https://vm02.example.com:9443/=https://ccm-node2.example.com:9443/The property only needs to be set in the nodes themselves (e.g. for CCM, in this example), and only the shortest URL prefix needed to define the mapping is required. (Best practice is to make sure the URLs end with a trailing slash.) Also, since all URLs that can be used for an application must be defined in the Jazz Authorization Server registration data for the application, you must make sure that the alternate URLs are included as well. The
addNodeReg scripts can be used to add the alternate URLs, as was done when the cluster nodes were originally added to the environment. (The addNodeReg scripts can be found in the server/clustering folder of an ELM application installation area.)
For example, commands such as the following can be used to add the alternate URLs for the CCM nodes used in the mapping example above:
addNodeReg.sh ccm1-client-id  https://ccm-node1.example.com:9443/ccm
addNodeReg.sh ccm2-client-id  https://ccm-node2.example.com:9443/ccm
The
ccm1-client-id and ccm2-client-id values must first be determined as described in the Interactive Installation Guide for each cluster node. Refer to the Interactive Installation Guide for complete instructions on using the addNodeReg scripts (request instructions for setting up a CCM or QM cluster, then refer to the section Adding nodes to the Jazz Authorization Server client registration).
Troubleshooting the cluster
Clustered applications have several interacting components each of which must be functioning in concert to provide for a smooth and efficient operation of the cluster application.IBM IoT MessageSight Broker
This software provides a facility through which nodes of a clustered application exchange messages with one another. The broker must be configured properly. Logging into MessageSight's console window allows monitoring of clients, connections, and subscriptions. By default, there will 1 client per clustered application's node and one connection per client. Each client will create few dozen subscriptions. The subscriptions' names allow easy identification of the owning client and, consequently, the owning node. When troubleshooting, verify that the expected number of clients are present and that all these clients have subscriptions. Verify that there is no excessive buffering; if that is the case, then a node is slow in processing the incoming messages, or that the subscription on that node is lost, or that the node went offline unexpectedly without closing its connections. All of this are indications that something is not functioning properly. It is also useful to examine log files from MessageSight (refer to appropriate documentation for details).HAProxy
HAProxy is fronting load-balancing proxy that directs the traffic from clients to backend applications' nodes. It also provides for session affinity which is extremely important for our clustered applications. Consult HAProxy console page to verify that all nodes of an application are online and are getting (more or less) equal number of sessions. HAProxy log files are also useful for troubleshooting and can provide wealth of information about traffic (refer to HAProxy documentation for details).DCM
Distributed Cache Microservice is equally very important for proper operation of a clustered application. It must be very fast too to so that applications' performance is not affected since the data stored here is accessed and modified very frequently. DCM can be configured to publish and log much information about its own performance and states. It can publish (through MQTT broker data that will be represented as counters by clustered application (see section above). Extra logging can be enabled as well. The performance of a specific map or maps can be logged separately. Refer to DCM configuration file contents and comments for more details about this. Starting from version 6.0.6, the DCM monitors the online status of all nodes configured to use it. When the last node of a cluster goes down (i.e. the heartbeat from all nodes of the same clustered application stops) the DCM will clear persisted data for that application. This is done so that when nodes are shut down gracefully, and restarted, the software initializes itself (its distributed data rather) properly. When a node crashes or otherwise goes offline uncleanly, and brought back up, it can re-initialize its distributed data from the current state from DCM. This approach avoids usage of stale data. it is worth checking, especially after upgrading, but also as part of a routine maintenance, as servers are brought offline, that the persistent storage is properly cleared. Each clustered application will have its own sub-folder for distributed data (that is why it is also important to ensure that there are no two clustered applications sharing the same name i.e. the same cluster name).The clustered application
There are several tools in the clustered application itself that can help with diagnostics. All configured nodes must appear in the Web Admin UI Cluster Nodes page. Notice that if the application servers were just started, some of the nodes will not show up until they are actually hit with client's traffic. Enable viewing of Counters Page in Web Admin UI and examine the counters related to MQTT Service. There should be no lost or rejected messages, no excessive use of threadpools (threadpools are dynamic and can grow and shrink as needed) and queues (see MQTT service properties tables at the top of this page). Default values for these are typically adequate. Under normal conditions, no "error" counters should be even visible here. Many errors are logged in the application's log file.Cluster Diagnostic
Many (but not all) of the above tasks are automated by Cluster Diagnostic. This diagnostic checks various parts of the system for abnormalities and reports them. However, same as the rest of these tools, it can only point to a problem, but not to a reason or a solution. The problem, should it occur, needs to be investigated.MBeans
There are multiple data samples published as MBeans by applications. Some of those beans report various aspects of health of a cluster. Enabling beans and using monitoring software to track the data is the best way to have a historical perspective on the server health. MBeans collection and publishing is enabled on the Advanced Service Properties page. Some MBeans (such as DCM metrics, or MQTT broker metrics) require that some additional auxiliary services be configured as well. These services contact external "data sources" for information to be published, but at the same time they convert this information into counters which can be seen in the Web Admin UI Counters page. This way, even if the monitoring software is not installed, some of the useful data is still available.Cluster Nodes Page
Error in Cluster Nodes page related to OIDC node registration: New deployments might report an error in Cluster Nodes page with error message as follows: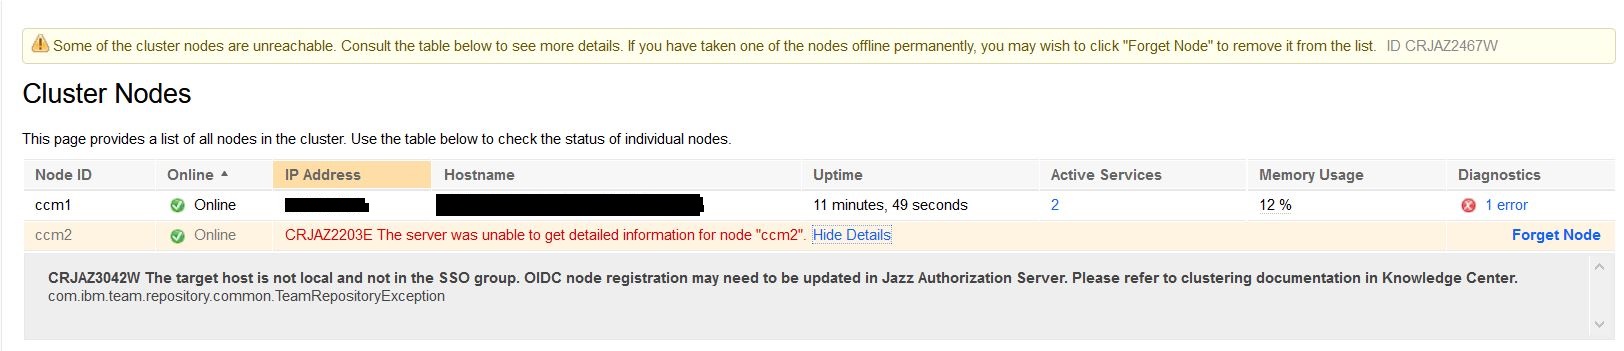 Perform the following checks to resolve this issue:
 - Check whether the Jazz authorization Server (JAS) registry is updated for the cluster node reporting this issue. Use the script addNodeReg.bat or addNodeReg.sh to update JAS registry for the clustered application to have local node URLs in the JAS registry. It is recommended to use lowercase characters for the hostnames that you specify when you run the addNodeReg script. For example, refer the following commands. Make sure that the same hostnames are used in the host file in the clustered nodes. Add the same cluster node's hostnames in host file of Jazz Authorization Server. Tip: Check the hostname in the UI for the node that does not display any error in the Cluster Nodes page. Most likely it is the node servicing that UI request. It does not display an error because it is local to itself. Check whether you have executed addNodeReg.sh with URL having that hostname. Similarly, it needs to be executed for the other node's local URL if not done already.
addNodeReg.sh ccm-client-id https://all-lowercase-node1.com:9443/ccm addNodeReg.sh ccm-client-id https://all-lowercase-node2.com:9443/ccm - Check whether the clustered nodes are assigned to have both internal and external IPs. You can verify by using ifconfig utility if it is a Unix environment. If it is mapped to both internal and external IPs, it might cause such issue. You can also check the IP address of the clustered node that is not reporting any error in the Clustered Node page. Check if it is the external IP or internal IP and verify it matches the IP specified in the hosts file of that clustered node. Most likely it is the external IP that is displayed in the Clustered Node page. If the IP address does not match the IP in the Clustered Nodes page and hosts file of that node, update the hosts file in the clustered node to have the same IP that is displayed in the Clustered Nodes page (most likely the external IP). Do the same for all other clustered nodes. Add these ip -hostname entries for all clustered nodes in the host file of JAS.
- Restart the Clustered nodes and Jazz Authorization Server to verify if the issue is resolved.
Related topics: Migrate from Traditional WebSphere to WebSphere Liberty
External links:
Additional contributors: TWikiUser, TWikiUser


| I | Attachment | Action | Size | Date | Who | Comment |
|---|---|---|---|---|---|---|
| |
CCM_Clustering.png | manage | 64.8 K | 2023-08-28 - 13:29 | AlessandraCristinaAndrade | According to v 7.0.3 |
Contributions are governed by our Terms of Use. Please read the following disclaimer.
Dashboards and work items are no longer publicly available, so some links may be invalid. We now provide similar information through other means. Learn more here.