
The following article is an example of how you can configure a Reverse Proxy Server using Plug-ins to act as a load balancer for LQE instances deployed on a Liberty Profile.
This article assumes that you have 2 separate LQE servers deployed on two different Liberty profiles and focuses on setting up a load balancer to distribute the query load between the two LQE servers.
For more information about setting up IHS as a reverse proxy for a CLM Deployment you can refer to: Creating The IHS Plugin for Liberty Profile for a CLM example or troubleshooting tips
And you will need to:
Our Installation Paths for each component will be:

New Keystore
(Note, To enable the CMS provider, add the following phrase to the java.security file.
Verify the default certificate was created.
Prior to creating the new Key Database for the plugin config file, create a new directory in your WebSphere Plugins directory. (This is on the IHS server)
As noted above, our plugin install path is: /opt/IBM/WebSphere/Plugins/
We want to create a new directory for our plugin config file.
We will call our new directory webserver1 and create it in /opt/IBM/WebSphere/Plugins/config/
As seen:
We need to get a certificate from our Liberty Server.
(If your IHS server is on a different server then your Liberty Server, you can use the ikeyman that comes with the CLM installation.
In our installation, it is located here: /opt/IBM/JazzTeamServer/server/java/jre/bin/ikeyman)


You should now have 2 certificates in /opt/IBM/WebSphere/Plugins/config/webserver1, cert-lqe1.arm and cert-lqe2.arm. </br.
Now we will return to Ikeyman on the IHS server. Ikeyman should still be up. If it is not, then start it again.
(Instead of creating a certificate like we did for IHS, we will use the exported signer certificate from the two Liberty servers.)


(It should be in the /opt/IBM/WebSphere/Plugins/config/webserver1 Directory)
Repeat the steps to import cert-lqe2.arm in the keystore (give it the label LQE2)
* *Copy the plugin-cfg.xml for each of the Liberty profile and rename them plugin-cfg-lqe1.xml and plugin-cfg-lqe2.xml. * *Make a copy of one of them that you will use to merge the content of the two and call it plugin-cfg.xml.
Examine the contents of the XML file and look for the following line:
Verify that this entry matches the directory you created for your Liberty plugin
You will also need to make changes to the Plugin config file regarding the Keystore / Certificate you created earlier in Key Database section, Import Jazz Signer Certifact to Web Server section
Modify this to match the certificate information you created for liberty plugin.
Edit the ServerCluster section
Edit the PrimaryServers section with the names of the servers specified in the Server section
Edit the UriGroup section with the cluster name and leave the entry
Edit the Route section with the names specified in the relevant sections:
The merged plugin-cfg.xml file should look like:
Uncomment it out and add the following:
EXAMPLE
Important parameters used in above configuration are described below. LoadBalance: The following values can be specified for this attribute: * Round Robin * Random The Round Robin implementation has a random starting point. The first application server is picked randomly. Round Robin is then used to pick application servers from that point forward. This implementation ensures that in multiple process-based web servers, all of the processes do not start by sending the first request to the same Application Server. The Random implementation also has a random starting point. However with this implementation all subsequent servers are also randomly selected. Therefore, the same server might get selected repeatedly while other servers remain idle. The default load balancing type is Round Robin. LoadBalanceWeight is a starting "weight". The value is dynamically changed by the plug-in during runtime. The "weight" of a server (or clone) is lowered each time a request is assigned to that clone. When all weights for all servers drop to 0 or below, the plug-in has to readjust all of the weights so that they are above 0. Using a starting value of only 2 (default), means that the weights will get to 0 very quickly and the plug-in will constantly be readjusting the weights. Therefore, It is recommended to start with a higher LoadBalanceWeight. The IBM WebSphere Application Server administrative console will allow a value up to 20 for this. However, it is certainly possible to manually edit the plugin-cfg.xml file and specify some other value for LoadBalanceWeight that is higher than 20. Note: At runtime, the LoadBalanceWeight of each appserver in a cluster are normalized by their highest common factor. For example, 100, 90, 80 have a common factor of 10. So, these configured weights would be divided by 10 at runtime, resulting in actual starting weights of only 10, 9, 8. Setting all clones to the same starting LoadBalanceWeight (for example: 20, 20, 20) will result in an actual starting weight of only 1 for each, because of normalization. So, it is recommended to set the weight of at least one of the clones to be off by a value of 1. For example, if there are 3 clones, you might choose the starting LoadBalanceWeights to be: 20, 20, 19. After normalization the weights will be unchanged. Recommended values = all clones the same, except one clone off by one. Affinity requests are requests that contain a session cookie (ie. JSESSIONID). Session affinity means that all requests of the same JSESSIONID will be sent to the same Application Server. For example, if the first request is sent to clone5, then the next request from that same client (affinity request) will also be sent to clone5 regardless of the LoadBalanceWeight. If using Round Robin for the LoadBalance option, by default the affinity requests do NOT lower the "weight" (IgnoreAffinityRequests="true"). This can cause an uneven distribution across the servers in environments that make use of session affinity. But, If IgnoreAffinityRequests="false" then the weight IS lowered by each affinity request, leading to a more balanced Round Robin environment. When using Random, the affinity requests are still handled correctly (sent to same cloneid as before). But new requests are routed randomly, and the LoadBalanceWeight is not used. Note: The IgnoreAffinityRequests option is only available in the web server plug-in v6.1 or higher. ConnectTimeout means "how long should the plug-in wait when trying to open a socket to the Application Server"? If there are streams already open and available to the Application Server, the plug-in will use one of those. However, sometimes the plug-in needs to open a new stream to the Application Server. That should not take very long, so the value for ConnectTimeout should be very small. A ConnectTimeout value of 0 means never time-out. In that case, the time-out is left up to the OS TCP layer, which is NOT ideal. It is much better to specify a small positive number (like 5 seconds). Recommended value = 5 MaxConnections Specifies the maximum number of pending connections to an application server that can be flowing through a web server process at any point in time. Specify one element for each Server. It is not used to determine when to fail-over (mark the server "down"). When a request is sent from the plug-in to the WAS appserver, it is called a "PendingRequest", until the response comes back. If the application running in WebSphere Application Server is handling requests quickly, each request will only be PENDING for a very short time. So, under ideal conditions, MaxConnections is not needed and therefore the default is (-1) meaning unlimited. However, sometimes an application may start to become overwhelmed and the application may not be able to handle the requests as quickly. Consequently Pending Requests start to build up. MaxConnections can be used to put a limit on the number of PENDING requests per server. When the MaxConnections limit is reached, the plug-in will stop sending requests to that appserver, but it is not marked down. The optimal value for MaxConnections will depend on how quickly the application and appserver respond to each request. If normal responses are returned in less than one second, it may be appropriate to set a low value for MaxConnections, like 20 or so. However, if it normally takes several seconds to get a response from the application, then it would be prudent to use a higher value for MaxConnections, like 100. Please note that if the MaxConnections limit has been reached the plug-in will not send ANY more requests to that server until responses come back for the current PENDING requests, and the pendingRequests count drops back down below the MaxConnections limit. Best Practices: with MaxConnections="-1" use LogLevel="Stats" to monitor the pendingRequests numbers in the plug-in log, under normal conditions. Then, choose a value for MaxConnections that is significantly higher than the highest number shown in the log. This method will help you to determine a MaxConnections value that is right for your specific environment. !ServerIOTimeout means how long should the plug-in wait for a response from the application. After the socket is opened, the plug-in sends the request to the Application Server. The application processes the request and a response is sent back to the client, through the plug-in. How long should that take? What is reasonable, based on the application? There is no single correct answer here. It depends on the application. If the application is very quick to respond, then you can use a lower value for ServerIOTimeout. However, if the application requires more time to process the request (maybe to retrieve data from a database), then you should use a higher number for ServerIOTimeout. Using a value of 0 means that the plug-in will NOT time-out the request. This is often NOT ideal. A positive value means that the plug-in will NOT mark the appserver down after a ServerIOTimeout pops. So, if you want the plug-in to continue sending requests to the timed-out appserver, use a positive value. On the other hand, a negative value means that the plug-in WILL mark the appserver down after a ServerIOTimeout pops. So, if you want the plug-in to immediately mark the appserver down and fail-over to another appserver in the same cluster, use a negative value. Best Practices: use traces to determine the amount of time it takes for your application to respond to requests under normal conditions. Be sure to include the longest running requests that take the most time to respond. Then choose a value for ServerIOTimeout that is much larger (2X or 3X or more) than the longest response time. This method will ensure that your ServerIOTimeout is high enough to allow adequate time for the application to respond normally. Make it a negative value so that if the ServerIOTimeout pops, the plug-in will immediately mark the server down, and retry the request to a different appserver. Note: It is important to set _IgnoreAffinityRequests="false"_ along with _LoadBalance="Round Robin"_ (for Plugin version higher than 6.1). This means that system will follow Round robin algorithm to pick up clustered server for non-sticky requests and will also reduce the load balance weight of server even if its an sticky routing. Other values can be fine-tuned as per application load.
To get more information about configuration parameters used in IHS and liberty, see the following documents: * Understanding IBM HTTP Server plug-in Load Balancing in a clustered environment
* WebSphere Plug-in Session Affinity and Load Balancing
* Recommended values for web server plug-in config
* Configuration elements in plugin-cfg.xml file
* Configuration elements in the server.xml file
Note: This requires a full WebSphere Application Server (WAS) system that is at the same level, or higher, as your Liberty Profile Servers. It is this WAS system that contains the Plugin Merge tool.
Run the pluginCfgMerge script to merge the plug-in configurations together into a single file, like this:
(On linux, the command is pluginCFgMerge.sh)
More information on this tool can be found here: How to create a merged plug-in config for multiple Liberty Profile Servers
Once the plugin-cfg files are merged, then you will need to edit them as mentioned in Changes to the Plugin Config section. Best practice is to create one keystore and certificate per Liberty server in your deployment. On the IHS server, create a directory to hold each of your keystores and certificates for each Liberty server. For example, Then, repeat the Export Signer certificate,New Key Database, and Import Signer Certificate sections once for each Liberty server.
You do not need to copy the keystores. The merged plugin file will be pointing to each of the corresponding keystores in their home directories.
Then, repeat the Export Signer certificate,New Key Database, and Import Signer Certificate sections once for each Liberty server.
You do not need to copy the keystores. The merged plugin file will be pointing to each of the corresponding keystores in their home directories.
This article assumes that you have 2 separate LQE servers deployed on two different Liberty profiles and focuses on setting up a load balancer to distribute the query load between the two LQE servers.
For more information about setting up IHS as a reverse proxy for a CLM Deployment you can refer to: Creating The IHS Plugin for Liberty Profile for a CLM example or troubleshooting tips
Requirements
In order to create and configure the IHS plugin, you will need to also install:- IBM HTTP Server (IHS)
- Web Server Plug-ins for IBM WebSphere Application Server
And you will need to:
- Create a Keystore File for IHS
- Create a Password Stash File for IHS Keystore
- Create a Certificate for IHS
- Create a Keystore File for Liberty Plugin Config
- Create a Password Stash File for Plugin Config Keystore
- Export a signer certificate from each of the Liberty Server where LQE is installed and import them using a different name into the Plugin Keystore.
Install Each of the Components.
Install IBM HTTP Server, IBM SDK, and Web Server Plug-ins for IBM WebSphere Application Server- Install each of these tools according to the corresponding installation documentation.
- In our example, we will be installing each of them in the following directory: /opt/IBM/
- Your installation directory may be different and will require you to make corresponding path changes.
Our Installation Paths for each component will be:
    IBM HTTP Server (IHS)
           /opt/IBM/HTTPServer
    WebSphere Plugins
           /opt/IBM/WebSphere/Plugins/
   LQE is installed on 2 different server using the same default location
           /opt/IBM/JazzTeamServer/
Create a Keystore and Certificate using Ikeyman for the IHS server
New Key Database
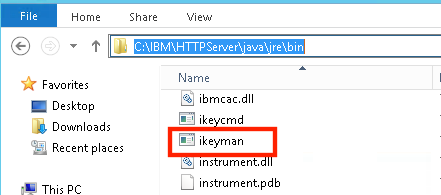
- Locate and start ikeyman
- Create a new Key Database File
New Keystore
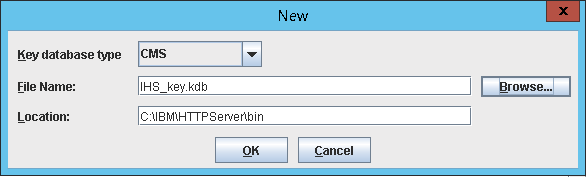
- Select Key database type CMS (If the CMS option is not available, see note below)
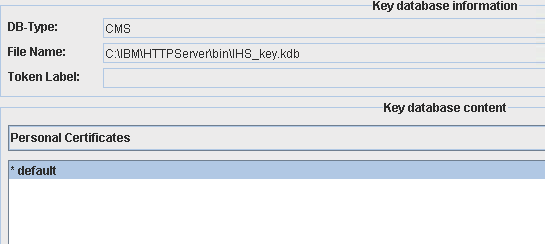
- Give a name to your keystore. (Our example: IHS_KEY.kdb)
- Enter a path for your keystore Recommendation: Put this in the bin directory of the HTTPServer (You will need to remember this for later for the httpd.conf file)
- Click OK
(Note, To enable the CMS provider, add the following phrase to the java.security file.
security.provider.10=com.ibm.security.cmskeystore.CMSProviderIf you are using ikeyman in /opt/IBM/HTTPServer/java/jre/bin then , you will find it:
/opt/IBM/HTTPServer/java/jre/lib/security/java.security
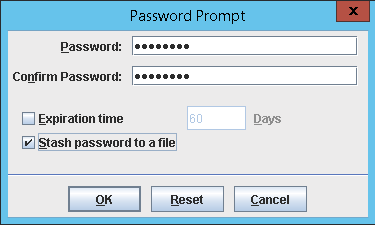
- Enter a password (and confirm)
- Check the box for the Stash Password to a file
- Recommendation: Do not put an expiration date. If you do, you will need to create a new stash file when this expires.)
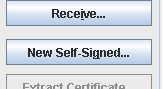
New Self Signed Certificate for the IHS Keystore
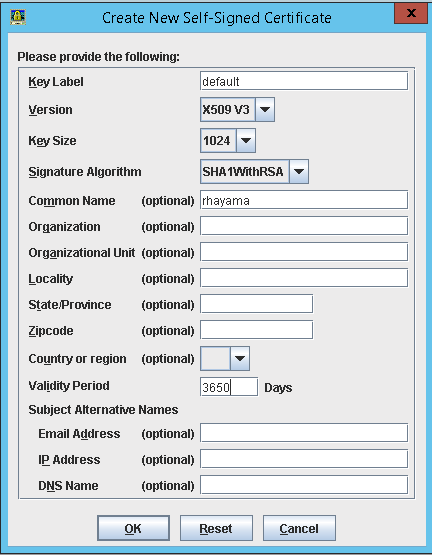
- Create a new Self Signed Certificate
- Enter in information about the server
(We are using 'default' as our certificate name) - Enter the WebServer Name
- Change the expiration to 3650 (This will avoid coming back in a year to do this again.)
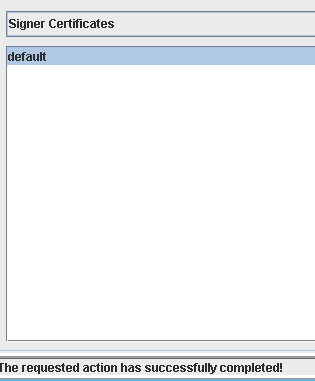
Verify the default certificate was created.
Create a Keystore and Certificate using Ikeyman for the web server Plugin.
Best Practice is to use a separate keystore for the IHS server and the plugin config file.New Directory for the plugin config information
Prior to creating the new Key Database for the plugin config file, create a new directory in your WebSphere Plugins directory. (This is on the IHS server)
As noted above, our plugin install path is: /opt/IBM/WebSphere/Plugins/
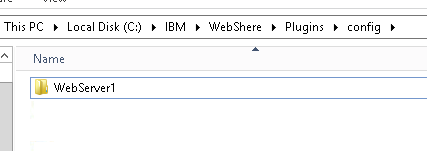
We want to create a new directory for our plugin config file.
We will call our new directory webserver1 and create it in /opt/IBM/WebSphere/Plugins/config/
As seen:
Export Signer Certificate
We need to get a certificate from our Liberty Server.
- Start ikeyman on the Liberty Server where LQE is deployed.
(If your IHS server is on a different server then your Liberty Server, you can use the ikeyman that comes with the CLM installation.
In our installation, it is located here: /opt/IBM/JazzTeamServer/server/java/jre/bin/ikeyman)
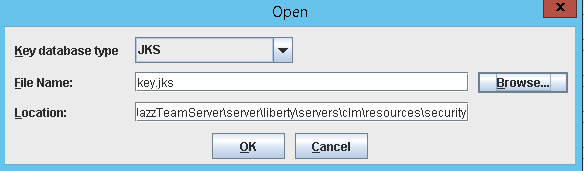
- In ikeyman, select open
- Select Key File type JKS
- At the bottom, select Files of Type All Files
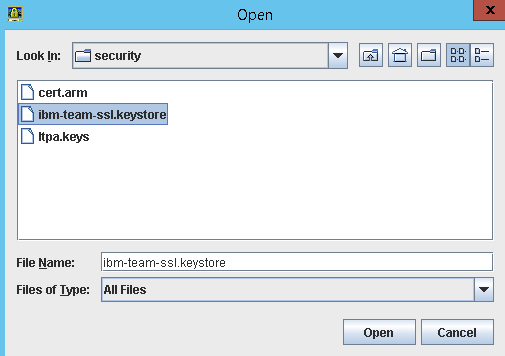
- Navigate to the Liberty Profile keystore
- /opt/IBM/JazzTeamServer/server/liberty/servers/clm/resources/security/ibm-team-ssl.keystore
- The password is ibm-team
- On the right side, select Extract Certificate
- Accept the default location (give the certificate a name that identifies the LQE server for example cert-lqe1.arm)
- Click Okay and verify your certificate was created
- Copy this certificate into the WebServer1 directory you created above. (On the IHS Server)
- You can now close ikeyman on the Liberty Server and repeat the same steps for the other LQE server
You should now have 2 certificates in /opt/IBM/WebSphere/Plugins/config/webserver1, cert-lqe1.arm and cert-lqe2.arm. </br.
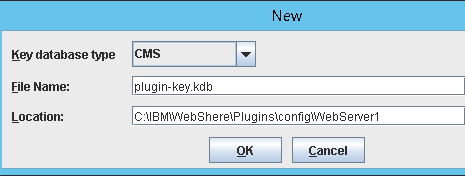
New Key Database
Now we will return to Ikeyman on the IHS server. Ikeyman should still be up. If it is not, then start it again.
- Select Key database type CMS
- Give a name to your keystore. (Our example: plugin-key.kdb)
- Enter a path for your keystore Recommendation: Put this in the directory you just created: /opt/IBM/WebSphere/Plugins/config/webserver1
- Click OK
- Enter a password (and confirm)
- Check the box for the Stash Password to a file
- Recommendation: Do not put an expiration date. If you do, you will need to create a new stash file when this expires.
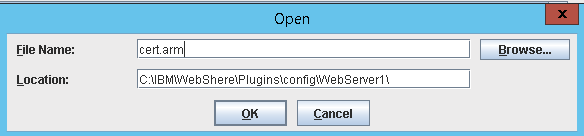
Import Jazz Signer Certificate
(Instead of creating a certificate like we did for IHS, we will use the exported signer certificate from the two Liberty servers.)
- Now import the signer certificate from first Liberty Server (cert-lqe1.arm)
- In the middle of the page, you should see Personal Certificate
- change this to Signer Certificate:
- Select the Add button and navigate to the WebServer1 directory that you copied the cert-lqe1.arm into in the preceding step.
(It should be in the /opt/IBM/WebSphere/Plugins/config/webserver1 Directory)
- When the box comes up, navigate to the certificate file cert-lqe1.arm file.
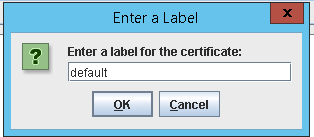
- You will enter a label. Choose LQE1
- You should see a message that you successfully imported the certificate.
Repeat the steps to import cert-lqe2.arm in the keystore (give it the label LQE2)
Update server.xml on each LQE node
Update the Liberty server.xml configuration file on each clustered node with the unique cloneId. Update the httpSession tag in server.xml file in all the clustered nodes to add cloneId field as shown below. Its the clone identifier of the cluster member. Within a cluster, this identifier must be unique for each node to maintain session affinity. When set, this name overwrites the default name generated by the server. The same cloneId will then be used in the Web Plugin configuration to identify affinity requests.
<httpSession invalidateOnUnauthorizedSessionRequestException="true" cookieSecure="true" cloneId="ccm1"/>
You should now be ready to create the plugin config file
Create the Plug-in Config file
- On versions 6.0.4 and higher, the plugin-cfg.xml is generated automatically at server startup under server_install_dir/server/liberty/servers/clm/logs/state
- You will need to copy this over to your IHS server and place in the directory we created for it earlier. (Our example: /opt/IBM/WebSphere/Plugins/config/webserver1)
* *Copy the plugin-cfg.xml for each of the Liberty profile and rename them plugin-cfg-lqe1.xml and plugin-cfg-lqe2.xml. * *Make a copy of one of them that you will use to merge the content of the two and call it plugin-cfg.xml.
- You can open the plugin config file and verify the contents. You should see something similar to this snippet:
<?xml version="1.0" encoding="UTF-8"?><!--HTTP server plugin config file for clm generated on 2019.08.26 at 12:05:12 EDT-->
<Config ASDisableNagle="false" AcceptAllContent="false" AppServerPortPreference="HostHeader" ChunkedResponse="false" FIPSEnable="false" IISDisableNagle="false" IISPluginPriority="High" IgnoreDNSFailures="false" RefreshInterval="60" ResponseChunkSize="64" SSLConsolidate="false" TrustedProxyEnable="false" VHostMatchingCompat="false">
   <Log LogLevel="Error" Name="/opt/IBM/WebSphere/Plugins/logs/webserver1/http_plugin.log"/>
   <Property Name="ESIEnable" Value="true"/>
   <Property Name="ESIMaxCacheSize" Value="1024"/>
   <Property Name="ESIInvalidationMonitor" Value="false"/>
   <Property Name="ESIEnableToPassCookies" Value="false"/>
   <Property Name="PluginInstallRoot" Value="/opt/IBM/WebSphere/Plugins"/>
<!-- Configuration generated using httpEndpointRef=defaultHttpEndpoint-->
<!-- The default_host contained only aliases for endpoint defaultHttpEndpoint.
         The generated VirtualHostGroup will contain only configured web server ports:
                webserverPort=80
                webserverSecurePort=443 -->
   <VirtualHostGroup Name="default_host">
      <VirtualHost Name="*:80"/>
      <VirtualHost Name="*:443"/>
   </VirtualHostGroup>
   <ServerCluster CloneSeparatorChange="false" GetDWLMTable="false" IgnoreAffinityRequests="true" LoadBalance="Round Robin" Name="clm_default_node_Cluster" PostBufferSize="0" PostSizeLimit="-1" RemoveSpecialHeaders="true" RetryInterval="60" ServerIOTimeoutRetry="-1">
      <Server CloneID="lqe1" ConnectTimeout="5" ExtendedHandshake="false" LoadBalanceWeight="20" MaxConnections="-1" Name="default_node_clm" ServerIOTimeout="900" WaitForContinue="false">
         <Transport Hostname="lqe-1.myserver.ibm.com" Port="9080" Protocol="http"/>
         <Transport Hostname="lqe-1.myserver.ibm.com" Port="9443" Protocol="https">
            <Property Name="keyring" Value="/opt/IBM/WebSphere/Plugins/config/webserver1/plugin-key.kdb"/>
            <Property Name="stashfile" Value="/opt/IBM/WebSphere/Plugins/config/webserver1/plugin-key.sth"/>
         </Transport>
      </Server>
      <PrimaryServers>
         <Server Name="default_node_clm"/>
      </PrimaryServers>
   </ServerCluster>
   <UriGroup Name="default_host_clm_default_node_Cluster_URIs">
      <Uri AffinityCookie="JSESSIONID" AffinityURLIdentifier="jsessionid" Name="/lqe/*"/>
      <Uri AffinityCookie="JSESSIONID" AffinityURLIdentifier="jsessionid" Name="/IBMJMXConnectorREST/*"/>
      <Uri AffinityCookie="JSESSIONID" AffinityURLIdentifier="jsessionid" Name="/ibm/api/*"/>
      <Uri AffinityCookie="JSESSIONID" AffinityURLIdentifier="jsessionid" Name="/ibm/adminCenter/explore-1.0/*"/>
      <Uri AffinityCookie="JSESSIONID" AffinityURLIdentifier="jsessionid" Name="/ibm/adminCenter/serverConfig-1.0/*"/>
      <Uri AffinityCookie="JSESSIONID" AffinityURLIdentifier="jsessionid" Name="/adminCenter/*"/>
   </UriGroup>
   <Route ServerCluster="clm_default_node_Cluster" UriGroup="default_host_clm_default_node_Cluster_URIs" VirtualHostGroup="default_host"/>
</Config>
Changes to the Plugin Config File
You will need to make some changes to this xml file to match your environment.Examine the contents of the XML file and look for the following line:
<Log LogLevel="Error" Name= ************
Verify that this entry matches the directory you created for your Liberty plugin
<Log LogLevel="Error" Name="/opt/IBM/WebSphere/Plugins/logs/webserver1/http_plugin.log"/>
You will also need to make changes to the Plugin config file regarding the Keystore / Certificate you created earlier in Key Database section, Import Jazz Signer Certifact to Web Server section
            <Property Name="keyring" Value="keyring.kdb"/>
            <Property Name="stashfile" Value="keyring.sth"/>
            <Property Name="certLabel" Value="LibertyCert"/>
Modify this to match the certificate information you created for liberty plugin.
            <Property Name="keyring" Value="/opt/IBM/WebSphere/Plugins/config/WebServer1/plugin-key.kdb"/>
            <Property Name="stashfile" Value="/opt/IBM/WebSphere/Plugins/config/WebServer1/plugin-key.sth"/>
            <Property Name="certLabel" Value="LQE1"/>
Edit the ServerCluster section
<ServerCluster CloneSeparatorChange="false" GetDWLMTable="false" IgnoreAffinityRequests="true" LoadBalance="Round Robin" Name="lqe_node_Cluster" PostBufferSize="0" PostSizeLimit="-1" RemoveSpecialHeaders="true" RetryInterval="60" ServerIOTimeoutRetry="-1">Edit the server section to have a unique cloneId and Name (the CloneID has to match the clone id that was specified in the server.xml) duplicate the server section and edit it to match the LQE2 node:
      <Server CloneID="lqe2" ConnectTimeout="5" ExtendedHandshake="false" LoadBalanceWeight="20" MaxConnections="-1" Name="lqe2_node" ServerIOTimeout="900" WaitForContinue="false">
         <Transport Hostname="lqe-2.myServer.ibm.com" Port="9080" Protocol="http"/>
         <Transport Hostname="lqe-2.myServer.ibm.com" Port="9443" Protocol="https">
            <Property Name="keyring" Value="/opt/IBM/WebSphere/Plugins/config/webserver1/plugin-key.kdb"/>
            <Property Name="stashfile" Value="/opt/IBM/WebSphere/Plugins/config/webserver1/plugin-key.sth"/>
            <Property Name="certLabel" Value="LQE2"/>
         </Transport>
      </Server>
Edit the PrimaryServers section with the names of the servers specified in the Server section
      <PrimaryServers>
         <Server Name="lqe1_node"/>
         <Server Name="lqe2_node"/>
      </PrimaryServers>
Edit the UriGroup section with the cluster name and leave the entry
   <UriGroup Name="lqe_node_Cluster_URIs">
      <Uri AffinityCookie="JSESSIONID" AffinityURLIdentifier="jsessionid" Name="/lqe/*"/>
   </UriGroup>
Edit the Route section with the names specified in the relevant sections:
<Route ServerCluster="lqe_node_Cluster" UriGroup="lqe_node_Cluster_URIs" VirtualHostGroup="default_host"/>
The merged plugin-cfg.xml file should look like:
<?xml version="1.0" encoding="UTF-8"?><!--HTTP server plugin config file for clm generated on 2019.08.26 at 08:05:47 EDT-->
<Config ASDisableNagle="false" AcceptAllContent="false" AppServerPortPreference="HostHeader" ChunkedResponse="false" FIPSEnable="false" IISDisableNagle="false" IISPluginPriority="High" IgnoreDNSFailures="false" RefreshInterval="60" ResponseChunkSize="64" SSLConsolidate="false" TrustedProxyEnable="false" VHostMatchingCompat="false">
   <Log LogLevel="debug" Name="/opt/IBM/WebSphere/Plugins/logs/webserver1/http_plugin.log"/>
   <Property Name="ESIEnable" Value="true"/>
   <Property Name="ESIMaxCacheSize" Value="1024"/>
   <Property Name="ESIInvalidationMonitor" Value="false"/>
   <Property Name="ESIEnableToPassCookies" Value="false"/>
   <Property Name="PluginInstallRoot" Value="/opt/IBM/WebSphere/Plugins"/>
<!-- Configuration generated using httpEndpointRef=defaultHttpEndpoint-->
<!-- The default_host contained only aliases for endpoint defaultHttpEndpoint.
         The generated VirtualHostGroup will contain only configured web server ports:
                webserverPort=80
                webserverSecurePort=443 -->
   <VirtualHostGroup Name="default_host">
      <VirtualHost Name="*:80"/>
      <VirtualHost Name="*:443"/>
   </VirtualHostGroup>
   <ServerCluster CloneSeparatorChange="false" GetDWLMTable="false" IgnoreAffinityRequests="false" LoadBalance="Round Robin" Name="lqe_node_Cluster" PostBufferSize="64" PostSizeLimit="-1" RemoveSpecialHeaders="true" RetryInterval="60" ServerIOTimeoutRetry="-1">
      <Server CloneID="lqe2" ConnectTimeout="5" ExtendedHandshake="false" LoadBalanceWeight="20" MaxConnections="-1" Name="lqe2_node" ServerIOTimeout="900" WaitForContinue="false">
         <Transport Hostname="lqe-2.myserver.ibm.com" Port="9080" Protocol="http"/>
         <Transport Hostname="lqe-2.myserver.ibm.com" Port="9443" Protocol="https">
            <Property Name="keyring" Value="/opt/IBM/WebSphere/Plugins/config/webserver1/plugin-key.kdb"/>
            <Property Name="stashfile" Value="/opt/IBM/WebSphere/Plugins/config/webserver1/plugin-key.sth"/>
            <Property Name="certLabel" Value="LQE2"/>
         </Transport>
      </Server>
      <Server CloneID="lqe1" ConnectTimeout="5" ExtendedHandshake="false" LoadBalanceWeight="20" MaxConnections="-1" Name="lqe1_node" ServerIOTimeout="900" WaitForContinue="false">
         <Transport Hostname="lqe-1.myserver.ibm.com" Port="9080" Protocol="http"/>
         <Transport Hostname="lqe-1.myserver.ibm.com" Port="9443" Protocol="https">
            <Property Name="keyring" Value="/opt/IBM/WebSphere/Plugins/config/webserver1/plugin-key.kdb"/>
            <Property Name="stashfile" Value="/opt/IBM/WebSphere/Plugins/config/webserver1/plugin-key.sth"/>
            <Property Name="certLabel" Value="LQE1"/>
         </Transport>
      </Server>

      <PrimaryServers>
         <Server Name="lqe1_node"/>
         <Server Name="lqe2_node"/>
      </PrimaryServers>
   </ServerCluster>
   <UriGroup Name="lqe_node_Cluster_URIs">
      <Uri AffinityCookie="JSESSIONID" AffinityURLIdentifier="jsessionid" Name="/lqe/*"/>
   </UriGroup>
   <Route ServerCluster="lqe_node_Cluster" UriGroup="lqe_node_Cluster_URIs" VirtualHostGroup="default_host"/>
</Config>
Modify the httpd.conf File
SSL Module
- Search for the following:
Uncomment it out and add the following:
- The Port you will be listening on (port 443 is the default)
- The virtual host name ( a * means accept all traffic coming in on port 443)
- The path to your Key file (created above)
- The path to the stash file (created above)
EXAMPLE
LoadModule ibm_ssl_module modules/mod_ibm_ssl.so
Listen 0.0.0.0:443
## IPv6 support:

<VirtualHost *:443>
SSLEnable
SSLProtocolDisable SSLv2 SSLv3
 KeyFile /opt/IBM/HTTPServer/bin/IHS_KEY.kdb
 SSLStashFile /opt/IBM/HTTPServer/bin/IHS_KEY.sth
</VirtualHost>
Plugin Location
At the bottom of the httpd.conf file, enter in the path to the plugin file as well as the path to the ap22 module- Windows
LoadModule was_ap22_module "C:\IBM\WebSphere\Plugins\bin\64bits\mod_was_ap22_http.dll"
WebSpherePluginConfig "C:\IBM\WebSphere\Plugins\config\WebServer1\plugin-cfg.xml"
- Linux
LoadModule was_ap22_module "/opt/IBM/WebSphere/Plugins/bin/64bits/mod_was_ap22_http.so"
WebSpherePluginConfig "/opt/IBM/WebSphere/Plugins/config/WebServer1/plugin-cfg.xml"
Important parameters used in above configuration are described below. LoadBalance: The following values can be specified for this attribute: * Round Robin * Random The Round Robin implementation has a random starting point. The first application server is picked randomly. Round Robin is then used to pick application servers from that point forward. This implementation ensures that in multiple process-based web servers, all of the processes do not start by sending the first request to the same Application Server. The Random implementation also has a random starting point. However with this implementation all subsequent servers are also randomly selected. Therefore, the same server might get selected repeatedly while other servers remain idle. The default load balancing type is Round Robin. LoadBalanceWeight is a starting "weight". The value is dynamically changed by the plug-in during runtime. The "weight" of a server (or clone) is lowered each time a request is assigned to that clone. When all weights for all servers drop to 0 or below, the plug-in has to readjust all of the weights so that they are above 0. Using a starting value of only 2 (default), means that the weights will get to 0 very quickly and the plug-in will constantly be readjusting the weights. Therefore, It is recommended to start with a higher LoadBalanceWeight. The IBM WebSphere Application Server administrative console will allow a value up to 20 for this. However, it is certainly possible to manually edit the plugin-cfg.xml file and specify some other value for LoadBalanceWeight that is higher than 20. Note: At runtime, the LoadBalanceWeight of each appserver in a cluster are normalized by their highest common factor. For example, 100, 90, 80 have a common factor of 10. So, these configured weights would be divided by 10 at runtime, resulting in actual starting weights of only 10, 9, 8. Setting all clones to the same starting LoadBalanceWeight (for example: 20, 20, 20) will result in an actual starting weight of only 1 for each, because of normalization. So, it is recommended to set the weight of at least one of the clones to be off by a value of 1. For example, if there are 3 clones, you might choose the starting LoadBalanceWeights to be: 20, 20, 19. After normalization the weights will be unchanged. Recommended values = all clones the same, except one clone off by one. Affinity requests are requests that contain a session cookie (ie. JSESSIONID). Session affinity means that all requests of the same JSESSIONID will be sent to the same Application Server. For example, if the first request is sent to clone5, then the next request from that same client (affinity request) will also be sent to clone5 regardless of the LoadBalanceWeight. If using Round Robin for the LoadBalance option, by default the affinity requests do NOT lower the "weight" (IgnoreAffinityRequests="true"). This can cause an uneven distribution across the servers in environments that make use of session affinity. But, If IgnoreAffinityRequests="false" then the weight IS lowered by each affinity request, leading to a more balanced Round Robin environment. When using Random, the affinity requests are still handled correctly (sent to same cloneid as before). But new requests are routed randomly, and the LoadBalanceWeight is not used. Note: The IgnoreAffinityRequests option is only available in the web server plug-in v6.1 or higher. ConnectTimeout means "how long should the plug-in wait when trying to open a socket to the Application Server"? If there are streams already open and available to the Application Server, the plug-in will use one of those. However, sometimes the plug-in needs to open a new stream to the Application Server. That should not take very long, so the value for ConnectTimeout should be very small. A ConnectTimeout value of 0 means never time-out. In that case, the time-out is left up to the OS TCP layer, which is NOT ideal. It is much better to specify a small positive number (like 5 seconds). Recommended value = 5 MaxConnections Specifies the maximum number of pending connections to an application server that can be flowing through a web server process at any point in time. Specify one element for each Server. It is not used to determine when to fail-over (mark the server "down"). When a request is sent from the plug-in to the WAS appserver, it is called a "PendingRequest", until the response comes back. If the application running in WebSphere Application Server is handling requests quickly, each request will only be PENDING for a very short time. So, under ideal conditions, MaxConnections is not needed and therefore the default is (-1) meaning unlimited. However, sometimes an application may start to become overwhelmed and the application may not be able to handle the requests as quickly. Consequently Pending Requests start to build up. MaxConnections can be used to put a limit on the number of PENDING requests per server. When the MaxConnections limit is reached, the plug-in will stop sending requests to that appserver, but it is not marked down. The optimal value for MaxConnections will depend on how quickly the application and appserver respond to each request. If normal responses are returned in less than one second, it may be appropriate to set a low value for MaxConnections, like 20 or so. However, if it normally takes several seconds to get a response from the application, then it would be prudent to use a higher value for MaxConnections, like 100. Please note that if the MaxConnections limit has been reached the plug-in will not send ANY more requests to that server until responses come back for the current PENDING requests, and the pendingRequests count drops back down below the MaxConnections limit. Best Practices: with MaxConnections="-1" use LogLevel="Stats" to monitor the pendingRequests numbers in the plug-in log, under normal conditions. Then, choose a value for MaxConnections that is significantly higher than the highest number shown in the log. This method will help you to determine a MaxConnections value that is right for your specific environment. !ServerIOTimeout means how long should the plug-in wait for a response from the application. After the socket is opened, the plug-in sends the request to the Application Server. The application processes the request and a response is sent back to the client, through the plug-in. How long should that take? What is reasonable, based on the application? There is no single correct answer here. It depends on the application. If the application is very quick to respond, then you can use a lower value for ServerIOTimeout. However, if the application requires more time to process the request (maybe to retrieve data from a database), then you should use a higher number for ServerIOTimeout. Using a value of 0 means that the plug-in will NOT time-out the request. This is often NOT ideal. A positive value means that the plug-in will NOT mark the appserver down after a ServerIOTimeout pops. So, if you want the plug-in to continue sending requests to the timed-out appserver, use a positive value. On the other hand, a negative value means that the plug-in WILL mark the appserver down after a ServerIOTimeout pops. So, if you want the plug-in to immediately mark the appserver down and fail-over to another appserver in the same cluster, use a negative value. Best Practices: use traces to determine the amount of time it takes for your application to respond to requests under normal conditions. Be sure to include the longest running requests that take the most time to respond. Then choose a value for ServerIOTimeout that is much larger (2X or 3X or more) than the longest response time. This method will ensure that your ServerIOTimeout is high enough to allow adequate time for the application to respond normally. Make it a negative value so that if the ServerIOTimeout pops, the plug-in will immediately mark the server down, and retry the request to a different appserver. Note: It is important to set _IgnoreAffinityRequests="false"_ along with _LoadBalance="Round Robin"_ (for Plugin version higher than 6.1). This means that system will follow Round robin algorithm to pick up clustered server for non-sticky requests and will also reduce the load balance weight of server even if its an sticky routing. Other values can be fine-tuned as per application load.
To get more information about configuration parameters used in IHS and liberty, see the following documents: * Understanding IBM HTTP Server plug-in Load Balancing in a clustered environment
* WebSphere Plug-in Session Affinity and Load Balancing
* Recommended values for web server plug-in config
* Configuration elements in plugin-cfg.xml file
* Configuration elements in the server.xml file
Restart IHS Server
You have now completed the Proxy configuration for Liberty ProfileEnterprise Deployments and Multiple Liberty Profiles
IHS can only recognize one plugin file. When you have a distributed deployment, you need to merge the plugin files into a single plugin. This can be accomplished either manually or with the Plugin Merge Tool.Note: This requires a full WebSphere Application Server (WAS) system that is at the same level, or higher, as your Liberty Profile Servers. It is this WAS system that contains the Plugin Merge tool.
- Plugin Merge Tool
Run the pluginCfgMerge script to merge the plug-in configurations together into a single file, like this:
pluginCfgMerge.bat plugin-cfg1.xml plugin-cfg2.xml plugin-cfg3.xml merged-plugin-cfg.xml
(On linux, the command is pluginCFgMerge.sh)
More information on this tool can be found here: How to create a merged plug-in config for multiple Liberty Profile Servers
Once the plugin-cfg files are merged, then you will need to edit them as mentioned in Changes to the Plugin Config section. Best practice is to create one keystore and certificate per Liberty server in your deployment. On the IHS server, create a directory to hold each of your keystores and certificates for each Liberty server. For example,
C:\IBM\WebSphere\plugins\config\<serverA>, C:\IBM\WebSphere\plugins\config\<serverB>, etc.
Then, repeat the Export Signer certificate,New Key Database, and Import Signer Certificate sections once for each Liberty server.
You do not need to copy the keystores. The merged plugin file will be pointing to each of the corresponding keystores in their home directories.
Related topics: Deployment web home, Deployment web home
External links:
Additional contributors: BenSilverman, RosaNaranjo
Contributions are governed by our Terms of Use. Please read the following disclaimer.
Dashboards and work items are no longer publicly available, so some links may be invalid. We now provide similar information through other means. Learn more here.