Creating The IHS Plugin for Liberty Profile
Authors: MikeDelargy, BenSilverman, RosaNaranjo, BrianLahaie Build basis: 6.0.6.x - 7.0.2
The following article is an example of how you can configure a Reverse Proxy Server using Plug-ins with Liberty Profile.
More information on Generating Plug-ins for Liberty Profile can be found here: Liberty Profile Plugin Note: This example covers an all in one Liberty server CLM implementation. For enterprise-specific considerations and/or multiple Liberty profiles, see the section Enterprise Deployments and Multiple Liberty profiles.
And you will need to:
Our Installation Paths for each component will be:

New Keystore
(Note, To enable the CMS provider, add the following phrase to the java.security file.
Version 6.x (Type CMS)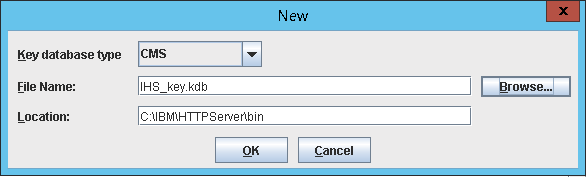
Version 7.x (Type PKCS12)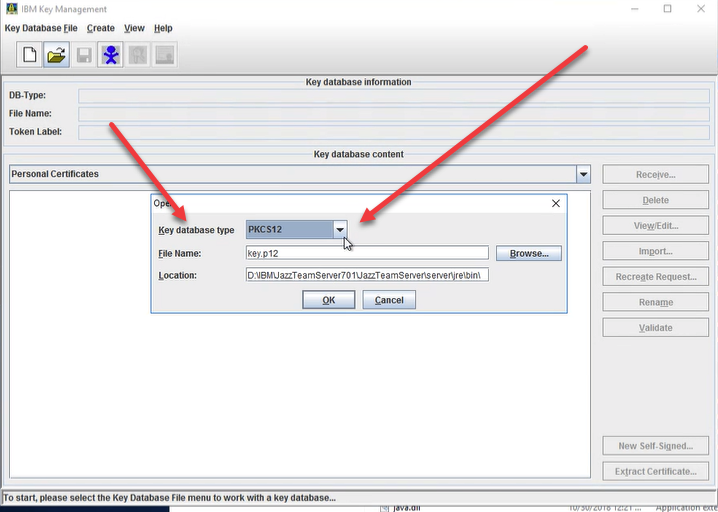
Verify the default certificate was created.
Prior to creating the new Key Database for the plugin config file, create a new directory in your WebSphere Plugins directory. (This is on the IHS server)
As noted above, our plugin install path is: C:\IBM\WebSphere\plugins
We want to create a new directory for our plugin config file.
We will call our new directory WebServer1 and create it in C:\IBM\WebSphere\plugins\config
As seen:
We need to get a certificate from our Liberty Server.
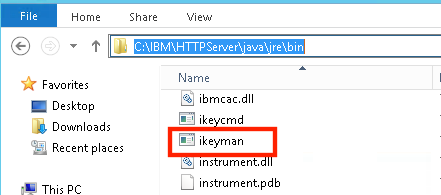
(If your IHS server is on a different server then your Liberty Server, you can use the ikeyman that comes with the CLM installation.
In our installation, it is located here: C:\IBM\clm602\JazzTeamServer\server\jave\jre\bin\ikeyman)
(7.0.1 and higher)
(7.0.0 and lower)


Now we will return to Ikeyman on the IHS server. Ikeyman should still be up. If it is not, then start it again.
(Instead of creating a certificate like we did for IHS, we will use the exported signer certificate from the Liberty server.)


(It should be in the C:\WebSphere\Plugins\config\WebServer1 Directory)
You should now be ready to create the plugin config file
Note: These steps can still be performed even if the server has not yet been configured through /jts/setup:
1) Enable Repodebug by going to https://server:port/app/admin -> Advanced Properties. For example, https://clmweb.ibm.com:9443/rm/admin -> Advanced Properties.
Locate the advanced property called Enable repodebug service and set its value to true. Save the change by clicking Save at the top of the page.
2) Go to https://server:port/app/repodebug/mxBeans/WebSphere%3Aname%3Dcom.ibm.ws.jmx.mbeans.generatePluginConfig/operations/generateDefaultPluginConfig() and click the POST button
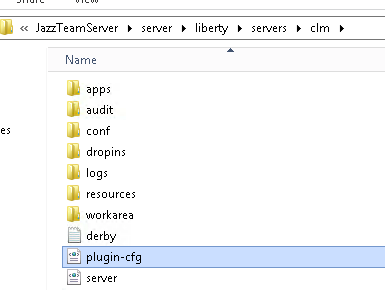
The plugin-cfg.xml will be generated under server_install_dir/server/liberty/servers/clm
Alternate method if the server has been started but not yet configured (should no longer be necessary given options 1 and 2 above):
You must enter two parameters, P1 and P2

(At the end of the article is information on the 'generateDefaultPluginConfig" option instead of the "generatePluginConfig")
Examine the contents of the XML file and look for the following line:
Verify that this entry matches the directory you created for your Liberty plugin
You will also need to make changes to the Plugin config file regarding the Keystore / Certificate you created earlier in Key Database section, Import Jazz Signer Certifact to Web Server section
Modify this to match the certificate information you created for liberty plugin.
Uncomment it out and add the following:
EXAMPLE
*OPTIONAL INFORMATION*
The generateDefaultPluginConfig operation generates the plugin-cfg.xml file
However, if you choose this option, you will have to manually enter this information to each corresponding entry in the Plugin config file. The generatePluginConfig operation is used to customize installation root directory on the WebServer (IHS Server) and Web Server name before you generate the plugin-cfg.xml file. (There are two parameter files with this option)
Parameters for GeneratePluginConfig:
Note: This requires a full WebSphere Application Server (WAS) system that is at the same level, or higher, as your Liberty Profile Servers. It is this WAS system that contains the Plugin Merge tool.
Run the pluginCfgMerge script to merge the plug-in configurations together into a single file, like this:
(On linux, the command is pluginCFgMerge.sh)
More information on this tool can be found here: How to create a merged plug-in config for multiple Liberty Profile Servers
Once the plugin-cfg files are merged, then you will need to edit them as mentioned in Changes to the Plugin Config section. Best practice is to create one keystore and certificate per Liberty server in your deployment. On the IHS server, create a directory to hold each of your keystores and certificates for each Liberty server. For example, Then, repeat the Export Signer certificate,New Key Database, and Import Signer Certificate sections once for each Liberty server.
You do not need to copy the keystores. The merged plugin file will be pointing to each of the corresponding keystores in their home directories.
Then, repeat the Export Signer certificate,New Key Database, and Import Signer Certificate sections once for each Liberty server.
You do not need to copy the keystores. The merged plugin file will be pointing to each of the corresponding keystores in their home directories.
If it works for non ssl but fails for ssl, then there is a problem with your certificate.
Try to get to your Application server by "bypassing" the IHS server.
In your browser, go to:
If you can go directly to your Application server, but not through your proxy server, check your IHS log for errors. Typically this is a problem with the certificate from the Application server.
Look at the Plugin.log (The path is noted in your Plugin-cfg.xml file>
If you get an error similar to the following:
When you try connecting you will have to re-import the certificate.
More information on Generating Plug-ins for Liberty Profile can be found here: Liberty Profile Plugin Note: This example covers an all in one Liberty server CLM implementation. For enterprise-specific considerations and/or multiple Liberty profiles, see the section Enterprise Deployments and Multiple Liberty profiles.
Requirements
In order to create and configure the IHS plugin, you will need to also install:- IBM HTTP Server (IHS)
- Web Server Plug-ins for IBM WebSphere Application Server
- IBM SDK (or JDK)
And you will need to:
- Create a Keystore File for IHS
- Create a Password Stash File for IHS Keystore
- Create a Certificate for IHS
- Create a Keystore File for Liberty Plugin Config
- Create a Password Stash File for Plugin Config Keystore
- Export a signer certificate from the Liberty Server and import it into a keystore
Install Each of the Components.
Install IBM HTTP Server, IBM SDK, and Web Server Plug-ins for IBM WebSphere Application Server- Install each of these tools according to the corresponding installation documentation.
- In our example, we will be installing each of them in the following directory: C:\IBM\
- Your installation directory may be different and will require you to make corresponding path changes.
Our Installation Paths for each component will be:
    IBM HTTP Server (IHS)
           C:\IBM\HTTPServer
   WebSphere Plugins
          C:\IBM\WebSphere\Plugins\
   IBM SDK
          C:\IBM\Java
   CLM Tools
           C:\IBM\clm601\JazzTeamServer\
Create a Keystore and Certificate using Ikeyman for the IHS server
New Key Database
- Locate and start ikeyman
- Create a new Key Database File
New Keystore
- Select Key database type CMS for versions 6.x. For Version 7.x choose type PKCS12 (If the CMS option is not available, see note below)
- Give a name to your keystore. (Our example: IHS_KEY.kdb for type CMS; IHS_KEY.p12 for type PKCS12)
- Enter a path for your keystore Recommendation: Put this in the bin directory of the HTTPServer (You will need to remember this for later for the httpd.conf file)
- Click OK
(Note, To enable the CMS provider, add the following phrase to the java.security file.
security.provider.10=com.ibm.security.cmskeystore.CMSProviderIn Java 6, you will find it:
...\java60\jre\lib\security\java.security)In Java 8, the java.security file is located in this directory:
.../java/8.0/jre/lib/security/java.securityIn Java 11, the java.security file is located in this directory:
.../java/11.0/jre/conf/security/java.security
Version 6.x (Type CMS)
Version 7.x (Type PKCS12)
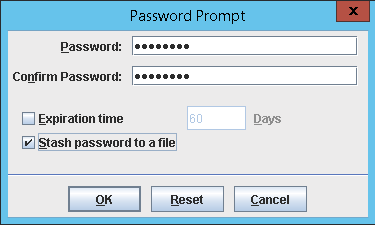
- Enter a password (and confirm)
- Check the box for the Stash Password to a file
- Recommendation: Do not put an expiration date. If you do, you will need to create a new stash file when this expires.)
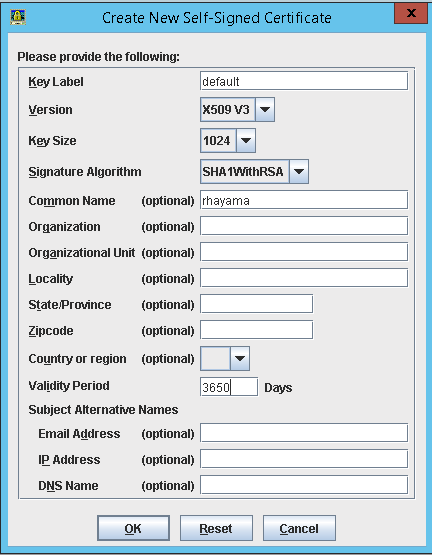
New Self Signed Certificate for the IHS Keystore
- Create a new Self Signed Certificate
- Enter in information about the server
(We are using 'default' as our certificate name) - Enter the WebServer Name (Our server name is 'rhayama')
- Change the expiration to 3650 (This will avoid coming back in a year to do this again.)
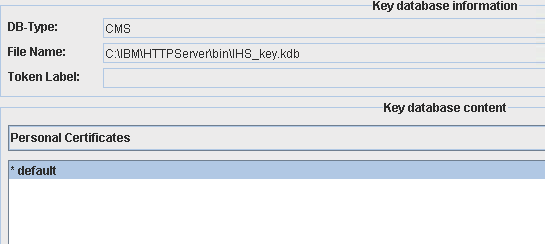
Verify the default certificate was created.
Create a Keystore and Certificate using Ikeyman for the web server Plugin.
Best Practice is to use a separate keystore for the IHS server and the plugin config file.New Directory for the plugin config information
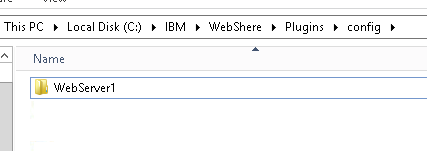
Prior to creating the new Key Database for the plugin config file, create a new directory in your WebSphere Plugins directory. (This is on the IHS server)
As noted above, our plugin install path is: C:\IBM\WebSphere\plugins
We want to create a new directory for our plugin config file.
We will call our new directory WebServer1 and create it in C:\IBM\WebSphere\plugins\config
As seen:
Export Signer Certificate
We need to get a certificate from our Liberty Server.
- Start ikeyman on the Liberty Server.
(If your IHS server is on a different server then your Liberty Server, you can use the ikeyman that comes with the CLM installation.
In our installation, it is located here: C:\IBM\clm602\JazzTeamServer\server\jave\jre\bin\ikeyman)
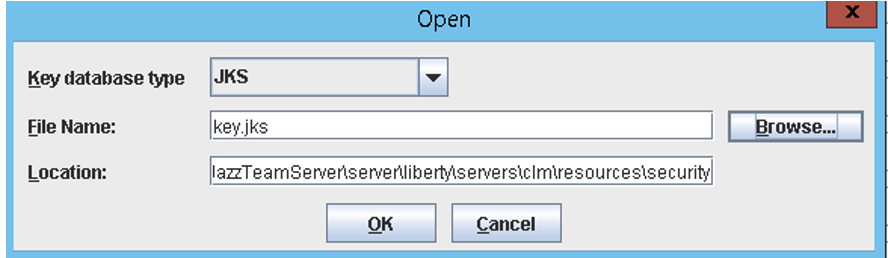
- In ikeyman, select open
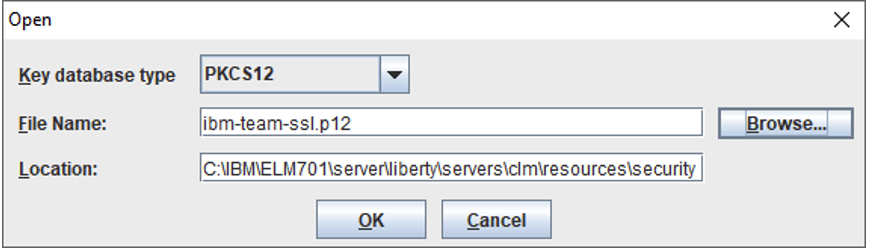
- On versions 7.0.1 and higher, Select Key File type PKCS12
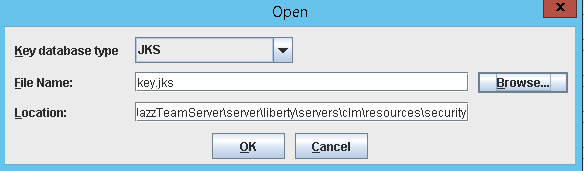
- On versions 7.0.0 and lower, Select Key File type JKS
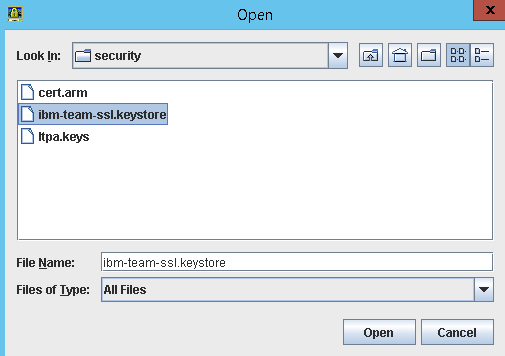
- At the bottom, select Files of Type All Files
(7.0.1 and higher)
(7.0.0 and lower)
- On versions 7.0.1 and higher, navigate to the Liberty Profile keystore
- C:\IBM\clm701\JazzTeamServer\server\liberty\servers\clm\resources\security\ibm-team-ssl.p12 *On versions 7.0.0 and lower, navigate to the Liberty Profile keystore
- C:\IBM\clm601\JazzTeamServer\server\liberty\servers\clm\resources\security\ibm-team-ssl.keystore
- The password is ibm-team
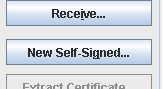
- On the right side, select Extract Certificate
- Accept the default location
- Click Okay and verify your certificate was created
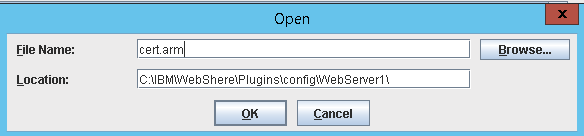
- Copy this certificate into the WebServer1 directory you created above. (On the IHS Server)
- You can now close ikeyman on the Liberty Server.
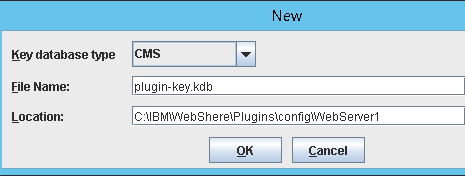
New Key Database
Now we will return to Ikeyman on the IHS server. Ikeyman should still be up. If it is not, then start it again.
- Select Key database type CMS (Version 6.x) / PKS12 (Version 7.x
- Give a name to your keystore. (Our example: plugin-key.kdb)
- Enter a path for your keystore Recommendation: Put this in the directory you just created: C:\IBM\WebSphere\plugins\config\WebServer1
- Click OK
- Enter a password (and confirm)
- Check the box for the Stash Password to a file
- Recommendation: Do not put an expiration date. If you do, you will need to create a new stash file when this expires.
Import Jazz Signer Certificate
(Instead of creating a certificate like we did for IHS, we will use the exported signer certificate from the Liberty server.)
- Now import the signer certificate from Liberty Server
- In the middle of the page, you should see Personal Certificate
- change this to Signer Certificate:
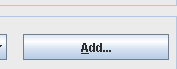
- Select the Add button and navigate to the WebServer1 directory that you copied the cert.arm into in the preceding step.
(It should be in the C:\WebSphere\Plugins\config\WebServer1 Directory)
- When the box comes up, navigate to the cert.arm file.
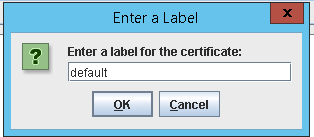
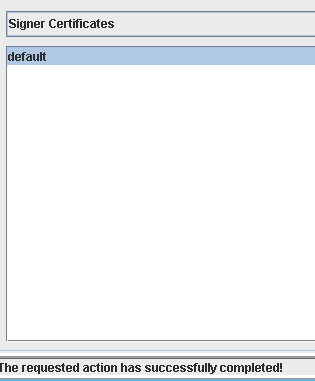
- You will enter a label. Choose default
- You should see a message that you successfully imported the certificate.
You should now be ready to create the plugin config file
Create the Plug-in Config file
- To create the Plug-in Config for Liberty Profile, your Liberty Server must be running.
- On versions 6.0.4 and higher, the plugin-cfg.xml is generated automatically at server startup under server_install_dir/server/liberty/servers/clm/logs/state
- On versions 6.0.3 and below, the plugin-cfg.xml can be generated by calling an mbean from repodebug from any application using the following steps:
Note: These steps can still be performed even if the server has not yet been configured through /jts/setup:
1) Enable Repodebug by going to https://server:port/app/admin -> Advanced Properties. For example, https://clmweb.ibm.com:9443/rm/admin -> Advanced Properties.
Locate the advanced property called Enable repodebug service and set its value to true. Save the change by clicking Save at the top of the page.
2) Go to https://server:port/app/repodebug/mxBeans/WebSphere%3Aname%3Dcom.ibm.ws.jmx.mbeans.generatePluginConfig/operations/generateDefaultPluginConfig() and click the POST button
The plugin-cfg.xml will be generated under server_install_dir/server/liberty/servers/clm
Alternate method if the server has been started but not yet configured (should no longer be necessary given options 1 and 2 above):
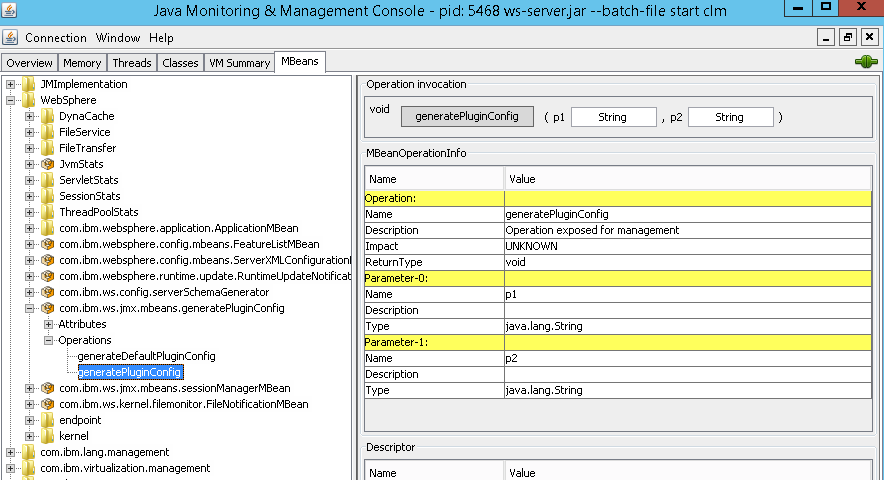
- Run Jconsole
C:\IBM\Java70\bin\jconsole
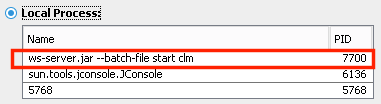
- Because we are running on the same system, we can connect to a local process.
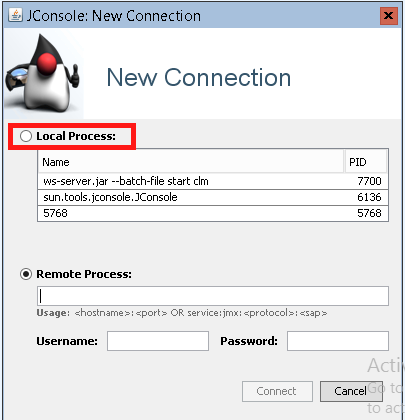
- Select the ws-server.jar --batch-file start clm process and click Connect
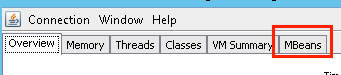
- Select the MBeans Tab
- Select the WebSphere:name=com.ibm.ws.jmx.mbeans.generatePluginConfig MBean located in the WebSphere directory.
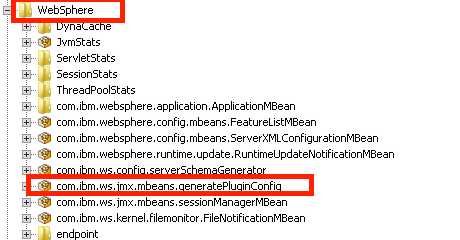
- Expand the Operations and click the generatePluginConfig
You must enter two parameters, P1 and P2
- P1: For P1, enter the path for your plugin on the IHS server. (This is the same directory you put your Liberty Keystore in. C:\IBM\WebSphere\Plugins\)
- P2: For P2, enter the WebServer name (We will use WebServer1 )
- On the Top Right, click the generatePluginConfig button
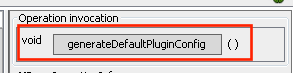
(At the end of the article is information on the 'generateDefaultPluginConfig" option instead of the "generatePluginConfig")
- You should get a message that the Method was successfully invoked

- You should now see your plugin config file
- You will need to copy this over to your IHS server and place in the directory we created for it earlier. (Our example: C:\IBM\WebSphere\Plugins\config\WebServer1)
- You can open the plugin config file and verify the contents. You should see something similar to this snippet:
<?xml version="1.0" encoding="UTF-8"?><!--HTTP server plugin config file for WebServer1 generated on 2016.05.17 at 16:14:49 PDT-->
<Config ASDisableNagle="false" AcceptAllContent="false" AppServerPortPreference="HostHeader" ChunkedResponse="false" FIPSEnable="false" IISDisableNagle="false" IISPluginPriority="High" IgnoreDNSFailures="false" RefreshInterval="60" ResponseChunkSize="64" SSLConsolidate="false" TrustedProxyEnable="false" VHostMatchingCompat="false">
   <Log LogLevel="Error" Name="C:\IBM\WebShere\Plugins\logs\WebServer1\http_plugin.log"/>
   <Property Name="ESIEnable" Value="true"/>
   <Property Name="ESIMaxCacheSize" Value="1024"/>
   <Property Name="ESIInvalidationMonitor" Value="false"/>
   <Property Name="ESIEnableToPassCookies" Value="false"/>
   <Property Name="PluginInstallRoot" Value="C:\IBM\WebShere\Plugins"/>
<!-- Configuration generated using httpEndpointRef=defaultHttpEndpoint-->
<!-- The default_host contained only aliases for endpoint defaultHttpEndpoint.
    The generated VirtualHostGroup will contain only configured web server ports:
      webserverPort=80
      webserverSecurePort=443 -->
   <VirtualHostGroup Name="default_host">
      <VirtualHost Name="*:80"/>
      <VirtualHost Name="*:443"/>
   </VirtualHostGroup>
   <ServerCluster CloneSeparatorChange="false" GetDWLMTable="false" IgnoreAffinityRequests="true" LoadBalance="Round Robin" Name="WebServer1_default_node_Cluster" PostBufferSize="0" PostSizeLimit="-1" RemoveSpecialHeaders="true" RetryInterval="60">
      <Server CloneID="8192ea2e-0dc3-4d34-9766-dc7240d46b43" ConnectTimeout="5" ExtendedHandshake="false" MaxConnections="-1" Name="default_node_WebServer1" ServerIOTimeout="900" WaitForContinue="false">
         <Transport Hostname="192.168.199.254" Port="9080" Protocol="http"/>
         <Transport Hostname="192.168.199.254" Port="9443" Protocol="https">
            <Property Name="keyring" Value="keyring.kdb"/>
            <Property Name="stashfile" Value="keyring.sth"/>
            <Property Name="certLabel" Value="LibertyCert"/>
         </Transport>
      </Server>
Changes to the Plugin Config File
You will need to make some changes to this xml file to match your environment.Examine the contents of the XML file and look for the following line:
<Log LogLevel="Error" Name= ************
Verify that this entry matches the directory you created for your Liberty plugin
<Log LogLevel="Error" Name="C:\IBM\WebShere\Plugins\logs\WebServer1\http_plugin.log"/>
You will also need to make changes to the Plugin config file regarding the Keystore / Certificate you created earlier in Key Database section, Import Jazz Signer Certifact to Web Server section
            <Property Name="keyring" Value="keyring.kdb"/>
            <Property Name="stashfile" Value="keyring.sth"/>
            <Property Name="certLabel" Value="LibertyCert"/>
Modify this to match the certificate information you created for liberty plugin.
- Example Windows
            <Property Name="keyring" Value="C:\IBM\WebSphere\Plugins\config\WebServer1\plugin-key.kdb"/>
            <Property Name="stashfile" Value="C:\IBM\WebSphere\Plugins\config\WebServer1\plugin-key.sth"/>
            <Property Name="certLabel" Value="default"/>
- Example Linux
            <Property Name="keyring" Value="/opt/IBM/WebSphere/Plugins/config/WebServer1/plugin-key.kdb"/>
            <Property Name="stashfile" Value="/opt/IBM/WebSphere/Plugins/config/WebServer1/plugin-key.sth"/>
            <Property Name="certLabel" Value="default"/>
Modify the httpd.conf File
SSL Module
- Search for the following:
Uncomment it out and add the following:
- The Port you will be listening on (port 443 is the default)
- The virtual host name ( a * means accept all traffic coming in on port 443)
- The path to your Key file (created above)
- The path to the stash file (created above)
EXAMPLE
LoadModule ibm_ssl_module modules/mod_ibm_ssl.so
Listen 0.0.0.0:443
## IPv6 support:

<VirtualHost *:443>
SSLEnable
SSLProtocolDisable SSLv2 SSLv3
 KeyFile C:\IBM\HTTPServer\bin\IHS_key.kdb
 SSLStashFile C:\IBM\HTTPServer\bin\IHS_key.sth
</VirtualHost>
Plugin Location
At the bottom of the httpd.conf file, enter in the path to the plugin file as well as the path to the ap22 module- Windows
LoadModule was_ap22_module "C:\IBM\WebSphere\Plugins\bin\32bits\mod_was_ap22_http.dll"
WebSpherePluginConfig "C:\IBM\WebSphere\Plugins\config\WebServer1\plugin-cfg.xml"
- Linux
LoadModule was_ap22_module "/opt/IBM/WebSphere/Plugins/bin/32bits/mod_was_ap22_http.so"
WebSpherePluginConfig "/opt/IBM/WebSphere/Plugins/config/WebServer1/plugin-cfg.xml"
Restart IHS Server
You have now completed the Proxy configuration for Liberty Profile*OPTIONAL INFORMATION*
Generate Plugin Options
In the mbean, there are two plugin options:- generateDefaultPluginConfig
- generatePluginConfig
The generateDefaultPluginConfig operation generates the plugin-cfg.xml file
However, if you choose this option, you will have to manually enter this information to each corresponding entry in the Plugin config file. The generatePluginConfig operation is used to customize installation root directory on the WebServer (IHS Server) and Web Server name before you generate the plugin-cfg.xml file. (There are two parameter files with this option)
Parameters for GeneratePluginConfig:
- P1 is the "installation root directory
- P2 is the "Application server name"
Enterprise Deployments and Multiple Liberty Profiles
IHS can only recognize one plugin file. When you have a distributed deployment, you need to merge the plugin files into a single plugin. This can be accomplished either manually or with the Plugin Merge Tool.Note: This requires a full WebSphere Application Server (WAS) system that is at the same level, or higher, as your Liberty Profile Servers. It is this WAS system that contains the Plugin Merge tool.
- Plugin Merge Tool
Run the pluginCfgMerge script to merge the plug-in configurations together into a single file, like this:
pluginCfgMerge.bat plugin-cfg1.xml plugin-cfg2.xml plugin-cfg3.xml merged-plugin-cfg.xml
(On linux, the command is pluginCFgMerge.sh)
More information on this tool can be found here: How to create a merged plug-in config for multiple Liberty Profile Servers
Once the plugin-cfg files are merged, then you will need to edit them as mentioned in Changes to the Plugin Config section. Best practice is to create one keystore and certificate per Liberty server in your deployment. On the IHS server, create a directory to hold each of your keystores and certificates for each Liberty server. For example,
C:\IBM\WebSphere\plugins\config\<serverA>, C:\IBM\WebSphere\plugins\config\<serverB>, etc.
Then, repeat the Export Signer certificate,New Key Database, and Import Signer Certificate sections once for each Liberty server.
You do not need to copy the keystores. The merged plugin file will be pointing to each of the corresponding keystores in their home directories.
Troubleshooting
- Test IHS (without clm) Go directly to your proxy server (stem of your Public URI)
First try without ssl:
http://My_proxy_server

Then try with ssl:
https://My_proxy_server
If it does not work without ssl, have you started your proxy server?
If it works for non ssl but fails for ssl, then there is a problem with your certificate.
- Connectivity to CLM
Try to get to your Application server by "bypassing" the IHS server.
In your browser, go to:
https://your_AppServer:<port>/jts/admin
example:
https://my_clm:9443/jts/admin
If you cannot get directly to your Application server, is CLM Running?
If you can go directly to your Application server, but not through your proxy server, check your IHS log for errors. Typically this is a problem with the certificate from the Application server.
Look at the Plugin.log (The path is noted in your Plugin-cfg.xml file>
If you get an error similar to the following:
ERROR: lib_security: logSSLError: str_security (gsk error 408): GSK_ERROR_BAD_KEYFILE_PASSWORD
[Tue Apr 5 11:42:03 2010] 00001750 00000bec - ERROR: lib_security: initializeSecurity: Failed to initialize GSK environment
[Tue Apr 5 11:42:03 2010] 00001750 00000bec - ERROR: ws_transport: transportInitializeSecurity: Failed to initialize security
[Tue Apr 5 11:42:03 2010] 00001750 00000bec - ERROR: ws_server: serverAddTransport: Failed to initialize security
The problem is possibly:
- You have a bad Keystore / Certificate / Stash file
- You have not modified both the httpd.conf and Plugin-cfg.xml file with the correct information
- You have an old certificate in your browser
When you try connecting you will have to re-import the certificate.
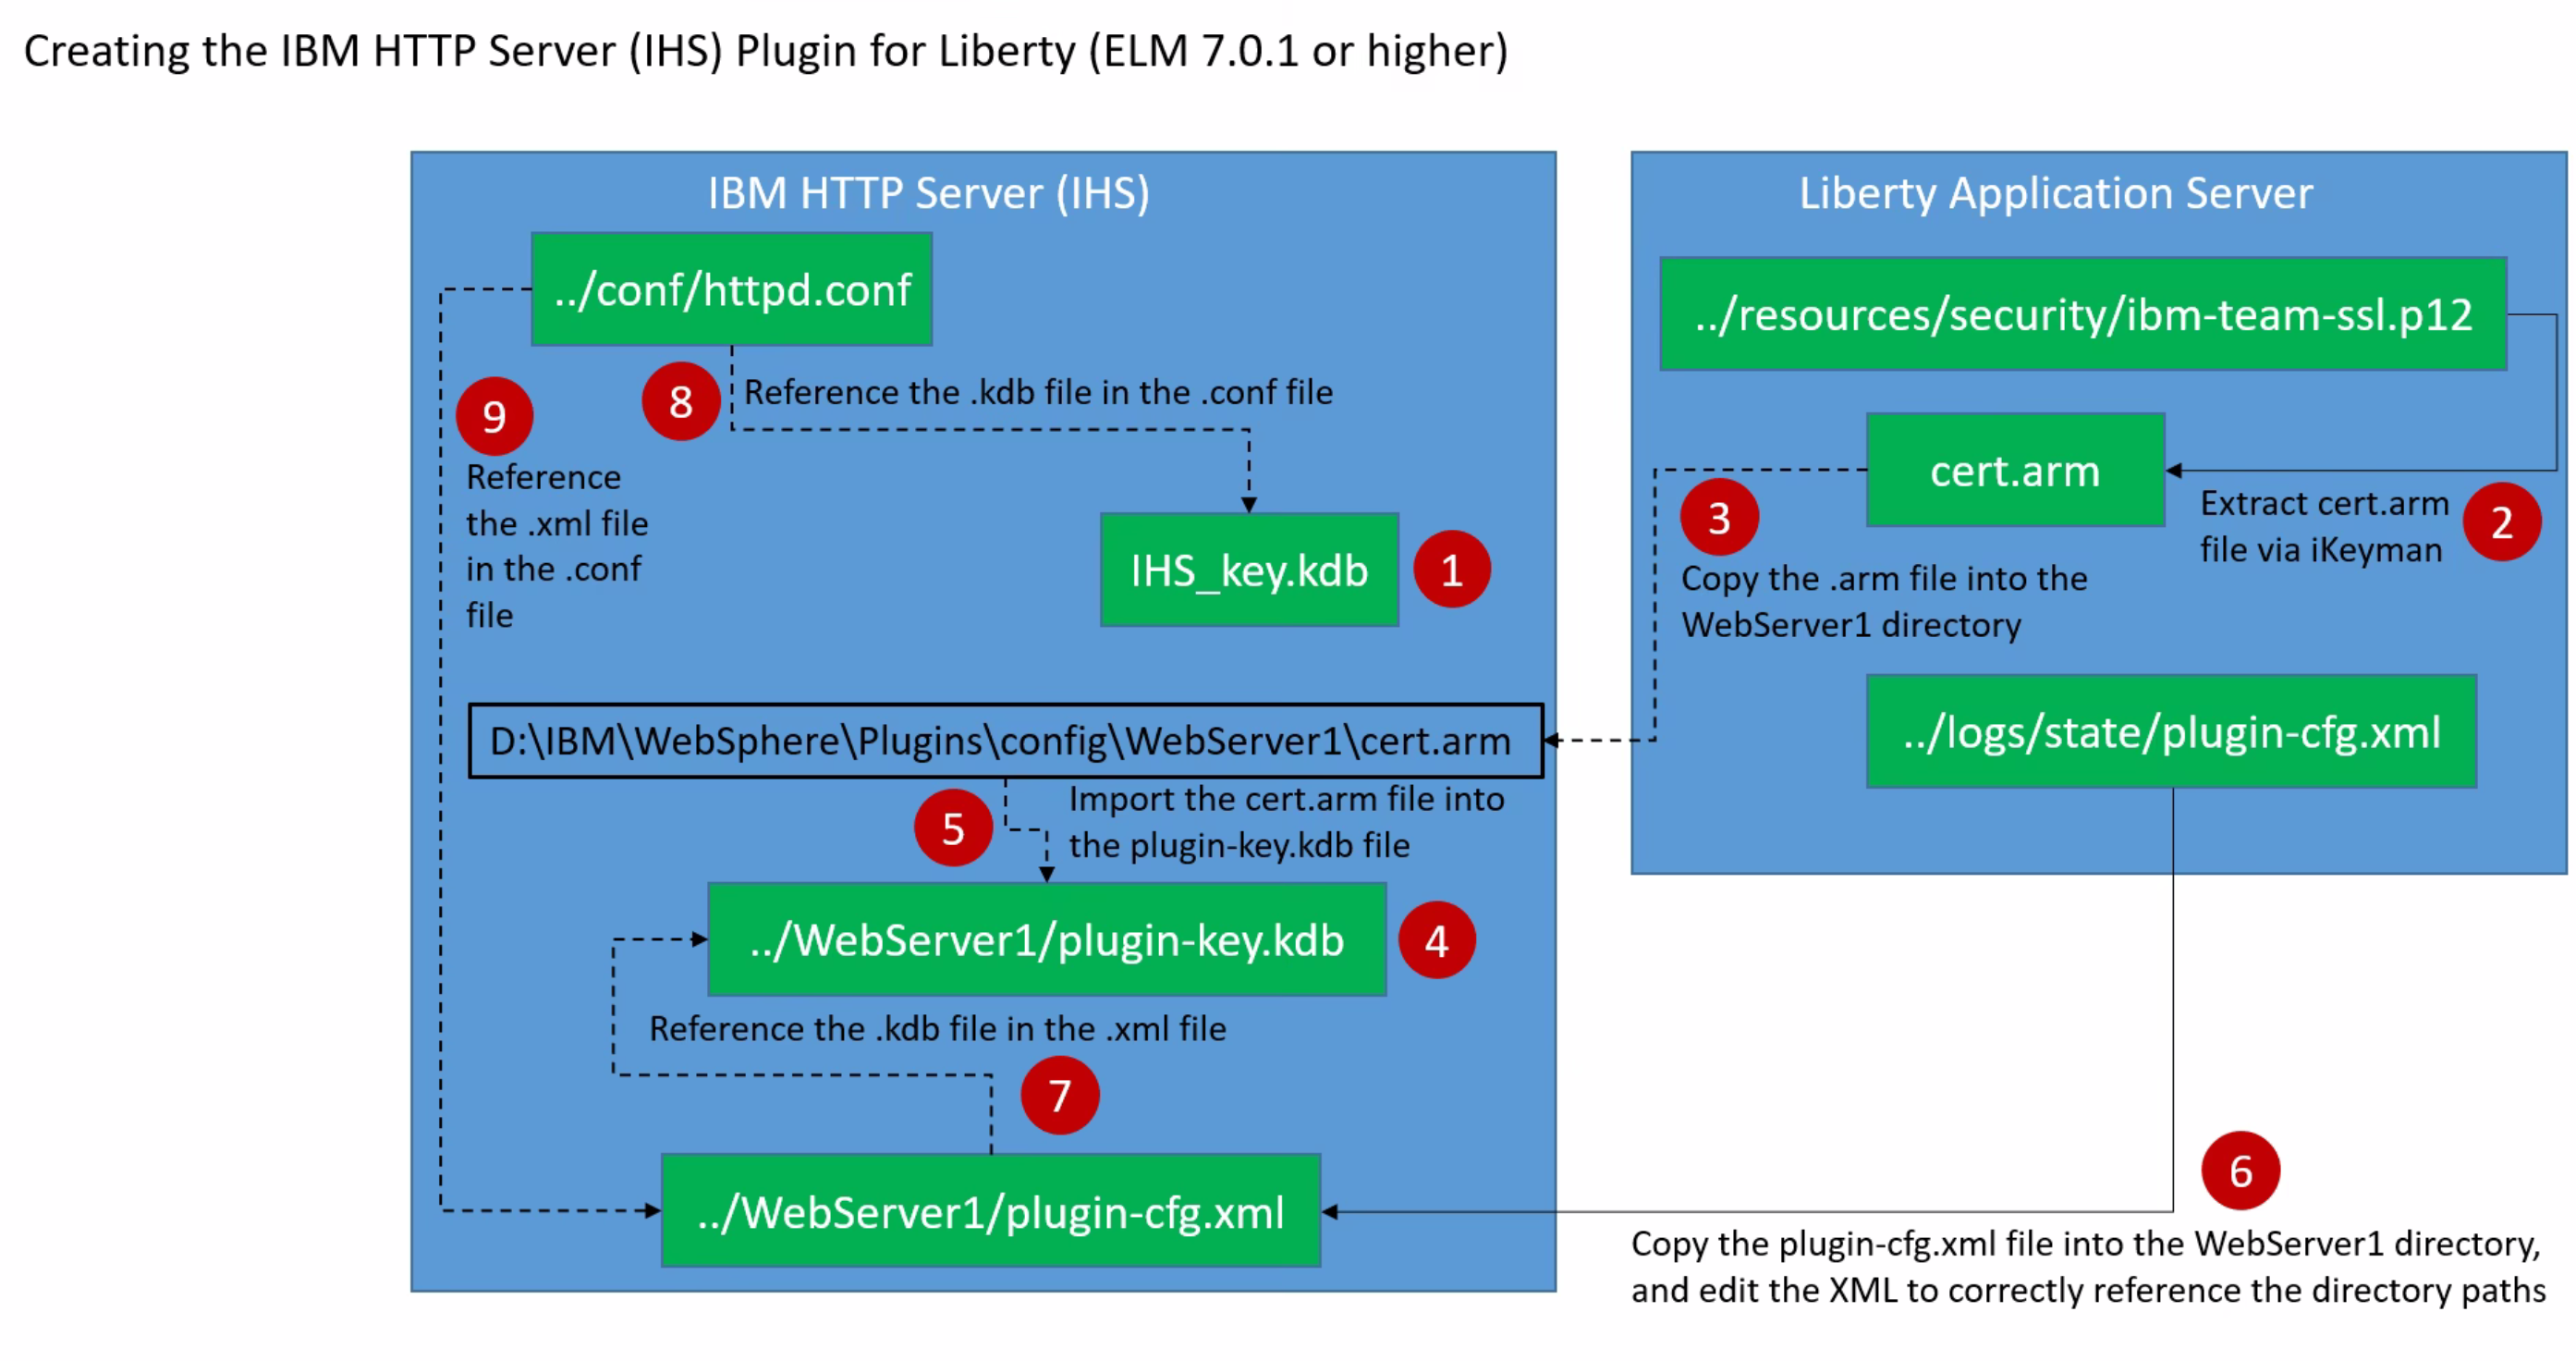
- Visualization of steps required to create a liberty profile IHS:
Related topics: Deployment web home, Deployment web home
External links:
Additional contributors: BenSilverman, RosaNaranjo, BrianLahaie


| I | Attachment | Action | Size | Date | Who | Comment |
|---|---|---|---|---|---|---|
| |
CreatingLibertyProfileIHSVisualization.png | manage | 884.2 K | 2023-01-06 - 22:01 | RosaNaranjo | Visualization of steps required to create a liberty profile IHS |
| |
JKS-2.png | manage | 48.0 K | 2020-09-24 - 13:33 | UnknownUser | |
| |
PKCS12-2.png | manage | 1.0 K | 2020-09-24 - 13:34 | UnknownUser | |
| |
PKCS12-3.png | manage | 69.0 K | 2020-09-24 - 13:45 | UnknownUser | |
| |
pks12.png | manage | 194.3 K | 2020-09-22 - 10:36 | UnknownUser | pks12 screen shot |
Contributions are governed by our Terms of Use. Please read the following disclaimer.
Dashboards and work items are no longer publicly available, so some links may be invalid. We now provide similar information through other means. Learn more here.