 CLM z/OS configuration utility
Authors: LiamDoherty Build basis: Rational Team Concert - Enterprise Extensions v5.0.1
The Collaborative Lifecycle management (CLM) Configuration Utility is an ISPF based utility to aid in the configuration of all the components of CLM on the z/OS platform. As there are many optional configuration components to CLM, such as where the server is installed, what application server to use, what data base, etc, it can be a unclear what to install. The configuration utility allows the user to select the components they wish to install and from there it creates a work flow based list of items to action, that perform the configuration. The work flow is presented in a logical order of items to be actioned. Users can add additional configuration items or even create completely new configurations.
.SBLZEXEC(BLZCINIT)'' '
The ISPF client command
Installation
The installation of the CLM Configuration utility is performed by the SMP/E installation of FMID HRCC501 which is the Common Components FMID. For information see the SMP/E installation process topic.Running the CLM Configuration Utility on z/OS®
The Colaborative Lifecycle Management Configuration Utility libraries are created as part of the SMP/E installation. When you run the REXX procedure for starting the Configuration Utility, the libraries are dynamically added to your TSO/ISPF session. The libraries are assigned only when needed using LIBDEF and ALTLIB services. This method ensures that existing TSO/ISPF logon procedures do not need to be changed. The components of the ISPF client dialog are delivered in these libraries:- hlq.SBLZEXEC
- REXX EXECs
- hlq.SBLZLOAD
- Load modules
- hlq.SBLZMxxx
- ISPF messages
- hlq.SBLZPxxx
- ISPF panels
- hlq.SBLZSLIB
- ISPF skkeletons
- hlq.SBLZSAMP
- Work flow XML
Starting the Configuration Utility
Start the Configuration Utility dialog using the BLZCINIT REXX executable code. You can run the executable code from the TSO command processor panel: On the TSO command processor panel, enter EX 'BLZCINIT accepts three parameters:
- HLQ
- (Optional.)The data set name high level qualifiers for the Configuration Utility data sets. If this is not specified the HLQ used to start
BLZCINITwill be used as the default. - USERHLQ
- (Optional.)The data set name high level qualifiers for the Configuration Utility data sets created by the Configuration Utility process. If this is not specified the default is BLZ.#CUST.
- Language
- (Optional.) Identifies the national language. Currently, the Configuration Utility only supports the following languages:
- ENU
- U.S. English, which is the default if Language is omitted
- ENP
- U.S. English Uppercase
- JPN
- Japanese
ex 'BLZ.V501.SBLZEXEC(BLZCINIT)' 'BLZ.V501 BLZ.CONFIG ENU'
The resulting data set used are:
BLZ.V501.SBLZPENU (etc System data sets)
BLZ.CONFIG.CLMnnn.* (configuration data sets)
When the Configuration Utility is started, either for the first time or on subsequent invocation the following information is presented to the user:
Rational CLM V5.0.1 utility initialization
HLQ for install datasets = BLZ.V501
HLQ for user datasets = BLZ.CONFIG
This information tells the user the version of the Configuration Utility, the product library high level qualifier used, and the high level qualifier of the configuration data sets.
Creating a new configuration
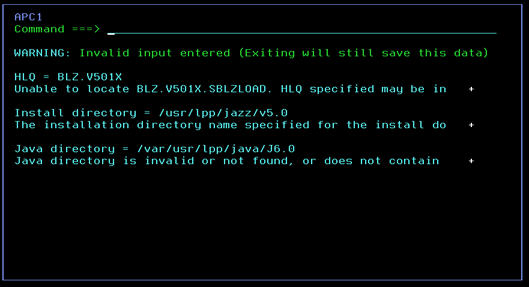
On the initial invocation, or when a new configuration is requested, the Initial options menu is presented. This screen allows the user to enter the location of :- The HLQ of the installed product data sets. On initial invocation this defaults to the HLQ used to start the Configuration Utility
- The location of the BLZPASTK module. It is possible this has been moved to a secure library that is APF authorized already.
- The product installation directory in the Hierarchical File System, by default this is /usr/lpp/jazz/v5.0.
- The location of Java. The Configuration Utility will use the Java version found in the users path, if one exists.
- The directory to be used for CLM configuration files, by default /etc/jazz50.
- The directory to be used for work files, log files and temporary files, by default this is /u/jazz50.
- The location of the iconv executable, by default /bin/iconv.
- CLM Configuration utility - Options Menu:

- CLM Configuration utility - Options Errors:
- CLM Configuration utility - Options Menu Java Version:

Entering customization information via the customization panels
Once the user has entered the valid information on the Options menu they will be presented with the main customization menu. This is the menu that drives the selection and customization of the required and optional components to be installed for CLM. The list presented in the Main Customization Menu shows all of the available options:- CLM Configuration utility - Customization Main Menu:
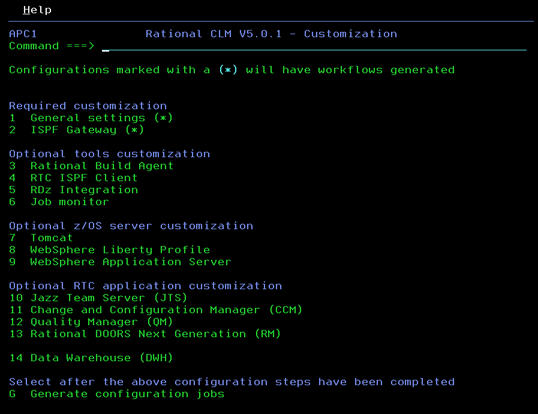
1  General settings (*)
2  ISPF Gateway (*)
3  Rational Build Agent
The
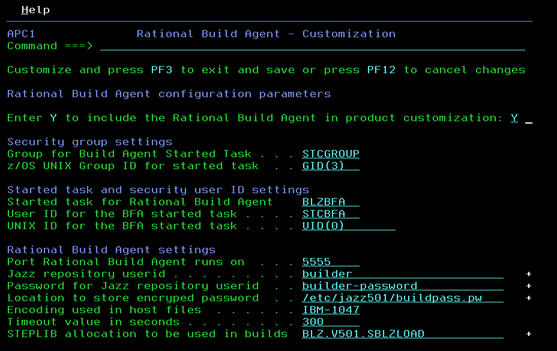
(*) next to an option indicates if that option has been selected to be configured. The General Settings and ISPF Gateway are required customizations so are marked with a (*). For any of the optional customizations the user need to select the option, and then in the subsequent screen mark that they wish this optional component to be customized. Taking the above scenario of just installing the Rational Build Agent the user would enter option 3 and press Enter and then be presented with the Rational Build Agent Customization panel. They need to enter a Y at the specified place to indicate that this component will be included in the customization. In addition all of the default settings should be reviewd and changed if required.
- CLM Configuration utility - Rational Build Agent Customization:
Generating the configuration work flow
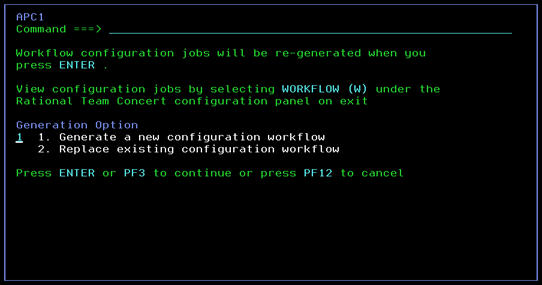
Once all of the required components have been selected and the settings checked the work flow for this particular configuration can be generated. On the main configuration panel select the G option to generate the configuration jobs.- CLM Configuration utility - Generate Configuration:

- Generate a new configuration workflow or
- Replace the existing workflow
- CLM Configuration utility - Generation Selection:
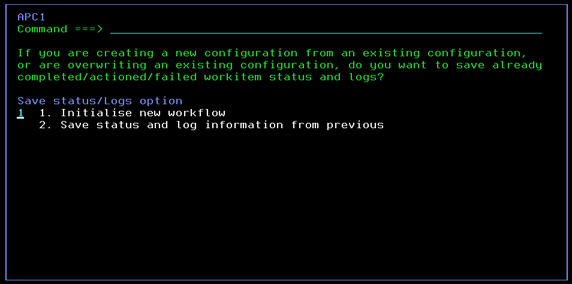
- Initialize a new workflow or
- Save the status and log information from the current configuration
- CLM Configuration utility - Initialisation Selection:
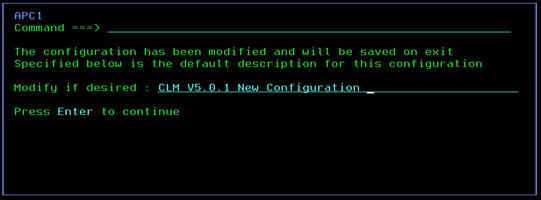
- CLM Configuration utility - Configuration Description:
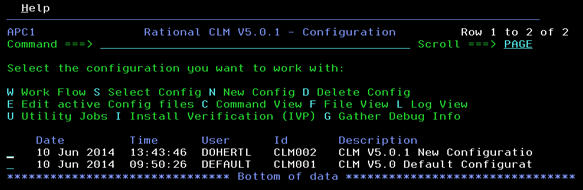
- CLM Configuration utility - Configuration Selection:
Modifying an existing configuration
Should you wish to modify an existing configuration for example to change a parameter setting or to add a new optional component you can do so by placing an S next to a configuration listed in the Configuration selection list. When you press Enter the main customization panel will be displayed again, where you can select the component that you want to modify. Once you have made your modifications you can use the G option to Generate the workflow. At this point you will be offered a choice to:- Generate a new configuration workflow or
- Replace the existing workflow
- Initialize a new workflow or
- Save the status and log information from the current configuration
Working with a configuration workflow
Depending on what components you have chosen to install will determine what workflow items have been added to the workflow for a particular configuration. To actually perform the CLM configuration, that is, to create and modify the configuration files, create databases and started tasks, the workflow items need to be actioned. The process of actioning them will run them is some way, depending on the type of workflow item to be actioned. To see the list of workflow items that your configuration has generated enter a W next to the configuration you want to work with. The workflow item list screen is displayed:- CLM Configuration utility - Workflow Item list:
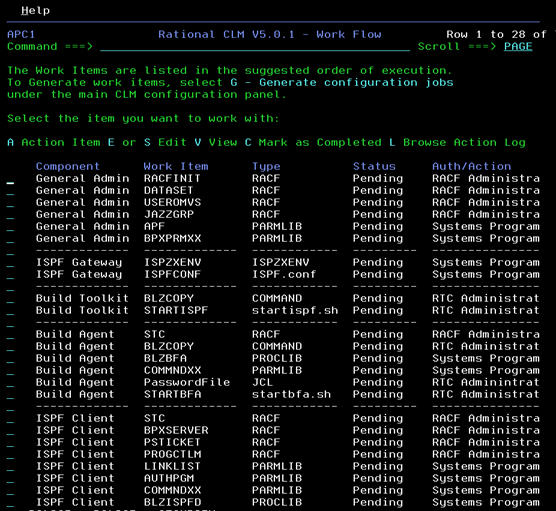
- A - Action Item
- Action the specified workflow item. This could mean running a RACF command, a REXX exec or some SQL, submit a job or just provide some instructions
- E or S - Edit
- Edit the generated workflow item. The workflow item which might be an exec, RACF command or Job may need some local edits to be made. If the are made they will be saved so they can subsequently be actioned.
- V - View
- View the contents of the workflow item
- C - Mark as Completed
- Some workflow items have a manual task that needs to be performed. Actioning them does not do anything. Once the manual task has been completed the user can mark a workflow item as complete.
- L - Browse Action Log
- Browse the action log. This could be the output from a RACF command, a REXX exec or a job.
- RACF
- A RACF command. If you action a RACF command the workflow processor will run the RACF command. If you wish you can edit the workflow item prior to actioning it, for example to replace the RACF statements with Top Secret or ACF2 statements.
- PARMLIB
- Update to a PARMLIB member. Actioning these will not do anything. The workflow item will contain instructions on what the user must do to complete the workflow item. Once done the user can mark the workflow item as Complete.
- PROCLIB
- Update to a PROCLIB member. Actioning these will not do anything. The workflow item will contain instructions on what the user must do to complete the workflow item. Once done the user can mark the workflow item as Complete.
- COMMAND
- Run a command. This could be a TSO command, a REXX exec or an SQL command. The workflow processor will run the specified command and save the log. It will mark the status and completed on successful completion or failed if the command fails to run successfully.
- JCL
- Run a JCL member. The job will be submitted when the workflow item is actioned. Once complete the job output will be retrieved and written to the log. See Note below on Job retrieval.
- filename
- The remaing types specify a file name such as ISPZXENV and ISPF.conf. Actioning these workflow items will copy the generated file to the live configuration directory. A backup of what was there previously will be taken.
Additional configuration options
Once a workflow has been completely actioned there are other co0nfiguration options that can be utilized. These options are available from the configuration selection panel:- CLM Configuration utility - Configuration Options:
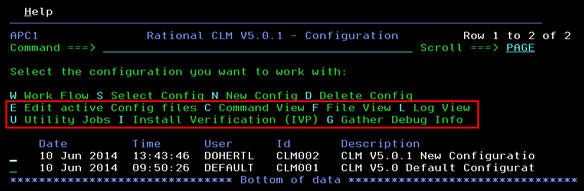
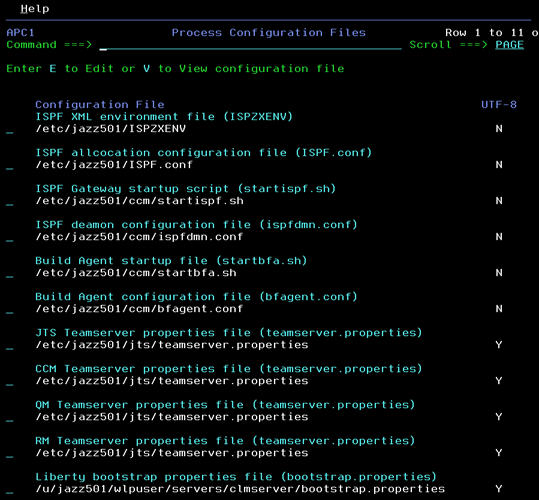
Edit active Config files
Use the E option if you need to make direct edits on the CLM configuration files. For a particular configuration, all of the configuration files will be listed in a single screen, making it easy to find and edit the files that you require.- CLM Configuration utility - Edit Configuration files:
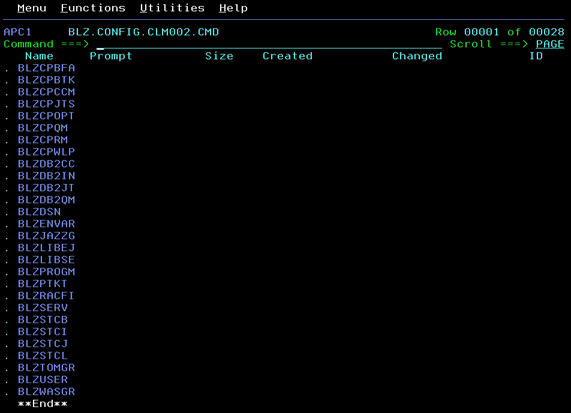
Command View
Use the C option to view the generated commands. You can view the commands in the context of the workflow items from the Workflow list screen. But this options presents a listing of the files in the data set in which they were created.- CLM Configuration utility - View Commands:
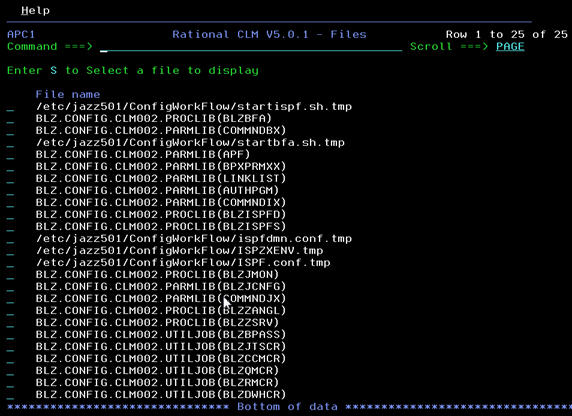
File View
Use the F option to view the generated files such as generated config files, PARMLIB and PROCLIB members. You can view the files in the context of the workflow items from the Workflow list screen. But this options presents a listing of the files in the data sets and directories in which they were created.- CLM Configuration utility - View Files:
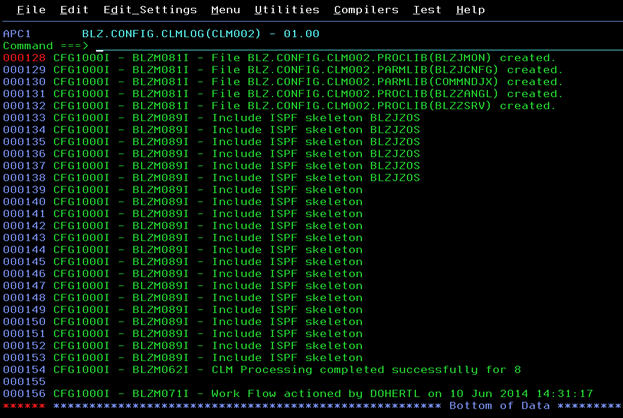
Log View
Use the L option to view the log. This is the overall log for a particular configuration rather than the specific logs relating to a workflow item.- CLM Configuration utility - View Logs:
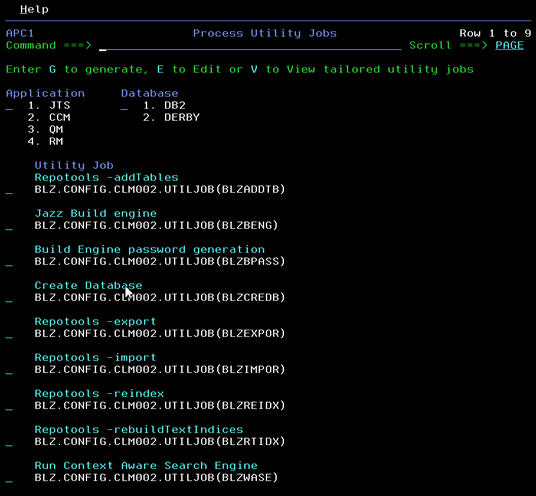
Utility Jobs
Use the U option to generate utility jobs from templates. These are a number of jobs that are not part of a workflow and are required on an as-required basis such as some of the Repotools jobs such as Export. tailor the jobs as you require from the options provided. * CLM Configuration utility - Process Utility Jobs:
Install Verification (IVP)
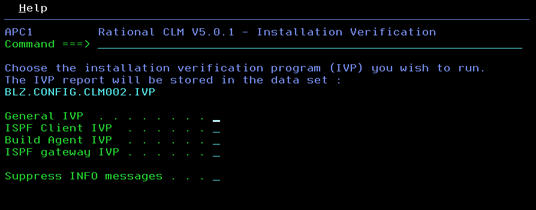
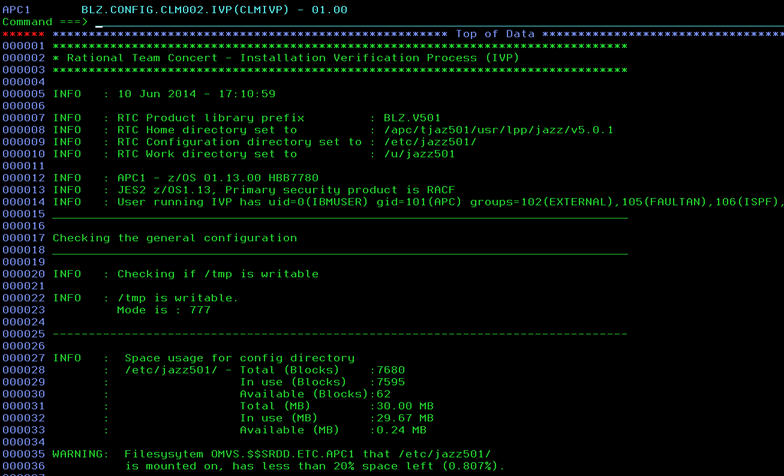
Use the I option to run the Installation Verification process in foreground mode. Select which parts of the IVP to run. You can use the Suppress INFO messages to do just that, such that only WARNING and ERROR messages are produced. However, to ensure everything looks OK it is a good idea to not suppress the INFO messages the first time the IVP is run.- CLM Configuration utility - Installation Verification Process:
- CLM Configuration utility - IVP report:
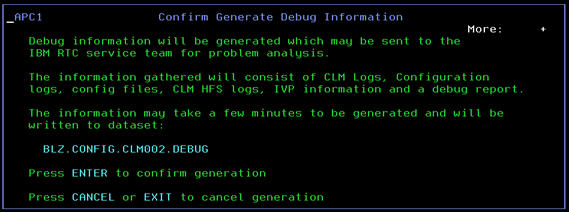
Gather Debug Info
On the instruction of IBM support use the G option to gather debug information. this option will collect all the logs, config files, generated commands and other information that might be useful in debugging an installation problem.- CLM Configuration utility - Gather Debug Information:
External links:


| I | Attachment | Action | Size | Date | Who | Comment |
|---|---|---|---|---|---|---|
| |
Configuration_Description.jpg | manage | 21.1 K | 2014-06-10 - 05:42 | UnknownUser | CLM Configuration utility - Configuration Description |
| |
Configuration_Selection.jpg | manage | 30.4 K | 2014-06-10 - 05:58 | UnknownUser | CLM Configuration utility - Configuration Selection |
| |
Configuration_options.jpg | manage | 32.9 K | 2014-06-10 - 07:59 | UnknownUser | CLM Configuration utility - Configuration Options |
| |
Customization_Main_Menu.jpg | manage | 43.5 K | 2014-06-10 - 02:33 | UnknownUser | CLM Configuration utility - Customization Main Menu |
| |
Edit_Configuration_files.jpg | manage | 62.1 K | 2014-06-10 - 08:05 | UnknownUser | CLM Configuration utility - Edit Configuration files |
| |
Gather_Debug.jpg | manage | 32.7 K | 2014-06-10 - 08:12 | UnknownUser | CLM Configuration utility - Gather Debug Information |
| |
Generate_Configuration.jpg | manage | 5.5 K | 2014-06-10 - 03:29 | UnknownUser | CLM Configuration utility - Generate Configuration |
| |
Generation_Initialisation.jpg | manage | 25.2 K | 2014-06-10 - 05:39 | UnknownUser | CLM Configuration utility - Initialisation Selection |
| |
Generation_Selection.jpg | manage | 28.1 K | 2014-06-10 - 05:10 | UnknownUser | CLM Configuration utility - Generation Selection |
| |
IVP.jpg | manage | 21.0 K | 2014-06-10 - 08:13 | UnknownUser | CLM Configuration utility - Installation Verification Process |
| |
IVP_Report.jpg | manage | 90.5 K | 2014-06-10 - 09:09 | UnknownUser | CLM Configuration utility - IVP report |
| |
Options_Errors.jpg | manage | 29.2 K | 2014-06-10 - 02:15 | UnknownUser | CLM Configuration Utility - Options Errors |
| |
Options_Menu.jpg | manage | 55.4 K | 2014-06-10 - 02:10 | UnknownUser | CLM Configuration utility - Options Menu |
| |
Options_Menu_Java_Version.jpg | manage | 6.6 K | 2014-06-10 - 02:29 | UnknownUser | CLM Configuration utility - Options Menu Java Version |
| |
Process_Utility_Jobs.jpg | manage | 47.5 K | 2014-06-10 - 08:43 | UnknownUser | CLM Configuration utility - Process Utility Jobs |
| |
Rational_Build_Agent_Customization.jpg | manage | 55.6 K | 2014-06-10 - 03:07 | UnknownUser | CLM Configuration utility - Rational Build Agent Customization |
| |
View_Commands.jpg | manage | 29.0 K | 2014-06-10 - 08:25 | UnknownUser | CLM Configuration utility - View Commands |
| |
View_Files.jpg | manage | 58.9 K | 2014-06-10 - 08:26 | UnknownUser | CLM Configuration utility - View Files |
| |
View_Log.jpg | manage | 104.5 K | 2014-06-10 - 08:26 | UnknownUser | CLM Configuration utility - View Logs |
| |
WorkFlow_Item_List.jpg | manage | 89.0 K | 2014-06-10 - 06:30 | UnknownUser | CLM Configuration utility - Workflow Item list |
Contributions are governed by our Terms of Use. Please read the following disclaimer.
Dashboards and work items are no longer publicly available, so some links may be invalid. We now provide similar information through other means. Learn more here.