Creating a Reverse Proxy Server with WebSphere Plugins
Authors: MikeDelargy,
Build basis: CLM 5.x, 6.x
There are a number of different articles on configuring a reverse proxy server for the CLM solution. While the articles are correct in nature, the implementation can be challenging as there are a number of steps.
As new technologies have been created (or just discovered / understood) we have sought to simplify the process to allow you to expedite the implementation.
The Application server is where the actual CLM work gets done.
The Web server's job is to direct traffic. (It forward all request for JSPs or Servlets to the J2EE server [ WebSphere ])
It is also important to understand that in a reverse proxy server environment, the reverse proxy server (Web Server / IHS server) can be thought of as the Gate Keeper to your CLM deployment.
The route to the Web Server is your Public URI. From there, the Web Server redirects traffic to your application server based upon the context route.
More information on what this looks like can be seen here:
If you are implementing a reverse proxy server into an existing environment, your reverse proxy server can be easily configured to listen on the port specified in your current Public URI and use the Host Name of the public URI as a Virtual Host Name.
This is all configured within the httpd.conf file of the reverse proxy server (IHS). Therefore, there is no need to do a server rename to implement this into an existing environment.
If you are implementing a reverse proxy server into a new environment, then the reverse proxy server / public URI can be configured to not display a port number. (by using the default ports 80 and 443.) The best way to setup this relationship is to create Plugins on the Application server (WebSphere) and put them onto the Web Server (IHS) (No Special Tools needed)
In order for the two servers to communicate, (in an SSL environment) we have to set up a trust. We do this using certificates.
Fortunately, when you create the plugin on the Application Server, it will automatically create the certificates for you. (This is one of the big changes from the other articles)
Keep in mind, There are multiple certificates that are needed in a CLM deployment with a reverse proxy server. You need one certificate to access the Web Server (IHS Server) and the IHS server will need a certificate to communicate with the Application Server. (The Web Server will need a certificate for each application server it communicates with.)
Best Practices is to keep these certificate in their own keystores.
You can use the command line (gskcmd) to create the keystore and certificate but we will be using a GUI based tool called Ikeyman.
1. Find ikeyman on your IHS server.
The typical path on Windows is:
2. Create the new key

3. For the Type select CMS, File name, IHS_key.kdb, and browse to the HTTPServer\bin directory.
Click OK
4. Enter a password (you won't forget) and select the "Stash password to a file" option
Click OK
5. Create a new certificate. Click the New Self-Signed button.

6. Enter a Key Label (I chose jazzapacheds.. but the name does not matter. Often times, the server name is used.)
For the Validity Period, I chose 3650 (10 years) so I don't have to come back next year and do this again.
Click OK

7. Make a note of the path name, you will need it in the next section.
8. Your are done creating your Keystore and Certificate.
Notice the path to the IHS_key.kdb and the IHS_key.sth? They must match what you have in the previous section!
For the next steps, you will need to log into the WebSphere Admin Console
1. Login to the WAS Integration Solutions Console on the left side, select Server Types \ WebSphere application server
2. Select your server
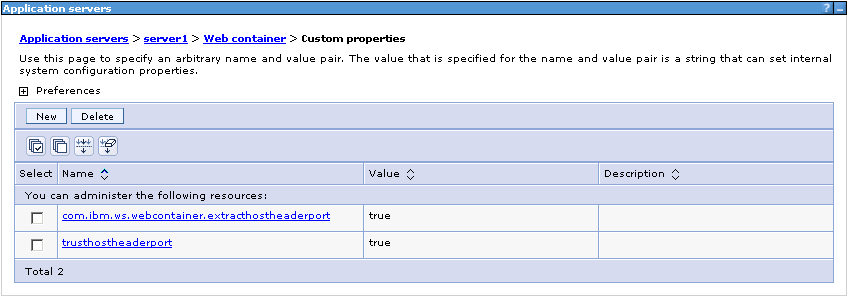
3. Under "Container Settings" on the right side, expand Web Container Settings. Choose "Web Container".
4. Select Custom Properties
5. Add the following custom properties:
1. Go to Servers / Server Types / Web servers
 2. Click "New"
3. Enter information regarding your server
When choosing a Server name, it is recommended you choose a name that matches your application server deployment.
For example. if your environment will have JTS on one server, RTC on another server, RQM on a third, etc... then you should consider the following (respective) names:
Server name:
This will make it easier to work with the plugins later.
If your server will have all of the applications on the same server, then simply calling it something like clmwebserver would be fine.
The name you choose for the Server name will simply be the name of the directory that gets created in the steps below.
The Host Name, is the host name of the IHS server.

4. click Next
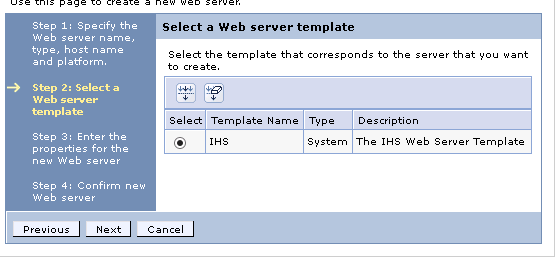
5. On the next screen (select a template) accept the default and click Next
6. On the Create new Web Server definition, verify that the Web server port is correct, (80) and CHANGE the IHS installation directory to the actual installation directory and also CHANGE the plugin location to your actual plugin location.
Verify this information on your IHS server. If this information is different on your IHS server, then enter in the data that matches your IHS server.
IHS: C:\Program Files\IBM\HTTPServer Plugins: C:\IBM\WebSphere\Plugins Username: wasadmin (This would be a user you would create if you were using the admin control center for IHS. (This is a simple installation and we will not be needing this. You must enter a username and password, but the actual values you enter are not important for this configuration.)
Password: wasadmin (the associated password)
7. Confirm your settings and Click Next when you are finished.
8. Click Save to the master configuration.
9. When it is done saving, you should see a green arrow (If your IHS server is running)
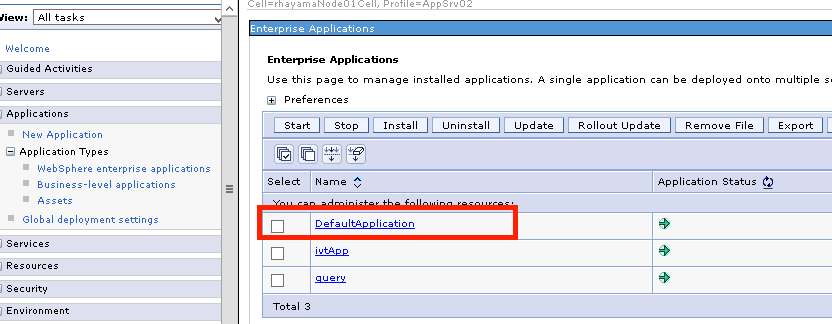
When you generate the plugin file, it will collect all of the information (applications, ports, etc...) about your configuration. It will also create the necessary keystore, certificate, and stash file you will need and put them into a directory. (worth noting, prior to generating the profile, you should already have installed and configured your clm applications.)
1. Select the check box next to your server name and then click "*Generate Plugin*"
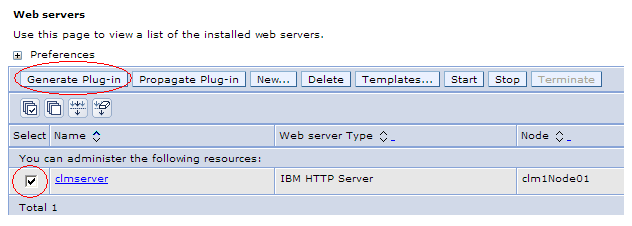
2. You should get a message that says the plugin has been created.
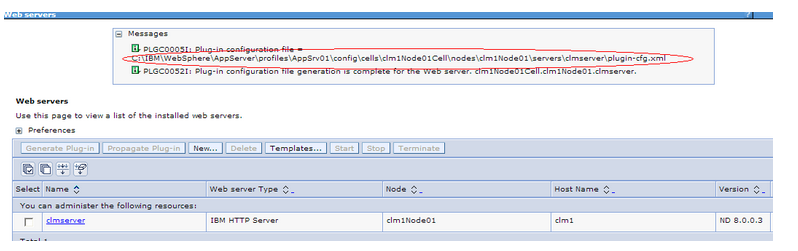
It will actually create the plugin-cfg.xml file in a subdirectory (multiple sub directories) of the WebSphere installation.
Make note of the path location (You need to copy the entire directory that the plugin-cfg.xml is in.)
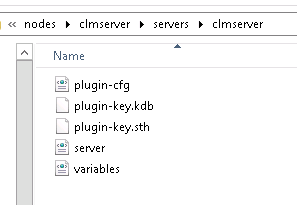
In this example, the clmserver directory that hosts the plugin-cfg.xml file also contains a keystore and stash file that IHS can use to communicate with the application server.
Best practices for the certificates is to use a separate keystore (kdb file) for the plugin and the IHS server (we discussed this in the first section)
3. If you look in the clmserver directory, you can see the plugin-cfg.xml file and the keystore / stash files as well as a few other files.
You will be copying this entire directory over to your IHS server and place it into the directory location noted section above.
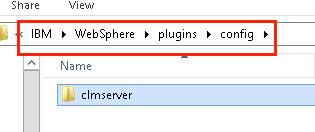
4. Copy the "clmserver" directory noted in the path and carry it over to your Web Server (IHS). If the plugin location noted in the earlier steps above is: Plugins: C:\IBM\WebSphere\Plugins then you should see a config directory under the Plugins directory. This is where you want to put the copied plugin directory.
You will now go back to the Web Server (IHS) machine.
If your IHS server is collocated with your Web Server, you can propagate the plugin. However, if you propagate the plugin, it will only copy the plugin-cfg.xml file; it will NOT copy the keystore/certificate files that you will need. You will have to manually copy these over.
1. Open the IHS httpd.conf file in a text editor and enter the following two lines:
VERY IMPORTANT make sure the "mod_was_app11_http.dll" is in the specified directory. If it is not, then enter the correct path in the httpd.conf file
(If you cannot find the mod_was_app11_http.dll then verify you have installed the Plugins for WebSphere package onto the IHS server.
Also, verify the path of the plugin-cfg.xml file
2. Open the generated plugin configuration file (C:\IBM\WebSphere\Plugins\config\clmserver\plugin-cfg.xml from our example ) and verify the keyring and stash file properties match the actual path.
3. Restart IHS.
You can test the application by first "by-passing" the IHS server and going directly to your Application server, and then test your IHS server
(We will test with snoop, but this assumes that you installed the default WebSphere Application. If you did not install the default WebSphere Application, you can test with your /jts/admin url.)
The reason we test with snoop is that we are testing the relationship between WebSphere Application server and IHS. If there is a problem, it helps us to understand that the problem is outside of the CLM tools and we can focus solely on the Application Server and Web Server.
1. Open a Web Browser and go to: https://your application server:port/snoop (you may get a request for a login. This is good.)
Example: https://myclmserver:9443/snoop
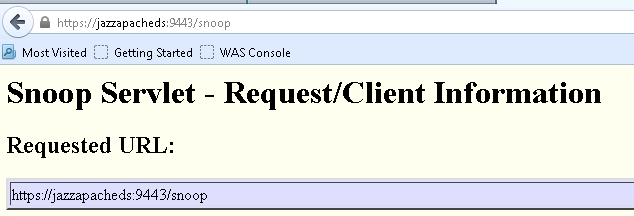 Notice, we included the port number configured for WAS
If you get an error, you may not have installed the default application in WebSphere. If you did not install the default application, then just test your CLM application /jts/admin (if this is your jts server)
regardless of the error, it is outside of the Web Server, we are trying to get directly to your Application server.
2. If you find success, then go to: https://your IHS server/snoop (This assumes you have configured your IHS server to listen on ports 80 and 443) (You should get the same result as in step 1)
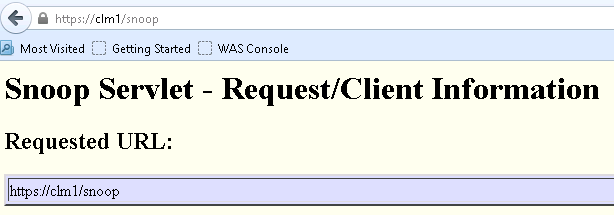 Here, we did not include a port number. We are using the proxy.
3. You can now test your CLM Application(s)
You are done Configuring IHS using WebSphere Plugins.
The httpd.conf file can only point to one plugin-cfg.xml file. You can and should test each individual plugin to make sure it can communicate with its corresponding application server.
After you have tested each of the individual plugin files, be sure to update your httpd.conf file with the path to the merged plugin.
When you have created each of your Plugins, your Plugin\config directory should have one directory for each of your Application Servers.
Create a new directory in the Plugins/conf directory called merged_plugins
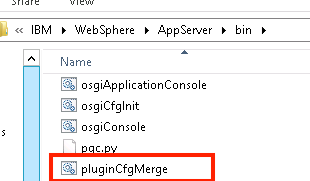
1. Locate the pluginCfgMerge.bat file Typically located in the install_root\bin directory on your WebSphere server. You will want to copy it over to your Web Server (IHS)

You do not need to copy the keystores. The merged plugin file will be pointing to each of the corresponding keystores in their home directories.
As new technologies have been created (or just discovered / understood) we have sought to simplify the process to allow you to expedite the implementation.
REVERSE PROXY SERVER OVERVIEW
There are two key parts to a clm deployment using a reverse proxy server.- Part 1: The Application Server (WebSphere for the sake of this article) (You could -and probably do- have more then one Application server. This is known as an enterprise deployment )
- Part 2: The Web Server (IHS in this example)
The Application server is where the actual CLM work gets done.
The Web server's job is to direct traffic. (It forward all request for JSPs or Servlets to the J2EE server [ WebSphere ])
It is also important to understand that in a reverse proxy server environment, the reverse proxy server (Web Server / IHS server) can be thought of as the Gate Keeper to your CLM deployment.
The route to the Web Server is your Public URI. From there, the Web Server redirects traffic to your application server based upon the context route.
More information on what this looks like can be seen here:
If you are implementing a reverse proxy server into an existing environment, your reverse proxy server can be easily configured to listen on the port specified in your current Public URI and use the Host Name of the public URI as a Virtual Host Name.
This is all configured within the httpd.conf file of the reverse proxy server (IHS). Therefore, there is no need to do a server rename to implement this into an existing environment.
If you are implementing a reverse proxy server into a new environment, then the reverse proxy server / public URI can be configured to not display a port number. (by using the default ports 80 and 443.) The best way to setup this relationship is to create Plugins on the Application server (WebSphere) and put them onto the Web Server (IHS) (No Special Tools needed)
In order for the two servers to communicate, (in an SSL environment) we have to set up a trust. We do this using certificates.
Fortunately, when you create the plugin on the Application Server, it will automatically create the certificates for you. (This is one of the big changes from the other articles)
Keep in mind, There are multiple certificates that are needed in a CLM deployment with a reverse proxy server. You need one certificate to access the Web Server (IHS Server) and the IHS server will need a certificate to communicate with the Application Server. (The Web Server will need a certificate for each application server it communicates with.)
Best Practices is to keep these certificate in their own keystores.
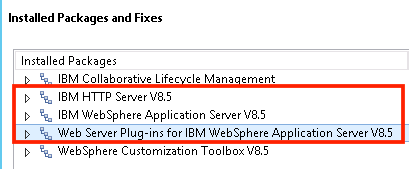
ASSUMPTIONS
It is assumed that prior to implementing the steps outlined below, that you have:- Installed and configured WebSphere (and your clm applications)
- Installed IBM HTTPServer (IHS -- your Web Server)
- WebSphere Plugins add on module (onto your IHS server)
Creating a Keystore and Certificate for the Web Server (IHS)
Best practices is to have a separate keystore / certificate for each of our servers. We will be creating the keystore and certificate for the IHS server, but as noted above, the keystore and certificate for our Application servers will get created automatically.You can use the command line (gskcmd) to create the keystore and certificate but we will be using a GUI based tool called Ikeyman.
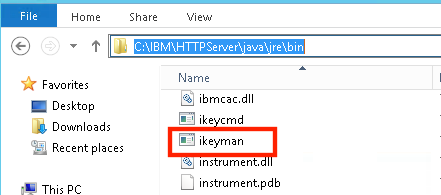
IKEYMAN
1. Find ikeyman on your IHS server.
The typical path on Windows is:
C:\<IHS_Install_Directory>\java\jre\bin\ikeyman

Example:   C:\IBM\HTTPServer\java\jre\bin\ikeyman
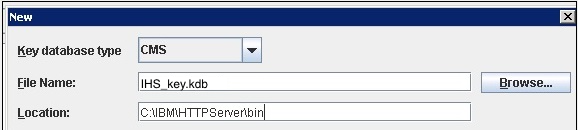
2. Create the new key
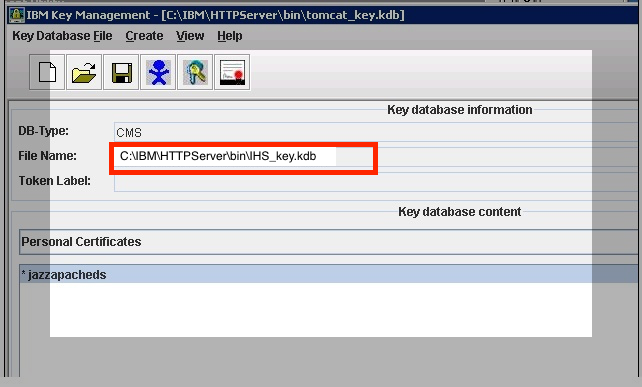
3. For the Type select CMS, File name, IHS_key.kdb, and browse to the HTTPServer\bin directory.
Click OK
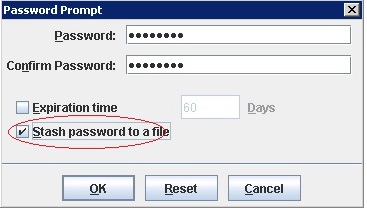
4. Enter a password (you won't forget) and select the "Stash password to a file" option
Click OK
5. Create a new certificate. Click the New Self-Signed button.
6. Enter a Key Label (I chose jazzapacheds.. but the name does not matter. Often times, the server name is used.)
For the Validity Period, I chose 3650 (10 years) so I don't have to come back next year and do this again.
Click OK
7. Make a note of the path name, you will need it in the next section.
8. Your are done creating your Keystore and Certificate.
Enable SSL directives within the IBM HTTP Server's configuration file (httpd.conf)
Add (or uncomment) the following lines in httpd.conf, making sure that the values for the Key File and SSL Stash File directives match the names of the files generated in the previous section:LoadModule ibm_ssl_module modules/mod_ibm_ssl.so Listen 0.0.0.0:443 ## Uncomment for IPv6 support: #Listen [::]:443 <VirtualHost *:443> SSLEnable </VirtualHost> KeyFile C:/IBM/HTTPServer/bin/IHS_key.kdb SSLStashFile C:/IBM/HTTPServer/bin/IHS_key.sth SSLDisable
Notice the path to the IHS_key.kdb and the IHS_key.sth? They must match what you have in the previous section!
Create the plugins on the Application Server (WebSphere)
We now focus our attention on the Application server.For the next steps, you will need to log into the WebSphere Admin Console
Force WAS To Honor Host Headers
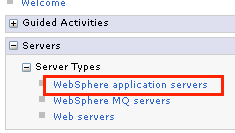
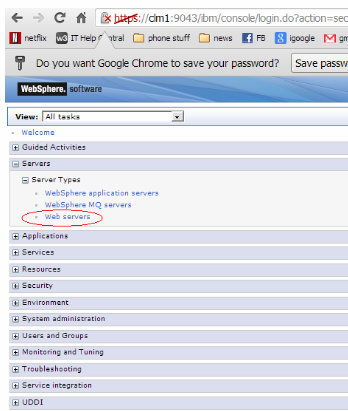
1. Login to the WAS Integration Solutions Console on the left side, select Server Types \ WebSphere application server
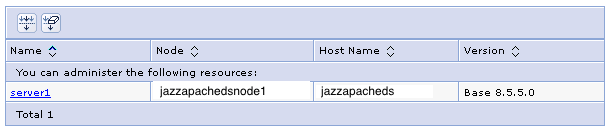
2. Select your server
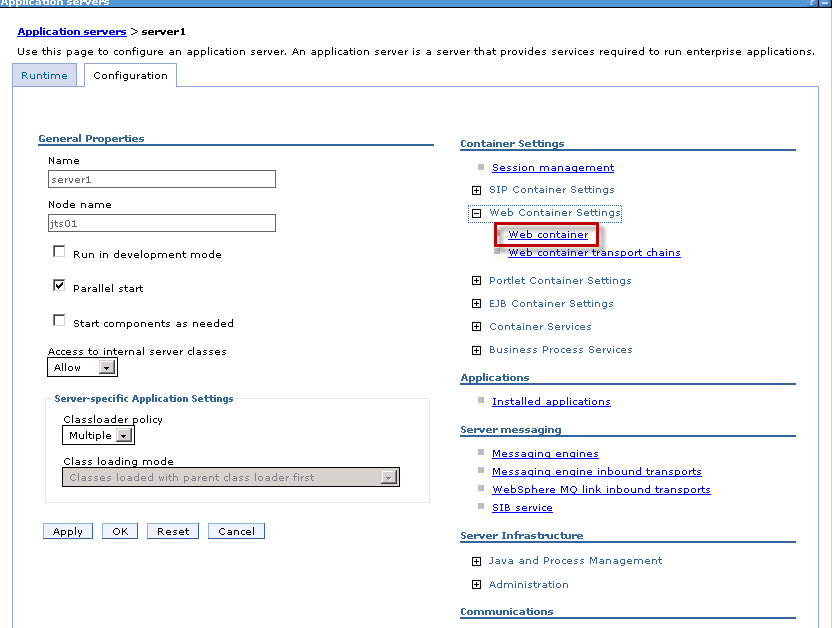
3. Under "Container Settings" on the right side, expand Web Container Settings. Choose "Web Container".
4. Select Custom Properties
5. Add the following custom properties:
trusthostheaderport = true
com.ibm.ws.webcontainer.extracthostheaderport = true
Configure the Plugin for the CLM Application Server
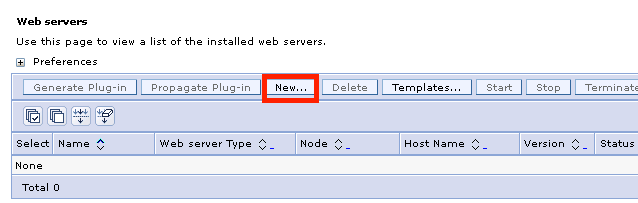
You should still be in the WebSphere Admin Console1. Go to Servers / Server Types / Web servers
2. Click "New"
3. Enter information regarding your server
When choosing a Server name, it is recommended you choose a name that matches your application server deployment.
For example. if your environment will have JTS on one server, RTC on another server, RQM on a third, etc... then you should consider the following (respective) names:
Server name:
- for the JTS server: jtswebserver
- for the CCM server: ccmwebserver
- for the RQM server: rqmwebserver
This will make it easier to work with the plugins later.
If your server will have all of the applications on the same server, then simply calling it something like clmwebserver would be fine.
The name you choose for the Server name will simply be the name of the directory that gets created in the steps below.
The Host Name, is the host name of the IHS server.
4. click Next
5. On the next screen (select a template) accept the default and click Next
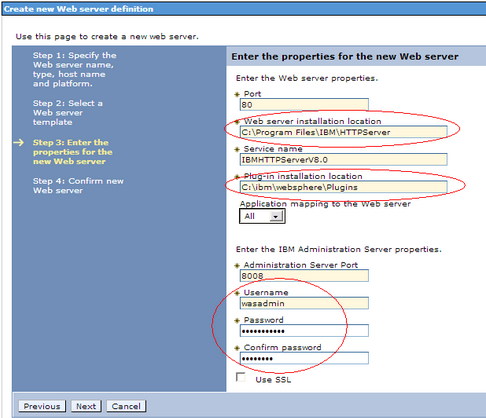
6. On the Create new Web Server definition, verify that the Web server port is correct, (80) and CHANGE the IHS installation directory to the actual installation directory and also CHANGE the plugin location to your actual plugin location.
Verify this information on your IHS server. If this information is different on your IHS server, then enter in the data that matches your IHS server.
IHS: C:\Program Files\IBM\HTTPServer Plugins: C:\IBM\WebSphere\Plugins Username: wasadmin (This would be a user you would create if you were using the admin control center for IHS. (This is a simple installation and we will not be needing this. You must enter a username and password, but the actual values you enter are not important for this configuration.)
Password: wasadmin (the associated password)
7. Confirm your settings and Click Next when you are finished.
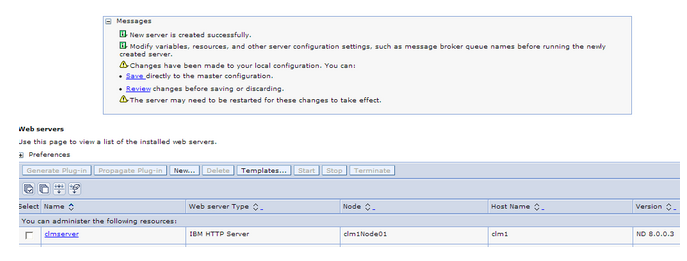
8. Click Save to the master configuration.
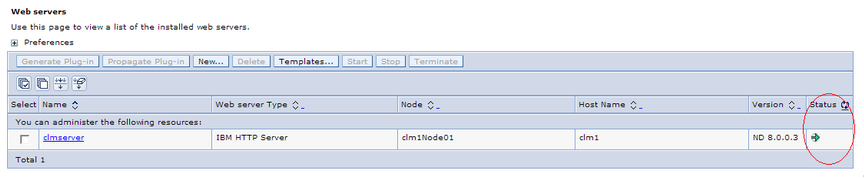
9. When it is done saving, you should see a green arrow (If your IHS server is running)
- A green arrow indicates the Application Server can communicate with the Web Server and the Web Server is running.
- A Red indicates the Application Server can communicate with the Web Server and the Web Server (IHS) is not running.
- A small circle with a question mark in it "?" indicates that the Application Server cannot communicate with the Web Server.
Generate Plugin File
When you generate the plugin file, it will collect all of the information (applications, ports, etc...) about your configuration. It will also create the necessary keystore, certificate, and stash file you will need and put them into a directory. (worth noting, prior to generating the profile, you should already have installed and configured your clm applications.)
1. Select the check box next to your server name and then click "*Generate Plugin*"
2. You should get a message that says the plugin has been created.
It will actually create the plugin-cfg.xml file in a subdirectory (multiple sub directories) of the WebSphere installation.
Make note of the path location (You need to copy the entire directory that the plugin-cfg.xml is in.)
In this example, the clmserver directory that hosts the plugin-cfg.xml file also contains a keystore and stash file that IHS can use to communicate with the application server.
Best practices for the certificates is to use a separate keystore (kdb file) for the plugin and the IHS server (we discussed this in the first section)
3. If you look in the clmserver directory, you can see the plugin-cfg.xml file and the keystore / stash files as well as a few other files.
You will be copying this entire directory over to your IHS server and place it into the directory location noted section above.
4. Copy the "clmserver" directory noted in the path and carry it over to your Web Server (IHS). If the plugin location noted in the earlier steps above is: Plugins: C:\IBM\WebSphere\Plugins then you should see a config directory under the Plugins directory. This is where you want to put the copied plugin directory.
You will now go back to the Web Server (IHS) machine.
If your IHS server is collocated with your Web Server, you can propagate the plugin. However, if you propagate the plugin, it will only copy the plugin-cfg.xml file; it will NOT copy the keystore/certificate files that you will need. You will have to manually copy these over.
Update the Web Server
You will now update the Web Server configuration file (httpd.conf) to use the new plugin file.Modify the Httpd.conf file
1. Open the IHS httpd.conf file in a text editor and enter the following two lines:
LoadModule was_ap22_module "C:\IBM\WebSphere\Plugins\bin\32bits\mod_was_ap22_http.dll"
WebSpherePluginConfig "C:\IBM\WebSphere\Plugins\config\clmserver\plugin-cfg.xml "
VERY IMPORTANT make sure the "mod_was_app11_http.dll" is in the specified directory. If it is not, then enter the correct path in the httpd.conf file
(If you cannot find the mod_was_app11_http.dll then verify you have installed the Plugins for WebSphere package onto the IHS server.
Also, verify the path of the plugin-cfg.xml file
2. Open the generated plugin configuration file (C:\IBM\WebSphere\Plugins\config\clmserver\plugin-cfg.xml from our example ) and verify the keyring and stash file properties match the actual path.
   <Property Name="keyring" Value="C:\IBM\WebSphere\Plugins\config\clmserver\plugin-key.kdb"/>
   <Property Name="stashfile" Value="C:\IBM\WebSphere\Plugins\config\clmserver\plugin-key.sth"/>
3. Restart IHS.
Test the Plugin
You are now ready to test the communication between the Web Server (IHS) and the Application Server (WebSphere)You can test the application by first "by-passing" the IHS server and going directly to your Application server, and then test your IHS server
(We will test with snoop, but this assumes that you installed the default WebSphere Application. If you did not install the default WebSphere Application, you can test with your /jts/admin url.)
The reason we test with snoop is that we are testing the relationship between WebSphere Application server and IHS. If there is a problem, it helps us to understand that the problem is outside of the CLM tools and we can focus solely on the Application Server and Web Server.
1. Open a Web Browser and go to: https://your application server:port/snoop (you may get a request for a login. This is good.)
Example: https://myclmserver:9443/snoop
Notice, we included the port number configured for WAS
If you get an error, you may not have installed the default application in WebSphere. If you did not install the default application, then just test your CLM application /jts/admin (if this is your jts server)
regardless of the error, it is outside of the Web Server, we are trying to get directly to your Application server.
2. If you find success, then go to: https://your IHS server/snoop (This assumes you have configured your IHS server to listen on ports 80 and 443) (You should get the same result as in step 1)
Here, we did not include a port number. We are using the proxy.
3. You can now test your CLM Application(s)
- https://your IHS server /jts/admin (If you are using a plugin from your JTS server.)
- https://your IHS server /ccm/admin (If you are using a plugin from your RTC server.)
- https://your IHS server /qm/admin (If you are using a plugin from your RQM server.)
- https://your IHS server /rm/admin (If you are using a plugin from your RDNG server.)
You are done Configuring IHS using WebSphere Plugins.
MULTIPLE APPLICATION SERVERS
If you have multiple application servers, you will need to perform the exact same steps on each application server. Be sure to name the Web Server you create on each Application server as outlined above.The httpd.conf file can only point to one plugin-cfg.xml file. You can and should test each individual plugin to make sure it can communicate with its corresponding application server.
After you have tested each of the individual plugin files, be sure to update your httpd.conf file with the path to the merged plugin.
LoadModule was_ap22_module "C:\IBM\WebSphere\Plugins\bin\32bits\mod_was_ap22_http.dll"
WebSpherePluginConfig "C:\IBM\WebSphere\Plugins\config\merged_plugins\plugin-cfg.xml "
When you have created each of your Plugins, your Plugin\config directory should have one directory for each of your Application Servers.
Create a new directory in the Plugins/conf directory called merged_plugins
Plugin Merge Tool
Use the Plugins merge tool to merge each of the plugins.1. Locate the pluginCfgMerge.bat file Typically located in the install_root\bin directory on your WebSphere server. You will want to copy it over to your Web Server (IHS)
usage:
pluginCfgMerge.bat  path-to-plugin-1   path-to-plugin-2   path-to-plugin-3   path-to-merged-plugin

example:
 pluginCfgMerge.bat  C:\IBM\WebSphere\Plugins\config\jtswebserver\plugin-cfg.xml   C:\IBM\WebSphere\Plugins\config\rtcwebserver\plugin-cfg.xml C:\IBM\WebSphere\Plugins\config\rqmwebserver\plugin-cfg.xml   C:\IBM\WebSphere\Plugins\config\merged_plugins\plugin-cfg.xml
You do not need to copy the keystores. The merged plugin file will be pointing to each of the corresponding keystores in their home directories.
Related topics: Deployment web home, Deployment web home
External links:
Additional contributors: TWikiUser, TWikiUser
Contributions are governed by our Terms of Use. Please read the following disclaimer.
Dashboards and work items are no longer publicly available, so some links may be invalid. We now provide similar information through other means. Learn more here.