Creating a performance simulation for Rational Team Concert using Rational Performance Tester
Authors: VaughnRokoszBuild basis: Rational Team Concert 6.0, Rational Performance Tester 8.3.0.3
I've had several recent conversations regarding customers who are doing their own performance testing with the Jazz products. This is a good idea - although IBM does its own extensive performance testing (publishing the results here), customer results may be different because of unique aspects of a customer environment. On the other hand, performance testing is hard. Building a good simulation of a user population requires expertise at many levels, including: 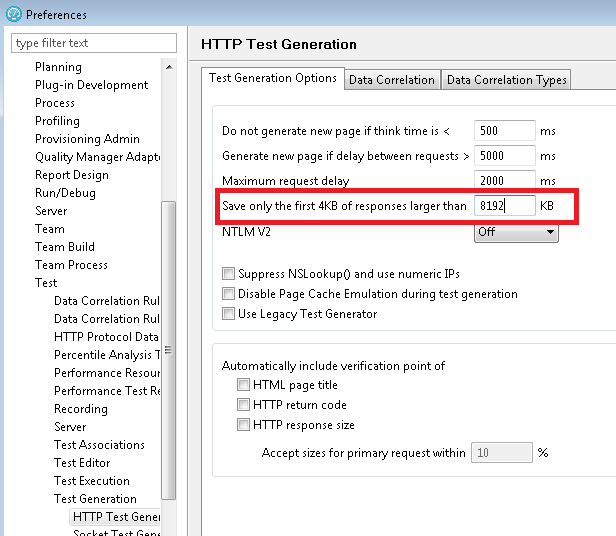 I want to automate the following steps:
 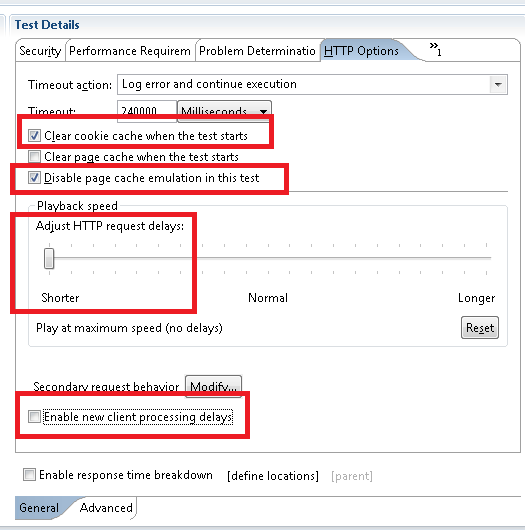 Next, I want to disable image requests. Images (like PNG or GIF files) are going to be cached by the browser, so I don't want the performance scripts to be constantly asking for things that the browser would not be asking for. You can use RPT to do this in bulk by clicking the Modify button next to "Secondary request behavior".
 The last preparation step is to enable all of the response code verification points, by right-clicking on the test script name and selecting "Verification Points -> Enable Response code VPs". I set the verification to "Exact" so that any difference between what the script observed during recording and what happens during playback will be flagged. The main problem this addresses is something that can happen during long tests, when authentication tokens expire. The server will respond with 302 requests, and while this will cause a prompt for reauthentication in the browser, RPT is not resilient enough to react to this change in protocol. By using Exact matching, I can tell if this happens because I'll see errors reported by RPT. Then I can adjust the server settings to avoid the problem and repeat my test.
 Now I'm ready to review the script to see how well RPT did in getting the script ready to execute in a multi-user test. If I open up the CreateDefect_phase1 script, I'll see the transactions captured by RPT (see next image). Light purple shows values that RPT could correlate between requests and responses. Light green shows values that RPT could not correlate, but flagged as potential issues. There are several uncorrelated data values that are going to cause trouble during playback, and a few of these are highlighted in red:
 Here are a few of the problems which are easy to spot:
 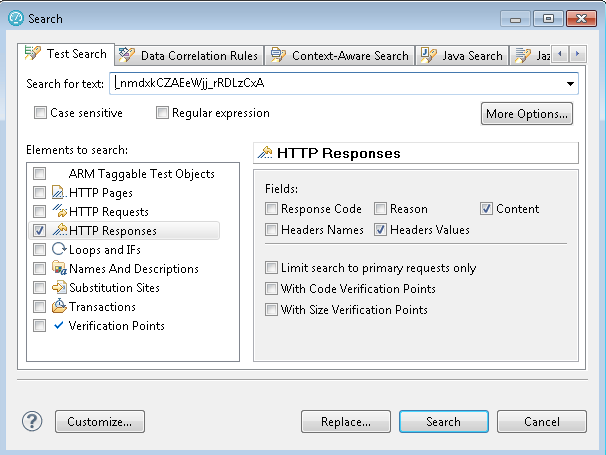 This found one match, in the return data from a call to ccm/_js. Right-click on the "Content Offset" and select "Go to":
 The "Go to" option takes us to the return data for the ccm/_js call, and that shows us where this value comes from. This is the "Web UI guard", which tries to prevent random clients from using the private plan REST services.
 Now, highlight the data value, right-click, and select "Create Reference". The Edit Reference dialog appears, so enter a short name for the reference field (like "WebGuard"), and select "Edit Reference Properties". (If you select OK at this point, RPT will take its best guess at a regular expression that will pull out that value, but it is better to double-check that, since you will often want to improve the extraction logic). In this case, the extraction expression is good:
 Next, RPT will ask you whether it can find places which match this data value, so it can substitute the value during test execution. Say "Yes", and you'll see something like this:
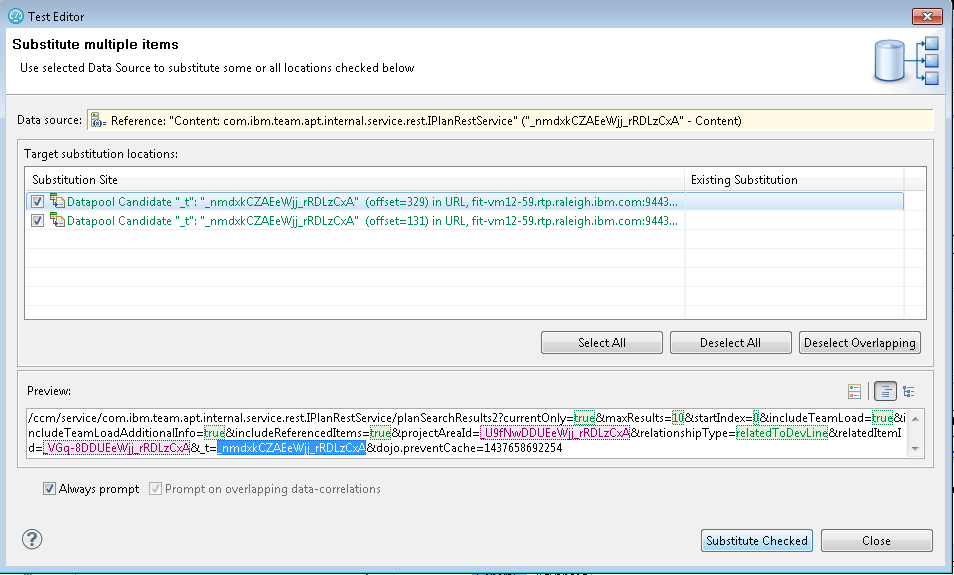 Allow RPT to substitute both occurences.
Now, repeat the process for all the rest of the uncorrelated values that you need to address. I've mentioned before that this can be time-consuming. Fortunately, RPT provides you with a way to capture the results of your manual correlations as correlation rules, so that you can apply them easily against future tests. Here at IBM, we've developed an extensive set of correlation rules which we apply to the Jazz products, and I've made those available in the sample project. Let's look at those in more detail.
Allow RPT to substitute both occurences.
Now, repeat the process for all the rest of the uncorrelated values that you need to address. I've mentioned before that this can be time-consuming. Fortunately, RPT provides you with a way to capture the results of your manual correlations as correlation rules, so that you can apply them easily against future tests. Here at IBM, we've developed an extensive set of correlation rules which we apply to the Jazz products, and I've made those available in the sample project. Let's look at those in more detail.
 This means that we need to look at the recording, and identify the following values:
 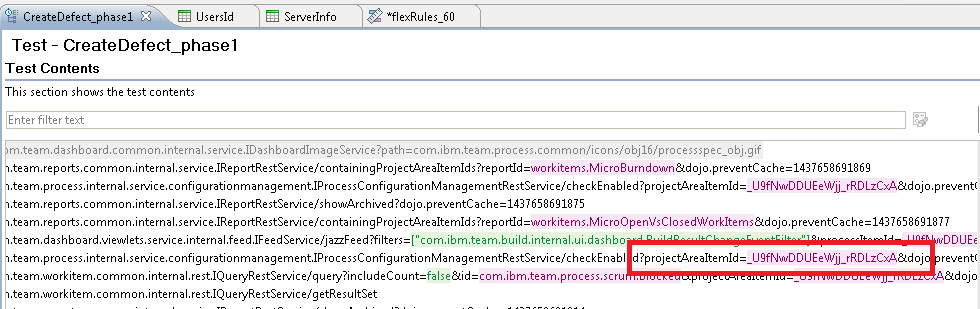 Note that our practice is to extract the part of the id after the underscore, since that gives us a way to pull out the ids more precisely. So, when copying the project area id into the rules arguments, be sure to leave off the underscore.
Here's how it looks after initializing the rules file:
Note that our practice is to extract the part of the id after the underscore, since that gives us a way to pull out the ids more precisely. So, when copying the project area id into the rules arguments, be sure to leave off the underscore.
Here's how it looks after initializing the rules file:
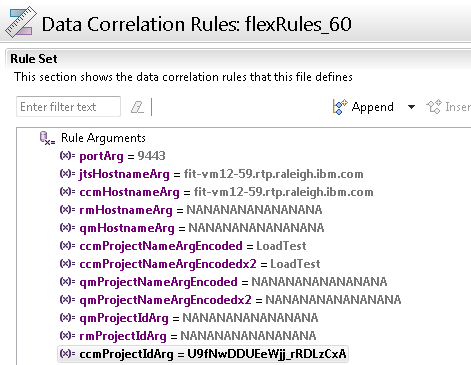 Keep in mind that you'll need to update the rules arguments if you record new scripts against different servers or projects.
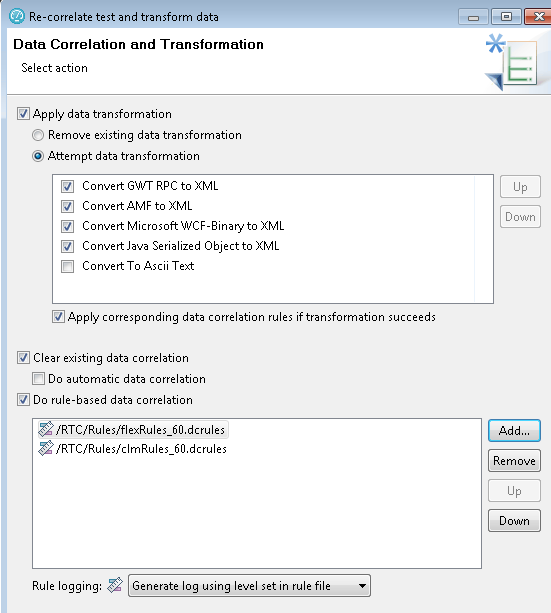
Next, you apply the rules by opening up the script, right-clicking on the script name, and selecting "Data Correlation -> Re-correlate test data using rules".
Keep in mind that you'll need to update the rules arguments if you record new scripts against different servers or projects.
Next, you apply the rules by opening up the script, right-clicking on the script name, and selecting "Data Correlation -> Re-correlate test data using rules".
 There are a few things to note:
 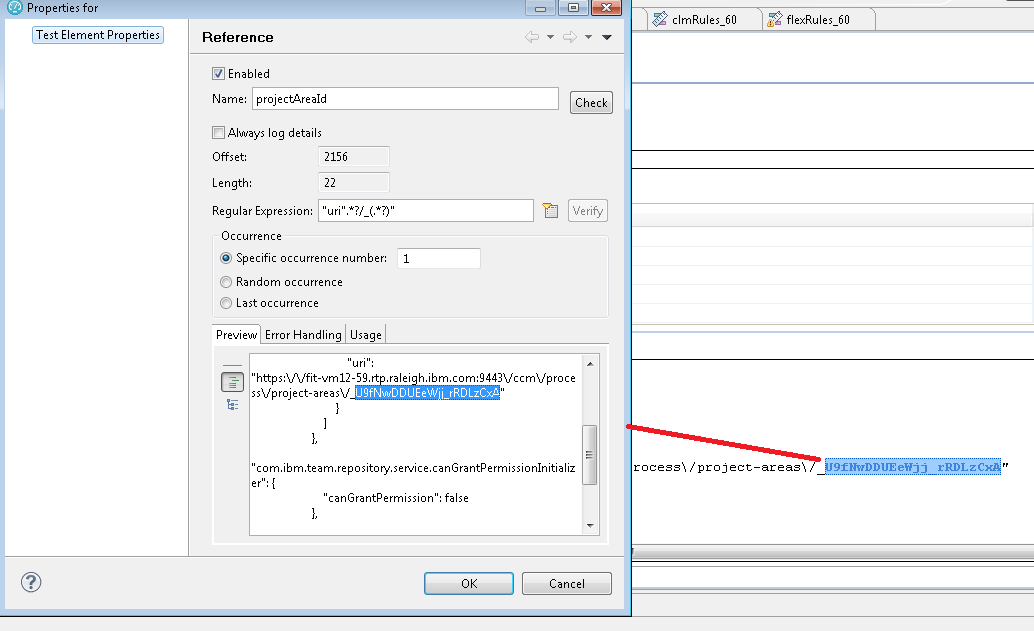 Note that we extract out everything after the underscore, per our internal convention.
It is possible to do more sophisticated extraction (e.g. to pull out an id for a project area of a given name), but that requires custom code. I've included some sample code that does that in the attached project (in the Java perspective, see clmFlexCode.CCMProjectIdExtraction.java - but I won't use that here.
Once I've created the reference, I can assign it to the CCM_ProjectID test variable as follows:
Note that we extract out everything after the underscore, per our internal convention.
It is possible to do more sophisticated extraction (e.g. to pull out an id for a project area of a given name), but that requires custom code. I've included some sample code that does that in the attached project (in the Java perspective, see clmFlexCode.CCMProjectIdExtraction.java - but I won't use that here.
Once I've created the reference, I can assign it to the CCM_ProjectID test variable as follows:
 There is one more tweak needed. The POST to ccm/view-history (which updates the historical selections visible in the Work items drop down) uses the title from the recording. I need to extract the new title, and substitute. The new title is available in the return data from the POST that creates the workitem. The new title can be extracted from that data as follows:
 Note how the regular expression "(RPTDefect.?)" matches a double-quote delimited string that begins with RPTDefect, and returns the complete string. Once you create the field, RPT will look for places that require substitution, and do that for you:
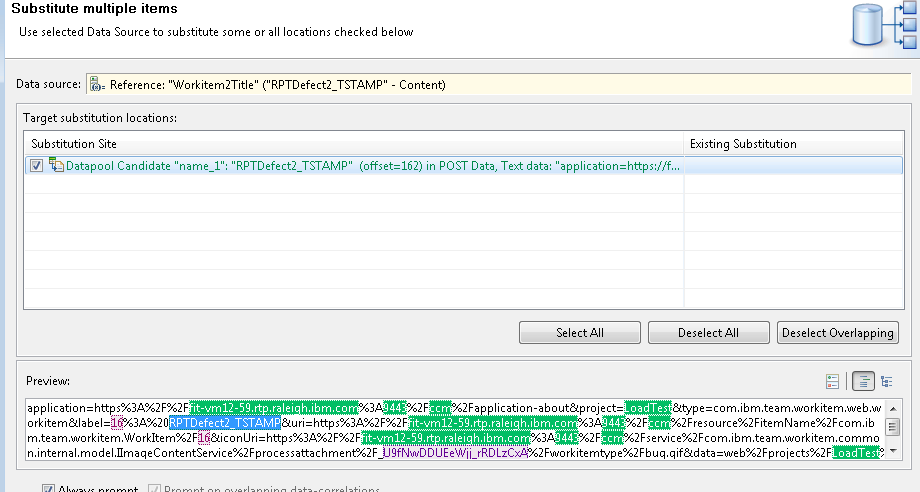 Since there are two work items created in this use case, this has to be done twice. But now, each workitem will contain a long numeric id in the title (that id is the timestamp).
You may be wondering at this point if there is any easy way to speed this up. Unfortunately, there is no magic. When you are working with a use case for the first time, you've got to look at every GET and every POST, and try to spot anything that needs to be correlated. Things you don't spot by inspection will usually surface as test failures, or unexpected behaviors in your test runs. You can over time capture that knowledge in correlation rules, but the first time is always a bit time-consuming.
Since there are two work items created in this use case, this has to be done twice. But now, each workitem will contain a long numeric id in the title (that id is the timestamp).
You may be wondering at this point if there is any easy way to speed this up. Unfortunately, there is no magic. When you are working with a use case for the first time, you've got to look at every GET and every POST, and try to spot anything that needs to be correlated. Things you don't spot by inspection will usually surface as test failures, or unexpected behaviors in your test runs. You can over time capture that knowledge in correlation rules, but the first time is always a bit time-consuming.
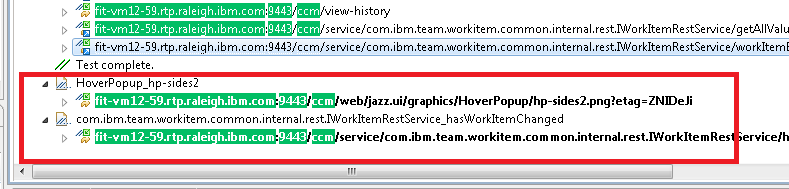
 There were also some requests which were captured accidentally during my recording session, so I removed the last two pages.
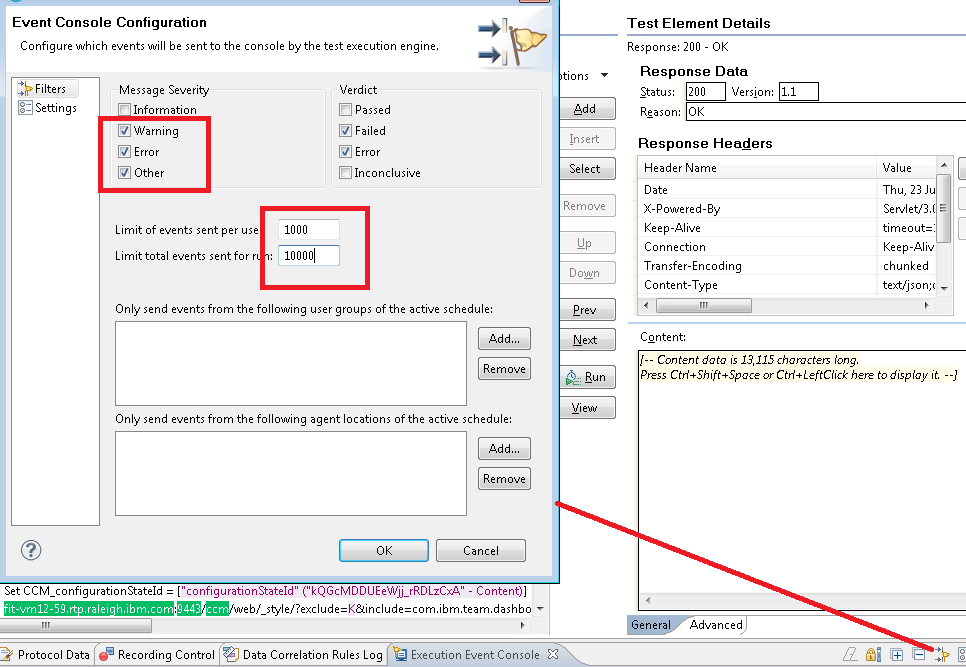 Be sure that RPT will report on warnings, because that's how data correlation issues may surface. Also be sure to watch the log file (ccm.log) on the RTC server while you are running the test, to spot any issues which result in server side errors (those won't always should up on the RPT side).
When I did that, the script ran cleanly. It is ready to be used as part of a multi-user simulation.
Be sure that RPT will report on warnings, because that's how data correlation issues may surface. Also be sure to watch the log file (ccm.log) on the RTC server while you are running the test, to spot any issues which result in server side errors (those won't always should up on the RPT side).
When I did that, the script ran cleanly. It is ready to be used as part of a multi-user simulation.
- An understanding of what the user population is likely to be doing, and how often
- Experience with the performance simulation tool of choice
- Ability to reverse-engineer the protocols sent to the Jazz server, in order to debug automation scripts
Overview of the process
One of the primary tools I use for doing performance testing of the Jazz products is Rational Performance Tester (RPT). I use RPT when I am creating a simulation of a user population that is using Web browsers to access a Jazz server. With RPT, you can create test scripts by recording the traffic sent by the browser to the server. Once you have a basic recording, you can then adjust it so that it can RPT can play it back as if multiple users were performing the operation at the same time. This can be tricky for complex protocols like those used by the Jazz products. A logical user operation like opening a project area involves a number of exchanges between the browser and the server. Calls made early in the process often return values that is needed by calls made later, and the request data needs to be properly correlated with the response data. While RPT will do its best to automatically correlate data, it won't catch everything so you have to correlate some values by hand. Fortunately, RPT provides a way to capture correlations as "correlation rules", so that as you build up an understanding of a specific protocol, you can capture that understanding in rules files to apply later. That's what we've done for the Jazz products. A good way to think of your performance scripts is as if they are a simplified version of the browser client. As the browser interacts with the Jazz server, it pulls down code which can act on data provided by the server. The browser is capable of making decisions based on that data which impact the requests that the browser will send to the Jazz server. RPT scripts, however, do not have that logic and so they can only play back what they observed. This means that you have to be mindful of areas where the protocol is dynamic, and try to account for those areas when you develop your scripts. You especially need to watch for caching logic which the browser may apply. First-time operations can be more expensive than second-time operations, so a simulation that is based on a set of first-time operations will stress the server more than is reasonable. Let's see how this looks for a use case involving the Rational Team Concert and a web browserBasic use case: create a defect
For this article, I want to simulate a user population that creates defects in RTC. To set up for this, I deployed Rational Team Concert onto a test system, and I created a project area called "LoadTest" from the Scrum template. Then, I added 250 test users to the project area and granted them all of the roles. I use an LDAP server in my test lab which contains users named UD0001 - UD0250, so those are the users I added. I used Rational Performance Tester 8.3.0.3 for this example. Before I started, I needed to adjust one of the RPT preferences. Some of the responses from the RTC server (especially the code bundles) are larger than 2 megabytes, and RPT will truncate those responses unless the buffer size is increased. Since I want all the data to come back, I need to adjust this in Windows->Preferences, then select Test->Test Generation->HTTP Test Generation.
I want to automate the following steps: - Open a web browser, and enter the URL that will open the dashboard for the "LoadTest" project area
- In the menu bar, select Work Items -> Create -> Defect
- Give the defect a title, and update the "Filed against" field to be "LoadTest"
- Save the defect
- Repeat this process to create a second defect (without shutting down the browser)
The first recording - basic preparation
To get started, I need to use Rational Performance Tester to make a recording of my "create defect" use case. This is straightforward; You start RPT, and then select New -> Test from Recording. If you select HTTP Test, then RPT will launch the browser and you can then go through the steps I outlined above. Once you're done, close the browser and RPT will generate a test script based on its observations of how the browser and the RTC server interacted. In the sample project, you can find the recording and the associated test script in the Recordings folder (CreateDefect.rec and CreateDefect.testsuite). I've allowed RPT to apply its default correlation rules, so if you open the CreateDefect test script, you can get an idea of how well it did. Since I know I need to make a few adjustments to this script before I can use it, I created a copy of it called CreateDefect_phase1 in the Scripts folder. The first step is to adjust the HTTP options for the script. The key settings are: * Clear the cookie cache when the test starts, since this script includes a login operation. That allows each execution of the script to start fresh. (For scripts that don't simulate logins, you'd leave this unchecked).- Disable page cache emulation. I don't want RPT to try to apply caching logic to the RTC requests.
- Adjust the playback speed to the minimum. I don't want RPT to inject delays because that makes it harder to interpret the results. The tradeoff is that the simulation will run a bit faster than a browser session (but I'll offset this by using longer page think times)
- Uncheck "enable new client processing delays". This is another place where RPT can inject delays into the simulation, but since I'm interesting in the raw performance of the transactions, I don't want these delays to make it harder to interpret results.
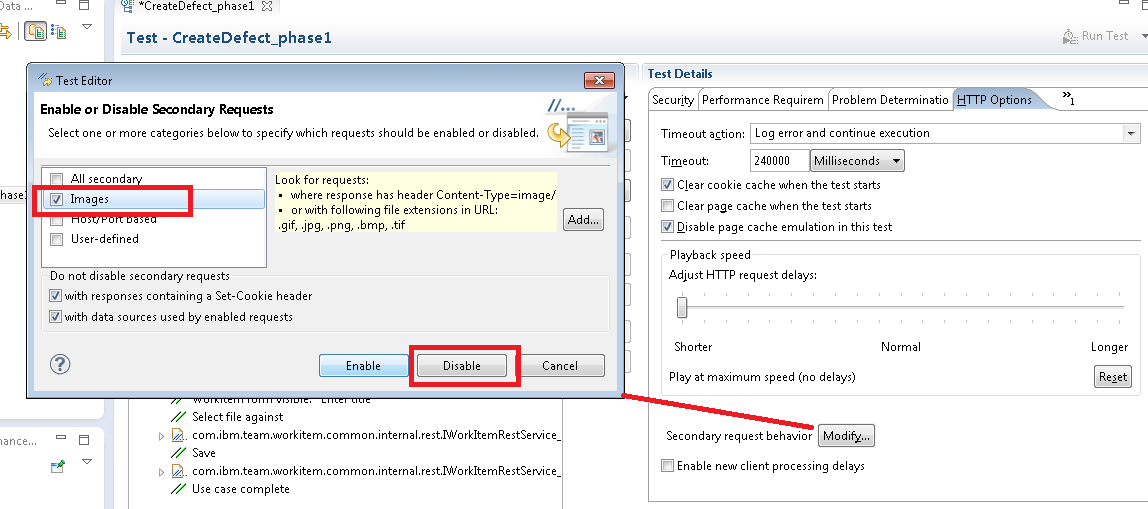
Next, I want to disable image requests. Images (like PNG or GIF files) are going to be cached by the browser, so I don't want the performance scripts to be constantly asking for things that the browser would not be asking for. You can use RPT to do this in bulk by clicking the Modify button next to "Secondary request behavior".
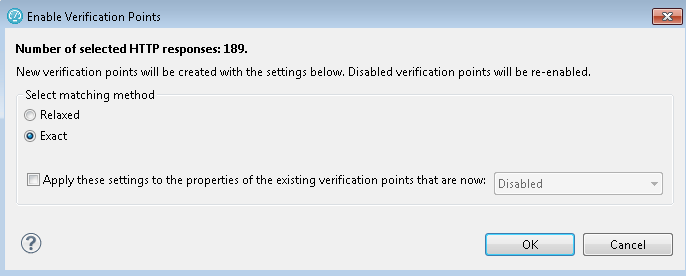
The last preparation step is to enable all of the response code verification points, by right-clicking on the test script name and selecting "Verification Points -> Enable Response code VPs". I set the verification to "Exact" so that any difference between what the script observed during recording and what happens during playback will be flagged. The main problem this addresses is something that can happen during long tests, when authentication tokens expire. The server will respond with 302 requests, and while this will cause a prompt for reauthentication in the browser, RPT is not resilient enough to react to this change in protocol. By using Exact matching, I can tell if this happens because I'll see errors reported by RPT. Then I can adjust the server settings to avoid the problem and repeat my test.
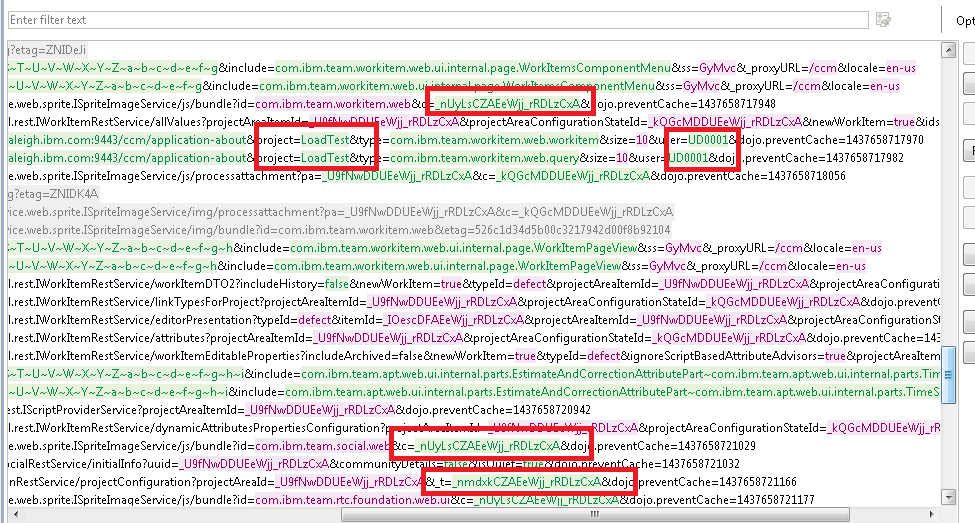
Now I'm ready to review the script to see how well RPT did in getting the script ready to execute in a multi-user test. If I open up the CreateDefect_phase1 script, I'll see the transactions captured by RPT (see next image). Light purple shows values that RPT could correlate between requests and responses. Light green shows values that RPT could not correlate, but flagged as potential issues. There are several uncorrelated data values that are going to cause trouble during playback, and a few of these are highlighted in red:
Here are a few of the problems which are easy to spot: - The name of the project area is hard-coded, so I can only use this script against projects with the name "LoadTest".
- There are places where the host name of the original server is hard-coded. That means that I can only use this test script with one server.
- The user name used during recording is hard-coded. Since I am going to be running a multi-user simulation, I'd like for each simulated user to have a different user name.
- The project area id is not correlated on the ISpriteImageService (another thing that limits this script to running against one server/project)
- There are uncorrelated ids for the "c" parameter on ISpriteImageServiceand the t parameter for calls to IPlanRestService. These calls are likely to fail unless we get the values at runtime from earlier requests.
- The dashboard requests include a dashboard id which is not correlated.
Manual correlation of data values
The next step is to manually correlate the data values which were not picked up by RPT. The basic procedure is as follows:- Do a "Test search" to find the first transaction which returned the value you want to correlate
- Create a "Reference" field in RPT that will extract the value you need from the return data
- Substitute the reference in later requests
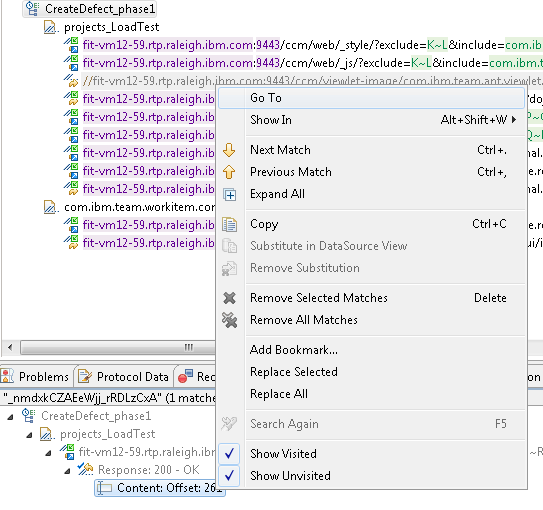
This found one match, in the return data from a call to ccm/_js. Right-click on the "Content Offset" and select "Go to":
The "Go to" option takes us to the return data for the ccm/_js call, and that shows us where this value comes from. This is the "Web UI guard", which tries to prevent random clients from using the private plan REST services.
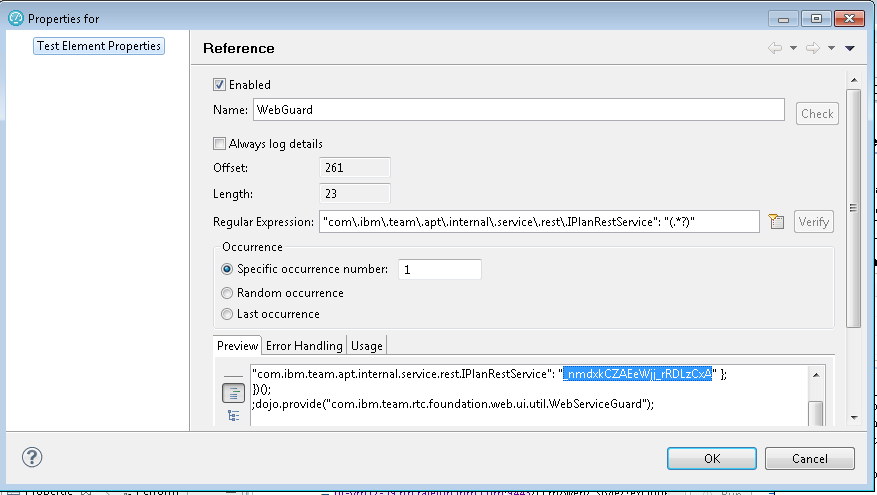
Now, highlight the data value, right-click, and select "Create Reference". The Edit Reference dialog appears, so enter a short name for the reference field (like "WebGuard"), and select "Edit Reference Properties". (If you select OK at this point, RPT will take its best guess at a regular expression that will pull out that value, but it is better to double-check that, since you will often want to improve the extraction logic). In this case, the extraction expression is good:
Next, RPT will ask you whether it can find places which match this data value, so it can substitute the value during test execution. Say "Yes", and you'll see something like this:
Allow RPT to substitute both occurences.
Now, repeat the process for all the rest of the uncorrelated values that you need to address. I've mentioned before that this can be time-consuming. Fortunately, RPT provides you with a way to capture the results of your manual correlations as correlation rules, so that you can apply them easily against future tests. Here at IBM, we've developed an extensive set of correlation rules which we apply to the Jazz products, and I've made those available in the sample project. Let's look at those in more detail.
Using correlation rules
One of the time-saving features provided by Rational Performance Tester is support for correlation rules. You can capture your manual correlations as rules that can be applied to a script. If you build up a set of correlation rules over time, you can reduce the cost of creating a new performance script, so that it begins to approach the cost of just doing the recording. In the CLM performance team, we've done just that, and the correlation rules we apply to the CLM products (Rational Team Concert, Rational Quality Manager, and Rational DOORS Next Generation) are provided in the sample project attached to this article. Before I get into how the correlation rules work, it is worth mentioning a few of the standard practices which the CLM performance team follows. First, we make all of our scripts independent of the server that we use for recording. That means we can apply the scripts to different servers and different project areas. We can do more work in parallel if we can have more test systems in use at one time. Next, we use unique user names in our multi-user tests. To make this happen, we use two standard datapools:- ServerInfo specifies host names, ports, context roots, and project area names
- UserId specifics user name/password combinations
- flexRules_60 does correlations which require you to provide some input values
- clmRules_60 does id correlations which don't require any special input
- Edit the rules arguments in flexRules_60 so that the rules will be able to match specific values in your recording (like host names or ports)
- Apply the two rules files to your script
- Double-check the results, and make any necessary manual corrections for things which the rules didn't catch
- Test the script in single user mode to ensure there are no failures (and be sure to watch the log files on the server to catch any errors which only show up in the logs)
Specifying arguments for the rules
The correlation rules automate the steps you go through in RPT to create references and apply substitutions to values. Sometimes you do this manually by looking for a specific value, like a host name. So, for the rules to work, you must tell the rules about a few of the key values that need to be extracted or substituted. We use the flexRules_60 file as the place to specify all of the arguments, and the list of arguments is shown below. The arguments that apply to Rational Team Concert are high-lighted in red:
This means that we need to look at the recording, and identify the following values: - The host names for the RTC and JTS servers
- The name of the RTC project
- The project area item id for the RTC project
- The port on which the servers are running (we assume all servers use the same port - we typically use 9443). We avoid 443 because some browsers strip that from URLs, and that can create problems with the Jazz public URIs.
Note that our practice is to extract the part of the id after the underscore, since that gives us a way to pull out the ids more precisely. So, when copying the project area id into the rules arguments, be sure to leave off the underscore.
Here's how it looks after initializing the rules file:
Keep in mind that you'll need to update the rules arguments if you record new scripts against different servers or projects.
Next, you apply the rules by opening up the script, right-clicking on the script name, and selecting "Data Correlation -> Re-correlate test data using rules".
There are a few things to note: - Host names, ports, and project area names have been correlated to the ServerInfo data pool
- User names and passwords have been correlated to the Userid data pool
Final tweaks
To apply the final tweaks to this script, I created a copy called CreateDefect_phase3. After looking at the GET calls and inspecting the parameters in the POST calls, I see that I need to do the following things before I can run this:- I want to give each defect a unique name; the recording used names like "RPTDefect_TSTAMP" which are currently hard-coded
- I want to give each page a meaningful name, so that I can better interpret RPT's execution reports.
- I want to set the page think time to 60 seconds for all pages, so that I can control the think time from within a test schedule to model the user population the way I want
- I need to manually initialize a test variable to contain the project area id. Usually, my tests use a login script that is separate from the rest of the operations, and I use the login to initialize test variables which I pass into other scripts. Since this script includes login as well as other operations, I need to do a bit of manual setup in the login sections.
- I need to clean up a few pages which were accidentally recorded after I had finished the use case, and I need to disable a few requests involving icons.
Project area id correlation
The CLM performance team usually separates authentication operations into a standalone script, and we use that script to initialize parameters which would be required by other scripts. Those parameters are passed from the login script to the other scripts via test variables, and the correlation rules reflect that. Since this is a script which includes login, we need to initialize the test variable CCM_ProjectID with the item id for the target project area. The first step is to extract the project area item id. This comes back from the following GET call which occurs just after authentication completes:GET /ccm/service/com.ibm.team.repository.service.internal.webuiInitializer.IWebUIInitializerRestService/initializationDataThe return data includes a section which lists the project areas to which the current belongs. If you are willing to assume that the first project area is the target, or if there is only one project area, then you can extract out the required value using a regular expression like so:
Note that we extract out everything after the underscore, per our internal convention.
It is possible to do more sophisticated extraction (e.g. to pull out an id for a project area of a given name), but that requires custom code. I've included some sample code that does that in the attached project (in the Java perspective, see clmFlexCode.CCMProjectIdExtraction.java - but I won't use that here.
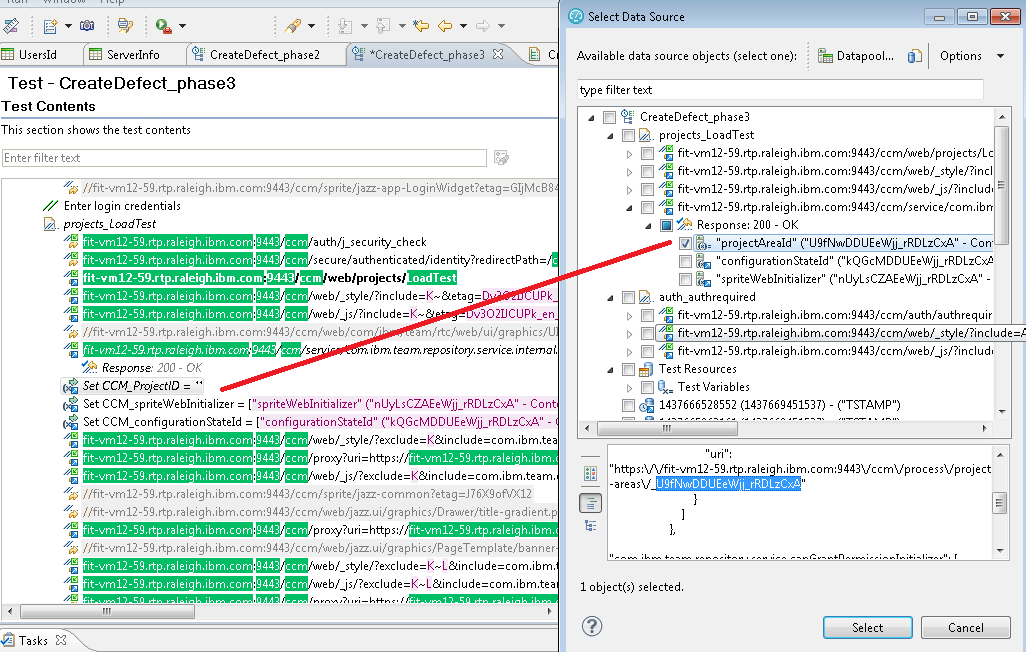
Once I've created the reference, I can assign it to the CCM_ProjectID test variable as follows:
Creating unique defect titles
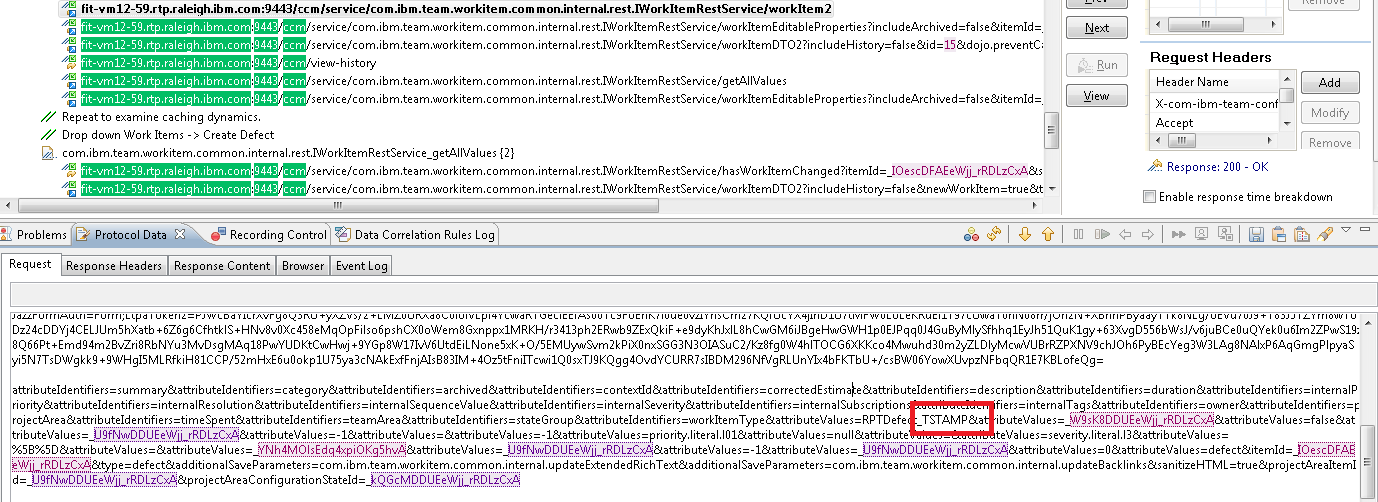
The next manual task is to alter the scripts to create a unique defect title, so that this simulation doesn't end up creating its defects with identical titles. I use one of the RPT built-in functions for that: Timestamp. When I created my defects during the recording session, I included the string TSTAMP in the title. So I want to substitute TSTAMP with the Timestamp function. Since I created two work items, I need to do this in two places: the two POST calls:POST /ccm/service/com.ibm.team.workitem.common.internal.rest.IWorkItemRestService/workItem2Select the TSTAMP section of the POST call, right-click on the selection and then select Substitute -> Builtin Datasources, and select the Timestamp function.
There is one more tweak needed. The POST to ccm/view-history (which updates the historical selections visible in the Work items drop down) uses the title from the recording. I need to extract the new title, and substitute. The new title is available in the return data from the POST that creates the workitem. The new title can be extracted from that data as follows:
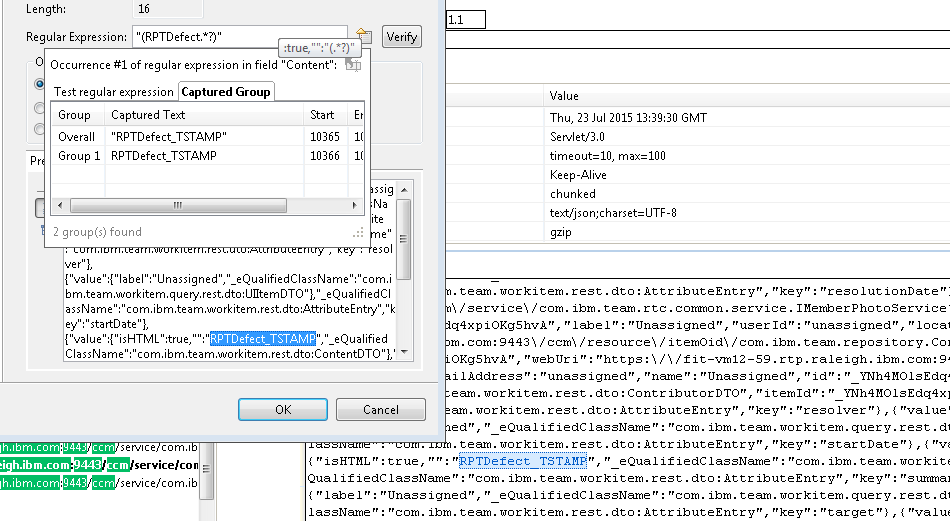
Note how the regular expression "(RPTDefect.?)" matches a double-quote delimited string that begins with RPTDefect, and returns the complete string. Once you create the field, RPT will look for places that require substitution, and do that for you:
Since there are two work items created in this use case, this has to be done twice. But now, each workitem will contain a long numeric id in the title (that id is the timestamp).
You may be wondering at this point if there is any easy way to speed this up. Unfortunately, there is no magic. When you are working with a use case for the first time, you've got to look at every GET and every POST, and try to spot anything that needs to be correlated. Things you don't spot by inspection will usually surface as test failures, or unexpected behaviors in your test runs. You can over time capture that knowledge in correlation rules, but the first time is always a bit time-consuming.
Minor page fixups
There are a few last tweaks. First, I noticed that there are calls to the sprite service that involve a bundle id. These would need to be correlated to make the script work against any server. I just commented those two calls out, because they shouldn't have a large impact on the tests, and I didn't want to bother with ferreting out the ids in this example.
Testing the script
The phase 3 script is now completed. All that's left is to test it out. This involves:- Editing the ServerInfo data pool with the names of the target server and project area
- Ensuring that the user ids and passwords in the Userid data pool are correct, and the users have access to the project area
- Running the test and looking for errors
Be sure that RPT will report on warnings, because that's how data correlation issues may surface. Also be sure to watch the log file (ccm.log) on the RTC server while you are running the test, to spot any issues which result in server side errors (those won't always should up on the RPT side).
When I did that, the script ran cleanly. It is ready to be used as part of a multi-user simulation.
Final thoughts
In this article, I've run through the basic process of creating performance automation that can simulate a user population creating workitems. I've provided a sample project that includes the scripts I referenced, along with correlation rules files that capture much of the experience of the CLM team. I will close with some miscellaneous thoughts. First, the automation script here has some flaws, and requires a bit more work. The key issues:- The login, dashboard, and create defect operations should not be combined in one script. They should be split into 3 separate scripts, and a RPT schedule should be used to better control the frequency of operations. As it stands, each pass through this script goes through expensive, first-time operations (like loading the dashboard) that create more stress on the server than would be normal.
- If you look at the pages for first-time vs. second-time work item creation, you can see that the second time requests involve far fewer operations. The browser caches a great deal of information on the first call. So, it would also be reasonable to split the script further into a first-time create and a second time create, and create a schedule that executes more second-time calls than first-time calls.
- The rules are sensitive to the specific CLM release, as well as to variations like JVM versions and Websphere vs. Tomcat. Plan to carefully inspect your scripts after applying the rules. I'm making the rules available as-is, so use them at your own risk.
- The rules file includes hard-coded references to datapools in a Datapools directory of a project called RPT. If you use them in different projects, you'll need to edit the files and do a search/replace on the path to the datapools. Fortunately, the files are in XML format so you can manipulate them with a test editor.
Appendix - the sample project
To work with the sample project, first download RPTSample.zip from the attachments listed at the bottom of this article. Then, from a Rational Performance Workbench (version 8.3.0.3 or later), select Import -> General -> Existing projects into workspace. Select the "archive file" radio button, then navigate to the directory where you downloaded RPTSample.zip, select it and hit Finish. This will import the project and you should be able to look at the tests I describe in this article, and use the correlation rules as well.Related topics: Deployment web home, Deployment web home
External links:
Additional contributors:


Contributions are governed by our Terms of Use. Please read the following disclaimer.
Dashboards and work items are no longer publicly available, so some links may be invalid. We now provide similar information through other means. Learn more here.