How to setup a DB2 V9 remote CLM Data Warehouse
on a reporting server location
Rational Insight reporting solution & Rational Reporting for Development Intelligence (RRDI)
Authors: PhilippeChevalierBuild basis: Collaborative Lifecycle Management Solution (CLM) (Jazz Team Server (JTS), Rational Team Concert (RTC), Rational Quality Manager (RQM), Rational Requirements Composer (RRC)) 4.0.x.
Page contents
- 1. Select or verify the DB2 Client software package
- 2. Catalog the remote database node using a command on the server's client instance
- 3. Catalog the database instance of the CLM data warehouse using the report server client instance
- 4. Test the catalogs
- 5. Setting up the root user, for the DB2 Client environment to support RRDI setup and IBM Rational WebSphere Profile
This topic describes the steps to catalog a remote CLM data warehouse database using DB2 V9 Client software.
1. Select or verify the DB2 Client software package
A possible interpretation of the following link leads to installing the DB2 32-bit Client version. Installing in 64-bit or 32-bit mode on a 64-bit OS http://pic.dhe.ibm.com/infocenter/clmhelp/v4r0m2/topic/com.ibm.rational.rrdi.admin.doc/topics/c_preinstall_OS_ovr.html If you attempt the installation on a 64-bit machine of the 32-bit DB2 client, it will result in failure. That is because the 32-bit package is not supported on a 64-bit implementation. The solution is to use the 64-bit client package for the DB2 client software, the package includes both 64 and 32 bit libraries. Recommended DB2 V9.7 Client software: IBM Data Server Runtime Client 9.7 for Linux on AMD64 and Intel EM64T systems (x64) English More details on the available DB2 packages can be found at this link: Downloading IBM DB2 Version 9.7 for Linux, UNIX, and Windows: http://www.ibm.com/support/docview.wss?uid=swg21378087 To install the package and setup the instance, review the following documentation: Installing IBM Data Server Driver Package (Linux and UNIX): http://pic.dhe.ibm.com/infocenter/db2luw/v9r7/topic/com.ibm.swg.im.dbclient.install.doc/doc/t0054799.html2. Catalog the remote database node using a command on the server's client instance
The following will define the communication channel to the remote DB2 server that services the CLM data warehouse database over TCP/IP. The command must be executed by the db2inst1 user which is associated to the db2inst1 default instance of DB2 Client Software.
db2 CATALOG TCPIP NODE {node-name} REMOTE {server-name} SERVER {port-or-service-name}

WHERE:

    {node-name} = The  name you want to give to the node.
    {server-name} = The server IP or DNS.
    {port-or-service-name} = The port or services name defined on the original database instance.
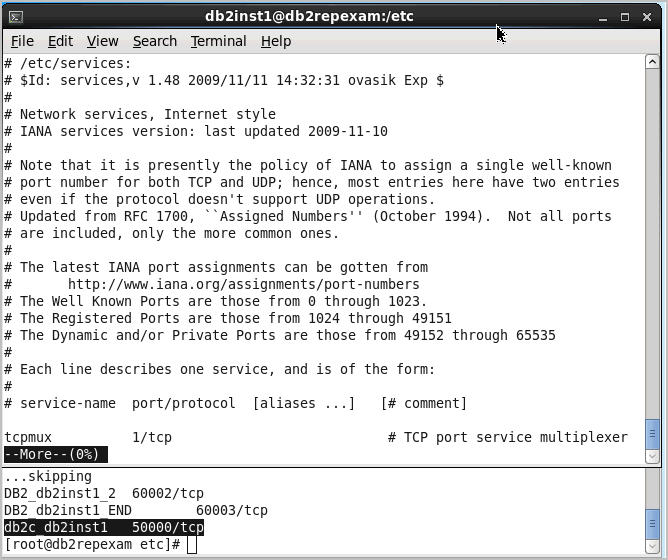
To identify the services name or port you can review the remote DB2 instance using the get dbm cfg, SVCENAME property and reviewing the /etc/services file or, speak to your physical DBA for details.
Example of get dbm cfg
 Example of "/etc/services file", see db2c_db2inst1 entry
 Example with values and result:
[db2inst1@repexample]$ db2 CATALOG TCPIP NODE DB2REPEX REMOTE db2repexam.ibm.com SERVER 50000
DB20000I  The CATALOG TCPIP NODE command completed successfully.
DB21056W  Directory changes may not be effective until the directory cache is refreshed.
3. Catalog the database instance of the CLM data warehouse using the report server client instance
This will define the database name to use on the remote database node. The user constraints are the same as the catalog node section.
db2 CATALOG DB {clm-dw-name} AS {clm-dw-name} AT NODE {local-node-name}

WHERE:

    {clm-dw-name} = The name of the remote database
    {local-node-name} = The node we first catalog in this technote
Example with values and result:
[db2inst1@repexample]$ db2 CATALOG DB CLMDB AS CLMDB AT NODE DB2REPEX
DB20000I  The CATALOG DATABASE command completed successfully.
DB21056W  Directory changes may not be effective until the directory cache is refreshed.
4. Test the catalogs
Once the Node and the database have been cataloged, you can test the results using the following two commands: "list db directory" which will list all databases cataloged on the current DB2 instance.[db2inst1@repexample]$ db2 list db directory System Database Directory Number of entries in the directory = 1 Database 1 entry: Database alias = CLMDB Database name = CLMDB Node name = DB2REPEX Database release level = d.00 Comment = Directory entry type = Remote Authentication = SERVER Catalog database partition number = -1 Alternate server hostname = Alternate server port number =and connect to, using the DB2 instance owner, which in the following example is db2inst1.
[db2inst1@repexample bin]$ db2 connect to CLMDB user db2inst1
Enter current password for db2inst1: *******
   Database Connection Information

 Database server        = DB2/LINUXX8664 9.7.0
 SQL authorization ID   = DB2INST1
 Local database alias   = CLMDB

[db2inst1@repexample]$
If both of these tests are returned without errors, you have been successful in setting up the remote database.
5. Setting up the root user, for the DB2 Client environment to support RRDI setup and IBM Rational WebSphere Profile
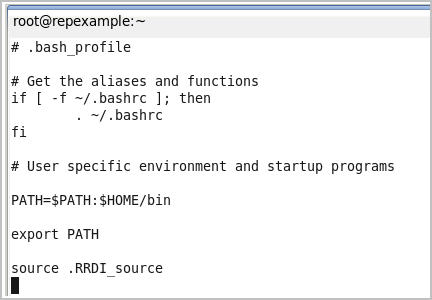
In this example the assumption is that there is a default DB2 Client Instance and its name is db2inst1, and is owned by the OS user "db2inst1". The "root" user is the owner of the WebSphere Java processes, and owns the RRDI Home directory. In the root home directory /root, create a Linux source file named .RRDI_source, insert the db2profile file absolute path, set the DB2INSTANCE environment variable, and assign it the instance name. Example of .RRDI_source# Configuration setup file for RRDI and db2 database on Linux # declare the instance the user will use for DB2 export DB2INSTANCE=db2inst1 # set environment for db2 source /home/db2inst1/sqllib/db2profileThis file can be managed in different ways: loaded manually, or within a script that sets up the WebSphere environment variables before starting the Java Virtual Machine. This example uses the command source .RRDI_source which is placed within the file /root/.bash_profile which by default is loaded when the BASH shell is invoked. This will source the file to the environment every time the root user logs in.
 If the configuration is setup correctly, you can then execute the same steps indicated in point 4 of this article with the "root" user. You should have positive results.
Related topics: Manually configuring DB2 servers after installation, Deployment web home
External links:
Contributions are governed by our Terms of Use. Please read the following disclaimer.
Dashboards and work items are no longer publicly available, so some links may be invalid. We now provide similar information through other means. Learn more here.