Configuring enterprise CLM reverse proxies: WebSphere 8.5 ND Proxy
Authors: IndradriBasu, SudhakarFrederickBuild basis: Rational solution for Collaborative Lifecycle Management (CLM) 4.0.3, WebSphere Application Server - Network Deployment 8.5.0.2
Other topics in this series
- Understanding reverse proxy
- Configuring Enterprise CLM Reverse Proxies: WebSphere 8 and IHS 8
- Configuring Enterprise CLM Reverse Proxies: Apache and mod_proxy
Introduction
In this deployment scenario you will setup a CLM environment and a proxy server, with each of the applications in a separate WAS profile in a single physical server environment. The user accessible Public URIs will be different as the Proxy Server will route the requests to respective application server nodes. The topology is described in detailed in the CLM Infocentre topic Standard single-server departmental topology while the use of Proxy Servers in CLM topologies is described in Reverse proxy servers in topologies. This topology is typically useful for deployments where the initial volume of users is low or in deployments where only a single CLM application (CCM, RM or QM) is initially used. As the volume of users increases or additional applications are added, a distributed enterprise topology should be considered. As described in the Infocentre - in addition to being able to redeploy the applications at a later stage - using a proxy server has the following additional benefits:- Server rename can be avoided, unless there is a change in domain name itself.
- For security and user friendliness, port numbers are not visible (not required) in the public URIs

Prerequisites and Assumptions
- WebSphere Application Server ND profiles are used
- When configuring Global Security in Section 1.2 follow the guidance in one of the following articles :
Tip: Configuring WAS with Federated realm
Tip: Configuring WAS with LDAP realm
Installing Rational Team Concert 3.x with IBM WAS, IBM DB2 and Microsoft Active Directory
Configuring Jazz applications for LDAP on WAS 7.0.0.7 - In this example you will only deploy the JTS and CCM applications for brevity. Once the WAS application server template has been created, it is simple enough to use it to deploy the other applications as required.
- Administrative console access to the WAS Deployment Manager
profile is available
- The firewall on the server must allow access to only port 443 from the outside world
- A separate database server is available
- The physical host used in the example is called "vhost5459". A
DNS alias exists that maps "clm.example.org" to this
host.
- Though the steps here were carried out in a Windows environment, their Unix/Linux equivalents will work as well.
Procedure
1 Setup the ND Deployment Manager
1.1 Create a Deployment Manager profile
Launch a the WebSphere Profile Management Tool (PMT) which comes along with the WebSphere ND installation. You can also launch it from:
<WAS_ND_Install_Dir>/bin/ProfileManagement/pmt.(sh|bat)
Once the Profile Management Tool has launched, click the
"Create..." button. In the dialog window that
opens:
- Select "WebSphere Application Server > Management" , click "Next >"
- Select "Deployment manager", click "Next >"
- Select "Advanced profile creation", click "Next >"
- Ensure the Deploy the administrative console (recommended) option is checked. Click "Next >"
- Leave the defaults, click "Next >"
- Change the following (as per the DNS Alias):
Node Name: clmCellManager01
Host Name: clm.example.org
Cell Name: clmCell01 - Keep "Enable administrative security" enabled and choose an
administrative user name and password. For
Example:
User name: admin
Password: admin
Click "Next >" - Leave the defaults, click "Next >" twice.
- Make a note of the SOAP port as you will need that while
federating application server and proxy server nodes (The default
value is 8879).
Leave the default ports, click "Next >" - Choose whether to run dmgr as a service, click "Next >"
- Click "Create" to create the Deployment Manager profile.
- Once finished, launch the First Step Console and Start the Deployment Manager
Alternatively, you can use the command line to create a
deployment manager profile.
To do so, Open a command window and navigate to
WebSphere_Install_Folder/bin and execute the following
commands:
<WAS_ND_Install_Dir>/bin/manageprofiles.(sh|bat) -create -templatePath <WAS_ND_Install_Dir>/profileTemplates/management -profileName Dmgr01 -profilePath <WAS_ND_Install_Dir>/profiles/Dmgr01 -enableAdminSecurity true -adminUserName admin -adminPassword admin]
Start the Deployment manager profile.
startServer.(sh|bat) dmgr -profileName Dmgr01
1.2 Set up Global Security on the Deployment Manager
It is recommended to fully configure the deployment manager security before creating the nodes which will host the application servers. Each of the nodes uses authentication to communicate with the Deployment Manager and if authentication is not configured on the Deployment Manager before the nodes are deployed, the nodes
will need to be manually resynchronized.
Follow the
Configuring Global Security instructions to setup the parameters.
Set up the authentication mechanism, refer to Prerequisites and Assumptions section.
Additionally, configure the Single Sign-on for the Deployment Manager which will be followed by all the other nodes which you are about to create. This is to ensure that applications across
different nodes can be accessed by users without having to re-authenticate.
- In WebSphere Integrated Solutions Console, click Security > Global security.
- Under Authentication section, expand the Web and SIP security and click Single sign-on (SSO)
- Click the Requires SSL check box.
- In the Domain Name text box, specify your domain name (e.g. example.org) for which the SSO is applicable.
- Click OK and Save directly to the master configuration.
1.3 Restart the Deployment Manager Profile
To Stop the Deployment Manager profile:
<WAS_ND_Install_Dir>/bin/stopServer.(sh|bat) dmgr -profileName DMGR01 -username <admin username> -password <admin user password>To Start the Deployment Manager profile:
<WAS_ND_Install_Dir>/bin/startServer.(sh|bat) dmgr -profileName DMGR01
1.4 Enable Automatic Node Synchronization
Moving forward, all configuration changes you are about to perform, must be propagated and synchronized between all the nodes agents. The synchronization between nodes can be performed manually but enabling automatic synchronization is a more effective way and saves manual effort.
- Using a browser, open the WebSphere Administrative Console (For example: https://clm.example.org:9043/ibm/console and login using the username:admin and password:admin
- Navigate to "System Administration > Console Preferences" and select "Synchronize changes with Nodes"
- Click "Apply"
2 Setup the Application Server Nodes
2.1 Create and Federate Application Server Nodes
Launch the WebSphere Profile Management Tool (PMT). You can also launch it from the command line:
<WAS_ND_Install_Dir>/bin/ProfileManagement/pmt.(sh|bat)
Once the Profile Management Tool has launched, click the "Create..." button. In the dialog that opens:
- Select "WebSphere Application Server > Custom profile" , click "Next >"
- Select "Advanced profile creation" and click "Next>"
- Optionally change the Application Server profile name to something meaningful like JTSSrv. Change the profile directory path as well to <WAS_ND_Install_Dir>/profiles/JTSSrv. Click "Next >"
- Change the "Node name" to JTSNode to match the profile name and change the "Host name" to clm.example.org (as per your DNS alias) . Click "Next >"
- To federate this Node with the Deployment Manager, enter the FQDN (Fully Qualified Domain Name) of the server in the
Deployment Manager Host name or IP address text box. In this case enter clm.example.org.
Enter the correct Soap Port number of the Deployment Manager node.
NOTE: The Soap Port number, can be found in the <WAS_ND_Install_Dir>/profiles/Dmgr01/logs/AboutThisProfile.txt file.
Under Deployment Manager Authentication, enter the username and password of the Deployment Manager profile.
Click "Next >" - Leave the defaults and click "Next >" twice.
- In the Security Certificate (Part 2) page, ensure the certificate information matches the DNS alias name. Click "Next>"
- Leave the defaults and click "Next >"
- Click "Create"
- Once the profile creation finishes, uncheck the "Launch the First Step Console" box and click "Finish".
Alternatively, you can use the command line to create a custom profile and federate it with the Deployment Manager.
To do so, Open a command window and navigate to WebSphere_Install_Folder/bin and execute the following commands:
<WAS_ND_Install_Dir>/bin/manageprofiles.(bat|sh) -create -profileName CCMSrv -enableAdminSecurity true -adminUserName jtsadmin -adminPassword Passw0rd -templatePath <WAS_ND_Install_Dir>/profileTemplates/managed -profilePath <WAS_ND_Install_Dir>/profiles/CCMQMSrv -federateLater true
<WAS_ND_Install_Dir>/profiles/CCMSrv/bin/addNode.(bat|sh) clm.example.org 8879 -username jtsadmin -password Passw0rd
Verify that the newly created Nodes agents are started and their Status is running (as shown below).
- In the WebSphere Administrative Console, navigate to System administration > Node Agents

2.2 Create Application Servers on the Federated Nodes
So far, you have created two managed nodes for application servers. Now, you will create and configure one application server (for the JTS application) and create an application server template from it, and then create the second application server (for the CCM application) from the template. This is more efficient than performing the same configuration for each and every application server definitions.
To create Application Server definitions, follow the steps below.
- Login to the WebSphere Administrative Console for the Deployment Manager. (For example: https://clm.example.org:9043/ibm/console)
- On the left panel, navigate to Servers > Server Types > WebSphere Application Servers
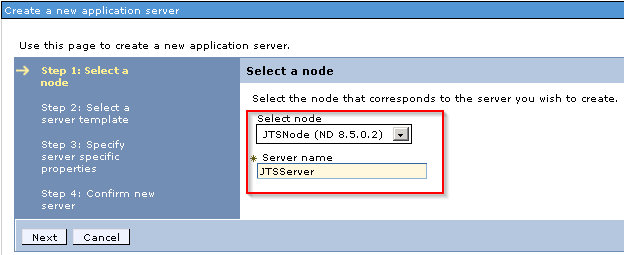
- On the right hand section, click the New button and Server creation wizard will come up.

- Select the Node name as JTSNode and type JTSServer in the Server name text box. Click
Next.
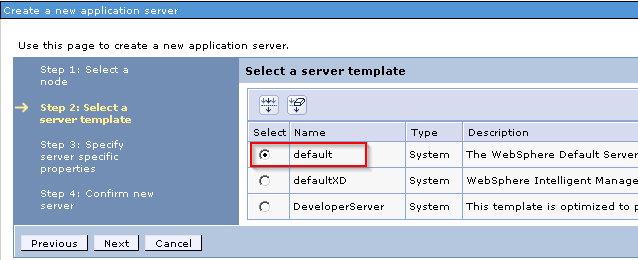
- In Step 2, select default server template and click Next.
- In Step 3, leave the defaults and click Next.
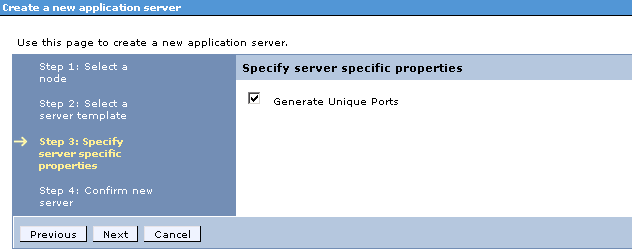
- In the final Step, click Finish.

- Once you are back on the Application Server page, click Save directly to the master configuration.
- Once the Nodes are synchronized, click OK.
2.3 Configure the Application Server
Before deploying the CLM applications, you must configure each of the application servers.
2.4 Create an Application Server Template
Now that you finished configuring the first application server, you will create a template from it so that you can create the second server identical to the configuration of the first server.
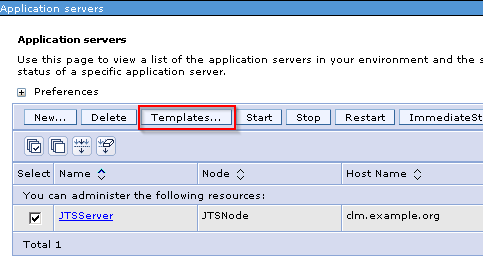
- Navigate to Servers > Server Types > WebSphere application servers
- Select the JTSServer
- and click Templates....
- Click the New button.
- Select the JTSServer and click OK

- Give a Name to the template like
clm_server_template and optionally, enter a
Description. Click OK

- Click Save directly to master configuration.
- Once the Nodes are synchronized, click OK.
2.5 Create the second Application Server using the Template
Now that our custom application server template is created, we
will proceed towards creating the second application server
instance. This step is very similar to what you have done earlier
except that you select the newly created clm_server_template
instead of the default template.
- Navigate to Servers > Server Types > WebSphere application servers
- Click the New button.
- Select CCMNode as the node name and type the
server name as CCMServer. Click Next.
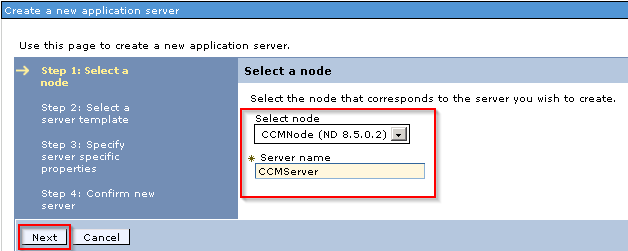
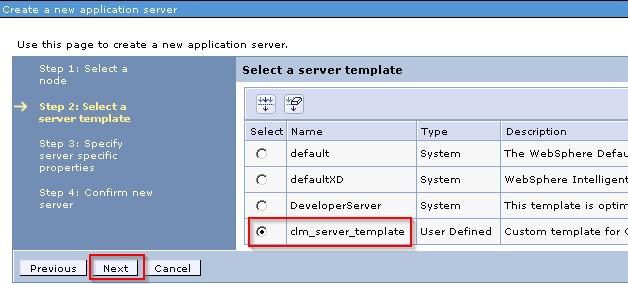
- Select the clm_server_template template and click
Next.
- Ensure the Generate Unique ports is checked. Click Next.
- Click Finish.
- Click Save directly to the master configuration.
2.6 Start the Application Servers on Federated Nodes
- Open the WebSphere Administrative Console in a browser. For example: https://clm.example.org:9043/ibm/console
- On the Left hand panel, navigate to Servers > Server Types > WebSphere Application Servers
- On the right hand section, select the Application Servers and
click Start.

Ensure the Status pane is showing that both the servers are running as indicated by a green arrow.
3 Setup the WAS ND Proxy Server
3.1 Create and federate a Node for the Proxy Server
To create a Proxy Server Profile
Launch a the WebSphere Profile Management Tool (PMT). You can also launch it from:
<WAS_ND_Install_Dir>/bin/ProfileManagement/pmt.(sh|bat)
Once the Profile Management Tool has launched, click the
"Create..." button. In the dialog window that
opens:
- Select "WebSphere Application Server > Custom profile" , click "Next >"
- Select "Advanced profile creation" and click "Next>"
- Change the profile name to ProxySrv. Accordingly, change the profile directory path as well to <WAS_ND_Install_Dir>/profiles/ProxySrv. Click "Next >"
- Change the "Node name" to ProxyNode to match the profile name and change the "Host name" to clm.example.org (as per your DNS alias) . Click "Next >"
- To federate this Node with the Deployment Manager, enter the FQDN (Fully Qualified Domain Name) of the server in the
Deployment Manager Host name or IP address text box. In this case enter clm.example.org.
Enter the correct Soap Port number of the Deployment Manager node.
NOTE: The Soap Port number, can be found in the <WAS_ND_Install_Dir>/profiles/Dmgr01/logs/AboutThisProfile.txt file.
Under Deployment Manager Authentication, enter the username and password of the Deployment Manager profile.
Click "Next >" - Leave the defaults and click "Next >" twice.
- In the Security Certificate (Part 2) page, ensure the certificate information matches the DNS alias name. Click "Next>"
- Leave the defaults and click "Next >"
- Click "Create"
- Once the profile creation finishes, uncheck the "Launch the First Step Console" box and click "Finish".
Alternatively, you can use the command line to create a custom profile and federate it with the Deployment Manager. To do so, Open a command window and navigate to WebSphere_Install_Folder/bin. Issue the following command:
<WAS_ND_Install_Dir>/bin/manageprofiles.(bat|sh) -create -profileName ProxySrv -enableAdminSecurity true -adminUserName jtsadmin -adminPassword Passw0rd -templatePath <WAS_ND_Install_Dir>/profileTemplates/managed -profilePath <WAS_ND_Install_Dir>/profiles/ProxySrv -federateLater true
<WAS_ND_Install_Dir>/profiles/ProxySrv/bin/addNode.(bat|sh) clm.example.org 8879 -username jtsadmin -password Passw0rd
3.2 Create the Proxy Server on the Federated Node
To create Proxy Server definitions, follow the steps
below.
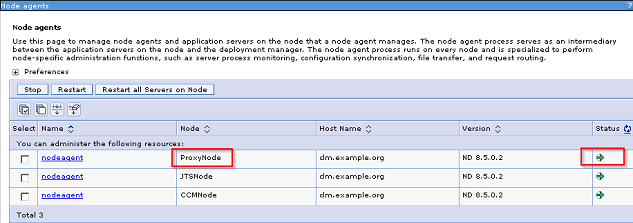
- First ensure if the Proxy Server Node that you have just created
has Started.
In the WebSphere Administrative Console, navigate to System administration > Node Agents
- Login to the WebSphere Administrative Console.
- On the Left hand panel, navigate to Servers > Server Types > WebSphere proxy servers
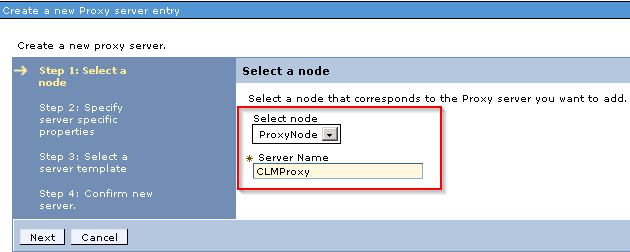
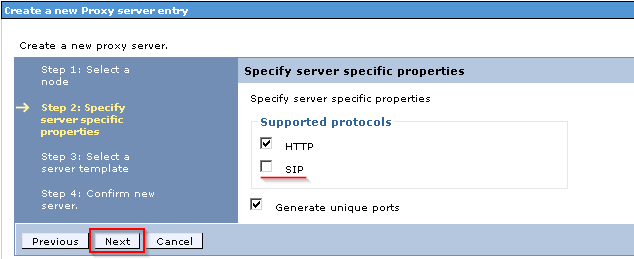
- On the right hand section, click the New button and Server creation wizard will come up.
- Select the Node name as ProxyNode and type
CLMProxy in the Server name text box. Click
Next.
- In Step 2, uncheck SIP check box and click
Next.
- In Step 3, leave the defaults and click Next.
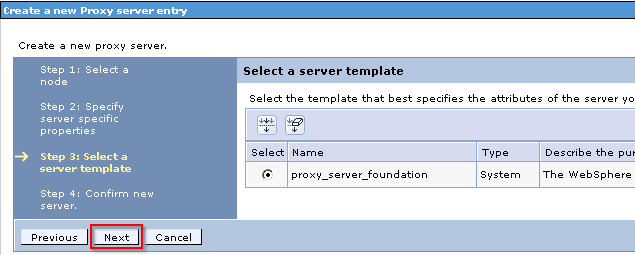
- In the final Step, click Finish.
- Click Save directly to the master configuration
- Once the Nodes are synchronized, click OK.
3.3 Configuring the Proxy Server
- Login to the WebSphere Administrative Console.
- On the Left hand panel, navigate to Servers > Server Types > WebSphere proxy servers
- On the right hand side, click the CLMProxy

- Under Communications section, expand the Ports
and ensure that PROXY_HTTP_ADDRESS and PROXY_HTTPS_ADDRESS are set
to 80 and 443 respectively.

If they are not set to as shown above, then you may want to check if any other proceses are blocking port 80 or 443. Click the Details button and change them as needed.
- Under Server Infrastructure section, go to Java and Process Management > Process definition > Java
Virtual Machine
- Under General Properties, ensure the Verbose garbage collection check box is unchecked.
- Under General Properties, set the Minimum heap size is set to 256MB.
- Under General Properties, set the Maximum heap size is set to 1024MB.
- In the Generic JVM arguments, add the following argument
-Xgcpolicy:gencon
- Click Apply, and then click Save directly to the master configuration.
You will increase the persistent timeout value so that the connection between the application servers and the proxy server remains open for a little longer time.
- Navigate to Servers > Server Types > WebSphere proxy servers
- On the right hand side, click the CLMProxy
- Under Proxy Settings, expand the HTTP Proxy Server Settings tree.
- Click Proxy server transports.
- Click HTTPS_PROXY_CHAIN. It should be associated with port 443.
- Click HTTP inbound channel (HTTP 4).
- Under General Properties, set the Persistent timeout to 60 seconds.
- Click Apply, and then click Save directly to the master configuration.
Configure the Proxy server thread pools to match the same settings as the CLM application server nodes.
- Navigate to Servers > Server Types > WebSphere proxy servers
- On the right hand side, click the CLMProxy
- Under Additional Properties, click Thread pools
- Click Proxy
- Under General Properties make sure the Minimum Size and Maximum Size are both set to 200 threads
- Click Apply, and then click Save directly to the master configuration.
3.4 Configuring Virtual Hosts
You will be using the default_host virtual hosts in this setup to exchange all communications and as mentioned earlier and you may want the proxy server to resolve only to the DNS alias you have created earlier using the HTTPS port 443 only.
To ensure the web modules are associated with the virtual host:
- Open and login to the WebSphere Administrative Console in a browser.
- On the Left hand panel, navigate to Servers > Server Types > WebSphere application servers
- On the right hand side, click on JTSServer
- Under Communications section, expand the Ports and note down port number for the WC_defaulthost_secure (if you are using an unsecured communication use WC_defaulthost instead)
- Ensure the port number that you noted, exists in the list under Environment > Virtual Hosts > default_Host > Host Aliases. If not, add an entry by clicking on the New button on the above pane.
- Click Save directly to the master configuration.
- Once the Nodes are synchronized, click OK.
To configure the virtual host with DNS alias:
- Open and login to the WebSphere Administrative Console in a browser.
- On the Left hand panel, navigate to Environment > Virtual Hosts
- Click default_host > Host Aliases
- For port 443, click the * and replace with the DNS alias (clm.example.org) and click OK.
- Click Save directly to the master configuration.
- Once the Nodes are synchronized, click OK.
3.5 Starting the Proxy Server
- Navigate back to Servers > Server Types > WebSphere proxy servers
- Select CLMProxy and click Start button to start the proxy server.
Deploying CLM applications
Follow the
Deploy CLM Applications on the Server instructions except follow the table below while Mapping Modules to the application servers.
|
Application
|
Node
|
Mapped Server
|
Context root
|
|---|---|---|---|
| admin.war |
JTSNode |
cell=clmCell01,node=JTSNode,server=JTSServer |
/admin |
| ccm.war |
CCMNode |
cell=clmCell01,node=CCMNode,server=CCMServer |
/ccm |
| jts.war |
JTSNode |
cell=clmCell01,node=JTSNode,server=JTSServer |
/jts |
Running the JTS Setup wizard
Now that you have URLs that are server agnostic, you can run the JTS setup wizard and use these URLs when registering the applications. Here are the discovery URLs that will be used:Change and Configuration Management: https://clm.example.org/ccm/scr
Moving an application
Now suppose that you wish to redeploy the CCM application to it's own separate physical server (for example, ccmserver01.example.org) without affecting users' ability to access it through https://clm.example.org/ccm. Here is a summary of the steps, previously detailed, to be repeated:- Create and federate a WAS profile as in Step 2.1 on the new server.
- Create an Application Server on the new node using the
clm_server_template as in Step 2.5.
- Install the CCM application on the exact same location on the
new server so that the template configuration remains
effective.
Follow the instructions in the CLM Infocenter, making sure to copy over the directory that contains the indexes and configuration files, located at <JazzInstallDir>/server/conf/ccm for the CCM application from the original server. - From Applications > Enterprise Applications > ccm_war > Manage Modules, select both the new application server definition and the application.
- Click OK and Save directly to the master configuration.
- Restart all the application servers and the proxy server.
Related topics: Proxy server installation, Understanding reverse proxy, Configuring Enterprise CLM Reverse Proxies: WebSphere 8 and IHS 8, Configuring Enterprise CLM Reverse Proxies: Apache and mod_proxy
Additional contributors: RosaNaranjo
Questions and comments:
Warning: Can't find topic Deployment.ConfiguringEnterpriseCLMReverseProxiesWebSphere85NDProxyCommentsContributions are governed by our Terms of Use. Please read the following disclaimer.
Dashboards and work items are no longer publicly available, so some links may be invalid. We now provide similar information through other means. Learn more here.