
IBM Rational Quality Manager
Quality management � Manual testing � Continuous improvement
Rational Quality Manager 4.0.5 New & Noteworthy
Rational Quality Manager is an integral part of the Rational solution for Collaborative Lifecycle Management (CLM). For new and noteworthy information about other parts of the Rational solution for CLM, see these pages:
- Jazz Foundation (Jazz Team Server) 4.0.5
- Change and Configuration Management 4.0.5
- Requirements Management 4.0.5
New in previous versions of Rational Quality Manager
For details about new features and functionality in previous releases, see these pages:
- Rational Quality Manager New & Noteworthy 4.0.4
- Rational Quality Manager New & Noteworthy 4.0.3
- Rational Quality Manager New & Noteworthy 4.0.2
- Rational Quality Manager New & Noteworthy 4.0.1
- Rational Quality Manager New & Noteworthy 4.0
New in Rational Quality Manager 4.0.5
- Correcting mistakes by restoring deleted test artifacts
- Improved organizational capabilities through categories
- Improvements for governing the test artifact lifecycle
- More insight into test case results when you use datapools
- Easier requirement-to-test traceability through reconciling a subset of requirement collections
- Improved productivity through test suite performance and scalability enhancements
- New capabilities to pause, resume, and stop test suites support long-running test suites
- Better lab data management through reportable REST API support for lab resource attributes and support of a simple properties format
- Licensing
- Prototype of offline testing application for mobile devices
- New video about test case execution records
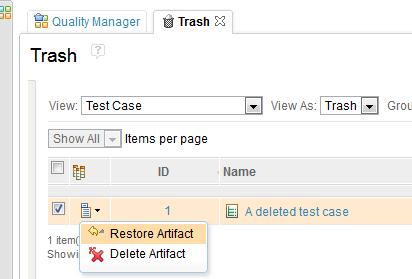
Correcting mistakes by restoring deleted test artifacts
You can now restore deleted test artifacts in the Trash view. To open the Trash view, click Admin > View Trash. The restore action is governed by a new Restore permission that was added for each artifact type. To set permissions, click Admin > Manage This Project Area > Permissions.
Improved organizational capabilities through categories
Category management through hierarchical views
The category editor was redesigned to provide a more dynamic and complete way to manage categories. Because of the need to categorize artifacts that are based on multiple and more specialized criteria, you sometimes must create and maintain complex category structures with several hierarchy levels that move from general to specific. In the new category editor, you can show the category structures as a tree so that you can see the dependencies between categories, subcategories, and values. You can also use the editor to create, associate, edit, and remove elements.
In addition, you can define the hierarchy by dragging elements to the tree. With this method, you can define a subcategory by dragging a category to another category. You can also associate multiple values across the tree by dragging values to a parent category.
To create category hierarchies that are based on defined values, use the Values panel that is near the tree. This panel lists the names of the values that are defined for a certain category in the context of the current test artifact. The panel can also include the names of all of the values that have been created so far for categories that belong to other artifacts. You can create a category by selecting a range of listed values from the panel and dragging them to a category to generate the category's values.

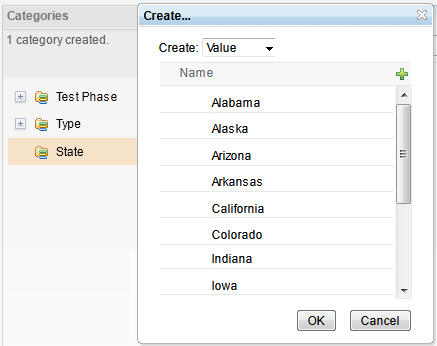
Views for category management
The category editor has two view modes: Show All and Show Outline. Use the Show Outline view to manage categories and subcategories. You can drag categories to arrange them and to establish dependencies between them so that you can define them as subcategories. After you define the hierarchy, you can switch to the Show All view mode to create and associate values.
To create and associate values, use the new Create window. In that window, you can also copy and paste a list of words that you want to be automatically generated as category values.
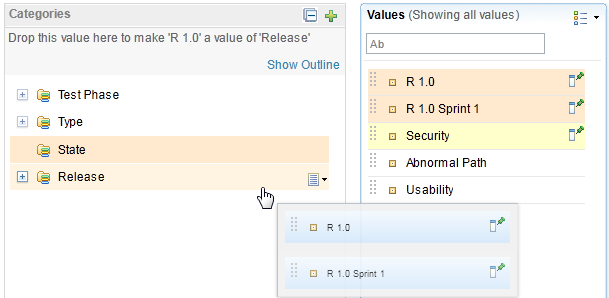
Ability to create values from values
When you are defining similar category hierarchies across different test artifacts, you can drag values from a list on the Values panel to the new category and generate new values. In the Values panel, you can filter to find specific values. You can also pin a value to the top of the list while you search for another value.
Subcategory filters in artifact table views
With subcategories, you can create a hierarchy of categories to classify test artifacts. For example, a subset of subcategory values is related to a specific value of a parent category, showing the dependency between those values.

You can see the dependency when you use the category filters. When you select a filter on a parent category, a list of values is displayed.

Then, when you select one or more values from that list and filter on a subsequent child category filter, the options list for the dependent filter is populated based on the parent selection. The names of the parent values are shown in the list so that you can identify the child options.

In addition, a search field is displayed at the top of every category filter in which you can type to find specific options.

Multiple subcategories in a single category
You can now add multiple subcategories to a category. For example, if you had a Shoe category, it might include the "Upper material" and "Sole material" subcategories.
Improvements for governing the test artifact lifecycle
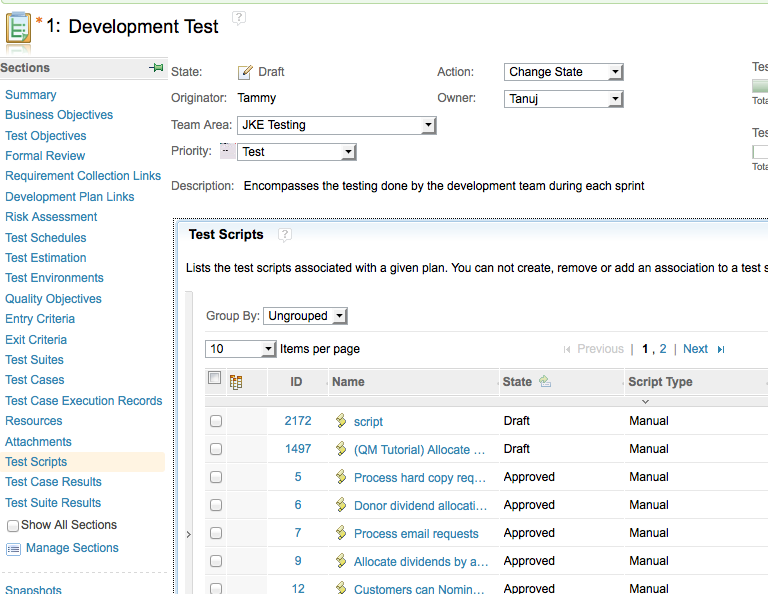
New test plan sections
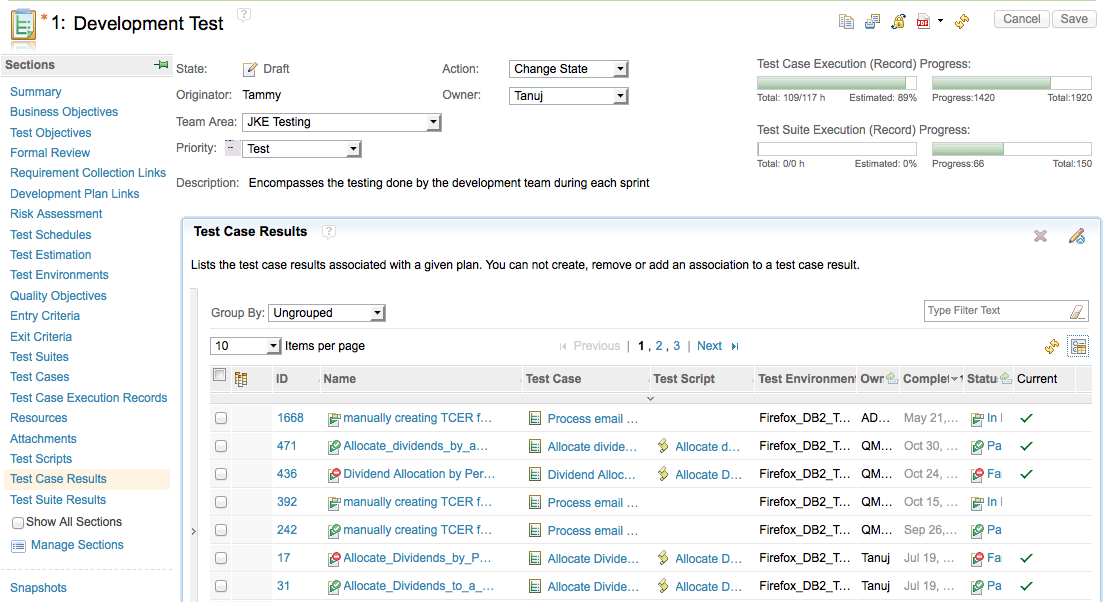
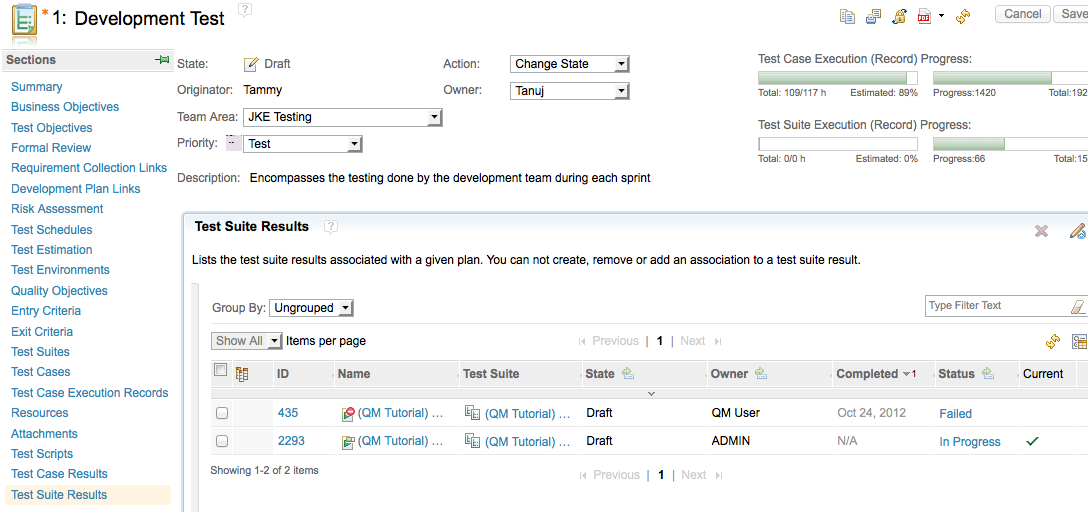
Test plans have three new sections: Test Scripts, Test Case Results, and Test Suite Results. In those sections, you can see your test scripts, test execution results, and test suite results directly from a test plan.
The new sections improve the workflow for the multi-artifact approval process because you can transition between states and approve or reject artifacts without leaving the test plan editor.
The new Test Scripts section:
The new Test Case Results section:
The new Test Suite Results section:
New process advisors for state transitions
New process advisors prevent state transitions until child artifacts have transitioned to a given state group. For example, you can configure the new advisors to prevent a test plan from moving to approved until all of the child test cases are approved. The new process advisors are supported for these artifacts: test plans, test cases, test scripts, test suites, test case results, and test suite results.
New "Published" state group
You can customize a test artifact's workflow by adding states that belong to the new "Published" state group. You might use that state group to improve the workflow for controlled test artifact reuse.
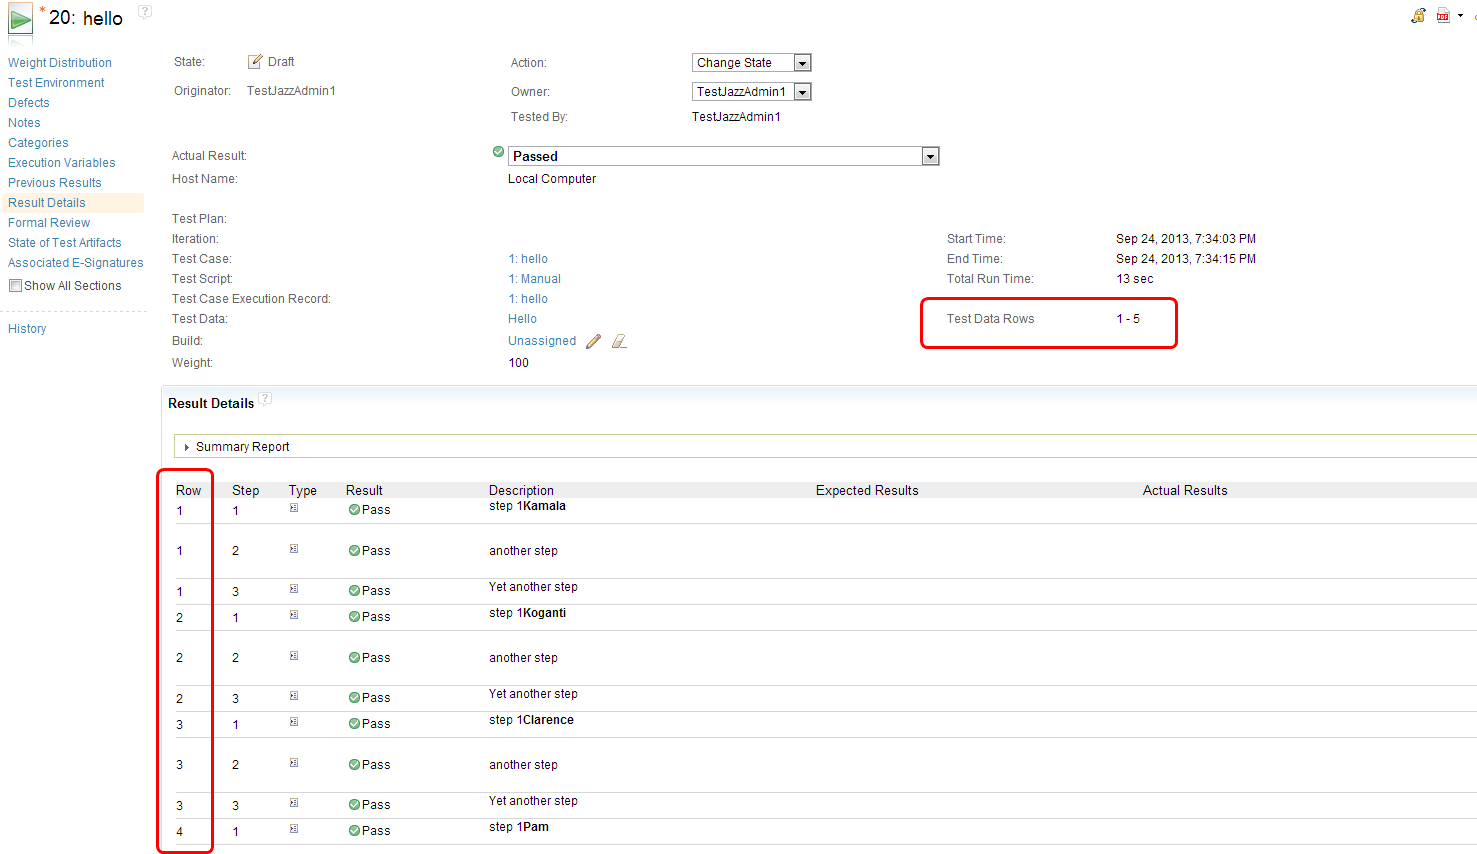
More insight into test case results when you use datapools
The test case results for test scripts that have test data associated with them now include the row number of the test data for each step result. This information is useful when you want to understand how the overall result of the test script relates to a particular test data row. The summary section of the test case result also shows a summary of the test data rows that were run. You can also access this information in exported PDF files and from the REST APIs for test case results.
Easier requirement-to-test traceability through reconciling a subset of requirement collections
When you reconcile requirement collections, instead of reconciling all of the collections, you can now select a subset of collections to reconcile. In the reconciliation results, you can view the removed items, which are requirements that were removed from the collections since the last reconciliation.

If any requirements are not in the reconciled requirement collections but are associated with test cases in the test plan, those requirements are listed as unplanned items.

When you reconcile only a subset of requirement collections in a test plan, you can hide the unplanned requirements from being shown in the reconciliation results. To hide unplanned requirements from the results, in your OSLC preferences, select When only a subset of requirement collections in the test plan are reconciled, hide any unplanned requirements, as shown in the following image.

The preference to hide unplanned requirements works on only the subset of requirement collections. If you reconcile all of the requirement collections that are in a test plan, even if you set the preference to hide unplanned requirements, any unplanned requirements are still shown.
Improved productivity through test suite performance and scalability enhancements
Test suite scalability is improved in several ways. In the Run Test Suite window and in the results editor for test suites, tables are now paginated and can be sorted, filtered, and grouped, where applicable. On the Test Case Results page, the custom properties are also now paginated and can be filtered. In addition, it takes less time to save large schedules. For more details, see these work items:
- 65219: Test Suite Execution Dialog does not scale well with larger number of Testcases in it
- 90021: Test Suite results are not paged
- 92707: Saving a test schedule takes 2 or 3 minutes
- 71546: Add Type Filter Text capabilities to the Custom Properties section on a Test Case Result
- 71548: Add Items Per Page capabilities to the Custom Properties section on a Test Case Result
New capabilities to pause, resume, and stop test suites support long-running test suites
The Test Suite Execution Console contains two new buttons: a button to pause and resume a test suite run, and a button to stop a test suite run. You can also resume a test suite run from the Test Suite Execution Record editor and from the Test Suite Execution Record view.
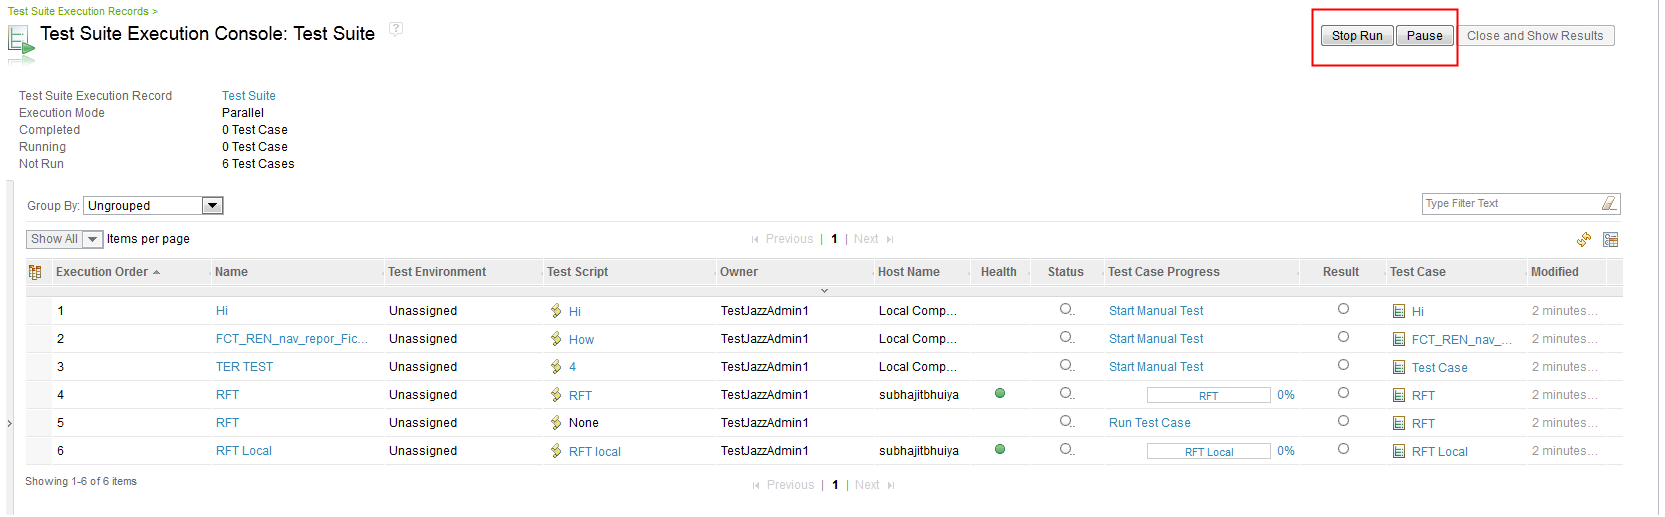
Pausing a test suite run
When you click Pause, all of the execution requests that have not completed are paused. The names and test case progress information of the paused execution requests are disabled. After a test suite is paused, the Pause button becomes the Resume button. If a test suite is running a remote script and you click Pause, the test suite will be paused after the remote script finishes running.

Resuming a test suite run
When you click Resume, the test suite run is resumed. All of the paused execution requests that are under the test suite run return to the states they were in before they were paused. After the test suite run is resumed, the Resume button becomes the Pause button.
Stopping a test suite run
When you press Stop, all of the execution requests that have not completed are canceled. You cannot resume a test suite run after you click Stop.

For more information, see this Jazz.net story: 93098: As a User, I want to Pause my Suite Execution and Resume it afterwards.
Better lab data management through reportable REST API support for lab resource attributes and support of a simple properties format
The properties format is a mechanism for accessing lab resources by using REST calls, such as GET, POST, and PUT. By using a simple property naming scheme, you can fully address every attribute in a lab resource. Here is an example of the new properties format:
<ns2:property name="Machine"/>
<ns2:property name="Machine.Location" value="my office"/>
<ns2:property name="Machine.Manufacturer" value="IBM"/>
<ns2:property name="Machine.memory" value="16000"/>
<ns2:property name="Machine.name" value="Test"/>
<ns2:property name="Machine.operatingsystem.Linux"/>
<ns2:property
name="Machine.operatingsystem.Linux.SoftwareInstall[0].Firefox"/>
<ns2:property
name="Machine.operatingsystem.Linux.SoftwareInstall[1].Chrome"/>
<ns2:property name="Machine.Operational Status"
value="Unavailable"/>
<ns2:property name="Machine.owner"
value="TestJazzAdmin1"/>
To use the properties format, specify the format=properties parameter to the REST calls.
A dictionary listing of all of the available catalog properties can be retrieved from //server/.../labresource?propertyDictionary=true.
Licensing
In the 4.0.5 release, the default time-out values for licenses changed:
- Floating licenses: The default time-out value changed from 7200 seconds (120 minutes) to 3600 seconds (60 minutes).
- Token licenses: The default time-out value changed from 7200000 ms (120 minutes) to 1800000 ms (30 minutes).
In 4.0.5, the minimum time-out values for licenses are as follows:
- Floating licenses: The minimum time-out value changed from 7200 seconds (120 minutes) to 1800 seconds (30 minutes).
- Token licenses: The minimum time-out value remains at 1800000 ms (30 minutes). This value has been the same since the 4.0.3 release.
- Floating licenses: See step 4 in Installing and managing floating client access license keys.
- Token licenses: See the note in step 4 in Setting up the Rational Common Licensing token service keys.
In the 4.0.5 release, the reset frequency for the time-out of token licenses changed. Before this release, the time-out value was reset only after the license expired. Now, most actions reset the time-out value of the license to the value of the time-out. This change makes the resetting of the time-out for token licenses the same as for floating licenses. This change causes the lmgrd.log file on the Rational License Key Server to increase in size faster than it used to, because each reset of the license causes entries to be written to the lmgrd.log file. That file is in the common directory. For example, on Windows systems, the file is typically in C:\Program Files(x86)\IBM\RationalRLKS\common\lmgrd.log.
Prototype of offline testing application for mobile devices
The QM team has a working prototype of an application that you can use to run tests from a mobile device. The application facilitates offline scenarios, such as when you are working without a connection to the QM server. For more information, see 90088: Explore QM mobile client app to support offline execution. You can download an evaluation copy of the Rational Quality Manager Mobile App from the Extras section of the All Downloads page.
New video about test case execution records
You can learn more about test case execution records by watching a new video, Test Case Execution Records Part 1: Why You Need to Understand and Manage Test Case Execution Records. This video is the first in a series of videos aimed at explaining how you can use test case execution records to plan, execute, and report on testing. Part 1 introduces test case execution records and explains why they are so important. The video is hosted on YouTube.com.