Rational Requirements Composer 4.0.5
Rational Requirements Composer 4.0.5 New & Noteworthy
Rational Requirements Composer is an integral part of the Rational solution for Collaborative Lifecycle Management (CLM). For new and noteworthy information about other parts of the Rational solution for CLM, see these pages:
- Jazz Foundation (Jazz Team Server) 4.0.5
- Change and Configuration Management 4.0.5
- Quality Management 4.0.5
New in previous versions of Requirements Management
For details about new features and functionality in previous releases, see these pages:
- Rational Requirements Composer New & Noteworthy 4.0.4
- Rational Requirements Composer New & Noteworthy 4.0.3
- Rational Requirements Composer New & Noteworthy 4.0.2
- Rational Requirements Composer New & Noteworthy 4.0.1
- Rational Requirements Composer New & Noteworthy 4.0
New in Requirements Management 4.0.5
- Overview
- Linking
- Modules
- Module organization
- Copying artifacts by dragging them in modules
- Dragging artifacts to link them in modules
- Improved keyboard shortcuts
- Module editor performance
- Linking saved module views to artifacts in other tools by using OSLC
- Module scrolling improvements
- Module and collection usability enhancements
- Reporting
- RDF URIs for the type system
- ReqIF (Requirements Interchange Format)
- Inline view of PDF files
- Query and search
- Shortcuts to select and add artifacts
- Tips for requirements management
- Licensing
- Technology preview: Client customization with JavaScript
Overview
Rational Requirements Composer equips teams with the capabilities to define and manage requirements in an online community. Because teams can include many stakeholders, including customers, analysts, developers, testers, and operations or production professionals, your organization can foster better business and development collaboration.
Version 4.0.5, which is part of the Rational solution for Collaborative Lifecycle Management (CLM), expands support for enterprise deployment, delivers higher value for some systems customers, and provides enhanced capabilities for customer consumability (time-to-value) in the software and IT markets. This release includes new and enhanced features:
- Ability to create links by copying and pasting artifacts
- Ability to create links between artifacts by using drag and drop between two browser windows
- Ability to rearrange artifacts in a module by using drag and drop
- Faster loading and scrolling in large modules
- New requirements management reporting metrics to report on new data measurements
- Preview of the first steps to support client-side customization with JavaScript
Linking
Copying and pasting artifacts to create links
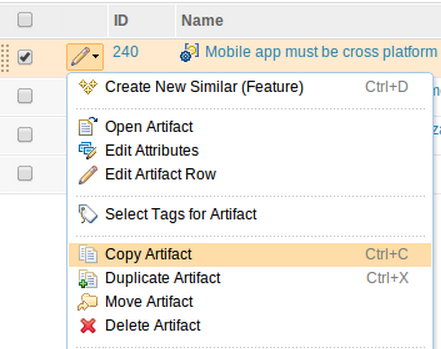
You can now create links between artifacts by copying and pasting them. From an artifact's menu, click Copy Artifact to place the artifact on the clipboard.
Then, click the artifact that you want to link to, and from its menu, click Paste as Link.
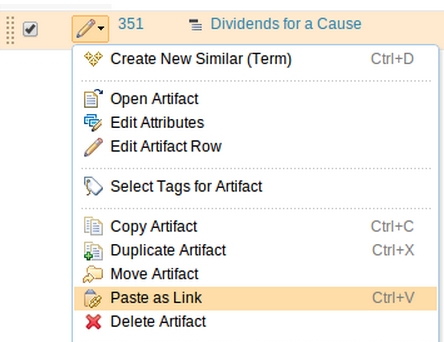
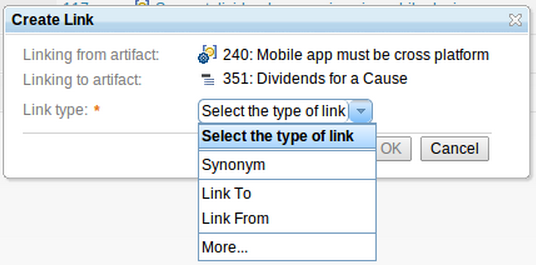
A window opens where you can specify details about the link.
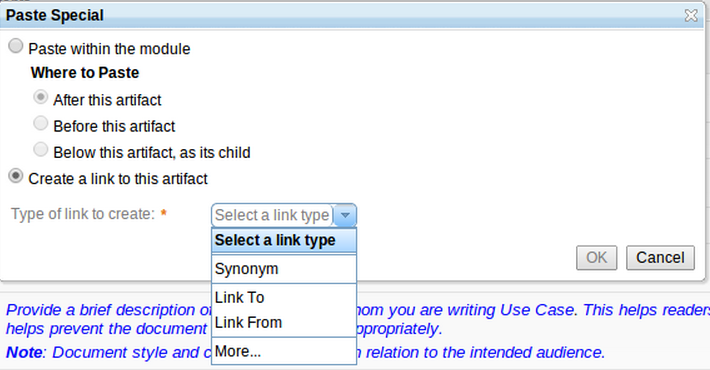
You can also create a link to an artifact in a module by using copy and paste. To do so, copy an artifact from the Artifacts page, and then open a module and click Paste Special. In the Paste Special window, you can specify that you want to link to the artifact. The clipboard data persists across browser windows and tabs in all supported browsers.
For more information about linking in modules by using copy and paste, see Copying artifacts by dragging them in modules. For information about keyboard shortcuts that you can use to copy and paste, see Keyboard shortcuts for the Requirements Management (RM) application.
Dragging artifacts to create links
In addition to creating links by copying and pasting artifacts, you can create links by dragging artifacts. You can drag artifacts between modules, collections, and on the Artifacts page. For more information about dragging artifacts in and between modules, see Dragging artifacts to link them in modules.
While you drag an artifact, a link target is shown on the right side of the row that you are hovering over.
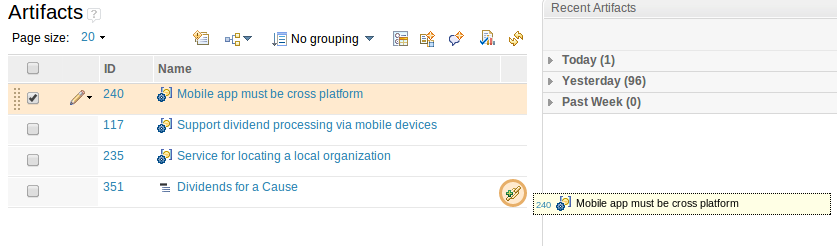
When you drop one or more artifacts onto the target, a window opens where you can finish creating the link.
If link columns are shown, you can drop artifact rows onto the columns to create links of that type. For example, in the following image artifact 240 is being dragged to the Synonym link column to create a Synonym link.
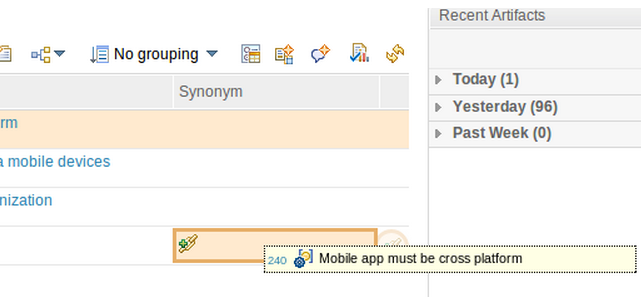
In Firefox and Chrome browsers, you can drag artifacts across browser windows and tabs.
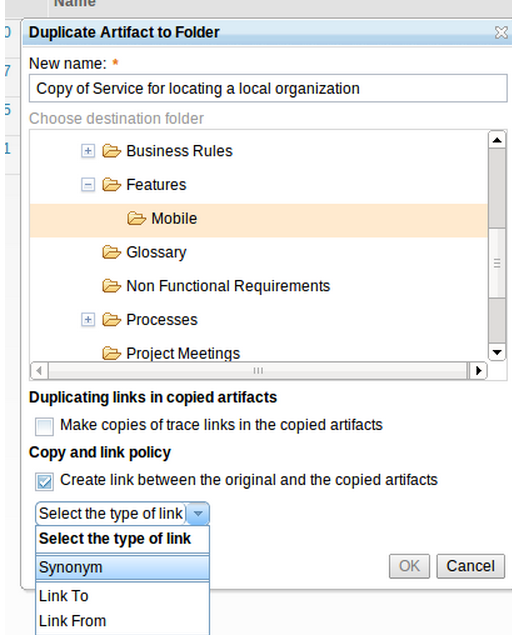
Links between artifacts and their copies
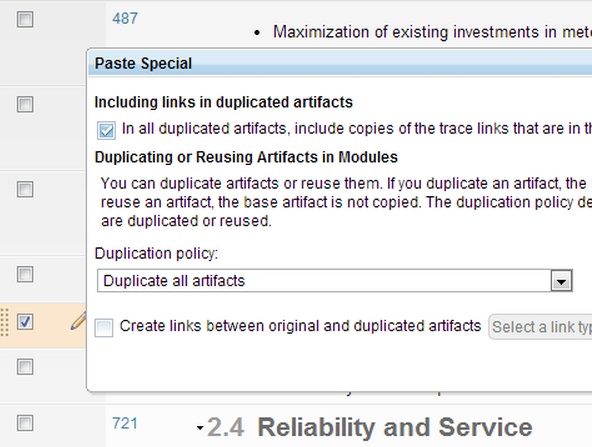
You can now copy artifacts and create links between the original and duplicated artifacts. To do so, on the Artifacts page, click the Duplicate Artifact menu item, or in a module, click the Paste Special menu item.
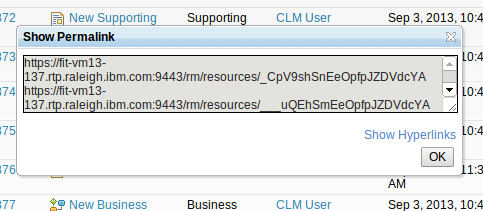
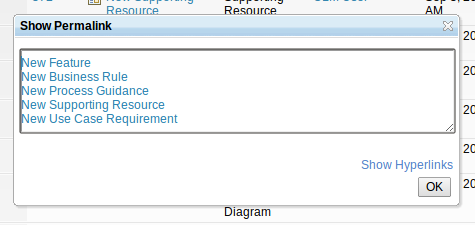
Permalinks and hyperlinks for multiple artifacts
You can now select and show the permalinks and hyperlinks of multiple artifacts at the same time so that you can share artifact links with other users.
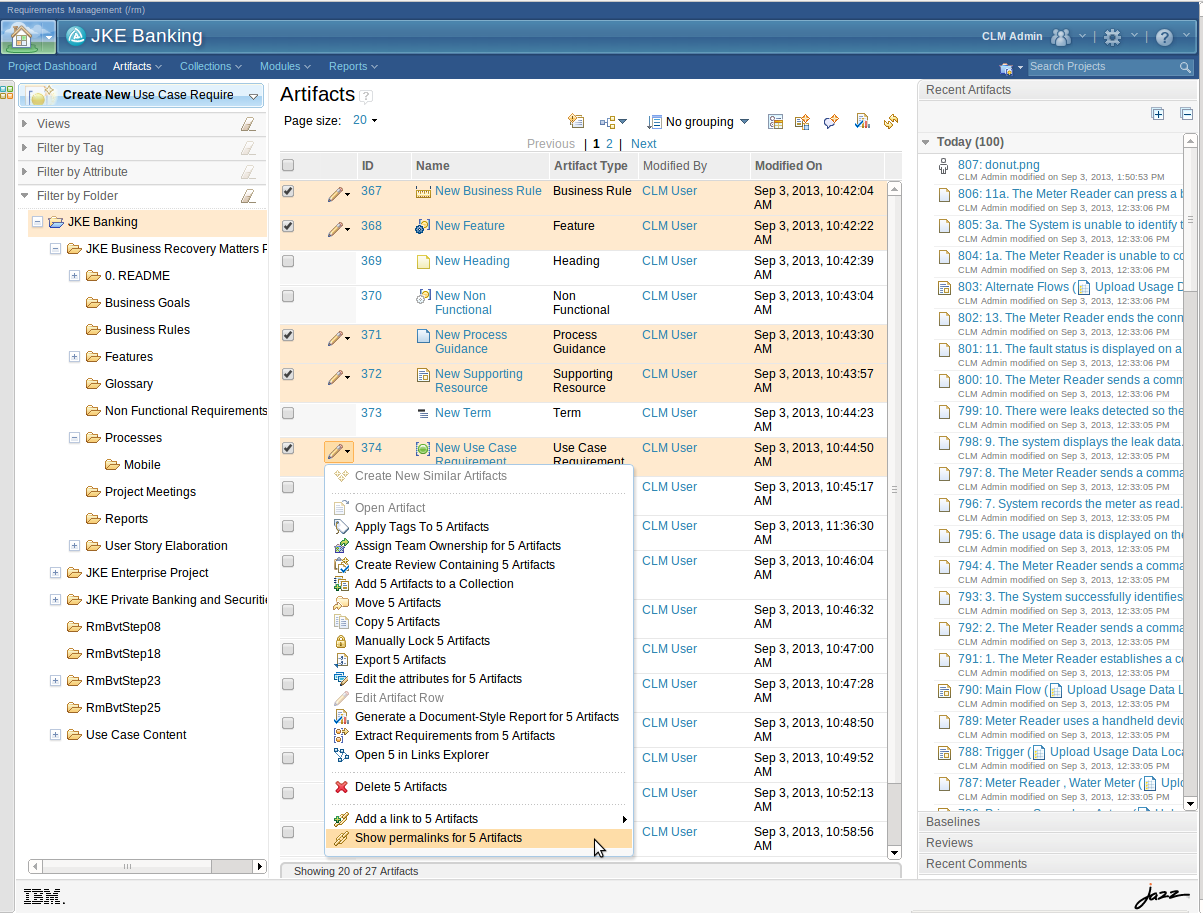
You can select whether to show permalink URIs or hyperlinks for the artifacts.
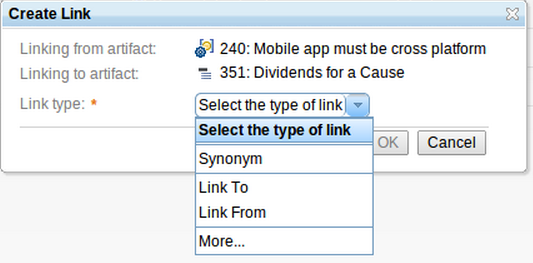
Preferred link types
If preferred link types are specified for an artifact type, the Create Link window shows only the preferred link types. To see all of the available link types, click More.
Modules
Module organization
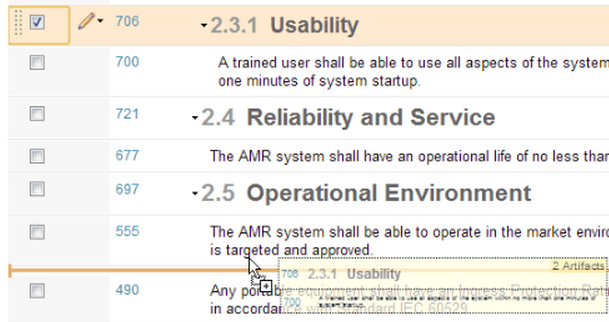
You can now reorder artifacts in a module by dragging them. When you drag an artifact that has child artifacts, that artifact and all of its children are moved. As you drag, an orange insertion arrow indicates where the selection that you are dragging will be placed.
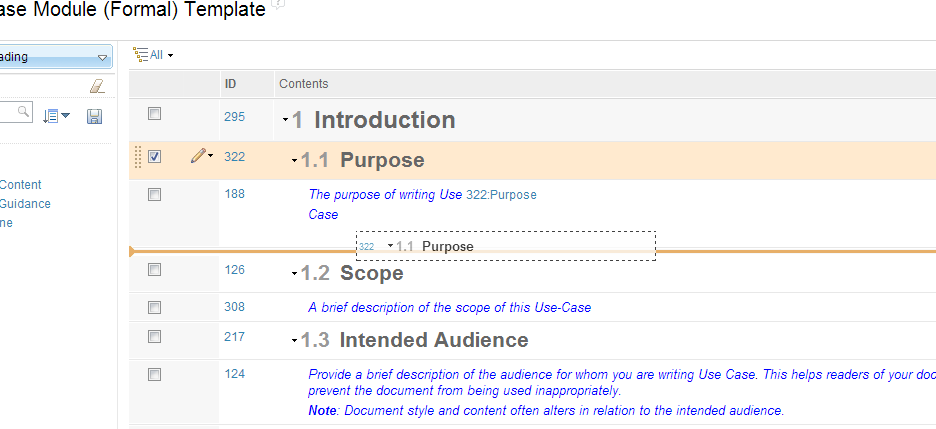
The module editor supports bump scrolling: when you drag toward the top or bottom of a module, the module automatically scrolls. If you need to drag an artifact to a section that is collapsed, hover over the collapsed section for a moment to automatically expand the section.
Copying artifacts by dragging them in modules
You can now copy an artifact by dragging it to the location in the module where you want the artifact to be copied. As you drag the artifact, press Ctrl. When you are hovering over an area where you can drop the artifact, the cursor changes and a drop indicator is shown.
When you drop the artifact and are pressing the Ctrl key, a Copy window opens. The window does not contain the location information because that information is detected when you drop the artifact.
In Chrome, Firefox, and Safari browsers, you can also drag artifacts between modules in different browser tabs and windows to create copies of artifacts.
Dragging artifacts to link them in modules
You can now create links between artifacts in modules by dragging artifacts. For example, from an artifact that is in a subsystem module, you can create a Satisfies link to a related requirement in a higher-level system module. You can link between artifacts that are in different modules or between artifacts in the same module. To link between artifacts in different modules, you must first open each module in a separate browser tab.
While you drag an artifact in a module, a link target is displayed in the target row that you hover over:

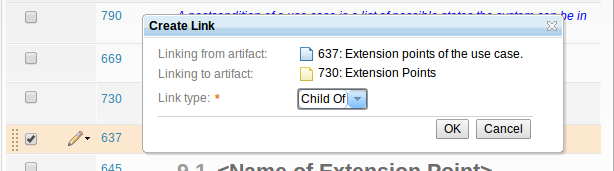
After you drop the artifact onto the target, a window opens where you can finish creating the link:
In addition, if a link type is displayed as a column in the module, you can drag artifacts to that column to quickly create links of that type.

You can also create links by copying an artifact and then selecting the Paste Special menu item in the module editor. For more information, see Copying and pasting artifacts to create links.
Improved keyboard shortcuts
The module editor has been improved in several ways:
- When you are editing a cell within a module, all of the editable cells within the associated row are in edit mode so that you can see where the cursor will move if you press Tab or press Shift+Tab.
- When you are working in a cell and open a window; for example, by using a keyboard shortcut, after you close the window, the focus returns back to the cell that you were working in before the window opened.
- When you cancel the editing of a row, the focus moves back to one of two places:
- If you cancel editing an existing artifact, the focus moves to the cell that represents that artifact.
- If you cancel editing a row that you created by using the Create New Similar menu item, the focus moves to a cell in the next row.
- After you promote or demote artifacts or display artifacts as headings, the focus moves back to the row cell that originally had focus.
- After you remove one or more artifact rows, the focus moves back to an appropriate cell.
- The keyboard shortcuts now work in all supported browsers. However, a few shortcuts changed:
- To create a similar artifact, press Ctrl+Enter instead of Ctrl+N and variants of Shift or Alt.
- To add an existing artifact, press Ctrl+E instead of Ctrl+D and variants of Shift or Alt.
- To create artifacts, press Ctrl+K instead of Ctrl+O and variants of Shift or Alt.
For the full list of keyboard shortcuts, see Keyboard shortcuts for the Requirements Management (RM) application.
Module editor performance
Response times have improved for editing modules. When you begin editing a row in a module, the edit fields are available instantly in most cases, unless the data is out of date and needs to be updated from the server. Data becomes out of date only if the artifact is changed after you viewed the module.
Linking saved module views to artifacts in other tools by using OSLC
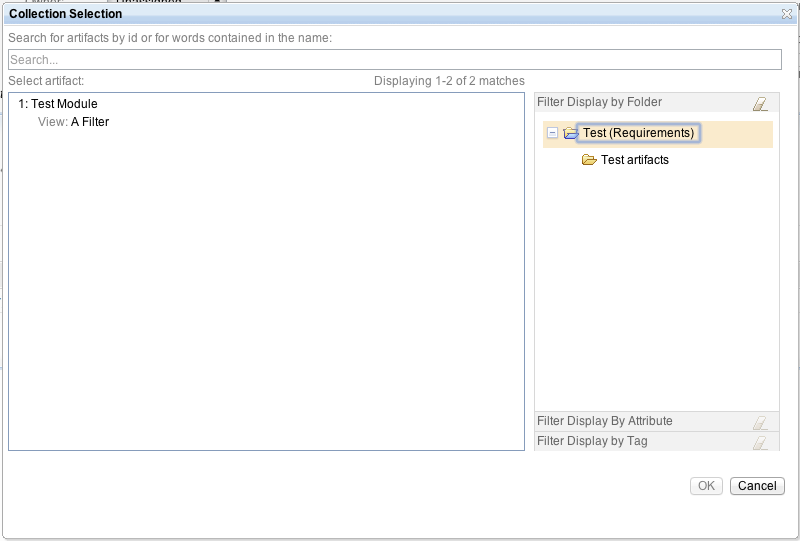
You can now link your saved module views to artifacts in other tools, such as test plans in Rational Quality Manager and development plans in Rational Team Concert. Only public views that are particular to a single module can be linked to artifacts in other tools. Private views and views that are shared across all modules cannot link to artifacts in other tools. The module views that can be linked to artifacts in other tools are shown in the OSLC collection picker windows. The views are listed under the modules that they belong to.
Links from test plans are listed in the Requirement Collection Links section of Rational Quality Manager. You can reconcile those links, which means that you can link to a subset of requirements in a module rather than the whole module.

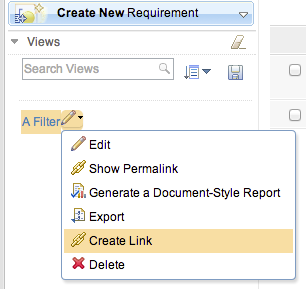
You can also create links from the module editor by clicking the pencil icon of a saved, public module-specific view and clicking Create Link.
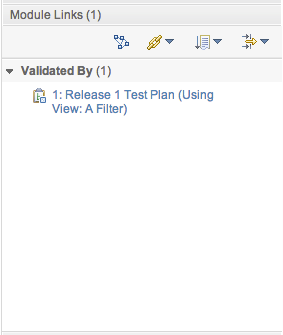
The links to saved, public module-specific views are listed in the Links section of the module sidebar. Those links show the name of the artifact that they are linked to and the name of the related view.
Because module views can now be represented as OSLC collections, those views can be included in Rational Reporting for Development Intelligence reports. To ensure that those views are up to date in the data warehouse, an administrator can use the Module Views tab on the Project Properties page of the RM administration interface. On that tab, administrators can specify any number of saved module views to daily watch and update.
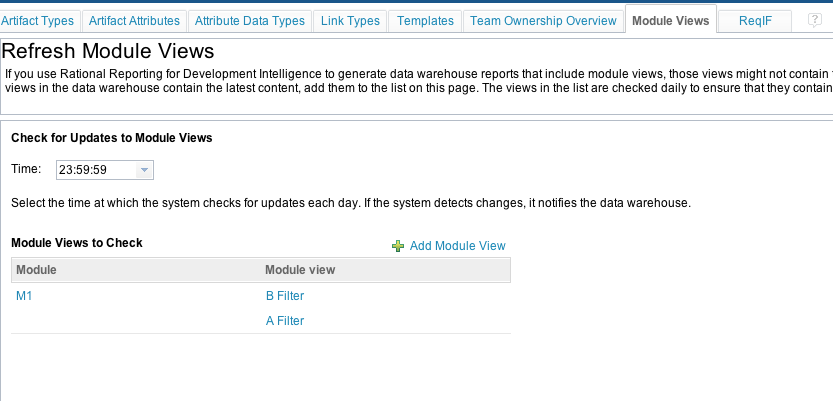
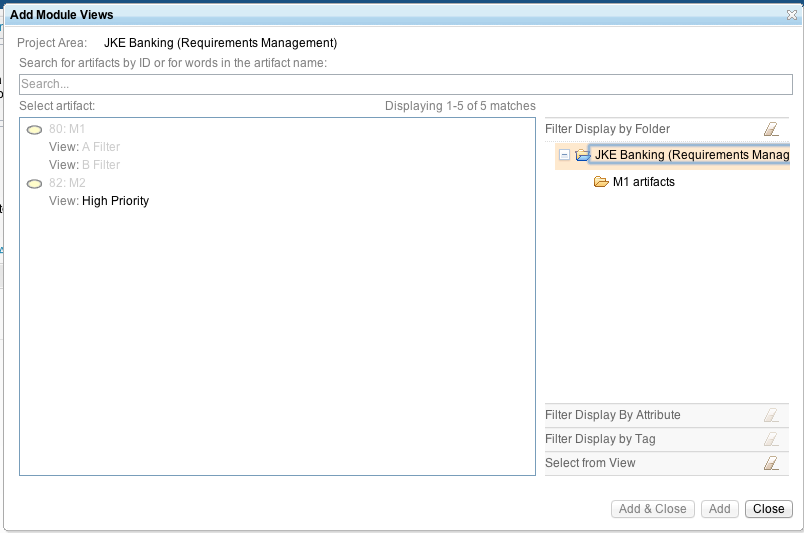
To select the module views, click the Add Module View icon and select the views from the window that opens. The views are organized under the modules that they belong to.
Module scrolling improvements
The scroll preview in the module editor is now shown only when you browse portions of the module that are not currently loaded and available. When you scroll for a long time or scroll to areas that you have not previously seen, the scroll preview is shown in order to provide high-level information about what will load if you stop scrolling.
When you scroll to a section of a module that you have already seen, the content loads faster. If you change a filter or refresh the module, the sections that you have already seen are reloaded on demand. In addition, on the Artifacts page of a project, when you revisit a previously visited page, the content loads faster.
When you click to go to the next page, the page loads faster. The application detects when you are near the end of the current page and starts downloading the next page so that it is ready faster when you scroll. Also, less loading time is required when you scroll at a typical reading pace. If you skip ahead in a module, the portions after the section that you are currently viewing are downloaded so that they are available faster.
Module and collection usability improvements
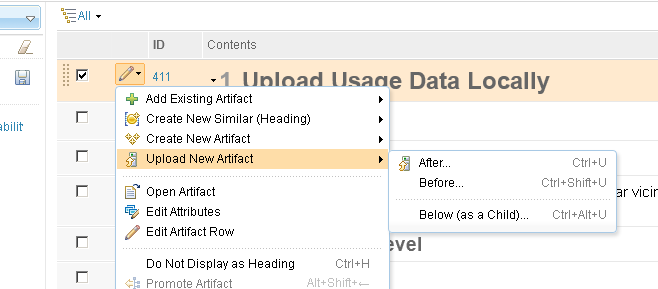
You can now upload a new artifact and include it in a module in one step.
Several changes were made to reduce the risk of accidental deletions, especially while viewing a module or collection:
- In the modules and collections editors, the Delete icon was removed from the toolbar.
- In all other artifact editors, the Delete icon is disabled when the artifact is being edited.
- The tooltip on the Delete icon was changed from Delete to Delete This Artifact.
You can now more easily control how many levels of a module are shown. To select the number of levels, you can use a new menu.

When you embed images and graphical artifacts, the module editor now automatically scales the embedded artifacts proportionally to the width of the module content column for easier viewing.
Reporting
Rational Reporting for Development Intelligence
In 4.0.5, you can use new requirements management reporting metrics to report on new data measurements, especially in the scope of a collection. Optionally, you can configure the system to load the main requirements content (primary text) in the data warehouse, which is turned off by default.
The new metrics are listed below with the sample reports that expose newly aggregated data. You can navigate the reports to see the current data snapshot, which is the latest version of the data that is loaded into the data warehouse.
- Third-party requirement selection (recursive):
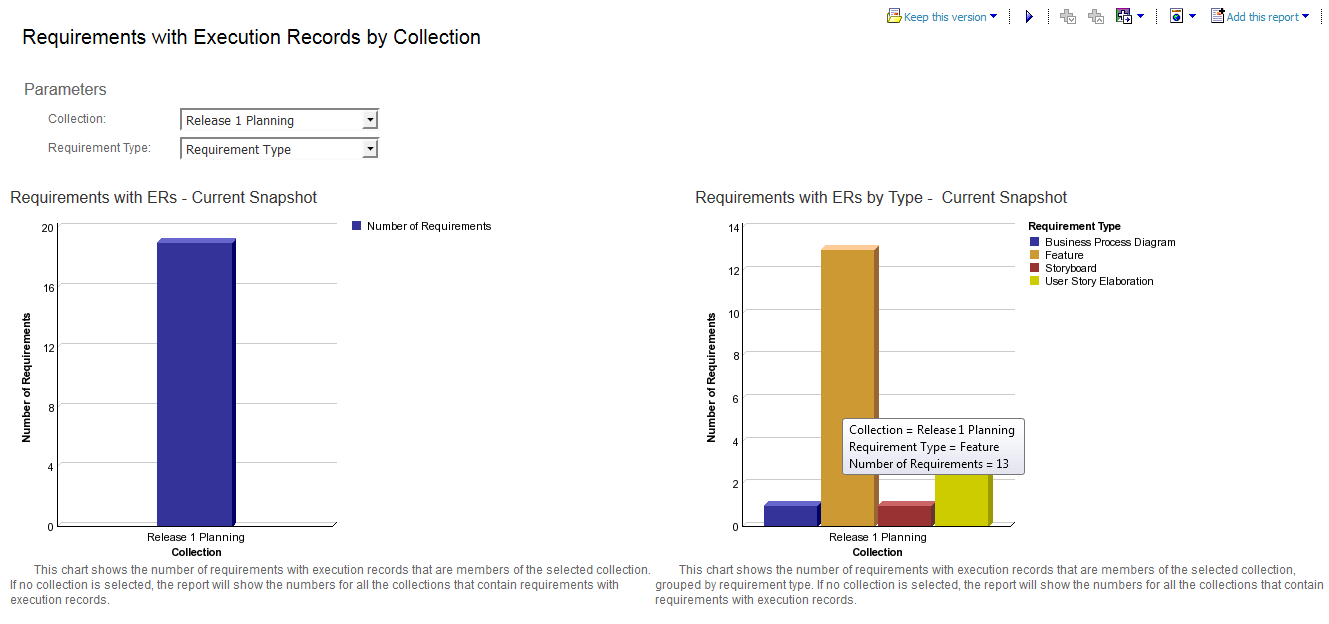
- Requirements with Execution Results by Collection
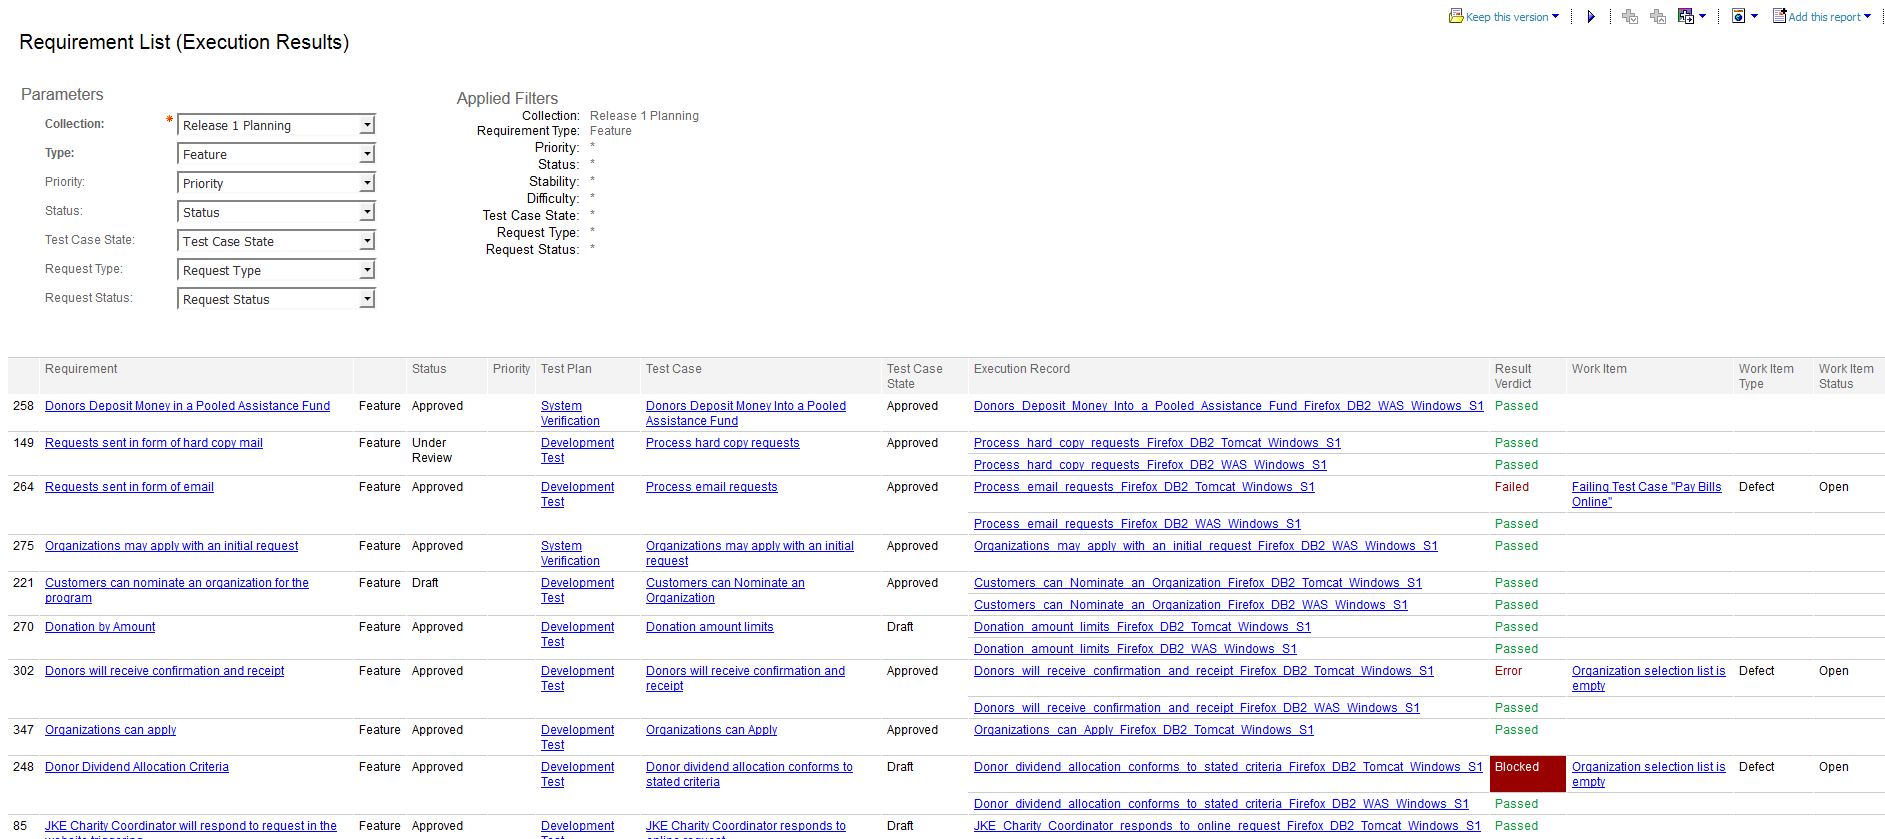
- Requirement List by Collection (Execution Results): Provides details about the aggregated data from the previous report
- Requirements with Execution Results by Collection
- Artifact count: Provides details at the project level and collection level
- Requirement count: Provides details at the project level and collection level, by artifact type
- Requirement Totals by Project: Includes requirements grouped by type
- Requirement List by Project: Provides details about the aggregated data from the previous report
- Requirement Totals by Collection: Includes requirements grouped by type
- Requirement List by Collection: Provides details about the aggregated data from the previous report
- Requirement distribution
- Requirements Distribution by Collection
- Third-party requirement selection
- Requirement Linked to Work Items by Collection
- Requirement List by Collection (Work Item Coverage): Provides details about the aggregated data from the previous report
- Requirement Linked to Test Cases by Collection
- Requirement List by Collection (Test Coverage): Provides details about the aggregated data from the previous report
- Collection count: Provides information at the project level, and includes modules and module views
- Requirement Collection Totals By Project
- Requirement Collection Totals By Type: Provides details about the number of collections, grouped by type
- Requirement Collection List: Provides details about the aggregated data from the previous report
- Upstream coverage analysis by artifact
- Requirement Upstream Coverage by Collection
- Requirement List by Collection (Upstream coverage): Provides details about the aggregated data from the previous report
- Downstream gap analysis by artifact
- Requirement Downstream Gap Analysis by Collection
- Requirement List by Collection (Downstream Gap Analysis): Provides details about the aggregated data from the previous report
- Coverage and gap analysis by link type
- Requirement Upstream/Downstream Coverage
- Requirement List (Upstream/Downstream Coverage): Provides details about the aggregated data from the previous report
Rational Reporting for Document Generation
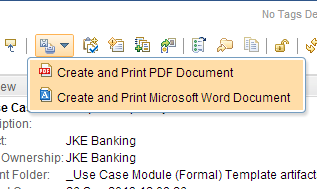
You can now use the Report wizard to generate the same reports as you can if you have permission to quickly print reports. This image shows the options for generating reports in the Report wizard:
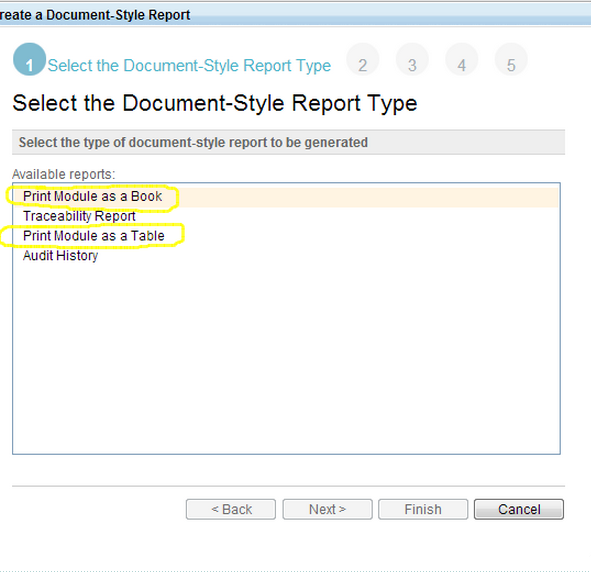
If you have permission to quickly print reports, these menu items are shown:

In addition, the reports can include parameters that are entered by the Report wizard. If you generate a report from within a module, the current view is printed. If you generate a report of a module from elsewhere, the default view is printed.
Quick print
If you have permission to complete the Quickly Print operation, you can quickly generate reports without providing any parameters. When you have this new permission, you can see the menu items that are shown in the following image.
If you do not have permission to quickly print reports, you can use the Report wizard to produce reports. The new Quickly Print operation is listed on the Permissions page under the Print Reports operation.

RDF URIs for the type system
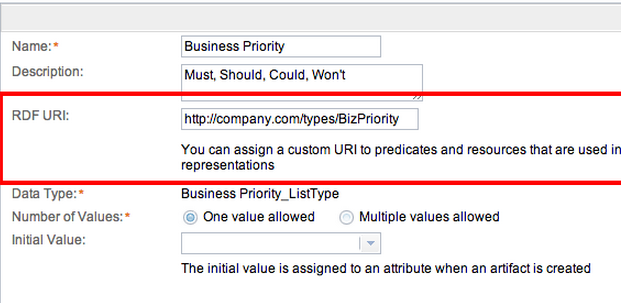
You can now specify an RDF URI for artifact types, attributes, data types, link types, and for values in an enumeration data type. The RDF URIs are used by the external data interface (OSLC API) to give more meaningful names to the data and attributes. When you specify an RDF URI, querying and reporting is simplified across projects in the lifecycle index, which is part of IBM Rational Engineering Lifecycle Manager.
For example, in the following image, https://company.com/types/BizPriority is assigned as an RDF URI to the Business Priority attribute that is defined in an RM project.
ReqIF (Requirements Interchange Format)
The RDF URIs that are specified for artifact types, attributes, data types, link types, and enumeration values are exported through ReqIF and can be imported into IBM Rational DOORS. Similarly, if you have exported requirements that have RDF URIs in Rational DOORS, you can import those requirements to the RM application.
By using RDF URIs, you can avoid the creation of duplicate types during ReqIF file exchanges. For example, if Rational DOORS requirements share the same RDF URI, only a single type is created in the RM application.
Inline view of PDF files
When you edit an uploaded artifact that is a PDF file, if you have a PDF viewer plug-in installed in your browser, you can show an inline view of the PDF file.

Query and search
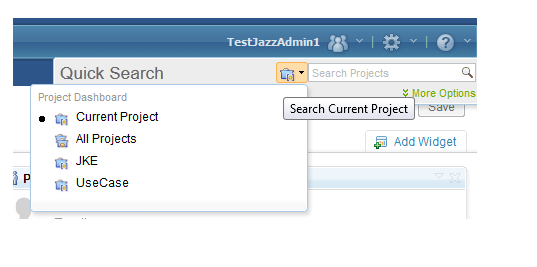
The scope of the Quick search feature now defaults to the current project, as opposed to the entire repository. If you do not change the scope, it defaults to whichever project is currently open. If you change the search scope, that selection remains in effect.
Shortcuts to select and add artifacts
You can now double-click to select an artifact and press Enter to select the highlighted artifact. This function is available in the Create Link window, the Add Artifact to Collection window, the Add Artifact to Module window, the Insert Artifact window, and the Insert Image window.
Tips for requirements management
Starting in version 4.0.5, you can search for tips you saw once and want to see again, or look through additional tips to learn about how to work more effectively with the RM application. A list of all of the tips is now available on the Requirements management tips page.
Licensing
In the 4.0.5 release, the default time-out values for licenses changed:
- Floating licenses: The default time-out value changed from 7200 seconds (120 minutes) to 3600 seconds (60 minutes).
- Token licenses: The default time-out value changed from 7200000 ms (120 minutes) to 1800000 ms (30 minutes).
In 4.0.5, the minimum time-out values for licenses are as follows:
- Floating licenses: The minimum time-out value changed from 7200 seconds (120 minutes) to 1800 seconds (30 minutes).
- Token licenses: The minimum time-out value remains at 1800000 ms (30 minutes). This value has been the same since the 4.0.3 release.
- Floating licenses: See step 4 in Installing and managing floating client access license keys.
- Token licenses: See the note in step 4 in Setting up the Rational Common Licensing token service keys.
In the 4.0.5 release, the reset frequency for the time-out of token licenses changed. Before this release, the time-out value was reset only after the license expired. Now, most actions reset the time-out value of the license to the value of the time-out. This change makes the resetting of the time-out for token licenses the same as for floating licenses. This change causes the lmgrd.log file on the Rational License Key Server to increase in size faster than it used to, because each reset of the license causes entries to be written to the lmgrd.log file. That file is in the common directory. For example, on Windows systems, the file is typically in C:\Program Files (x86)\IBM\RationalRLKS\common\lmgrd.log.
Technology preview: Client customization with JavaScript
This release includes a technology preview for scripting that shows how client customization through JavaScript will look. Use the technology preview to plan for your organization's needs and to provide feedback. The technology preview is supported through the Jazz.net forum only. For more information, see the Jazz.net wiki.