
IBM Rational Team Concert
Task tracking � Source control � Agile planning
Rational Team Concert 4.0 "New and Noteworthy"
This is a summary of the main new features and improvements in the 4.0 release of Rational Team Concert.
Rational Team Concert is an integral part of the Rational solution for Collaborative Lifecycle Management (CLM), which provides seamless integrations for application lifecycle management with reduced cost of ownership and administration, improved cross-product visibility and reporting, and lifecycle integrations.
For information on new features and changes in other parts of the Collaborative Lifecycle Management solution, see the Jazz Foundation 4.0 "New and Noteworthy," the Rational Requirements Composer 4.0 "New and Noteworthy," and the Rational Quality Manager 4.0 "New and Noteworthy."
Table of contents:
Build- Build a Hudson or Jenkins job
- View build definition tabs in the web client
- View build engine information in the web client
- View a build definition and its results in the Builds widget
- Select a snapshot owner in post-build deliver options
- Retrieve logs and artifacts by using two new Ant tasks
- Use the Build System Toolkit on Solaris 10 (SPARC)
- Build multiple projects or solutions
- Set up unit tests to run before source control deliveries
- Load and share symbolic links
- Delete file states
- Load by using load rules
- Filter the Pending Changes view
- Locate change sets
- Use variables to create and run queries
- Modify read-access permissions
- View work items in the My Dashboard view
Dependency build and promotion
- Create dependency-based build on IBM i platforms
- Create and build subsets
- Use IBM i LinkEdit support
- Automatically run IBM i commands before and after builds
- Use additional IBM i scanners
- Use additional load rules for z/OS dependency builds
- Deliver across repositories with system definition ID mapping
- Store, share, and index source code data
- Migrate deprecated z/OS dependency build definitions
- View a dependency build report
- Include or exclude file patterns for language definition
- Promote and package based on work items on IBM i platforms
- Override the Include and Exclude ship lists and container mapping
- View deployed and packaged objects in deployment and packaging summary work items
- Show all packages
- Query for deployed packages
- Deploy packages from the Builds view
- Request a personal deployment
- Use new options for packages in the Create Package wizard
- Select packages for deployment
- Deploy non-sequentially on z/OS and IBM i platforms
- Create ship lists and restore mapping files for z/OS and IBM i platforms
- Manage the package and load space for z/OS and IBM i platforms
- Use the Build System Toolkit for Solaris 10 (SPARC)
- Install on to Rational software development products that are based on Eclipse 3.6
- Use the SCM tools application in Build System Toolkit
- Install with the redesigned launchpad
- Install separate installation packages for Jazz Team Server and applications
- Run in 64-bit runtime mode
- List PDS members in the ISPF client
- Load artifacts on a fine-grained level in the ISPF client
- View and compare change set details in the ISPF client
- View, compare, and merge during conflict resolution
- Drag columns to reorder them
- Drag work items from the plan to the world
- Increase productivity by using keyboard shortcuts
- Track work items by using the tracks link type
- Drag items in plans
- Plan by using the Kanban board
- View multiple schedules in one Gantt chart
- Import from Microsoft Project
- Enhanced UCM integration with ClearTeam Explorer
- Bridge link operations from ClearCase Change-Set view
- Map a base ClearCase folder to a Jazz SCM component
- Specify custom pre- and post-synchronization actions for the synchronizer and importer
- Initialize a Jazz SCM stream with a snapshot
- Synchronize faster
- Use a new command-line option to improve scriptability
- Integrate with Microsoft Source Code Control Interface (MS-SCCI)
- Complete SCM operations by using Rational Team Concert MS-SCCI Provider
- Share directories and the files within them
- Configure Rational Team Concert MS-SCCI Provider by using the control panel
- Deliver and accept content in the Pending Changes view
- Review processes in the Process Advisor window
- Specify preferences for SCM in Rational Team Concert MS-SCCI Provider
- Get started with Rational Team Concert Shell from the control panel
- Perform source control operations on files and folders
- Work with change sets in the Pending Changes view
- Connect to and open Jazz artifacts
- View and edit Jazz properties
- Access help contents
Source control
- New advisor: Restrict changes by file name
- New advisor: Require disinterested approvers
- Restrict changes to items
- Prevent linking to approved work items
- Validate delivery by using work item queries
- Automatically resolve add conflicts
- Command-line interface features and enhancements
- Eclipse client features and enhancements
- Generate load rules
- Load from load rule file
- View links in the Change Explorer
- Show pending changes on a repository workspace
- Show check-in history in the History view
- Permanently delete content associated to a file change
- Detect references to deleted content
- Locate change sets in work items and in multiple streams
- Show pending changes in the Java perspective
- Use symbolic links on Windows 7
- Specify a due date when you submit for review
- Scope read permissions on files and folders
- Automatically detect changes made outside of Eclipse (Windows operating system only)
- Set read-access permissions in the Repository Files view
- Modify components with the Component editor
- Web client features and enhancements
- Learn with new tutorials
- Deploy a clustered environment
- Upgrade to V4.0 by using the interactive upgrade guide
- Interactive guides contain planning checklists
- Set up the server applications by using the command-line interface
- Use Jython scripts to set up WebSphere Application Server and deploy the CLM applications
- Plan your work by using new features and enhancements
- Perform new and enhanced SCM operations
- Integrate Rational Team Concert with Microsoft Source Code Control Interface
- Transition from the ClearQuest Synchronizer to the ClearQuest Bridge
- Create and use access groups to restrict read access to work items
- Filter content in the information center
- Customize work item notification Email templates
- Customize work item attributes
- Do more with Enterprise Extensions
- Get updated help about reporting
- Configure data source value set providers
- Include input variables in work item queries
- View parameterized work item queries using dashboard widgets
- Customize chart colors in the Work Item Statistics dashboard widget
- Dynamically mark attributes as read-only
- Restrict access to work items
- Customize work item emails by using mail templates
- Add enumeration values
- Select enumerations from the enumeration list
- Store strings by using the String List attribute
- Add and remove subscribers from multiple work items
- Upload attachments by using HTML5 drag and drop
- Archive enumeration values
Build
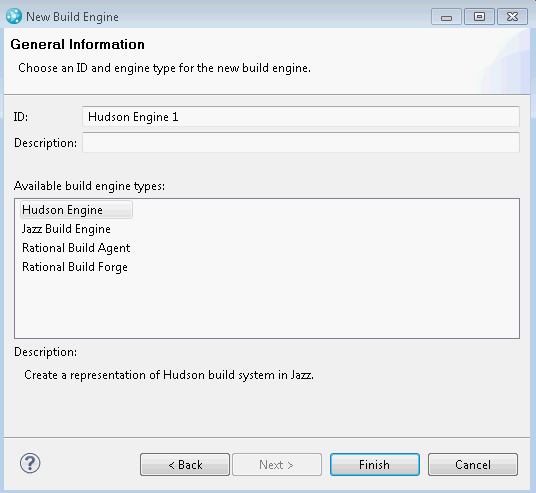
Build a Hudson or Jenkins job
You can request a build of a Hudson or Jenkins job from within Rational Team Concert. You can use a new Hudson/Jenkins Engine type and Hudson/Jenkins build definition template to map a Hudson or Jenkins job to a Rational Team Concert build definition.
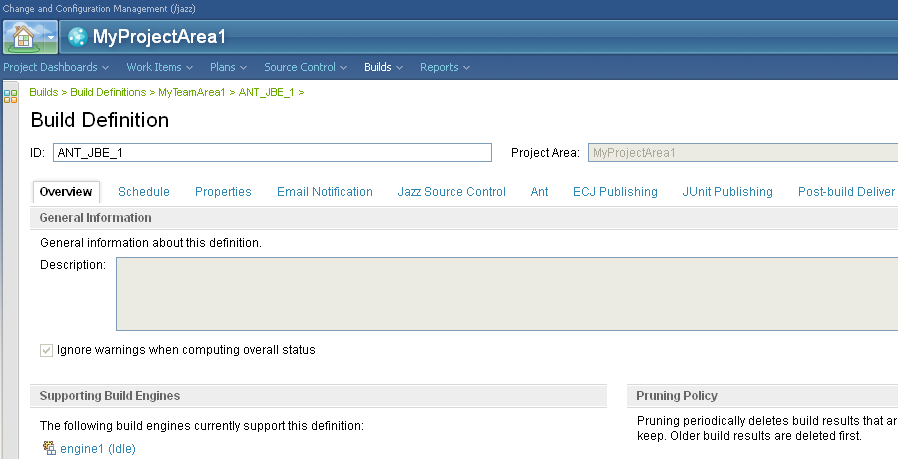
View build definition tabs in the web client
In the web client, you can now view information from the following build definition tabs: Email, Command Line, Maven, Build Forge, Build Agent, ECJ Publishing, JUnit Publishing, and Post-Build Deliver.
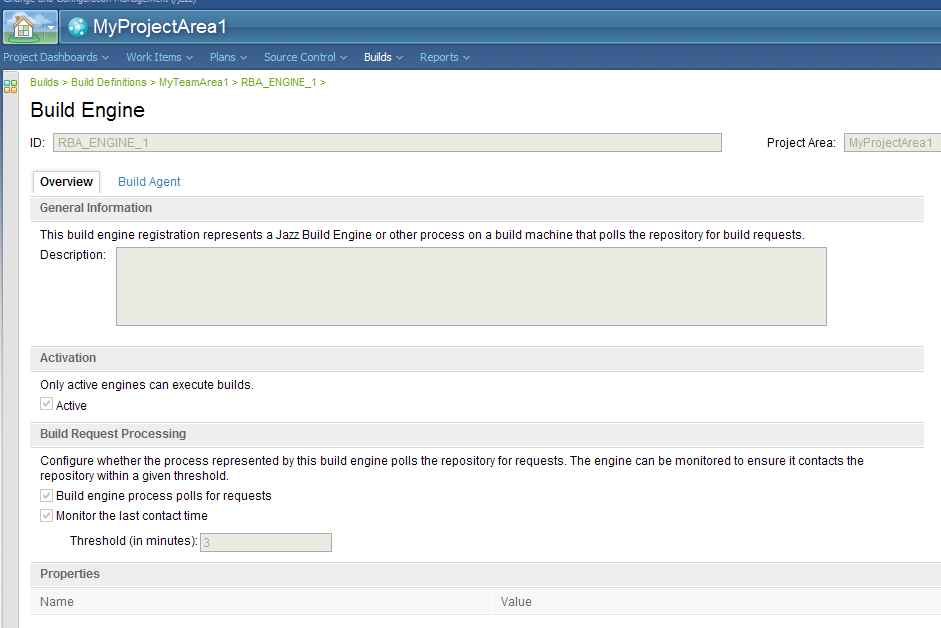
View build engine information in the web client
You can now view build engine information in the web client.
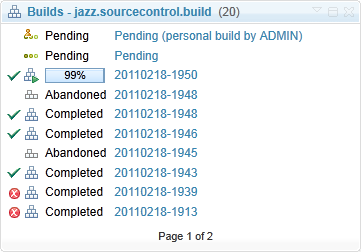
View a build definition and its results in the Builds widget
You can use the improved Builds widget to select a specific build definition and show all of its corresponding build results. Also, you can now filter build results by tags.
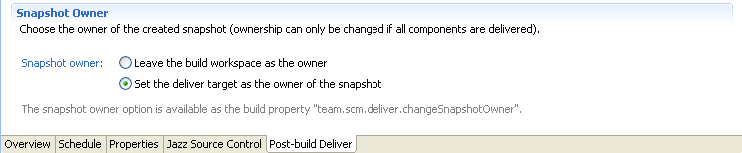
Select a snapshot owner in post-build deliver options
On the Post-Build page of the New Build Definition wizard, when you select the Post-build Deliver option, you can select the owner of the snapshot.
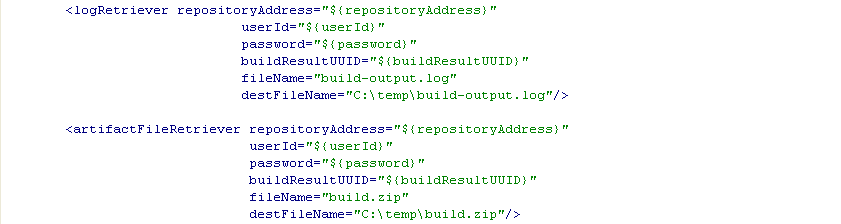
Retrieve logs and artifacts by using two new Ant tasks
You can use two new Ant tasks to retrieve log and artifact files from build results.
Use the Build System Toolkit on Solaris 10 (SPARC)
The support for the Build System Toolkit now includes the Solaris 10 operating system (SPARC).
Client for Microsoft Visual Studio IDE
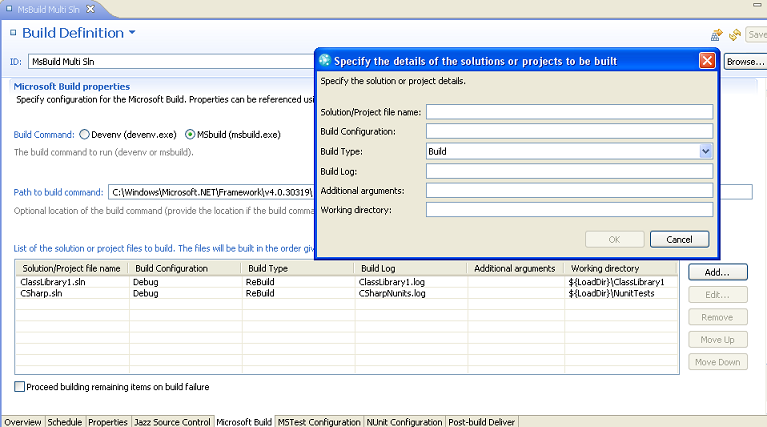
Build multiple projects or solutions
The Microsoft Build template had a restriction of building only single solutions. In this release, the build template can build multiple projects or solutions.
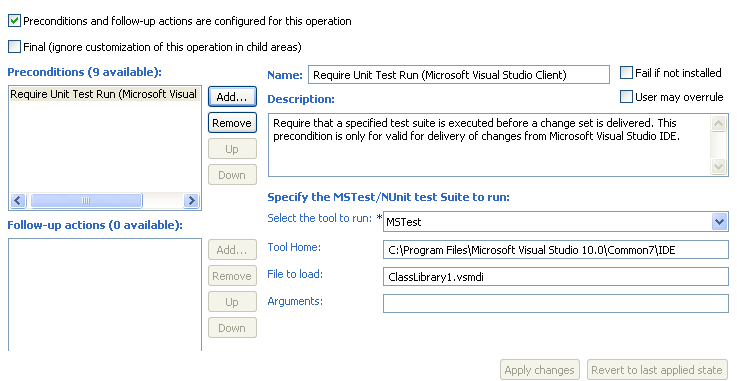
Set up unit tests to run before source control deliveries
In this release, you can configure the Rational Team Concert Client for Microsoft Visual Studio IDE to run unit tests before you deliver changes to a Rational Team Concert source control repository. You can set up your team's process to not allow source code delivery if the unit test fails. This rule supports both Microsoft MSTest and NUnit frameworks.
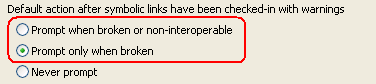
Load and share symbolic links
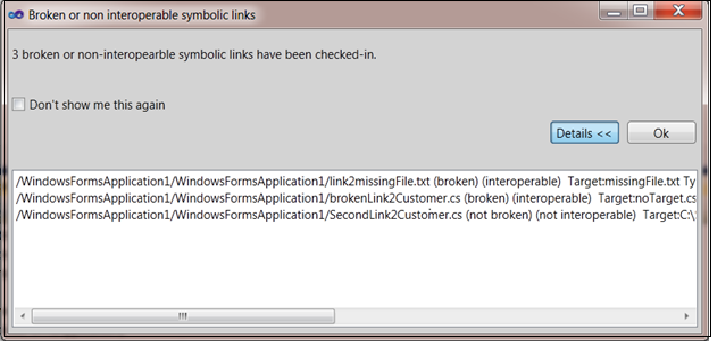
You can now load and share symbolic links by using Rational Team Concert Client for Microsoft Visual Studio IDE. Many SCM operations are supported, such as check-in, deliver, undo, compare, move, and rename. You can choose to receive a prompt if a broken link is checked-in.
Delete file states
If you have JazzAdmin permissions, you can delete a file state from the repository. However, you cannot recover a deleted state.
In the History view, you can browse through the intermediate states of a change set. You can select any intermediate state and delete it from the repository.
Load by using load rules
The load wizard provides the option to load by using a load rule file, which makes the process more flexible. Load rules are a collection of rules that determine what repository items are loaded into a sandbox.
You can generate load rule files for a loaded workspace, and you can share rules or communicate load rules to other users and processes, such as build scripts. When you generate load rules, you can rename each load rule file that you create and select where to save the file.
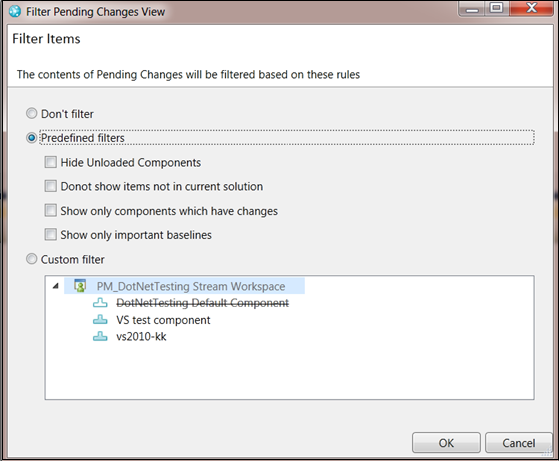
Filter the Pending Changes view
You can now apply filters in the Pending Changes view to filter components from the view. You might want to filter components from the view when many components are in the view and you want to see only certain components.
Locate change sets
In Rational Team Concert for Microsoft Visual Studio Client, you can determine which workspaces or streams contain a change set or set of change sets.
In the context menus of change sets and work items, you can select Locate change set. The editor shows the work item and its associated change sets in the source area. You can select the stream, workspace, or baseline in the target area.
You can also drag work items on to the source area, and drop a repository, a project area, streams, workspaces, and baselines on to the target area. If you drop a project area or repository, all of the associated streams and workspaces are added to the target area. Adding a project area or repository can be time-consuming if the project or repository contains a large number of streams or workspaces.
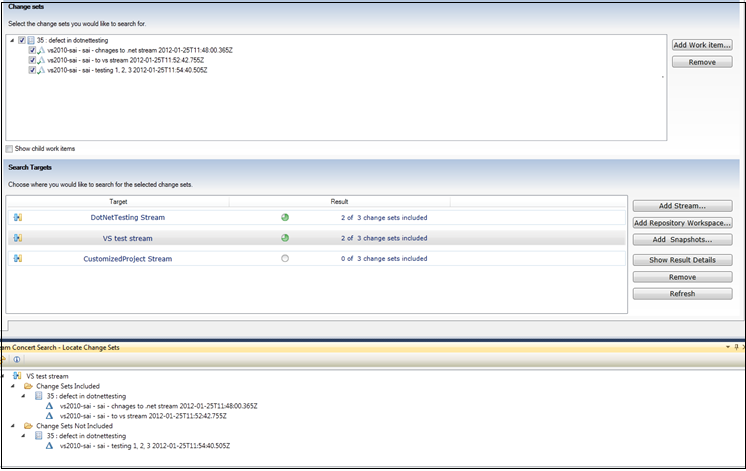
To show the search results for a target item in a separate result view, click Show Result Details.
Use variables for creating and running queries
The Rational Team Concert for Microsoft Visual Studio Client now supports creating and running queries with variables. When you create or edit a query, you can specify that values are to be provided when the query is run. To do so, in the upper-right corner of the condition area in the query editor, select the Provide condition values by parameter icon. For example, if you run the parameterized query, by selecting Show Work Items from the query menu for the parameterized query, an input wizard is displayed that you can use to provide values for the query parameters.

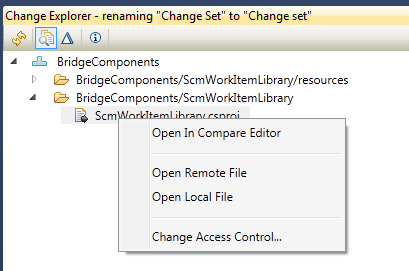
Modify read-access permissions
In Rational Team Concert client for Microsoft Visual Studio, you can now change read-access permission on files, symbolic links, and folders. To change the permissions, use the context menus in the Change Explorer view and the Repository File Browser view.
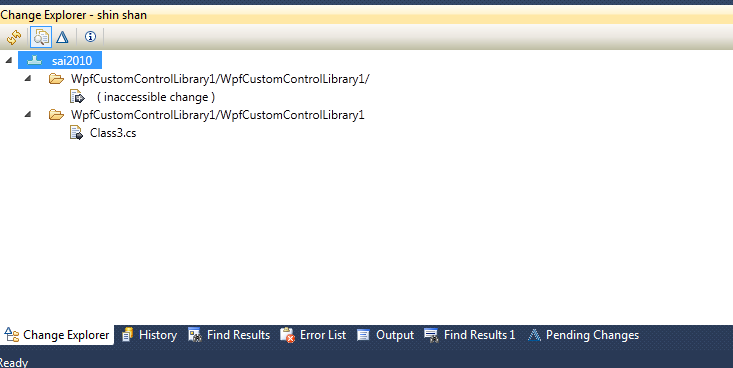
Outgoing changes on files, folders, and symbolic links for which you no longer have access are shown as inaccessible changes in the Pending Changes view. If you have an outgoing change on a file that you no longer have access to, you can spot the file and undo the changes.
You can restrict a file or folder to a user, project area, or team area.
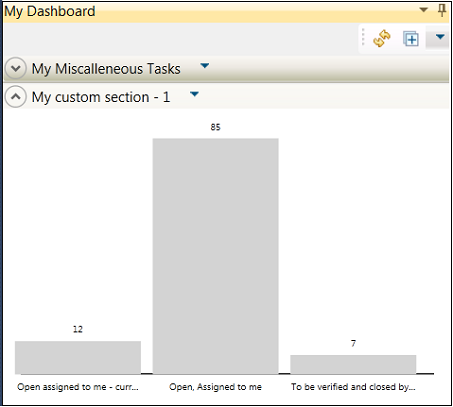
View work items in the My Dashboard view
You can use a new view, My Dashboard, to quickly view information about a user's work items. The view is organized into sections that refresh automatically to update the data.
By default, the following built-in sections are displayed:
* My Current Work: This section lists all of the open work items for the user that are marked for the current iteration.
* My Future Work: This section lists all of the open work items that are marked for future iterations. Work items are grouped by iterations.
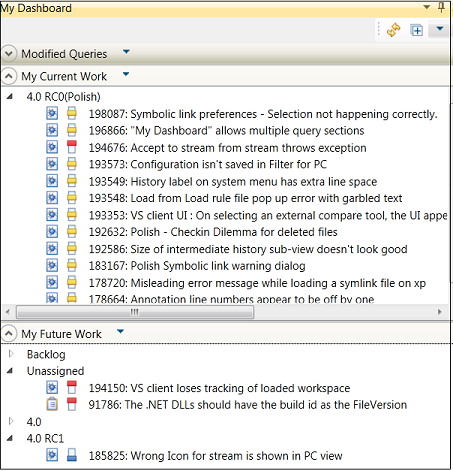
You can also add Queries sections and configure them to display the summary results of multiple queries in a bar chart. You can view work items that were returned from a query by clicking a corresponding bar in the chart.
Clustering for high availability
Clustering provides high availability with automatic failover. To find out how to obtain the necessary supporting programs for clustering and how to deploy the Rational solution for CLM in a cluster, see the High Availability with Rational solution for CLM 2012 Clustering article on jazz.net and the Setting up a clustered environment infocenter topic.
Dependency build and promotion
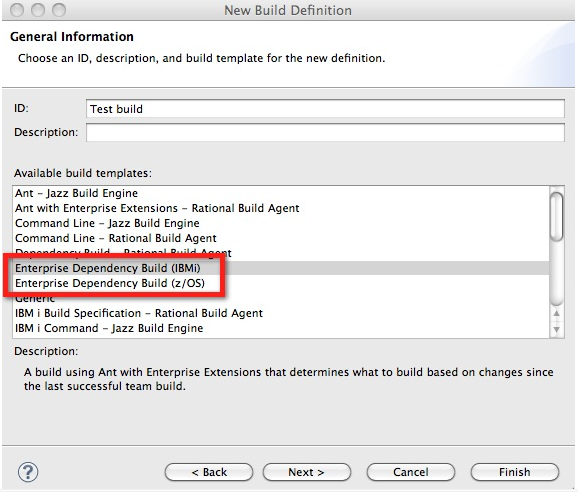
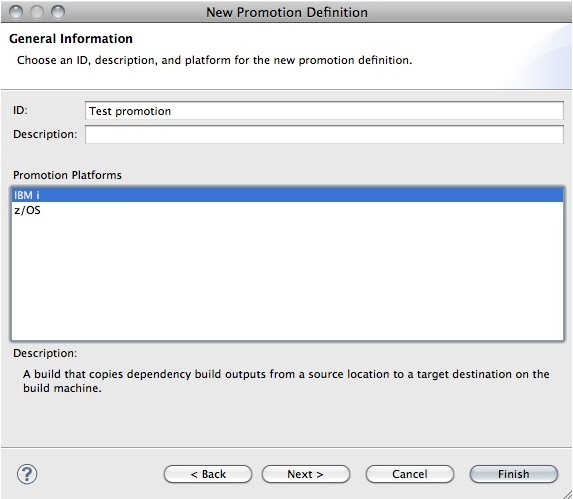
Create a dependency-based build on IBM i platforms
Building on the solid dependency-based build framework for the z/OS platform, support for dependency-based builds is extended to other Enterprise platforms. This release adds the required system definitions to support dependency-based builds to the IBM i platform.
A new build definition template for IBM i platforms is also included.
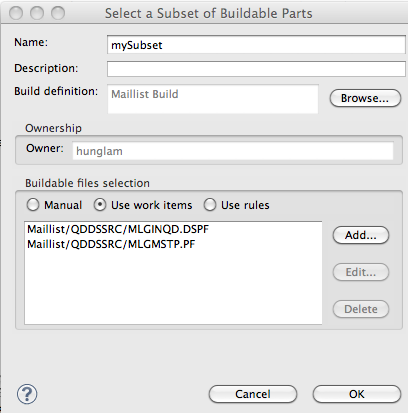
Create and build subsets
Dependency build support is enhanced with the addition of the Buildable Subset wizard. Previously, to select a subset of files to build, you had to browse through files in a repository workspace and select individual files to include in a subset. With the new wizard, you can create build subsets by using work items or rules.
Use IBM i LinkEdit support
Support for SCM link files has been added. The link files are scanned and information is stored in source code data. These link files are processed at build time to resolve command arguments.
Automatically run IBM i commands before and after builds
In the dependency build editor, you can specify IBM i commands to run automatically before and after IBM i dependency builds.

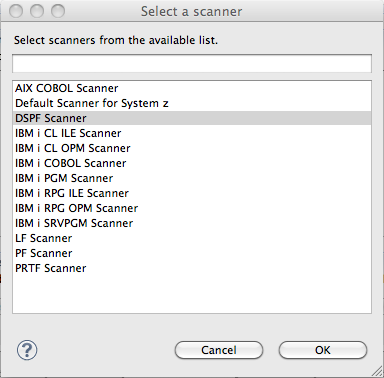
Use additional IBM i scanners
New source code data scanners are added for IBM i DDS, CL, and PF files.
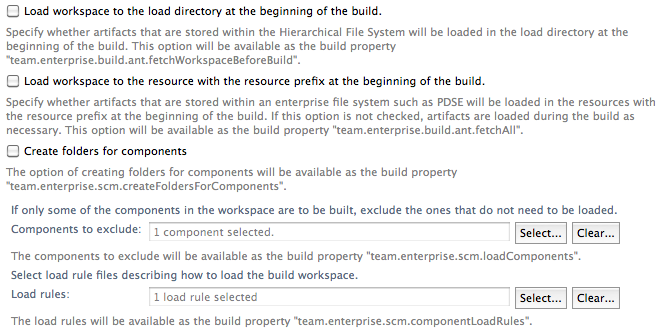
Use additional load rules for z/OS dependency builds
You have more options to load source files during a z/OS dependency build.
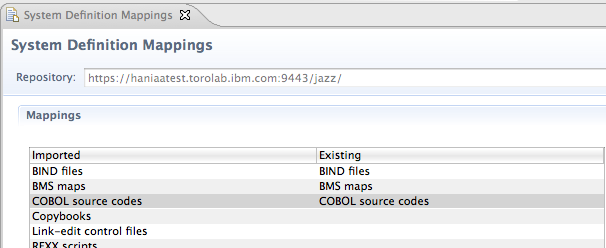
Deliver across repositories with system definition ID mapping
You can use a new editor to associate remote system definition IDs with local system definitions. This association automatically resolves any system definitions during cross-repository delivery.
Store, share, and index source code data
Source code data collection and storage are redesigned to lower the memory footprint that is required to store the source code data. You can share source code data between streams. The handling of the index history of source code data is also redesigned. Only the amount of history that is needed for dependency build, impact analysis, and promotion is kept.
Migrate deprecated z/OS dependency build definitions
In the Eclipse client, you can migrate dependency build definitions that were created with version 3 of the product to the new build template. When you migrate dependency build definitions, you can more easily employ new features.

View a dependency build report
In addition to the preview build report, a build report at the end of a dependency build is now available. When you display the build report, a list of source files is shown. The list is ordered by component and project, and includes the reason that the source was rebuilt, the code for the source, the language definition used, the outputs with a link to the Build Map for that source, and the maximum return code. On the z/OS operating system, the maximum return code is the highest return code from the commands in the translators in the associated language definition. On IBM i, the maximum return code is the highest severity level found from the events file that the translators in the associated language definition produced.

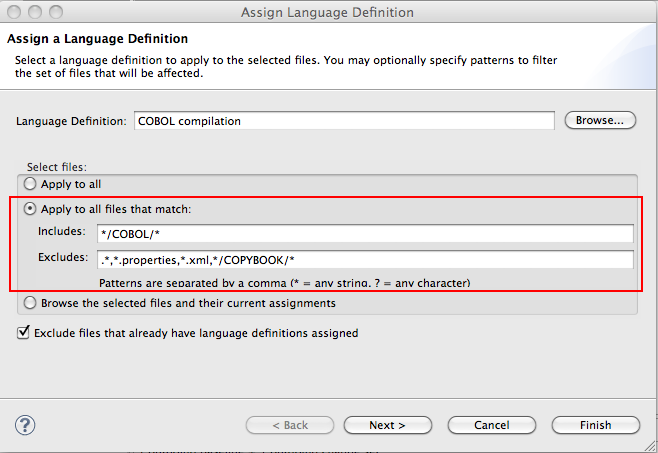
Include or exclude file patterns for language definition
In the Assign Language Definition wizard, you can now specify file patterns to include and exclude when the files to assign the language definition are being located. You can also use file paths in the fields along with patterns of files to include or exclude.
Deployment
Promote and package based on work items on IBM i platforms
On the IBM i platform, you can promote and package based on work items. Work item-based promotion and packaging on IBM i is like work item-based promotion and packaging on z/OS platforms.
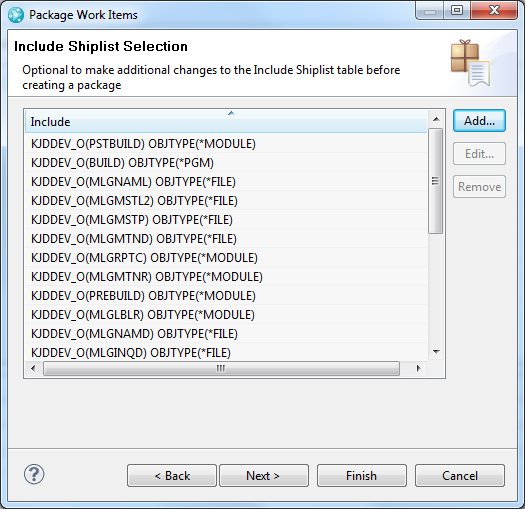
Override the Include and Exclude ship lists and container mapping
In the Create Package wizard, you can override the Include and Exclude ship lists that are defined in the package definition. You can also override the container mapping. Any changes will affect only the package that is being created.
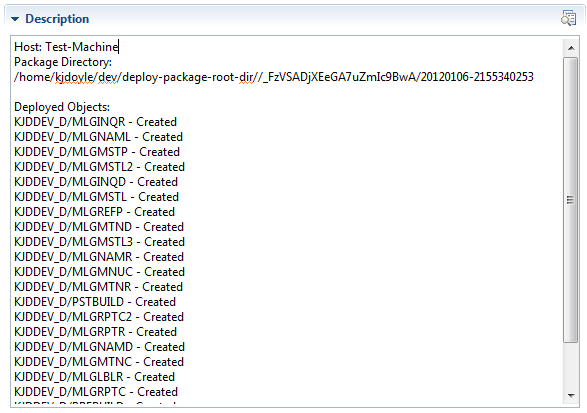
View deployed and packaged objects in deployment and packaging summary work items
The summary work item that is created during a deployment or packaging contains a list of all of the outputs that were deployed or packaged. The list also contains the name of the host and the package directory.
Show all packages
You can view a list of all of the packages by right-clicking a package definition and selecting Show All Packages. You can then double-click any column to open the artifact for that column. To open an HTML report about the package, double-click the Package Label column.
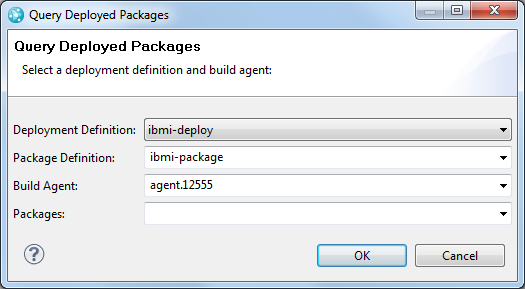
Query for deployed packages
You can query for deployed packages by right-clicking a deployment definition and selecting Query Deployed Packages. Then, specify one or more deployment definitions, package definitions, build agents, or packages. If you specify the deployment definition, package definition, and build agent, you can see all of the packages that are deployed to the machine that is running that build agent. To see which machines a package is deployed to, leave all of the fields blank except for the Packages field. In that field, enter the specific package that you are interested in.
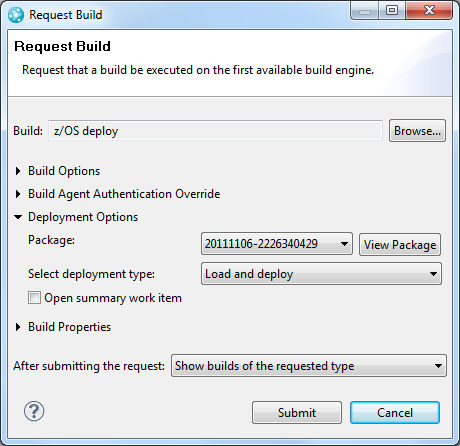
Deploy packages from the Builds view
When you view the results of a package definition in the Builds view, you can right-click a result and select Load and Deploy. A window opens in which you can specify the deployment definition to use. Then, the Request Deployment window opens and indicates the package to deploy.
Request a personal deployment
When you request a deployment, you can specify that it is a personal deployment. You can also change the container mappings to deploy to your personal locations.
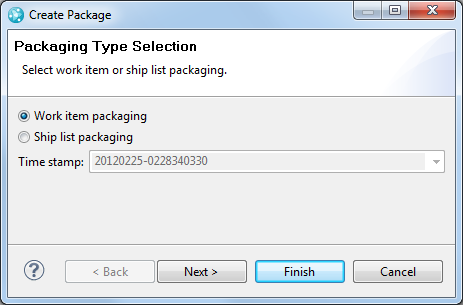
Use new options for packages in the Create Package wizard
On the new first page of the Create Package wizard, you can choose the type of package you to create. You can select either work item packaging or ship list packaging. On IBM i, when you select ship list packaging, you can also specify a time stamp so that only objects that are newer than the time stamp are packaged.
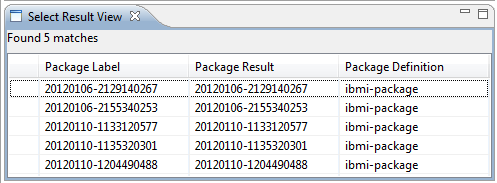
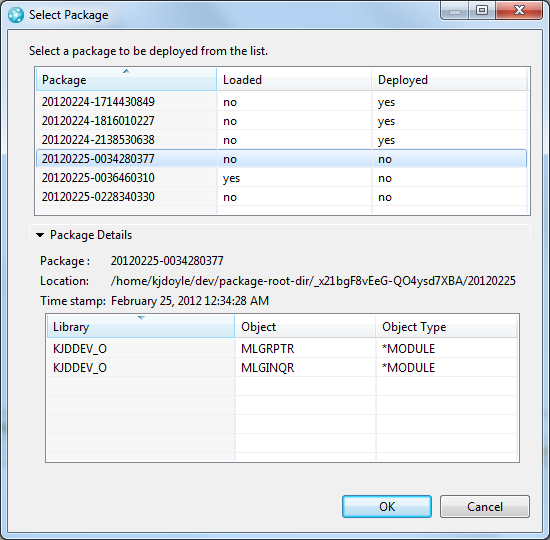
Select packages for deployment
When you select the package to deploy, the Select Package window now contains more information that you can use to decide which package to deploy. You can see whether each package has been loaded or deployed. You can also see all of the details about the output that is in the package.
Deploy non-sequentially on z/OS and IBM i platforms
The new z/OS and IBM i deployment definitions are non-sequential. When you deploy, you must select the package to deploy. You can now deploy a package multiple times and deploy packages in any order.
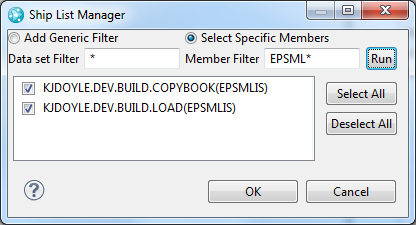
Create ship lists and restore mapping files for z/OS and IBM i platforms
You can create the ship list and restore mapping files in a new UI for the z/OS and IBM i package definitions. You can use the ship list manager to add members or objects to your ship list or run a query to find outputs from the Enterprise Dependency Build (IBM i) or Enterprise Dependency Build (z/OS) build definitions. In the package and deployment definitions, you can map data sets and libraries to the data sets and libraries to use during deployment.
Manage the package and load space for z/OS and IBM i platforms
You can clean the package space by deleting the packaging results. When a package result is deleted, it is marked for deletion during the Build Result Pruner Task, which runs every 30 minutes by default. When the next requested package runs, all of the packages that are marked for deletion are cleaned. You can enable or disable this option by using the Auto Clean property in the package definitions.
The load space is cleaned automatically after every deployment, whether or not it was successful. If the deployment of a package fails, the next deployment request of that package is not affected.
Installation
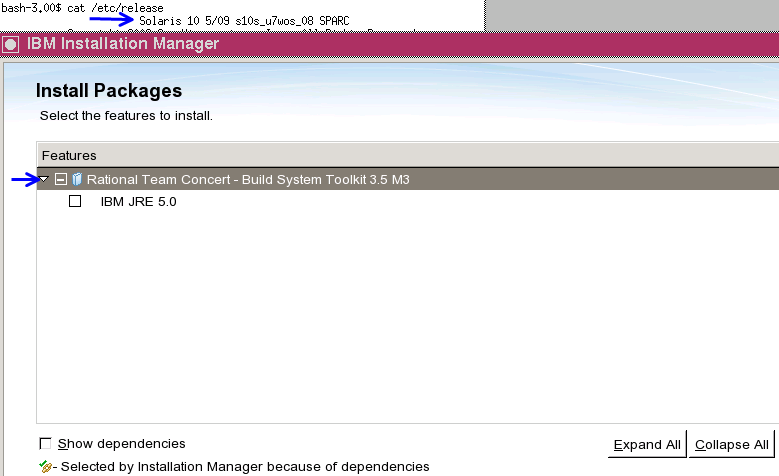
Use the Build System Toolkit for Solaris 10 (SPARC)
The IBM Installation Manager Build System Toolkit offering now supports Solaris 10 (SPARC)
Install on to Rational software development products that are based on Eclipse 3.6
You can use a supplied Installation Manager package to install the Rational Team Concert Eclipse client into Rational software development products that are based on Eclipse 3.6 and installed by using Installation Manager. Such products include IBM Rational Application Developer 8.0 and IBM Rational Software Architect 8.0. In addition, support is added for 64-bit installations of the compatible Rational software development products. You can find the Installation Manager repository for this variation of the Rational Team Concert Eclipse client at https://jazz.net/downloads/rational-team-concert/4.0/M3/install-repository/rtc-client-ext-offering/offering-repo/repository.config.
To install the repository:- In Installation Manager, click File > Preferences, and in the Preferences window, add the repository.
- Temporarily disable other repositories, and close the Preferences window.
- Click Install, and then install the Rational Team Concert - Client Extension package.
- When you are prompted to select which package group to install into, select a package group that contains one of the products that is based on Eclipse 3.6.

Use the SCM tools application in the Build System Toolkit
The SCM tools command-line application, which was available as part of the Eclipse IDE client installation only, is now included in the Build System Toolkit installation for all supported platforms.
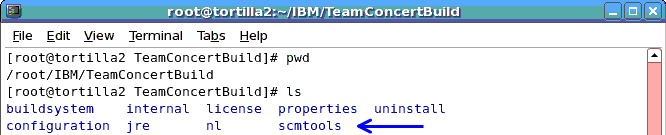
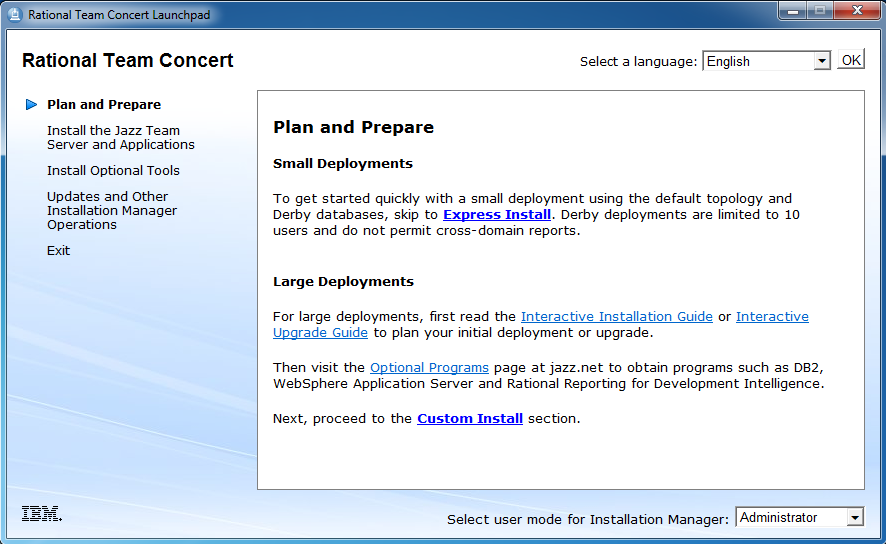
Install with the redesigned launchpad
The Rational Team Concert launchpad has a new design. Instead of a single page, the launchpad has sections for the different types of installation packages, such as the server applications and IDE clients.
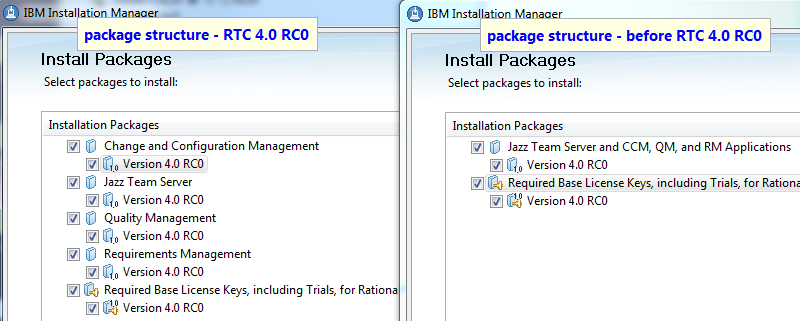
Install separate installation packages for Jazz Team Server and applications
The installation for Jazz Team Server and the CLM applications is split from a single installation package into separate installation packages for Jazz Team Server, the Change and Configuration Management (CCM) application, the Quality Management (QM) application, and the Requirements Management (RM) application.
Run the product in 64-bit runtime mode
Prior to this release, the Rational Team Concert Eclipse client supported only a 32-bit runtime, even if the product was installed on a 64-bit operating system. Now when you install the Eclipse client, you can select either 32-bit or 64-bit runtime mode.
You can select either a 32-bit or 64-bit runtime when you create a package group in Installation Manager. On the Location panel, in the Architecture Selection section, click a radio button, as shown in the following image.
Other products that can be installed by Installation Manager and that support 64-bit architecture selection, such as IBM Rational Application Developer, can be installed with the Rational Team Concert Eclipse client into a 64-bit package group.

ISPF client
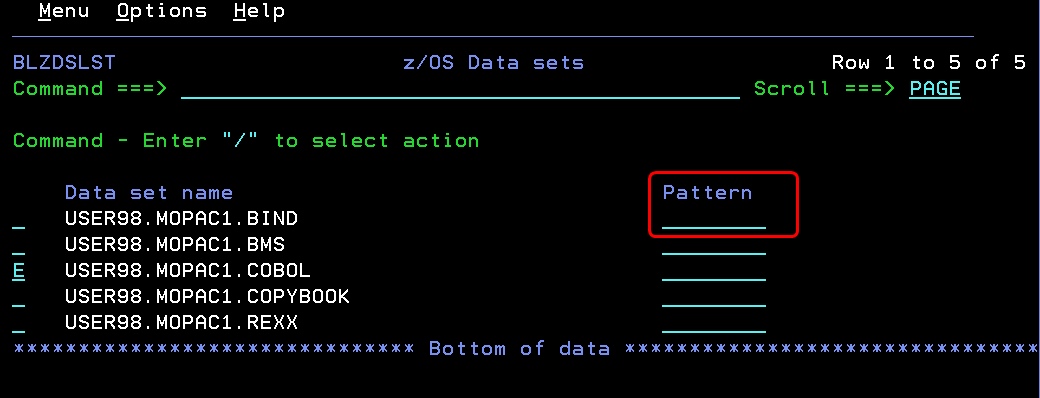
List PDS members in the ISPF client
When you edit a member of a partitioned data set (PDS) that contains over 1000 members, you can list members by using a pattern filter. When you use this method to list PDS members, you can display a filtered list of members, and the performance of the product improves.
Load artifacts on a fine-grained level in the ISPF client
Previously in the ISPF client, you could load at a component level only. You can now load SCM artifacts at the project level, folder level, and file level.
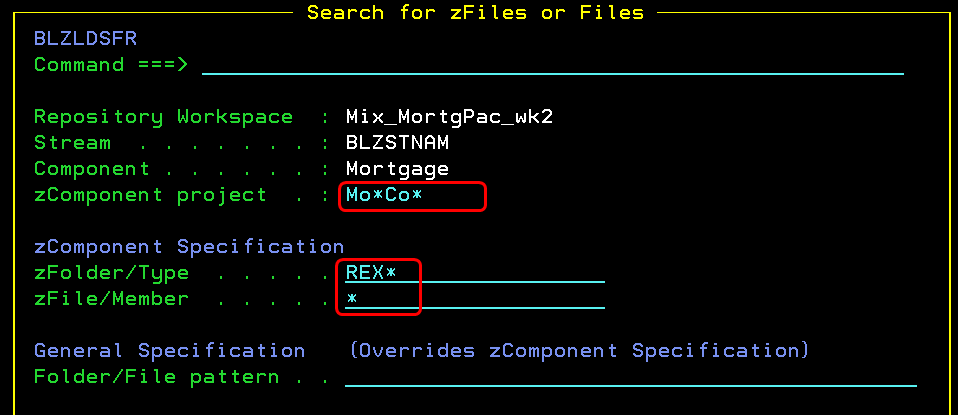
For example, if you are a developer who is working on a COBOL program that is contained by a component that houses 1000 other COBOL programs, you can now load that single program. Developers on the z/OS platform can quickly load artifacts to their sandboxes.
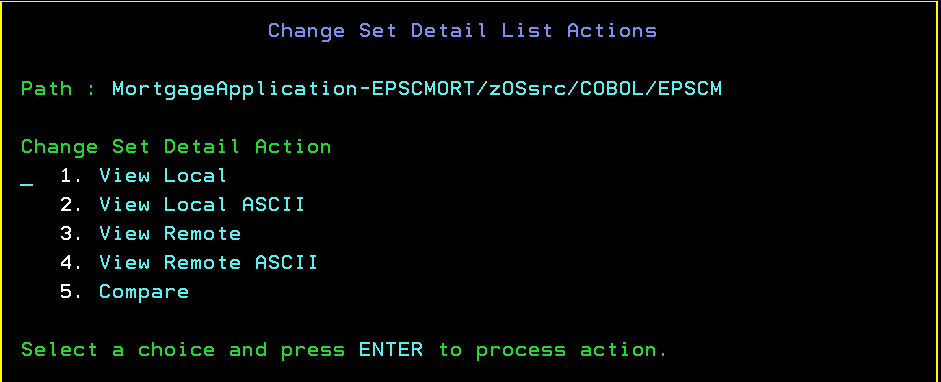
View and compare change set details in the ISPF client
Previously in the ISPF client, you could view only a list of resources that were included in a specific incoming or outgoing change set. Now, you can view the contents of the corresponding local file or remote file. You can also compare the two files by using the standard ISPF compare tool.
View, compare, and merge during conflict resolution
Previously in the ISPF client, to resolve conflicts, you had the options to "Resolve with mine" or "Resolve with proposed." Now, you can view, compare, and merge the contents of local and remote files.
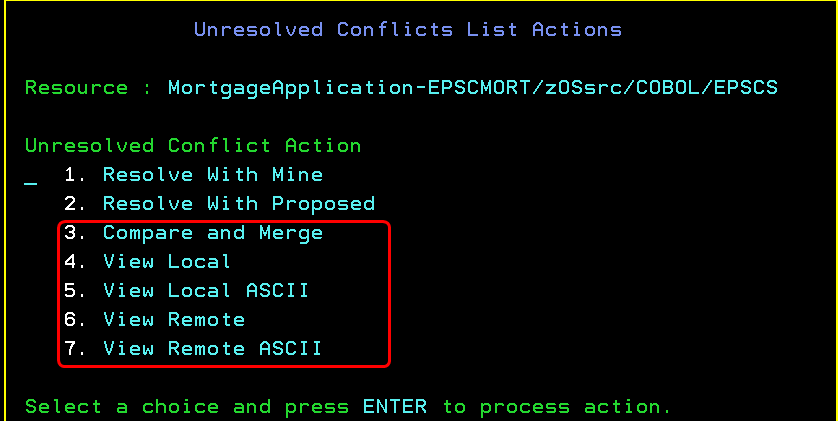
You can also save a backup version of your local file before you complete a "resolve with proposed" action.

Previously, you could use the ISPF client to associate a work item during a check-in operation. Now, you can also create and associate a new a work item during a check-in operation.
Planning
Drag columns to reorder them
Configuring your plan just got easier. You can now drag columns left and right to create a view mode of your plans. You can drag columns only while you are editing your current plan mode.

Drag work items from the plan to the world
Drag-and-drop actions in plans have been improved by using HTML5 technologies. If you use Firefox 4 or later or Google Chrome, you can drag work items from inside a plan to other places on your desktop.
For example, you can drag several work items on to a rich text field, such as an e-mail composer.

The work items are displayed as links.

You can also drag work items on to the Quick Information box of another work item in the Eclipse client to create links between the work items.

Increase productivity by using keyboard shortcuts
While you are working in a plan, you can use the following keyboard shortcuts to perform common actions:
| Action | Windows, Linux | MacOS X |
|---|---|---|
| Save | Ctrl+S | Cmd+S |
| Create work item | Ctrl+Enter | Cmd+Enter |
| Create child work item | Ctrl+Shift+Enter | Cmd+Shift+Enter |
To expand, collapse, select, and deselect a full hierarchy of work items in a plan, use the modifier key. On Windows and Linux systems, the modifier key is Ctrl. On Mac OS X, the modifier key is Alt. Press the modifier key and click either the expand or collapse arrow, or the selection check box. The entire hierarchy of work items is modified.

You can also use the modifier key in the contextual menu to the left of each work item. As the next image shows, you can plan an entire hierarchy of work items to other iterations.

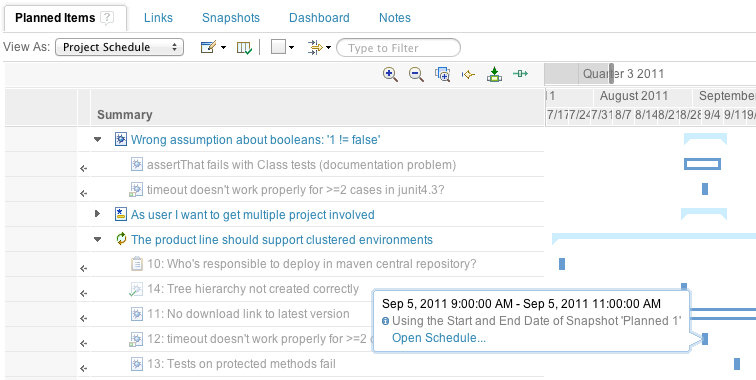
Track work items by using the tracks link type
Work items can now track each other by using the new tracks link type. A tracked work item is interpreted as a contribution of a bigger, potentially cross-project effort.
Create a Cross Project Plan and inspect the Project Schedule view. The view shows a tree that is based on the Tracks/Contributes To relationship. You can see items from different project in one plan.
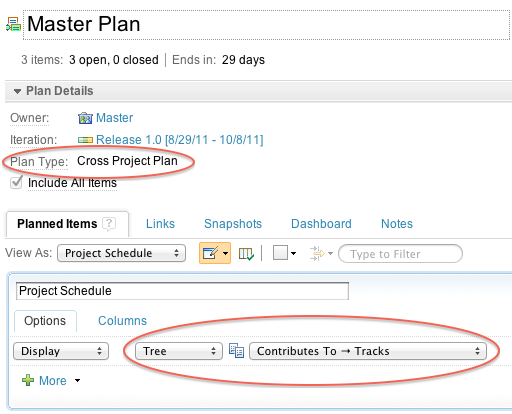
A Cross Project plan shows all of the items that match the plan query and the items that are tracked by them. To see a rolled-up schedule across items, add the Accumulated Time column. This column is useful when you are tracking work that is spread across different projects and on potentially different servers.
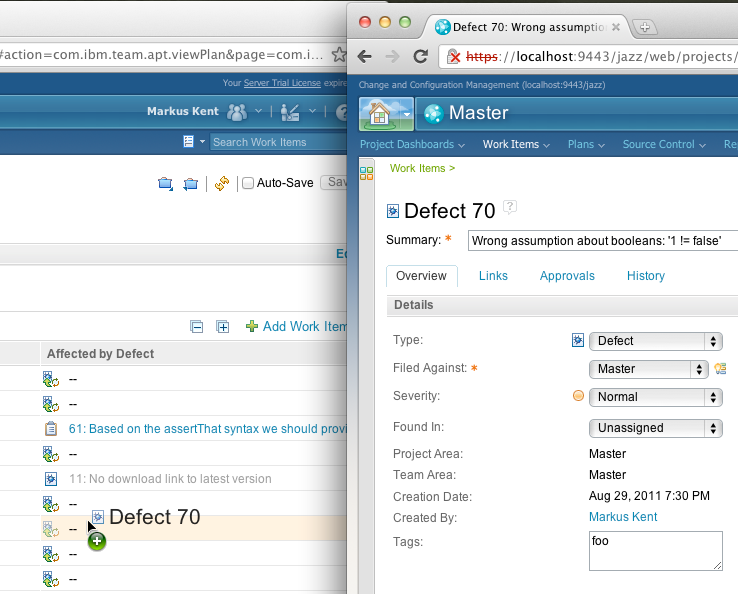
Drag items in plans
In plans, you can now drag items on to the reference cell to create a relationship. For instance, you might add the Affected by Defect column and drag work items on to it. You can use many drag sources, including other plans, work items in the Eclipse or web client, and URLs from chat windows.
Plan by using the Kanban board
Plans now include a Kanban board. To use a Kanban board, configure your view mode to use Kanban as the display type and define the limits. By default, limits use counts. However, you can choose Complexity or Estimates. Deviations from the ideal are shown as a small box in the column header. If you are far from reaching your goal, the box is red.

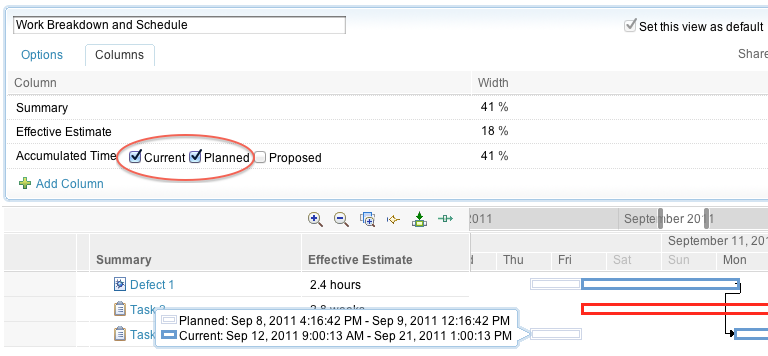
View multiple schedules in one Gantt chart
If you work with snapshots, you can see how well your current schedule matches the planned or proposed schedule. To do so, add the Accumulated Time column and select the schedules that you want to see: Current, Planned, Proposed, or all three. By viewing several schedules in one chart, you can quickly see whether you are on track.
Import from Microsoft Project
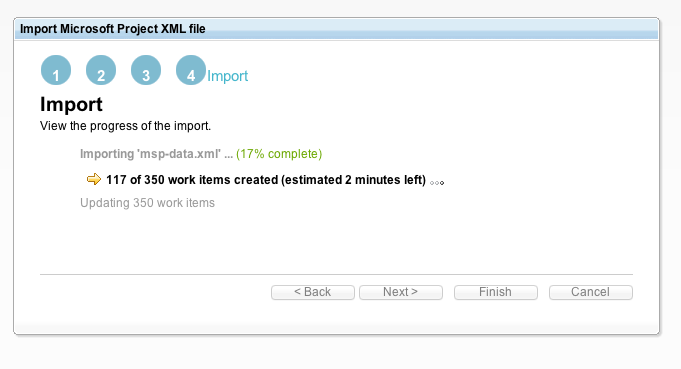
View the progress of Microsoft Project imports
Microsoft Project importer now provides feedback about the progress of an import. You no longer have to guess about how much time an import will need to finish.
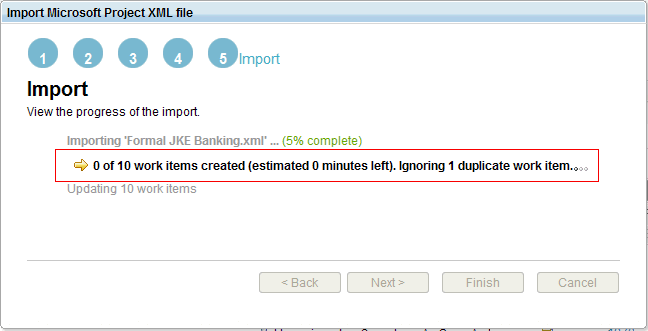
Reimport Microsoft Project XML
You can now make changes to the original Microsoft Project XML and reimport the XML into Rational Team Concert. Do all of the execution tasks in Rational Team Concert. You can update the task hierarchy or create tasks in Microsoft Project, and then reimport those changes to Rational Team Concert. The tasks that were already imported are ignored.
During the import of the Microsoft Project XML to Rational Team Concert, the state of the task is retained. If a task is completed, you can select a resolved state to map to the task.

Rational Team Concert ClearCase Bridge
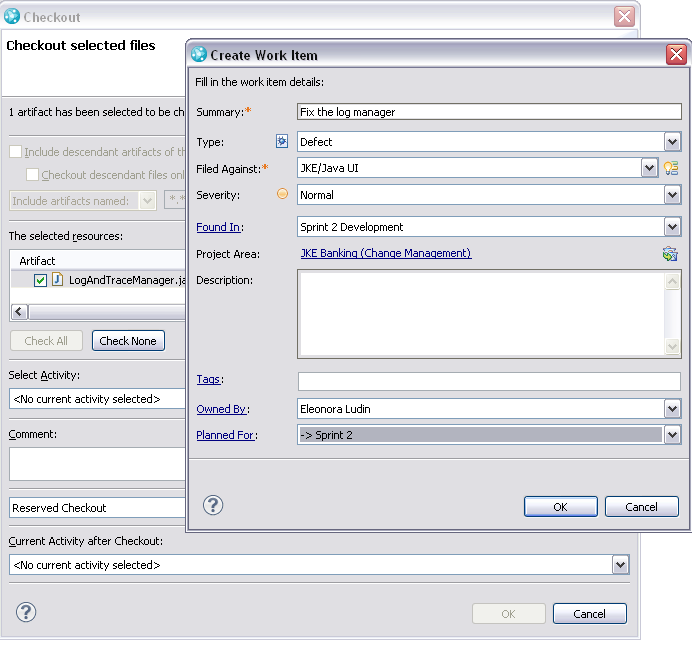
Enhanced UCM integration with ClearTeam Explorer
UCM operations on the ClearTeam Explorer, the new client IDE for Rational ClearCase, is now integrated with Rational Team Concert in an enhanced way. In the previous version's integration, you needed to create a UCM activity and a Rational Team Concert work item separately, and then you needed to associate an activity with a work item in a manual operation. The new integrated client simplifies operations and creates a UCM activity, associating it with a work item automatically when you run UCM operations. For example, when you try to check out, check in, or add to source control, you are prompted to select or create a work item instead of a UCM activity. A UCM activity is then automatically created and linked to the work item. In addition, from the UCM toolbar, you can select or create a work item, instead of a UCM activity, and a UCM activity is automatically created and linked to the work item.
You can make all of the work that you check in to Rational ClearCase traceable from planning, builds, requirements, or tests through work items without any manual steps.
This new integration is available with Rational ClearCase V8.0.0.2 or later.
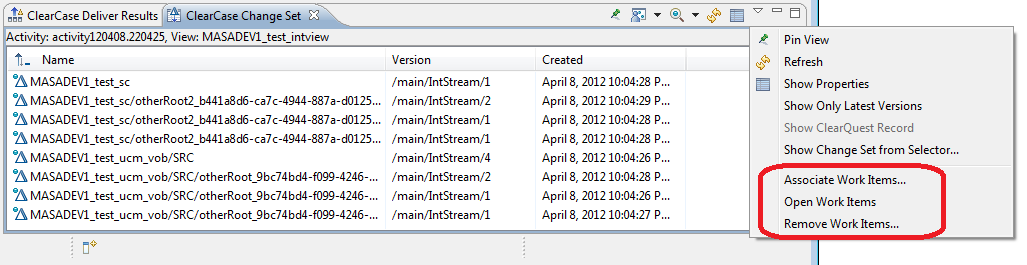
Bridge link operations from ClearCase Change-Set view
Bridge link operations are now available from ClearCase Change-Set view, and you can associate a work item, open associated one, or remove association.
Note that this new integration is available with Rational ClearCase 8.0.0.2 or later.
Rational Team Concert ClearCase Synchronizer
Map a Base Rational ClearCase folder to a Jazz SCM component
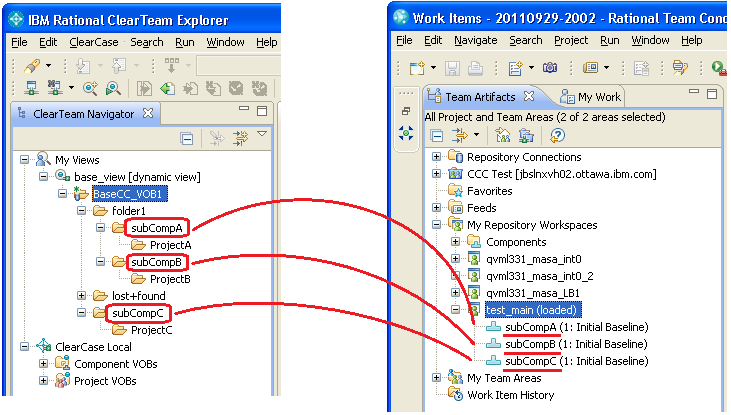
You can now mark a non-UCM Rational ClearCase folder to be promoted as the root of a Jazz SCM component when the folder is synchronized. Previously, a Rational ClearCase VOB root was always synchronized to the root of a Jazz SCM component. As a result, you could not break a VOB into multiple Jazz SCM components, even if the VOB had multiple components logically. Now, you can select multiple Rational ClearCase folders in single VOB and map them to individual Jazz SCM components.
To mark a folder as a sub-VOB component, create an attribute type by running the following cleartool command.
cleartool mkattype -global -nc -shared -vtype string com.ibm.rational.interop.ClearCase.subVOB_Component
Next, make the attribute on the element of the folder by running the following command (In this example, a folder element "folder1\subCompA@@" is made as a sub-VOB component "subCompA").
cleartool mkattr -nc com.ibm.rational.interop.ClearCase.subVOB_Component \"subCompA\" folder1\subCompA@@
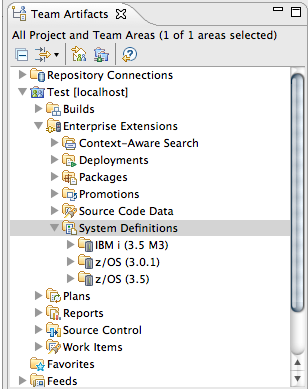
Then, set up a Rational ClearCase synchronization stream and select synchronization roots in the sub-VOB component folder. For example, you can make attributes on three folders in Rational ClearCase: subCompA, subCompB, and subCompC. You can select three folders as synchronization roots: ProjectA, ProjectB, ProjectC, or the same folder to which you just added the attributes. When the synchronization is complete, you will have three components in the Jazz SCM system, as the next image shows.
You can also import these base Rational ClearCase folders with history and select label types that are inidividually applied to these folders.
When you select a Jazz SCM folder to synchronize, its component can also be mapped to a folder under a base Rational ClearCase VOB as a sub-VOB component.
For more details about the sub-VOB component, see Preparing a sub-VOB component for base Rational ClearCase synchronization, Preparing to import Rational ClearCase data with history, and How exports are mapped to VOBs and UCM components.
Specify custom pre- and post-synchronization actions for the synchronizer and importer
You can provide custom scripts that run before and after synchronization. For example, you can create an IBM Rational ClearCase baseline at the end of synchronization, or you can start a clearmake or Jazz build immediately after the synchronization.
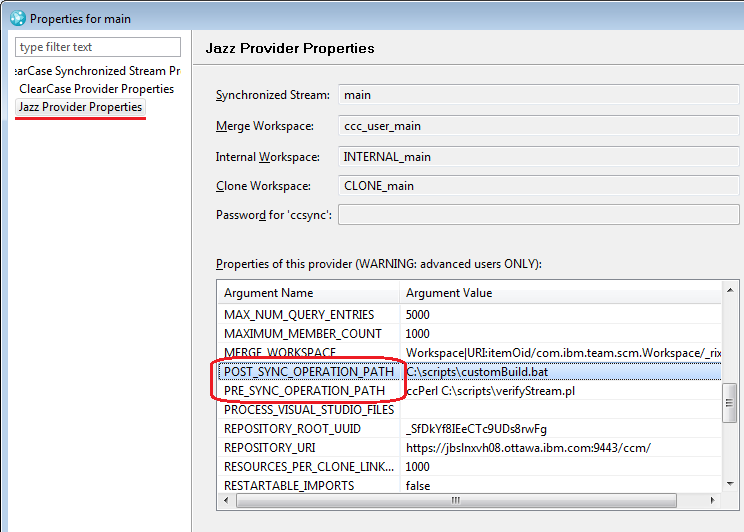
To set up the scripts, in the Properties window of your synchronized stream, select Jazz Provider Properties, and then provide the path of your script to the PRE_SYNC_OPERATION_PATH or POST_SYNC_OPERATION_PATH arguments.
In this example, ccPerl C:\scripts\verifyStream.pl is provided for before synchronization, and C:\scripts\customBuild.bat is provided for after synchronization.
After you set the values, click OK and close the Properties window. In the next synchronization, your scripts will run.
Important: If the pre-synchronization script fails, or if it exits with non-zero value, the subsequent synchronization is not run. Because the subsequent synchronization is not run, you can use the pre-synchronization script to perform verification before the synchronization. The post-synchronization script is run whether or not the synchronization fails with an error. The synchronizer sets the SYNC_OPERATION_STATUS environment variable for the post-synchronization script so that the script can detect what to run.
For more details about the pre- and post-synchronization actions, see Running custom scripts before and after synchronization.
Initialize a Jazz SCM stream by using a snapshot
When you create a Jazz synchronized stream, you can now select a Jazz SCM snapshot as the initial content of the stream.
Previously when you create a synchronized stream, the Jazz stream was created with no contents. To export Jazz SCM components, you had to configure your merge workspace and deliver change sets or baselines to the Jazz synchronized stream.
Now in the New ClearCase Synchronized Stream wizard, you can select a Jazz SCM snapshot as the initial content of the synchronized stream.
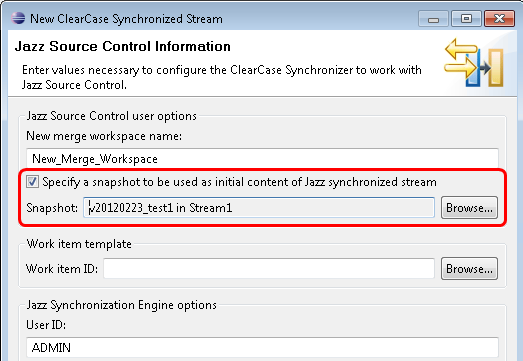
When you click Browse next to the Snapshot field, the Select Snapshot to Initialize Jazz Synchronized Stream wizard opens, and you can select a snapshot.
You might want to initialize by using a snapshot when you import files and folders from Rational ClearCase and it is not the first time to synchronize. If you have synchronized content in Jazz SCM, you can select a snapshot that contains the component. The initial import of the stream creates only delta change sets, and you can save Jazz repository disk space.
Synchronize faster
The speed of the synchronization process is improved significantly. Tests showed that compared to the V3.0.1.3 release, the speed of synchronization in the V4.0 release is improved in these ways:
- Synchronization is 30% faster to import a large number of files and folders (more than 1,000) initially from Rational ClearCase. In tests, 2,000 files and folders were imported.
- Synchronization is 50% faster to add many UCM components to the synchronized stream. In tests, 30 UCM components were added.
- Synchronization is 45% faster in UCM and 25% faster in base Rational ClearCase to synchronize file additions from Rational ClearCase. In tests, 500 files were added.
- Synchronization is 20% faster to import files and folders that have been imported by other synchronized streams. In tests, 2,000 files and folders were re-imported.
Use a new command-line option to improve scriptability
A new --wait command-line option is available for the ccc requestSync command and ccc addSyncRoots command. Because the synchronizer and the importer are based on Jazz build technology, those commands add one request to the synchronization build queue and immediately return without checking the synchronization process results. With the new --wait option, the commands wait until the synchronization processes end and return the synchronization results as the exit codes. You can now write a script to execute a synchronization, check the result, and run further operations after the synchronization completes. For more details, see requestSync, and addSyncRoots.
Rational Team Concert ClearQuest Synchronizer
Transition from the ClearQuest Synchronizer to the ClearQuest Bridge
In V4.0, the Rational Team Concert ClearQuest synchronizer component includes a new stand-alone Java application: the syncToBridge tool. With this tool, Rational Team Concert and Rational ClearQuest customers can automate the transition from the synchronizer to the Rational ClearQuest Bridge integration, which is based on OSLC.
For more details about the syncToBridge tool, see Migrating from the ClearQuest Synchronizer to the ClearQuest Bridge.
For more details about the Rational ClearQuest Bridge in Rational Team Concert, see Configuring and using integrations for Collaborative Lifecycle Management and Configuring and using the Rational® ClearQuest Bridge .
Rational Team Concert MS-SCCI Provider
Integrate with Microsoft Source Code Control Interface (MS-SCCI)
Microsoft Source Code Control Interface (MS-SCCI) is an interface specification. Source code control providers can use MS-SCCI to integrate with Microsoft Windows applications that are compatible with MS-SCCI. Windows applications can use MS-SCCI to use the source control services of a compliant source control provider.
The integration with MS-SCCI is based on Source Control Plug-in APIs (MS-SCCI APIs). To integrate, the source control plug-in implementer writes a DLL that exports the Source Control Plug-in APIs for source control integration. The process to create and register this plug-in is described in the article Creating a Source Control Plug-in. This interface provides source control functionality such as check-out and check-in. For the list of APIs that can be implemented and exported by this plug-in, see Source Control Plug-in API Functions.
The Rational Team Concert MS-SCCI Provider provides Jazz SCM functionality through MS-SCCI APIs so that the consuming host application can use the distributed and collaborative capabilities of Jazz source control.
Complete SCM operations by using Rational Team Concert MS-SCCI Provider
The Rational Team Concert MS-SCCI Provider implements SCM functions, as defined by the MS-SCCI specification, so that the host application can complete SCM operations with Jazz SCM as the source control provider.
Rational Team Concert MS-SCCI Provider supports the following SCM operations:
- Sharing directories and files within directories
- Checking-out and checking-in files and folders, and undoing check-out for files and folders
- Removing and renaming files and folders
- Viewing the history, differences, and properties of shared files and folders
- Loading content from source control
Each feature integrates the corresponding SCM wizards and windows into the consuming tool. For example, you can use the Share feature to select the repository workspace and component, and to review the files that are to be ignored by the Share wizard that is integrated into the MS-SCCI consumer. This brings the richness of the Rational Team Concert SCM features into the MS-SCCI consumer.
After the contents of a project are shared, you can complete SCM operations such as checking out, checking in, undoing a checkout, viewing the history and properties of a shared file or folder, and viewing the differences by using the host application. You can also rename the shared files and folders or remove them from source control.
Share directories and the files within them
By using the sharing APIs in Rational Team Concert MS-SCCI Provider, from the host application you can add directories and files to the Jazz source control. Typically, all of the related assets are in a local directory called project. You can add such a project to Jazz source control.
Configure Rational Team Concert MS-SCCI Provider by using the control panel
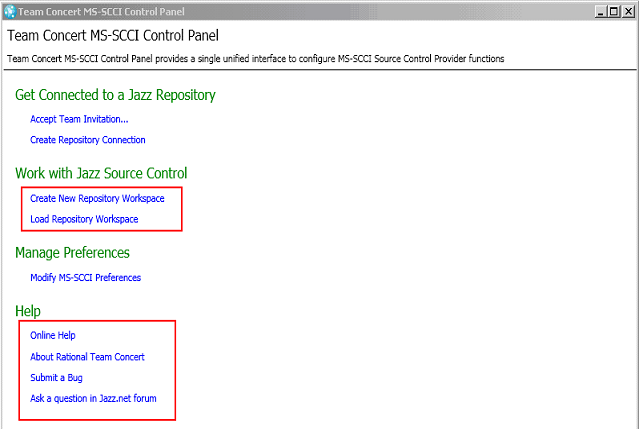
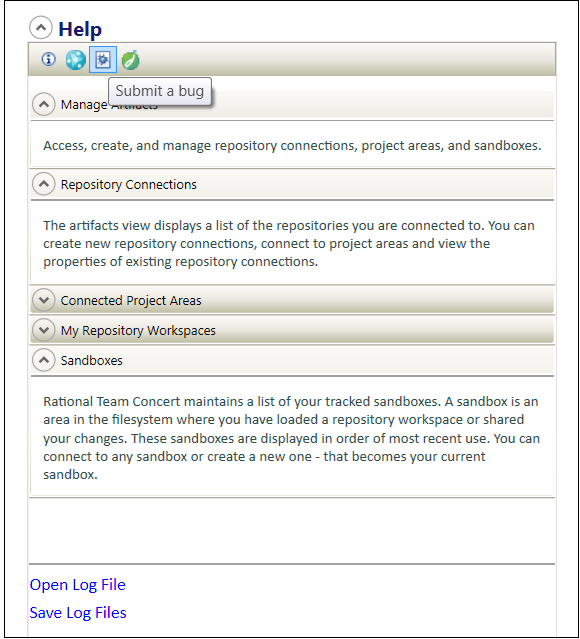
From the control panel of Rational Team Concert MS-SCCI Provider, you can load contents that other users share by loading or creating a repository workspace, as shown in the following image.
The control panel is a single unified interface that you can use to control or configure the Rational Team Concert MS-SCCI provider.
From the control panel, you can do the following tasks:
- Create a repository connection or accept a team invitation to join a team.
- Create a repository workspace or load the contents of a repository workspace.
- Configure behavior by invoking MS-SCCI preferences.
- Access the online help, submit a bug, or ask a question on a jazz.net forum.
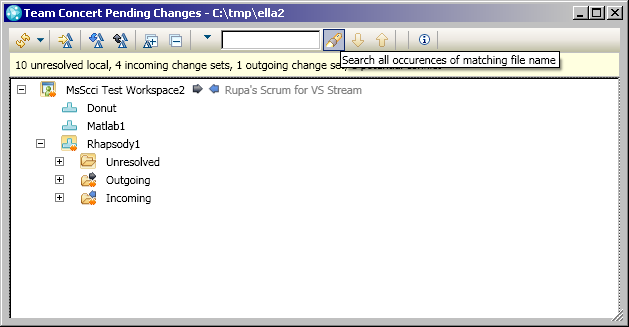
Deliver and accept content in the Pending Changes view
You can use the Pending Changes view to deliver content and accept incoming content. The Pending Changes view in Rational Team Concert MS-SCCI Provider has some of the same advanced functionality as the Pending Changes view in the Rational Team Concert Eclipse client.
Review processes in the Process Advisor window
In the Process Advisor window, you can review information about the process that governs a particular operation, such as the delivery of a change set. You can also use the window to respond to situations where an operation is prevented due to a process violation.

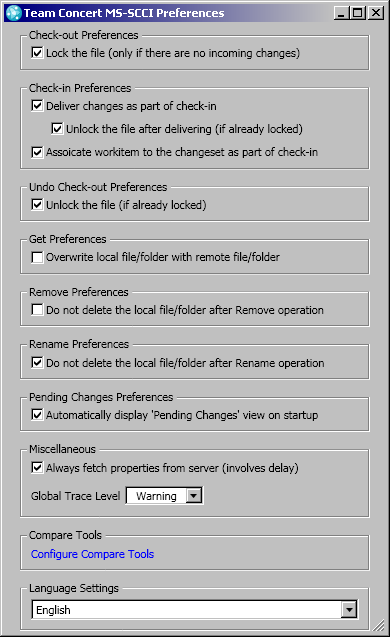
Specify preferences for SCM in Rational Team Concert MS-SCCI Provider
From the Preferences GUI, you can control the behavior of SCM functionality.
Rational Team Concert Shell
With Rational Team Concert Shell, you can perform source control operations on files and folders from Microsoft Windows Explorer.
Rational Team Concert Shell includes a control panel, a set of context menus for files and folders that is specific to Rational Team Concert, and a Pending Changes view. You can use the Control Panel to manage Jazz artifacts and preferences. From the context menus, you can perform source control operations on files and folders. The Pending Changes view provides more sophisticated source control by which you can work with change sets and perform advanced operations on work items.
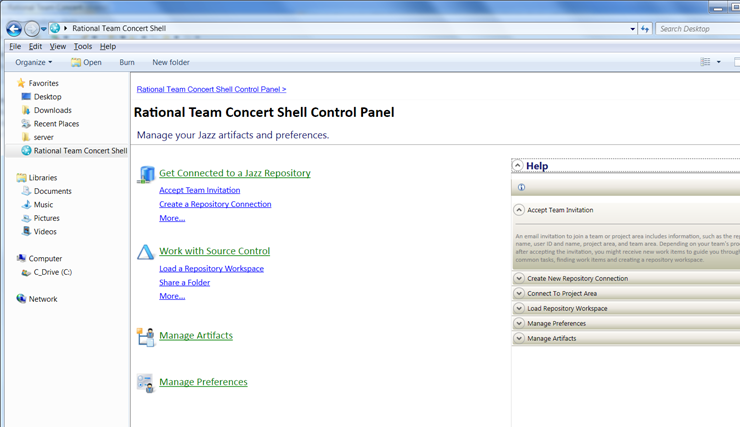
Get started with Rational Team Concert Shell from the control panel
You can use the Rational Team Concert Shell control panel to get started. You can accept a team invitation, share sources, or load a repository workspace, and tailor your environment by specifying preferences. The control panel includes help for ease of use. You can start the control panel from the Start menu or from the Rational Team Concert icon on the task tray or the desktop.
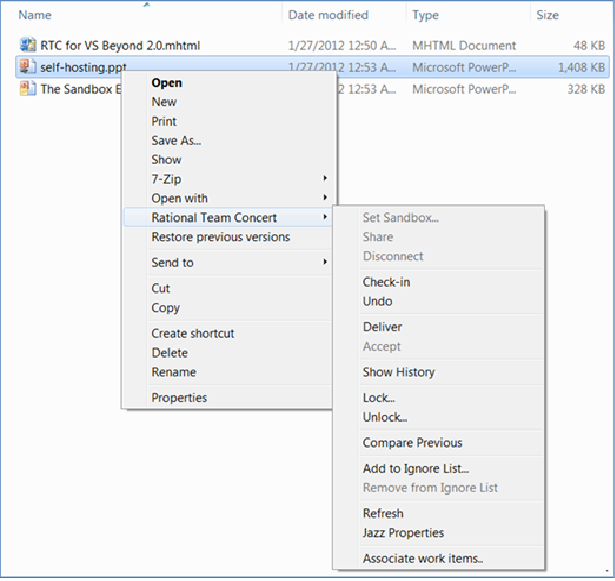
Perform source control operations on files and folders
The Rational Team Concert Shell includes the Rational Team Concert context menu. From this context menu, you can do various source control operations on files and folders, such as share and disconnect, check in and deliver, associate a work item, lock and unlock, and ignore and remove from the ignore list.
Files and folders that are under source control have visual cues. For example, shared files and folders are marked with orange cylinders. Local unresolved files and folders are marked with yellow squares. Arrows indicate incoming and outgoing changes.
![]()
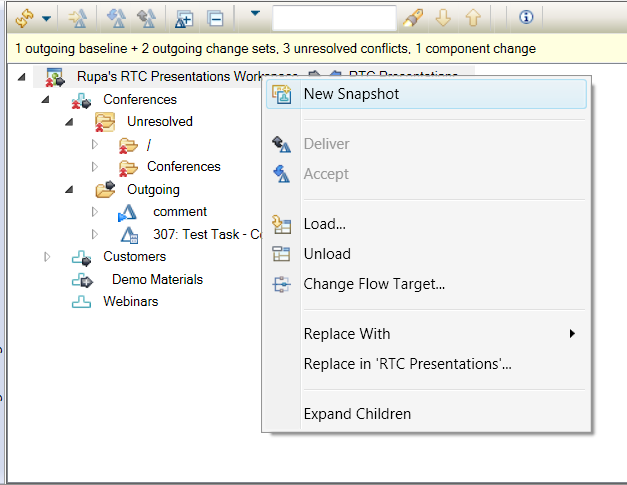
Work with change sets in the Pending Changes view
If you want more control over source control operations, you can use the Pending Changes view, which is integrated into Windows Explorer. In the Pending Changes view, you can do advanced source control operations, such as discarding and suspending change sets and submitting change sets for review.
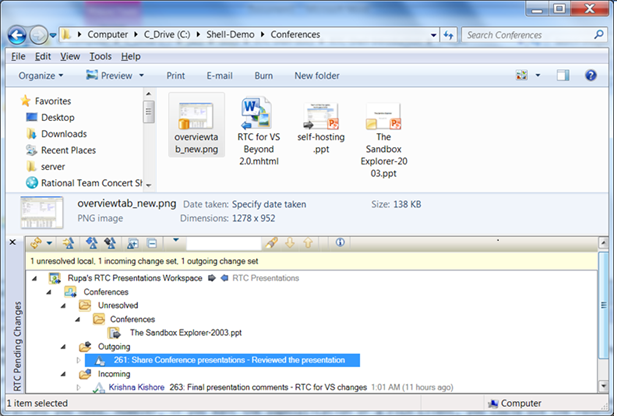
You can also create snapshots and replace the contents of the current workspace and component.
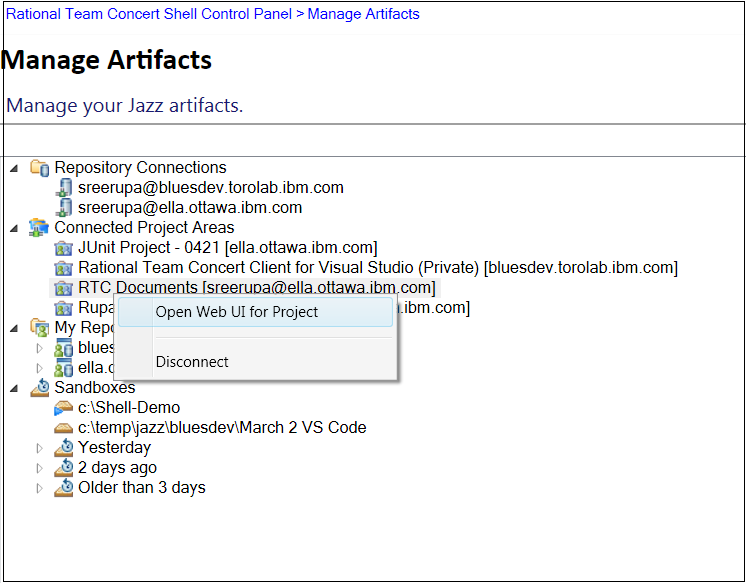
Connect to and open Jazz artifacts
In the Manage Artifacts view, you can now connect to a Jazz repository.
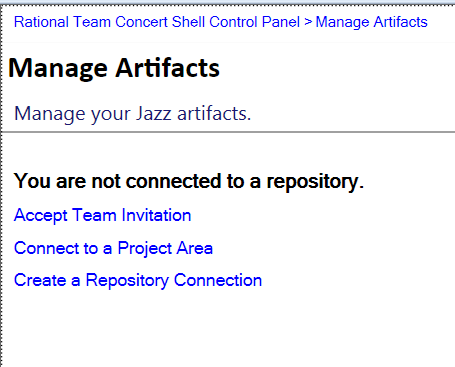
You can also select a project area from the Manage Artifacts view and open it in the web client.
View and edit Jazz properties
You can view the Jazz properties for a file and edit custom properties.

Access help contents
The help panel provides more detailed help and a toolbar that you can use to connect to the online help, submit a bug on jazz.net, or ask a question in a jazz.net forum.
Reports
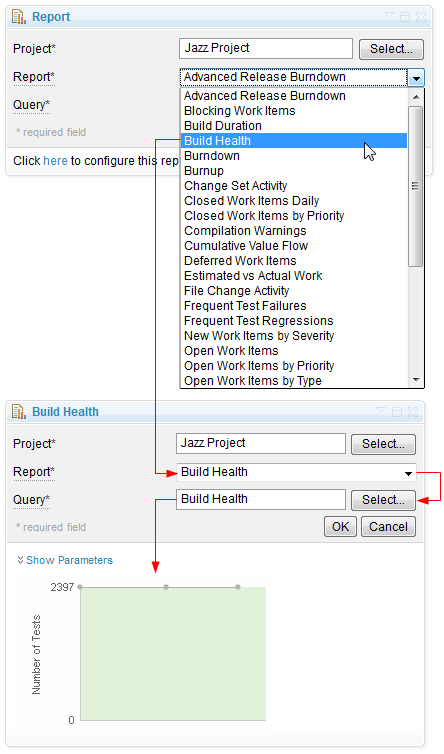
View report results using the Report dashboard widget
You can now use the Report widget to select, configure, and view results for any report resource on the server.
You can also change the report type of any pre-configured Trend Report widget on demand.
Server rename
In V4.0, you can change the public URLs of one or more of the servers or applications in your deployment. In previous releases, changing a public URL after deployment was not possible. While planning a deployment and choosing stable URLs is still highly encouraged, there are some situations which require a URL change because other techniques for preserving URLs, such as DNS and reverse proxy, are not sufficient. For example, these situations likely require a URL change:
- Cross-geography relocation
- Reorganization
- Acquisition
- Dropping a domain name
- Data center consolidation
- Alignment with corporate naming policies
For additional information on server rename, please see the Changing the public URL using server rename infocenter topic and the related jazz.net article.
Source control
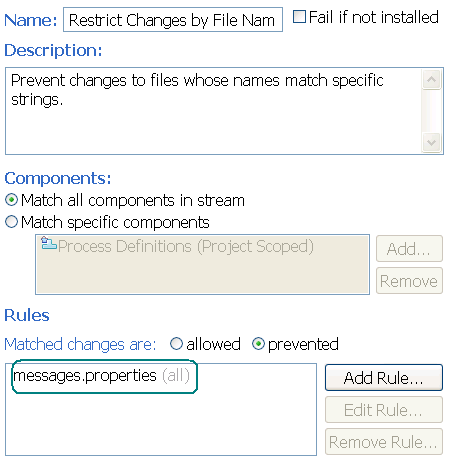
New advisor: Restrict changes by file name
You can prevent changes to files that match a particular pattern by setting a precondition on the deliver operation (operation 'Source Control / Deliver Phase 2 (server)'). The following example sets the advisor to prevent files named messages.properties from being modified, added, or deleted. You might use this advisor if the strings in your product are
stored in messages.properties files and you want to freeze the strings during a release candidate iteration.
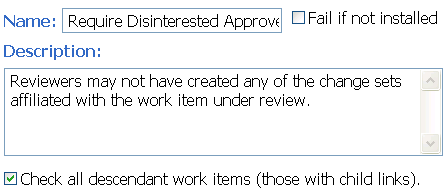
New advisor: Require disinterested approvers
You can require that approvers on a work item are not creators of any of the associated change sets for that work item or any of its child work items. Set the Require Disinterested Approvers precondition on the Work Items / Save Work Item (server) operation.
Restrict changes to items
In project areas or team areas where the Restrict Changes to Items advisor is enabled, you can specify that only certain process roles can modify certain files in a component or that certain roles are not allowed to modify certain files. To access the advisor, click Team Configuration > Operation Behavior > Source Control > Deliver Phase 2 (server).
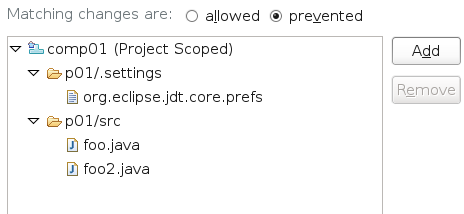
In the example, users whose role matches the role that this advisor is added to cannot modify the resources foo.java, foo2.java and org.eclipse.jdt.core.prefs in the component comp01. They can modify the other files in that component. The rule is enforced for any stream that belongs to the project area or team area the advisor is applied to.
Prevent linking to approved work items
By using the Prevent Linking to Approved Work Items advisor, you can enforce a strict process and avoid additional change sets from being linked to a work item if that work item is approved. You can customize the advisor to fit the particular type of approval that you use. To access the advisor, click Team Configuration > Operation Behavior > Source Control > Save Change Set Links and Comments (server).
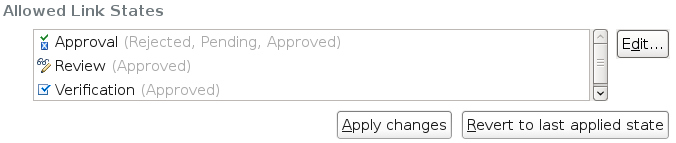
In the example, change sets cannot be associated with work items whose approval is either rejected, pending, or approved, or whose review or verification was approved.
Validate delivery by using work item queries
You can use the Require Work Items to Match Query advisor to use a work item query to validate work items during delivery. You can prevent change sets that are associated with work items and that fail to meet a query from being delivered to a stream.
Automatically resolve add conflicts
You can auto-resolve conflicts that arise when you and another user add a folder with the same name. The auto-resolve merges as much of the file hierarchy as possible.
Command-line interface features and enhancements
Find streams, workspaces, snapshots and components by name
You can use the following commands to get a list of the corresponding source control artifacts:
lscm ls streamlscm ls workspacelscm ls snapshotlscm ls component
You can also specify name patterns to scope the results.
Create load rule files
Use the lscm create loadrules command to create load rule files that
describe how your sandbox was loaded. You can share these load rule files with
other Rational Team Concert users, including users of the Eclipse client or the Client for Microsoft
Visual Studio IDE.
            $ lscm create loadrules -C Filesystem /test/lr/
            Successfully created load rules.
Locate change sets
Use the lscm changeset locate command to
find a change set. You can use the command to search for change sets or change sets in
workitem in streams, in an entire project area or team area, or in an arbitrary list
of streams, workspaces, or snapshots.
            $ lscm changeset locate -r jazzdev -W 175212 -w 1065 1162 1160 -v
            (1065) "Source Control 4.0" (3 of 3)
              (1255) ---$ Sridevi Sangaiah "Add more unresolved changes"
              (1256) ---$ Sridevi Sangaiah "Fixed Tests"
              (1222) ---$ Sridevi Sangaiah "Display count of unchecked-in changes"
            (1160) "Source Control 3.0.1.3 (iFix 3)" (0 of 3)
            (1162) "Source Control 4.0 Side Stream (RC1)" (3 of 3)
              (1255) ---$ Sridevi Sangaiah "Add more unresolved changes"
              (1256) ---$ Sridevi Sangaiah "Fixed Tests"
              (1222) ---$ Sridevi Sangaiah "Display count of unchecked-in changes"
Create a stream
Use the lscm create stream command to create a stream. You
can specify the name, owner, and a stream or snapshot to populate the new
stream.
            $ lscm create stream TestStream --teamarea TeamArea1
            Stream (1301) TestStream successfully created
List change sets
Use the lscm list change sets command to list change sets in the repository. Typically, you might run the following queries to list change sets:
- List the change sets for a workspace
- List the change sets of a component by specifying the creator of the change set
- List the change sets of a component by specifying the name of the file contained in the change set and the type of change
            $ lscm list changesets -C Filesystem -m 3 -n statuscmd
            Change sets:
              (1262) ---$ Shashikant Padur "added more tests" 03-May-2012 10:46 AM
              (1263) ---$ Sridevi Sangaiah "Fix test failures on windows" 27-Apr-2012 12:28 PM
              (1264) ---$ Sridevi Sangaiah "replace quotes" 30-Mar-2012 02:31 PM
Change read-access permissions
In the SCM command-line client, you can change read-access permission on files, symbolic links, and folders. The subcommand that supports this operation is the changeaccess subcommand. To allow anyone who has access to the parent component to retrieve the selected file or folder, choose --public. If you want to limit the access to yourself, select --private. To specify which project area or team area to use to control access to these resources, use --projectarea or --teamarea.
Example:
            $ lscm changeaccess file1.txt --projectarea ProjArea1
            Successfuly change read access permissions.

            $ lscm property get jazz.read-access file1.txt
            /home/shashi/test/jazztest/tmp1/Comp1/compfolder1/3.txt
              jazz.read-access - ProjArea1
List file states and delete the contents of a file
In the SCM command-line client, you can delete the content of a state of an item in a configuration. The subcommand that supports this operation is delete state-content.
Example:
            $ lscm history file1.txt
            Change sets:
              (3323) ---$ ADMIN ""

            $ lscm list states 3323
            (3325) /Comp1/compfolder1/file1.txt
            (3329) Initial 16-Feb-2012 08:58 AM
            (3330) Final - Modified 16-Feb-2012 08:58 AM

            $ lscm delete state-content 3325 3330
            Successfully deleted content of the item state(s).

            $ lscm list states 3323
            (3325) /Comp1/compfolder1/file1.txt
              (3329) Initial 16-Feb-2012 08:58 AM
              (3330) Final - Modified [Content deleted by ADMIN on 17-Feb-2012] 16-Feb-2012 08:58 AM
List the files in a configuration
In the SCM command-line client, you can now list the files and folders that are in a baseline or snapshot. These options are incorporated into the list remotefiles subcommand. The listing now shows both the item ID and the state ID of the files and folders.
Generate JSON output
Typically, the command-line interface (CLI) is used to script and automate certain SCM tasks, and then pass the output of its commands to other command-line tools. You can instruct most of the SCM CLI subcommands that provide output on the command line to provide their output in JSON format by using the -j/--json option.
Example: Workspace listed in JSON format
            $ lscm list workspace -r satchmo -n "Source" -j
            [
                {
                    "name": "ShashiSourceControl200x",
                    "owner": "Shashikant Padur",
                    "type": "WORKSPACE",
                    "url": "https:\/\/satchmo.ottawa.ibm.com:19443\/jazz\/",
                    "uuid": "_QiXXoHCREeCOe8gWvNEF4g"
                },
                ...
Eclipse client features and enhancements
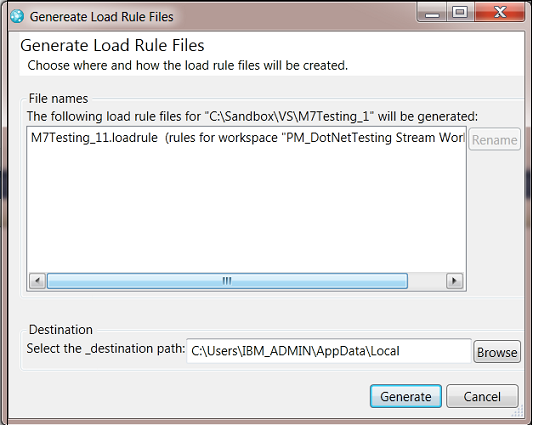
Generate load rules
You can use load rules to load components in your sandbox in distinct ways. For example, you can specify that certain subfolders are placed in specific locations. Load rules are helpful if you work with tools that expect a layout on disk that differs from the way resources are stored in the server. You can capture the way that content was loaded in your sandbox so that someone else on your team can have the same setup. To generate load rules, click Preferences > Team > Jazz Source Control > Sandboxes, select a sandbox, and click Generate Load Rules.
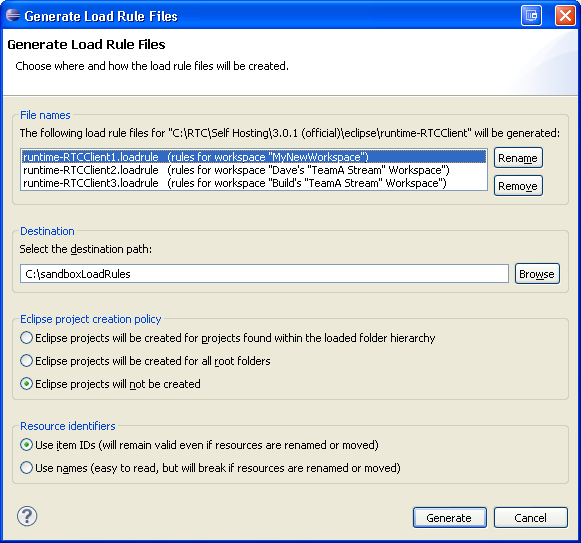
In the previous image, the sandbox contains content that is loaded from three repository workspaces. Three load rule files will be generated that describe how the components for each of the workspaces have been loaded. You can deliver the load rule files to a stream if you want them to be easily accessible to everyone in your team, or you can store the files locally.
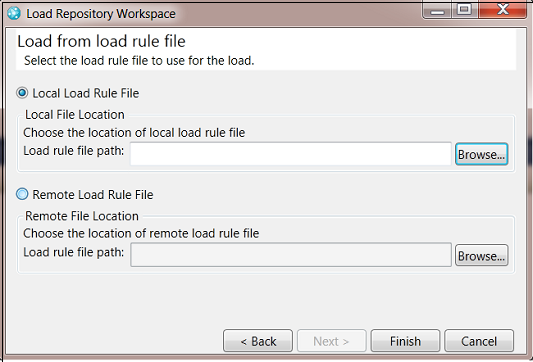
Load from load rule file
You can easily re-create a sandbox by using a load rule file. For more information about load rule files, see "Generate load rules." Select one of your repository workspaces from the Team Artifacts view > Load... > Load from a load rule file.
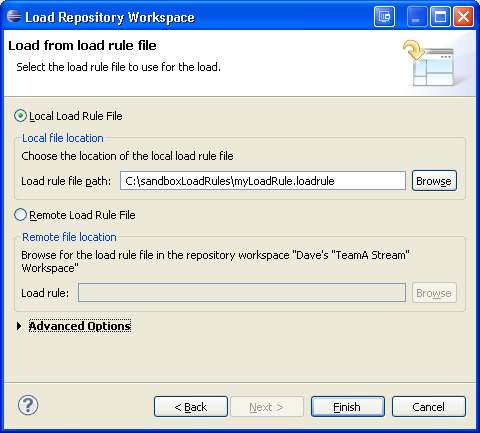
The components in the selected repository workspace are loaded into the sandbox according to the rules in the load rule file. You can choose a load rule file on your local drive or inside the repository workspace. For example, you might choose a load rule file after someone on your team delivers it to the stream that you use and you accept the file in your repository workspace.
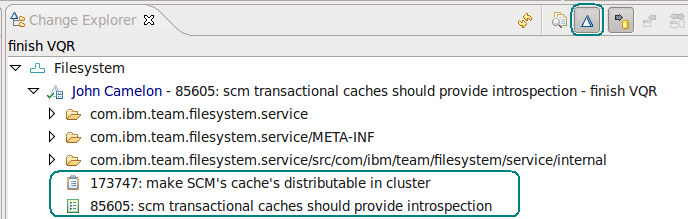
View links in the Change Explorer
The Change Explorer is useful when you need to view the details of a change set. If you enable the action on the toolbar to show change sets, you can see the artifacts that are associated with a change set. For example, associated artifacts might inclue work items or OSLC change requests from other repositories. The Change Explorer also now has the same color scheme as the Pending Changes view.
Show Pending Changes on a repository workspace
In the Pending Changes view, you can track outgoing and incoming changes between a repository workspace and its current flow target without loading anything in your sandbox. Select the repository workspace and click Show > Pending Changes. You can also track a stream and its flow target.
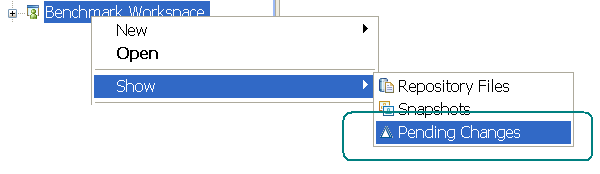
This action replaces the former option, "Do not load - track in the pending changes view," in the load wizard.
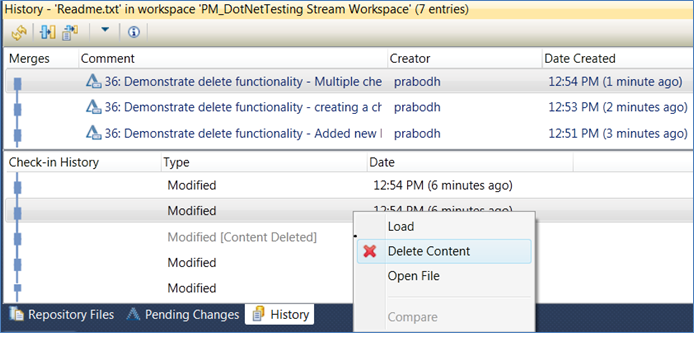
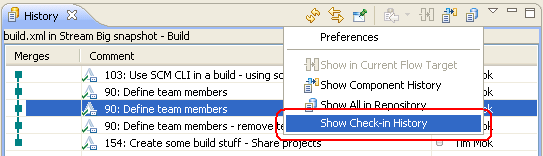
Show check-in history in the History view
When you browse the history of a file in the History view, you can inspect the history of each selected change by selecting the Show Check-in History option.
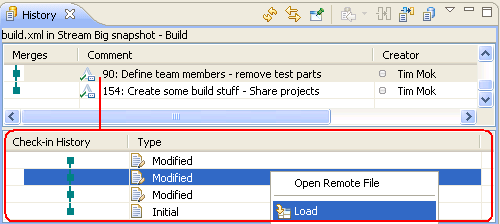
Tip: Check in frequently. Do not accumulate local changes in your sandbox; check them into your repository workspace. Source control detects each check-in separately, even when the check-in is performed against the same file in the same change set. In the Check-in History pane, you can access and reload all of the intermediate check-ins.
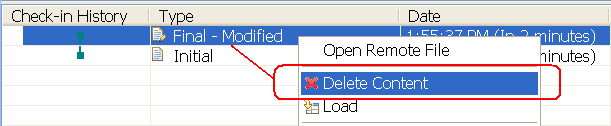
Permanently delete content associated to a file change
If improper content is checked into a workspace and delivered to one or more streams, an administrator can physically remove the content from the repository. This removal is different from discarding the change from a workspace or stream. The change still exists wherever it was delivered to. However, you cannot open that change in a compare editor or load the change because the content is removed from the repository.
To delete content that is associated to a file change, open the file change history for that resource. Select Show Check-in History to enable the Check-in History pane, and decide which content to delete. After you locate the change, you must contact an administrator or be an administrator to delete the content.
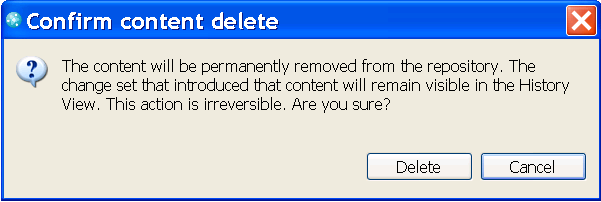
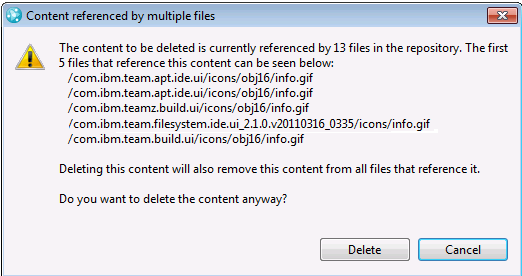
A message explains that the deletion is permanent.
In the Check-in History pane, you can see which changes the content was deleted from.

Tip: To see all of the changes for a resource regardless of workspace, stream, or snapshot, right-click a file and select Show History, and then select Show all in repository. If you suspect that one of the changes refers to content that must be deleted, you can review all of the changes, and then delete content from the Check-in History pane.
The content that is associated with the selected change is permanently removed from the repository. No one can retrieve the content from a workspace, stream, snapshot, or change-set link in a work item that contains the corresponding change set. If you need to restore deleted content and you have a local copy of the content, check in the content in a new change.
If you load a workspace that contains files that refer to deleted content in the current configuration, you might see a message like the following message.
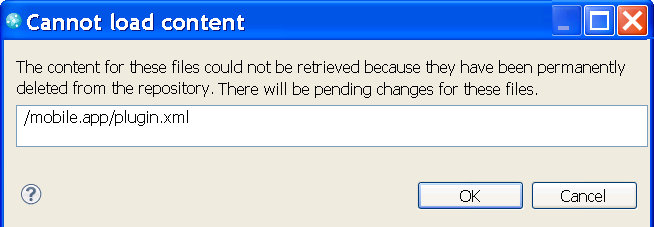
You are warned about deleted content only if the configuration points to the change for which content was deleted. After the message is displayed, a local change is created. The change contains a placeholder text file that contains a string that states that the content was deleted.
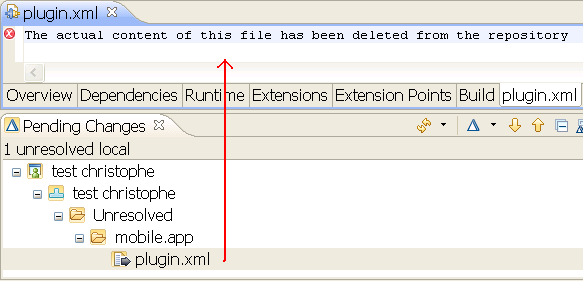
You can delete this file to remove it from the configuration, load content from a previous change that was not deleted, or check in new content.
Detect references to deleted content
When an administrator deletes content that is referenced by other files, the administrator is prompted. The administrator can review the paths and decide whether to delete the content.
Locate change sets in work items and in multiple streams
You can find out if your maintenance streams contain the change sets that are associated to a work item in your development stream. Right-click the work item and select Locate Change Sets
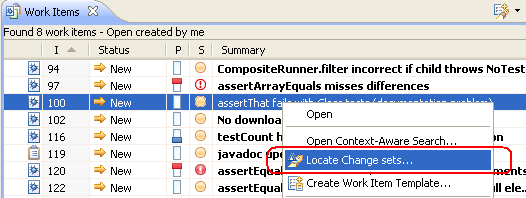
The Locate Change Sets editor shows the work item and its associated change sets. You can also include the child work items.
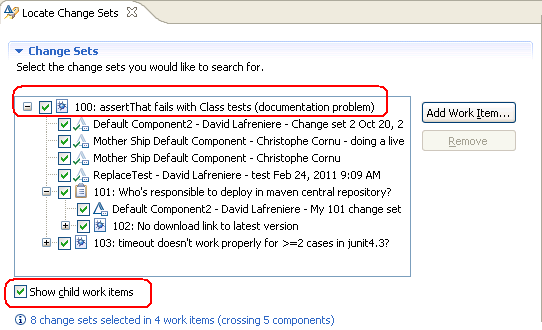
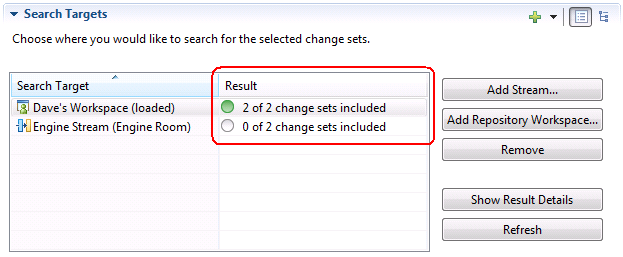
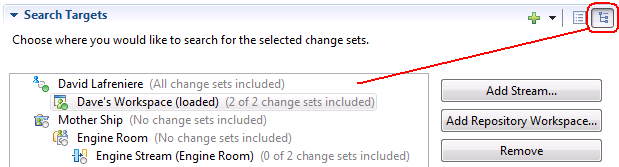
Add the streams or workspaces in the Search Targets section. You can select streams individually by using the pickers, or you can drag streams and workspaces from various places that show those resources, such as the Team Artifact Navigator or Pending Changes view. The editor computes the results automatically. In this example, all of the changes are included in Dave‘s Workspace and none of the changes are displayed in the Engine Stream stream.
You can drag team areas, project areas, or repositories from the Team Artifact Navigator and Team Organization views to the Search Targets area in the Locate Change Sets editor. When you drag a team area, project area, or repository, all of the corresponding streams are included. From the menu next to the plus sign (+) icon, you can include the workspaces that you are working with in the Pending Changes view or the streams from the project and team areas you are part of.

You can switch to the hierarchical view and see the workspaces and streams grouped by owner. You can quickly learn which team areas contain change sets and which do not.
Tip: To open the Locate Change Set editor, from the top menu, or from wherever you see change sets or work items, click Search > Jazz Source Control > Locate Change Sets.
Show pending changes in the Java perspective
You can open the Pending Changes view from the Java perspective by selecting Window > Show View > Pending Changes.
Use symbolic links on Windows 7
Source control now has full support for symbolic links on Windows 7.
- You can check in symbolic links that were created on Windows 7 and share the links with other Windows 7 users.
- You can share certain symbolic links, such as relative links, between Windows 7 and Linux or UNIX users.
You can customize how to handle broken links. To change the preferences about broken links, click Preferences > Team > Jazz Source Control > Notification Dialogs.
Restriction: Symbolic Links on Windows 7 are subject to Windows 7 permissions.
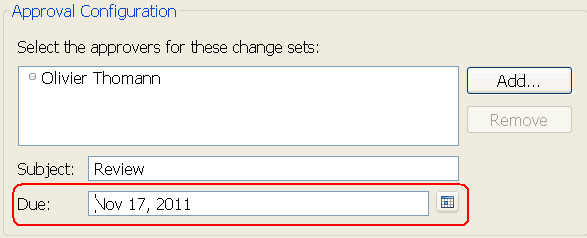
Specify a due date when you submit for review
When you submit an item for review on an outgoing change set, you can set the due date for the review.
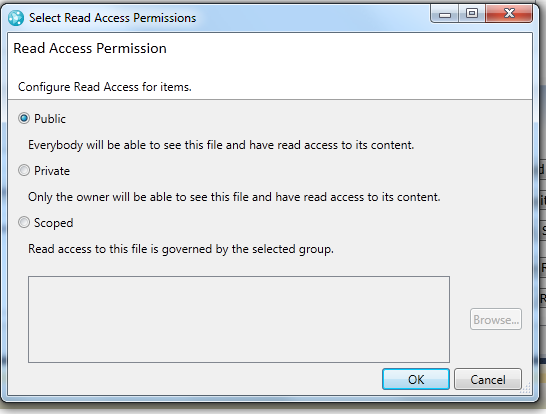
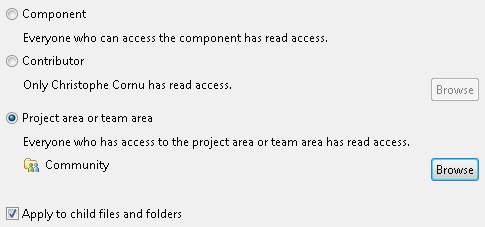
Scope read permissions on files and folders
Read permissions on files and folders are inherited from their components. You can further scope read permissions of a file or folder by opening the Repository File view, right-clicking the file or folder, and clicking Change Access Control.
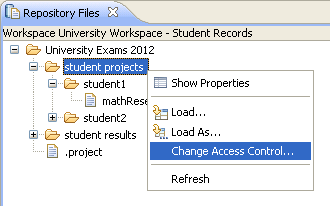
In V4.0, you can use the Access Control window to control the read access of files and folders in three ways:
- To allow anyone who has access to the parent component to retrieve the selected file or folder, select Component. This is the default.
- To limit the access to yourself or to someone in particular, select Contributor.
- To specify which project area or team area to use to control access to files and folders, select Project area or team area.
These permissions apply to the selected items in the component throughout the entire repository. The permissions also apply to any workspace, stream, snapshot, or baseline that includes the component. The permissions apply to every state of the selected files or folders. Previous versions of any workspace, stream, or snapshot are protected by the same permissions.
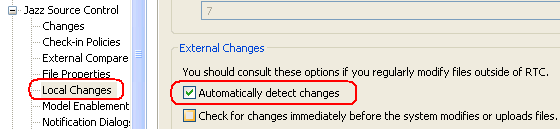
Automatically detect changes made outside of Eclipse (Windows operating system only)
If you enable this new option, the Eclipse client automatically detects changes that external tools made. The changes are shown in the Pending Changes view. You can also use this option for external sandboxes, even when the files are not shown in the Eclipse workspace.
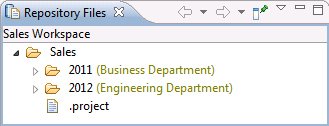
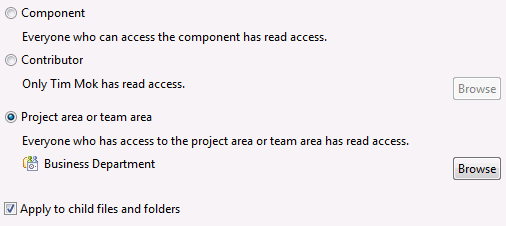
Set read-access permissions in the Repository Files view
You can set read permissions on files and folders by using the Change Access Control action in the Repository Files view. Files and folders whose read permissions are scoped to a contributor, project area, or team area are displayed with the name of that contributor, project area, or team area in parentheses. For example, in the following image, the 2011 folder is accessible to members who can access the Business Department team area. The 2012 folder is accessible to members who can access the Engineering Department team area. Because the Sales parent folder is accessible to anyone who can access its component, additional information is not displayed next to that folder.
When you select Change Access Control from the Repository Files view, the window that opens contains new information about the three options that are supported in V4.0.
Modify components with the Component editor
In a view, such as the Team Artifacts view, you can right-click a component and open it in a stand-alone editor. You can then easily rename the component or change its owner and visibility.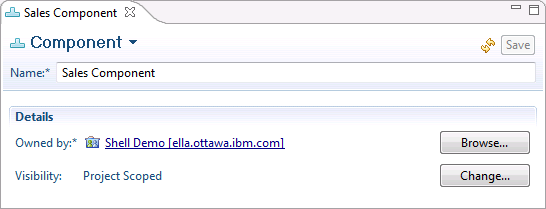
Web client features and enhancements
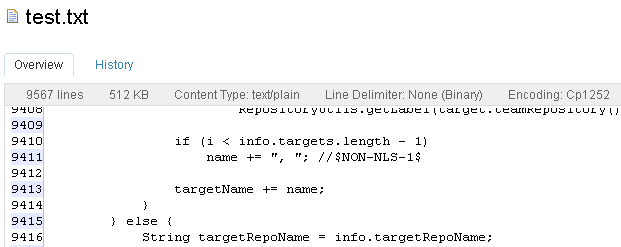
Display a file that has many lines
The web client now uses the Orion editor to display file content. To save time and memory, the Orion editor efficiently displays content without rendering the entire contents of a file. For more information about Eclipse Orion, see the Orion website.
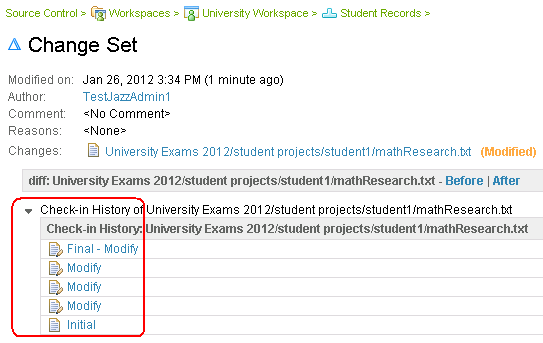
Access check-in history
In the web client, you can access the check-in history of any change in a change set. The check-in history is useful if you checked in an invalid change and want to reload the content that was checked-in in that same change set. In the following example, four versions of the mathResearch.txt file were checked in into this change set before it was delivered.
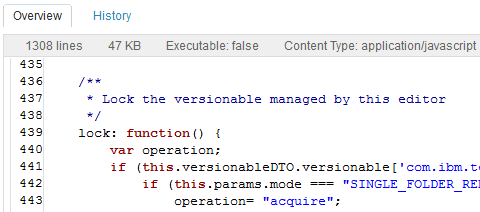
Scalability and usability improvements
You can now display large text documents of up to 32 MB or 100,000 lines by using the embedded Orion Eclipse web editor. In addition, syntax highlighting is supported for Java, HTML, JavaScript, and CSS files.
Each page is now identified by a large icon and title.

User assistance
Learn by using new tutorials
The information center includes seven new tutorials.
- Managing builds with Jazz Team Build shows how to use build definitions and build engines, submit build requests, and view build results.
- Sharing changes with your team shows how to create a repository workspace, deliver changes and resolve work items, accept changes from other team members, and resolve conflicts while working in the Eclipse client.
- Sharing changes with your team in the web client shows how to perform source control operations in the web client.
- Plan an agile project walks you through the process of agile planning by using the Scrum process.
- Control access to project areas and their artifacts shows you how to use access control features to determine who can access a project area and its artifacts, such as work items, streams, and components.
- Customize process in your project area and team areas shows you how to create timelines and iteration; create roles and assign permissions; customize process in team areas; configure operation preconditions; and use iteration types.
- Standardize process by using project area process sharing shows you how to use the project area process sharing feature to standardize the process that project areas across your organization use. By using process sharing, you can also centralize process management.
Deploy a clustered environment
A new set of topics describe how to configure and deploy a cluster of servers to achieve load-balancing and high availability by using IBM WebSphere Application Server Network Deployment. See Setting up a clustered environment.
In addition, the interactive installation guide now includes a choice for clustering:

Upgrade to V4.0 by using the interactive upgrade guide
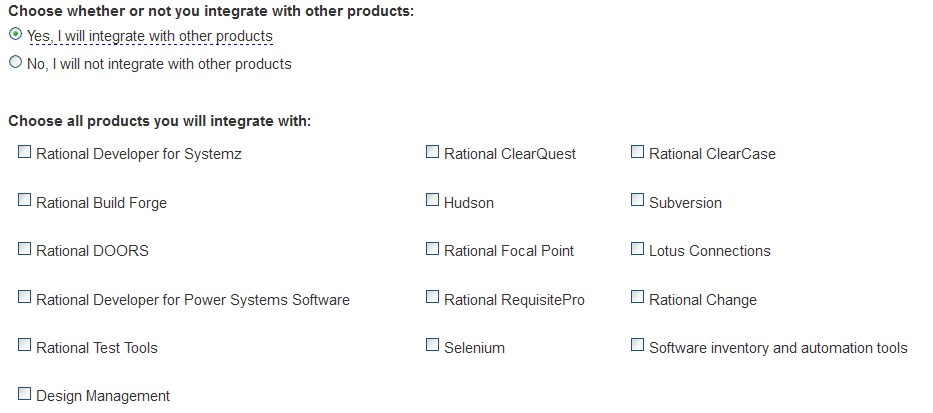
The interactive upgrade guide includes new information, including instructions to upgrade to the 4.0 release and set up integrations with other products, such as IBM Rational DOORS and IBM Lotus Connections. In the interactive HTML form, you can select the products that you plan to integrate with.
Interactive installation guide and interactive upgrade guide include planning checklists
The interactive installation guide now includes a planning checklist. Before you proceed with the installation, ensure that you have performed the items in the checklist. Likewise, the interactive upgrade guide includes planning and verification checklists.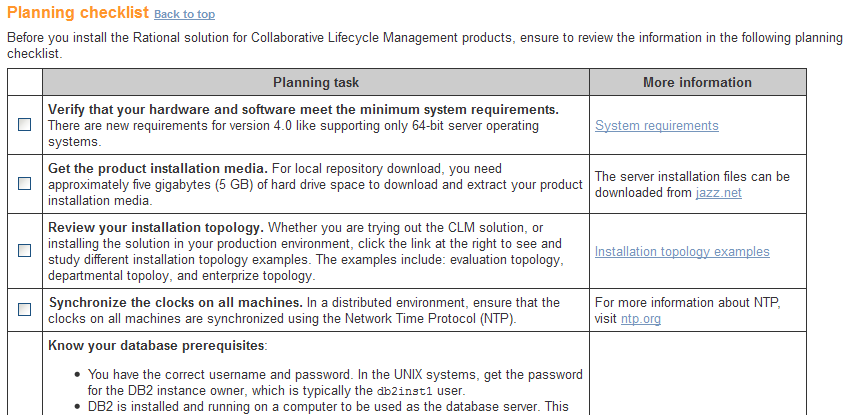
Set up the server and applications by using the command-line interface
As an alternative to using the Setup wizard, you can set up the Jazz Team Server and associated applications by using the command-line interface. For instructions, see Running the setup with command-line commands.Use Jython scripts to set up WebSphere Application Server and deploy the CLM applications
For details about how to use Jython scripts to automate common administration tasks and configure security in WebSphere Application Server, see Setup WebSphere Application Server and deploy CLM applications using Jython scripts.
Plan your work by using new features and enhancements
To get a quick overview of work item status, use the Kanban board. This plan view is divided into columns of open, in progress, and resolved work. You can set limits for each column and also drag work items to columns. For more details, see Creating plan views.
To view relationships between work items across project areas, use a cross-project plan. For details about creating cross-project plans, see Tracking work item relationships across projects.
You can now reimport the original Microsoft Project XML into Rational Team Concert to add new tasks or update changes to the hierarchy. For details, see Importing and exploring plans.
Perform new and enhanced SCM operations
Determine which repository workspace or stream contains a particular change set by using the locate change sets function. For details about using the Locate Change Sets editor, see the context-sensitive help, which you can access from the editor, and Locating change sets.
You can permanently delete file versions from source control. For more details, see Deleting file versions from the repository.
You can view the history of check-ins of a file in source control. For more details, see Viewing the change history of files.
You can restrict read access to specific files and folders in source control. For more details, see Read access permissions and Setting read access permissions.
To perform source control operations without using an IDE, you can use Rational Team Concert Shell. For information about installing Rational Team Concert Shell, see Installing the IBM Rational Team Concert Shell using the IBM Installation Manager. For details about all of the source control operations that you can perform in Rational Team Concert Shell, see the following topic and its child topics:Working in the Rational Team Concert Shell.
Integrate Rational Team Concert with Microsoft Source Code Control Interface
Rational Team Concert provides several ways for teams that use both Microsoft Source Code Control Interface and Rational Team Concert source control to collaborate. See Rational Team Concert and Microsoft Source Code Control Interface and Installing Rational Team Concert MSSCCI Provider using IBM Installation Manager.Transition from the ClearQuest Synchronizer to the ClearQuest Bridge
If you use the ClearQuest Synchronizer to synchronize Rational Team Concert work items with Rational ClearQuest change requests, you can migrate the synchronized work items and change requests so that they use the ClearQuest Bridge. For details about using the new syncToBridge command-line utility, see Transitioning from the ClearQuest Synchronizer to the ClearQuest Bridge.
Create and use access groups to restrict read access to work items
To restrict access to work items, you can define access groups that can consist of members of project areas, members of team areas, and specific users. You can then limit read access to specific work items to members of an access group. For details about creating and using access groups, see Using access groups to control access to work items.
Filter content in the information center
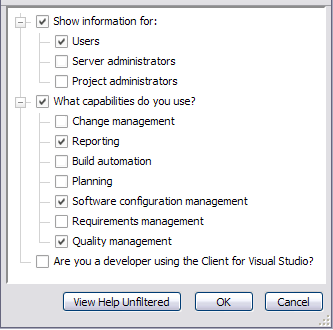
Information about content filtering is available in the Rational solution for Collaborative Lifecycle Management 4.0 information center. By setting a filter, you customize the online help to suit your information needs. At any time, you can modify the filter to see fewer or more topics. You can also remove the filter to see all of the the help topics. The filter affects the topics that are listed in both the navigation tree and the search results.
To access the filter options, click the Filter icon on the information center banner.
![]()
In the filter window that opens, you can filter content by role and capability.
Customize work item Email notification templates
By using templates, you can customize the content of Email messages that are sent to users to notify them of changes to work items. See Customizing Email notifications.Customize work item attributes
The information center now includes topics about configuring HTTP-filtered value sets and dynamic Read-Only attributes. For details, see this topic and its child topics: Customizing attributes.
Do more with Enterprise Extensions
You can now set up and use dependency builds on IBM i. Dependency builds save time and resources by building only the items that changed since the last successful team build. For more details, see Dependency builds on z/OS and IBM i.
You can now use promotion-based on work items or components on IBM i. With promotion, you can systematically control the flow of artifacts up a stream hierarchy, such as from development, to test, to production. For details, see Promoting with Enterprise Extensions.
You can now use the deployments and packages components on IBM i to gather your built artifacts and move them to another location. For details, see Packaging and deploying with Enterprise Extensions.
Get updated help about reporting
The following help topics about reporting contain extensive improvements:
- Installing Rational Reporting for Development Intelligence
- Introduction to reporting
- Getting started
- Administering reporting
In addition to the improved help topics, you can now view context-sensitive help on the Reports pages in the administrative web user interface for each application and Jazz Team Server.
Work items
Configure data source value set providers
Value sets are shown in radio buttons, combo boxes, and selection windows as possible values for a work item attribute. In V4.0, you can configure a value set provider that fetches value sets from a remote data source. The "HTTP Filtered Value Set Provider" loads an XML document through HTTP and extracts data by using XPath expressions. The following image shows a configuration for fetching and extracting car makes.

Such a value set provider can be set to a work item string attribute. Then the value set provider is used by either the "Value Set Selection" or the "Value Set Combo" editor presentation. The next image shows the selection window of the "Value Set Selection" editor presentation.

Include input variables in work item queries
Work item queries can contain input variables, such as values for query conditions that can be specified differently for each execution of the query. A query condition specifies the operator, such as "is" or "contains," to be used with the variable. The query also declares the condition as an input variable. When you run the query, you are prompted to select values for each input variable before the query is executed. You can specify input variables for any work item attribute that can be queried, including custom attributes.
In the query editor in the web and Eclipse clients, you can declare a query condition as an input variable. For conditions with input variables, you cannot select values.
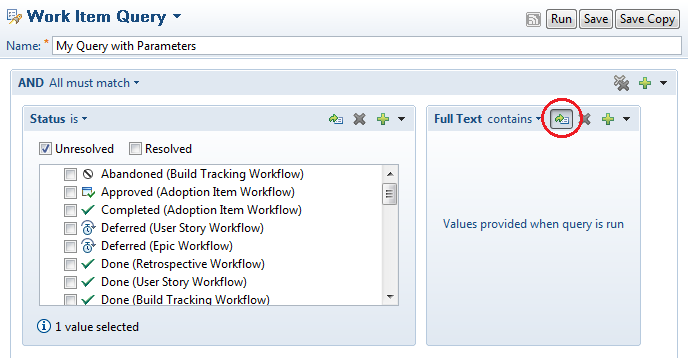
When a query with input variables runs, you can use a new wizard window to select the values for every input variable. You can navigate to inspect all of the input variables, and you can select multiple values for each variable.
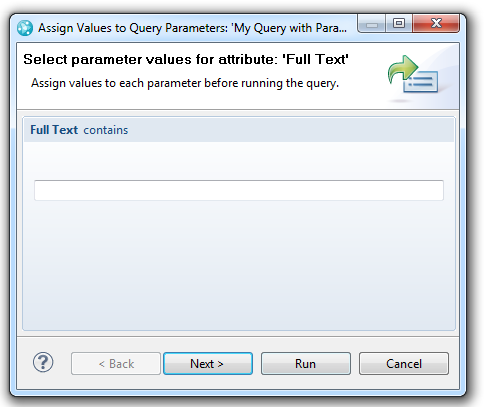
View parameterized work item queries using dashboard widgets
You can now use work item queries with conditional values in both the Work Items widget and the Work Item Statistics widget.
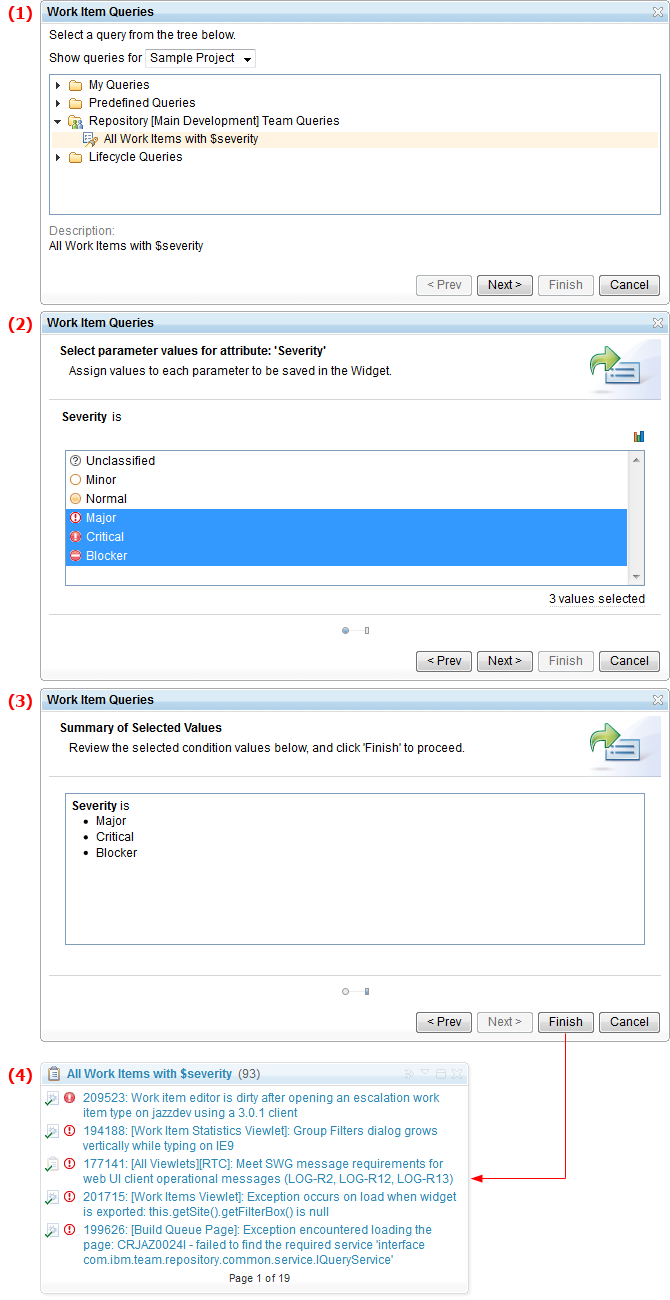
Customize chart colors in the Work Item Statistics dashboard widget
You can now use the Work Item Statistics widget to customize the chart color of any parameter value in the work item query results.
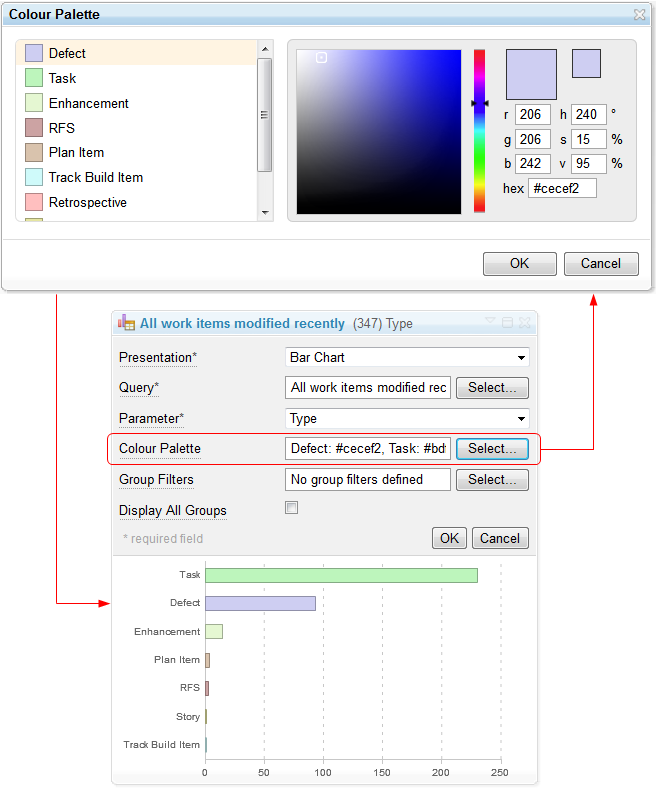
Dynamically mark attributes as read-only
A work item attribute can be dynamically marked as being read-only based on the state of a work item or based on the values of other attributes.
This behavior is controlled by a work item save precondition. You can either use the 'Read-Only Attribute for Type and State' precondition to base read-only by type and state, or use the 'Read-Only Attribute for Condition' precondition to use condition script
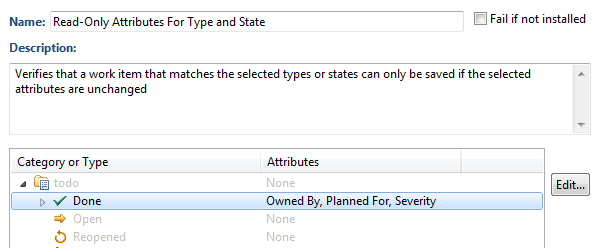
Restrict access to work items
Until this release, you could configure work item access restrictions only through project areas, team areas, and categories. It was difficult to provide access to users who are distributed across projects or teams, or to select a group of members and teams. On the new restricted access pages in the Work Item editor, you can select access groups that the work item can be shared with. These access groups are independent of teams and projects, and can have individual users, teams, or both. This capability is supported in both the Eclipse and web clients. For more information about creating and managing access groups, see the information center.
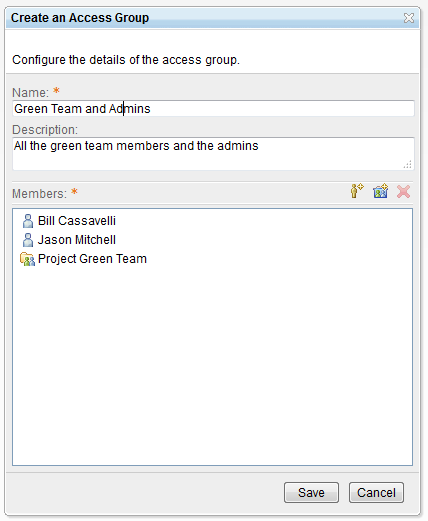
To enable restricted access to work items, add the new attribute presentation property, Restricted Access, to a work item editor presentation.
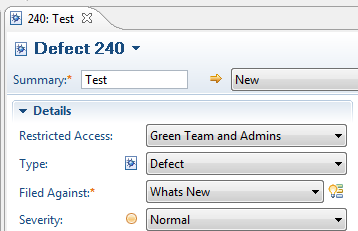
You can select or change a restricted access group for a work item by using this new presentation. You can select a project area in the repository, an access group, or a public group.
Customize work item emails by using mail templates
You can customize the emails about work item changes by using mail templates. Mail templates are defined for each project area and use the Velocity template language. For more information about the contexts that are available for templates, see the Email templates help page.
The process area configuration editor contains a new page for mail templates.
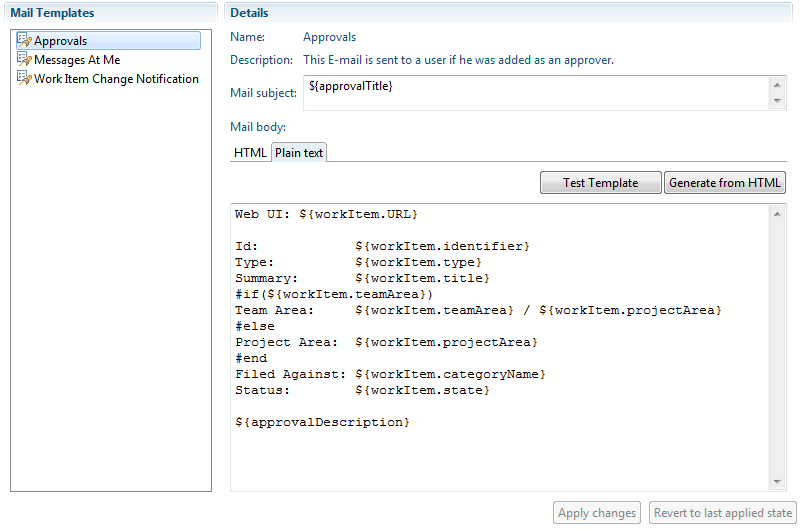
Before you use a template, you can test it in the Template Test window.
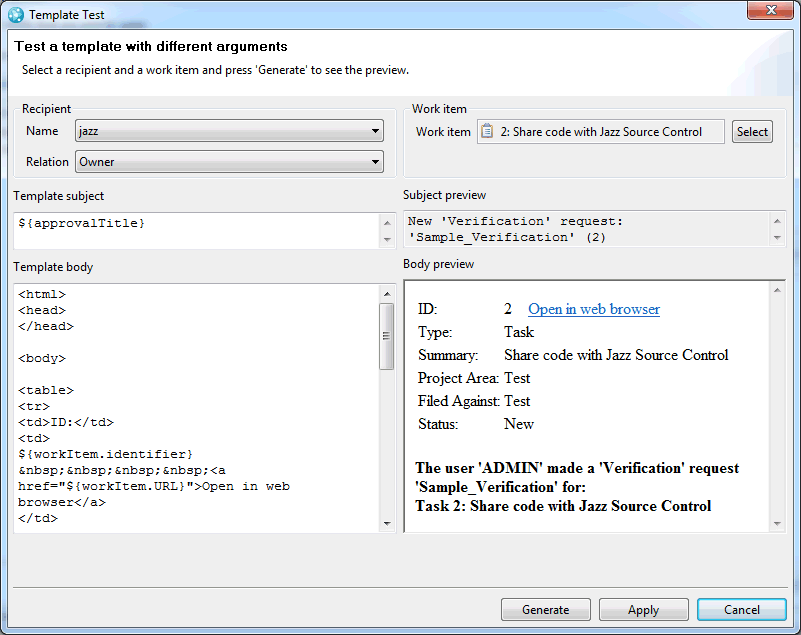
Add enumeration values
You can add new enumeration values if you have the necessary permissions. Enumerations can be defined in the process specification or in the database (new in 4.0). The advantage of defining an enumeration in the database is that you can configure the permissions to add new values independently from configuring the permissions to change the process specification. The permission to make changes to the process specification is typically restricted to a project administrator role, while the permission to add an enumeration value can be less restricted.
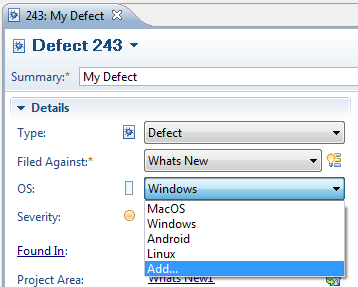
Select enumerations from the enumeration list
A new attribute-type enumeration list represents collections of enumeration values. You can use the list to select any combination of different enumerations. You can configure a new editor to display the attributes of that new type.
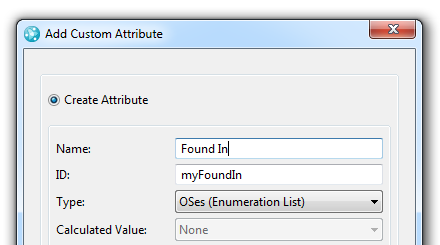
The new attribute-type enumeration list replaces the multi-list presentation. It contains support for queries and printing.
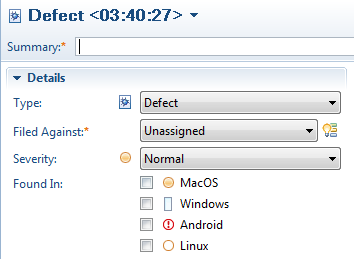
Store strings by using the String List attribute
String List is a new work item attribute type that stores a list of strings. You can connect the attribute with a value set provider to get the possible values for the string list from a remote or custom data source.
To add an attribute of the String List type, in the process configuration editor, click Project Configuration > Configuration Data > WorkItems, and select the Types & Attributes page. Select a work item type from the list and click Add in the Attributes section to add a new attribute. The new String list type is displayed in the type list for the new attribute. You also must add a matching editor presentation for the new attribute from the Editor Presentation page.
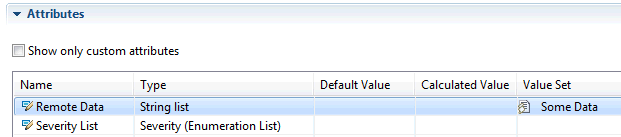
From the editor, you can select New or Add to view and select entries from the connected value set provider.

Add and remove subscribers from multiple work items
In the Eclipse client, you can add and remove the logged-in user and other users to and from work items. To add or remove users, select one or more work items and click Subscriptions >Manage Subscriptions.
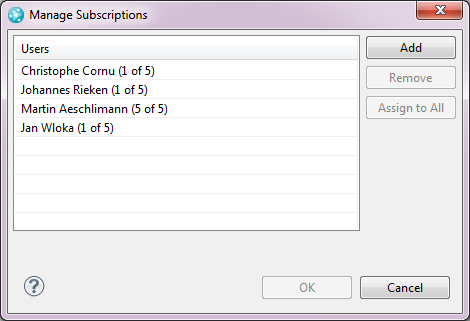
Upload attachments by using HTML5 drag and drop
If you use Firefox 4 or later or Google Chrome, you can upload attachments to a work item by dragging one or more files from the desktop to the work item.

Archive enumeration values
You can archive enumeration values on the work item customization pages. Click Project Area editor > Process Configuration > Configuration Data > Work Items > Enumerations. If you archive enumeration values instead of removing them, any values that are being used can still show a human-readable name instead of an ID. Archived values are not displayed in areas where the value can be changed, such as in the work item editor. However, you can write queries that search for archived values.