
IBM Rational Requirements Composer
Definition � Management � Analysis
Rational Requirements Composer 4.0 "New and Noteworthy"
This is a summary of the main new features and improvements in the 4.0 release of Rational Requirements Composer.
Rational Requirements Composer is an integral part of the Rational solution for Collaborative Lifecycle Management (CLM), which provides seamless integrations for application lifecycle management with reduced cost of ownership and administration, improved cross-product visibility and reporting, and lifecycle integrations.
For information on new features and changes in other parts of the Collaborative Lifecycle Management solution, see the Jazz Foundation 4.0 "New and Noteworthy", the Rational Team Concert 4.0 "New and Noteworthy", the Rational Quality Manager 4.0 "New and Noteworthy".
Table of contents:
Clustering for high availability
Graphical links explorer for traceability
- New write-access permissions
- Team ownership overview
- Artifact editors
- Context menus in query results
- Team area assignments shown in the filter by folder area
- Link creation and edit permissions
Identify and create requirements
Requirements Interchange Format (ReqIF)
- Simple URL
- Multiple file uploads
- Tree view
- Query multiple folders
- Artifact type icons
- Link to saved filters
- Integrity of links after artifact deletion
Clustering for high availability
Clustering provides high availability with automatic failover. To find out how to obtain the necessary supporting programs for clustering and how to deploy the Rational solution for CLM in a cluster, see the High Availability with Rational solution for CLM 2012 Clustering article on jazz.net and the Setting up a clustered environment infocenter topic.
Server rename
In V4.0, you can change the public URLs of one or more of the servers or applications in your deployment. In previous releases, changing a public URL after deployment was not possible. While planning a deployment and choosing stable URLs is still highly encouraged, there are some situations which require a URL change because other techniques for preserving URLs, such as DNS and reverse proxy, are not sufficient. For example, these situations likely require a URL change:
- Cross-geography relocation
- Reorganization
- Acquisition
- Dropping a domain name
- Data center consolidation
- Alignment with corporate naming policies
For additional information on server rename, please see the Changing the public URL using server rename infocenter topic and the related jazz.net article.
Graphical Links Explorer
You can now visualize traceability links graphically by using the graphical links explorer, as shown in the next image. To open the graphical links explorer for one artifact, use the Links sidebar of the artifact. To open the graphical links explorer for several artifacts, use the artifact list.
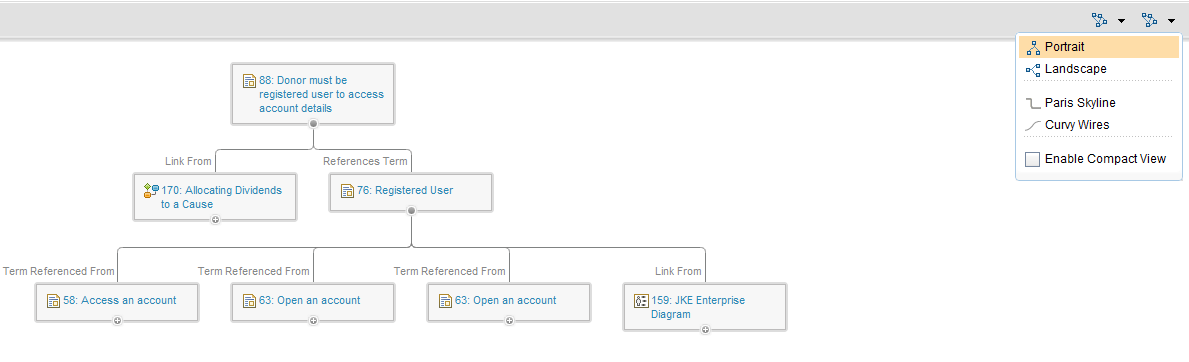
In the graphical links explorer, you can edit the title of an artifact, add new links, or delete links.
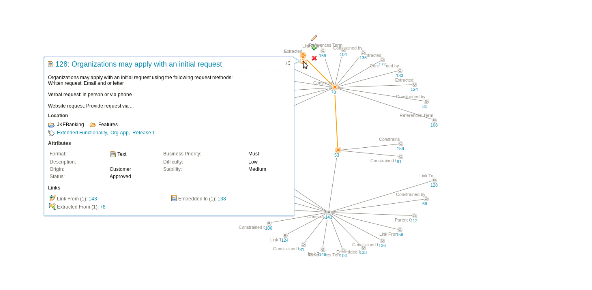
The graphical links explorer supports three layouts. When you hover your cursor over a node, the rich hover for the requirement that the node represents is displayed.
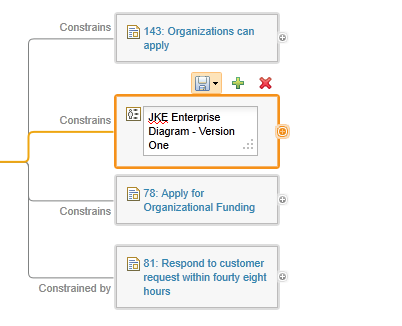
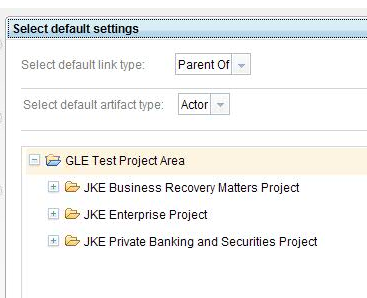
Graphical links explorer has a quick create mode, where you can create artifacts similar to how you would in a concept map editor. When you enable quick create mode, you are prompted for default link type, artifact type, and directory. After you specify that information, you can click the Add link icon on the toolbar of the tree nodes to create a blank artifact. The blank artifact is represented by a tree node that is in edit mode.
Suspect Links
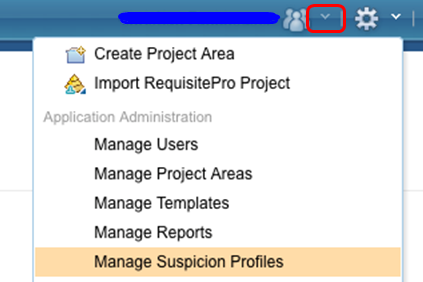
You can use suspect analysis to discover changes across traceability links among requirement and other lifecycle elements, including between test and requirement artifacts, and between development and requirement artifacts. In the Suspicion Profile Administration application, you can define suspicion in project areas across the applications in the Rational solution for Collaborative Lifecycle Management (CLM). To open the Suspicion Profile Administration application, from the Administration menu, click Manage Suspicion Profiles.
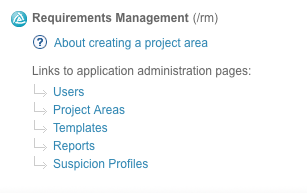
You can also access the Suspicion Profile Administration application from the Jazz Team Server administration page. In the Requirements Management section, click Suspicion Profiles.
The following image shows the home page of the Suspicion Profile Administration application:
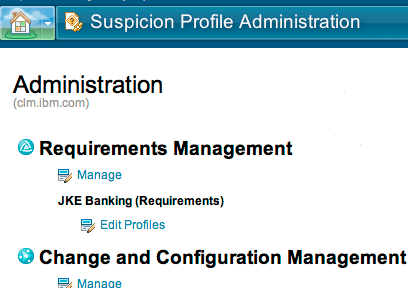
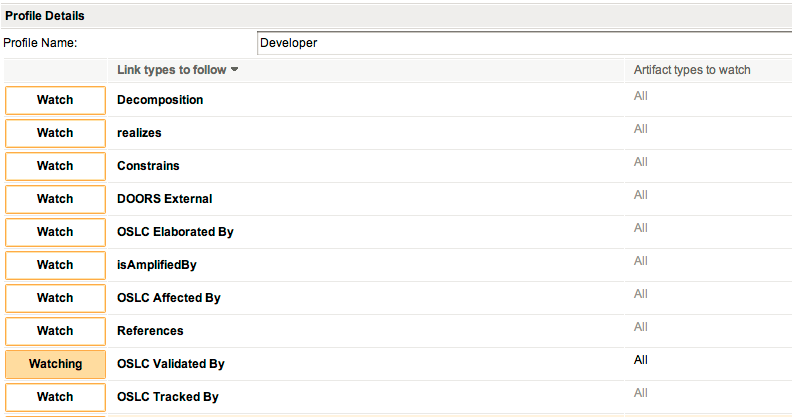
You can define multiple suspicion profiles for each project area. To define a suspicion profile for a project area, from the home page of the Suspicion Profile Administration application, click the project area name.
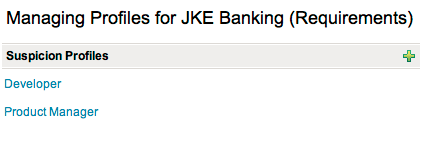
For each suspicion profile, you can define the link types that will participate in suspicion and the end-point artifact types and attributes
After you define your profiles, when an artifact is marked as suspect, it is flagged with an icon in the Overview section
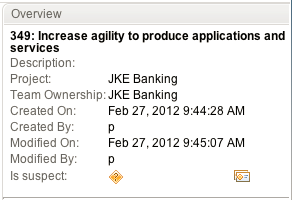
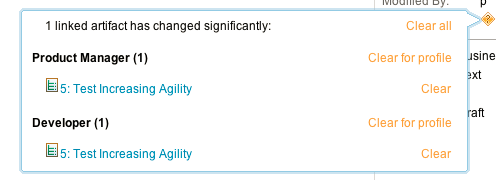
To see more information about the source of suspicion, hover your cursor over the suspicion icon.
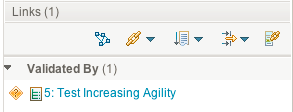
Links that are suspect are also flagged with the suspicion icon.
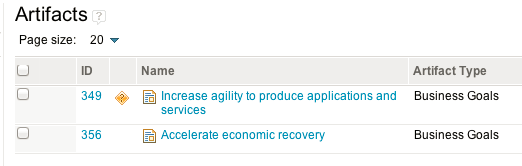
To view suspicion in the artifact list, use the Suspicion column.
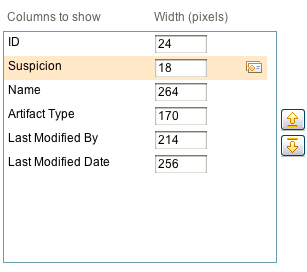
If an artifact is suspect, the suspicion icon is shown next to the artifact.
The requirements view widget also shows suspicion:

Write Access Control
New write access permissions
You can configure process permissions for each project area and for individual team areas in a project area. You can configure the create, modify, and delete permissions for folders, artifact types, and link types. You can also specify whether users can modify the team ownership assignments that are associated with each folder and artifact. For artifact types and link types, you can configure the permissions at various levels of granularity. For example, for artifacts you might configure the following permissions:
- Can create artifacts
- Can create artifacts, but not Vision artifacts
- Can modify artifacts, but not the Priority attribute for Business Goal artifacts
- Cannot delete Vision artifacts
For links, you can configure permissions such as "can create links," "can create links, but not Decomposition links," or "cannot delete Decomposition links."
Each project area might be associated with one or more team areas. You can configure the default permissions at the project level. To configure permissions, go to the Team Configuration area in the Permissions section of the project. To assign finer-grained permissions, you can create a team area for the project in which you configure its permissions to be more specific to address your needs.
For example, you might want a particular folder to contain only certain kinds of artifacts. In this case, you might specify at the project level that the create permission is enabled for all of the artifact types, but for a particular team area, the create permission is enabled only for Business Goals. Then, you can associate a specific folder with the team area by right-clicking the folder and clicking Assign Team Ownership. As a result, users will be permitted to create only Business Goal artifacts in the folder.
The next image is an example of how to configure project-level write access permissions.
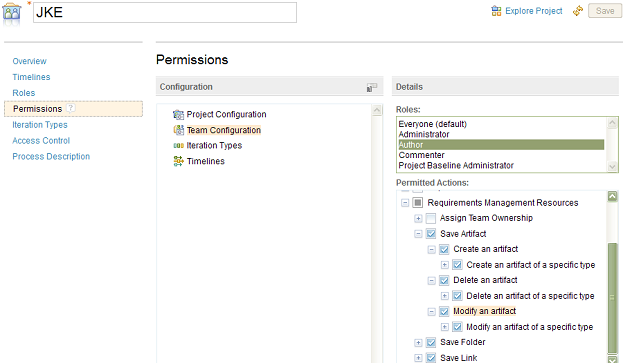
This image shows how to configure write-access permissions that are based on a team area.

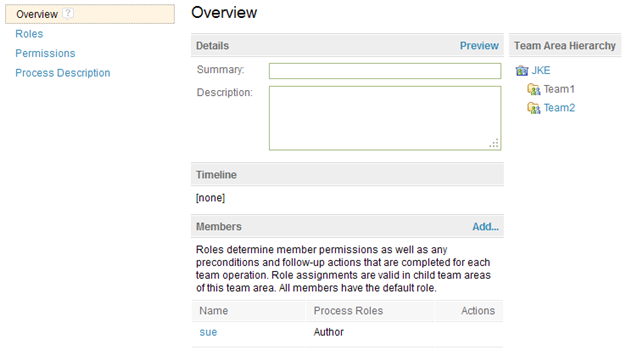
If you click Overview, which is displayed in the upper-left of the previous image, you can specify the team area members and their roles, such as author. If the user that you want to add is already a project member, you do not need to add the user as a member of the team area because he or she is implicitly a member of the team area. In the team area, the user has the same role that he or she has at the project level. If users are not members of the project, you must explicitly add them as team area members.
The next image shows an example in which a user named sue has been added with the author role to the Team1 team area.
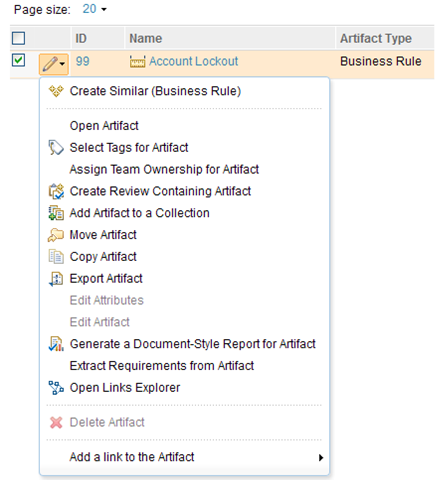
The folder and artifact context menus, which are displayed as rows in the artifacts list, accommodate the new write-access permissions. The next image shows an example in which the user does not have modify permissions for a folder, but does have create and delete permissions for a folder and permission to assign team ownership.

If you click Assign Team Ownership, a window opens, as shown in the next image
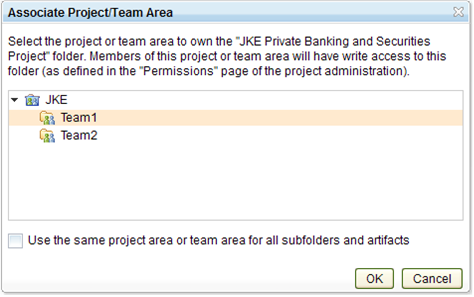
In the window, you can associate the folder with a particular process area, such as the project itself or one of the team areas of the project. You can also access this window from the context menu available for grid rows and from the Team Ownership field in the Overview sidebar section when you are editing an artifact.
The next image shows an example where the user cannot create, modify, or delete an artifact because of a permissions check. The permissions check is based on the artifact type; the assigned process area of the artifact, such as Team1; and the user's role in that process area.
The context menu that is associated with links contains menu items for link creation and deletion. Those items can be enabled or disabled based on permissions. For more details, see "Link creation and edit permissions."
In a row, you can edit only the cells of attributes that the permissions check determines that you are allowed to edit. If you use the context menu of a row to edit attributes, only the attributes that the permissions check determines that you can edit are displayed.
The next image shows a team area in which all Business Goal artifact attributes are editable except for the Priority attribute. When you use the context menu to edit the artifact, you can edit the status, but not the priority

Similarly, if you were to edit this row in-line instead of by clicking Edit Artifact in the context menu, the cell editor icon is displayed when you hover your cursor over the Status cell only.

If you open an artifact and edit it, the title, content area, and attributes of the artifact are enabled or disabled based on the permissions checks. As the following image shows, if you open the Business Goal artifact from the last example for editing, in the Overview sidebar section, you can edit the status, but not the priority.

When you move an artifact, the following write-access checks are now performed:
- The "move artifact" action is enabled only if you have permission to delete an artifact that is of the artifact type of the artifact from the containing folder. This permission is based on the process area of the containing folder.
- The "destination folder" is restricted to only those folders whose process areas support creating the artifact type of the artifact.

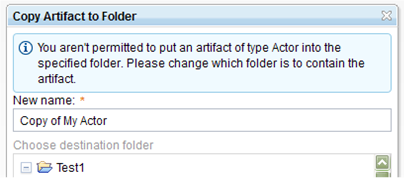
When you copy an artifact, the destination folder that you select is now restricted to a folder whose process area states that the artifact type of the source artifact can be created. For example, to copy an Actor artifact, the process area of the target folder must have "Create an artifact / Create an artifact of a specific type / Create Actor artifact" enabled.
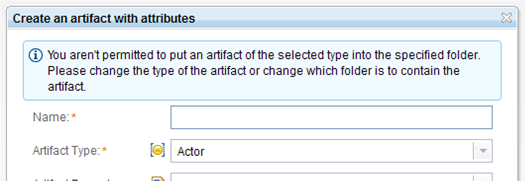
When you create an artifact, you are now restricted to only to artifact types that are enabled for creation in the process area of the target folder. For example, to create an Actor artifact, the process area of the target folder must have "Create an artifact / Create an artifact of a specific type / Create Actor artifact" permission enabled.
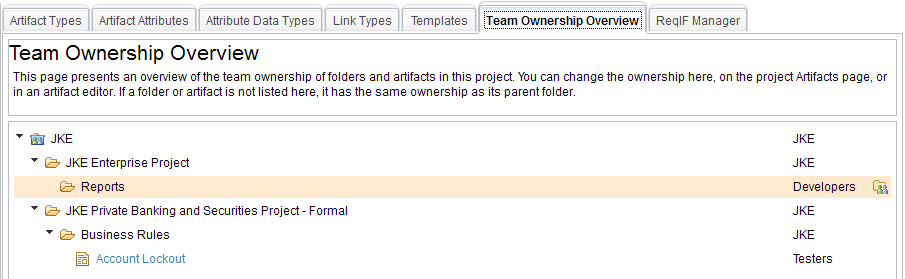
Team Ownership Overview
The Administration page has a new tab for administering team area assignments: Team Ownership Overview. You can reach this tab from the Administration menu by selecting Manage Project Properties.
On the tab, the tree view shows the differences in team area assignments for folders and artifacts. For example, if a folder contains a different team area assignment than its parent folder, the child folder is listed in the tree. Likewise, if an artifact has a different team area assignment than its containing folder, the artifact is listed in the tree. The following image shows both of these cases.
You can reset the team area assignment by clicking the button that is to the right of every tree node. When you click the button, the Associate Project/Team Area window opens. This window is the same window that you use when you reset team area assignments by using the context menu for a folder or artifact.
Artifact editors
The artifact editors now detect the user's permissions when an artifact is in edit mode. For example, in the team area that is associated with the editor, if the "Modify the artifact's content" permission is not enabled, you cannot edit content of the artifact. Similarly, if the appropriate permissions are not granted, you cannot edit an artifact by using the input controls in the Overview section, such as Description and Priority. If the "Modify the artifact's public tags" permission is not enabled, you cannot edit the public tags of an artifact.
Context menus in query results
In the artifact list, and the collection editor, the context menus use your permissions to determine the menu items to display. However, this behavior occurs only when one row is selected. For example, if you are editing an artifact in a collection and the "Modify the artifact's content" permission is not enabled, the context menu looks like the following image.
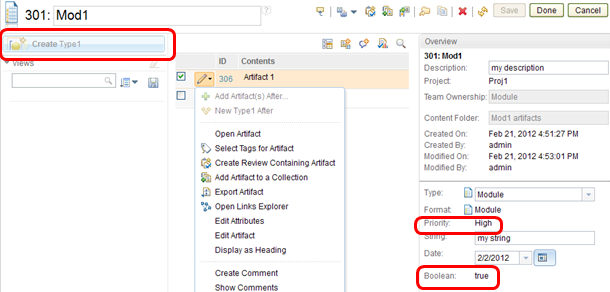
As shown in the image, the following attributes that are based on the team area permissions are disabled:
- "Modify the artifact's content:" The Create button and a few menu items are disabled.
- "Modify the Boolean attribute:" The Boolean field in the Overview section is not editable.
- "Modify the Priority attribute:" The Priority field in the Overview section is not editable.
In the artifact list and Collection editor, the edit permissions for individual cells are calculated based on the settings for the team area of the artifact, the type of the artifact, and the attribute that is being edited. For inline editing, if you do not have certain permissions, the edit controls are not shown when you hover your cursor over the area to edit. The following image shows the menu for a user who has permission to edit.

The next image shows the menu for a user who does not have permission to edit.

Team area assignments shown in the Filter by Folder area
In the Filter by Folder area, you can see which Team Area owns a folder by using the context menus of the folders. For example, the following image shows that the Reports folder is owned by the Developers Team Area.

Link creation and edit permissions
When you create a link, the permissions for creating, editing, and deleting links are enforced on both ends of the link.
Link permissions are set for team areas. As the next image shows, you can set link permissions in the Jazz Team Server Admin UI.

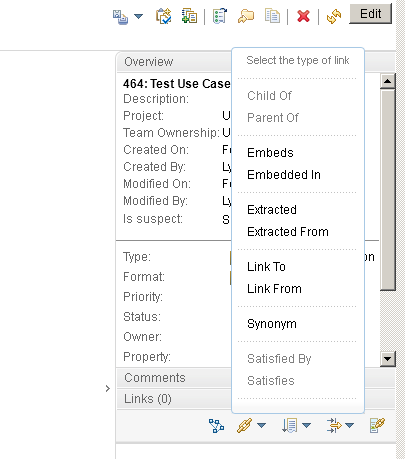
If you do not have permission to create a link on both ends, you cannot create the link. The next shows how link types that you do not have permission for are displayed in the link type selector.
The next image shows the warning that the artifact picker displays when an artifact that you select is of an artifact type that you do not have permission to modify.

Dashboards and widgets
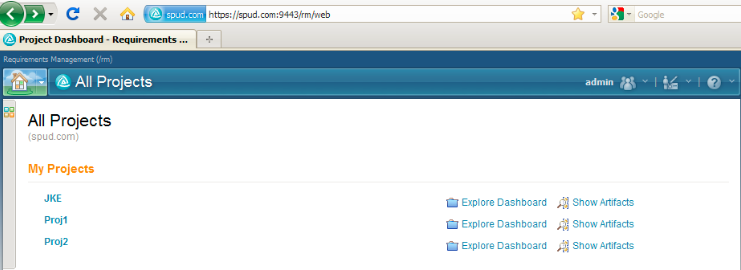
All Projects Dashboard
The entry URL to the web client, https://yourhost.com/rm/web, now opens a Requirements Management (RM) All Projects dashboard
In order to create a personal dashboard, you can use the user dashboard provided by Jazz Foundation. You can create and access your user dashboard by clicking the Home button. In the Jazz Foundation dashboard, you can include all of the requirements management widgets that used to be in the Requirements Management dashboard.
The Requirements Dashboard link that used to be in the banner area is replaced with a Project Dashboard link, which opens the project dashboard that is associated with the currently opened project.
New project dashboards can include the new My Requirements Projects widget.
Project Dashboards
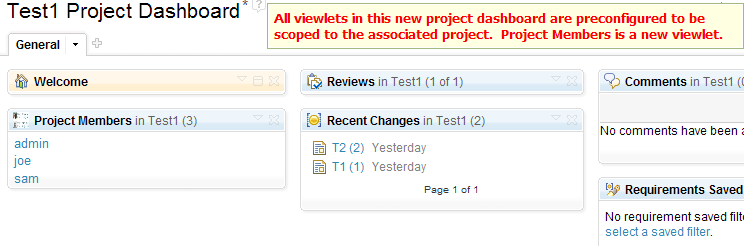
You can now associate dashboards with a project. New project dashboards are pre-configured to contain a Welcome widget and a set of RM-specific widgets that are scoped to the associated project. You can also add new widget that shows the project members. The following image shows these widgets on a project dashboard.
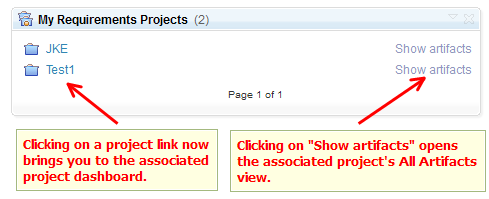
If you click a project link from the Home menu or the My Projects widget, the associated project dashboard opens. From a project dashboard, you can open All Artifacts view of the associated project by clicking Artifacts > Browse Artifacts. As the next image shows, the My Requirements Project widget contains links to project dashboards. You can click the new "Show artifacts" link to open the All Artifacts view of the associated project.
Requirements view widget
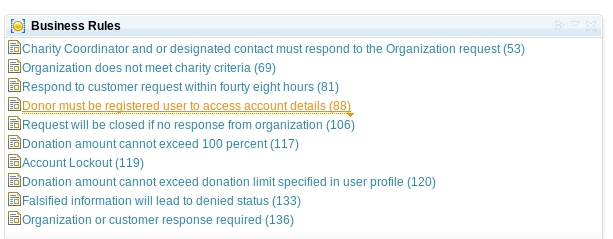
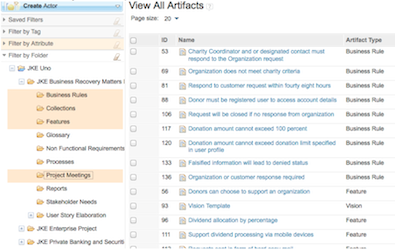
You can create a Requirements view widget to display shared or personal queries. For example, the following image shows queries that are related to business rules.
Team members widget
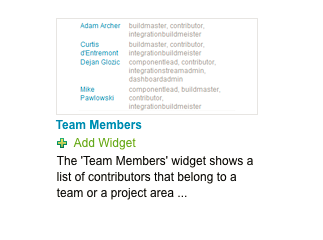
You can now use the Team Members widget and the Project Members widget to view the entire RM project and team members on your dashboards. In this release, the Project Members section is no longer on the Artifacts page of the project.
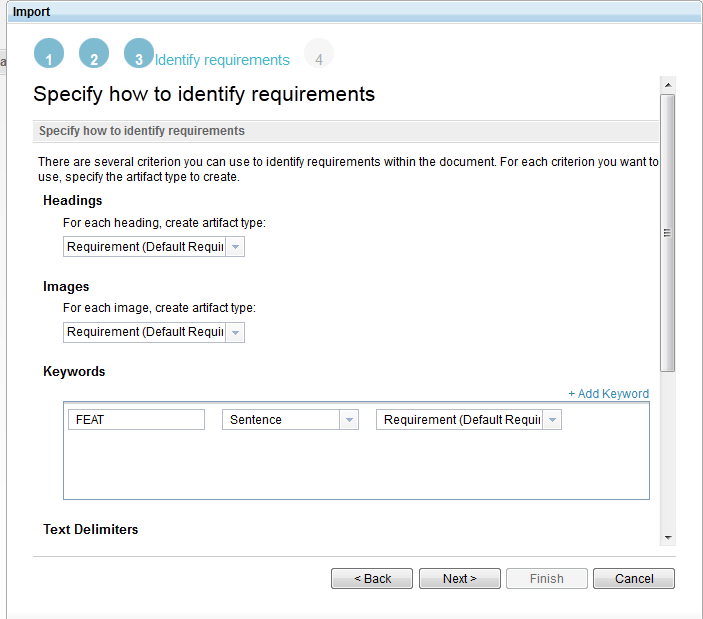
Identify and create requirements
By using a Microsoft Word, Open Document Text, or Rich Text Format document, you can now identify and create individual artifacts. You can specify artifact type for the headings and images in the document. You also use text delimiters when you identify requirements in a document to make into separate artifacts. You can mark up a document with text delimiters and then define those delimiters by using a wizard. Requirements are created from the text that is in the delimiters.
Requirements Interchange Format (ReqIF)
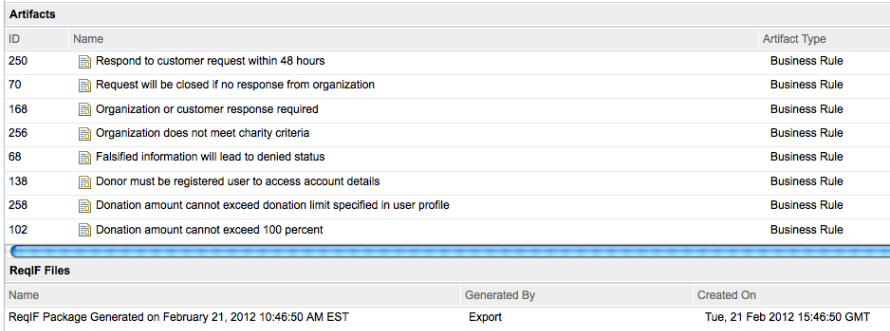
You can now import artifacts in a Requirements Interchange Format (ReqIF) file that was exported from Rational Requirements Composer or IBM Rational DOORS 9.4. You can upload a package file and import it at any time.

The ReqIF Manager tab lists all of the ReqIF files that are associated with a ReqIF definition. From this list, you can download a ReqIF file, view a report for that file, delete the file, and export a ReqIF definition.
The ReqIF wizard is now keyboard accessible. You can navigate the ReqIF import wizard by pressing the Tab key, and you can activate elements by pressing the Spacebar key.
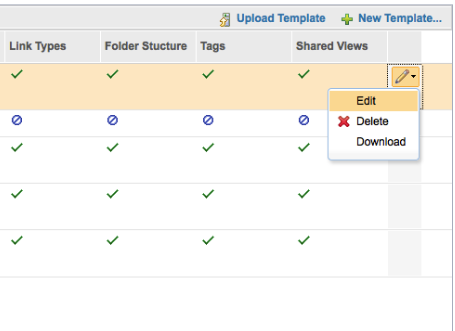
Project templates
On the Template tab of the project properties administration page, you can download and upload project templates. You can download a project from one repository and upload and use the project in another repository.
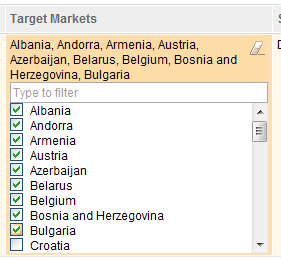
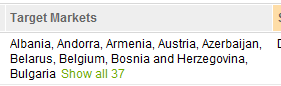
Multi-value attributes
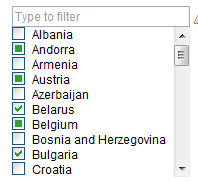
You can now handle long lists of multi-value attributes by using a filter. To reduce the number of entries that are displayed, type in the filter field. Only the entries whose titles contain the text that you typed will be displayed.
If you click a multi-value enumeration entry, press Shift, and click another entry, all of the entries between the entries that you clicked are selected. All of the entries will be changed to reflect the state of the newly selected one, so this can be used to select all and deselect all entries. If the entries are constrained by a filter, only the entries that match the filter visible are selected or deselected.
The multi-value selection window can be scaled to large numbers of possible values. You can filter the choices to allow the correct entry to be chosen, click and press Shift to select many options, and either truncate the values that are displayed or show all of them.
When you edit multiple artifacts from the grid and select a multi-value enumeration for editing, a list is displayed that shows which values are used in all of the edited artifacts (selected), which are not used (cleared), and which are used in some but not others (a filled box).
You can select or deselect values to add or remove them from all of the artifacts. When you add or remove values, the other values are not affected.
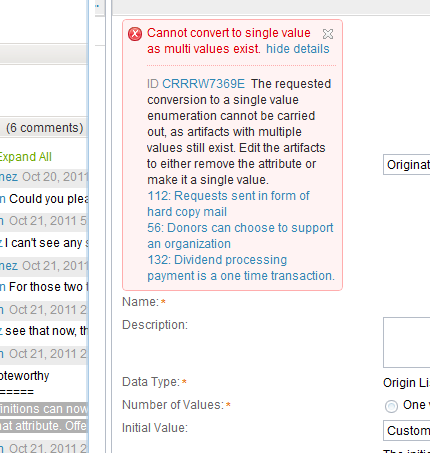
You can convert attribute definitions from single-valued to multi-valued and from multi-valued to single-valued. You can always convert attribute definitions from single-valued to multi-valued. However, you cannot convert attribute definitions from multi-valued to single-valued for an attribute, if any artifacts have multiple values for that attribute. As the following image shows, artifacts that have multiple values for an attribute are listed so that you can manually correct them.
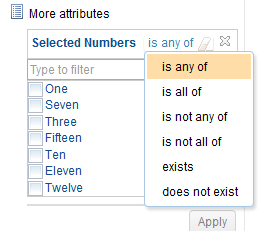
The queries with multi-value attributes support several filter operators.
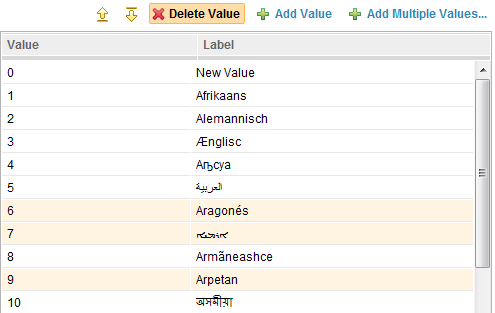
When an administrator is creating or editing enumerated lists of values for an attribute data type, the administrator can do these actions:
- Copy and paste a large list of items so that the items are added in bulk, rather than one at a time.
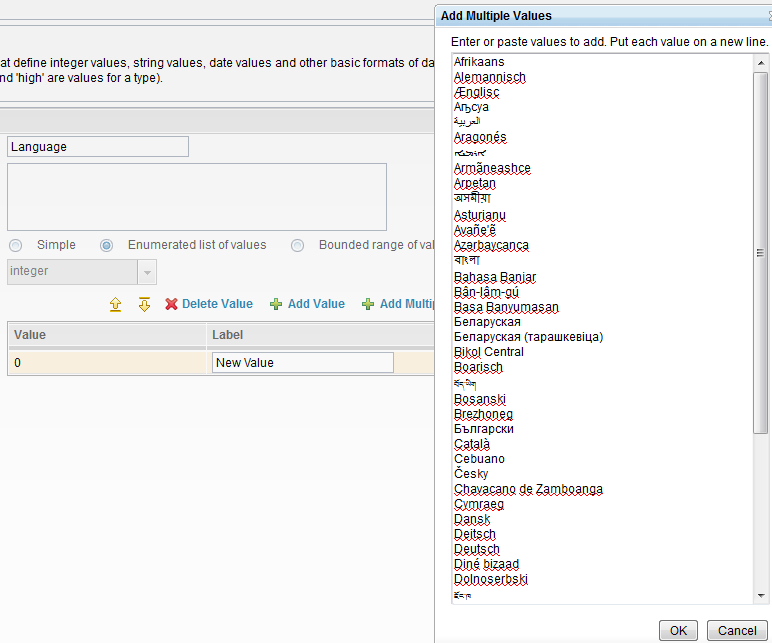
Select multiple values in the list to be moved or deleted.
Sample project improvements
Money that Matters, the JKE Banking sample, now contains new process guidance, artifacts, icons, and artifact types to support the 2012 scenario that is being self-hosted
Usability enhancements
Simple URL
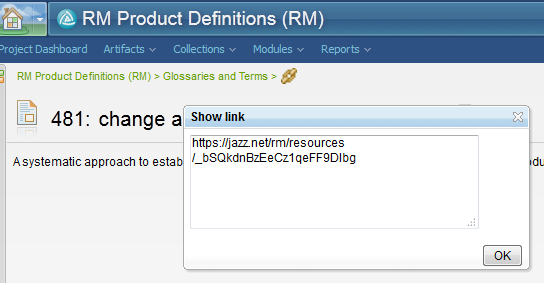
You can use the breadcrumb for each artifact to access the simple URL, or permalink, of an artifact. To copy the permalink to the clipboard, right-click the newly added icon at the end of the breadcrumb, and use the context menu of the browser. For Firefox, click Copy Link Location. If you click the icon, a window opens from which you can also select and copy the permalink to the clipboard.
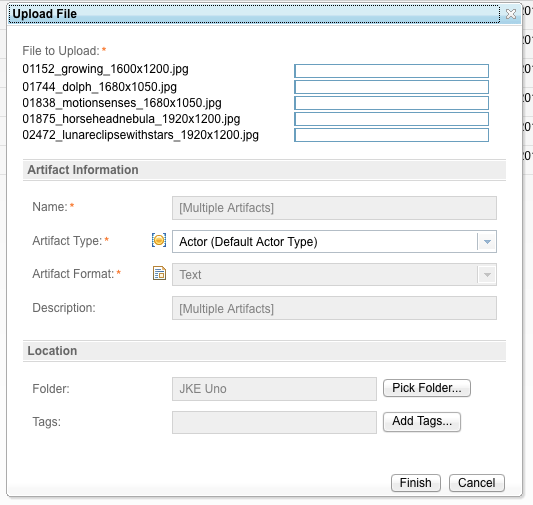
Multiple file uploads
You can now upload multiple files. In Firefox, you can upload multiple files by dragging and dropping them. In Internet Explorer or Firefox, you can select multiple files and then upload them in the Upload File window, as shown in the following image.
Tree view
You can now view a hierarchy tree for artifacts on the Artifacts page. The collapse/expand control is now merged with the left-most non-system column on display.
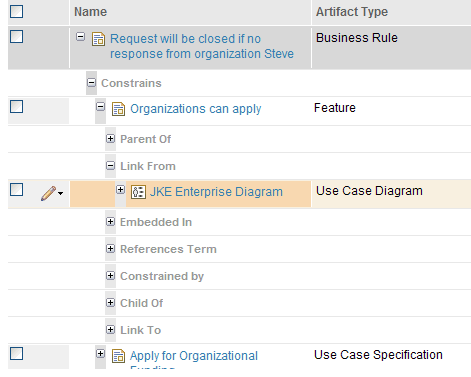
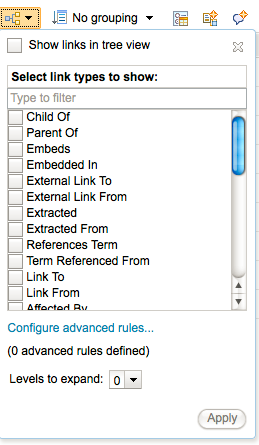
The hierarchy configuration has been simplified. In the simplified tree configuration window (shown in the image below), you can quickly apply and change link filters for the grid traceability view without having to create a specific rule. You can still add advanced rules, and you can combine rules with any link filters that are applied.
Query multiple filters
In the folders section, you can display artifacts from multiple folders. You can select multiple folders by pressing Ctrl + Click or Shift + Click. The results in the grid will match any of the selected folders.
Artifact type icons
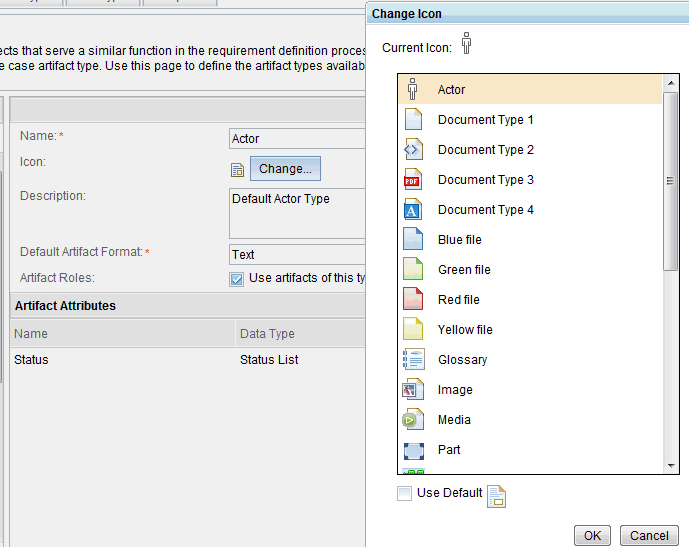
You can associate artifact types with a custom icon that is selected from a supplied system palette. After you select an image, all of the artifacts of that type are indicated by that icon.
Link to saved filters
As the following image shows, you can now get a link to a saved filter.

Integrity of links after artifact deletion
In Rational Requirements Composer V3.0.1, when an artifact was deleted, its links remained in the repository and were displayed as broken links. Now when an artifact is deleted, any links to other artifacts are also deleted. For example, artifact A is linked to artifact B. If artifact A is deleted, when you view artifact B, a broken link is not shown to the deleted artifact A.
This functionality applies only to links between RM artifacts that are on one RM server. For example, if a requirement is linked to a test case and you delete the requirement, the reverse link that can be seen in the test case is not deleted. The Rational Quality Manager provides a mechanism to address this case.
Accessibility
This release includes substantial accessibility improvements. Most of these improvements are in the areas of keyboard navigability and support for screen readers
The left and right sidebars are now keyboard navigable and can be expanded and collapsed using the keyboard. When focus is on a section header, you can move focus to the previous header by pressing the Left Arrow or the Up Arrow. To move focus to the next header, you can press the Right Arrow or the Down Arrow. In addition, when focus is on a section header, you can press the Home key to move to the first header and the End key to move to the last header. If you press the Spacebar, you can expand the section. To collapse a section, press the Enter key.
To navigate the items in a list, press the Up and Down Arrow keys. In most cases, you can press Tab to move to the next element and press Shift+Tab to move to the previous element. For example, you can press Tab and Shift+Tab to navigate in these areas:
- Views that are displayed in the Views section
- Tags that are displayed in the Filter by Tags section
- Various filters, such as Artifact Type, in the Filter by Attribute filter section
You can also use the Tab key to navigate sidebars and the separator control that separate them from the main content areas. When focus is on the separator between a sidebar and the main content, you can change the sidebars in various ways:
- To resize a sidebar, press the arrow keys.
- To minimize and maximize a sidebar, press Home and End.
- To restore a sidebar, press Enter.
If you press Tab to move to the angle bracket (> or <) in the separator, you can press the Spacebar key to expand or collapse the separator.
In most cases, you can use the keyboard to navigate all of the focusable elements on pages and their associated windows. In addition, the underlying DOM structure for the user interface supports screen readers for blind and visually challenged people.
Report defaults
You can now set a default page size and font for reports. For more information, see the Available Reports page at Jazz.net .