Rational Requirements Composer 4.0.6
Rational Requirements Composer 4.0.6 New & Noteworthy
Rational Requirements Composer is an integral part of the Rational solution for Collaborative Lifecycle Management (CLM). For new and noteworthy information about other parts of the Rational solution for CLM, see these pages:
- Jazz Foundation (Jazz Team Server) 4.0.6
- Change and Configuration Management 4.0.6
- Quality Management 4.0.6
New in previous versions of Requirements Management
For details about new features and functionality in previous releases, see these pages:
- Rational Requirements Composer New & Noteworthy 4.0.5
- Rational Requirements Composer New & Noteworthy 4.0.4
- Rational Requirements Composer New & Noteworthy 4.0.3
- Rational Requirements Composer New & Noteworthy 4.0.2
- Rational Requirements Composer New & Noteworthy 4.0.1
- Rational Requirements Composer New & Noteworthy 4.0
New in Requirements Management 4.0.6
- Module improvements
- Preferred module content
- Faster artifact creation
- Updates to the blue Create button and menu
- Additional editing functions when a module row is in edit mode
- Heading information provided when you add an artifact
- Changes to the row edit menu
- Ability to change a module row's artifact type or row style
- Menu items can be disabled based on permissions
- New icons for headings and subheadings
- Improved module load times
- Artifact creation: Set initial content
- More artifact information on pages and in menus
- Extension API improvements
- Client extensions documentation on Jazz.net
- Locking improvements: Unlock only the artifacts that you locked
- Review improvements
Module improvements
Preferred module content
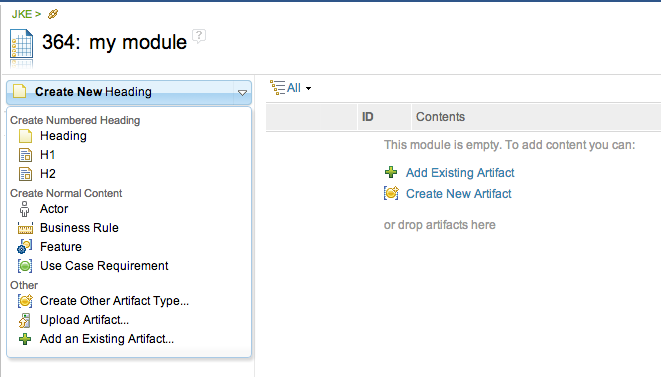
When you create an artifact type that is based on the Module format, you can specify the types of artifacts to use in that module in the new Preferred Module Content field. Then, when other team members add artifacts to modules, the preferred artifact types are presented by default.
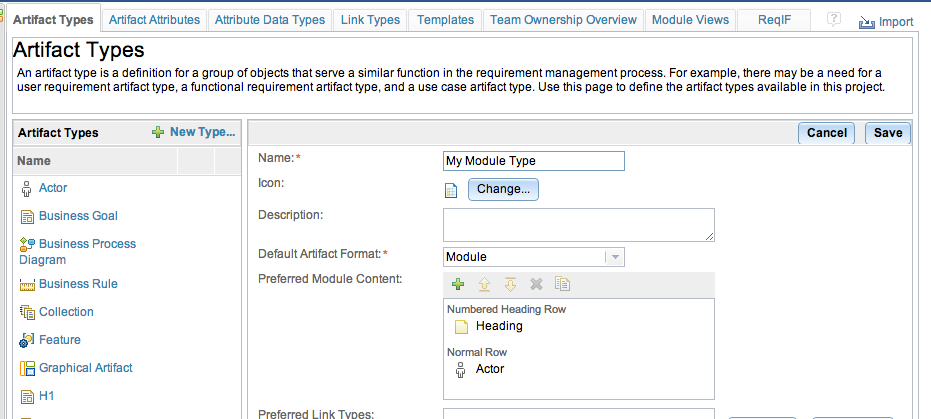
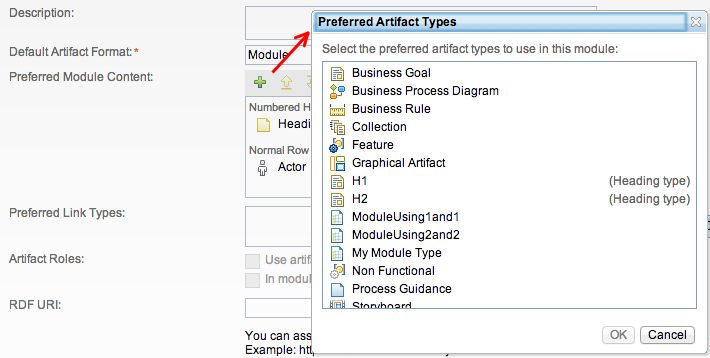
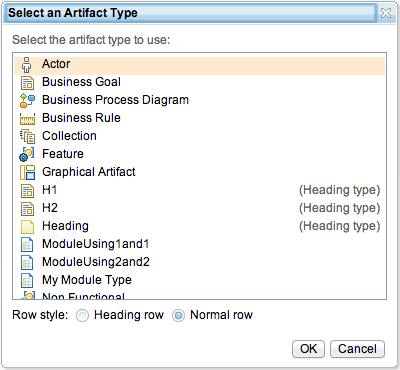
In the above example, the preferred artifact types include the Heading and Actor types. To add more preferred artifact types, you can click the Add Artifact Type icon. In the window that opens, you can select one or more artifact types to include, as shown in the next image.
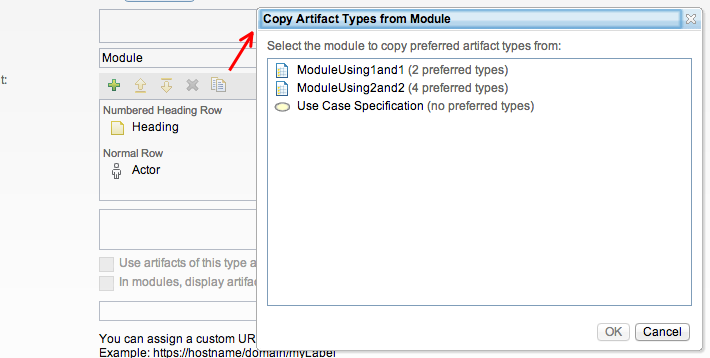
Whenever a new artifact type is added to the list of preferred types, the artifact type is automatically added to either the Numbered Heading Row section or Normal Row section, depending on whether the In modules, display artifacts of this type as headings by default check box is selected for that artifact type. To copy over all preferred artifact types from another module, click the Copy From icon.
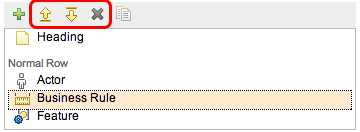
You can change the order of the preferred artifact types or remove them by using the Move Up, Move Down, or Delete icons.
The order of preferred artifact types is important because they are shown in the same order in several menus, including the drop-down menu from the blue Create button, the artifact row menu, and the Type menu on the inline editor toolbar for modules.
Faster artifact creation
As of this release, when you click Insert New Artifact, a new row automatically opens in edit mode. In earlier releases, when you click Create New Artifact, the Create Artifact window opens and you must enter information about the artifact.
Updates to the blue Create button and menu
The menu from the blue Create button in modules is updated. When you click that button to expand the menu, the menu shows the same artifact types and order that are in the Preferred Module Content field of the underlying module artifact type.
If you select one of the preferred types from the menu, a new row of that type opens in edit mode. The placement of the new row depends on where the cursor was focused was just before you clicked the menu item. If the cursor was focused on another row, the newly opened row is placed after that row. Otherwise, the newly opened row is placed at the end of the module.
Additional editing options when a module row is in edit mode
In modules, the inline editor toolbar now has a new Type section. From that section, you can promote or demote the associated artifact within the module. You can also change the type and row style of the artifact.

For instance, you can change a row from a heading row to a normal row. In this example, the row defaulted to the first preferred type, which is Heading.

If you select the Actor menu item, the artifact becomes an Actor artifact, which is displayed as a normal row.

If you do not want to use a preferred type, or if you want to explicitly specify which row style to use, click Other Artifact Type or Row Style. In the window that opens, you can select the type and row style to use.
Heading information provided when you add an artifact
When you add an existing artifact to a module, the window that you select the artifact from now shows icons that represent whether an artifact type is a heading. This visual cue can help you find artifacts of a particular type or quickly determine what row style will be used when the artifact is added.
![]()
Changes to the row edit menu
In the edit menu of a module row, the menu options have changed. The first two menu items are reversed in order and their names have changed. The first two items used to be Add Existing Artifact followed by Create New Similar. Now, they are Insert New Artifact followed by Insert Existing Artifact.
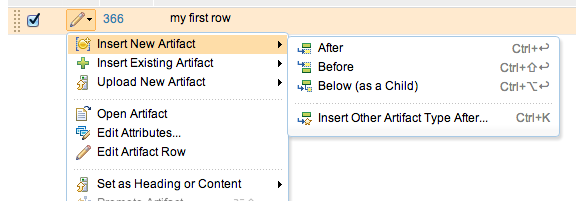
In addition, the Create New Artifact menu item, which existed in earlier releases to create an artifact of a different type, was removed. Now you can change the type by using the Type menu on the inline editor toolbar.
Ability to change a module row's artifact type or row style
From the edit menu of a row, you can now change the row's artifact type and row style. You can change the artifact type and row style of one row or multiple selected rows. The artifact types that you can select are the the preferred types for the current Module artifact type. You can also view a list of all artifact types by clicking More Options.
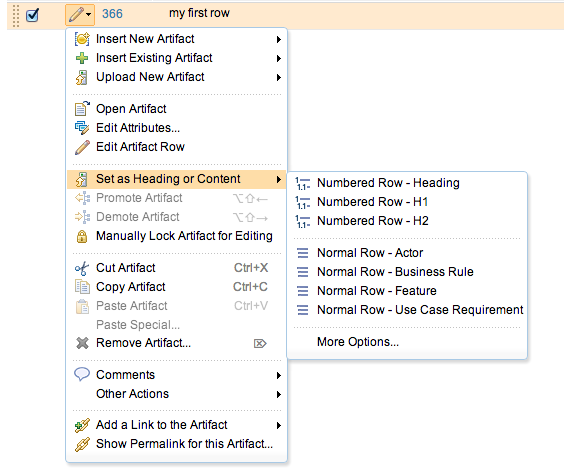
If you press the keyboard shortcut for this action, CTRL+H, a window opens that shows the preferred types of the opposite row style. If no preferred types of that row style exist, all artifact types are shown.
Menu items can be disabled based on permissions
When necessary, certain menu items in a module might be disabled depending on your permissions. For example, the blue Create button and some menu items in the row edit menu and in the editor toolbar might be disabled.
Menu items can be disabled because of either license restrictions or team area permissions. For example, if your account has only the RRC Contributor license, these options are disabled: the Create button, the Set as Heading or Content submenu from the row edit menu, and the menu from the inline editor toolbar.
On the other hand, if you have an RRC Analyst license but cannot create, modify, or delete particular artifact types, certain menu items in the Set as Heading or Content submenu and in the inline editor toolbar are disabled. You can hover over the disabled menu items to learn why they are disabled. In the following example, the user cannot use the menu items because he or she does not have permission to modify the artifact type of a use case requirement.

If that user selects Other Artifact Type or Row Style, a window opens in which the menu items to select a different artifact type are disabled. However, in that window, the user can select a row style.
New icons for headings and subheadings
To identify an artifact type with the heading row style, you can associate the artifact type with an icon that looks like a heading. New icons for heading and subheadings have been added in three colors: green, blue, and purple.
![]()
Improved module load times
The initial load time of a module is improved: most module load times are now reduced to within a few seconds. This improvement affects modules of all sizes on repositories that contain a large number of artifacts.
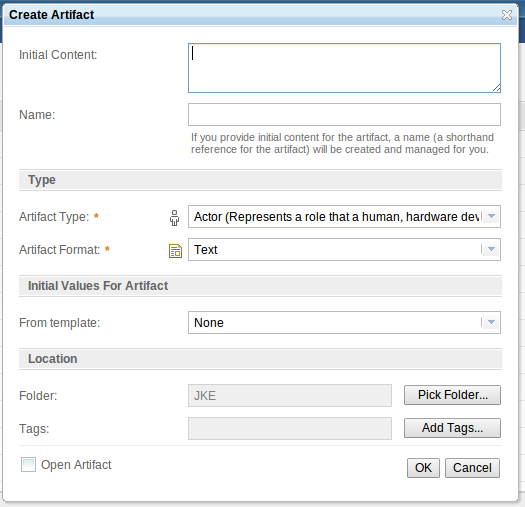
Artifact creation: Set initial content
When you create an artifact, you can now set its initial content. After the artifact is created, the text that you provided as the initial content is shown as the artifact's primary text. Setting the initial content is useful when you need to quickly create many artifacts that contain the same content. For example, you might set the initial content for artifacts that you are adding to a module.
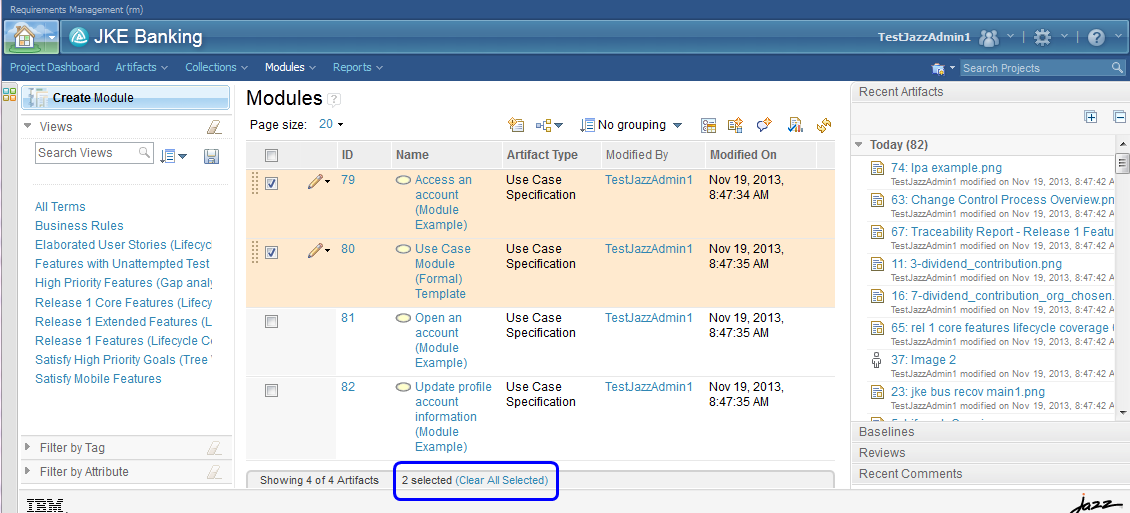
More artifact information on pages and in menus
Near the bottom of the Artifacts, Collections, and Modules pages, you can now see the number of artifacts that are on the page, the total number of artifacts, and the number of artifacts that are selected. That information is also shown near the bottom of the page when you are viewing an individual module or collection.
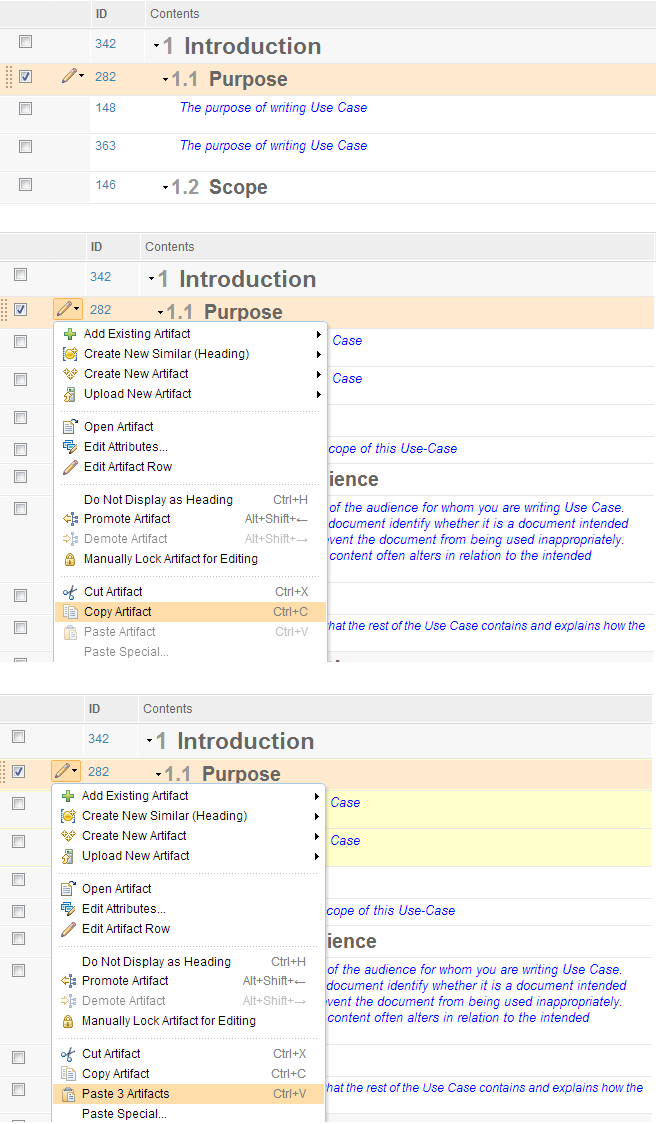
In addition, when you are copying and pasting artifacts in a module, the Paste menu item indicates how many artifacts will be pasted. When you copy an artifact, you also copy its child artifacts, if it has any. The indication on the Paste menu item helps you keep track of how many artifacts you are copying and pasting.
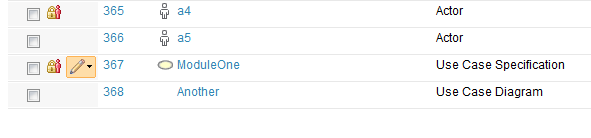
For example, as shown in the following image, when you copy artifact 1.1, you copy it and both of its child artifacts. As a result, when you paste, the Paste menu item indicates that you are pasting 3 artifacts.
Extension API improvements
You can now refer to attribute definitions and link types by specifying user-defined URIs.
Attributes
When you specify an attribute in an API call, you can use either the well-known attribute constant, such as RM.Data.Attributes.NAME; the display name, such as Status; or a user-defined URI for the attribute, such as https://company.com:9444/rdm/types/_unique_id. To see the list of user-defined URIs, go to the Project Properties page and view the entry for the attribute.
Link types
When you specify a link type in an API call, you can use either a LinkTypeDefinition object, such as RM.Data.LinkTypes.LINK_TO, or a string that indicates the label of the link type, such as Implemented By. Existing well-known link type constants are now instances of the LinkTypeDefinition object rather than strings.
You can also construct instances of the LinkTypeDefinition object to refer to custom link types by using this constructor: LinkTypeDefinition(uri, direction). The uri is the user-defined link type URI. The direction is the RM.Data.LinkDirection constant, with values of FROM, TO, or BIDIRECTIONAL. Those values indicate whether the link type distinguishes between directions in its labeling, and if so, which direction the link type is in. To see the list of user-defined URIs, go to the Project Properties page and view the entry for the link type.
Client extensions documentation on Jazz.net
The client extensions documentation is updated to include content that is specific to 4.0.6. You can access both the 4.0.5 and 4.0.6 content from the main page.
The 4.0.6 documentation includes these updates:
- In the API documentation, changes to the client extensions capabilities.
- Instructions to host and run client extensions, including information about creating a catalog of extensions that can be accessed from a dashboard. Administrators can use such a catalog to create a list of known extensions to make available to team members.
- More sample extensions that demonstrate capabilities and provide a starting point for developing your own extensions.
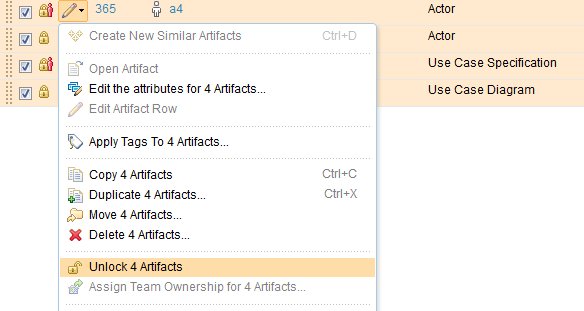
Locking improvements: Unlock only the artifacts that you locked
When you select several artifacts and try to unlock them, if any of the artifacts were locked by other people, you are prompted to override their locks. However, if you do not want to unlock those artifacts, you can now unlock only the artifacts that you locked.
For example, you might want to unlock four artifacts: two are locked by you, and two are locked by others.
When you try to unlock the artifacts, a message is shown.

Click Cancel. The two artifacts that you locked are unlocked, but the other two artifacts remain locked.
Review improvements
When you pause a review, you can add artifacts to the review that were created after the review's capture date.