
IBM Rational DOORS Next Generation
Definition � Management � Analysis
Rational DOORS Next Generation 6.0 New & Noteworthy
Rational DOORS Next Generation is an integral part of the Rational solution for Collaborative Lifecycle Management (CLM). For new and noteworthy information about other CLM applications, see these pages:
- Jazz Foundation (Jazz Team Server) 6.0
- Change and Configuration Management 6.0
- Quality Management 6.0
- Jazz Reporting Service 6.0
- Rational Engineering Lifecycle Manager 6.0
New in previous versions of Rational DOORS Next Generation
For details about new features and functionality in previous releases, see these pages:
- Rational DOORS Next Generation & Noteworthy 5.0.2
- Rational DOORS Next Generation & Noteworthy 5.0.1
- Rational DOORS Next Generation & Noteworthy 5.0
- Rational DOORS Next Generation & Noteworthy 4.0.7
New in Rational DOORS Next Generation 6.0
- Configuration management
- Global Configuration Management
- Configuration management information and activation
- Using global configurations
- Personal streams with global configuration management
- Linking with the Global Configuration Management application
- Managing References links between RM applications that support configuration management capabilities
- Searching and configurations
- Displaying the active change set
- Delivering change sets between configurations
- Comparing configurations
- Delivering a change set from the Change Set tab
- Comparing a change set to its flow target from the Change Set tab of the stream
- Accepting the changes from a parent stream and delivering them to a child configuration stream
- Selecting a subset of change sets to deliver
- Revision history of modules
- Finding configurations
- Assigning permissions
- Selecting change sets to deliver
- Linking between projects
- Add Configuration window
- Diagram editor
- Diagram features
- Extensive palette of shapes
- Shape alignment and distribution
- Navigation in large diagrams
- Guides and grid
- Properties
- Rich text in shapes
- Comments
- Links
- Undo and redo
- Inserting images
- Turning and flipping shapes
- Copying and pasting elements between diagrams
- Grouping and ungrouping elements
- Downloading diagrams as PNG files
- Viewing thumbnail images of diagrams
- Adding diagrams to modules
- Embedding diagrams in rich-text artifacts
- Setting preferences for the grid and guidelines
- Adding waypoints to straight lines
- Adding images to diagrams
- Setting default styles for lines and shapes
- Including diagrams in reports
- Importing and exporting diagrams and embedded images
- Accessibility features
- Keyboard shortcuts
- Selecting and moving elements by using the keyboard
- Creating shapes by using the keyboard
- Resizing shapes by using the keyboard
- Resizing lines by using the keyboard
- Creating connections by using the keyboard
- Using the keyboard to create connections to specific anchor points
- Using screen readers with diagrams
- Compare and merge feature
- Ability to view content for all modules in a comparison
- Improved scrolling
- Change set sharing
- Comparing modules
- Opening artifacts
- Merging attributes
- Reviews
- Creating reviews in context of a stream
- New behavior to open reviews
- Formal/Informal reviews removed
- Commenting in reviews
- Ability to pause and resume a review
- Streams and baselines in the review process
- Improved handling of reviews in large projects
- Reporting
- RM reporting services support for configuration baseline data
- Jazz Reporting Service
- Viewing audit history reports from previous releases
- Miscellaneous
- Baselines
- Resource recovery
- Permissions checking improvements
- Enhancements to web text editor
- Improvements to RM sample application
- Type-related permissions with multiple configurations
- Change sets no longer have a Completed state
- Licensing
Configuration management
Global Configuration Management
Begin your understanding of Global Configuration Management with these IBM Documentation topics:Configuration management information and activation
To learn how to get started with configuration management capabilities, see these resources:
- Watch the Introduction to configuration management video, which is part of a larger video series
- Read the Workflow for using configurations help topic
- When ready to move forward with enabling configuration management, read the considerations, and obtain an activation key.
Using global configurations
Rational DOORS Next Generation now supports nested global configurations. When a global configuration is selected within the Requirements Management (RM) application and that global configuration represents a hierarchy of contributions, all of the contributions in the hierarchy are included in queries, links, and other items. This includes contributions from other applications, such as the Quality Management (QM) application. When you add a contribution to a global configuration, you can select the RM application as a configuration provider.
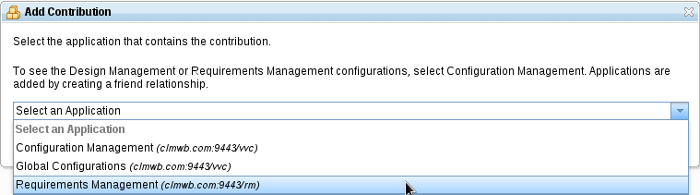
Figure 1: Selecting the RM application as a configuration provider
When the RM application is selected, the global configuration editor shows a custom delegated user interface for adding and replacing an RM configuration.
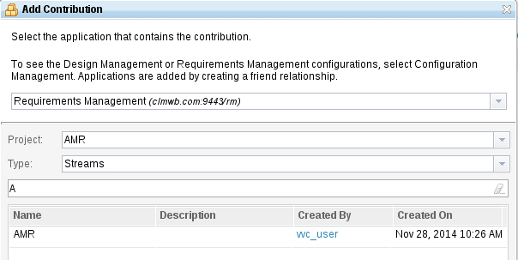
Figure 2: Selecting a configuration from the delegated configuration picker
Personal streams with global configuration management
If you make changes in Rational DOORS Next Generation and do not use change sets or your changes remain in your current Requirements Management (RM) project area, the following information does not apply.
If you use change sets and make changes to links to artifacts in other project areas, you need a global stream context that includes the other project areas. Global streams are defined in the Global Configuration Management application. You can now add a Rational DOORS Next Generation change set to a personal stream in the Global Configuration Management application.
You can now assign "create" and "modify" privileges for a global stream: all roles have both privileges by default. A shared global stream can have at most one personal stream per user.
If you have personal stream privileges, when you view a global stream, a field in the global stream details view is labeled Personal Stream. If you haven't created a personal stream for the shared global stream, the field provides a link to create a personal stream or you can create one from the context menu.

A personal stream acts the same way as a shared global stream. Because the shared global stream is a (hidden) contribution to the personal stream, any changes to the shared global stream are always reflected in the personal stream. You can add configurations to a personal stream, such as change sets, to test them without adding them to the shared global stream and possibly disrupting other users.
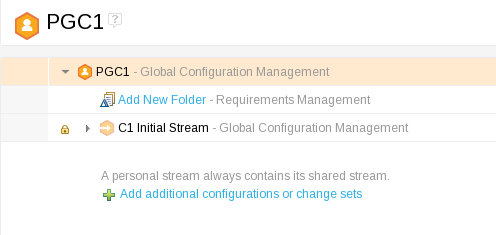
You cannot delete a personal stream, but you can clear and reset it by removing the current configurations and adding different ones.
Linking with the Global Configuration Management application
Link across applications through global configurations
Rational DOORS Next Generation supports linking across applications through global configurations. To make the best use of global configurations, familiarize yourself with global configuration management concepts: Overview of Global Configuration Management.
Links to and from other applications that support configuration management
You can link to artifacts in other CLM applications if those applications support configuration management, a global configuration is defined, and the project's configurations are added as contributors of that global configuration.
Cross-project links and global configuration
You can add, change, and remove cross-project links between projects that are in different configurations if those project's configurations are in the same global configuration.
Managing References links between Rational DOORS Next Generation and other RM applications
In a Rational DOORS Next Generation project that is enabled for configuration management, you can now create, display, and remove References links to artifacts in other RM applications. If the other RM applications are enabled for configuration management, a global configuration must be defined and the configurations from both projects must be added to that global configuration.
Programmatically creating and removing links between RM projects in the same global configuration
In the OSLC interface for the Rational DOORS Next Generation server, you can add and remove user-defined links between artifacts that are in different project areas, as long as the artifacts are in the same global configuration. To add links, you can use OSLC PUT or OSLC POST. To remove links, use OSLC PUT.
Searching and configurations
When you search, only the current configuration is searched. When you search from the Quick Search field, you are searching the selected project in the current configuration. If you want to search across multiple project configurations, they must all be in the current global configuration.
If the current configuration is a global configuration that includes two or more requirements configurations, and you select one of the artifacts in the search results, the artifact opens in the same global configuration, even if another configuration was set for the requirements project.
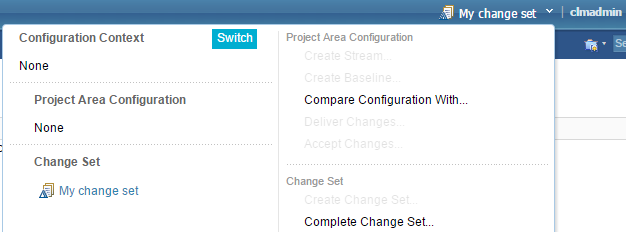
Displaying the active change set
The configuration context banner button shows the current configuration that you are working in. If the you are actively working in a change set after creating a change set or switching to a change set, the configuration context reflects that.
Delivering change sets between configurations
You can use the Configurations page to compare and deliver changes between two streams.
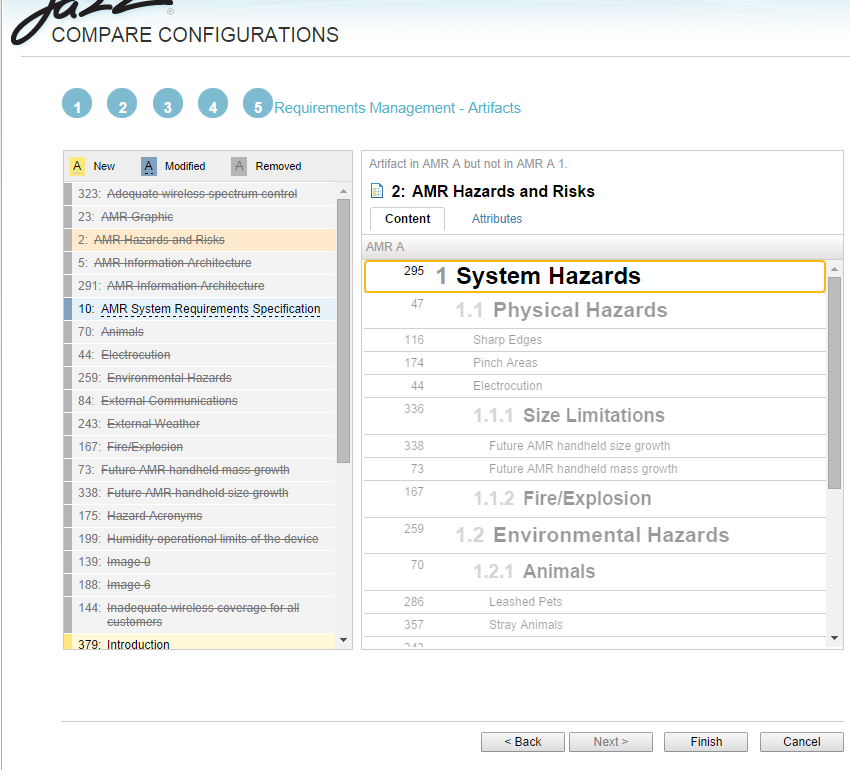
Comparing configurations
You can compare changes between two streams by using the banner button or the Configurations page.
Delivering change sets from the Change Set tab
You can deliver a change set to its flow target from the Change Set tab.
Comparing a change set to its flow target from the Change Set tab of the stream
You can compare the changes between the change set and its flow target from the Change Set tab of the stream.
Accepting the changes from a parent stream and delivering them to a child configuration stream
You can accept changes from a parent stream and deliver them to a child stream.
Selecting a subset of change sets to deliver
In previous releases, when you delivered several change sets between two streams, all the change sets and each dependent change set were displayed on one page. In this release, a new change set picker is available, where you can search for the change sets to deliver. These change sets are displayed in a paged list.
Revision history of modules
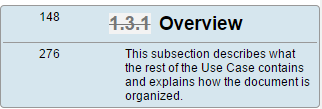
In this release, you can still view the revision history of modules by pressing the History toolbar button in the module editor. In 5.0.2 and earlier, the history for a module was organized by project baseline or module baseline. Each thumbnail in the timeline bar represented one baseline. In 6.0, those types of baselines were removed and replaced with CM baselines. So, that timeline now shows all relevant CM baselines made on the CM stream you are currently in.
You can hover over each thumbnail to view more information, such as the baseline's name and the date it was created. Click a thumbnail to see the module as it existed when that baseline was taken. Click the link that's displayed to see the module in the context of the chosen baseline in a new tab.
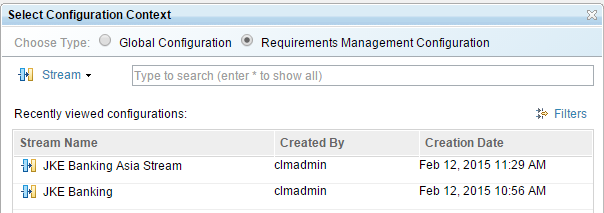
Finding configurations
Recently viewed configurations
When the dialog box opens, the project's recently viewed streams are displayed, sorted by creation date. To display recently viewed baselines or change sets, change the configuration type.
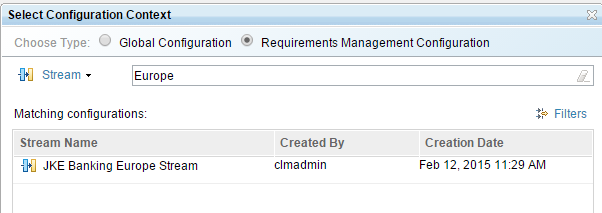
Searching for configurations
If a configuration does not appear because it was not recently viewed, you can search to find the configuration.
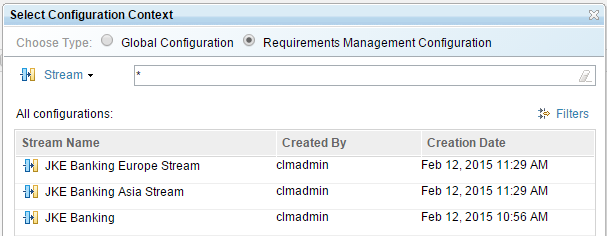
Wildcard searches
Wildcard searches are supported. To search for all instances of the selected configuration type, enter an asterisk (*) as a wildcard character.
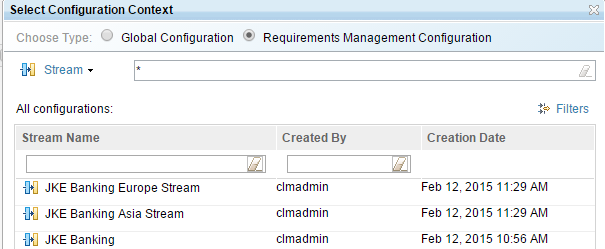
Filtering search results
To further filter the list of displayed configurations, use the filter toggle button above the configuration table to filter by the configuration name or the configuration creator.
Assigning permissions
New permissions exist for configuration management. These permissions are available on the Permissions page for a project area, in a new Configuration Management category. The permissions are grouped as follows:
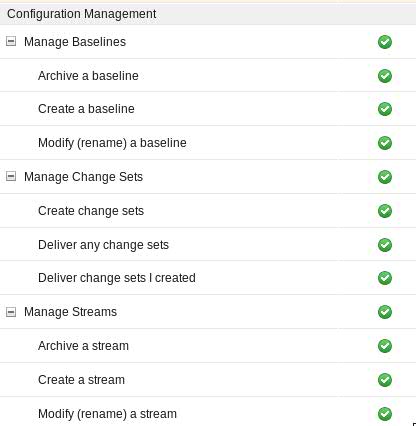
By default, the Configuration Administrator role can perform all of the actions. The Author and Administrator roles are assigned a subset of the permissions. Some of these permissions replace permissions that were defined in earlier releases. During an upgrade to this release, the roles that were assigned to the previous Create Project Baseline permission are assigned to the new set of Manage Baselines permissions.
Selecting change sets to deliver
Previously, if you delivered several change sets between two streams, all the change sets and dependent change sets were displayed on one page. A new paged list now enables you to search for and select the change sets to deliver, which improves performance when there are many change sets.
Linking between projects
When you link between one or more Requirements Management (RM) and Quality Management (QM) project areas, the system ensures that you can only link to project areas with the same configuration management status: either turned on or not turned on. This feature ensures that the linking behavior makes sense to users.
If an RM project has configuration management turned on, you can create, display, and delete these link types with Design Management project areas: Derives Architecture Element, Refined by Architecture Element, Traced by Architecture Element, and Satisfied by Architecture Element.
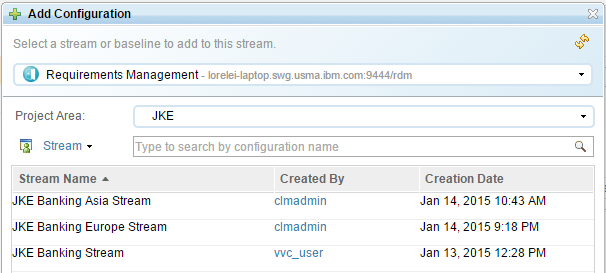
Add Configuration window
Each CLM application has an Add Configuration window. When you add an RM configuration to a global configuration, you can now view the configuration types in a menu.
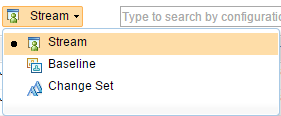
From the menu in the upper-right corner, you can sort configurations by name, creator, and creation date to find the configuration to add.
To filter a list of configurations, hover over the column heading to display the filter option. Click the filter option, and then select the filter criteria.

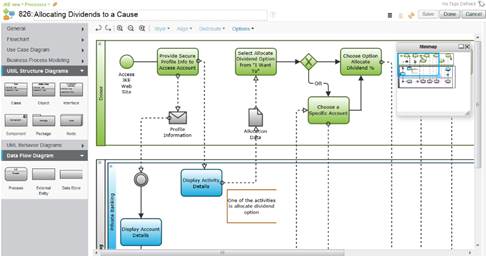
Diagram editor
This release of Rational DOORS Next Generation features a new diagram editor. This new editor works in all supported browsers without the need for any browser plug-in.
Note: Before the diagram editor can be used, an administrator should create at least one artifact type with the default artifact format set to Diagram. When artifacts of this type are created and edited, the new diagram editor opens.
Diagram features
After you click Edit, you are presented with a palette of shapes in a series of folders. You can drag the shapes onto the canvas, where you can move and resize them or connect them to other shapes.
Extensive palette of shapes
From the palette of shapes, you can create many types of diagrams. In addition to general shapes, such as rectangles, circles, and arrows, the palette includes shapes for flowcharts, use case diagrams, business process models, data flow diagrams, and UML diagrams.
Shape alignment and distribution
When multiple shapes are selected, the align and distribute options are enabled. You can align the group of selected shapes to the left, right, top, bottom, or middle. You can also evenly distribute them horizontally or vertically.
Navigation in large diagrams
To ease navigation in large diagrams, you can use the zoom feature or view a small-scale version of the larger diagram. To open the small-scale version, click the options menu on the toolbar.
Guides and grid
When you move and place shapes, you can use guides and grids, which are available from the options menu. When the grid is enabled, the background shows a dotted grid pattern and all elements are aligned to the grid as they are moved. Guides are useful for aligning an element to other shapes on the screen. While you move a shape, the guides are shown, indicating when the shape is in alignment with other shapes on the screen.
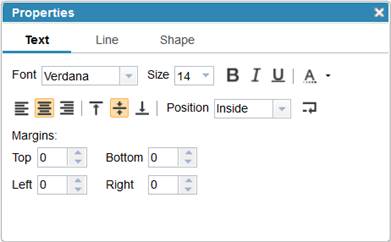
Properties
The shapes and lines on the screen have many properties that you can set, such as font name, alignment, background color, line style, and rounding. To set the properties, select one or more shapes or lines and open the property window by right-clicking. You can change any of the properties. The changes are applied when you click something else. You can set properties on multiple shapes at the same time.
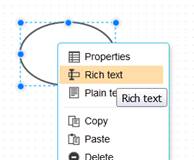
Rich text in shapes
By default, text in shapes is simple Unicode text, possibly separated by new lines. The diagram editor also supports limited rich text. To enable rich text, right-click a shape and select the rich text option. Then, when you edit the text of the shape, a rich-text toolbar is shown. From the toolbar, you can create numbered and bulleted lists and make text bold, italic, and underlined.
Comments
To create a comment in the diagram editor, right-click a shape. Comments for a selected diagram shapes are highlighted in the sidebar on the right.
Links
You can create links between shapes in a diagram and requirement artifacts. OSLC links can be made to the diagram only, not to individual diagram elements. To create a link, right-click a shape and click Add Link. Links for selected diagram shapes are highlighted in the sidebar on the right.
Undo and redo
For a given editing session, everything you do can be undone. To undo or redo changes, you can use the icons in the toolbar or the standard keyboard shortcuts.
Inserting images
You can now insert images into a diagram. The images must already be in the Rational DOORS Next Generation repository. To insert an image, from the toolbar menu, click Insert > Image. From the window that opens, you can select an image and optionally create a link between the artifact and the image in the diagram.

Turning and flipping shapes
You can flip or turn a shape in a diagram. Flipping or turning a shape does not change the orientation of any associated text; it affects only the shape. To turn and flip a shape, right-click it or press Shift+F10, and then select from the Transform menu.

Copying and pasting elements between diagrams
You can copy elements, such as shapes and lines, in a diagram and paste them in another. To copy and paste a shape, use the available keyboard shortcuts.
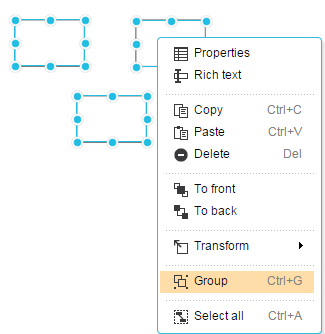
Grouping and ungrouping elements
You can group elements, such as shapes and lines, by pressing Ctrl+G or by right-clicking them and selecting from the menu. To ungroup elements, press Ctrl+Shift+U or right-click the grouped elements and select from the menu.
Downloading diagrams as PNG files
From the artifact toolbar, you can now download a diagram as a PNG file.

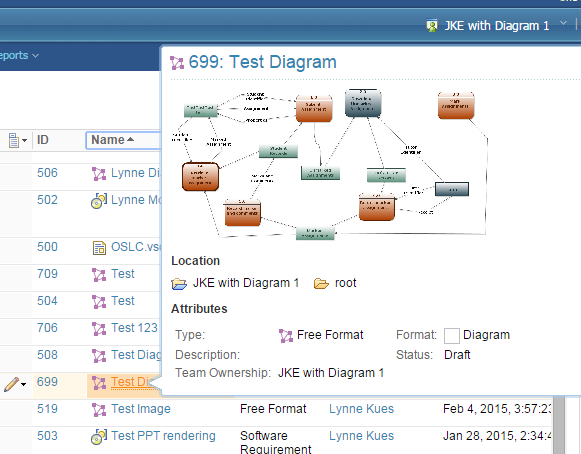
Viewing thumbnail images of diagrams
The rich hover for diagram artifacts includes a thumbnail image of the diagram.
Adding diagrams to modules
You can add diagrams as artifacts to modules. When you add a diagram, it is displayed as an image in the module, and the image scales to the width of the Contents column.
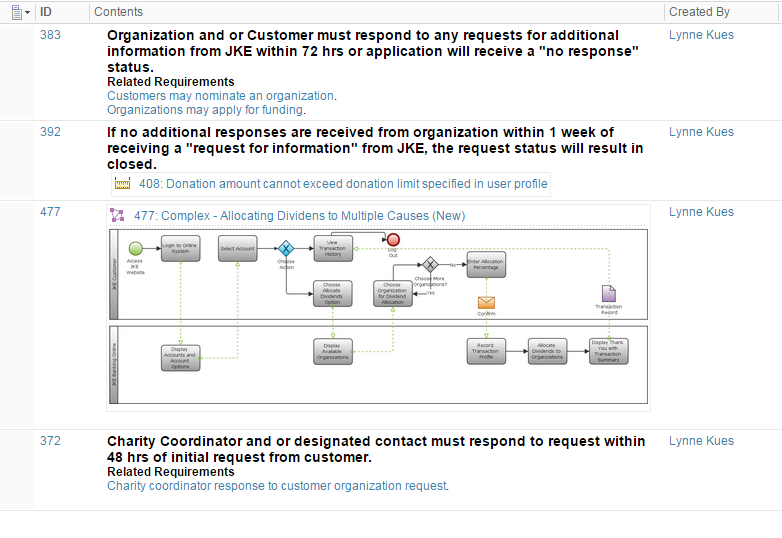
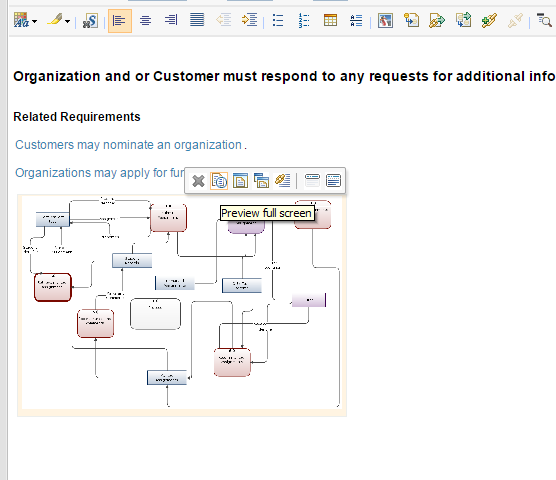
Embedding diagrams in rich-text artifacts
You can embed diagrams in rich-text artifacts. When you embed a diagram, it is displayed as a thumbnail image, but you can preview it in a full-screen size.
Setting preferences for the grid and guidelines
You can set a preference for displaying the grid and guidelines for diagrams. The grid and guidelines preference is available on the Options menu on the diagram toolbar. The preference is saved when you save the diagram, and is then applied to all diagrams in the same browser.
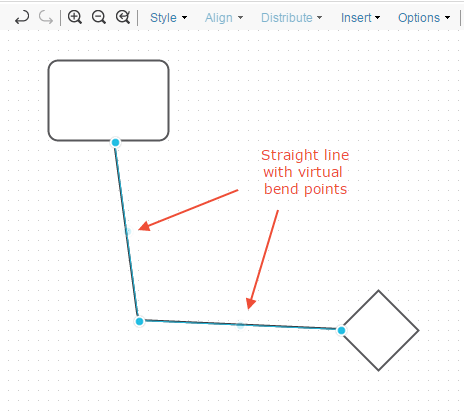
Adding waypoints to straight lines
Straight lines have virtual bend points that appear as semi-transparent points on the line. You can drag these bend points to add a waypoint to the line and change its routing.
Adding images to diagrams
You can add images to diagrams by using the Insert > Image
operation.
Setting default styles for lines and shapes
You can set a default style for lines and shapes in diagrams: select the object that you want as the default and use the context menu option to set it as the default style.
Including diagrams in reports
You can create reports for modules and rich-text artifacts that include diagrams. An image of the diagram is included in the report.
Importing and exporting diagrams and embedded images
Diagrams and embedded images are supported in ReqIF export and import operations.
Accessibility features
Keyboard shortcuts
- Undo: Ctrl+Z
- Redo: Ctrl+Y
- Copy: Ctrl+C
- Paste: Ctrl+V
- Duplicate: Ctrl+D
- Select All: Ctrl+A
- Group: Ctrl+G
- Ungroup: Ctrl+Shift+U
- Move selection: Ctrl and the Arrow keys
- Move focus: Arrow keys
- Select Element: Enter
- Select connected line: Ctrl+/, Ctrl+\
Selecting and moving elements by using the keyboard
You can select and move elements, such as shapes and lines, by using only the keyboard. To select a shape, use the Arrow keys to move the grey focus border, as shown in the following image.

Select the shape by pressing Enter, or add it to the selection by pressing Shift+Enter. To move the selection, press Ctrl and the Arrow keys.
When a shape has connected lines, you can rotate the gray focus indicator between the lines by pressing Ctrl+\ and Ctrl+/.

Creating shapes by using the keyboard
You can create shapes by using only the keyboard. Press Tab to go to a palette section; to open the section, press Enter. Highlight a shape by using the Arrow keys. To create the shape, press Enter. To move the shape, press Ctrl and the Arrow keys.

You can resize a shape by using the keyboard. When a shape is selected, press Ctrl+comma (,) or Ctrl+period (.) to rotate the selection around the control points. Press Ctrl+arrow keys to move the selected control point and resize the shape.
Resizing lines by using the keyboard
You can resize a line by using the keyboard. When a line is selected, press Ctrl+comma (,) or Ctrl+period (.) to rotate the selection around the control points. Press Ctrl+arrow keys to move the selected control point and resize the line.
Creating connections by using the keyboard
You can now create a connection between shapes by using the keyboard. To connect two shapes, select them both and press Ctrl+H.
You can also use the keyboard to move an existing connection to another shape. To move a connection, select the line and press Ctrl+comma (,) or Ctrl+period (.) to rotate the selection around the control points. To move an end point, select the end point and press Ctrl+arrow keys to move the point to another shape.
Using the keyboard to create connections to specific anchor points
You can create a connection to a specific anchor point on an object by using the keyboard. First, select the line between two connected shapes. Use Ctrl-Comma (,) or Ctrl-Period (.) to cycle to the control point on the shape for which you want to change the anchor point. Then, use Ctrl-Forward slash (/) Ctrl-Backslash (\) to change the anchor point connection.
Using screen readers with diagrams
The diagram editor and its components (such as the palette, toolbar, dialog boxes, and menu options) support screen readers such as JAWS.
Compare and merge feature
Ability to view content for all modules in a comparison
When you compare a module that is in different configurations, the module's content is now shown for all modules that have changed in any way. Previously, the Content tab was available for modules that changed but not for modules that were added or removed.
If a module was added or removed, it exists in only one of the two configurations that are being compared, so only one version of the module is shown, rather than two versions side-by-side.
Improved scrolling
When you compare a module that is in different configurations, and you scroll on one side of the compare view, the other side no longer automatically scrolls. If you click any row on either side of the module compare view, the other side scrolls so that the corresponding row is shown.
Change set sharing
When change sets are shared, conflicts are detected and can be resolved. You can also see exactly what changed in the change set.
Comparing modules
When you compare modules, you can now see changes to the heading numbers for module artifacts that were demoted, promoted, or moved. The heading numbers for those module artifacts are displayed with mark-up that is similar to the mark-up for attribute changes.
Opening artifacts
You can now open artifacts directly from the compare and merge wizards. In the step to compare or merge artifacts, you can open artifacts from a new menu. The artifacts open in a new browser window.

Merging attributes
When you deliver changes to conflicting artifacts, you can now merge changed attributes. In the artifact delivery step of the wizard, any modified attributes for conflicting artifacts have new menus. From the menus, you can choose between the attribute values in the source or target configuration for delivery.
Reviews
Creating reviews in context of a stream
When you create a review, you can create it in the current stream or in a new stream.
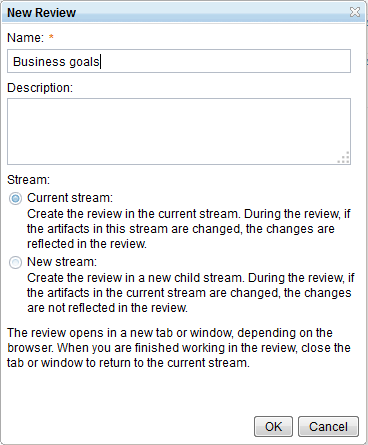
When you create a review in the current stream, the review functions the same way that informal reviews work in previous versions of the product. For example, when you edit the artifacts that are in the current stream, those changes are reflected in the review. When you create a review in a new stream, the review functions in the same way that formal reviews work in previous versions. For example, the artifacts that are in the review are isolated in their own review stream, so any edits to the artifacts in the initial stream are not reflected in the review stream.
When you create a review in a new stream and then finalize the review, a baseline of the review stream is created.
New behavior to open reviews
Previously, reviews opened in the same browser tab that they were requested from. Now, reviews always open in a new browser tab or window to emphasize that a review is being worked on, perhaps in a different stream. Use the new tab to work in the review. When you are finished working in the review, save the review and close the tab to ensure that you are no longer working in the review stream. Be careful when you work on the tab that shows the review because you might accidentally make edits to artifacts in the review stream.
Whether a new browser tab or window is launched depends on the browser that you use and on its settings. To avoid problems that might occur if, for example, you forget that you are working in the review stream, you are notified that you are working in a new tab or window.
Formal and informal reviews were removed
The choice to create a formal or informal review was removed from the review creation process. Instead, reviews are now linked to the configuration in which they were created. Instead of creating a formal review, you create the review when your current configuration is a baseline. Instead of creating an informal review, you create the review when your current configuration is a stream. If your current configuration includes a global configuration, the review always opens in that global configuration.
Commenting in reviews
Comments in reviews work in the same way whether configuration management is enabled or not. In both cases, comments are versioned.
If you comment on the review or artifacts in the review, those comments are visible in all configurations. These changes to reviews also apply to reviews that were upgraded from earlier releases of Rational DOORS Next Generation or Rational Requirements Composer.
Ability to pause and resume a review
When you create a review in the same stream, if you need to edit the artifacts that are in the review, you can edit them and the edits are reflected in the review.
When you create a review in a new stream, if you need to edit the artifacts that are in the review, follow these steps:
- Update the artifacts in the parent stream, not the review stream.
- The review owner pauses the review.
- The review owner, or someone with the required permissions, delivers the changes from the parent stream to the review stream.
- The review owner resumes the review. The time stamps for each artifact in the review are updated. From that point, any users who are working in the review can see the updated artifacts in the review stream.
Streams and baselines in the review process
If you create a review by clicking Current stream, a stream or baseline is not created. Instead, you review by using the current stream; that stream is recorded in the review.
If you create a review by clicking New stream, as you progress through the review, baselines and streams are created and archived in the following order:
- Create: The review owner creates a review by clicking the New stream option, and the review opens in a new tab. No stream or baseline has been created at this time. The opened review is still using the same stream that was used at the time that the review owner clicked New Review. The review is stamped with that current stream, so if it is closed and opened later from another stream, it will switch over to the stream that it was created from.
- Draft: While the review is in draft status, users can add participants and artifacts to the review and save the review. Again, no new streams or baselines are created.
- Start: At this point, a baseline and a child stream are created, and you move to the new child stream. You can ignore the baseline that is created; it exists only as a requirement for creating the child stream. The name of the new baseline is suffixed with "Review baseline." The name of the new child stream is suffixed with "Review stream."
- In Progress: At this point, users can review and comment, and mark their reviews as done. This work is done in the child stream. The comments that are created here are versioned in the child stream. If someone opens the review from another stream, that stream switches to the review stream on another tab.
- Finalize: When the review is finalized, a baseline of the child stream is created, preserving an immutable copy of the stream. The name of this baseline is suffixed with "Final review baseline." The child stream is archived. The original baseline that was created at the Start point cannot be archived. From this point, if anyone opens the review, the final review baseline opens.
Improved handling of reviews in large projects
In this release, the product behavior is improved when you start or finalize a review in a large project. When you create a review in a child stream and the project is large, the creation of the stream can take a long time. In earlier releases, the operation sometimes timed out with an error before the review was saved. Now, the product waits for the review to be saved and a message is displayed to indicate that the save operation is in progress.
If you open a review while a save operation is in progress, you are notified. After the save operation is completed, the review is displayed.
Reporting
RM reporting services support for configuration baseline data
Baselines from releases before 5.x M5 are migrated to equivalent read-only configurations. The new implementation accepts a configuration URL for the snapshotId parameter and a configuration URL for the baselineURI parameter, which is supported in releases earlier than 5.x M5. These parameters override any configuration header that is present. You can use the parameters to report against a configuration, from a browser, by supplying the snapshotId / baselineURI parameter in the request URL. The new parameter, vvc.configuration, is equivalent to the two previously mentioned parameters and is consistent with the rest of the RM requests that specify a configuration URL.
The following requests are equivalent:
https://rmserver:9443/rm/publish/text/*
Configuration Header: configX
https://rmserver:9443/rm/publish/text/*?snapshotId=configXurl
Configuration Header: ignored if present
https://rmserver:9443/rm/publish/text/*?baselineURI=configXurl
Configuration Header: ignored if present
https://rmserver:9443/rm/publish/text/*?vvc.configuration=configXurl
Configuration Header: ignored if present
Jazz Reporting Service
The Jazz Reporting Service replaces Rational Reporting for Development Intelligence as the default reporting solution. Jazz Reporting Service contains the following applications:
- Data Collection Component replaces the default CLM data collection tasks (Java ETLs). This application must be installed and configured to keep data in the data warehouse current.
- Report Builder provides useful out-of-the box reports for software lifecycle management and is integrated with CLM dashboards through the widget catalog.
- Lifecycle Query Engine indexes data from across lifecycle tools that support the tracked resource set (TRS) specification.
For more details about Jazz Reporting Service, see Rational Reporting overview.
Viewing audit history reports from previous releases
You can now view audit history reports that were generated in releases earlier than 6.0. The audit history data is migrated from the earlier format when you access the audit history for a specific requirement.
Miscellaneous
Baselines
Now, when configuration management is not enabled, you can also compare baselines with each other or with the current state of the requirements in your project by using the Compare Configuration With menu item on the configuration menu on the banner.
Resource recovery
The Recover Resources feature finds and recovers folders that no longer have parent folders. If you divided the delivery of change sets, you might notice that folders, artifacts, or both are now missing. You can confirm whether artifacts still exist by searching for them in the Quick Search field. If you find artifacts but they do not have folder paths, you likely need to recover artifacts.
To recover resources, in the project properties, go to the Configuration Management tab, and click the Recover button. The recovery process searches for artifacts to recover in the current configuration in the current project. The process might take a long time, especially in large projects.
After the recovery process is complete, you can find any recovered resources in the Recover Resources folder.
Permissions checking improvements
The permissions checking feature is enhanced so that checks run faster. In some cases, permissions checks that used to take 12 minutes to complete now take only 5 minutes.
Enhancements to web text editor
You can now split table cells without causing the content to move, and editing modules in Safari now works properly.
Improvements to RM sample application
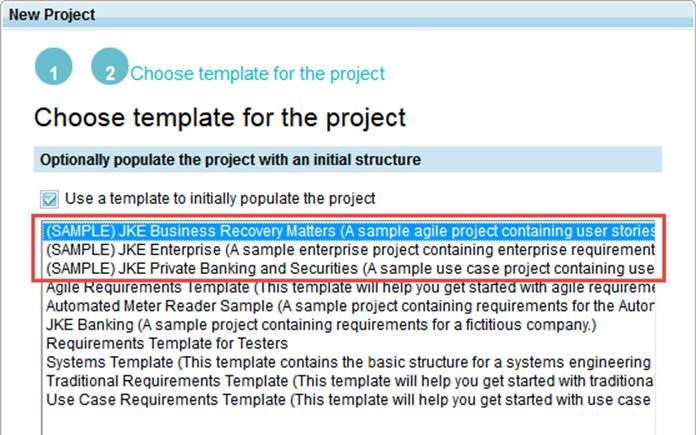
The all-in-one JKE Banking template has been distributed across three new sample project templates to demonstrate modules and the new diagram editor.
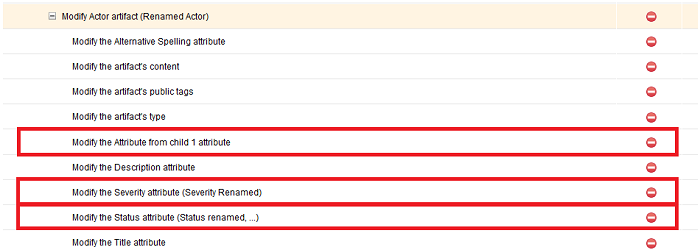
Type-related permissions with multiple configurations
When you set artifact type and link type permissions in a project that has configuration management capabilities enabled, you now see an aggregation of all types in all configurations of a project. You also see an aggregation of all attribute types for all configurations. If a type title was modified in a child workspace, it is displayed in parentheses.
Change sets no longer have a Completed state
The action to complete a change set has been disabled, which simplifies conflict resolutions for merge operations.
Licensing
Rational License Key Server lmgrd.log file output is different in 6.0
In version 6.0, the output of the Rational License Key Server lmgrd.log file includes the client access license (CAL) role type. For details, see the Collaborative Lifecycle Management New & Noteworthy page.
CLM Server Monitoring permanent and term licenses available in 6.0
In version 6.0, permanent and term authorized user licenses are available for CLM Server Monitoring. When you generate a permanent or term authorized user license or floating license for a CLM product from the License Key Center, the license includes the CLM Server Monitoring authorized user license. For details, see the Collaborative Lifecycle Management New & Noteworthy page.
Token license packaging in 6.0
Because of issues with generating both 5.0 and 6.0 token licenses from the License Key Center (the license generator would time out and no licenses were generated), version 5.0 licenses are no longer generated when you generate 6.0 token licenses. The only exception is for Rational DOORS 9.6 customers, where 5.0 and 6.0 token client access licenses (CALs) are generated for Rational DOORS Next Generation Analyst and Rational DOORS Next Generation Contributor. All other licenses are generated for version 6.0 only. For version 5.0 token licenses, contact IBM Support.