Using content caching proxies for Jazz Source Control
Authors: JohnCamelon, DmitryKarasik, NancyCoelho, ErikMatsBuild basis: Rational Team Concert 4.0.x
Page contents
- Introduction
- Using a Forward Proxy
- Using a Reverse Accelerator Proxy
- Setting up Squid with HTTP as Accelerator Proxy
- Setting up Squid with HTTPS as Accelerator Proxy
- Using the Accelerator Proxy
- Tuning Squid
- Are cache results accurate?
- Security and read permissions
- Using this ourselves on jazz.net
- Summary
- Terminology and acronyms
- References
- Questions and answers
In this article, we will discuss different strategies for using Jazz Source Control with proxy servers in order to minimize wide area network (WAN) traffic and improve performance of updating Jazz Source Control sandboxes.
For proxy cache instructions based upon RTC 1.0.1, please refer to this tech tip.
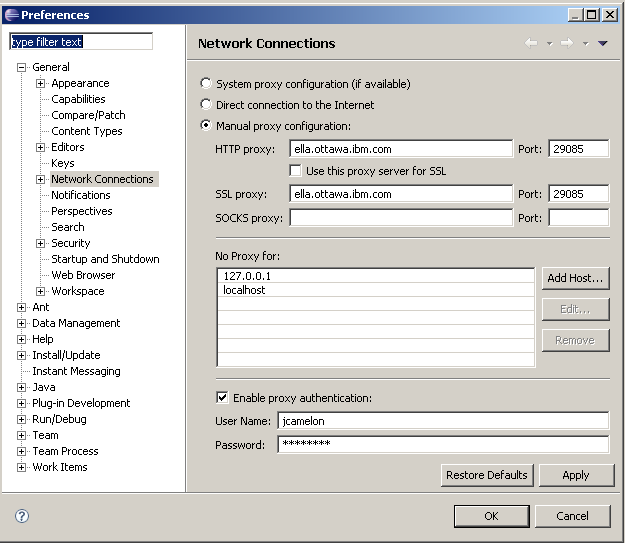
Figure 1 : Setting up a manual proxy configuration.
These settings here are similar to that you would find in configuring a web browser to use a forward proxy configuration. Since all client-server communication in Jazz Source Control is done over HTTP and HTTPS, you only need to configure the HTTP and SSL proxy settings, as we have done in Figure 1.
For the Jazz SCM command line and Visual Studio client, you can configure your terminal or command window to take advantage of a forward proxy by setting one of two environment variables prior to executing the command line. If using http, set the environment variable http_proxy to "http://:". If using HTTPS, set the environment variable https_proxy to "https://:".
We have tested this configuration with a squid forward proxy cache configuration. Squid is a popular open source proxy server. This configuration can also be applied using apache httpd or other commercial proxy products.
The benefits of this proxy configuration is that the proxy does not have any specific knowledge of Rational Team Concert, and can use already existing infrastructure. The forward proxy configuration works with the Eclipse client for RTC 4.0.x and higher. For the Visual Studio and command-line client, this configuration only works from RTC 4.0.x onwards
Run this command to create the directory structure.
29839 ... TCP_MISS/504 4666 ...
Unfortunately there is no practical way to capture this HTML from a build engine.
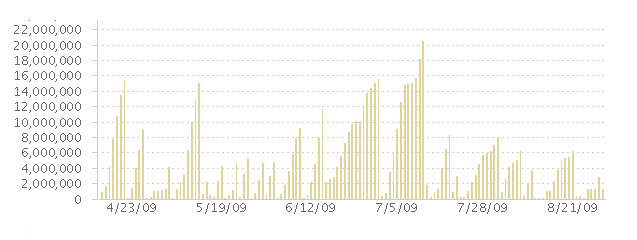
Figure 2: Report illustrating how the number of calls to the REST method IVersionedContentService.GET can reduce.
Introduction
Jazz Source Control was developed in a distributed environment, and we have taken effort to provide rich and command line clients that are WAN-friendly. The clients do not unnecessarily contact the remote server and batch server calls to improve responsiveness of these clients. We also designed Jazz Source Control to provide efficient updating of the local file area (also called a sandbox) with respect to the contents in a repository workspace. However, if the server is located across a WAN, the time to update a local sandbox is determined mostly by the speed of network access across the WAN. For the RTC 4.0.x release, we have tested different proxy server configurations which can help improve performance of loading and updating Jazz Source Control sandboxes by greatly reducing amount of WAN network calls amongst multiple users. The document is provided for informational purposes only. While efforts were made to verify its completeness and accuracy, it is provided AS IS without warranty of any kind, express or implied. IBM shall not be responsible for any damages arising out of the use of, or otherwise related to, this document or any other materials.Using a Forward Proxy
A forward proxy server is a proxy server that can generically support Internet traffic between any client and server. Many enterprises already provide a forward proxy configuration within their network to speed up and shape web traffic throughout their WAN. If your network already employs a manual proxy server for caching static content, you can configure RTC to take advantage of this already existing infrastructure. You can configure this setting through the RTC Eclipse client by updating the "General/Network Connections" preference as indicated in figure 1.Figure 1 : Setting up a manual proxy configuration.
Using a Reverse Accelerator Proxy
You can also configure squid or apache httpd (with the mod_cache module) to run as a accelerator proxy server against your Jazz RTC Team Server. The strategy here is that instead of referencing the Jazz RTC Team Server URI from your client, you would connect instead to a proxy server which forwards all requests onto the Jazz RTC Team Server. Note: For best results in using a reverse accelerator proxy, clients should start new eclipse, command line or visual studio sandboxes. There can be issues in switching between different repository URIs pointing to the same repository from within the clients.Setting up Squid with HTTP as Accelerator Proxy
Most Linux distributions provide an easy to install squid in its default configuration, which is with support of HTTP only. If this is adequate for your configuration, then installing squid through your package manager is fairly simple. The package is called "squid3" on some Linux distributions, so you may need to hunt around about to find squid.conf and the squid executable once installed. You will need to make sure that your Jazz Team Server is set up to accept HTTP. This can be done by editing the web.xml as per these techtips. Replace the contents of /etc/squid3/squid.conf with the following:cache_replacement_policy heap GDSF memory_replacement_policy heap GDSF cache_dir aufs <cache.dir> <disk.cache.size> 256 256 cache_mem <memory.cache> MB cache_store_log none cache_peer <jazz.server.host.address> parent <jazz.server.host.port> 0 no-query originserver name=httpAccel login=PROXYPASS cache_peer_access httpAccel allow all coredump_dir /usr/local/squid/var/cache http_access allow all http_port <proxy.port> accel vhost refresh_pattern . 0 20% 4320 cachemgr_passwd disable all maximum_object_size 1024 MB maximum_object_size_in_memory 16 MB buffered_logs on visible_hostname <proxy.host.address>Within squid.conf:
- Replace all references of <jazz.server.host.address> with the hostname of the server you wish to proxy.
- Replace all references of <jazz.server.host.port> with the port name that your jazz server listens upon.
- Replace all references of <proxy.host.address> with the hostname of your proxy machine.
- Replace all references of <proxy.port> with the port of your proxy machine.
- Replace all references of <memory.cache> with the amount of RAM that you want to allocate to squid's caching. This must be less than the available memory on the machine. On a 32-bit machine, this should be less than 2GB. See the "Tuning Squid" section for more details.
- Replace all references of <cache.dir> with a directory where the user running squid will be able to write to.
- Replace all references of <disk.cache.size> with the amount of diskspace (in MB) you want ot allocate to squid. This must be less than the available disk space in <cache.dir>. See the "Tuning Squid" section for more details.
squid or squid3 depending on the Linux distribution. You should change directories to where this executable lives.Run this command to create the directory structure.
./squid3 -zRun this command to start the proxy.
./squid3To stop the proxy, you can run
./squid3 -k shutdown. To test the proxy, please see the section Using the Accelerator Proxy.
Setting up Squid with HTTPS as Accelerator Proxy
Pre-requisites
Squid uses OpenSSL for HTTPS support. Squid and OpenSSL need to built together in order to work as a secure caching proxy. Before starting this process, you should read and and agree to the OpenSLL and squid licenses. You will need to compile squid from scratch, as there are not any distributions of squid which work out of the box for this configuration. To test a proxy, you should have cURL installed. cURL is available for all Linux distributions. If you do not have a certificate for your proxy machine, you will need to generate a self-signed certificate. This can be done by using the OpenSSL toolchain. This is available for most distributions of Linux. This configuration will work across all RTC clients (Eclipse, Visual Studio and Command Line) from 2.0 forward. Squid performs best on 64-bit Linux, and enterprises should expect to invest in an enterprise class 64-bit server, and to install a 64-bit Linux distribution for maximum performance. Having many disk drives, configured in a RAID-0 configuration (hardware or software RAID) would be ideal for performance.Creating a self signed certificate
The proxy machine will need a certificate for clients to accept if you wish to connect using https. To do this you need to run the following commands (assuming that openssl/openssl.exe are in your path):- Run the command
openssl req -new -keyform PEM -x509 -out server.pem. You will be prompted for various values (password for the certificate, corporation, etc.). Answer the questions accordingly. - Run the command
openssl rsa -in privkey.pem -out privkey.pem.new. You will be prompted for a password for the private key here as well. - copy privkey.pem.new over top of privkey.pem.
Building Squid
You can download the squid 3.3.9 source code (latest at the time this article was last updated). The following instructions assume that you understand how to install packages. You will require either the distribution CD or a connection to the internet in order to install new Linux packages.- Through your package manager, ensure you have the following packages installed:
- openssl
- libssl-dev
- gcc
- make
- perl
- vim ; (or some other text editor you are comfortable with)
Note: libssl-dev may be called something different on your Linux distribution, like openssl-devel, if you have problems finding it, do a Google search against your distribution.
- Open a shell terminal to some working directory.
- Unzip the squid 3.x archive
- Run the command
cd squid-3.0.STABLE20 - For 64-bit machines, run
export CFLAGS="-O2 -pipe -m64 -march=core2 -fomit-frame-pointer -s". On older versions of Red-Hat, core2 support is not available, so you should omit the-march=core2option or replace it with something that works for your machine architecture. For 32-bit machines, runexport CFLAGS="-O2 -pipe -m32 -fomit-frame-pointer -s". - For 64-bit machines (and core2 processor), run
export CXXFLAGS="-O2 -pipe -m64 -march=core2 -fomit-frame-pointer -s". On older versions of Red-Hat, core2 support is not available, so you should omit the-march=core2option or replace it with something that works for your machine architecture. For 32-bit machines, runexport CXXFLAGS="-O2 -pipe -m32 -fomit-frame-pointer -s". - For 64-bit machines, run
export LDFLAGS="-m64 -s -Wl,-O1". For 32-bit machines, runexport LDFLAGS="-m32 -s -Wl,-O1". - Run the command
"./configure -prefix=/usr/local/squid --with-pthreads --enable-storeio=ufs,aufs --enable-removal-policies=lru,heap --enable-ssl --with-large-files".
- For Squid version 3.5 and higher the "--enable-ssl" paramater is depreciated. Run the following command instead
"./configure -prefix=/usr/local/squid --with-pthreads --enable-storeio=ufs,aufs --enable-removal-policies=lru,heap --with-openssl --with-large-files".
- For Squid version 3.5 and higher the "--enable-ssl" paramater is depreciated. Run the following command instead
- Run the command
make. - As the root user, run the command
make install. - Ensure that /usr/local/squid is writable for the user you plan to run squid as.
Configuring Squid as Reverse Accelerator Proxy
Replace the contents of /usr/local/squid/etc/squid.conf with the following:cache_replacement_policy heap GDSF memory_replacement_policy heap GDSF cache_dir aufs /usr/local/squid/var/cache <disk.cache.size> 256 256 cache_mem <memory.cache> MB cache_store_log none cache_peer <jazz.server.host.address> parent <jazz.server.host.port> 0 no-query originserver name=httpsAccel ssl login=PROXYPASS sslflags=DONT_VERIFY_PEER cache_peer_access httpsAccel allow all coredump_dir /usr/local/squid/var/cache http_access allow all https_port <proxy.port> cert=/usr/local/squid/etc/server.pem accel key=/usr/local/squid/etc/privkey.pem vhost refresh_pattern . 0 20% 4320 cachemgr_passwd disable all maximum_object_size 1024 MB maximum_object_size_in_memory 16 MB buffered_logs on visible_hostname <proxy.host.address>Within squid.conf:
- Replace all references of <jazz.server.host.address> with the hostname of the server you wish to proxy.
- Replace all references of <jazz.server.host.port> with the port name that your jazz server listens upon.
- Replace all references of <proxy.host.address> with the hostname of your proxy machine.
- Replace all references of <proxy.port> with the port of your proxy machine.
- Replace all references of <memory.cache> with the amount of RAM that you want to allocate to squid's caching. This must be less than the available memory on the machine. On a 32-bit machine, this should be less than 2GB. See the "Tuning Squid" section for more details.
- Replace all references of <disk.cache.size> with the amount of diskspace (in MB) you want ot allocate to squid. This must be less than the available disk space in "/usr/local/squid/var/cache". See the "Tuning Squid" section for more details.
cd /usr/local/squid/sbin
Run the command ./squid -z to create the directory structure.
Run the command ./squid to start the proxy. To stop the proxy, you can run ./squid -k shutdown.
Using the Accelerator Proxy
Adjusting WAS configuration
If you are using Wepsphere Application Server, and you have set <proxy.port> different than <jazz.server.host.port>, you will need to adjust your WAS configuration according to this technote.Testing the Accelerator Proxy
To test if the proxy is set up properly, you should be able to runcurl -k http[s]://<proxy-hostname>:<proxy-port>/jazz/service -v -u <your-userid>. If you get back a 40* or 302 (Found) response code from the server, it means that the proxy relayed your message and response correctly. If things are not working properly, check the var/logs/cache.log for errors. To diagnose problems, you can enable access logging by adding the following line to squid.conf.
access_log /usr/local/squid/var/logs/access.log squidWith the Eclipse client, you can connect to a repository using the URI http[s]://<proxy-hostname>:<proxy-port>/jazz. If you load a component in a rich client through the proxy, you will see
TCP_HIT and TCP_MISS logging in the access.log which will indicate whether or not the cache is being hit.
1248191626.896 219 127.0.0.1 TCP_HIT/200 32732 GET https://myserver:9443/jazz/service/com.ibm.team.scm.common.IVersionedContentService/content/com.ibm.team.filesystem/FileItem/_cGu0ABDfEdyPex3tN74vWg/_bbSTEceYEd2szcxlf-P2-g/AufYUlD416mgHCzlqmq0x60DbhHDydtDmdCpIZ22HAw - NONE/- application/octet-stream
Tuning Squid
Some tips that we recommend include:- Set the "cache_mem" directive in squid.conf as large as possible, to ensure that squid can serve up as much as possible without accessing the disk. As stated before, this should be limited to 2GB on 32-bit machines. On 64-bit machines, make it as large as the machine can tolerate. If you expect your users to load N GB of source, then your squid proxy should try and have 2 * N GB of cache memory available. Minimally, we recommend 4GB as a starting point for 64-bit servers.
- Set the "cache_dir" directive in squid.conf to a large value will increase the disk-based cache size for squid. This will ensure that most of the content accesses to the proxy will be hits.
- Turn off access logging if you do not require it for day to day use. If you do require access logging, you will need to come up with a system to rotate the logs periodically in order to avoid filling up the disk.
iostat -x 10. This will list off the system usage of disk and cpu every 10 seconds. If you see that the disk is hitting 100% capacity, then you should increase the amount of memory cache.
In addition to increasing the memory cache size, if the disk is still saturated, you can improve squid performance by putting the cache directory on a RAID-0 disk configuration, so to improve the speed of the disks and thus improve the capacity and performance of the proxy.
Troubleshooting Status 504 failures from the Squid proxy
If your build engines or other clients receive 504 errors, check your Squid proxy access logs to determine if they are 30s or 900s timeouts. For 30 second timeouts, thepeer_connect_timeout limit has been reached. This means that the CLM server had a port open, but wasn't able to accept the connection. This could for example be due to garbage collection pauses.
Example log contents:
29839 TCP_MISS/504 4666 ... -
TCP_MISSindicates the proxy forwarded the request on to the server. - 29839 is the number of milliseconds. This will be around 30000 for a 30s timeout.
- 4666 is the number of bytes sent by the proxy to the client machine/build engine. This does not imply that the server responded at all, but could be a simple html page from the proxy to the client to indicate an error message.
peer_connect_timeout to 60s or even 120s to alleviate the problem. If this error only occurs in automated builds, users will not likely notice this difference.
In one customer environment, we found that all 30s pauses occurred when the server was performing garbage collection, but the server always recovered. So increasing this timeout would let the server respond within the timeout period.
For 900 second timeouts, the read_timeout limit has been reached. This means that the CLM server started responding to a message, but in a 900s period, the proxy received no data from the
Example:
900447 TCP_MISS/504 4632 POST ... -
TCP_MISSindicates the proxy forwarded the request on to the server. - 900447 is the number of milliseconds. This will be around 900000 for a 900s/15 minute timeout.
- 4632 is the number of bytes sent by the proxy to the client machine/build engine. This does not imply that the server responded at all, but could be a simple html page from the proxy to the client to indicate an error message.
- Server performance tuning.
- Set read_timeout to 30 minutes to alleviate the problem. If this error only occurs in automated builds, users will not likely notice this difference.
Are cache results accurate?
Some users are concerned about having stale data or updates being applied to their local or build sandboxes. Architecturally, this cannot happen, as the only requests that are marked as being cacheable are the requests to fetch frozen file content. When you load or update a workspace, the client receives back a list of content identifiers from the target (non-proxy) server. These content objects are then retrieved in parallel through the proxy server. Any cache hit on these content fetches are returning unchanging data, which shall be equivalent to any request fetched from the originating server.Security and read permissions
There are many options in setting up a proxy configuration, and not all of them honor security or authentication equivalently. For example, there are additional setup instructions for squid to enable different authentication schemes. If you can authenticate on the same LAN as you run the proxy, then the authentication will not take away from the overall performance of the proxy : however, if the authentication server is located across the WAN, then the proxy may not improve performance as much as without authentication. Independent of authentication, it is very difficult for an unprivileged user to gain access to read protected content through the proxy server, assuming that the caching server is setup and configured with a directory that is protected using proper system permissions. In order to access a particular content, users would need to guess two unique identifiers and a SHA-256 hash code that describes the content. Only the server knows about these items, and the protocol used in Team Concert enforces that the server is asked before any item is fetched and read permissions are applied. To access read protected file content in the Team Concert repository, one would either have to gain access to the account on the proxy server running the cache or guess 3 unique identifiers. If using HTTPS, HTTPS encrypts every part of the URL except for the hostname and port after the initial hand shake. You can also add extra layers of security in the proxy, either by subnet, IP range, or user (e.g., restrict only the build user to connect).Using this ourselves on jazz.net
We have been using a reverse accelerator proxy configuration with squid against the main jazz.net source code repository for the Ottawa lab build farm. All of the Ottawa build engines load their jazz sandboxes through a centralized squid proxy, and we have reduced the time to load sandboxes in integration builds by approximately 50%. Considering that the network link between jazz.net and Ottawa is fairly fast, this result illustrates the end user benefit from cache hits within the local area network. From the perspective of server administration, we have improved the capacity of the Jazz RTC Team Server by reducing the number of redundant calls the main server. Figure 2 is a report available on jazz.net that illustrates how the number of calls to the REST method IVersionedContentService.GET had reduced significantly when we deployed the Ottawa squid server in July 2009.Figure 2: Report illustrating how the number of calls to the REST method IVersionedContentService.GET can reduce.
Summary
In this article, we have presented different proxy strategies that can be employed to improve the performance of loading and updating the sandboxes of Jazz Repository Workspaces as Jazz builds across a WAN. We have provided a concrete tested configuration using the squid proxy cache as a accelerator proxy as well as instructions as to how one could use a forwarding proxy with different RTC clients. Jazz Source Control does not have any specific dependencies on any proxy, and it should be possible to plug in any HTTP-based caching proxy technology.Terminology and acronyms
- HTTP : Hypertext Transfer Protocol
- HTTPS : Hypertext Transfer Protocol Secure
- RTC : Rational Team Concert
- Sandbox : The local file area on disk that one loads a Jazz Repository Workspace into.
- WAN : Wide Area Network
References
Questions and answers
Will importing a CA verified certificate work with openssl and squid configuration?Yes. Convert your certificate and key to PEM format and specify it in the config file just like you would a self-signed cert.
Is it possible to configure one squid proxy server for multiple RTC instances running in different server/ports? Or is one squid proxy server limited to only single RTC server? If so, how does the squid(squid.conf) need to be configured?
You can do it using acls. For each RTC server you add a cache_peer entry with a distinct name. Then you add acls to control which ports/contexts use that cache_peer instead of the blanket "allow all" access. For example to map by port you would do:

acl server1access myport <server 1 port on proxy>
cache_peer_access <server 1 name in cache_peer> allow server1access
acl server2access myport <server 2 port on proxy>
cache_peer_access <server 2 name in cache_peer> allow server2access

etc..

You can use acls other than port too, for example context as mentioned earlier.
I'm using squid-3.2.2 as a reverse proxy for RTC but can't configure it properly to cache anything during requests. Every single item in log gets TCP_MISS/200. I've also noticed that some elements has it's own ?etag={etag} included in url. What am I doing wrong?
There is a bug starting in squid 3.2 and 3.3 that prevents it from working properly with RTC: http://bugs.squid-cache.org/show_bug.cgi?id=3670. This is fixed in 3.2.3 and 3.3.0.1
Why don't I see any performance improvements in my Web UI access of RTC?
As the title of this article suggestions, this solution is meant to accelerate Jazz Source Control operation, specifically versioned content stored in the repository. It is not intended to accelerate browsing the WebUI or any other RTC component; although a number of things, such as images may be cached.
Additional contributors: RosaNaranjo
Contributions are governed by our Terms of Use. Please read the following disclaimer.
Dashboards and work items are no longer publicly available, so some links may be invalid. We now provide similar information through other means. Learn more here.