Maintaining the Rational DOORS Next Generation type system in a configuration-management-enabled environment. Part 3: Automation tool deep dive
This article assumes that you are familiar with these concepts:
- Collaborative Lifecycle Management (CLM) and Continuous Engineering (CE) tool support for configuration management
- Working with Rational DOORS Next Generation configurations and performing common operations such as selecting a configuration and delivering changes
- Working with the Eclipse IDE and Java code
If you are unfamiliar with these concepts, see the Configuration management overview and Managing artifacts by using configurations topics in IBM Knowledge Center. Also, ensure that you are familiar with the information in Part 1 and Part 2 of this series.
Note: This article is not a step-by-step tutorial or workshop. Links to supporting resources and workshops are provided.
The first four sections of this article are moderately technical and intended for users who want to get the source code and run the tool. The target audience for these sections is users with a development background. Experience with Java development with the Eclipse IDE is ideal.
The subsequent sections are more technically complex and intended for users who want to understand and reuse the code. These sections provide information about how the code is structured, how the code works, how the frameworks such as OSLC4J work, and how the prototype uses them. The article explains how the automation tool implements an OSLC/REST interface consumer by using the OSLC4J framework. The target audience is users with a deep development background, in particular with developing Java applications by using the Eclipse IDE.
Contents
- Type system management prototype code
- Prerequisites
- Building and deploying the automation prototype
- Running the automation prototype
- Eclipse project overview
- Code details
- Using OSLC and REST APIS with OSLC4J
- Pattern
- APIs and their implementation
- Summary
- Related information
Type system management prototype code
Before you can reuse the type system management prototype code, ensure that you are familiar with the Eclipse IDE and Java code.
Overview
By using the Rational DOORS Next Generation type system management prototype, you can export editable configurations into a comma-separated values (CSV) file, which creates a source-to-target mapping. Then, you can use that mapping to automate the type system maintenance operations of the tool.
The following image shows a logical view of the prototype. First, the code creates a CSV file with a source and target mapping. Another operation uses this mapping to import the type system from the source stream into a new change set that is delivered to the target stream.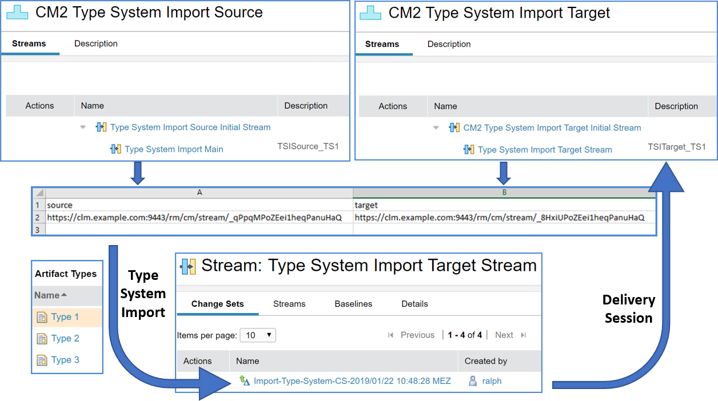
The following image shows a logical view of the prototype that uses a CSV mapping file to perform a delivery session. First, the code creates a CSV file with a source and target mapping. Next, this mapping is used to deliver the type system change to the target stream.
License
This software is licensed under the Eclipse public license: Eclipse Public License – v 1.0.
Download
You can download the code from the Git repository in either of following ways:
- Download the latest code as a compressed (.zip) file:
- Click Clone or download and use the Download ZIP option. After the download is complete, browse the folder structure of the .zip file. The top level contains the README.md file. The com.ibm.rm.typemanagement folder contains an Eclipse project. You can use this project to develop the code and to generate an executable file.
- You can also clone the repository and import the project by using Git. Clone the Git project to your local file system. You must have Git or a Git GUI installed. For details about setting up Git and using it with Eclipse, see the GitHub help.
- Download the code from the releases page. The .zip code is in the same format as the preceding option and can be used as described above. Note that the releases might be older, and there might not be a corresponding release for the latest code version.
Some releases might contain a prepackaged executable file for convenience, for example, tsm-V1.0-20190122.zip. For details about this format, see Deploying the packaged application. The prepackaged executable might not be available for all versions. Later in this article, you learn how to create this executable.
For details about packaging, see Packaging the application for shipping.
Prerequisites
Before you can use the code, you must set up an environment where you can develop, debug, build, deploy, and run the code.
Eclipse Lyo
The prototype is based on Eclipse Lyo OSLC4J code. For details, see the Eclipse Lyo Wiki.
Initially, the code was based on the Eclipse Lyo Client Sample for RM, but there aren’t many similarities now. However, if you want to work with the code, the Eclipse Lyo project and the sources are the best areas to look for additional hints.
This article explains only the high-level steps for working with the code. For details about the Eclipse Lyo code, see Getting started with the source code on GitHub.
Development environment
The code was created by using Eclipse version 4.8 “Photon” in the J2EE Developer packaging. Other Eclipse versions should also work.
The project was created by using Eclipse Lyo client 2.3, and was later updated to Eclipse Lyo 2.4. You can find the code for the Eclipse Lyo client on GitHub. Maven manages the dependency on the latest Lyo version and other libraries in the pom.xml file, which is included in the source code.
The development environment requires the following items:
- An Eclipse IDE client: Ideally, Eclipse 4.8 “Photon” in the J2EE Developer packaging.
- Apache Maven 3.5.4 or later installed locally. An installation of Maven in Eclipse should also work.
- Java 1.8 JDK set as active in Eclipse as the Installed JRE and Execution Environment. A JRE is not sufficient.
Project setup
After you set up the development environment, complete these steps:
- In Eclipse, open the Java perspective.
- Import the project into Eclipse from the file system.
- To import the .zip file, select File > Import and select Existing Projects into Workspace. Click Select archive file and browse to and select the .zip file that you downloaded. Import the enclosed Eclipse project, for example, com.ibm.rm.typemanagement.
- To import the Git repository, use the Git perspective to add the local cloned repository. Then, import the project, for example, com.ibm.rm.typemanagement.
- Select Project > Clean and clean the project that you imported.
- Open the Eclipse project:
- Right-click pom.xml in the project folder and click Run as > Maven clean.
- Right-click pom.xml in the project folder and click Run as > Maven install.
The project should build and compile with no errors.
If you encounter errors or other problems, the following hints might help you before you report the preceding steps:
- If you encounter problems with Maven, especially if you see a “compiler is missing” error in the Maven install step, complete the following steps:
- Download and install the latest Java 1.8 JDK (not JRE).
- Define the Java 1.8 JDK in Window > Preferences > Java > Installed JREs. Point to the JDK root folder, for example, jdk1.8.0_191/, and not to the jre/ folder.
- Select the check box beside the JDK or define a JavaSE-1.8 Execution Environment based on that JDK.
- In the Java perspective, right-click the Eclipse project and select Build Path > Configure Build Path for the prototype project.
- On the Libraries tab, select JRE System Library, click Edit, and ensure that Workspace default JRE is selected and shows the JDK that you provided.
- Consider installing an external Maven instance instead of a Maven instance that is integrated in Eclipse, such as M2E.
- If you encounter problems such as version mismatches or compiler errors with Maven libraries, delete the downloaded libraries in the Maven user directory, for example, C:\Users\UserName\.m2, and repeat the preceding steps.
- If you encounter problems with SLF4J, such as Failed to load class org.slf4j.impl.StaticLoggerBinder, follow the link and try to fix the problem. For example:
- Ensure that you have a Java 1.8 JDK installed and selected to be used in Eclipse by Maven.
- Ensure that no slf4j*.jar library exists in any of the JDK subfolders or on the class path (except the one managed by Maven listed in the .pom file).
You can also search the following resources for solutions:
- Stackoverflow
- Eclipse Lyo, which the source code is based on. See the download descriptions and tutorials.
- Lyo forum
- Maven community
Building and deploying the automation prototype
Learn how to build, share, and deploy the automation prototype.
Building the automation prototype
You can export the type system management prototype as a .jar file that contains all the code, packages, and libraries that the prototype requires.
To build the prototype, complete the following steps (which are also listed in ReadMe – HowToRelease.txt in the root folder of the com.ibm.rm.typemanagement project):
- In Eclipse, open the Java perspective.
- Right-click the com.ibm.rm.typemanagement project.
- On the main Eclipse menu, select Project > Clean.
- Right-click the pom.xml file in the project folder and select Run as > Maven clean.
- Right click the pom.xml file in the project folder and select Run as > Maven install.
- Right-click the com.ibm.rm.typemanagement project and select Export.
- Select Java > Runnable Jar File and complete the following steps in the wizard:
- For Launch Configuration, select DNGTypeSystemManagement – runnable jar.
- In the Export Location field, select a path. Example: C:\temp\TSM\tsm.jar. You can change the root for the export if needed, but keep the top folder name TSM, and don’t modify the name of the .jar file.
- In the Library handling section, select Package required libraries into generated JAR.
- In the last section, you can choose to save the export as an Ant script. A sample Ant script is in the build\BuildTSM.xml project, which you can overwrite.
- Click Finish and follow any prompts to create the folder.
- Copy the content of the scripts subfolder into the export folder named C:\temp\TSM\. The script files, tsm.bat and tsm.sh files, the LICENSE.html file, and the log4j.properties log configuration file are copied.
- Check the script files and provide a dedicated JRE 1.8 if needed, for example, by using the JAVA_HOME lines in the scripts. For details, see Calling the automation prototype.
- For UNIX, ensure that the tsm.sh script file that you just copied is executable.
You can now use the application in the C:\temp\TSM\ folder.
Packaging the application for shipping
To package the type system management prototype for shipping:
- Select the C:\temp\TSM\ folder and compress the file. Example: C:\temp\tsm.zip.
- Rename the .zip file from step 1 to C:\temp\tsm-Vx-YYYYMMDD.zip, where x is the version, YYYY is the year, MM is the month, and DD is the date.
- The file is ready for shipping. You can now extract and use it on a different machine if the required Java version is available.
Deploying the packaged application
Assume that a file named tsm-V1.0-20190109.zip was created by following the preceding steps. This binary file contains the prototype as a .jar file that you can run and that contains the code, packages, libraries, script files, log configuration, and a license file.
To deploy the automation prototype, create a folder, such as C:\temp, to deploy from.
Extract the binary tsm-Vx-YYYYMMDD.zip file into the folder that you just created. The new folder C:\temp\TSM contains these files: tsm.jar, tsm.bat, tsm.sh, and log4j.properties.
Running the automation prototype
Learn how to run the type system management prototype.
CLM server requirements
Ensure that the following environment is configured:
- A CLM system with a Jazz Team Server and at least one deployed Rational DOORS Next Generation (Requirements Management) application
- Configuration management must be enabled for at least one Requirements Management (RM) project area. For details, see Activating configuration management in applications.
- A user ID and password with the licenses and permissions to perform the required operations
Check the Java version
To run the prototype from the binary file, ensure that you have an up-to-date and compatible Java Runtime Environment (JRE) version installed. Other than for development, which requires a JDK, a JRE is required only for running the executable .jar file. You can also use a JDK to run it: any JDK includes a JRE.
The file can run in either of these ways:
- If the compatible JRE version is in the path
- If the prototype is called with a shell script that sets the path so that the JRE is available
To test the Java version, open a command or shell window and go to the C:\temp\TSM folder, which contains the tsm.jar file.
cd c:\temp\TSM
Enter the following command:
java -version
Java should run and print the version information. If the Java version is not in the path, use a full path to call it. Example:
C:\PROGRA~1\Java\jre1.8.0_181\bin\java -version
Check the version information.
The prototype was compiled and tested using Java 1.8. Ensure that the version number begins with 1.8, and is version _191 or later, as in this example:
java version "1.8.0_191"
In earlier Java versions, revoked security certificates can prevent communication with servers. If you encounter errors or you aren’t sure about the version that’s installed, download and use the most recent version of Java 1.8.
Calling the automation prototype
From a command window, you can now call the type system management prototype. Enter the following command to show the prototype commands and parameters:
java -jar tsm.jar
The console shows the commands and parameters that each command requires. To run the commands, ensure that a user can log in to the target Rational DOORS Next Generation server and get the required information such as the public URI, user IDs, and passwords that the commands require.
Consider this example, which specifies a valid public URI, user ID, password, and a project area that is enabled for configurations:
java -jar tsm.jar -command exportConfigurations -url https://clm.example.com:9443/rm -user ralph -password ralph -project "GC JKE Banking (Requirements Management)" -csvfile "../exporttest.csv" -csvDelimiter ";"
The command output should be similar to the following image:
Note: You can ignore the cookie error.
You can use a batch or script file to specify a different Java version and to make it easier to call the prototype and increase automation. In the current folder, see the tsm.bat and tsm.sh sample scripts, which are based on examples that are included in the prototype code.
The following image shows a tsm.bat sample Windows batch file: 
The following image shows a tsm.sh sample shell script:

If the Java version is not in the path and Java is invoked by providing the absolute path, ensure that you set this path in the scripts. Replace the path to be set for JAVA_HOME in the script by the path that worked above, and remove the comments prefix (rem and #) at the beginning of the line that sets the JAVA_HOME variable.
For Linux, remove the # in line 3, and ensure that the shell script tsm.sh is executable.
To run from the script, enter tsm or ./tsm followed by the parameters to run the prototype. Example:
tsm -command exportConfigurations -url https://clm.example.com:9443/rm -user ralph -password ralph -project "GC JKE Banking (Requirements Management)" -csvfile "../exporttest.csv" -csvDelimiter ";"
The command output should look similar to the following image:

If you encounter errors, fix the path until Java is called correctly. For other issues, check the hints above and adjust the script and other files until the prototype runs. Also, ensure that the user can log in to the target Rational DOORS Next Generation server and complete the required tasks.
Eclipse project overview
The following section explains the structure of the code.
Eclipse main project folder
The main Eclipse project folder contains the prototype code.
The project is based on a Maven archetype and uses Maven to manage dependencies to other libraries and projects.
- The dependencies are managed in the pom.xml file.
- The license is in the LICENSE.html file.
- The ReadMe – HowToRelease.txt file contains a brief description how to create and package a runnable .jar file.
- The Java source code is in the src/main/java folder.
See also the following folders:
- build: Contains an Ant build file that you can use to build the runnable .jar file, if the paths in the file match the files on the system.
- launches: Contains launch files that you can use to run the prototype from within Eclipse to debug and test.
- license: Contains the license files.
- log4j: Contains the log4j.log file if the prototype is run from Eclipse.
- scripts: Contains script files to run the prototype.
The following image shows the launch files. Change the public URI, test user ID, test user password, and other values in the launch properties to adjust to the test environment. No Rational Team Concert SDK or Plain Java Client Libraries are needed.
Use the Debug Configurations command to duplicate or edit launch configurations that debug the code.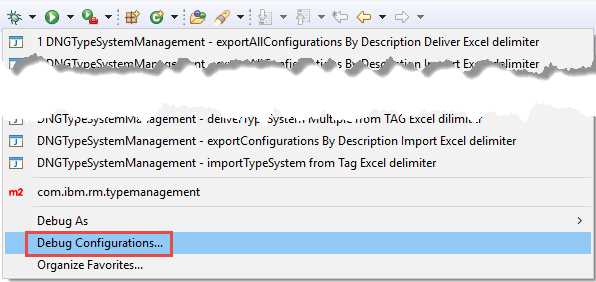
On the Arguments tab, edit the program arguments. Provide the command name, public URI, user credentials, and other required information.

To apply the changes and save the configuration, click Apply. You can use the launch script for debugging and testing.
Main class and constants
The main class and the constant definitions are in the com.ibm.requirement.typemanagement.oslc.client.automation package, as shown in the following image: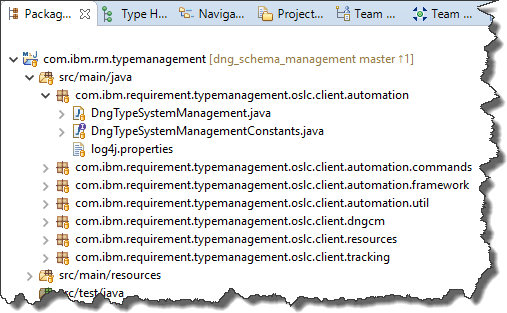
- DngTypeSystemManagementConstants.java manages the constants.
- DngTypeSystemManagement.java provides the main entry point.
- log4j.properties configures log4j if the prototype is started from within Eclipse.
Command implementations
The supported commands are implemented in the com.ibm.requirement.typemanagement.oslc.client.automation.commands package.

Each command is implemented by its own class. The command classes are named CommandNameCmd.java.
Each command class does the following things:
- Defines its command name string
- Declares the options and parameters that the command requires
- Provides a method that checks if the mandatory parameters are available
- Provides a method that prints the command syntax
- Provides a method to run the command
The CommandFactory.java class is the only class that manages the instantiation of the available commands in its constructor.
Command framework
To increase reuse and to make it easy to implement new commands, see the framework in the com.ibm.requirement.typemanagement.oslc.client.automation.framework package, which is shown in the following image:

- AbstractCommand.java implements a small runtime environment that can be subclassed by a command implementation. The subclass only has to implement the methods to do these things:
- Define the command name
- Define the parameters that the command provides and requires
- Confirm whether the required parameters are available
- Run the command
- Print the command syntax
- ICommand.java defines the interface that a command must implement. The AbstractCommand class implements this interface.
- IRule.java defines rules that can be used to find matching objects. The RegularExpressionRule.java implementation matches regular expressions and the ContainsStringRule.java implementation matches for “contains substring”.
Utilities
See the com.ibm.requirement.typemanagement.oslc.client.automation.util package for utility classes that can help with various tasks.

- CsvExportImportInformation.java stores information to be written to or read from a CSV file.
- CsvUtil.java implements the CSV import and export by using opencsv.
- LoggingUtil.java sets the logging level directly in the code. For example, you can set the logging level to TRACE before calling a method, and set it to INFO after the call to get detailed logs in the sequence.
- RDFUtils.java facilitates the analysis of RDF response data. It gets and logs the raw message response, obtains and accesses the RDF model, and prints the statements and other details.
- TimeStampUtil.java creates timestamps.
Rational DOORS Next Generation configuration management API tools
See the com.ibm.requirement.typemanagement.oslc.client.dngcm package for the classes that implement the API to access the Rational DOORS Next Generation API that finds components and configurations.
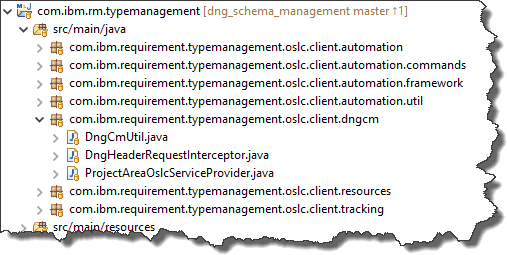
- DngCmUtil.java contains all the methods used to find Rational DOORS Next Generation components and configurations.
- DngHeaderRequestInterceptor.java manipulates the request headers in the OSLC4J HTTP requests.
- ProjectAreaOslcServiceProvider.java finds the project area service provider based on the project area name.
Lyo assumes an OSLC interface, which is not always available. Sometimes APIs do not tolerate the OSLC request header. Rational DOORS Next Generation also has special request headers that some of the APIs require, especially in the configuration-management-related API. The “Configuration-Context” header with a value that contains the URI of the active configuration is required in most Rational DOORS Next Generation configuration management API calls for them to function. Other examples include DngHeaderRequestInterceptor, which adds headers and also removes them (such as the ones that OSLC4J adds by default).
Rational DOORS Next Generation resource representations
See the com.ibm.requirement.typemanagement.oslc.client.resources package for the classes related to the Rational DOORS Next Generation API.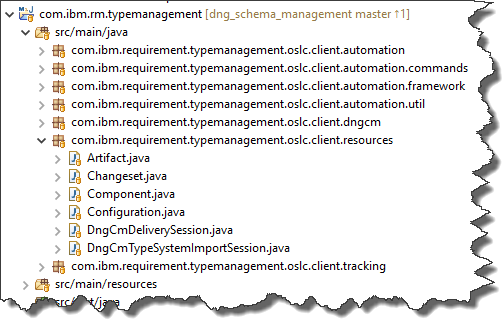
- Artifact.java is the simplest OSLC4J object that can be unmarshaled or marshaled in XML/RDF. It provides only the URI (rdf:about) of the object.
- ChangeSet.java creates and represents a Rational DOORS Next Generation change set.
- Component.java represents a Rational DOORS Next Generation component.
- Configuration.java represents a Rational DOORS Next Generation configuration such as a stream, baseline, or change set.
- DngCmDeliverySession.java represents a Rational DOORS Next Generation configuration management delivery session. For details, see the Rational DOORS Next Generation API documentation. This class also implements the methods to run the delivery operation. The API is implemented for Rational DOORS Next Generation version 6.0.6 and later.
- DngCmTypeSystemImportSession.java represents a Rational DOORS Next Generation type system import session. For details, see the Rational DOORS Next Generation API documentation. The API is implemented for Rational DOORS Next Generation version 6.0.6 and later.
The preceding classes implement a pattern that Eclipse Lyo OSLC4J uses to support a mechanism for unmarshaling and marshaling XML/RDF. To support unmarshaling and marshaling, OSLC4J uses Javax and annotations. You can find these annotations in the files in this package.
The marshaling works reliably, however, OSLC4J requires a type property to do the unmarshaling. Some of the Rational DOORS Next Generation APIs do not provide this information. For example, with DngCmTypeSystemImportSession, the unmarshaling did not work automatically and marshaling had to be done manually by iterating the RDF model. In these scenarios, perform the unmarshaling directly on the RDF/XML model or use other formats for the conversion. Examples for possible formats include JSON or Turtle. Consider checking whether these formats are supported by the API as representation. For these formats, other limitations might exist for automated unmarshaling support in OSL4J.
Rational DOORS Next Generation asynchronous, long running, task tracking API
See the com.ibm.requirement.typemanagement.oslc.client.tracking package for the classes that support the Rational DOORS Next Generation asynchronous, long running, task tracking API.
![]()
These classes are provided by the IBM Services organization and are slightly modified for the type system management prototype.
Logging
The prototype code uses the Simple Logging Facade for Java (SLF4J) with the Log4J 1.2 binding for logging. The SLF4J facade provides simple logging. A class defines a logger in this way:
public static final Logger logger = LoggerFactory.getLogger(DeliverTypeSystemCmd.class);
You can then use the logger where needed, as in this example:
     @Override
    public void printSyntax() {
        logger.info("{}", getCommandName());
        logger.info("\tSyntax : -{} {} -{} {} -{} {} -{} {} -{} {} [ -{} {} ]",
                DngTypeSystemManagementConstants.PARAMETER_COMMAND, getCommandName(),
                DngTypeSystemManagementConstants.PARAMETER_URL,
                DngTypeSystemManagementConstants.PARAMETER_URL_PROTOTYPE,
The logger provides different logging levels, for example, logger.info, logger.debug, and so on. The log4j.properties file defines the logging level.
To change the logging level in the code, use the following statement:
com.ibm.requirement.typemanagement.oslc.client.automation.util.LoggingUtil.setLoggingLevel(String)
For example, you might do this to increase the logging level in a sequence of statements in a method.
If a log4j.properties file exists in the folder with the .jar file, for example, c:\temp\TSM, a log is written in the c:\temp\TSM\log4j folder.
The log collects data each time the prototype runs. You can change the logging level in the log4j.properties file.
The Eclipse project contains several examples in the com.ibm.rm.typemanagement/scripts folder. When you debug in Eclipse, the log is written to the log4j folder, which is in the project folder in the Eclipse workspace.
Code details
The following section explains how the code works.
Main entry point
The DngTypeSystemManagement.java class provides the main entry point, and does the following things:
- Instantiates itself
- Calls a main execute() method and passes the command line arguments
- Gets the name of the command that was passed, for example, exportConfigurations
- Instantiates the commands and gets the class instance for the command, for example, ExportConfigurationsCmd.java
- Passes the command line parameters to the command instance to run the code and the pass back the results
- Graceful error handling, such as printing the supported commands if no command is passed
The interesting Java code from the central method execute() is shown below. At this point, the command line arguments have been parsed into the options variable. This method gets the command name from options. The execute() command gets the class that implements the command. This class is then used and the run() method is called, which passes the parsed options and the original arguments.
        // Get the command name provided as option
        String command = cmd.getOptionValue(DngTypeSystemManagementConstants.PARAMETER_COMMAND);
        if (command == null) {
            logger.error("Missing command \nSyntax: -command commandName {[-parameter] [parameterValue]}");
            printSupportedCommands();
            logger.info("Failed.");
            return result;
        }

        // get the class to execute
        ICommand execCommand = CommandFactory.INSTANCE().getCommandMap().get(command);
        if (execCommand == null) {
            logger.error("Unsupported command name '{}' ", command);
            printSupportedCommands();
            logger.info("Failed.");
            return result;
        }

        // run the command
        result = execCommand.run(options, args);
        return result;
To find and call a command, you must add the command to the constructor of the CommandFactory class, as shown in this example:
    /**
     * Creates the list of supported commands
     */
    private CommandFactory() {
        super();
        put(new ExportConfigurationsCmd());
        put(new ExportConfigurationsByDescription());
        put(new ExportAllConfigurationsByDescription());
        put(new ImportTypeSystemCmd());
        put(new DeliverTypeSystemCmd());
        // Enable sample command
        // put(new SampleCommandCmd());
    }
Framework
The code uses a small framework to implement and add new custom commands. A command must implement the following com.ibm.requirement.typemanagement.oslc.client.automation.framework.ICommand interface:

The AbstractCommand.java abstract class implements this interface and a small runtime that can be subclassed by a command implementation. The subclass has to only implement the abstract methods to do these things:
- Define the command name
- Define the required parameters
- Check that the required parameters are available
- Print the command syntax
- Run the command
A subclass of AbstractCommand.java must implement the following methods:
    /**
     * Add the parser options for the subclass. Method to be implemented in
     * subclasses.
     *
     * @param options
     * @return
     */
    public abstract Options addCommandOptions(Options options);

    /**
     * Validate the parameters for the command. Method to be implemented in
     * subclasses.
     *
     * @param cmd
     * @return true if the required parameters are available.
     */
    public abstract boolean checkParameters(final CommandLine cmd);

    /**
     * Used to print the syntax of a command. Method to be implemented in
     * subclasses.
     */
    public abstract void printSyntax();

    /**
     * Execute the command. Implement this method to create the desired behavior.
     * Method to be implemented in subclasses.
     *
     * @return
     */
    public abstract boolean execute();
Framework sample command
To create custom commands, you can use the com.ibm.requirement.typemanagement.oslc.client.automation.commands.SampleCommandCmd class as a template. This class also shows how the framework works. Complete these high-level steps:- Extend AbstractCommand.
- Define a logger to participate in the logging framework.
- In the constructor, set the commandName as a string, for example, “myCommand”.
- Use a constant so that the data is available in one place.
- Set the command name by calling the superclass constructor and passing the string that contains the name.
public class SampleCommandCmd extends AbstractCommand implements ICommand {

    public static final Logger logger = LoggerFactory.getLogger(SampleCommandCmd.class);

    /**
     * Constructor, set the command name which will be used as option value for the
     * command option. The name is used in the UIs and the option parser.
     */
    public SampleCommandCmd() {
        super(DngTypeSystemManagementConstants.CMD_SAMPLE);
    }
Typically, commands have parameters or options. Implement addCommandOptions() and add options. Return the modified options class.
When you add an option, include the option or parameter name, a flag that specifies whether a value is required with the option, and a description (which is not used at the moment).
Example 1: This example shows how to define an option that requires a parameter value:
options.addOption("myOption", true, "This is an option requiring a value")Example 2: This example shows how to define an option as a flag without a required value:
options.addOption("myFlag", false, "This is an option or flag without a value")The following example shows code from the sample command, which you can change. The framework calls the method to parse the command parameters.
    /**
     * Method to add the options this command requires.
     */
    @Override
    public Options addCommandOptions(Options options) {
        // Add Options required for the command
        //
        // Example code
        options.addOption(DngTypeSystemManagementConstants.PARAMETER_SAMPLE_OPTION, true,
                DngTypeSystemManagementConstants.PARAMETER_SAMPLE_OPTION_DESCRIPTION);
        options.addOption(DngTypeSystemManagementConstants.PARAMETER_SAMPLE_OPTION_OPT, true,
                DngTypeSystemManagementConstants.PARAMETER_SAMPLE_OPTION_OPT_DESCRIPTION);
        return options;
    }
The framework calls the checkParameters() method to check required parameters and values. The cmd parameter provides access to the parsed parameters or options. This method checks the available data and returns true if all the data needed is available, and returns false otherwise. If false is returned, the framework does not run the command; instead, it prints a syntax hint. In the following example, only PARAMETER_SAMPLE_OPTION is tested. The command also has a parameter named PARAMETER_SAMPLE_OPTION_OPT, which is optional and wasn’t tested.
    /**
     * Method to check if the required options/parameters required to perform the
     * command are available.
     */
    @Override
    public boolean checkParameters(CommandLine cmd) {
        // Check for required options
        boolean isValid = true;

        if (!cmd.hasOption(DngTypeSystemManagementConstants.PARAMETER_SAMPLE_OPTION)) {
            isValid = false;
        }
        return isValid;
    }
The framework calls the printSyntax() method to print a syntax hint, for example, when the command is wrong or not enough parameters are passed.
    /**
     * Method to print the syntax in case of missing options.
     */
    @Override
    public void printSyntax() {
        // Print syntax hint for the command
        //
        // Example code
        logger.info("{}", getCommandName());
        logger.info("\tSyntax : -{} {} -{} {} [ -{} {} ]", DngTypeSystemManagementConstants.PARAMETER_COMMAND,
                getCommandName(), DngTypeSystemManagementConstants.PARAMETER_SAMPLE_OPTION,
                DngTypeSystemManagementConstants.PARAMETER_SAMPLE_OPTION_PROTOTYPE,
                DngTypeSystemManagementConstants.PARAMETER_SAMPLE_OPTION_OPT,
                DngTypeSystemManagementConstants.PARAMETER_SAMPLE_OPTION_OPT_PROTOTYPE);
        logger.info("\tExample: -{} {} -{} {}", DngTypeSystemManagementConstants.PARAMETER_COMMAND, getCommandName(),
                DngTypeSystemManagementConstants.PARAMETER_SAMPLE_OPTION,
                DngTypeSystemManagementConstants.PARAMETER_SAMPLE_OPTION_EXAMPLE);
        logger.info("\tOptional parameter: -{} {}", DngTypeSystemManagementConstants.PARAMETER_SAMPLE_OPTION_OPT,
                DngTypeSystemManagementConstants.PARAMETER_SAMPLE_OPTION_OPT_PROTOTYPE);
        logger.info("\tExample optional parameter: -{} {}",
                DngTypeSystemManagementConstants.PARAMETER_SAMPLE_OPTION_OPT,
                DngTypeSystemManagementConstants.PARAMETER_SAMPLE_OPTION_OPT_EXAMPLE);
    }
The framework calls the execute() method, which is shown in the following example, to run the command. The getCmd() method, provided by the abstract superclass, accesses the options that are passed to the command. The method returns true when the command runs successfully, or false otherwise. As shown in the following example, the code currently returns false, so the sample command always fails:
    /**
     * The main method that executes the behavior of this command.
     */
    @Override
    public boolean execute() {
        boolean result = false;
        // Execute the code
        // Get all the option values
        String mandatoryOption = getCmd().getOptionValue(DngTypeSystemManagementConstants.PARAMETER_SAMPLE_OPTION);
        String optionalOption = getCmd().getOptionValue(DngTypeSystemManagementConstants.PARAMETER_SAMPLE_OPTION_OPT);

        /**
         * TODO: Your code goes here
         *
         */

        return result;
    }
To change the value that’s returned, duplicate an existing debug launch and edit the program arguments to provide the options. Example:
-command sampleCommand -mandatorySampleOption "Value" -mandatorySampleOption "Value2"
In the console, you see that the command fails.
Implement some code and replace the TODO section with your code. Example:
        logger.info("Sample command '{}'", getCommandName());
        result=true;
Run the sample command again. The command should now run successfully, and the output should show the new log entry.
Sample execute method from one of the commands
All the commands work in a similar way. For example, see the following code from the ExportConfigurationsByDescriptionCmd class.
The execute method sets the return result to false. When an exception occurs, that is the result.
Then, the method gets the parameter and option values.
The method attempts to log in to the server by using the credentials (form-based login). If the login is successful, the code gets the service provider catalog.
The method then discovers the required services from the service provider catalog and gets the data that it needs. In the following example, the method gets all the components of the project area, and all the configurations (streams, baselines) of the components, and then processes this data.
    @Override
    public boolean execute() {
        boolean result = false;

        // Get all the option values
        String webContextUrl = getCmd().getOptionValue(DngTypeSystemManagementConstants.PARAMETER_URL);
        String user = getCmd().getOptionValue(DngTypeSystemManagementConstants.PARAMETER_USER);
        String passwd = getCmd().getOptionValue(DngTypeSystemManagementConstants.PARAMETER_PASSWORD);
        String sourceTag = getCmd().getOptionValue(DngTypeSystemManagementConstants.PARAMETER_SOURCE_TAG);
        String targetTag = getCmd().getOptionValue(DngTypeSystemManagementConstants.PARAMETER_TARGET_TAG);
        String csvFilePath = getCmd().getOptionValue(DngTypeSystemManagementConstants.PARAMETER_CSV_FILE_PATH);
        String csvDelimiter = getCmd().getOptionValue(DngTypeSystemManagementConstants.PARAMETER_CSV_DELIMITER);

        try {

            // Login
            JazzRootServicesHelper helper = new JazzRootServicesHelper(webContextUrl, OSLCConstants.OSLC_RM_V2);
            logger.trace("Login");
            String authUrl = webContextUrl.replaceFirst("/rm", "/jts");
            JazzFormAuthClient client = helper.initFormClient(user, passwd, authUrl);

            if (client.login() == HttpStatus.SC_OK) {

                // Get the URL of the OSLC ChangeManagement catalog
                logger.info("Getting Configurations");
                String cmCatalogUrl = DngCmUtil.getCmServiceProvider(helper);
                if (cmCatalogUrl == null) {
                    logger.error("Unable to access the OSLC Configuration Management Provider URL for '{}'",
                            webContextUrl);
                    return result;
                }

                // Get the components and the configurations for the components
                Collection<Component> components = DngCmUtil.getComponentsForAllProjectAreas(client, cmCatalogUrl);
                Collection<Configuration> configurations = DngCmUtil.getConfigurationsForComponents(client, components);

                logger.info("Filtering for Configurations");
                IRule sourceRule = new ContainsStringRule(sourceTag);
                IRule targetRule = new ContainsStringRule(targetTag);
                List<CsvExportImportInformation> configurationList = getConfigurations(configurations, sourceRule,
                        targetRule);
                if (configurationList == null) {
                    logger.info("No valid configuration data found.");
                    return false;
                }

                // export the data
                CsvUtil csv = new CsvUtil();
                if (null != csvDelimiter && csvDelimiter != "") {
                    csv.setSeperator(csvDelimiter.charAt(0));
                }

                logger.info("Exporting data to file '{}'.", csvFilePath);
                result = csv.exportConfigurationList(csvFilePath, configurationList);
                logger.trace("End");

            }
        } catch (Exception e) {
            e.printStackTrace();
            logger.error(e.getMessage(), e);
        }
        return result;
    }
The next step is to filter the configurations to the data of interest. In this example, configurations contain all configurations (streams and baselines) for all components for the project area. The following method eliminates the unwanted configurations and creates the collection of values to export to a CSV file. The method uses rules that match a substring to filter the data and create a list of elements to export. The rules find exactly one source and many target configurations. The method fails if either no source configuration is found or if more than one source configuration is detected.
    private List<CsvExportImportInformation> getConfigurations(Collection<Configuration> configurations,
            String projectArea, IRule sourceRule, IRule targetRule) throws URISyntaxException {
        List<CsvExportImportInformation> configurationList = new ArrayList<CsvExportImportInformation>();
        Configuration source = null;
        for (Configuration config : configurations) {
            if (!config.isStream()) {
                continue;
            }
            if (targetRule.matches(config.getDescription())) {
                configurationList.add(new CsvExportImportInformation(null, config, projectArea));
            }
            if (sourceRule.matches(config.getDescription())) {
                if(source!=null) {
                    logger.info("Ambiguous sources found source 1 URI '{}' title '{}' source 2 URI '{}' title '{}' exiting.", source.getAbout().toString(), source.getTitle(), config.getAbout().toString(), config.getTitle());
                    return null;
                }
                source = config;
            }
        }
        if (source != null) {
            for (CsvExportImportInformation csvExportImportInformation : configurationList) {
                csvExportImportInformation.setSource(source.getAbout().toString());
            }
        } else {
            logger.info("No match for source.");
            return null;
        }
In the final lines of the execute() method, the list of returned configurations is exported to a CSV file.
Using OSLC and REST APIS with OSLC4J
This section explains the code that consumes OSLC and REST APIs.
Eclipse Lyo OSLC 4J
An important part of this code deals with OSLC and REST calls. The code uses OSLC4J, a part of the Eclipse Lyo project, to implement the OSLC and REST calls. OSLC4J implements a framework that enables login to an HTTP/HTTPS server that follows the OSLC standards, and enables HTTP(S)-based communication that follows OSLC/REST conventions.
Because OSLC was initially based on RDF/XML, OSLC4J provides mechanisms for marshaling and unmarshaling XML/RDF in client/server communication. Specifically, OSLC4J provides mechanisms to marshal a Java object into a text representation and to send it to the server. A response can be received, the response body unmarshaled, and provided as a Java object. This capability is available for RDF/XML, and might be unavailable or only partially available for other formats such as JSON or Turtle. The code for this prototype uses a custom approach to unmarshal JSON for task tracking.
It is important to know how this works to understand the code provided. The following section explains the basics of OSLC4J and how it is used in the automation prototype. For additional basic information about RDF/XML, see XML RDF.
Resource representation
Data sent in HTTP request bodies is usually represented as a class in Java applications. The attributes and values of this class must be serialized into a format (typically text) that can be transmitted in the call. This process is called marshaling. If a value of some element in the server is requested, the representation sent by the server in the response body must be converted into information available for a Java application (typically, a class). This process is called unmarshaling. To enable marshaling and unmarshaling, OSC4J uses Javax and annotations.
Using a simple example, this section explains how marshaling and unmarshaling is represented in the application’s Java code. This section is intended only as an overview about how RDF/XML and Javax and annotations work. Other, more comprehensive resources are available on the internet.
The simplest example available in the prototype code is a representation for a Rational DOORS Next Generation component. This example shows how a component is represented in the client/server communication, the related Java code, and how it is used.
A component is represented in the client server communication as RDF/XML, as shown in this example:
<rdf:RDF
    xmlns:rdf="http://www.w3.org/1999/02/22-rdf-syntax-ns#"
    xmlns:dcterms="http://purl.org/dc/terms/"
    xmlns:oslc="http://open-services.net/ns/core#"
    xmlns:oslc_config="http://open-services.net/ns/config#"
    xmlns:acc="http://open-services.net/ns/core/acc#"
    xmlns:process="http://jazz.net/ns/process#">
  <oslc_config:Component rdf:about="https://clm.example.com:9443/rm/cm/component/_76h_QPoTEeiHfarJu_66SQ">
    <dcterms:title rdf:parseType="Literal">CM JKE 1 (Requirements Management)</dcterms:title>
    <oslc_config:configurations rdf:resource="https://clm.example.com:9443/rm/cm/component/_76h_QPoTEeiHfarJu_66SQ/configurations"/>
    <dcterms:description rdf:parseType="Literal"></dcterms:description>
    <process:projectArea rdf:resource="https://clm.example.com:9443/rm/process/project-areas/_74YDIPoTEeiHfarJu_66SQ"/>
    <oslc:serviceProvider rdf:resource="https://clm.example.com:9443/rm/oslc_rm/_74YDIPoTEeiHfarJu_66SQ/services.xml"/>
    <acc:accessContext rdf:resource="https://clm.example.com:9443/rm/acclist#_74YDIPoTEeiHfarJu_66SQ"/>
  </oslc_config:Component>
</rdf:RDF>
This text is sent and received using an HTTP client.
The first part specifies the namespaces used in the RDF:
xmlns:oslc_config="http://open-services.net/ns/config#"
The preceding example defines the oslc_config prefix, which represents the http://open-services.net/ns/config# namespace. The namespaces uniquely identify the elements and attributes. Two elements could be named test but have different prefixes and associated namespaces to distinguish them. The prefixes represent the namespace in a more compact form, which reduces the amount of text to transfer. When in doubt, replace the prefix with the namespace as shown below to understand the data. Note that the prefix might look different in some situations. OSLC4J does not specify the prefix, and the RDF/XML sent to the server uses artificial and abstract identifiers such as “j.0” or other text as a prefix.
The element shown in the preceding RDF/XML represents an oslc_config:Component, which is specified in the following lines of code:
  <oslc_config:Component rdf:about="https://clm.example.com:9443/rm/cm/component/_76h_QPoTEeiHfarJu_66SQ">
    ......
  </oslc_config:Component>
The element oslc_config:Component has the following form when resolving the prefix with the namespace:
"http://open-services.net/ns/config#Component"
By performing this transformation, it becomes clear which object is represented by an XML element in the RDF. This detail becomes important again later.
The oslc_config:Component element shown above contains the information about the component in attributes and nested elements. The attribute about (rdf:about) represents the URI of the component. The attribute about is of the namespace http://www.w3.org/1999/02/22-rdf-syntax-ns#, which is represented by the prefix rdf.
The oslc_config:Component element contains the following nested elements that describe the property:
- dcterms:title is the name or title of the component.
- oslc_config:configurations is the factory URI to create configurations in this project area.
- dcterms:description is the description of the component.
- process:projectArea is the service provider that owns the project area process.
- oslc:serviceProvider is the OSLC service provider for the project area that owns the component.
- acc:accessContext is the access context for the component.
This information, or at least the most important parts, must be represented by a class instance in Java. The component is represented in the prototype application Java code by the following class:
com.ibm.requirement.typemanagement.oslc.client.resources.Component
The Component class contains no code to communicate with the server itself. That code is implemented elsewhere. This class only represents the component itself and its properties. The Component class provides only constructors, and get and set methods. The constructor only creates the object itself.
Simplified, the class is declared as follows:
package com.ibm.requirement.typemanagement.oslc.client.resources;

@OslcNamespace("http://open-services.net/ns/config#")
@OslcResourceShape(title = "Component Shape", describes = "http://open-services.net/ns/config#Component")
public class Component extends AbstractResource {
The @OslcNamespace and @OslcResourceShape annotations define the namespace and name of the type in RDF/XML. Compared with the preceding RDF/XML, these two annotations represent the http://open-services.net/ns/config#Component element with its rdf:about attribute. Notice that the information in the namespace and the element type name are the same as what was used above.
The preceding code is simplified to make it easier to see the correlation. For better reuse, the application source code uses String constants that are defined in a different class.
The declaration with the preceding annotations represents an RDF/XML, as shown in the following example. Compare the information with the initial sample RDF/XML from the beginning of this section.
<rdf:RDF
    xmlns:rdf="http://www.w3.org/1999/02/22-rdf-syntax-ns#"
    xmlns:oslc_config="http://open-services.net/ns/config#"
  <oslc_config:Component rdf:about="https://clm.example.com:9443/rm/cm/component/_76h_QPoTEeiHfarJu_66SQ">
  </oslc_config:Component>
</rdf:RDF>
To enable its use in OSLC4J, the Component class must extend org.eclipse.lyo.oslc4j.core.model.AbstractResource, which adds fields and methods such as the get and set methods to access the about URI type attribute, which represents a component URI that can be found in the example RDF/XML above.
The constructors create a Component class. If a URI is provided, it is passed to the constructor of the AbstractResource abstract superclass.
    public Component() {
        super();
    }

    public Component(URI about) {
        super(about);
    }
To represent the nested elements of the component information from the RDF/XML, the Component class defines the following fields (as well as others that aren’t shown):
    private String title;
    private URI serviceProvider;
    private URI configurations;
These fields, in addition to the about field URI, represent only some of the attributes and properties that are available on a component. The downloadable code defines additional fields.
To receive and send this information, OSLC4J must be able to marshal and unmarshal the information. The required information is provided by annotations on the get methods.
The annotations for the get methods enable mapping the RDF/XML namespace and element information to the field in the class. Only the get methods need these annotations to participate in the marshaling and unmarshaling. Fields with get methods but no annotations don’t participate in the marshaling and unmarshaling.
The following example shows code for the get and set methods for the fields and attributes of the class. The annotations are simplified for easier reading; in the prototype code, all the strings are hidden in constants.
    public void setTitle(String title) {
        this.title = title;
    }

    public void setServiceProvider(URI serviceProvider) {
        this.serviceProvider = serviceProvider;
    }

    public void setConfigurations(URI configurations) {
        this.configurations = configurations;
    }

    @OslcDescription("A name for the component.")
    @OslcTitle("Title")
    @OslcPropertyDefinition("http://purl.org/dc/terms/title")
    @OslcReadOnly
    @OslcOccurs(Occurs.ExactlyOne)
    @OslcValueType(ValueType.XMLLiteral)
    public String getTitle() {
        return title;
    }

    @OslcDescription("The scope of a resource is a URI for the resource's OSLC Service Provider.")
    @OslcTitle("Service Provider")
    @OslcPropertyDefinition("http://open-services.net/ns/core#serviceProvider")
    @OslcRange(OslcConstants.TYPE_SERVICE_PROVIDER)
    public URI getServiceProvider() {
        return serviceProvider;
    }

    @OslcDescription("Available Configurations such as streams and baselines.")
    @OslcPropertyDefinition("http://open-services.net/ns/config#configurations")
    @OslcReadOnly
    @OslcTitle("Configurations")
    public URI getConfigurations() {
        return configurations;
    }
It’s important that the @OslcPropertyDefinition annotation precisely identifies the element namespace and name, for example, http://open-services.net/ns/core#serviceProvider, in the RDF shown below. The entry for oslc:serviceProvider for a given namespace prefix oslc=”http://open-services.net/ns/core#” represents the service provider resource.
The code shown so far represents the RDF/XML in the following example:
<rdf:RDF
    xmlns:rdf="http://www.w3.org/1999/02/22-rdf-syntax-ns#"
    xmlns:dcterms="http://purl.org/dc/terms/"
    xmlns:oslc="http://open-services.net/ns/core#"
    xmlns:oslc_config="http://open-services.net/ns/config#"
  <oslc_config:Component rdf:about="https://clm.example.com:9443/rm/cm/component/_76h_QPoTEeiHfarJu_66SQ">
    <dcterms:title rdf:parseType="Literal">CM JKE 1 (Requirements Management)</dcterms:title>
    <oslc_config:configurations rdf:resource="https://clm.example.com:9443/rm/cm/component/_76h_QPoTEeiHfarJu_66SQ/configurations"/>
    <oslc:serviceProvider rdf:resource="https://clm.example.com:9443/rm/oslc_rm/_74YDIPoTEeiHfarJu_66SQ/services.xml"/>
  </oslc_config:Component>
</rdf:RDF>
The http://www.w3.org/1999/02/22-rdf-syntax-ns#resource attribute, also known as rdf:resource, represents a resource. Resources are typically represented by URIs. In the preceding example, the resource URI is https://clm.example.com:9443/rm/oslc_rm/_74YDIPoTEeiHfarJu_66SQ/services.xml.
The resource contains the following nested elements:
- dcterms:title represents the title and is a text literal.
- oslc:serviceProvider represents the service provider XML of this component, which is a URI.
- oslc_config:configurations is the URI to query and work with configurations, for example, streams of the component.
With the preceding example, you can now see how the information for a component is represented in the RDF/XML and how annotations can automate marshaling and unmarshaling.
In summary, OSLC4J uses the annotations for the class and the get methods as shown above to marshal and unmarshal the HTTP request and response bodies by using Javax to simplify its use in Java applications. Many different annotations are available for various purposes. See the examples in the code and the OSLC4J documentation. Before you continue, ensure that you understand the concepts presented in this section.
GET: Retrieve a resource representation
In OSLC, HTTP GET retrieves resources. The following example shows the code that is used to perform unmarshaling in a OSLC/REST GET call to retrieve a resource.
The simplest case is to GET a resource by using its URI. The following code does this by using the OSLC4J JazzFormAuthClient that was used to log in to the server. The componentURI parameter is a string representation of a URI that was obtained in a previous call. The string is similar to this example, https://clm.example.com:9443/rm/cm/component/_76h_QPoTEeiHfarJu_66SQ, where the last section of the URI represents the unique identifier UUID for the component.
Although the code looks simple, a lot is happening behind the scenes. The REST/OSLC communication and unmarshaling is hidden in two lines of code. To complete this task manually requires much more code.
    public static Component getComponent(final JazzFormAuthClient client, final String componentURI)
            throws IOException, OAuthException, URISyntaxException {
        Component foundComp = null;
        ClientResponse response = null;
        try {
            response = client.getResource(componentURI, OslcMediaType.RDF_XML);
            switch (response.getStatusCode()) {
            case 200:
                // logger.info("Component:\n {}", RDFUtils.getRDFRepresentation(response));
                foundComp = response.getEntity(Component.class);
                break;
            default:
                logger.trace("Unexpected return code. Session '{}'.", componentURI);
                break;
            }
        } finally {
            if (response != null) {
                response.consumeContent();
            }
        }
        return foundComp;
    }
The following line of code sends the request to the server:
response = client.getResource(componentURI, OslcMediaType.RDF_XML);
The client.getResource() statement generates an HTTP GET request to the URI of the component with the required headers, as shown in this example:
GET https://clm.example.com:9443/rm/cm/component/_76h_QPoTEeiHfarJu_66SQ

Accept: rdf+xml
OSLC-Core-Version: 2.0
Content-type: application/rdf+xml
The preceding headers and the headers required for the session handling and authentication are passed, as well. No request body is created and sent in the GET method.
The response (class ClientResponse) contains the HTTP status code. For a response code of 200, the following code performs the unmarshaling:
foundComp = response.getEntity(Component.class);
The getEntity() method creates a class of type com.ibm.requirement.typemanagement.oslc.client.resources.Component and unmarshals the RDF/XML received in the response body by putting the values into the class attributes, including setting the about URI.
The following code prints the RDF/XML code for this article:
logger.info("Component:\n {}", RDFUtils.getRDFRepresentation(response));
This code is useful for exploring the response RDF/XML data, for example, when working with an interface that lacks documentation. The code is commented out because the response body can be read only once, in the getEntity() method call. It can be enabled and used for debugging.
The HTML client manages buffering, caching, and consuming communication data. It is important to clean up after the responses are processed and delete data that might still be unprocessed. To do this, invoke the consumeContent() method from within a finally block, as shown in this example:
        } finally {
            if (response != null) {
                response.consumeContent();
            }
        }
Failing to call the consumeContent() method can break the communication without an obvious reason. This code is also important for the other cases described below.
POST: Create a resource representation
In OSLC, an HTTP POST creates resources. The following example shows the core code that performs the marshaling in an OSLC/REST POST call to create a resource. Because the code in the example does not create components, the example shows creating a delivery session. A delivery session is required to create and run a Rational DOORS Next Generation delivery from a source configuration to a target configuration. The code in this article shows only the key parts.
The delivery session is represented by the com.ibm.requirement.typemanagement.oslc.client.resources.DngCmDeliverySession class, whose annotations are similar to the preceding example. The get methods are omitted. As before, most of the string constants are replaced with their string representation to increase clarity.
@OslcNamespace("http://jazz.net/ns/rm/dng/config#")
@OslcResourceShape(title = "Delivery Session Shape", describes = "http://jazz.net/ns/rm/dng/config#DeliverySession")
public class DngCmDeliverySession extends AbstractResource {

    public static final Logger logger = LoggerFactory.getLogger(DngCmDeliverySession.class);

    private String title;
    private URI deliverySessionState;
    private URI policy;
    private URI source;
    private URI target;
    private URI serviceProvider;
The API to work with Rational DOORS Next Generation Delivery Sessions requires a source element such as a change set or stream, a target element such as a stream or change set, and a service provider. This information is available in the variables source and target, which are of type configuration. The following code creates the DngCmDeliverySession object, sets its required values, and adds a title with a timestamp:
        DngCmDeliverySession deliverySession = new DngCmDeliverySession();
        deliverySession.setTitle("Type System Delivery Session " + TimeStampUtil.getTimestamp());
        deliverySession.setServiceProvider(target.getServiceProvider());
        deliverySession.setSource(source.getAbout());
        deliverySession.setTarget(target.getAbout());
The code then retrieves the creation factory for the Delivery Session – ultimately providing the URI of the factory to create the new delivery session:
CreationFactory deliverySessionFactory = getDeliverySessionFactory(client, projectAreaServiceProviderUrl);
The Rational DOORS Next Generation REST API for delivery sessions requires an additional Configuration Context header (or the older vvc.configuration form), which provides the configuration management context of the delivery session. This header is not part of the OSLC specification, and there is no obvious way to add an additional header to the POST request in OSLC4J. Other requests expose a way to add custom headers, but currently the OSLC4J createResource() call, which represents the POST request, does not.
However, workarounds exist, such as using org.apache.http.HttpRequestInterceptor. You can implement and register an HttpRequestInterceptor, which is called during the POST or any other HTTP operation, and can read and manipulate the request header; for example, add and remove headers before sending the message.
The com.ibm.requirement.typemanagement.oslc.client.dngcm.DngHeaderRequestInterceptor.DngHeaderRequestInterceptor() helper class wraps code for adding and removing request headers. The request interceptor can be added to and removed from an HTTP client. When adding a request interceptor, provide a hash map that contains the key and value pairs for the headers to add. Another hash map with keys for headers to be removed can be provided as well.
DngHeaderRequestInterceptor.installRequestInterceptor() installs a request interceptor that is called before the HTTP client sends the request. The HttpRequestInterceptor is then called by the HTTP client, and can add more headers or remove them.
The following code shows how to configure and install the request interceptor. The additional header provided is the required Configuration Context, which is set to the URI of the source configuration.
        HashMap<String, String> header = new HashMap<String, String>();
        header.put("Configuration-Context", source.getAbout().toString());
        DngHeaderRequestInterceptor.installRequestInterceptor(client, header);
Using the HttpRequestInterceptor in all calls to the HTTP client provides a simple and consistent approach. You can also use the methods that add custom headers OSLC4J provides, where available.
After the preparations, the client.createResource() method creates the resource on the server. The call marshals the deliverySession class instance that was created with the required content, based on the annotations. It sends the POST request with the request headers and the marshaled information in the request body to the delivery session factory.
        ClientResponse response = null;
        String sessionUrl = null;
        try {
            response = client.createResource(deliverySessionFactory.getCreation().toString(), deliverySession,
                    OslcMediaType.APPLICATION_RDF_XML, OSLCConstants.CT_RDF);
            DngHeaderRequestInterceptor.removeRequestInterceptor(client);
You should remove the DngHeaderRequestInterceptor after the call. Otherwise, the next use of the client has the interceptor installed as well.
This code shows the resulting POST request:
POST https://clm.example.com:9443/rm/delivery-sessions

Accept: rdf+xml
OSLC-Core-Version: 2.0
Content-type: application/rdf+xml
Configuration-Context: https://clm.example.com:9443/rm/cm/changeset/_2yQ8IBV2EemBH9V6euA71g
The request body is generated from the fields of the deliverySession class instance. The generated request body looks like the XML/RDF shown below, which is copied from the log output of the RM server:
<?xml version="1.0" encoding="UTF-8"?>
<rdf:RDF
    xmlns:dcterms="http://purl.org/dc/terms/"
    xmlns:rdf="http://www.w3.org/1999/02/22-rdf-syntax-ns#"
    xmlns:oslc="http://open-services.net/ns/core#"
    xmlns:rdfs="http://www.w3.org/2000/01/rdf-schema#"
    xmlns:j.0="http://jazz.net/ns/rm/dng/config#">
  <j.0:DngCmDeliverySession>
    <oslc:serviceProvider rdf:resource="https://clm.example.com:9443/rm/oslc_rm/_Vk2BUPoUEeiHfarJu_66SQ/services.xml"/>
    <dcterms:title rdf:parseType="Literal">Type System Delivery Session 2019/01/11 08:59:48 MEZ</dcterms:title>
    <j.0:source rdf:resource="https://clm.example.com:9443/rm/cm/changeset/_2yQ8IBV2EemBH9V6euA71g"/>
    <j.0:target rdf:resource="https://clm.example.com:9443/rm/cm/stream/_8HxiUPoZEei1heqPanuHaQ"/>
  </j.0:DngCmDeliverySession>
</rdf:RDF>
This data is processed by the server and a response is returned. Similar to the previous GET example, the response data needs to be processed. These details are not shown here. To see them, download the prototype code.
PUT: Update a resource representation
In OSLC, an HTTP PUT retrieves resources. The following code shows how to PUT a resource and perform marshaling in an OSLC/REST PUT call.
The delivery session does not automatically run after it is created: the delivery session state must be updated to complete the delivery. This is used as the example to show how a resource is changed and updated.
In this example, first, the code changes the delivery session state of the this resource object to the http://jazz.net/ns/rm/dng/config#delivered URI. Next, the client.updateResource() call to the resource URI with the class as argument causes the OSLC4J client to marshal the class information by using the annotations, and sends a PUT request with the headers and the RDF/XML to the server to update the object.
       this.setDeliverySessionState(new URI("http://jazz.net/ns/rm/dng/config#delivered"));

        ClientResponse response = null;
        try {
            response = client.updateResource(this.getAbout().toString(), this, OslcMediaType.APPLICATION_RDF_XML);
The resulting PUT request looks like this:
PUT https://clm.example.com:9443/rm/delivery-sessions/_TL0ysBV3EemBH9V6euA71g

Accept: rdf+xml
OSLC-Core-Version: 2.0
Content-type: application/rdf+xml
The request body is generated from the deliverySession class instance. The generated request body looks like this:
<?xml version="1.0" encoding="UTF-8"?>
<rdf:RDF
    xmlns:dcterms="http://purl.org/dc/terms/"
    xmlns:rdf="http://www.w3.org/1999/02/22-rdf-syntax-ns#"
    xmlns:oslc="http://open-services.net/ns/core#"
    xmlns:rdfs="http://www.w3.org/2000/01/rdf-schema#"
    xmlns:j.0="http://jazz.net/ns/rm/dng/config#">
  <j.0:DngCmDeliverySession rdf:about="https://clm.example.com:9443/rm/delivery-sessions/_TL0ysBV3EemBH9V6euA71g">
    <j.0:deliverySessionState rdf:resource="http://jazz.net/ns/rm/dng/config#delivered"/>
    <oslc:serviceProvider rdf:resource="https://clm.example.com:9443/rm/oslc_rm/_Vk2BUPoUEeiHfarJu_66SQ/services.xml"/>
    <dcterms:title rdf:parseType="Literal">Type System Delivery Session 2019/01/11 08:59:48 MEZ</dcterms:title>
    <j.0:source rdf:resource="https://clm.example.com:9443/rm/cm/changeset/_2yQ8IBV2EemBH9V6euA71g"/>
    <j.0:target rdf:resource="https://clm.example.com:9443/rm/cm/stream/_8HxiUPoZEei1heqPanuHaQ"/>
  </j.0:DngCmDeliverySession>
</rdf:RDF>
The code continues to evaluate the response. The delivery session is a long-running operation and requires a special task tracker to follow the operation until it’s complete. This mechanism is explained later in this article.
DELETE: Delete a resource representation
In OSLC, an HTTP DELETE deletes resources. The OSLC4J client provides a delete operation that requires only the URI of the resource. The parameter is the URI of the resource:
org.eclipse.lyo.client.oslc.OslcClient.deleteResource(String)
The resulting DELETE request looks like this:
DELETE https://clm.example.com:9443/rm/cm/changeset/_L3atcB4pEemlXO5HdTHYbQ

OSLC-Core-Version: 2.0
The following example shows the code for discarding change sets by using com.ibm.requirement.typemanagement.oslc.client.dngcm.DngCmUtil.discardChangeSet:
        logger.debug("DiscardChangeSet");
        ClientResponse response = null;
        try {
            response = client.deleteResource(changeset);
            logger.debug("Status: " + response.getStatusCode());

            switch (response.getStatusCode()) {
            case 200:
                result = true;
                logger.debug("Result '{}'.", result);
                break;
The response status code (200) determines whether the delete operation was successful. The response body is empty. This might not be the case for all interfaces.
A DELETE request is not the only way to remove items in REST interfaces. Some REST interfaces also use a POST request or other requests to manage objects lifecycles.
Task tracker: Long-running operations
There are several operations which, like the delivery session, take time to finish. To support these operations, Rational DOORS Next Generation implements the Task Tracker API. Long-running operations provide a task tracker URI. Typically, but not always, the tracking URI is returned in the org.apache.http.HttpHeaders.LOCATION response header, also known as Location.
After the tracking URI is retrieved, it can be queried until the state is complete and a verdict is created. Some utility classes in com.ibm.requirement.typemanagement.oslc.client.tracking support the tracking API.
The following example shows how OSLC4J can receive other formats such as JSON. Unmarshaling is performed by jsonReader.readObject().
            response = client.getResource(uri, requestHeaders);
            InputStream input = response.getEntity(InputStream.class);

            // Create JsonReader object
            JsonReaderFactory factory = Json.createReaderFactory(null);
            JsonReader jsonReader = factory.createReader(input);

            JsonObject jObj = jsonReader.readObject();
More recent versions of OSLC4J can typically marshal and unmarshal JSON, however, this capability was not used for this prototype.
Special API behavior
One of the many surprises working on this code was the many exceptions to the rules using the APIs. Consider the API for change sets: the API is implemented in the resource representation class Changeset. Issues with the Changeset API require special treatment of the RDF/XML request body that is sent to the server. The required behavior described below was not needed in any of the other API examples.
The first issue is that the API requires the attribute rdf:about in the RDF/XML request body sent to the server. The API requires the value to be at least rdf:about=”” or include a valid URL. Sending “” is impossible in OSLC4J because the value of a java.net.URI, which is the type of the about field used in the AbstractResource OSLC4J class, can only be set to a valid URI. Any valid URL is fine, but an empty URL is not valid. On the other hand, storing an arbitrary valid URI in the resource representation does not make any sense either. However, if rdf:about is omitted, the server fails with a null pointer exception. To avoid this exception, an artificial value is set before sending the request to create the change set. In the following example, setting rdf:about with the value “http://open-services.net/ns/config#Changeset” avoids the null pointer exception.
<j.0:Configuration rdf:about="http://open-services.net/ns/config#Changeset">
After the change set is created and the actual URI of the change set is available, the artificial value must be replaced with the real value in the representation class. To avoid having an invalid URI in the object, the code temporarily sets the URI back to null after the createResource() POST call until a valid URI is available.
Special handling was also needed to address the issue that a change set is represented in RDF/XML by a Configuration (j.0:Configuration) that has a special type set using rdf:type. See the value of rdf:type in the following RDF/XML code.
<?xml version="1.0" encoding="UTF-8"?>
<rdf:RDF
.......
  <j.0:Configuration rdf:about="http://open-services.net/ns/config#Changeset">
    ........
    <rdf:type rdf:resource="http://open-services.net/ns/config#Changeset"/>
  </j.0:Configuration>
</rdf:RDF>
The OSLC4J Framework API is not really designed for this but it was achieved by adding a special field that represents the type and by setting the URI to the desired value. The following code initializes the data in the Changeset class, including the type.
    public void initialize(String title, String description, URI component, URI targetStream, URI changesetFactory)
            throws URISyntaxException {
        if (title == null) {
            title = "No Title " + TimeStampUtil.getTimestamp();
        }
        setTitle(title);
        setDescription(description);
        setComponent(component);
        setStream(targetStream);
        setChangeSetFactory(changesetFactory);
        setAbout(null);
        setType(new URI("http://open-services.net/ns/config#Configuration"));
    }
The following RDF/XML code shows the information that the server receives from the prototype code.
<?xml version="1.0" encoding="UTF-8"?>
<rdf:RDF
    xmlns:dcterms="http://purl.org/dc/terms/"
    xmlns:rdf="http://www.w3.org/1999/02/22-rdf-syntax-ns#"
    xmlns:oslc="http://open-services.net/ns/core#"
    xmlns:j.0="http://open-services.net/ns/config#"
    xmlns:rdfs="http://www.w3.org/2000/01/rdf-schema#">
  <j.0:Configuration rdf:about="http://open-services.net/ns/config#Changeset">
    <j.0:component rdf:resource="https://clm.example.com:9443/rm/cm/component/_qQIn0PoYEei1heqPanuHaQ"/>
    <j.0:stream rdf:resource="https://clm.example.com:9443/rm/cm/stream/_8HxiUPoZEei1heqPanuHaQ"/>
    <dcterms:title rdf:parseType="Literal">Import-Type-System-CS-2019/01/11 08:59:21 MEZ</dcterms:title>
    <dcterms:description>Created for automation.</dcterms:description>
    <rdf:type rdf:resource="http://open-services.net/ns/config#Changeset"/>
  </j.0:Configuration>
</rdf:RDF>
Notice the namespace prefixes, which don’t look familiar: j.0 instead of oslc_config, which was used in the first examples in this article. The annotations for OSLC4J do not define the prefix name and it is automatically generated. The RDF/XML that is sent to the server contains artificial and abstract identifiers such as j.0 or other text as a prefix. This can be confusing, for example, if you use server logging as described below. The namespace that the prefix represents is important, not the prefix itself.
Another inconsistent area is that the Task Tracker URI is communicated in different ways in different parts of the API, which requires writing extra code. Some use the header “Location” to communicate the tracker URI, some send the tracker URI in the response body.
Although there are other exceptions to the rule, the preceding exceptions are the most obvious.
Server logging
You can log the communication that’s received on the server. By setting the log level for log4j.logger.com.ibm.rdm.fronting.server.wire in the log4j.properties file of the RM application to some other value, more information can be logged.
For example, to log all communication, use the following setting in the # HTTP logging section:
log4j.logger.com.ibm.rdm.fronting.server.wire=ALL
This setting affects the size of the log files and system performance, so choose its value carefully. Consider using it only on your own test server for API development. The “ALL” value was used to capture several of the preceding XML/RDF code examples.
Pattern
The prototype code is experimental and different approaches were considered for things such as representation and related communication. For example, several resource representation classes, such as Component, are only container classes that provide fields and getter and setter methods. The code for communicating with the server to retrieve and manipulate the represented objects is in utility classes. The utility classes provide static methods to call.
Some resource representations, such as Changeset, also contain the code to create and update the representation by communicating with the server in the class itself. Currently, it is not clear what the best approach is. Both have advantages and disadvantages. Using simple containers makes it easy to maintain the code and also to work around API limitations. For example, the issue with the Changeset API that was revealed during the implementation might have been easier to handle if the communication code was in a separate class.
A third, and perhaps better, approach might be the middle way: using simple resource representation classes that more or less are only containers. Also, consider providing more complex service classes for certain domains that implement the client server communication using the representations, instead of just one utility class.
One service class can handle local configurations, another with requirements. This approach keeps the resource representation classes simple and offers better reuse of the communication infrastructure.
Currently, the code is client code and contains only one connection and one thread. No effort was made to make the code thread safe, which is a considerable effort. Thread-safe code could run parallel operations. Instead of working on streams consecutively, multiple concurrent threads could run. This would increase the load on the server and might require balancing the number of concurrent operations. It would also increase the complexity of the implementation, which would make it more difficult to understand and reuse.
APIs and their implementation
The following APIs were used for the automation tool referred to in this article.
Basic public OSLC-based REST APIs are used to discover components and streams. Special public APIs are used to perform the subsequent necessary configuration management aware operations. For details about the main entry point for these server APIs, see the Rational DOORS Next Generation Server API documentation on Jazz.net.
The following APIs complete the necessary configuration-management-aware tasks:
- Rational DOORS Next Generation Type Import: Import types from one component or project to another
- Rational DOORS Next Generation Configuration Management: Work with Rational DOORS Next Generation delivery sessions
- Rational DOORS Next Generation Task Tracker: Monitor asynchronous long-running server activities
- An API to create change sets is supported, but there is no public documentation available
- An API to discard change sets is supported, but there is no public documentation available
Summary
This article explains how to obtain and use the Rational DOORS Next Generation type system management automation tool prototype and describes the code structure, so that you can extend the tool for reuse and add features to it. The article also explains how the tool uses OSLC4J to work against OSLC and REST APIs. By using the examples in the code and this article, you can start working on automation and integration with most OSLC-based or REST-based interfaces.
Your comments, feedback, ideas, and experience are appreciated. You can ask questions in the Jazz.net forum. Tag the question as a Rational DOORS Next Generation question by using the dng-type-system-management tag.
Related information
- Maintaining the Rational DOORS Next Generation type system in a configuration-management-enabled environment. Part 1: Manual procedures
- Maintaining the Rational DOORS Next Generation type system in a configuration-management-enabled environment. Part 2: Automation
- DOORS Next Generation server APIs
- Open Services for Lifecycle Collaboration Workshop
About the authors
Ralph Schoon is a member of the IBM Watson IoT Unleash the Labs team, which has a mission to help IBM staff and customers apply Jazz technologies. Ralph has his own blog about extending and automating Rational Team Concert. He has published multiple articles on Jazz.net and is committed to working with Jazz users on the Jazz.net forums to help them understand the technical details of the Jazz products and optimize their solutions. Before his current role, Ralph worked as a Leading Technical Sales Representative for IBM, team lead and developer for machine control for an industrial company, developer, Microsoft Certified Professional, and system and network administrator. He can be contacted at ralph.schoon@de.ibm.com.
Todd Dunnavant, Ph.D., P.E., is the Continuous Engineering Practice Lead and a Principal Solution Architect with IBM Watson IoT Services. He has 20 years of experience successfully transforming how software, systems, and product engineering teams work. For the past 7 years, Todd has focused on realizing these transformations using the IBM Jazz-based products. More recently, Todd has helped multiple product-centric companies adopt the lifecycle configuration management capabilities of the IBM Internet of Things Continuous Engineering tool suite. He can be contacted at twdunnav@us.ibm.com.
Ian Zimmermann is a CLM Solution Architect who has led requirements management, CLM, and global configuration implementations for many years. A former aerospace engineer with the Canadian Military, Ian has also held roles including Director of IZTech (an IBM Business Partner) and Director of Requirements and Project Portfolio Management for Telelogic. With deep expertise in the CLM suite and Rational DOORS, Ian is a Certified Rational DOORS Next Generation expert and has successfully migrated over 75 databases from Rational DOORS to Rational DOORS Next Generation. He can be contacted at ianz@ca.ibm.com.