Setting up Rational Team Concert Git integration by using a node server
Rational Team Concert (RTC) 6.0.3 release provides the following integration points with Git:
- Process governance for Git operations.
- Linking Git commits to work items in Rational Team Concert.
RTC server uses the Change and Configuration Management (CCM) application to provide features.This article describes the setup that is required for this integration.
Table of Contents
Setup
Prerequisites
You downloaded and installed the following software:
- Git (http://git-scm.com/download)
- Node.js (https://nodejs.org/en/download/current/)
- RTC Git Integration Toolkit zip (https://jazz.net/downloads/rational-team-concert/releases/6.0.3?p=allDownloads)
Setting up the Git repositories
- Select a path to create the Git repositories. For this example, use
c:/gitrepos. - Navigate to the folder c:/gitrepos.
- Create a new Git repository called
MyDemo:- Create a directory with the name
MyDemo.gitunderc:/gitrepos. - Navigate to the directory
c:/gitrepos/MyDemo.gitand run the commandgit init --bareC:\gitrepos>mkdir MyDemo.git C:\gitrepos>cd MyDemo.git C:\gitrepos\MyDemo.git>git init --bare Initialized empty Git repository in C:/gitrepos/MyDemo.git/ C:\gitrepos\MyDemo.git>dir HEAD config description hooks info objects refs C:\gitrepos\MyDemo.git>
- Create a directory with the name
An empty Git repository is created. Next, host the Git repository by using the node server and manage it by using the RTC server.
Setting up the node server
- Navigate to the directory where you extracted the RTC Git Integration Toolkit. For this example, use
c:/rtc_git_server_toolkit. - Navigate to the
serverfolder underc:/rtc_git_server_toolkit. - Install the required node modules by running the command
npm install --production. This action installs the required node modules, such as express, passport, and nodegit.c:\rtc_git_server_toolkit\server>npm install --production
The NodeGit module installation can fail if some dependencies are missing. To help resolve dependency issues, see http://www.nodegit.org/guides/install/from-source/. Alternatively, you can set Git-Use-NodeGit to false in the config.json file.
Server-side configurations
Configuring the node server
- After the node server dependencies are set up, configure the server to host the Git repositories. The server parameters are read from the file config.json, which is located in the folder
c:/rtc_git_server_toolkit/server. - Open the
config.jsonfile in a text editor. The file is in JSON format and every property (for example, “X”) has a corresponding description property (“X-Description”). - In this example, the node server is running by using
httpon the port8888. - Modify the following properties:
Server-Port: Set the value to the port number to which you want to run the node server. In this example, use port8888."Server-Port": 8888,
Git-Executable-Path: This property has the absolute value of the path togitexecutable. Ifgitis located on thePATHvariable, then specifying git as the value is sufficient."Git-Executable-Path":"git",
Git-Repositories-Root-Dir: This property specifies the full path to the parent folder, which is holding the Git repositories. In this example, the path isc:/gitrepos."Git-Repositories-Root-Dir": "C:/gitrepos/",
Auth-Profiles: This property defines a set of authentication profiles that can be used by the node server. In this example, the RTC serverhttps://everest:9663/ccmis used as the authentication server."Auth-Profiles": { "everest-9663": { "type": "BASIC", "url": "https://everest:9663/ccm/secure/authenticated/identity", "method": "GET" } }Git-URL-Prefixes: This property defines a set of URL prefixes to be considered as a Git request. If the incoming request has a prefix that is part of this list, the node server applies the corresponding profile for the request. In this example, for any requests with the prefixgit,apply the authentication profileeverest-9663."Git-URL-Prefixes": { "/git": { "authProfile": "everest-9663" } }
{
"Version": 1,
"Server-Use-HTTPS": false,
"Server-Key-File-Path": "",
"Server-Certificate-File-Path": "",
"Server-Setup-HTTP-Redirector": true,
"Server-Port": 8888,
"Server-Socket-Timeout": 180000,
"Git-Executable-Path": "git",
"Git-Repositories-Root-Dir": "C:/gitrepos/",
"Git-Use-NodeGit": false,
	"Auth-Profiles": {
	    "everest-9663": {
	        "type": "BASIC",
	        "url": "https://everest:9663/ccm/secure/authenticated/identity",
	        "method": "GET"
	    }
},
"Git-URL-Prefixes":
"/git": {
"authProfile": "everest-9663"
}
}
Running the node server
- Run the Node server to host the Git repositories. Navigate to the folder
c:\rtc_git_server_toolkit\serverand run the commandnode main.js.c:\rtc_git_server_toolkit\server>dir README.txt config.json git-lib hooks main.js node_modules package.json rtc services utils c:\rtc_git_server_toolkit\server>node main.js Server started. Listening at port 8888.
Note: The node server is accessed through the dns name ‘ceres’. For example http://ceres:8888.
- Perform a test to check that the node server is serving the Git repositories. Open a web browser and navigate to the url
http://ceres:8888/git/MyDemo.git. You are prompted for a user name and password, as shown below.
Configuring the RTC server
- Log in to the RTC server
https://everest:9663/ccmby using a web browser. In this example use the login clm, which has administrator permissions and a developer license assigned to it. - Create a new project area with the name GitProjects and apply the SCRUM template to it.
- Create a user named gituser and assign the user a contributor license. Add the user to the project area with the role Team Member.
- Go to the Permissions page of the project area and grant everyone access to all Git-related permissions. This action is for simplicity. After the integration is set up, you can change the permissions according to your requirements.
Git Permissions page:

- Authorise the Git requests by using the administrator user clm. Log in to the RTC server
https://everest:9663/ccmand open the project area GitProjects. Under the source control menu, click Git Requests. - In the Authorize Incoming Git requests dialog, click Yes.

Registering a Git repository in RTC
- Register the Git repository, so that the RTC server can start managing it. Using the administator user clm, log in to the RTC server
https://everest:9663/ccmand open the project area GitProjects. - Click Registered Git Repositories under the Source Control menu.
- After the Browse Registered Git Repositories page opens, click the Register Git Repository button in the top-right corner. A blank editor opens.
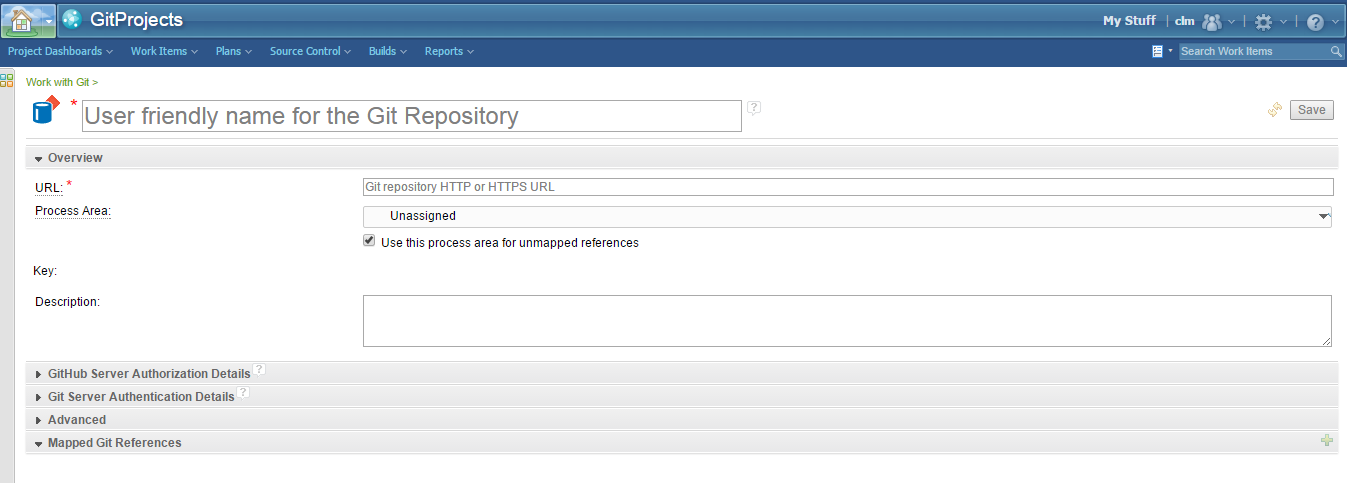
- On this page, add the details for the Git repository URL and the process area. The values are shown below.
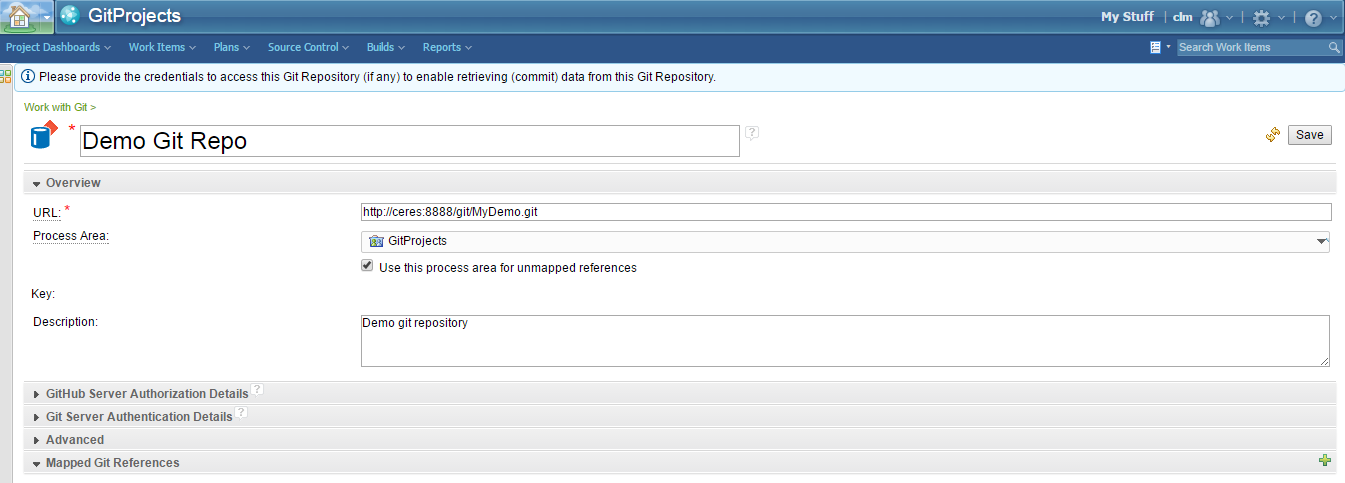
- Click Save, which saves the registry information and generates a unique key. Note the key value, which is used for configuring the Git side of the integration.

- To display the Git commit details, RTC needs to access the Git repository, which is also done through the node server. On the Git repository page, go to Git Server Authentication Details and provide user authentication information.

Configuring the Git repository
Configure the git repositoryMyDemo.git to link to the RTC server https://everest:9663/ccm.- Navigate to the Git repository folder. In this example, the path is
c:\gitrepos\MyDemo.git. - Open the file
configc:\gitrepos\MyDemo.git>ls HEAD config description hooks info objects refs
- In the config file, add RTC-specific parameters. These parameters provide details about the RTC server and the Git repository item that you created earlier. These two configuration variables are added under the
rtcsection, as shown below:[rtc] repourl = https://everest:9663/ccm repokey = 9f35952a70224411859a29f10cead2e3
Note: The value of therepokeyis the one generated by RTC when the Git repository mapping was created.
The final contents of the config file look something like the following:
	[core]
	    repositoryformatversion = 0
	    filemode = false
	    bare = true
	    symlinks = false
	    ignorecase = true
	    hideDotFiles = dotGitOnly
	[rtc]
	    repourl = https://everest:9663/ccm
	    repokey = 9f35952a70224411859a29f10cead2e3
Configuring the hooks
The final step in the setup is to configure the hooks of theMyDemo.git Git repository. In this example, configure both the pre-receive and post-receive hooks. If you are planning to use the integration only for work item linking, only configure the post-receive hook.The RTC Git server toolkit zip ships with template hook files, which can be used directly. These hook files are under the folder \server\hooks\examples.
	c:\rtc_git_server_toolkit\server\hooks\examples>dir
	ReadMe.txt  gitlab  post-receive  pre-receive
- Copy the files pre-receive and post-receive to the hooks folder under the Git repository MyDemo.git. On Unix systems, ensure that the copied files have
executablepermissions. - After the files have been copied, in each of the files, set the value of the variable
RTC_GIT_SERVER_TOOLKIT_PATH. In this example, the value isc:/rtc_git_server_toolkit.
Testing the integration
For testing and using the integration, use a client machine to connect to the Git repository and execute Git operations. This machine must access the machine that is running the RTC server and the node server.Initial checklist:
- For testing purposes, use the user gituser. This user has the required permissions in RTC to create and save work items, and read and write into Git repositories.
- A sample work item
54: Test Git Integrationis used. Log in to RTC and create a work item in the project area GitProjects. - On the client machine, ensure that Git is installed.
Smoke testing the integration:
- From the client machine, clone the Git repository by executing the Git command
git clone http://ceres:8888/git/MyDemo.git, whereceresis the name of the machine that is running the node server.workspace:git kk$ git clone http://ceres:8888/git/MyDemo.git Cloning into 'MyDemo'... Username for 'http://ceres:8888': gituser Password for 'http://gituser@ceres:8888': warning: You appear to have cloned an empty repository. Checking connectivity... done.
Note: If this command succeeds, the folder MyDemo is created on your machine. This folder is the clone of the Git repository that you created earlier. - Create a new file in the local Git repository. Add the file to a new commit, link it with an RTC work item, and push the commit to the remote Git repository.
	workspace:MyDemo kk$ echo test >> foo.txt
	workspace:MyDemo kk$ git add foo.txt
	krishna s-mbp:MyDemo kk$ git commit -a -m "for task 54"
	     [master (root-commit) 3aaf683] for task 54
	     1 file changed, 1 insertion(+)
	     create mode 100644 foo.txt
	workspace:MyDemo kk$ git push origin master
	     Username for 'http://ceres:8888': gituser
	     Password for 'http://gituser@ceres:8888':
	     Counting objects: 3, done.
	     Writing objects: 100% (3/3), 210 bytes | 0 bytes/s, done.
	     Total 3 (delta 0), reused 0 (delta 0)
	     To http://ceres:8888/git/MyDemo.git
	     * [new branch]      master -> master
	     workspace:MyDemo kk$
A new filefoo.txtis added to the Git repository and pushed to the remote Git repository. You also linked the commit to the RTC work item that has the id 54. - Verify that the commit has been pushed to the remote Git repository by cloning the same repository at a different location. The cloned repository has
foo.txt. - Verify that the work item linking works. Open the work item (provided in the commit comment) in a web browser. Under the Links tab, you can see a link of type
remote change sets.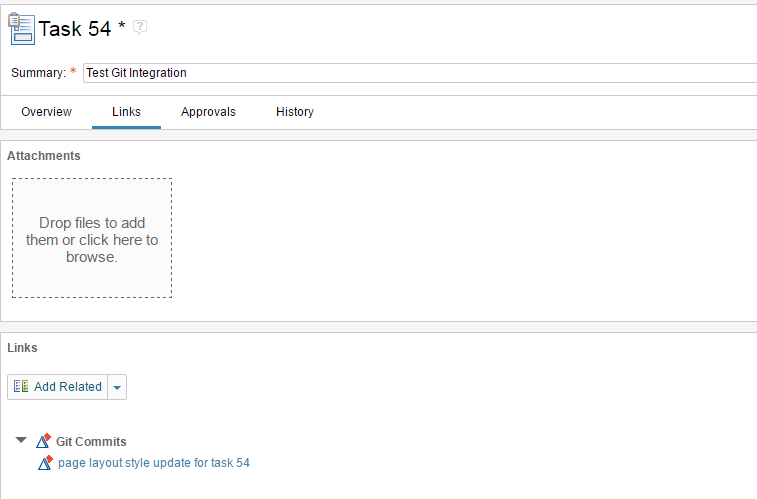
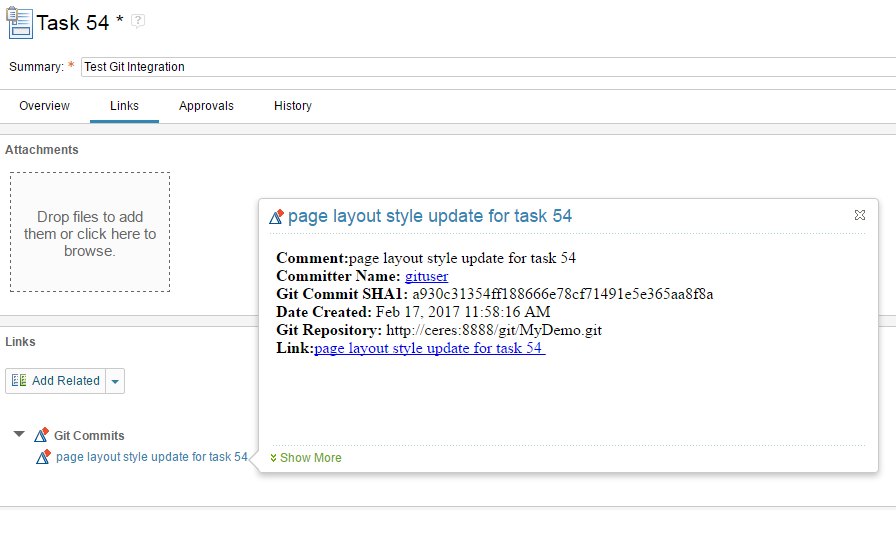
- Hover over the link to display a pop-up with Git commit information. Click the link to open a page with commit details.
Copyright © – 2017 IBM Corporation