Integrating your test tools with IBM Rational Quality Manager using the command-line adapter
Many teams have their own custom testing tools that meet the specific needs of their group. At the same time they would like to use the numerous features provided by IBM Rational Quality Manager (RQM) to increase the productivity of the testing team. The command-line adapter (CLA) provides a quick and simple path for integrating an existing test tool into RQM. In this article you will learn how to install and configure the CLA, create and execute CLA tests, and view test execution results. The article also covers some of the more advanced features of the CLA, including:
- Attaching files and links to the execution result
- Accessing and setting execution variables in CLA tests
- Setting custom properties
- Mapping application exit codes to RQM result codes
- Updating application progress complete values
- Limiting the applications that the CLA can execute
Install and Configure
Before you can create and execute CLA tests you need to install the CLA on the host(s) where you will execute the tests. See Setting up and starting the command-line adapter for instructions. Once this has been completed on each host where you want to execute your test tool, we will create and execute the CLA tests.
Create and Execute
Now that you have the CLA installed, follow these steps to create an RQM CLA test script that will invoke your test tool/application.
- Login to your RQM server.
- Click the Construction menu and select Test Script from the Create group.
- Enter a name for the new test script and select the Command Line script type from the pull-down.
- Select Use test resources that are local to a test machine, and then click the Select Adapter button.
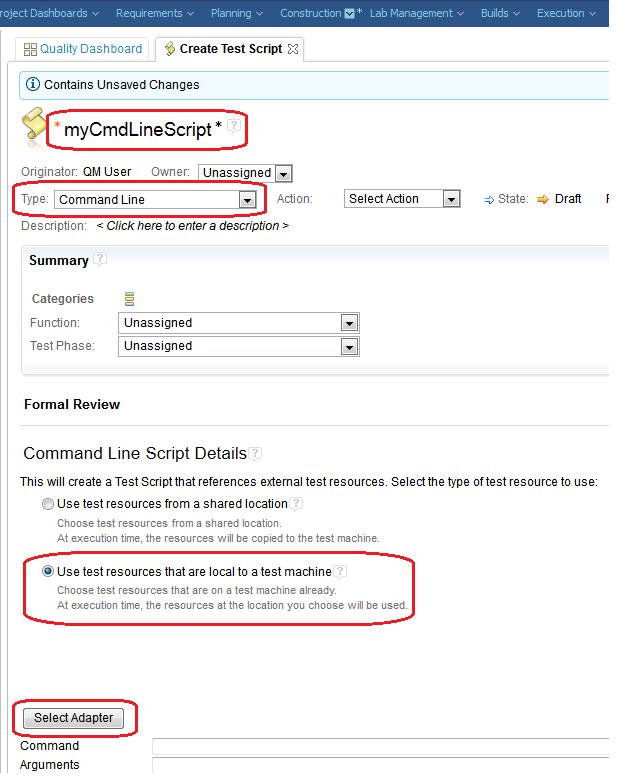
- Select the adapter from the list and click Next.

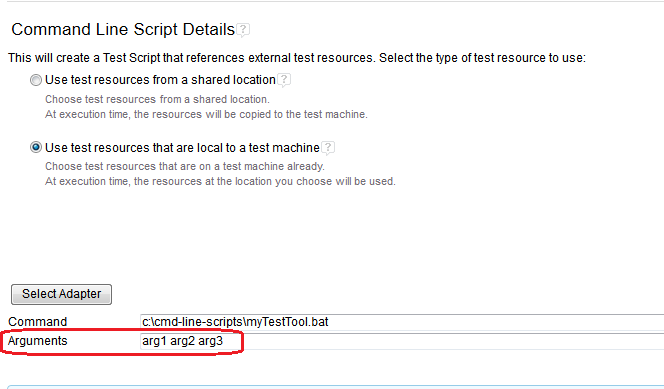
- In the Project Path field, enter the path of the directory on the target test machine that contains the application-under-test executable or shell script. For example, enter c:cmd-line-scripts.
- Click Go to populate the list of directory contents.
- Select the executable or script that will invoke the test tool and click Finish

- Specify any arguments that are required by the test tool executable or script and click Save to save the new test script.
Now we need to create a test case for executing the new command line test script. Follow these steps to create and execute the test case.
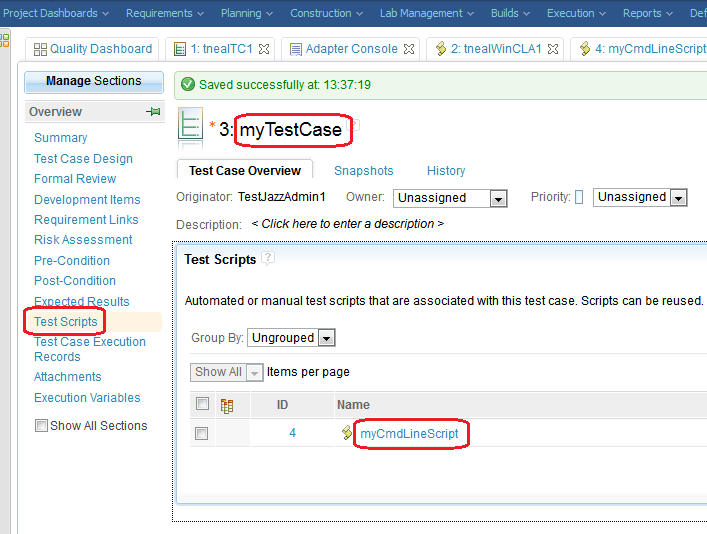
- Click the Construction menu and select Test Case from the Create group.
- Enter a name for the new test case.
- Click the Test Scripts section of the test case.
- Click the Add Test Scripts icon.
- Select the command line test you just created to run on the adapter, and click OK.
- Click Save to save the test case.
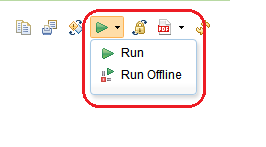
- Click the Run Test Case icon to run the test case.
- Check that the machine running the CLA you installed and configured earlier is listed. If not, click the Pencil icon to select it. Click OK to begin the test case execution.
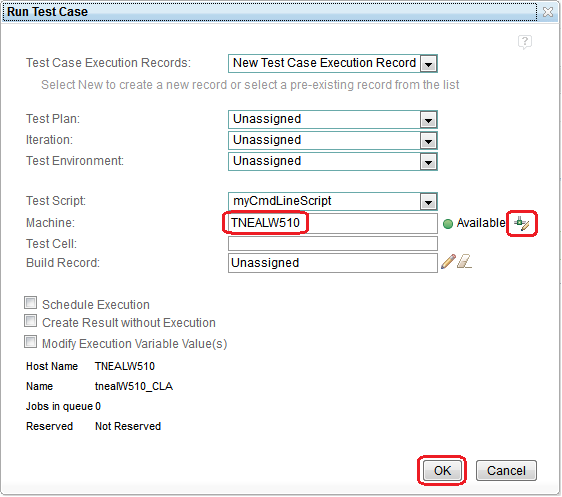
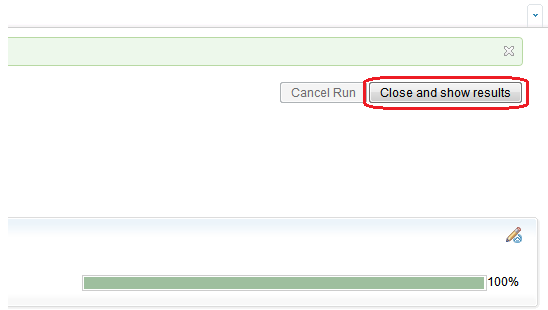
- When the execution of the test case has completed, click the Close and show results button to view the execution results.
If the test application produced any output (stdout) or error messages (stderr) they can be accessed via the links in the Result Details section of the execution result. By default, if the application exit code is zero, the execution result will be set to Passed. Later in this article, you will learn how to map application exit codes to the various execution result values in RQM.

At this point you have seen how you can easily integrate an existing test tool with RQM by creating a command line test script, adding it to a test case, and executing that test case to produce an execution result. Now we will see how you can make use of some more advanced features of CLA tests.
Attaching files and links to the execution result
In the previous example we saw that any output written to stdout and any errors written to stderr are captured and attached to the execution result. You can also attach your own files and links, such as a logfile produced by the application-under-test, or a link to a website.
When the CLA starts the execution of a test, it creates a file that can be updated with name/value pairs which describe files/links that should be included in the execution result of that test. When execution of the test has completed, this file is read by the CLA and any valid files/links found are included in the execution result.
The format of this file is a Java Properties file. In the simplest case, each line of this file will consist of a name, followed by an equal sign (=), followed by a value. The name is the label that will be displayed in the execution result. The value is either a full pathname to a file which resides on the machine running the CLA, or a URL. If the value is a valid pathname to a file that exists, a new attachment will be created on the RQM server and a reference to the attachment will be included in the execution result. If the value is a valid (correctly formatted) URL, a reference to that URL will be included in the execution result. No attempt is made to access the URL at this point, only to verify it is well-formed.
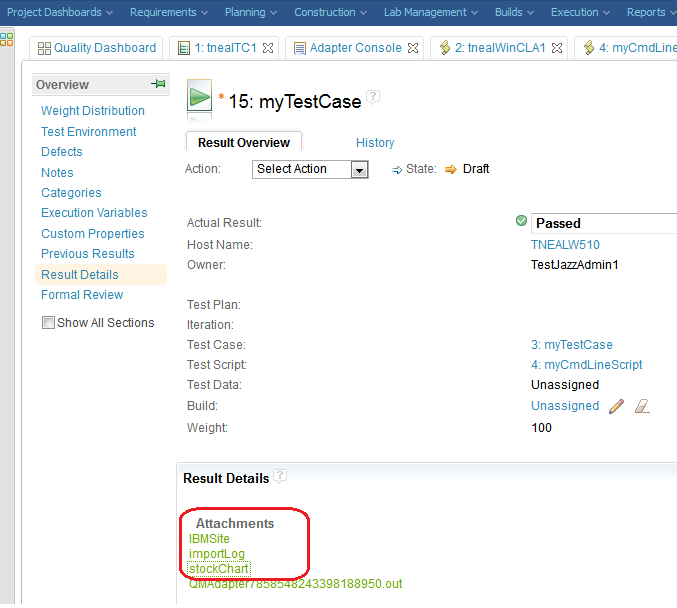
For example, the following file contents would add two file attachments and one link to the execution result.
stockChart=c:/tmp/IBMStockChart.png importLog=c:/tmp/repotools_import.log IBMSite=http://www.ibm.com
The resulting execution result details section would look like the following.
At this point you may be wondering how the test accesses this file which the CLA created. The answer is, via an environment variable named qm_AttachmentsFile. When the CLA creates the process that will run your test, it adds the environment variable to the process environment. The value of qm_AttachmentsFile is the full pathname to the file.
Execution Variables
Execution variables provide a generic mechanism to pass information into your test scripts. Execution variables can be set in the test suite, test case or test script. The following example shows how to access and modify execution variables in a CLA test.
One of the features of execution variables is that you can take a value that was generated in one test script and make reference to it in another test script. This example uses a Unix/Linux style shell script, but the same principles apply to Windows/DOS scripts or other executables as well. This example invokes an application that takes a user name as an argument and returns an ID that can be used in subsequent tests of a sequential suite execution for editing the user information.
- Create a new CLA test script.
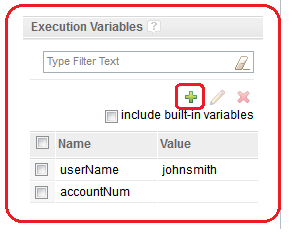
- Add two execution variables to the script, userName and accountNum and provide a default value for the userName variable. When you run the command line test, userName will contain the name of the user that you want to create. On return from a successful invocation of the command line test, accountNum will contain the account ID used to reference the user that was just created. We provide a default value for the userName variable, but will usually override this value when the test suite/test case is invoked.
- The shell script referenced in the Command field of the test script would have the following contents.
#!/bin/sh # Check that we were given a non-null user name if [ -z "$qm_userName" ] then echo User name is null exit 1 fi # Create the new account. The createAccount utility writes the new account number/id to stdout, which is then # saved in NEWID NEWID=`createAccount "$qm_userName"` RTNCODE=$? echo New account number for "$qm_userName" is "$NEWID" # Update the accountNum execution variable so it can be used by the # next test in a suite execution echo "accountNum=$NEWID" >> $qm_ExecutionVariablesFile # All done, set the exit code from the createAccount return code exit $RTNCODE
Note that environment variables are created for each of the execution variables specified in the command line test. The names of the environment variables have ‘qm_’ pre-pended to them to avoid collision with any existing environment variables. So in our example the environment variable names would be qm_userName and qm_accountNum. Ideally, execution variable names include only valid Java identifiers: A-Z, a-z, 0-9, _ and $. If an execution variable contains an identifier that is not in Java, an underscore (_) replaces that identifier in the new environment variable name. For example, if you have an execution variable named user.Name, the resulting environment variable is qm_user_Name.
Also note that to enable subsequent tests in a sequential test suite execution to access the modified value of the accountNum execution variable we must write the new value to the file referenced by the environment variable qm_ExecutionVariablesFile. This file is read after the process running the command line test completes and the name/value pairs found there will be used to populate the execution variables for the next test in the suite.
In a real world scenario the command createAccount in the shell script above would actually create and initialize a new user in some environment. In this fabricated example, createAccount could be anything that returned some text. For example, the line above could be replaced with NEWID=0001.
- Next create a test case that includes the CLA test script that you created in the previous step. In the Execution Variables section of the test case, add variables named userName and accountNum, just like in the CLA test script. You can provide a default value for accountName if you like, but this will usually be overridden at execution time.

- Run the test case to verify that everything is working correctly. As mentioned above, you can override the default values of the execution variables with the Modify Execution Variable Value(s) checkbox on the Run Test Case dialog.
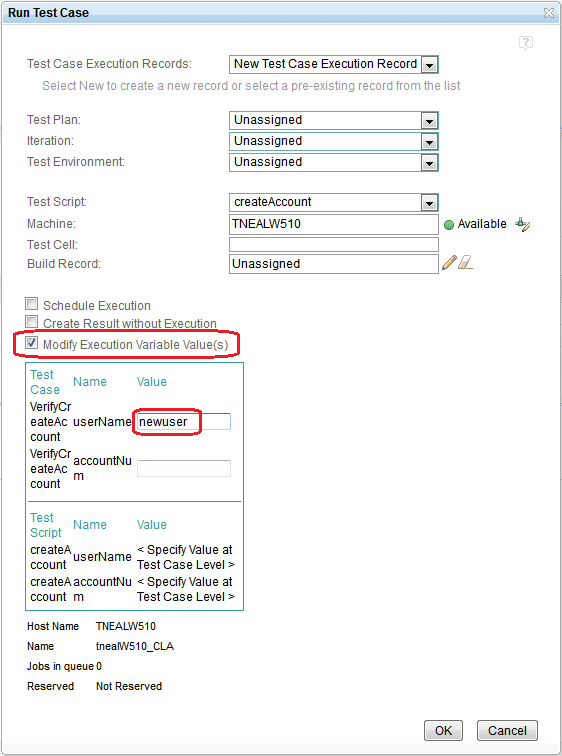
- After the execution completes, view the execution result to see the command output in the Result Details section. The Execution Variables section will show the values of the execution variables as they were when the CLA test script was started.
Execution Variables with Test Suites
To see the benefit of passing execution variables on to other test scripts we will need to create a test suite and add the test case we created above as well as another test case with a script that references the modified execution variables.
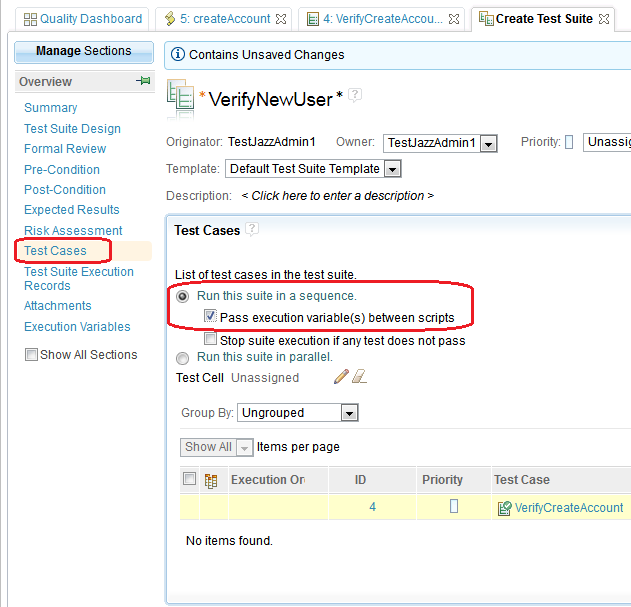
- Create a test suite that contains the test case you just created above. Select Run this suite in a sequence and Pass execution variable(s) between scripts
- In the Execution Variables section of the test suite, add variables named userName and accountNum, just like in the CLA test script. You can provide a default value for accountName if you like, but this will usually be overridden at execution time.
- Now we need to create another test case that will run a Manual test script that shows the accountNum execution variable that was modified in the createAccount CLA test script. In a real world scenario this test would do something like update the newly created user’s account information, print the account information, or delete the account. In our fabricated example we will just view the values of the execution variables to show that they have been modified and were accessed successfully in the second test. Follow these steps to create another test case and Manual test script which we’ll use to verify the execution variables were modified and passed correctly.
- From the Test Cases section of the VerifyNewUser test suite, click the Create Test Case icon.
- Type a name for the new test case and click OK.
- Save the test suite, then click on the name of the newly created test case to edit it.
- From the Test Scripts section of the test case, click the Create Test Script icon.
- Type a name for the new Manual test script and click OK.
- Save the test case, then click on the name of the newly created Manual test to edit it.
- From the Execution Variables section of the new Manual test, click the Add icon.
- Add the execution variable named userName. Optionally, give it a default value.
- Follow the previous two steps to add the execution variable named accountNum.
- Add a step to the Manual test and enter ‘userName is: ‘ in the description field.
- Select the userName execution variable and click the Insert Execution Variables in current Step icon.
- Follow the previous two steps to add a step in the Manual test showing the value of the accountNum execution variable.
- Save the Manual test script.
Now execute the VerifyNewUser test suite. You can select the Modify Execution Variable Value(s) checkbox at suite execution time to override the default values of the execution variables. When the command line script has finished, click the Start Manual Test link in the Test Suite Execution Console to begin the Manual test execution. You will see the values of the execution variables displayed in the Description field of the Manual test steps. You can also view the variable values in the Execution Variables section of the test case results found in the test suite execution result.
Built-in Execution Variables
In certain cases your CLA test may want to obtain information about the RQM test execution environment it is running in. For example, your test might need to know the name of the test suite or test case being executed, or possibly verify the test environment operating system or browser value. This type of information is available via a set of execution variables named built-in execution variables. They can be enabled by selecting the checkbox titled include built-in variables in the Execution Variables section of the test script editor.

When this checkbox is selected, the following additional execution variables will be created and their values will be set accordingly. Remember that execution variables are provided to CLA scripts as environment variables, with ‘qm_’ prefixed to the execution variable name. So to access the name of the test plan from a CLA script you would access the environment variable named ‘qm_RQM_TESTPLAN_NAME’.
- RQM_TESTSCRIPT_NAME
- RQM_TESTSCRIPT_WEBID
- RQM_TESTCASE_NAME
- RQM_TESTCASE_WEBID
- RQM_TESTSUITE_NAME
- RQM_TESTSUITE_WEBID
- RQM_TESTPLAN_NAME
- RQM_TESTPLAN_WEBID
- RQM_TESTPHASE_NAME
- RQM_TESTPHASE_WEBID
- RQM_TESTCASE_EXECUTIONRECORD_NAME
- RQM_TESTCASE_EXECUTIONRECORD_WEBID
- RQM_SUITEEXECUTIONRECORD_NAME
- RQM_SUITEEXECUTIONRECORD_WEBID
- RQM_PROJECT_NAME
- RQM_PROJECT_ALIAS
- RQM_BUILDRECORD_NAME
- RQM_BUILDRECORD_WEBID
- RQM_BUILDDEFINITION_NAME
- RQM_BUILDDEFINITION_WEBID
- RQM_CONFIGURATION_NAME
- RQM_CONFIGURATION_CPU
- RQM_CONFIGURATION_BROWSER
- RQM_CONFIGURATION_ADAPTER
- RQM_CONFIGURATION_DATABASE
- RQM_CONFIGURATION_APPLICATIONSERVER
- RQM_CONFIGURATION_MANAGEMENTAGENT
- RQM_CONFIGURATION_OS
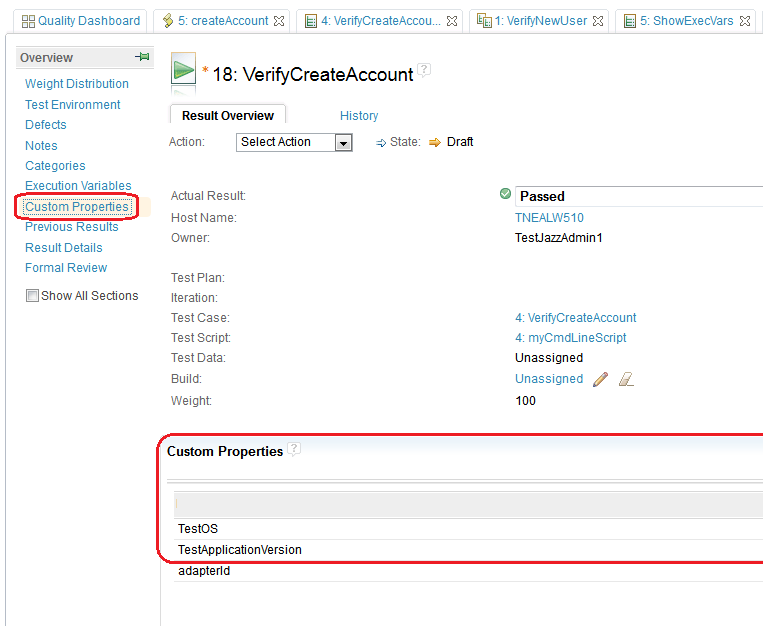
Custom Properties
You can use custom properties to populate information into the execution results of your CLA tests. This information consists of any name/value pairs you choose. For example you might want to log the version of your test application and the operating system it’s running on. There are two different ways you can add custom properties to an execution result. If the name/value pairs are fairly static you can simply add them to the commandline.properties file in the CLA installation directory. Any name/value pairs specified in this file, where the name does not begin with ‘com.ibm.rqm’, will be added to the execution result of all tests executed by that command line adapter. For example, if I added the following two lines
TestApplicationVersion=1.0 TestOS=RHEL 6
to commandline.properties and restarted the CLA, that information would be logged in the Custom Properties section of every execution result.
The other way to create custom properties is more suited to the case where the name/value pairs need to be created dynamically. To do this, the shell/batch script or executable started by the CLA test script can access an environment variable named qm_CustomPropertiesFile. The value of this environment variable is the absolute path to a file which will be read when test execution completes. Any name/value pairs found in this file will be placed in the Custom Properties section of the execution result of that single test execution.
Note that the custom property name should not start with a digit.
Mapping Application Exit Codes
RQM supports a variety of result codes (Passed, Failed, Error, Blocked, etc) that can be set in an execution result. These result codes can be mapped to application exit codes returned by the shell/batch script or executable started by the CLA test script. For example, by default, if the exit code returned is 0, the result code in the execution result will be ‘Passed’. These mappings can be changed by editing the commandline.properties file in the CLA installation directory. Be sure to restart the CLA after making any changes. The following properties (name/value pairs) define the mappings.
- com.ibm.rqm.commandline.exitcode.PASSED=0
- com.ibm.rqm.commandline.exitcode.FAILED=*
- com.ibm.rqm.commandline.exitcode.ERROR=40
- com.ibm.rqm.commandline.exitcode.INCOMPLETE=41
- com.ibm.rqm.commandline.exitcode.INCONCLUSIVE=42
- com.ibm.rqm.commandline.exitcode.BLOCKED=43
- com.ibm.rqm.commandline.exitcode.PARTIALLY_BLOCKED=44
- com.ibm.rqm.commandline.exitcode.PERMANENTLY_FAILED=45
- com.ibm.rqm.commandline.exitcode.DEFERRED=46
Note that the value for the FAILED result code is ‘*’, indicating that this will match all non-specified exit codes. No exit code should be repeated as this may result in mapping to an unexpected value.
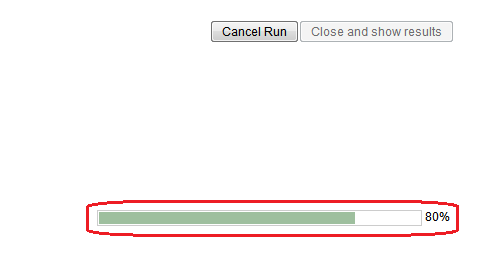
Updating application progress
While a CLA test is running, a progress bar is displayed to show the execution progress completed for that test. This progress information can be controlled by the shell/batch script or executable started by the CLA test script. To control the progress values displayed you will need to edit the commandline.properties file found in the CLA installation directory. Look for a property (name/value pair) with the name ‘com.ibm.rqm.commandline.executionproperties’. Give it a value that is the absolute path to a file on the local machine. Note that the file you specify will be truncated/removed at the beginning and end of each test executed by the CLA. Be sure to restart the CLA after updating the commandline.properties file.
The progress bar is updated by writing two properties (name/value pairs) to the file specified with the ‘com.ibm.rqm.commandline.executionproperties’ property. The names of the properties are ‘progress’ and ‘comment’. Valid values for the ‘progress’ property are integers between 0 and 99, indicating the percentage complete for the test. The ‘comment’ property is optional and is a string that can provide additional status about the progress of the test execution. The CLA will periodically read this file to check for progress updates and display the information in the test case execution tab. For example, if the property file contained the following two lines
progress=80 comment=Almost done...
the test case execution tab would display the test progress as 80% complete and the status as ‘Almost done’.
At strategic locations in your shell/batch script or executable you can update the properties file to indicate the percentage complete of the test execution.
To allow the test process dynamic access to the properties file controlling the update progress, an environment variable named qm_ExecutionPropertiesFile is available. The value of this environment variable is the absolute path to the file.
Limiting applications
Depending on the environment you are operating in, you may want to limit the set of applications that the command line script is allowed to execute. You can do this by editing the commandline.properties file found in the CLA installation directory and setting the value of the property named ‘com.ibm.rqm.commandline.allowed_executables’. If you want to allow multiple scripts or executables, be sure to separate their names with a comma.
com.ibm.rqm.commandline.allowed_executables=first.bat,second.exe,third
Restart the CLA after updating the commandline.properties file.
Conclusion
I hope this article has been helpful and informative. We are always looking for ways to make our tools more useful in meeting your needs. If you have any thoughts or suggestions please feel free to contact me at the address below.
About the author
Thomas P. Neal was a member of the IBM Rational Quality Manager development team for several years and is currently part of the CLM Continuous Delivery team. Tom works for IBM in RTP, NC. He can be contacted at tpneal@us.ibm.com.
© Copyright 2012 IBM Corporation