
CLM 2011 Advanced Upgrade Scenarios
Overview
With three different products and myriad configuration options, upgrading to CLM 3.0.1 can be a challenging exercise. This article addresses some of the trickier setups and contains tips for common pain points. Here is the list of scenarios this article examines:
- Upgrade of multiple CCM or QM applications
- Upgrade of RQM 2.x with Rational Common Reporting or Rational Insight
- Upgrade with Alternate Context Roots
- Distributed Deployment – Servers with Different Architecture
- Distributed Deployment Upgrade of RTC 3.0 to 3.0.1 – Cannot Mount Drives
- Distributed Deployment Upgrade of CLM 2.x to 3.0.1 – Cannot Mount Drives
- Planning for Future Applications
This article is meant to supplement the CLM 3.0.1 InfoCenter, not to replace the information there. Consult Planning the Deployment and Upgrade and CLM 2011 Migration FAQ before proceding with any of these steps.
You may also want to check out Tips for upgrading RTC 2.x to RTC 3.0 if you are upgrading RTC. There have been some changes to some of the command names and arguments in 3.0.1, but most of the general information contained in this article is still relevant.
Lastly, your environment may not entirely match the selected use cases. This article is intended to provide a basis for understanding the modifications that are needed for advanced scenarios with the hope that you can apply this knowledge to your own environment.
Upgrade Limitations
- Only one RM application can be registered with a given JTS.
- RTC 2.x and RQM 2.x cannot be upgraded to the same application server instance since they both have the same context root /jazz. You must distribute the CCM and QM applications on different application servers.
- The public URI of the JTS or application must be stable. Upgraded applications must continue to use the public URI specified in the previous release.
- When an application has been connected to a 3.x JTS, it cannot later be connected to a different JTS
- Upgrading to a shared JTS requires the same user authentication realm for all applications.
- LDAP User Directory – same LDAP server and same LDAP groups for each app
- Tomcat User Database – all the user ids are aligned in the separate servers
Upgrade of multiple CCM or QM applications
If you have multiple CCM or QM applications, you must distribute applications of the same type on different application servers so there are no context root collisions. The applications must also share the same authentication realm.
If you have a CCM 3.0 application, you must upgrade the corresponding JTS 3.0 server to 3.0.1 first. Use this server as the shared JTS for your applications. You can then upgrade the applications in any order of your choosing. Be sure to consult Understanding the deployment and upgrade process for tips on minimizing outage time.
Upgrade of RQM 2.x with Rational Common Reporting or Rational Insight
If you are using Rational Insight, upgrade Insight before upgrading any CLM applications.
If you are using RQM 2.x with Rational Common Reporting (RCR) or Rational Insight, it is recommended that you defer configuring the data warehouse until the QM application is upgraded. If you are upgrading RRC, followed by RTC, followed by RQM, you would defer the data warehouse configuration for the JTS, RM, and CCM by checking the “Skip configuration” checkbox on the data warehouse setup page. After upgrading RQM, visit the JTS setup wizard first to configure the common data warehouse. Finally, configure the data warehouse for all of the other applications. Note that the RTC data mart continues to work until the common data warehouse is configured and the first ETLs run.
Merging of data warehouses is not supported. If you choose not to defer and create a separate data warehouse, any data collected in the original data warehouse will not be merged into RCR.
Upgrade with Alternate Context Roots
The majority of consumers are using the standard context roots shown below. If you are using different context roots in a previous release, you must maintain the context roots in 3.0.1. You cannot use the Installation Manager user interface to install with alternate context roots. Follow the command-line install instructions instead.
Standard Context Roots | ||
|---|---|---|
Product | 2.x Context Root | 3.x Context Root |
| JTS | /jazz (RRC only) | /jts |
| RTC | /jazz | /ccm |
| RQM | /jazz | /qm |
| RRC | /rdm | /rm |
The upgrade scripts can be used with alternate context roots by overriding the default context root argument. For the upgrade script, specify the argument applicationContextRoot for applications and jtsContextRoot for the JTS on the command-line. The corresponding parameters in the upgrade script parameter files are APPLICATION_CONTEXT_ROOT and JTS_CONTEXT_ROOT.
If you are following the manual instructions, specify the applicationContextRoot for applications and jtsContextRoot for the JTS on the command-line of the migration_XXUpdateConfigurationFiles command.
Note that RRC 2.x includes a Jazz Team Server. This Jazz Team Server context root is the only one that is allowed to change when moving from 2.x to 3.0.1. In RRC 2.x, the default JTS context root is /jazz. By default, this JTS context root will be changed to /jts when RRC 2.x is upgraded. It is recommended that you keep the default /jts; if you carry /jazz forward as your JTS context root, you will not be able to upgrade any RTC or RQM 2.x applications into the same application server due to public URI collisions.
NOTE: A full CLM upgrade of all the products with alternate context roots is currently underway to ensure these are the only set of modifications needed.
Distributed Deployment – Servers with Different Architecture
If you are performing an upgrade and the JTS and application servers have different architecture (32-bit vs 64-bit), you can use the upgrade scripts with some minor workarounds. See Tip: Upgrade script workaround for distributed deployments where systems have different architecture (32 bit vs 64 bit) for more information.
Distributed Deployment Upgrade of RTC 3.0 to 3.0.1 – Cannot Mount Drives
This section takes you through an upgrade of RTC 3.0 to 3.0.1 in an environment where we cannot mount drives. We will use the Interactive Upgrade Guide (IUG). The information here only supplements the information the guide contains. When you encounter a step in the wizard instructions, check whether that topic is listed here. The notation “IUG: XXX” is used, where XXX is the instruction in the guide. When you encounter a step called “View this article on Jazz.net for complete instructions on migrating”, it is referencing this article. You are in the right place.The RTC 3.0 upgrade consists of two steps: upgrading the JTS followed by upgrading the CCM application. This upgrade is different from 2.x application upgrades because the JTS already exists. There is no need to move data or configuration information between the application servers or databases.
If you have other applications in your environment, it may make sense to upgrade them before CCM. The key thing to remember is that the JTS must always be upgraded first. Consult Understanding the deployment and upgrade process for tips on minimizing outage time.
The assumptions for this scenario include:
- The JTS and CCM application are distributed on two different application servers, each on its own physical server.
- Both the JTS and CCM are version 3.0.
- We cannot mount drives from one system to another. Note that the InfoCenter does not contain information on what to do in this scenario.
- SQL Server is the DBMS and it is installed on a separate server.
- We are not upgrading any additional applications to the shared JTS at this time.
For this RTC upgrade, select the following options from the IUG:
- Rational Team Concert
- Rational Team Concert version 3.0
- I have a Jazz Team Server version 3.0 application and want to upgrade it to version 3.0.1
- Microsoft Windows
- Apache Tomcat
- Microsoft SQL Server
- I distribute my applications on multiple machines
- No, I cannot mount shared directories or drives
- I do not use Rational Insight or Rational Common Reporting
- Yes, I use LDAP
–> IUG: Use Installation Manager to install a new Jazz Team Server application
The instructions do not clearly specify that two Installation Manager installations are needed. The first installation will install JTS 3.0.1 on its physical server. The second installation will install RTC 3.0.1 on its physical server. Note that all upgrades are really side-by-side installs, meaning we do not upgrade the existing installation.–> IUG: View this article on Jazz.net for complete instructions on migrating
- Upgrade the JTS 3.0 first. The jts_upgrade script can be used to upgrade the JTS as-is. The script will merge the JTS configuration files and update the JTS database tables. Go to the JTS301InstallDirserver directory to execute the command:
upgradejts_upgrade.bat -oldJTSHome JTS3.0InstallationDirserverconf
- Upgrade RTC 3.0. Go to the CCM301InstallDirserverconf directory to run the following commands:
- Update the CCM configuration files. You must specify ignoreJTSVersionCheck or the command will fail.
repotools-ccm.bat -migration_ccm_updateConfigurationFiles oldApplicationHome=CCM3.0InstallationDirserverconf applicationContextRoot=ccm ignoreJTSVersionCheck
- Update the CCM database tables.
repotools-ccm.bat -addTables
- Update the CCM configuration files. You must specify ignoreJTSVersionCheck or the command will fail.
Distributed Deployment Upgrade of CLM 2.x to 3.0.1 – Cannot Mount Drives
This section takes you through an upgrade of RTC 2.x, RQM 2.x, and RRC 2.x to 3.0.1 in an environment where we cannot mount drives. We will use the Interactive Upgrade Guide (IUG) three times, once per application. The information here only supplements the information the guide contains. When you encounter a step in the wizard instructions, check whether that topic is listed here. The notation “IUG: XXX” is used, where XXX is the instruction in the guide. When you encounter a step called “View this article on Jazz.net for complete instructions on migrating”, it is referencing this article. You are in the right place.The assumptions for this scenario include:
- The JTS and all three applications are distributed on four different application servers, each on its own physical server.
- A new shared JTS needs to be created.
- We cannot mount drives from one system to another. Note that the InfoCenter does not contain information on what to do in this scenario.
- We will upgrade RRC first to minimize outage time, followed by RQM and CCM.
- SQL Server is the DBMS and it is installed on a separate server.
Upgrade RRC 2.x to 3.0.1
The RRC upgrade is different from the other upgrades for a number of reasons:- The upgrade must be run from the JTS system, not the RRC system, if you have a distributed topology.
- RRC uses the JTS database to store its data.
- The upgrade consists of an offline migration where the configuration files are merged and user and license data is imported into the JTS database, followed by an online migration that handles migrating dashboards, registering the RM application, and other tasks. During the online migration, the JTS is in read-only mode. While the JTS is in read-only mode, the other applications can be used but operations related to user admin, licenses, etc are not permitted. The online migration allows us to minimize outage time for other applications.
For this RRC upgrade, select the following options from the IUG:
- Rational Requirements Composer
- I need the Jazz Team Server version 3.0.1 application
- Microsoft Windows
- Apache Tomcat
- Microsoft SQL Server
- I want to begin to distribute my applications on multiple machines
- No, I cannot mount shared directories or drives
- I do not use Rational Insight or Rational Common Reporting
- Yes, I use LDAP
–> IUG: Use Installation Manager to install a new Jazz Team Server application
The instructions do not clearly specify that two Installation Manager installations are needed. The first installation will install JTS 3.0.1 on its physical server. The second installation will install RRC 3.0.1 on its physical server. Note that all upgrades are really side-by-side installs, meaning we do not upgrade the existing installation.- Install the new JTS with trial licenses.
- Create a temp directory where you can transfer files to and from the JTS system. In this example, c:tmp is the temp directory.
- Determine the public URI for the JTS. For this example, the JTS public URI will be https://heatherVM6.rtp.raleigh.ibm.com:9443/jts
Consult Planning your URIs to understand how to choose the correct public URI. In general, the public URI should use a fully-qualified domain name and be stable over time. You cannot change the public URI once it is set, so get it right the first time!
–> IUG: Create new databases for the Jazz Team Server application
Be sure to create two new databases: one for the JTS and one for the common data warehouse.
On all of the application server systems, ensure that the SQLSERVER_JDBC_DRIVER_FILE environment variable is set. The SQLSERVER_JDBC_DRIVER_FILE and ORACLE_JDBC_DRIVER_FILE variables changed from 2.x. The change was made in 3.0. You no longer have to put the driver in the server/sqlserver or server/oracle directory (Tomcat) and should use the new variables for WAS. Examples:
SQLSERVER_JDBC_DRIVER_FILE=c:jdbcdriverssqlserversqljdbc.jar ORACLE_JDBC_DRIVER_FILE=c:jdbcdriversoracleojdbc5.jar
–> IUG: View this article on Jazz.net for complete instructions on migrating
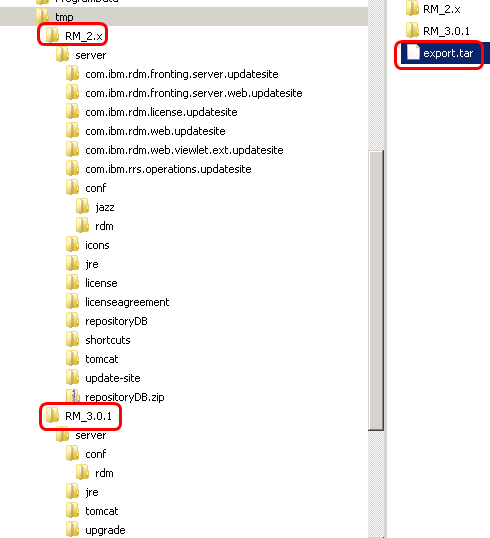
Here’s where things get a little tricky. We have to run the RM upgrade from the JTS box, so we need to have access to the RM 2.x and RM 3.0.1 configuration files. If you are able to mount drives, you can simply mount a drive to the RM 2.x and RM 3.0.1 directories – problem solved. However, in our use case, since we cannot mount drives, the easiest thing to do is to copy the files we need to the JTS box.- Read this tip before proceeding: Tip: Floating licenses must be installed earlier in the RM upgrade process
- Copy the RM2.xInstallDir/server/ folder to the JTS box.
- Copy the RM 2.x exported database tar file to the JTS box.
- Copy the RM301InstallDir/server/ folder to the JTS box. Below is a snapshot of my RM files copied to the c:tmp directory on the JTS box.
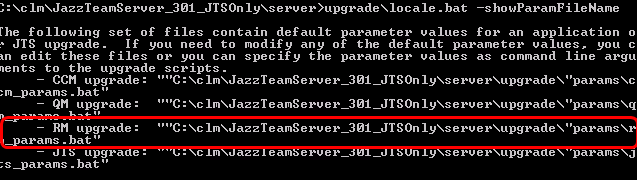
- Locate the parameter file for RM by running
upgradelocale.bat -showParamFileName
- Open the parameter file and set some values. For our use case, only the following values must be set:
set OLD_APPLICATION_HOME=C:tmpRM_2.xserverconf set NEW_APPLICATION_HOME=C:tmpRM_3.0.1serverconf set IMPORT_FROM_FILE=C:tmpexport.tar
- Open a new command prompt if you used this one to exercise any 2.x repotools commands. See Tip: Use a new command prompt for each application upgrade (CLM 2011)
- Given that this is a distributed deployment and the JTS is new, we’ll want to specify -createJTSTables and -jtsURL on the command-line. Note that these parameters are not in the parameter file. The -createJTSTables will create the tables in the JTS database we created earlier. The -jtsURL value is the public URI of the new JTS server. Do not mess this one up because once applications are registered with the JTS, there’s no going back!
- Execute the command. The RM upgrade contains two steps. Carefully review the command-line arguments before hitting ‘E’ to execute.
upgraderm_upgrade.bat -createJTSTables -jtsURL https://server:port/jts

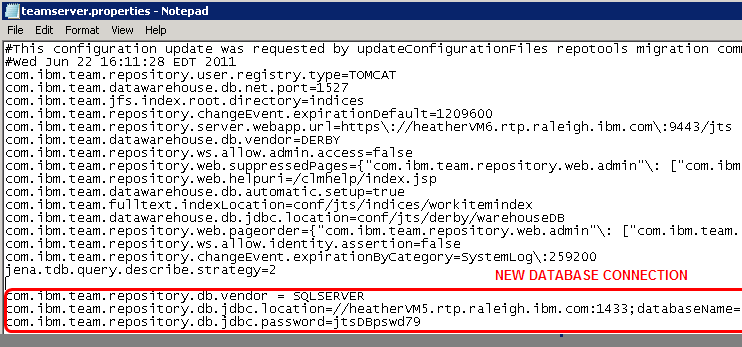
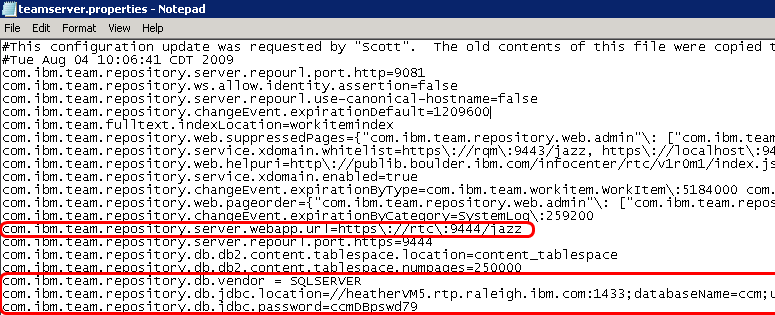
- After step 0 executes, you’ll be presented with the option to review the JTS teamserver.properties file.
- Validate the public URI.
- Update the database connection info. The database connection info is derived fro, the 2.x teamserver.properties file.
- Do not alter any of the com.ibm.team.datawarehouse.* properties.
- Run step 1 which imports the data the 2.x data into the new JTS database.
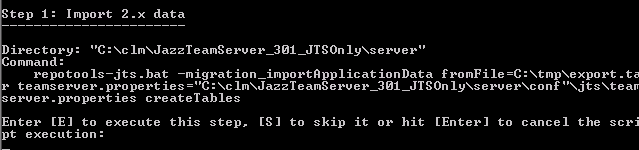
- Ensure that the offline migration was successful.

- Copy the RM 3.0.1 server directory from the JTS box back to the RM box. You’ll need to perform a diff to see which files were updated and to verify that the updates are correct. For more information on individual file changes, see Updates made to the configuration files. The set of files that the upgrade can modify include:
- server/conf/rdm/composerweb.properties
- server/conf/rdm/friendsconfig.rdf
Ensure that the JTS public URI is the one you specified with -jtsURL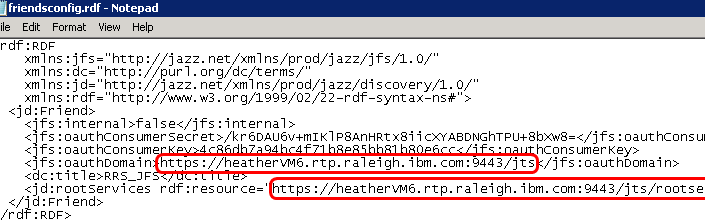
- server/conf/rdm/fronting.properties
- server/tomcat/conf/server.xml (ignore if using WAS)
If you’re using a non-default port, ensure that the port in server.xml is correct.
- server/tomcat/conf/tomcat-users.xml (ignore if using WAS)
- After confirming the values are correct, backup the original files in the RM 3.0.1 install on the RM box and replace them with the modified ones.
- Validate that the JTS 3.0.1 merged files are correct. The set of files that the upgrade can modify include:
- server/conf/jts/teamserver.properties
You already validated everything in this file during the upgrade script. - server/conf/jts/friendsconfig.rdf
This data is imported into the JTS database. You should see a friendconfig.rdf-saved file.
- server/tomcat/conf/server.xml (ignore if using WAS)
The port in the JTS server.xml is changed to the port in the new RM server.xml. This may be incorrect if your RM and JTS server are using different ports. - server/tomcat/conf/tomcat-users.xml (ignore if using WAS)
- server/conf/jts/teamserver.properties
–> IUG: Log into Rational Requirements Composer and start the migration wizard
If you get a licensing error when you navigate to https://server:port/rdm/web/projects/migration check out Tip: Floating licenses must be installed earlier in the RM upgrade process Otherwise, you should see: 
Upgrade RQM 2.x to 3.0.1
The upgrade script cannot be used to upgrade RQM directly if we cannot mount drives. We’re going to have to run the commands individually and transfer a few files between the JTS and QM servers.Select the following options from the IUG:
- I have already installed and configured the Jazz Team Server version 3.0.1 application
- Microsoft Windows
- Apache Tomcat
- Microsoft SQL Server
- I distribute my applications on multiple machines
- No, I cannot mount shared directories or drives
- I do not use Rational Insight or Rational Common Reporting
- Yes, I use LDAP
–> IUG: View this article on Jazz.net for complete instructions on migrating
- Create a temp directory on the QM system. For this example, we will use c:tmp
- Open a new command prompt and cd to the QM301InstallDirserver directory. See Tip: Use a new command prompt for each application upgrade (CLM 2011)
- Execute the repotools command to update the configuration files. For our case, only specify oldApplicationHome and ignoreJTSVersionCheck. Do not specify newJTSHome because we cannot access it.
repotools-jazz.bat -migration_qm_updateConfigurationFiles oldApplicationHome=ApplicationV2InstallDir/server/conf ignoreJTSVersionCheck
- Look in the QM301InstallDirserverjts-migration directory. This will contain the JTS teamserver.properties file, but we can ignore it in our case since the JTS is already configured. TIP: If you were updating applications in a different order and QM or CCM were first, the JTS teamserver.properties file would need to be updated (add database connection info, etc) and merged into the JTS teamserver.properties on the 3.0.1 JTS box.
- Open the QM301InstallDirserverconfjazzteamserver.properties file.
- Validate the public URI. The public URI must be the same as 2.x.
- Update the database connection info if you are using a different database (this is optional for RQM upgrades). The database connection info is derived from the 2.x teamserver.properties file.
- Do not alter any of the com.ibm.team.datawarehouse.* properties.

- Diff the following RQM 3.0.1 files against the RQM 2.x files and ensure everything is correct:
- serverconfjazzfriendsconfig.rdf
- servertomcatconfserver.xml
- servertomcatconftomcat-users.xml
- Execute the repotools command to import the QM data. Use the tar file you exported from the “Use repotools to export the data from your applications” IUG instruction
repotools-jazz.bat -import fromFile=c:tmpexport.tar
- Execute the repotools command to export QM data needed by the JTS:
repotools-jazz.bat -migration_exportJTSData toFile=qmData.tar
- Copy the qmData.tar file to the JTS 3.0.1 temp directory. Run the following command from the JTS box to import the user data:
repotools-jts.bat -migration_importJTSData fromFile=c:tmpqmData.tar createMappingFile=qmMapping.txt
- Copy the qmMapping.txt file to the QM 3.0.1 box temp directory. Execute the following repotools command from the QM box:
repotools-jazz.bat -migration_importUserMapping fromMappingFile=c:tmpqmMapping.txt
Upgrade RTC 2.x to 3.0.1
The upgrade script cannot be used to upgrade RTC without if we cannot mount drives. We’re going to have to run the commands individually and transfer a few files between the JTS and RTC servers.Select the following options from the IUG:
- Rational Team Concert
- Rational Team Concert version 2
- I have already installed and configured the Jazz Team Server version 3.0.1 application
- Microsoft Windows
- Apache Tomcat
- Microsoft SQL Server
- I distribute my applications on multiple machines
- No, I can mount shared directories or drives
- I do not use Rational Insight or Rational Common Reporting
- Yes, I use LDAP
- Create a temp directory on the RTC system. For this example, we will use c:tmp
- Open a new command prompt and cd to the CCM301InstallDirserver directory.
- Execute the repotools command to update the configuration files. For our case, only specify oldApplicationHome and ignoreJTSVersionCheck. Do not specify newJTSHome because we cannot access it.
repotools-jazz.bat -migration_ccm_updateConfigurationFiles oldApplicationHome=RTC2xInstallDirserverconf ignoreJTSVersionCheck
- Look in the CCM301InstallDirserverjts-migration directory. This will contain the JTS teamserver.properties file, but we can ignore it in our case since the JTS is already configured. TIP: If you were updating applications in a different order and QM or CCM were first, the JTS teamserver.properties file would need to be updated (add database connection info, etc) and merged into the JTS teamserver.properties on the 3.0.1 JTS box.
- Open the CCM301InstallDirserverconfjazzteamserver.properties file.
- Validate the public URI. The public URI must be the same as 2.x.
- Verify the database connection info.
- Do not alter any of the com.ibm.team.datawarehouse.* properties.
- Diff the following RTC 3.0.1 files against the RTC 2.x files and ensure everything is correct:
- serverconfjazzfriendsconfig.rdf
- servertomcatconfserver.xml
- servertomcatconftomcat-users.xml
- Execute the following repotools command to add tables to the RTC 2.x database (this brings the schema up-to-date).
repotools-jazz.bat -addTables
- Execute the repotools command to export CCM data needed by the JTS:
repotools-jazz.bat -migration_exportJTSData toFile=ccmData.tar
- Copy the ccmData.tar file to the JTS box temp directory. Run the following command to import the user data from the JTS box:
repotools-jts.bat -migration_importJTSData fromFile=c:tmpccmData.tar createMappingFile=c:tmpccmMapping.txt
- Copy the ccmMapping.txt file to the CCM 3.0.1 box temp directory. Execute the following repotools command from the CCM box:
repotools-jazz.bat -migration_importUserMapping fromMappingFile=c:tmpccmMapping.txt
- Execute the following repotools command:
repotools-jazz.bat -rebuildTextIndices
- Execute the following repotools command:
repotools-jazz.bat -reindex
Planning for Future Applications
If you are upgrading an application and considering installing more applications in the future, hold off on installing the future applications until they are needed. If you are using a single application server, the additional applications will add overhead since they are automatically started by the server. Additionally, the JTS setup wizard will automatically detect these applications. Unless you deliberately uncheck them on the application registration page, they will be registered.
The correct way to install applications into an existing installation is to use the Installation Manager Modify path. In this example, the QM 3.0.1 application is being added to an existing installation containing the JTS and CCM 3.0.1 applications.- Start Installation Manager and choose Modify.

- Select the existing installation and hit Next until you reach the Modify Packages page.
- On the Modify Packages page, check any additional applications you want to install. Do not uncheck things that are already installed. Hit Next.

- Verify the correct application is shown and select Modify.
- After the modification is complete, verify that there is a 301InstallDir/server/conf/qm directory in your CLM installation. This should be the only directory that is new or modified.
- Navigate to the JTS server administration page and select the Registered Applications item in the left nav. Click Add to register the QM application.
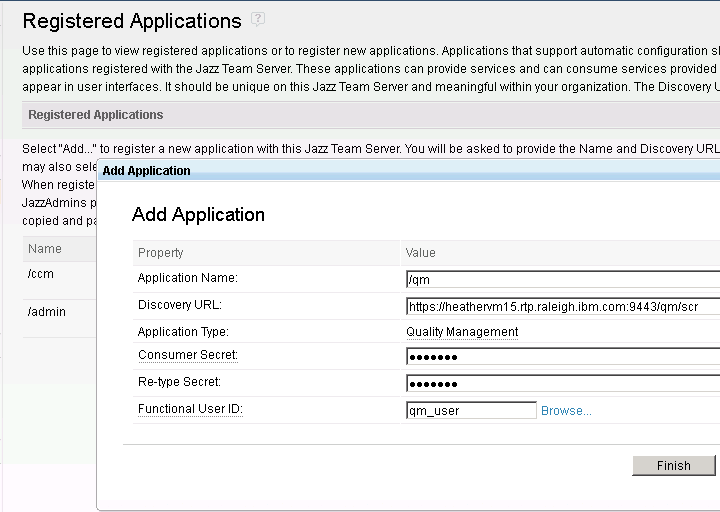
- After successful registration, click on the green link in the upper-right hand corner of the Registered Applications page to complete the QM application setup wizard.
For more information
- Planning the Deployment and Upgrade
- Understanding the deployment and upgrade process
- Planning your URIs
- CLM 2011 Migration Frequently Asked Questions
- Tip: Upgrade script workaround for distributed deployments where systems have different architecture (32 bit vs 64 bit)
- Tip: Use a new command prompt for each application upgrade (CLM 2011)
- Tip: Floating licenses must be installed earlier in the RM upgrade process
- JTS file checks are too harsh for the unmounted drive scenario
- Tips for upgrading RTC 2.x to RTC 3.0 — Some of this information is not applicable to 3.0.1.
About the author
Heather Sterling works on the Jazz Server team in RTP, NC. She can be contacted at hsterl@us.ibm.com.
Copyright © 2011 IBM Corporation