Importing data from Subversion and CVS into Jazz Source Control
In this article, we are going to present how to import data from Subversion (SVN), CVS and potentially other repository systems into Rational Team Concert. Basic instructions on how to import data into RTC from Subversion can be found in the RTC on-line help. The purpose of this article is to provide more detail on import from Subversion and CVS and to provide some helpful tips based on experience using the importer. First, we will describe the various ways that data can be imported from Subversion and CVS into RTC. After that we provide some techniques for porting multiple branches from an SVN or CVS repository into RTC as well as techniques for manually updating a stream to have the latest changes from an SVN or CVS repository. Finally, we will describe some advanced settings that are available for use.
Table of Contents
- Introduction
- Preparing to Import
- Overview of the Import Process
- Importing from Subversion (SVN)
- Importing from CVS
- Techniques for importing multiple CVS/SVN branches
- Techniques for Manually Updating a Stream with the Latest from an SVN or CVS Repository
- Advanced Configuration of the SVN Importers
- Gathering Debug Information When Things go Wrong
- Dealing with Non-standard Branch and Tag Folders
- Appendix: Importing Data from Other Repositories using Share
- Where to Look Next
Introduction
Many teams that want to transition to using RTC already have projects that are hosted in other repository systems such as Subversion or CVS. In this article we are going to give some examples of the various import features provided by RTC to import data from SVN, CVS and potentially other repository types.
If you are new to RTC, you may want to read Getting Started with Jazz Source Control to get a feel for the concepts and features of Jazz SCM. If you are already familiar with SVN, you may also want to read Comparing concepts between Subversion and Rational Team Concert to get a feel for how the concepts in Jazz SCM map to those of SVN.
Preparing to Import
Before you start importing your data into RTC, you will need to decide how to map the folders from your SVN or CVS repository to components and folders in Jazz SCM. Once you have determined the mapping of folders to components, you will want to create a project area in RTC that has a stream that contains these components. The following two sections describe these two steps in more detail.
Mapping Folders to Components
A component in Jazz SCM is used to group logically related folder trees together for the purposes of access control and versioning (referred to as a component baseline in RTC). When looking at the folders you want to import into RTC, it will be worthwhile to determine a grouping that makes sense for your team(s) based on what projects/folders are tagged or versioned together as a group or which folder groups require different access control (e.g. private vs. publicly accessible). The article Controlling access to source control in Rational Team Control contains information of configuring access control in RTC including configuring access control for Jazz SCM components.
Creating a Project Area
Once you’ve determined how many components you will need, the next step is to create a project area in RTC. The article Getting Started with Project Areas and Process in Rational Team Concert describes how to create and configure a project area. The steps to take in preparation for import are:
- Create a project area
- Part of project area creation is the creation of a stream where the project will share source code.
- We will use this stream as the eventual target of the data we import from trunk/HEAD.
- Open the stream in the stream editor from the Team Artifacts view and create additional components for the stream if needed.
- Create a repository workspace from the stream.
- We will perform the import into this workspace.
Overview of the Import Process
Before we present the details on the importers themselves, it is worthwhile to provide the general steps you will need to take to perform an import once you have created a project area, as described in the previous section.
- Create a repository workspace to import into.
- If this is the import of the main development line (e.g. trunk), you can create a workspace off the the stream created in the previous section.
- If this is the import of a branch, see the section Importing trunk and branches from an SVN Dump file for detail on how to create the target workspace.
- Perform the import of folders from SVN/CVS into the desired component of the workspace created in the previous step.
- If there are multiple components to import, you would repeat this for each component.
- Verify that the end result imported content matches what is expected.
- For this step, you can load the content of the of the repository workspace using the RTC client and verify that the content is correct either using manual inspection or by using a diff utility. See Loading Content from a Jazz Source Control Repository for details on how to load content from a repository workspace.
- Deliver the imported changes to the target stream.
- If this was the import of the main development line, you would just deliver to the stream that was created with the project area
- For branches, you can use the New/Stream action available on the imported workspace in the Team Artifacts view to create a stream that represents that branch.
You would repeat these general steps for importing multiple branches. More details on importing branches is given in the Importing trunk and branches from an SVN Dump file section of this article.
Importing from Subversion (SVN)
There are two ways to import data from SVN into RTC.
- Data can be imported from an SVN dump file
- An import can be launched from the SVN Repositories browser of either the Subversive or Subclipse Eclipse-based SVN clients.
Importing from an SVN dump file is the preferred approach for importing data for a couple of reasons:
- The dump file importer creates baselines for branch and tag points to make the subsequent import of branches easier.
- Using the dump file importer does not require connectivity to the SVN server which reduces the time it takes to import and removes the possibility of connectivity issues involving the SVN server during the import.
The following sections describe both of these approaches.
Important Note: The latest releases of Subclipse has breaking API changes and therefore is not compatible with RTC 2.0.0.x or earlier. If you are using an earlier RTC release and are planning on using Subclipse as your SVN client, it is easiest to use Subclipse version 1.2.4. However, you can use a later Subclipse version (e.g. 1.6.4) if you do not install the SVNKit support. In RTC 3.0 or later, this is not an issue.
What to Expect When Importing from Subversion
Before we present information on the operation of the SVN importer, it is worthwhile to describe how the data and concepts from an SVN repository will be mapped to an RTC repository.
- In Subversion, each commit maps to a revision. When importing from Subversion into RTC, each revision will be mapped to a change set.
- Subversion has the ability to track history across copies and moves (a move in SVN is represented in SVN as a copy and a delete). The SVN importer will detect when moves occurred and translate them into moves in the resulting change set. However, general copies made in SVN will become simple adds in the resulting RTC change set.
- When using the SVN dump importer, branch and tag points will be recognized and baselines will be created that represent these points in the history. However, because tags in SVN are not static, a baseline created from a tag point may not reflect the full contents of the tag. Such baselines will be denoted with a suffix of “partial” indicating that they are not 100% accurate. A subsequent import of the tag will give you an accurate recreation of the tag.
It is also worthwhile to note that the SVN importer only imports a single branch at a time. Typically, you will start by importing data from the SVN trunk and, after that has been successfully imported, you will import on or more branches. This is described in more details later in Techniques for importing multiple CVS/SVN branches.
It is also worth noting that the importer will only import to a single component at a time. If you want to divide the SVN data from a single dump file into multiple components, you will need to perform multiple imports.
Importing an SVN Dump File
The process of obtaining an SVN dump file and importing it into RTC is describe in the Importing a Subversion dump file section of the RTC on-line help. In this section, we will reiterate the steps to import a dump file and include some screen shots to highlight some of the features of the importer.
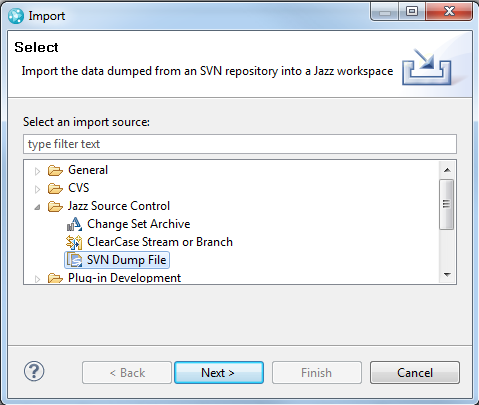
To open the wizard, you would choose File/Import from the RTC Eclipse client main menu and select the SVN Dump File entry in the Jazz Source Control section.
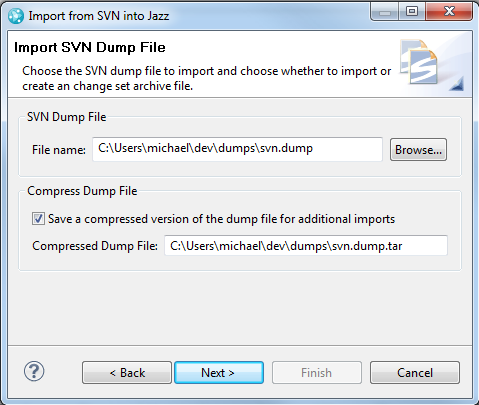
On the first page of the wizard, you will specify the dump file to be imported. There is also an option to save a compressed version of the dump file to make additional imports faster. You would want to do this if you were going to import other parts of the dump file into other RTC components or if you were going to import branches after you import (see the section Importing trunk and branches from an SVN Dump file for more details on importing branches). If you do save a compressed version of the dump file, you would simply use that file as the value of the File Name: field for future imports. Note that the file extension of the compressed file must be tar for the importer to recognize it as a compressed dump file.
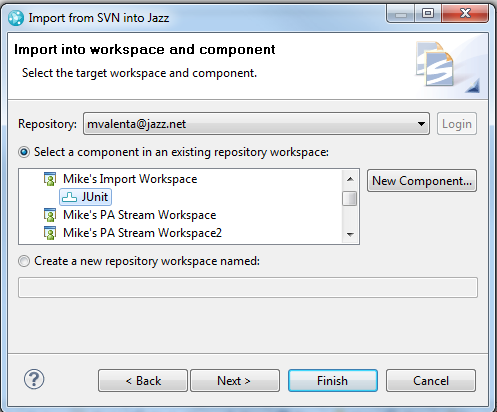
The next step in the import wizard is to specify the target workspace and component. You can specify that you want a new workspace and component created by the importer but it is better to follow the steps in Preparing to Import to create the target workspace and component before starting the import. You can then select that workspace and component on this page of the import wizard. In the below example Mike’s Import Workspace was created ahead of time with one component named JUnit
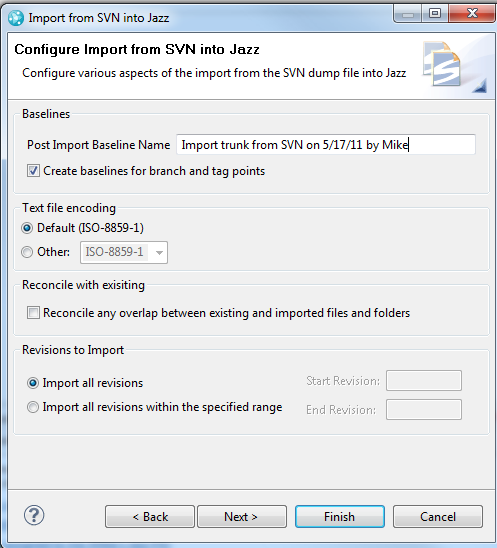
Once you have specified the target component, you can configure various settings of the import as shown in the following screen shot. You don’t need to make any changes on this page but, as a minimum, you should give the post import baseline a name so it can be easily identified in the future. You will also want to consider ensuring that the default encoding matches the data you are importing.
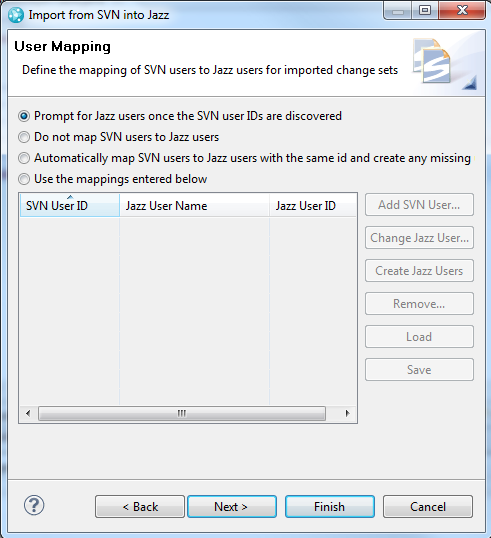
The next page of the wizard allows you to specify the mapping of the user identifiers from the Subversion repository to the identifiers of contributors in the RTC repository. The default options is to be prompted for the mappings once the dump file has been processed but before the import begins. The mapping of SVN identifiers to contributors is covered in more detail in the Mapping SVN user identifiers to RTC contributors section.
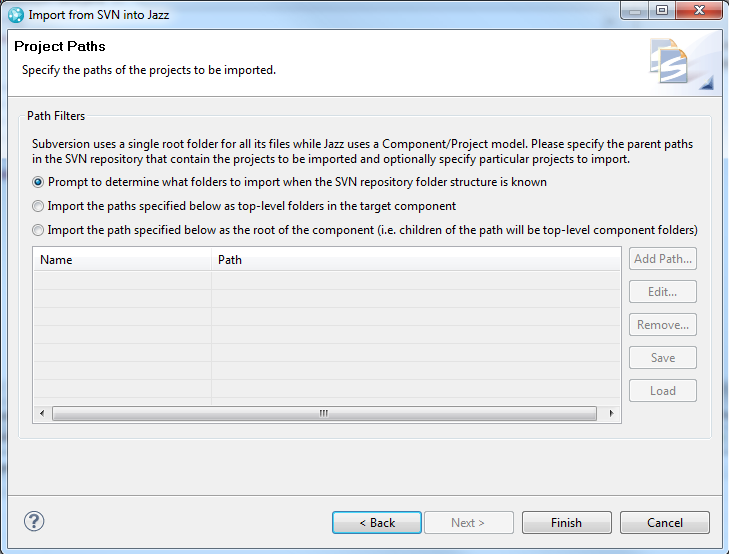
The final page of the wizard allows you to specify the paths to be imported. As with the user mappings, the default option will prompt you once the dump file has been processed and the available paths are known so that you can select the paths to import from the full set of available paths. Selecting the folders to import is covered in more in the Mapping SVN folders to Components in RTC section.
Mapping SVN folders to Components in RTC
When importing data from an SVN repository or SVN dump file, you will either enter or select one or more folders to be imported. There are two ways to map the folders being imported into folders in a component. We will use the following example SVN repository file structure to illustrate the two types of mapping.
trunk folderX folderY folderZ branches branch1 folderX folderY folderZ tags
The two types of mapping are:
- map selected folders to top-level folders in the component
- map a single selected folder to the component root.
With the first option, selecting folderX, folderY and folderZ to be imported will result in a component that contains these folders as top-level folders. However, using the second option would allow you to choose the trunk folder for import which would result in the same top-level folders in the component.
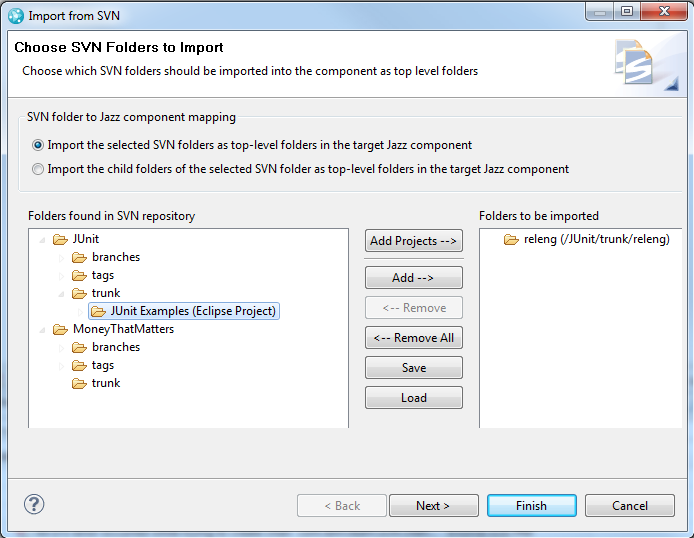
The following 2 screen shots show how to perform these two mappings when you have chosen to be prompted to specify the folders to be imported once the dump file has been processed but before the import begins. The first screen shot shows how to add individual folders by selecting a folder in the left pane and then clicking the Add button to add it to the right pane in order to include it in the import.
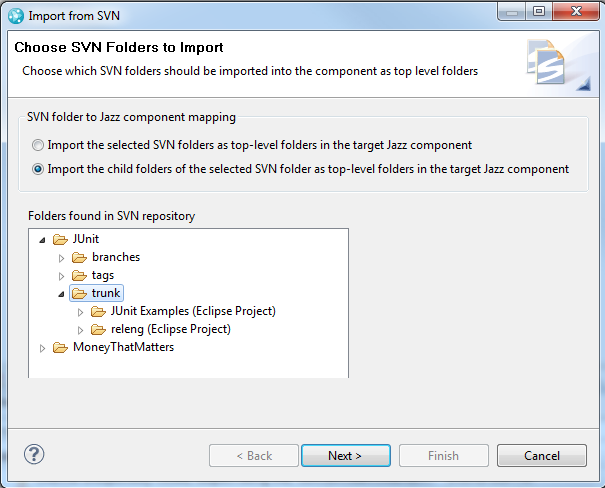
The next screen shot shows how you could import both the JUnit Examples and releng folders as top-level folders in the component by selecting the second option along with the parent folder of the folders to be imported (e.g. JUnit/trunk).
If you know the paths of the folders to be imported ahead of time, you can enter them manually in the import wizard and thus skip the prompt. The following screen shot shows how you could enter the paths for the JUnit Examples and releng folders so they are imported as top-level folders in the target component.
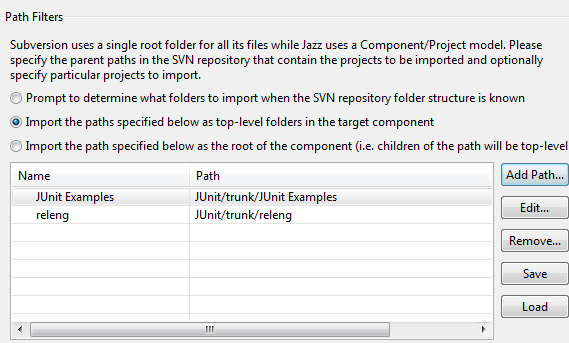
If you want to import all the folders in trunk (or some other folder), you can choose the appropriate option in the wizard and enter the path of the parent folder (e.g. JUnit/trunk), as shown below.
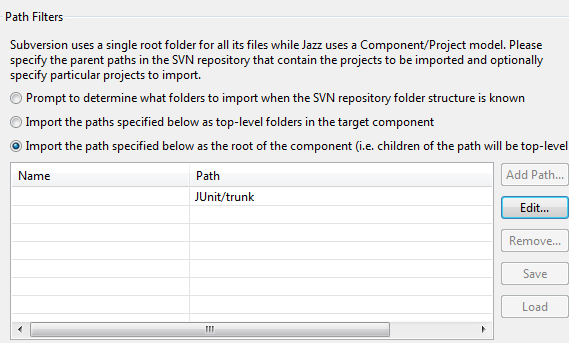
Entering the folder paths manually is not something you would typically do as it can be error prone than the folder selection dialog prompt that occurs after the paths are known. However, it is useful, if you saved a set of paths when importing the trunk and want to select those same paths when importing a branch. When importing a branch, the SVN dump file importer will recognize that the entered paths are on the trunk and translate those to the appropriate branch paths.
Mapping SVN user identifiers to RTC contributors
One of the import wizard pages is a page to specify the mapping of SVN user identifiers to RTC contributors. In the initial page, the importer doesn’t know all the SVN identifiers being imported so the page is empty and the default option is to prompt the user once the dump file has been processed but before the import begins. If this option is selected, the following prompt appears once the SVN users are known.
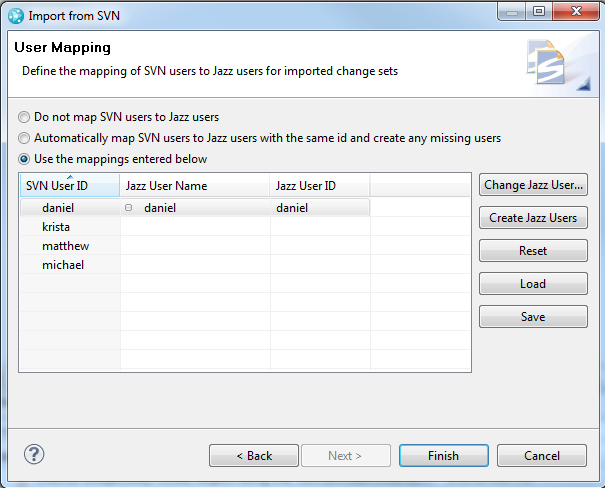
The wizard will first attempt to match the SVN user identifiers to existing contributors and these matches are shown in the wizard. For the unmatched identifiers this page allows you to either manually specify which RTC contributors should be assigned to each SVN user, or to create new contributors for the corresponding SVN user. There is also an option to automatically create a contributor corresponding to each SVN user identifier.
If you do know all the SVN users ahead of time, you can specify the user mappings in the import wizard without being prompted. The following screen shot shows what the wizard page from the previous section would look like if you added the SVN users and mappings (or loaded them from a file using the Load button).
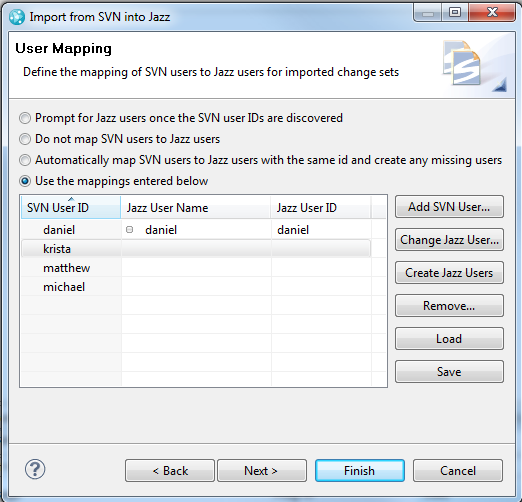
The wizard also supports saving and loading user mappings. The format of the user mapping file is fairly straight forward and has the following characteristics:
- Each line in the file is a new mapping.
- If a line contains a single id (e.g. mvalenta), this indicates that the svn user id mvalenta would map to the RTC user with the same id.
- If the line contains two ids separated by a comma (e.g michaelv, mvalenta), this indicates that the SVN user michaelv is to be mapped to the RTC contributor with the id mvalenta.
Importing from the SVN Repositories view
If you have one of the Eclipse SVN clients installed, you can initiate an import into RTC from the SVN Repositories view of the SVN client. The advantage of this approach is that, if you do have an SVN client installed, it is fairly easy to initiate an import. The disadvantage is that the import does not have enough information to generate the baselines for tag and branch points so this information would be lost making the subsequent import of branches in more complicated. Another down side is that connectivity is required to the SVN server for this type of import. For this reason, it is recommended that you use the SVN dump file import method if possible. However, if this is not possible or you just need trunk, you can follow these steps to import from the SVN Repository browser of an Eclipse based SVN client:
- Open the SVN Repositories view.
- If you haven’t already done so, create a repository location for the SVN repository you would like to import from.
- Drill down to select the folders you would like to import. Remember that an SVN repository represents branches and tags as folders so you will probably want to drill down to the trunk folder of the project you want to import from (unless, of course, you want to import a branch).
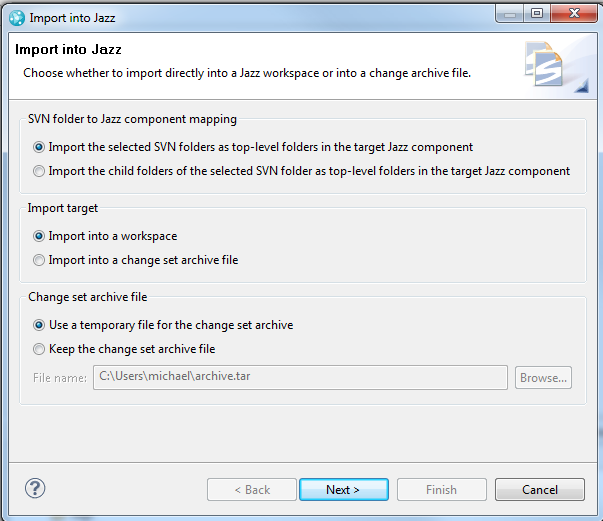
- The first page of the import wizard allows you to choose the following
- whether to import the selected projects as top-level folders in the target component or, if one folder was selected, to choose to import the children of that folder to top-level folders in the target component, as describe in the previous section.
- whether to import into a workspace or just create a change set archive file for later import using the Change Set Archive Import wizard.
- The second page allows you to specify either a new component or an existing component as the target of the import.
- Just as with the SVN dump file wizard, on the third page, you can specify
- the name for the post import baseline
- the default encoding
- the starting and ending revision
- whether to reconcile the data being imported with any previously existing data.
- On the final page, you can specify how to map SVN users to RTC contributors or choose to postpone the mapping until the SVN users are know (i.e. later in the import process). The page is the same as the user ID mapping page for the SVN dump file wizard.
Importing from CVS
To import content from CVS, you need to use the cvs2svn tool to extract an SVN dump file from your CVS repository and use the SVN dump import wizard.
Generating an SVN dump file from a CVS repository
In order to import data from CVS to RTC, you must use the cvs2svn tool to extract an SVN dump file from your CVS Repository. Once you have a dump file, you can use the SVN Dump File Import wizard which supports the creation of baselines for version tags and branch points and the import of branches.
Techniques for Importing Multiple CVS/SVN Branches
In this section, we present various techniques that can be used to import branches from SVN or CVS after the trunk import has been performed.
Importing Trunk and Branches from an SVN Dump File
The easiest way to import multiple branches into RTC from SVN is by using an SVN dump file. If you want to import branches into RTC from CVS, you must convert the CVS repository into an SVN dump with cvs2svn. When importing a dump file, you can indicate that baselines should be created for all branch and tag points in the main development line (i.e. trunk or HEAD). Once the main development line is imported, you can find the baselines for branch points and create new workspaces from these baselines. Once the new workspace is created, you can import the desired branch into that workspace.
The steps for importing the main development line followed by one or more branches from an SVN dump file are:
- Import one or more folders from trunk into a new workspace/component
- Make sure the option to generate baselines for branch and tag points in enabled.
- When prompted to select the folders to import, you can choose to save the selected folders so they can be loaded when importing a branch
- Once the import completes, create another workspace to represent the branch
- In the workspace editor, click Add and, in the dialog that appears, choose to add a component baseline. Navigator through the wizard to get to the list of baselines for your component. If there are a large number of baselines, you may need to hit the “Show More” button a few times to get the baseline you want to appear. Once it appears, you can select if and click Finish to add it to your new workspace
- Run the SVN Dump file import on the dump file again
- When prompted for the target component, select the component in the workspace we created in the previous step
- You can either load the folder mappings you saved during the first import or select the same folders when prompted
- When you click Finish, you should be prompted to indicate that you are importing into a baseline for a branch and given the option to import the branch. Choose to import the branch
- You can repeat the previous two steps for each branch you wish to import
There are some caveats to this approach:
- It can be difficult to search for older baselines if a workspace contains a large number of baselines. The process can be simplified if you import the main development is smaller chunks using revision ranges. That is, if you know you have an important branch that happened in the repository at revision 945, you could import up to that revision or a revision slightly larger (e.g. 1000). You could then easily find the baseline of interest as it would be one of the latest baselines. Once you create a workspace from that baseline to receive the branch, you could either continue importing the main development line (starting at 1001) or decide to import the branch first.
- Files that are added to the trunk and a branch after the branch was created will result in “evil twins”. An “evil twin” is two files in the same component that have the same path but are different items. Evil twins can still be merged but they will be treated as conflicting additions.
- Branch and tag points from SVN and CVS may not be “pure” from a change set perspective. What this means is that a branch point may contain only some of the files from a particular change set. In RTC a workspace must either contain the complete change set or none of the changes from that change set. The importer will flag any baselines that are not “pure” as partial but you can still import a branch based on a partial baseline.
Importing Trunk and Branches from the SVN Repository Browser
As we indicated above, importing from SVN using an SVN dump file is the preferred approach and this is the method you should use if possible. Importing both the trunk and branches using the SVN Repository Browser Import into Jazz action is a bit more complicated as this method will not create baselines for branch points. What you would need to do is import the changes up to a particular revision (or date), that you know was close to the desired branch point. As with the dump import, you would then create a second workspace from the state of your import workspace to represent your branch. This will be hard to get exactly correct but even if you create a workspace from a point that was not the exact branch point, when you import the branch, the initial state of the branch is reconciled against the workspace which will then make the contents of the workspace match that of the branch point. The rest of the branch changes will then be imported into the workspace.
Let’s consider a simple example of a project that has undergone a couple of releases and has a main development branch (e.g. trunk) for working on the next release and maintenance branches for patching their previous releases. We will use SVN revision numbers to describe the range for our imports.
Here are the revisions for our project called ROCK:
- Project started on November 11, 2004
- Release 1.0 on June 29, 2006 (SVN Revision: 1056)
- Release 2.0 on June 25, 2007 (SVN Revision: 15096)
Here are the steps to import these branches into RTC:
- Import the changes for release 1.0 into the ROCK workspace in RTC
- Select the folders to be imported from the SVN browser.
- Select to create a new workspace called ROCK. This will also create a component of the same name.
- Import the revisions range from 0 to 1056
- Optional: Import tag for 1.0 into same component with reconcile enabled (e.g. /tags/R1_0 for SVN)
- We’ll assume that a tag named R1_0 was created for the 1.0 release
- Select the folders to import in the SVN Repositories Browser
- To do this, you would drill down and select the folders from step 1 inside the tags/R1_0 folder
- Enter R1_0 as the post-import baseline name
- Ensure that the reconcile option is enabled (which it is by default) and click Finish
- Import the 1.0 maintenance branch into a ROCK 1.0 workspace (we’ll assume the branch is named R1_0_maintenance)
- Create a New Repository Workspace named ROCK 1.0 from the Team Artifacts view by Duplicating the Rock workspace
- The Duplicate action from the content menu of a workspace opens the new workspace in an editor. You can change the name to “ROCK 1.0” and save.
- Select the folders to be imported
- To do this, you will need to drill down to the branches/R1_0_maintenance folder and select the folders to be imported from there
- In the wizard, select the ROCK component in the ROCK 1.0 workspace as the target of the import
- Ensure that the reconcile option is enabled and click Finish
- Create a New Repository Workspace named ROCK 1.0 from the Team Artifacts view by Duplicating the Rock workspace
- Import the changes for release 2.0 into the ROCK component
- Select the same folders as step 1 to be imported from the SVN browser.
- Select the ROCK component in the ROCK workspace as the target component
- Import the revisions range from 1056 to 15096
- Optionally import the tag for R2_0 as was done in step 2 for R1_0
- Import the 2.0 maintenance branch as was done in step 3 for the 1.0 maintenance branch using ROCK 2.0 as the workspace name and R2_0_maintenance as the tag name
- Import the rest of the changes
- Select the same folders as step 1 to be imported from the SVN browser.
- Select the ROCK component in the ROCK workspace as the target component
- Import the revisions range from 15096 to the latest revision in the repository (or higher)
The optional steps of importing a tag representing the release state is suggested because of the nature of tags in SVN. For instance, a release tag in SVN may not line up exactly with the state of the repository at a particular date. This could occur for several reasons. One possibility is that the files and folders of a particular tag was changed after the tag was made. Because RTC is change set based, it is not possible to perform the same type of tag manipulation so the optional import of a tag is provided in order to ensure that a baseline is available for a particular tag.
Once you have workspaces for each of your development lines, you can create a Stream in your project area and add the component from the corresponding workspace to the Stream.
Helpful Hint: If it turns out that you imported past a branch point, you can still create a branch workspace from the imported component. In the branch workspace, you can then discard any unwanted change sets from the History view.
Importing Trunk and Branches from an SVN Dump File Generated from Another Repository
There are tools available to create SVN dump files from several other repository types. For example, there is a cvs2svn tool for creating a dump file from a CVS repository and there is a p42svn tool available to do the same thing from a Perforce repository. Unfortunately, these tools do not always result in an SVN dump file that is well behaved with respect to how branches are represented. The RTC importer relies on the branch information encoded in the dump file to properly generate the baselines that represent the branch points. In the absence of this information, it is still possible to import the branches but, while the configuration at the end of the branch will be correct, the history of the branches will not be 100% accurate (i.e. the imported branch will have the history of the branch appended to the history of the trunk).
The steps for importing the main development line followed by one or more branches from an SVN dump file that doesn’t contain any branching information are:
- Import one or more folders from trunk into a new workspace/component (e.g. MainWorkspace)
- Once the import completes, create another workspace (e.g. BranchWorkspace) to represent the branch
- In the Team Artifacts View, select MainWorkspace and choose Duplicate from the context menu.
- In the editor that opens, name the workspace BranchWorkspace
- Run the SVN Dump file import on the dump file again
- When prompted for the target component, select the component in BranchWorkspace
- On the next page of the wizard, check the option to Reconcile the imported data with any existing data
- When prompted for the folders to import, select the folders on the branch that correspond to the folders imported from the trunk
- When you click Finish, you will be prompted as to whether you want to continue from the last imported revision. Select No
- You can repeat the previous two steps for each branch you wish to import
This will import the branch over the latest from trunk. The advantage of this is that the file item UUIDs for many of the files should match up making future merges easier. If you don’t plan to merge between the trunk and a branch, you can create a new workspace for each branch instead of importing over the data imported into the trunk.
It is also possible that the SVN dump file did contain some branching information but the branching information is not interpreted properly by the RTC importer. In this case, you may still get baselines created but importing a branch using the baseline as described in the section Importing trunk and branches from an SVN Dump file but importing a branch over a baselines may fail. In this case, you can follow these adjusted steps for importing the branch:
- Import one or more folders from trunk into a new workspace/component (e.g. MainWorkspace)
- Once the import completes, create another workspace to represent the branch (e.g. BranchWorkspace)
- In the Team Artifacts View, select MainWorkspace and choose Duplicate from the context menu.
- In the editor that opens, name the workspace BranchWorkspace
- Replace the component in the workspace with the baseline that should be the base of the branch
- Run the SVN Dump file import on the dump file again
- When prompted for the target component, select the component in BranchWorkspace
- On the next page of the wizard, check the option to Reconcile the imported data with any existing data
- When prompted for the folders to import, select the folders on the branch that correspond to the folders imported from the trunk
- When you click Finish, you will be prompted twice; once to import a branch and once to start at the next revision. Select No for both prompts
- You can repeat the previous two steps for each branch you wish to import
It is also important to note that, in Subversion, there is no difference between a branch and a tag. They are both just copies of the data from trunk and they can be modified after they are created so if you want to ensure that the state of a tag is correct, you will need to import the tag just as if it was a branch.
Techniques for Manually Updating a Stream with the Latest from an SVN or CVS Repository
You can use revision ranges in a dump file or SVN Repositories view import to get the latest changes. This will require you to keep the state of the workspace pure (i.e. don’t accept changes from elsewhere) and you’ll also need to keep track of the last revision imported (although you could get it from the comment of the last change in the workspace history).
In the CVS case, you would first convert your CVS repository into an SVN dump file and then perform the import via the SVN importer and select the desired revision ranges as outlined above.
Advanced Configuration of the SVN Importers
There are a couple of ways that the SVN importers can be configured using VM arguments. You may need to use these configurations when:
- Your repository does not use the standard folder names for trunk, branches and tags
- Your import is using too much memory
We will look at each of these in more detail in the next sections/
Configuring the trunk, branches and tags Folder Names
The SVN dump file importer uses the repository structure to determine how to create baselines for tags and branch points and to optimize the memory usage during the import. The standard layout of an SVN repository uses the folder names trunk, branches, and tags to contain the branches and tags for the repository. However, this standard is not enforced so it is possible for repository owners to use different folder names for this purpose.
To support this, we have provided 3 VM property arguments to customize these names. For instance, if the folders used were Trunk, Branches and Tags, the following 3 lines could be added at the bottom of the eclipse.ini file to make the importer aware of this.
-Djazz.svn.import.folder.trunk=Trunk -Djazz.svn.import.folder.branches=Branches -Djazz.svn.import.folder.tags=Tags
Configuring the Memory Usage During the Import
NOTE: These parameters were added in 3.0.
The SVN dump file importer tries to balance memory usage with time when performing an import. However, sometimes the structure of the repository makes this difficult. To aid in these situations, we have provided several VM flags to customize the memory usage during the import. There are basically 3 internal data structures used when importing:
- The repository folders: The data structure is used to let the user choose which folders to import and what author to map in the import wizard.
- The trunk revision tree: This is the revision tree for all folders within a trunk folder of the repository
- The branch and tag trees: Separate trees are used to track the revisions in a tag or branch so that the memory can easily be freed when the tag or branch is no longer needed.
With each data structure, there are two parameters that can be set:
- capacity: this is the initial space that is reserved for the data structure when it is written to disk. A value of 0 or less indicates that the data structure should be kept in memory.
- cache: this is how many entries can be cached in memory.
The six parameters with there default values are:
-Djazz.svn.import.folders.dbhm.cache=32767 -Djazz.svn.import.folders.dbhm.capacity=32767 -Djazz.svn.import.trunk.dbhm.cache=0 -Djazz.svn.import.trunk.dbhm.capacity=0 -Djazz.svn.import.tags.dbhm.cache=32767 -Djazz.svn.import.tags.dbhm.capacity=32767
The values of these parameters represent the number of cache entries that are kept in memory. Each cache entry would be in the order of 100 to 200 bytes. From the default settings shown above, you an see that the revision tree for the trunk is kept in memory while the tags and branches are written to disk.
Gathering Debug Information When Things go Wrong
In reality, a Subversion repository does not support true branches and tags but instead emulates them using light weight copies of folders. The RTC SVN dump importer tries to interpret the history of these copies in the repository as best it can but there are a vast number of permutations possible which leads to some misinterpretations by the importer. If you encounter a error while importing, the best course of action is to enable some options so that information is saved during the import which may help debug the issue. The following sections provide the steps to enable the debug options and interpret the output.
Enabling the required debug options
To enable the debug options, create a file debug.options in the [installpath]/jazz directory containing the following lines ([installpath] is the directory into which you installed RTC):
com.ibm.team.scm.client.importz.svn/debug=true com.ibm.team.scm.client.importz.svn/revisions=true com.ibm.team.scm.client.importz/debug=true com.ibm.team.scm.client.importz/import=true com.ibm.team.scm.client.importz/logFiles=true
To have RTC recognise these options, add the following options to the eclipse.ini file in the [installpath]/jazz/client/eclipse directory.
-consolelog -debug [installpath]/jazz/debug.options
Here’s what an example eclipse.ini file which these options might looks like (assuming that the [installpath] is home/bob):
-startup plugins/org.eclipse.equinox.launcher_1.0.101.R34x_v20081125.jar --launcher.library plugins/org.eclipse.equinox.launcher.gtk.linux.x86_1.0.101.R34x_v20080805 --launcher.XXMaxPermSize 256m -consolelog -debug /home/bob/jazz/debug.options -vm jdk/jre/bin -vmargs -Xms100m -Xmx512m -Xjit:exclude={com/ibm/team/coverage/internal/common/report/SourceElementInfo.write*} -Dosgi.requiredJavaVersion=1.5 -Dosgi.bundlefile.limit=100 Interpreting the Debug Output
The debug output is found in a directory named importDebugDataYYYYMMDD (where YYYYMMDD is todays date) found within the users home directory. On Linux, the home directory usually /home/username and, on windows it is usually C:Documents and Settingsusername. The following files are of interest:
- The svnRevisionsNNNNNNN... file contains the an abridged version of dump file that includes all the revision history but does not contain any files contents. This usually makes the file small enough to be opened using a text editor.
- The branchesNNNN... file contains the interpreted branch and tag points from the revision file. It can be useful in some cases.
If an error occurs during import, it is usually the svnRevisions file that will shed light on the failure.
Dealing with Non-standard Branch and Tag Folders
The baselines for tags and branches are created using the subversion copy event that created the folder representing the tag or branch. The importer assumes that the defacto standard was followed for the folder structure used to represent branches and tags so the importer will only recognize direct children of the “tags” or “branches” folder. This means that if a non-standard tag or branch structure is used, the desired baselines will not be created. Also, changing the folder structure in a later revision will not help since it is the structure at the time the folder representing the tag was created that is used.
When a non-standard tag structure is used, it is possible that this will cause the memory consumption of the importer to increase. One possible way to address this is to set the properties for the trunk cache to a value other then 0 so that the trunk data uses a disk cache. For example:
-Djazz.svn.import.trunk.dbhm.cache=32767 -Djazz.svn.import.trunk.dbhm.capacity=32767
However, this may cause the import to take considerably more time.
Appendix: Importing Data from Other Repositories using Share
If you use a repository type that does not have an RTC importer or if you just want to try out RTC on a select number of configurations of your code base, you can use the Share command to import a sequence of interesting configurations or versions of your source tree. The steps to do this, starting from your earliest version and moving to your latest, would be:
- Create a workspace and component to share to.
- Load the version of the source tree you would like to import into the Eclipse workspace.
- Disconnect the loaded projects from your current repository.
- Use the Team/Share action to share the projects with RTC into the component you created in step 1.
- In the Pending Changes view, either deliver or complete the change set created for the share.
- if this is a subsequent share, the share action will reconcile what is being shared with what already exists in the component and create a change set for the delta.
- Delete the projects created in step 2.
- Repeat steps 2 to 6 for the next version of the source tree.
This will result in a history where each change set represents a subsequent version of your source tree.
Where to Look Next
In this article, we presented several ways to import data from SVN and CVS into RTC. Once you have transitioned to using RTC, you may find the following articles helpful.
- Comparing concepts between Subversion and Rational Team Concert is a useful resource for those who are swithcing from SVN to RTC.
- Getting Started with Jazz Source Control gives an overview of the SCM tooling and how to use it.
- Multiple Stream Development describes how to work in a multi-team environment where each team has its own stream.
- Stream strategies with Rational Team Concert 3.0 presents strategies and approaches to organizing projects and artifacts with Rational Team Concert.
- Easing into Jazz SCM presents a workflow that is familiar to SVN and CVS users.
About the author
Michael Valenta works for IBM and is a member of the RTC Source Control development team. He was previously a committer on the Eclipse Platform project.
© Copyright 2011, 2013 IBM