
Controlling access to source control artifacts in Rational Team Concert
Summary
Rational Team Concert source control is great for sharing files across teams, but that does not necessarily mean that the repository should be like a public library and give open access to everybody. You may want to have some files maintained by Rational Team Concert source control but restrict who can read or write to it. This article describes different strategies for controlling access to the Rational Team Concert source control, and gives examples of when each strategy might be used. A mixed approach using a combination of a couple of strategies might also work for your particular development cycle.
Contents
Read protection scenarios:
- Read protect the entire Project Area
The project is top secret, highly classified and only a select group of users should even know of its existence. - Read protect Source Control but give public access to Work Items
The project’s implementation contains trade secrets. Its specification and functionality is open to public comments. - Read protect some components but give public access to others
Only part of the project contains trade secrets but there are some public aspects can be worked on by a broader team. (contractors, interns, community submitted patches) - New in RTC 6.0.1: Access Groups
Read protect SCM artifacts for a select group of users, project areas, or team areas. - New in RTC 4.0: Read protect some files or folders within a component but give public access to others
Only part of the component contains trade secrets but there are some public aspects can be worked on by a broader team. (contractors, interns, community submitted patches) - New in RTC 4.0: Read protect some work items within a project or team area
Some of the work items within a project are to be visible to a larger audience while others are more restricted - Work in a private repository workspace
You are working on a surprise side project by yourself and you need to make sure that your nosey and gossiping co-worker doesn’t ruin the surprise for your boss. - Make a stream private to a team
You are working with fellow team members on a team, that you don’t want other teams (or the whole project) to know about.
Write protection scenarios:
- Use permissions to control delivery to streams
The integration stream is owned by a local team and accepts deliveries with approvals from a remote team. Or, the stream is being stabilized for a release and should only accept approved change sets. - Move the stream to a read-only Project Area
The stream is being locked down abruptly to fix a critical bug. Setting the appropriate permissions and getting the word out to all developers will be too slow. - Use permissions to control delivery to components
Different sub-teams own different components and they should have the only say of what is delivered to the integration stream with respect to their component. - Save a snapshot and delete the stream
The stream is for a release that is no longer being supported. No more code should be delivered to it. - Lock individual files in the stream
You are working on a binary file that is difficult to merge. You lock a file in a stream to declare that you are working on it and everybody else should wait until you are done. Or, locking one particular file effectively locks some architecture decision of the code, such as locking the MANIFEST.MF file to control plugin dependencies. - New in RTC 4.0: Restrict changes to individual files or files with a given name
There are specific files that you do not want to be changed or you want to restrict the changes made to files with a particular name.
The read protection sections in this article expands on the the Patterns for read protecting source code blog post. The examples here will use the JUnit Example as a start point to walk through the scenarios with a little more guidance. The steps for creating two project areas here are the reverse of those shown in the blog. Here, the supplied JUnit project area is made private, and a second public project area is created. In the blog, the JUnit project area is left public and a private project area is created.
To follow along, it will be helpful to have two instances of Rational Team Concert open to switch between users to see how their access to the repository is different. Using only one instance of Rational Team Concert and logging in/out as different users may be confusing, as the local cache will become filled with items that one user can see but the another user should not be able to see.
The examples below are independent of one another. Each of them starts from a fresh JUnit example so you do not have to follow this document from top to bottom, just skip to the example that you interested in. If you do want to try all examples you might have to undo some changes to permissions or use your imagination to piece together one scenario into the other. Otherwise, recreate the JUnit example from scratch between each scenario.
Read protect the entire project
Scenario
Bill, Jason, and Markus have decided that their new JUnit project will be revolutionary, but it is not yet ready for public criticism. Only they should be able to manage the process, builds, work items and source for their project so they decide to remove read access from the project area.
- Pros:
- It is a simple solution.
- It hides everything in the UI from users who do not belong to the project area.
- Cons:
- This all or nothing approach for controlling source control read access might be too simple for larger teams.
- Log in as ADMIN.
- Right click the JUnit Project Area and select Open.
- Go to the Access Control tab.
- Choose to grant read access to Members of the project area hierarchy as in Figure 1.
- Save the editor.
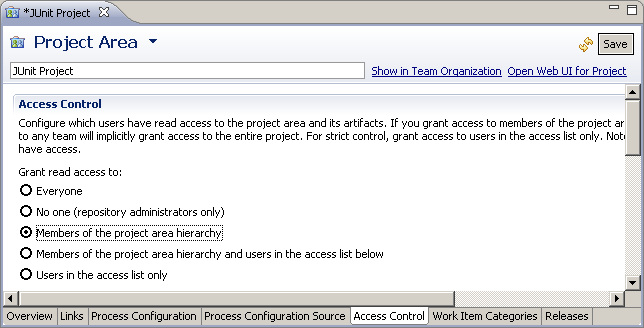
Figure 1: Setting the Project Area’s Access Control
Discussion
The access control for source control is based upon the component. For components owned by the project area, its access is scoped the same way the project area is. For components owned by an individual user, the owner can specify how it is scoped. Prior to RTC 40, there was no access control on the folder or file level in the repository so keep this in mind when laying out your file system with certain documents that should be hidden. Access control at the file and folder level was added in RTC 4.0 and is described in section Read protect some files or folders within a component but give public access to others
Markus is working very hard and has created a new component called JUnit Tools in his repository workspace and put some projects in it. It is all new code but still top secret. He accidently lets his new work leak into the public as shown by Figure 2.
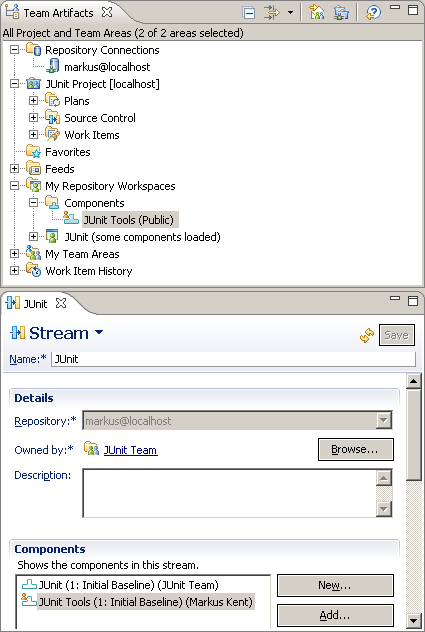
Figure 2: Public JUnit Tools Component
- Log in as Markus.
- Open the JUnit Repository Workspace from the Team Artifacts view by double clicking on it.
- Create a new component named JUnit Tools. Save the Repository Workspace editor.
- Notice that the new component is decorated with the outline of a person, indicating that the component is owned by a contributor and not by a process area. Markus fails to notice this, but that would be a first indication that the access control of the component might not be set correctly.
- For completeness, create a new java project called tools and share it into the component. Deliver the component to the JUnit stream.
- Switch to Freddy’s workspace. Run Search > Jazz Source Control > Components.
- Freddy has found Markus’s top secret JUnit Tools!
- Freddy can poke around some more but he cannot find references to the JUnit stream.
- Markus realizes his mistakes and acts quickly to hide the JUnit Tools component. Switch back to Markus. From the Team Artifacts view, right click the JUnit Tools component listed under the My Repository Workspaces / Components folder. Choose Change Access Control and select the component to be private.
- Go back to Freddy. He wants to show off his exciting discovery to Jennifer. Rerun the search but the component will not be returned in the search results.
- As Markus again, he decides there is no reason for him to own the component. Right click the component in the Team Artifacts view and Change Owner. Select the JUnit Project.
Read protect Source Control but give public access to Work Items
Scenario
The JUnit team has released their product to the public! They are not an open source project so they still want to maintain all the source control by themselves; however, they do have many customers who are interested in the products development.The JUnit team only ships the end binary product to their customers but they really appreciate customer feedback. To encourage better development of their product, they give their customers accounts to their Rational Team Concert system so that the customers can log bugs and feature requests directly to the developers.
- Pros:
- The source control is kept private but the bug tracking can be open to a larger community such as the end users.
- Cons:
- This all or nothing approach for controlling source control read access might be too simple for larger teams.
- Log in as ADMIN. Follow the steps to read protecting the entire project area in the previous section.
- Create a second project area to act as the public work items project area.
- Right click the Repository connection and select New > Project Area.
- Give the project area the name Public JUnit. Press Next.
- Pick the Simple Team Process template. Press Finish.
- When the Project Area Editor opens, add everybody to the members section with the Team Member role. Freddy, Jennifer, Marlene and Rick are the external users and Bill, Jason and Markus are the real JUnit contributors.
- Save the editor.
- Log in as Freddy.
- Connect to the Public JUnit project area. Notice that the private JUnit project area is not listed as shown in Figure 3.
- Create a new defect called “Program freezes under high load”
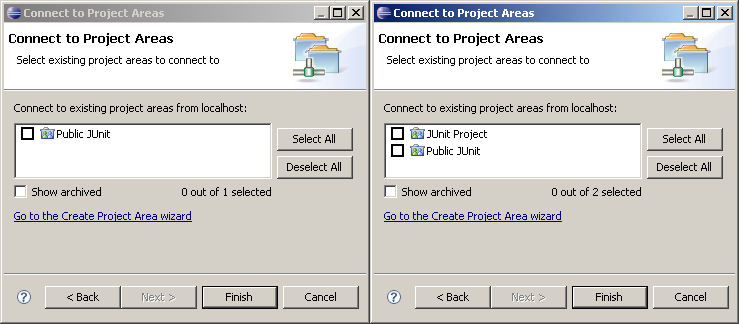
Figure 3: Freddy’s vs Markus’s Available Project Areas”
Now Markus is monitoring the Public JUnit project area and sees the new work item and knows exactly where the problem is and jumps to fix it.
Currently work items can be created under the Public JUnit and private JUnit project areas. With this setup, the JUnit team can make work items under the JUnit project area and talk about internal implementation without having the team members of the public team being able to see it.
Alternatively, if the JUnit team is finding the two project areas difficult to manage, they can disable creating work items in the private JUnit project area as shown in Figure 4. Then they would use only the work items in the Public JUnit project area. They just have to be aware that whatever they comment in the work item can be read by anybody.
Leave the work item creation enabled so that the JUnit team can create private work items.
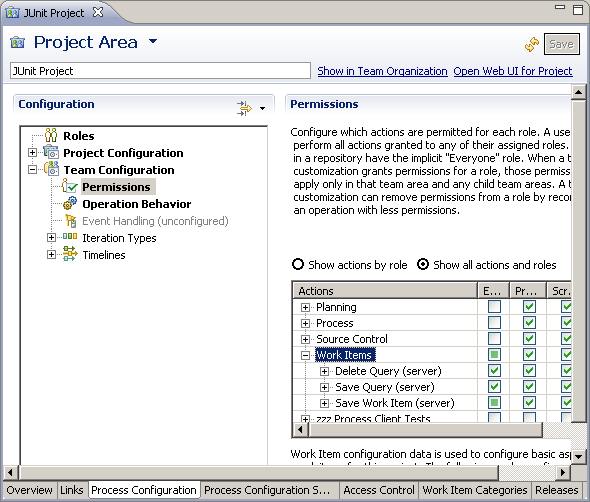
Figure 4: Disabling Work Items Permissions
Discussion
Work Items have a Links tab that shows artifacts that are related to the work item. Links on their own are vague by nature; they just point in certain directions without having much semantic backing behind them. This makes the jurisdiction of controlling links unclear. Linking artifacts from the private JUnit project area to the Public JUnit work item exposes the link’s description, but luckily that is it. Showing the description is generally not a concern and the actual artifacts that the link points to cannot be accessed without the appropriate permissions.
Markus busily works away at the fix. During his break, he browses his favourite computer forum website and is surprised to find an thread about his product called “Active development in JUnit component promises 300x speed up improvements with new Flux Capacitor”. While the 300x speed up is just a rumour, Markus is more disturbed that the post got the following right:
- Active development in the JUnit component – Markus has just started working on this recently. Also, nobody external should know the JUnit component’s name.
- Flux Capacitor – This is specifically the part of code that Markus is working on. The topic has hit too close to home.
Markus wonders how this information leaked and discovers that the Public JUnit work item exposed just enough to create these silly rumors but not enough to compromise his work.
- Log in as Markus.
- Create a new work item under the private JUnit project area called “Degauss the Flux Capacitor”. This work item will track the implementation details of his optimizations.
- Make this work item a blocker against the “Program freezes under high load” work item.
- Create a change set in the JUnit component.
- Associate the change set with both work items.
- Log in as Freddy.
- Open and refresh the “Program freezes under high load” work item.
- Go to the Links tab and start making rumours.
- Try to open the “Degauss the Flux Capacitor” work item and change set. Freddy will be denied access as shown in Figure 5.
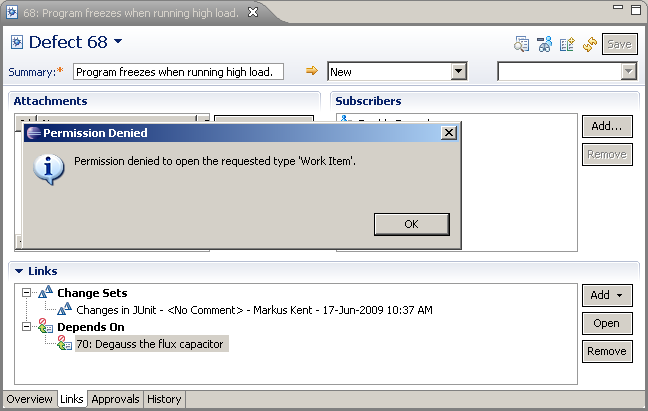
Figure 5: Work Item Links
Read protect some components but give public access to others
Scenario
The JUnit team is so impressed with Freddy’s enthusiasm in their project that they decide he should be allowed to make some direct changes. Freddy is still an outsider who should not be allowed full access to all the source but there is the JUnit Examples project that he can work on without being exposed to the top secret implementation.
- Pros:
- Different users can have different amount of read accessibility.
- All users still deliver to the same stream even if they have different read accessibility.
- Cons:
- Many project areas are required to cover all the used combinations of visibility. e.g:
- Freddy should be able to see only components A and B
- Jennifer should be able to see only components A, B and C
- Marlene should be able to see only components C and D
- Rick should be able to see only component C
- 3 project areas would be required owning A and B, C, and D.
- Many project areas are required to cover all the used combinations of visibility. e.g:
- Begin by creating public and private project areas as in the Read protect Source Control but give public access to Work Items scenario.
- Log in as Markus.
- Move the JUnit Examples project to a new JUnit Examples component.
- Open Markus’s JUnit repository workspace from the Team Artifacts view.
- In the components section, select New to create a new component. Name it JUnit Examples. Save the editor. Notice that Markus owns the component as in Figure 6.
- From the Package Explorer right click the JUnit Examples project. Choose Team > Move in Repository. Select the JUnit Examples component.
- From the Pending Changes view, deliver the move change set in the JUnit component and deliver the JUnit Examples component addition to the JUnit stream.
- From the Team Artifacts view, find the JUnit Examples component under My Repository Workspaces / Components. Right click the component and select Change Owner. Select the Public JUnit project area.
- Open the JUnit stream. Now, notice the two components in the components section and how the JUnit Examples component shows Public JUnit as the owner like Figure 7.
- Press the Browse button that corresponds to the Owned By field. Select the Public JUnit project area. Save the editor.
- As Freddy, in the Team Artifacts view, explore the streams under Public JUnit / Source Control. He can now see the JUnit stream! Open the stream.
- Notice how only the JUnit Examples component is listed in the components section as in Figure 8. Freddy cannot see the other JUnit component in the stream.
- Right click the stream and choose New > Repository Workspace. In the wizard press Finish. When prompted, load the workspace with the Find and load Eclipse workspaces option and press Finish.
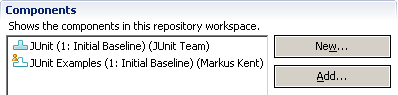
Figure 6: Markus owns the JUnit Examples component
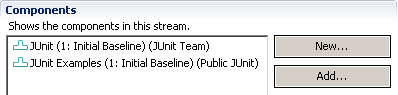
Figure 7: Public JUnit owns the JUnit Examples component
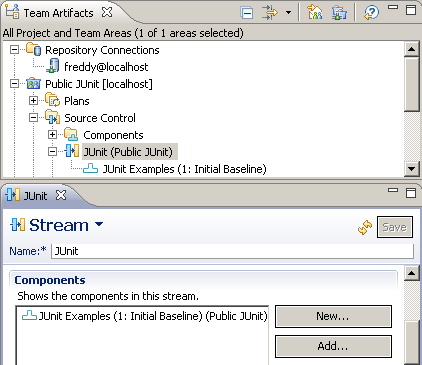
Figure 8: The JUnit Stream as Freddy sees it
To emphasize that Markus and Freddy are still working together despite having different read access we can show how they both deliver to the JUnit stream even though their view of the stream is different.
- In the Pending Changes create a change set and deliver it to the JUnit stream.
- Back as Markus. Accept Freddy’s change in the JUnit Examples component.
- In turn, have Markus create a change set in each component and deliver them.
- When Freddy refreshes his Pending Changes view, he only sees the change in the JUnit Example component as incoming.
Discussion
As with any team work, be kind to your fellow team members and understand that they may see things differently from you. Literally, in this case. When working with components, make sure that everybody generally understands where the boundaries are when creating project dependencies across components. Not all repository workspaces and streams load the same components that you do. This advice applies to all team structures but is emphasized in this case with read permissions.
Markus has been doing some heavy refactoring of code in the JUnit component. His changes also lead him to make changes in the JUnit Examples component and to keep his workspace compiling he creates a new dependency directly from the JUnit Examples code to an internal implementation in the JUnit code. He should have extracted a public interface first but from his view he sees his code compiles and executes properly. Markus thinks everything is fine and he is in a rush to catch a plane for his two weeks vacation, so he delivers the changes and leaves.
Now Freddy accepts Markus’s changes to the JUnit Examples component and his workspace no longer compiles! The error shows there’s a method call to a file that Freddy doesn’t have access to. Freddy thinks to himself “Why wouldn’t Markus create the interface? Clearly Markus would have seen the same compile error since they are both getting their source from the JUnit stream.”
Read protect SCM artifacts for a select group of users, project areas, or team areas.
In RTC 6.0.1 the ability to read protect SCM artifacts for a select group of users, project areas, or team areas, by means of an access group was added. Streams, repository workspaces, components, files, or folders can all have their read access determined by an access group. The following scenario illustrates how this could be used.
Scenario
Suppose, as a project administrator, you want to give read access to an SCM component to two separate teams. This can be done by creating an access group that contains both teams.
- Log in as ADMIN, and add yourself to the JUnit Project area. Give yourself all available roles.
- Create two new team areas under the JUnit Project area, JUnit US Developers and JUnit Canada developers.
- In the Eclipse client, execute File / New / Other and select Team Area from the list of options.
- Name your new team area JUnit US Developers and make it parented by the existing JUnit Project area.
- Repeat and create a new team area called JUnit Canada Developers.
- Add Bill and Jason to JUnit US Developers.
- Add Markus to JUnit Canada Developers.
- Create a new access group.
- As the ADMIN user, start a web client. The URL will end with “/admin” to start in admin mode.
- Click on “Access Groups” to open the Access Groups page.
- Click “Create Access Group”.
- In the Name field, enter “JUnit North American Developers”.
- Click on the icon to Add a Project or Team Area.
- Open Junit Project, and select JUnit Canada Developers.
- Click on the icon to Add a Project or Team Area.
- Open Junit Project, and select JUnit US Developers.
- Click Save.
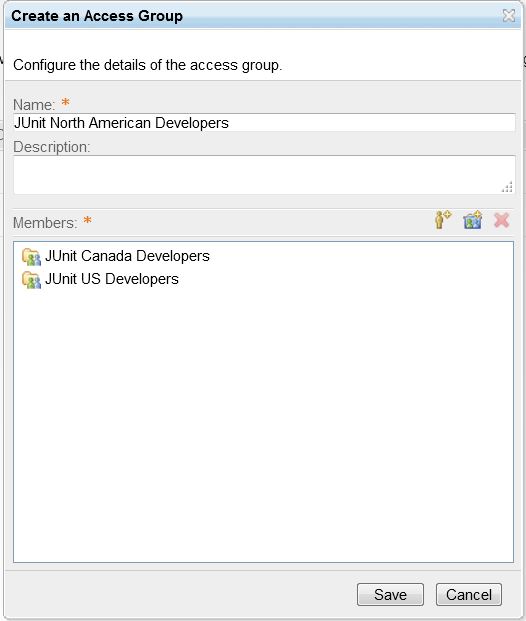
Figure 9: Creating an access group - Create a new component that will be visible to only the JUnit US Developers.
- In the Eclipse client, in the Team Artifacts View, open the JUnit Project area.
- Open Source Control.
- Double click on the JUnit stream to open it in the stream editor.
- Next to Components, click New.
- Enter “JUnit NA Development” as the name of the new component.
- Click Save in the stream editor.
- Under Components, right click on the new component, JUnit NA Development.
- Select Change Access Control.
- The Select Read Access Permission dialog will come up. Select the Access Group radio button.
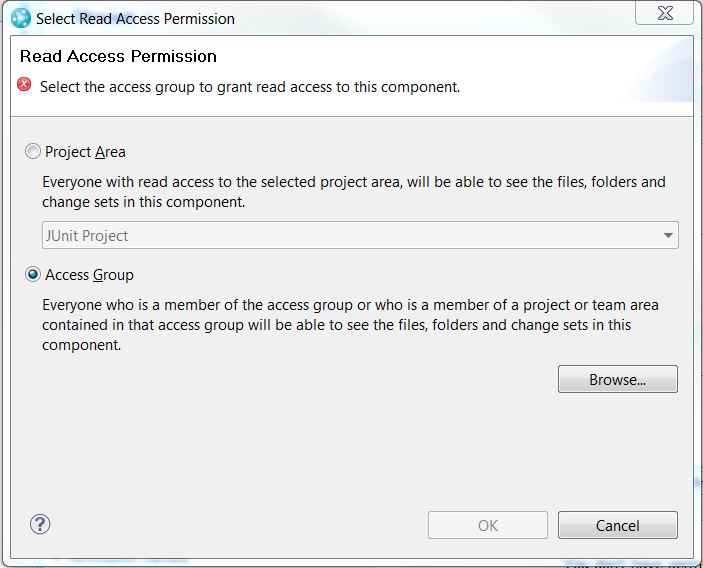
Figure 10: Select Read Access Permission - Click the Browse button, and the Select an Access Group dialog will come up.
- Click Search, and you will see all available access groups. Select “JUnit North American Developers”.

Figure 11: Select an Access Group - Click OK to close the Select Access Group dialog.
- Click OK to close the Select Read Access Permission dialog.
Discussion
Making a component visible to an access group allows access control based on a set of teams. In this case, only members of the two teams, JUnit US Developers and JUnit Canada developers will have access to this component, and, by default, any files created under the component.
Read protect some files or folders within a component but give public access to others
In RTC 4.0, the ability to protect specific files and folders was added. The following scenario illustrates how this could be used.
Scenario
As a followup to the previous section Read protect some components but give public access to others, it was decided that there were some sensitive files within the JUnit Examples component that Freddy should not have access to. To hide these files from Freddy, Markus performs the following steps:
- Log in as Markus.
- Show the files of the JUnit Examples component in the Repository Files view
- Drill down and find the sensitive file or folder.
- Select Change Access Control from the context menu
- In the resulting dialog, select the Project area or team area option, click Browse and then select the private JUnit Project. Click OK.
- The visibility of the file is now dictated by the JUnit Project so only members of that project can see the file.
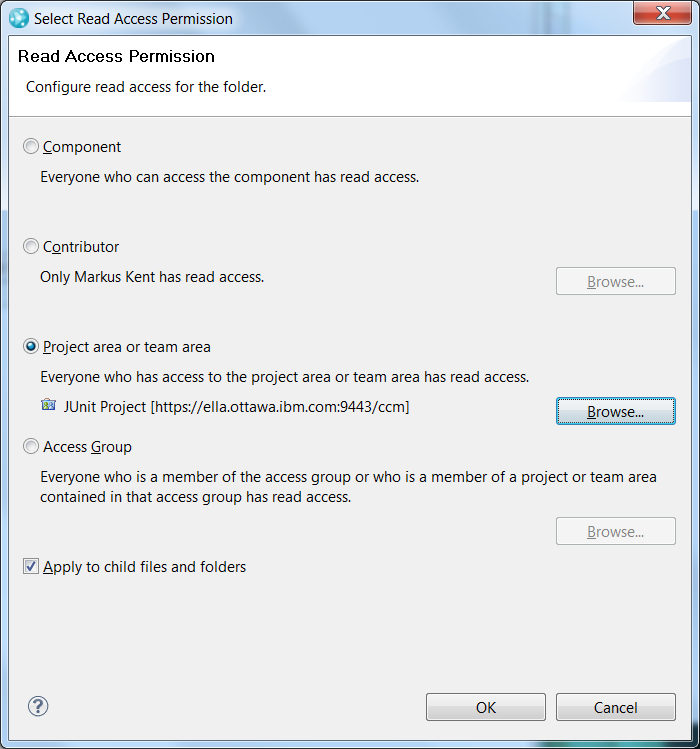
Figure 12: Setting Access Control for a File or Folder
It should be noted that, when setting the access control of a folder, the user has the option to have access set for all descendants of the folder as well.
Discussion
The user has the option to set the access control to one of three settings.
- Component: When the access control of a file or folder is set to this, the file is accessible to everyone who has access to the component.
- Contributor: When access control is set to a contributor, only the contributor or users with admin access can see the file or folder.
- Project or team area: When access control is set to a project area or team area, all users that have access to the project or team area can access the file or folder.
It should be noted that the component access is always enforced. In other words, only users that can access the containing component can access the file and folders in the component. The other options act to restrict access further.
Something else that needs to be noted is that files and folders can appear both inside a configuration of a component in a workspace or stream and in a change set. When present in the component of a workspace or stream, a file or folder will be hidden if it or any of its ancestors is hidden. However, this relationship does not apply to change sets so it is only the access control applied directly to a file or folder that determines whether the file can be viewed when it appears in a change set. That is why there is an option to recusrively apply the access control changes when setting the access control for a folder.
Read protect some work items within a project area or team
In RTC 4.0, the ability to restrict access to work items within a project was added. There are two ways to restrict access:
- You can restrict access to a particular work item.
- You can restrict access to all work items in a particular category.
We will illustrate both of these methods in the scenario that follows.
Scenario
- Make the JUnit Project public by setting the Access Control of the project area to Everyone
- Create a team area within the JUnit Project project area by following these steps:
- In the project area editor, click on the Show in Team Organzation link in the upper right hand corner of the project area editor.
- In the Team Organization view, select New/Team Area from the context menu of the JUnit Project entry.
- Enter The Insiders as the name of the team and click OK.
- Add Markus as a member of this new team.
- Open the JUnit Project project area in an editor and click on the Work Item Categories tab.
- Select the Framework category in the Categroies pane and The Insiders in the team area pane and click the Associate button.
- From the context menu of the Framework category, choose the Restrict Work Item Access to only Members of this Team action as shown in the following image.
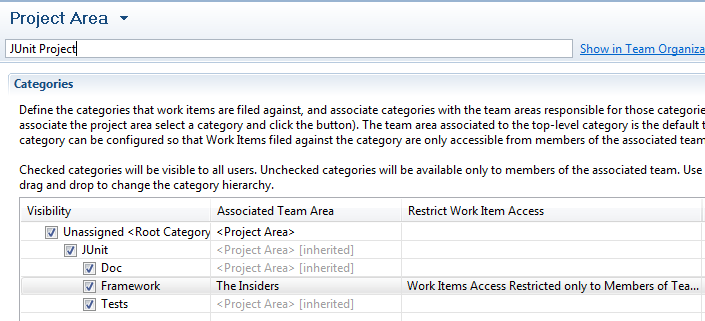
Figure 13: Restrict Access to Work Item Category
- Now create a work item in the JUnit Project project area and assign it to the category Framework. The work item will only be accessible to the members of The Insiders team.
- You can also restrict access to a particular work item by choosing the Restricted Access… action from the work item editor menu.
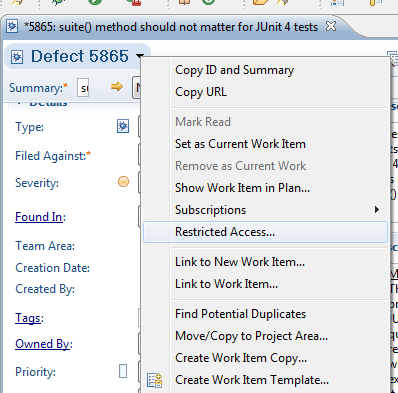
Figure 14: Restrict Access to Work Item
Work in a private repository workspace
Scenario
Markus does not have permission to create a project area to contain and hide a new secret project. He expects that it will only take him a few days to prototype and he does not want to bother the administrators to create a project area for him incase he discovers his prototype will not work. In that case he would have bothered the admins to create project area, then subsequently archive it, seemingly for nothing. If his prototype does work, he can get right to sharing his project into the public streams.
- Pros:
- No need to create project areas or move streams around in project areas.
- Cons:
- Other team members cannot deliver into a repository workspace.
- Log in as Markus.
- In the Team Artifacts view right click the My Repository Workspaces node and choose New Repository Workspace.
- With Just back up my work. Don’t flow changes to a stream yet. selected, press Next.
- On the next page, change the workspace name to Secret Workspace. Press Next.
- On this last page, select the Private read access permission. Note that this is the default selection. Press Finish.
- In the Team Artifacts view, find the Secret Workspace Default Component under the My Repository Workspaces / Components node. Right click it and select Change Access Control.
- Select the Private read access permission. Press Ok.
Later, after Markus has successfully prototyped his work and no longer needs to hide, he can change the visibility of his project to public. This is shown in Figure 15.
- In the Team Artifacts view, open the Secret Workspace by double clicking on it.
- Press the Change button that is associated with the visibility field.
- Select the Public read access permission and press Ok.
- Save the Repository Workspace Editor.
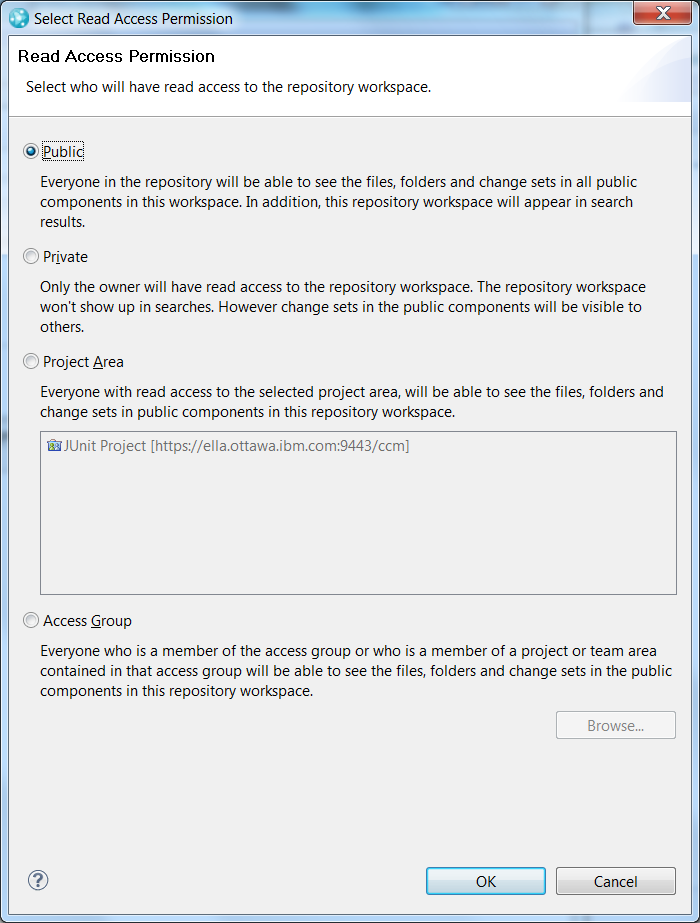
Figure 15: Repository Workspace Read Access Dialog
Discussion
This scenario is similar to the Read protect the entire Project Area scenario but the visibility scoping rules on repository workspaces is not as fine as that on project areas. The repository workspace’s visibility can also be scoped to a team area but cannot add individual contributors to the scoping. This means that it cannot be shared with a subset of users from a team. E.g. the workspace could not be setup to just allow you and the Build user to run scheduled builds.
It could be possible to work with a team having source completely hidden in private repository workspaces but still have the project area public. The repository workspaces and components can be scoped to the members of a project area if everybody on this team should have access. Without using a public stream (because they do not want the name nor description of the stream to be leaked into the public), the team would have to find another means to disseminate the code amongst everybody. Either everybody would have to constantly accept from everybody else’s workspace or somebody would have to act as an integrator. As soon as this becomes too hard to manage it may be better to go to the private project area pattern instead.
Don’t forget to do steps 6 and 7 to hide the component read access! The workspace read access hides workspaces from the workspace search and workspace pickers, but the component read access hides the code. Keeping the components public means that someone could search for recent change sets created by a particular user and find some changes which are contained within the private workspace.
Use permissions to control access to streams
Scenario
Starting with RTC 3.0.1, streams can be scoped to individual team areas, meaning that only the team’s members will have access to the streams and components that the team owns.
- Pros:
- Tighter access control.
- Access control can follow organizational hierarchy.
- Cons:
- Not all teams fit cleanly onto an org-chart.
The speed improvements for the flux capacitor haven’t been going as planned. Markus needs help, so he’s pulled Marlene onto a tiger team. Together they’re rebuilding the capacitor from the ground up, but they want to keep their work under wraps for the short term.
- Start by creating a new Team Area to host the stream:
- Run File / New / Other and select Team Area from the list of options.
- Name your new team area Flux Capacitor Tiger Team and make it parented by the existing JUnit Project area.
- Create a private stream for Markus and Marlene to work in:
- Open the Team Artifact Navigator and dig down to the Source Control node of Junit Area.
- Run New / Stream.
- Name the new stream Flux Capacitor Rebuild, and set the owner to be the Flux Capacitor Tiger Team.
- To ensure that nobody outside of the team will be able to find the stream, change the visibility to be Flux Capacitor Tiger Team.
- Create a private component in the stream:
- In the stream editor, click the New button beside the component list. In the editor give the name the component Flux Capacitor 2.
- Save the editor.
- Make the component private by selecting
Flux Capacitor 2and clicking on the Change Owner button. - In the ownership dialog, expand JUnit Project and select Flux Capacitor Tiger Team. Visibility is limited by checking the Restrict to members of this team area and its child team areas, as shown in Figure 16.
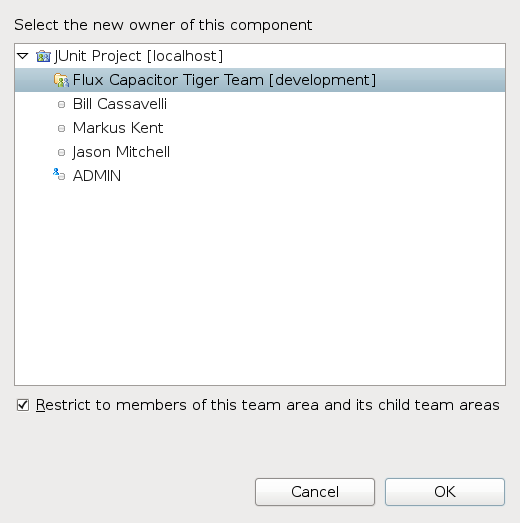
Figure 16: Making a component private to a team. - Click Ok in the dialog and save the stream editor.
Discussion
Making a stream or component private to a team area allows access control based on team structure. Only members of the team (and subteams) will be able to see the item.
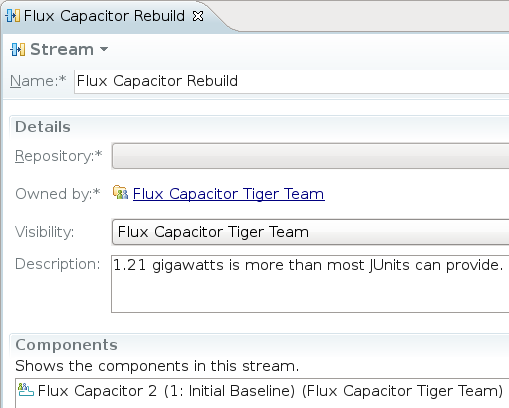
Figure 17: Stream editor showing a private stream with a private component.
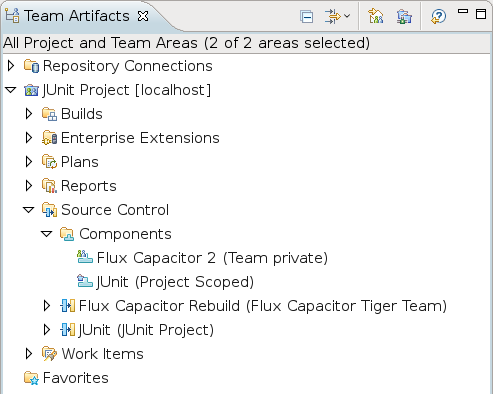
Figure 18: Team Artifacts Navigator showing a private stream with a private component.
Figures 17 and 18 show a private component in the stream editor and Team Artifact view. In each case the visibility is shown with an icon decorator and text describing the owner.
Use permissions to control delivery to streams
Scenario
Permissions are a powerful tool to configure the process of how a team works. A role is a set of permissions and behaviours in a team area. Users are assigned any number of roles allowing them (or disallowing them) to do certain operations in Rational Team Concert. In the Remote Development Guide the JUnit team is expanded by a remote team who deliver to their own stream; but the remote team cannot deliver directly to the JUnit stream. It also demonstrates creating a hierarchy of streams with an integration stream. The integration role that gives delivery permission to the integration stream is only assigned to select users.
- Pros:
- Flexable to change the roles of individual users.
- Easy to change the permission on a role, affecting all users with that role.
- Cons:
- There could be very many roles and project areas to manage the team, increasing the complexity of the team dyanmics.
Follow the remote development guide and pay attention to the “Process and Permissions” section. It has a good excercise at the end that tests every combination of role against each stream.
Move the stream to a read-only Project Area
Scenario
This is basically the same approach as configuring user role permissions but coming from a different direction. Instead of controlling “Who has permission to deliver to the streams in this project area” we control “In which project area is the stream located, where the delivering permissions of the project area differ”.
The quality of the JUnit project is horrible. The team is suffering from the ‘broken window’ syndrome; that is, they see unresolved bugs, broken builds and sloppy code all over. Since the build is already ‘red’, it is easy to slip in their next code change which introduces more errors, but the build never goes from ‘red to more-red’ to make any user culpable. The team sees one broken window and has no problem with throwing another stone at another window. Bill is convinced that if the builds were to run green, then nobody would want to be the first person to turns the build from ‘green’ to ‘red’. First, Bill needs to fix the build but nobody is listening to his orders to stop delivering. He decides to revoke all delivery permissions first and then all changes to fix the build will be reviewed by himself. When the build is fixed, he will restore the delivery permissions.
- Pros:
- It is easy to move streams back and forth between project areas, compared to changing the permission on roles and then trying to remember the original setting of the role to restore it.
- Cons:
- It could lead to keeping project areas around as a template for grouping users with certain roles. This project area might not be used at all for periods of time.
- It could be surprising to some users who were not aware of the stream-move when they try to deliver and suddenly do not have permission.
- Log in as Bill.
- Create a second project area to act as the read only project area.
- Right click the Repository connection, and select New > Project Area.
- Give the project area the name Read-Only JUnit. Press Next.
- Pick the Simple Team Process template. Press Finish.
- Do not add any users as team members to this project area when the project area editor opens.
- From the Team Artifacts view, open the JUnit stream.
- Press the Browse button that corresponds to the Owned By field. Select the Read-Only JUnit project area. Save the editor.
- Log in as Markus.
- Create a change set and try to deliver it to the JUnit. It will fail with a permission denied error.
Use permissions to control delivery to components
Scenario
The members of the JUnit team have started to specialize in respective components. Each component owner is in charge of deciding what gets pushed to the integration stream. Bill is also nominated to be the release engineer to help manage the integration across all streams because he is the Product Owner. Also a Customer Relations sub team has been created and been given full read access to the entire source. The Customer Relations team have free reign in their own stream but are allowed to integrate only their updated examples.
- Pros:
- Finer control of who can deliver to a component. Allows granting access to roles in other team hierarchies.
- Can customize the advisor warning when the delivery is denied access.
- Cons:
- The process roles must all come from the same project area, but can come from any of the team areas.
- This scenario requires some setup to organize the teams. Log in as Bill to assign component owners.
- Load his JUnit workspace using the Find and load Eclipse workspaces option.
- Open his JUnit workspace in the repository workspace editor.
- Create two new components called JUnit Examples and Releng. Save the editor.
- From the Package Explorer right click the JUnit Examples project and use the Team > Move in Repository action to move it to the JUnit Examples component.
- Move the Releng project to the Releng component using the same steps as above.
- Deliver all the change sets and components to the JUnit stream.
- From the Team Artifacts view, find the JUnit component under JUnit Project / Source Control / Components. Right click it and choose Change Owner. Select Bill to be the new owner.
- Find the JUnit Examples component under My Repository Workspaces / Components. Change the components owner to be Markus using similar steps as above.
- Change the Releng component’s owner to Jason, using similar steps as above.
- From the Team Artifacts view, right click the JUnit Project project area and chooose New > Team Area.
- Name the team area Customer Relations. Press Finish.
- In the Team Area editor, expand the Process Customization section and press the Customize the process link.
- In the Configuration list on the left, select the Roles item. The right half of the editor will update to customize the roles.
- Press the Create a new role button in the Defined Roles section. It looks like a gold man with a + symbol.
- Create a new role and change the ID to be called Consultant.
- Save the editor.
- Go back to the Overview tab of the team area editor. Under the Members section, add Freddy, Jennifer, Marlene and Rick. Give them the Team Member role.
- Select Rick again and click the Process Roles button. Give him the Consultant role as well.
- Save the editor.
Now that the team setup is complete, we set the delivery permissions. When a user tries to deliver to a component for which they do not have the permission, the Team Advisor dialog will prompt the user with a customizable message as shown in Figure 19.
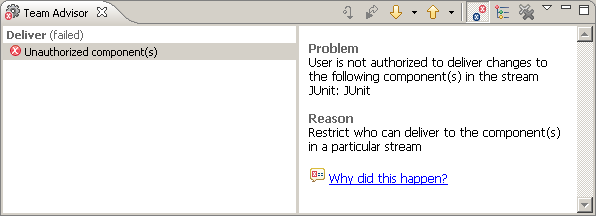
Figure 19: Component Delivery Advisor
- From the Team Artifacts view, right click the JUnit Project project area. Choose Show in team organization.
- In the Team Organization view, open the JUnit Team team area by double clicking on it.
- Under the Members section, add Rick and give him the Team Member role.
- In the Team Area editor, expand the Process Customization section and press the Customize the process link.
- In the Configuration list on the left, select the Operation Behavior item. The right half of the editor will update with a tables of roles and operation behaviour.
- Select the cell for Source Control / Deliver (server) under the Everyone column.
- Enable the Preconditions and follow-up actions are configured for this operation checkbox.
- Under Preconditions press the Add button.
- In the dialog select the Restrict Change set delivery to components in a stream precondition. Press Ok.
- In the Restriction Details table of components, select all the components and press Edit Permissions.
- Enable the Component Owner checkbox, and while the JUnit Project is selected in the Role Assignments tree, select the Product Owner role checkbox. Press Ok.
- Select just the JUnit Examples component in the Restriction Details and press Edit Permissions.
- In the Role Assignments tree, select the Customer Relations team area and enable the Consultant role as shown in Figure 20.
- Notice that we’ve just associated a role operation behaviour using a role that does not appear in the available roles shown in the Operation Behavior table. This is because Consultant is scoped to the Customer Relations team area however the stream we are working on is in the JUnit Team team area. That is why we chose to add this precondition to the Everyone column.
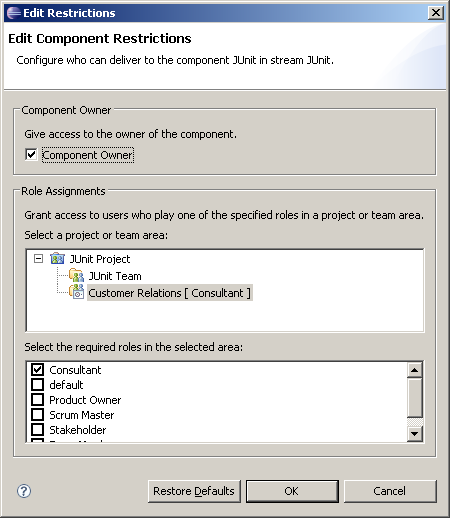
Figure 20: Edit Component Restrictions Dialog
Testing this out we will find that:
- Bill can deliver anywhere because he is the Product Owner.
- Markus can deliver only to his component JUnit Examples.
- Jason can deliver only to his component Releng.
- Rick can deliver only to JUnit Examples because he is a Consultant.
Discussion
The Edit Component Restrictions dialog allows you to select multiple roles to grant access. A user is granted access to deliver if that user has any of the selected roles. If you want a user to require multiple roles then you can create multiple component delivery advisor, each one containing one role that is required. These advisors will be checked sequentially ensuring that the user has every required role.
Save a snapshot and delete the stream
Scenario
The JUnit team has been working on the first incarnation of their JUnit code for years now and have decided to finally retire it for good. They will no longer be supporting it by releasing updates or backporting fixes, no matter who wants it. All of their users have already migrated to their new and improved JUnit 2.0 code. Just looking at the original JUnit stream is an eye sore because it reminds the team of all fallable design decisions that they had made in the past.
- Pros:
- Reduces clutter in the UI by deleting the stream.
- Cons:
- Could possibly be disruptive to the current development process. Need to make sure that everybody knows that the stream is going away. (Including the automated build schedule).
- Log in as Bill.
- From the Team Artifacts view, right click the Source Control node and select New > Stream.
- Name the stream JUnit 2.0. Pretend that it has been in development for a long time and differs greatly from the other JUnit stream.
- From the Team Artifacts view, right click the JUnit stream and select New > Snapshot. Give the snapshot the name JUnit 1.0 as shown in Figure 21 and press Ok.
- Right click the JUnit stream and select Delete.
- Press Yes to the dialog confirming the delete.
- Press Ok to acknolwedge that we will need to reparent the JUnit 1.0 snapshot.
- Select the JUnit 2.0 stream in the stream picker to associate the JUnit 1.0 snapshot with the JUnit 2.0 stream.
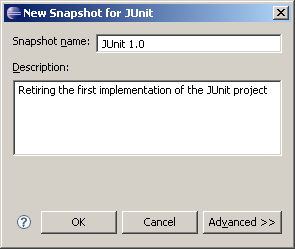
Figure 21: New Snapshot Dialog
It may be confusing that we’ve associated the JUnit 1.0 snapshot with the JUnit 2.0 stream but the intention is to have a reference point associated with the JUnit 1.0 snapshot. After all, we’ve just deleted the JUnit stream. The snapshot just needs to be reparented to somewhere so that it can be recovered.
Discussion
One of main points of source control is to be able to recover old data, even when we said previously that we are 100% sure that we want to delete something and never see it again. While it is not necessary to take a snapshot of a stream before deleting it, it is an easy way to save the stream’s configuration, just in case.
It turns out there were more users of the old JUnit than the team expected. When they announced the retirement of the JUint 1.0 version there was a huge outcry to keep it alive. Due to public demand, the team decides to revitalize the project.
- Right click the JUnit 2.0 stream, and select Show > Snapshots.
- The search view opens listing the old JUnit 1.0 snapshot. Right click the snapshot and select New > Stream from snapshot.
- Click the Browse button associated with the Owned By field. Select the JUnit Project project area to own the stream. Press Ok.
- Save the stream editor to restore the stream.
Lock individual files in the stream
Scenario
Markus and Jason don’t like the icons used in their product. Informally, they decide that they’ll divide up the work to replace all the icons but they don’t specify who is going to work on which particular files. They do not have tooling to merge images and it probably would not make sense to combine two icons anyways, but they do know that they do not want to double effort if they both accidently pick to edit the same file. Since the files they will be editing will be isolated (one or two icons at a time) they decide that they should just lock the file when they start working on it and unlock it when they are done.
- Pros:
- Can lock individual files in streams
- Cons:
- Awareness of locked files requires explicit searching, or after a change has already been made.
- While it is possible, it is not appropriate for locking every file in the stream.
- Log in as Markus.
- From the Package Explorer navigate to JUnit/src/junit/swingui/icons. Since error.gif and failure.gif are similar, Markus decides that he wants to edit them at the same time. Right click the file and select Team > Lock. Notice the blue lock decorators indicating that Markus owns the locks as shown in Figure 22.
- In the Lock dialog, press Ok to confirm locking the files in the JUnit stream.
- Log in as Jason.
- Jason also goes to JUnit/src/junit/swingui/icons and decides to work from top to bottom. Select error.gif and choose Team > Lock.
- A prompt appears telling Jason that Markus has locked this file first. Press Ok to dismiss the dialog.
- Jason decides to search for locks to see what else Markus has already claimed. From the main menu, click Search > Jazz Source Control > Locks
- Press Search to search for all locks without refining the criteria.
- The search view shows that Markus has locked both error.gif and failure.gif shown in Figure 23. Jason decides to work on the next file. Right click hierarchy.gif from the Package Explorer and select Team > Lock to lock the file.
- Open up an image editor and edit hierarchy.gif and save your changes.
- In the Package Explorer, select hierarchy.gif and press F5 to refresh the changes. It will now appear in the pending changes view.
- Check in and deliver the change to hierarchy.gif.
- The deliver operation will recognize the lock that is held and prompt to release. Since Jason is done editing the file he no longer needs the lock. Press Yes to unlock the file.
Jason has demonstrated how to work cooperatively with pessimistic locking. First he gathers awareness on locks that other people have on files that he wants to edit. When he discovers them he knows he can save his effort by not working on the same file until it is released. Also, when he holds his own locks, he releases the locks as soon as he is done with it so not to prevent somebody else from doing work as shown in Figure 24.
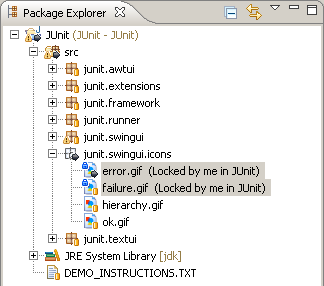
Figure 22: Blue locks owned by me (Markus)
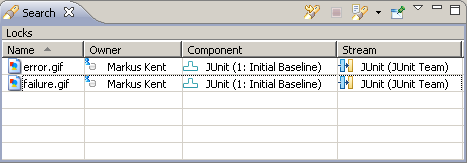
Figure 23: Lock Search Results
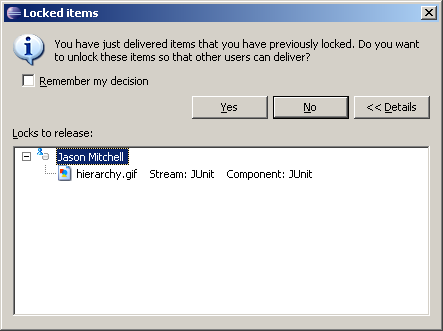
Figure 24: Locks to Release
Discussion
When a file is locked in a stream, Rational Team Concert does not enforce users to wait for the file to be unlocked before the user can edit the file. The user is always able to edit the file locally and check in the change to his repository workspace.
Earlier that day, Bill overheard Markus and Jason complaining about the icons at the watercooler but Bill did not hear them decide that they were going to fix the icons themselves. Bill also doesn’t like the icons and decided is going fix them himself without realizing that he will be duplicating Markus’s and Jason’s work.
- Log in as Bill.
- Open up an image editor and edit error.gif and save your changes. Bill did not check if anybody else had a lock on this file. He had no reason to believe that Markus was going to work on this as well.
- In the Package Explorer, select error.gif and press F5 to refresh the changes. It will now appear in the pending changes view. Notice the red lock decorators indicating that Markus owns the locks as shown in Figure 25. This is the first indication that Bill should probably stop his work and go talk to Markus about working on this file.
- Bill is so excited about his icons that he does not notice the red lock decorators. He checks in his change into a new change set and tries to deliver.
- The deliver operation fails! The dialog shows that Markus owns the lock. Press Ok to dismiss the dialog.
- Bill decides that his icons are much better than anything that Markus could create and wants his icons in the product. Markus has already gone home early so Bill can’t tell Markus to release the lock. Fortunately the admin is still at work and can release the lock for Bill.
- Log in as ADMIN.
- From the main menu, click Search > Jazz Source Control > Locks.
- Press Search to search for all locks without refining the criteria.
- The search view shows that Markus has locked both error.gif and failure.gif. Right click error.gif and choose Unlock.
- When the dialog prompts, choose Ok to force unlocking the file with administrative rights.
- Log in as Bill.
- Bill can proceed to deliver his changes. He will have appolgize to Markus later that Markus’s hard work has gone to waste.
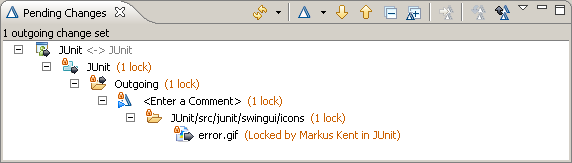
Figure 25: Red locks owned by Markus
Restrict changes to individual files or files with a given name
Scenario
You would like to place some role based restrictions on what files are edited within the JUnit components. The restrictions you would like to see are:
- You want to prevent changes to the metadata files within the example project (e.g. the .project and .classpath files) for most users.
- You want to prevent the addition, rename or move of java files by most users.
Both of these restrictions can be made using the Deliver Phase 2 (server) operation, which is available in the Operation Behavior pane of the Process Configuration tab of the process area editor.
Scenario: Prevent Changes to Metadata Files
Since there are a small number of metadata files, you can prevent modifications within a specific stream by using the ‘Restrict Changes to Items’ advisor. It controls who can add or remove change sets to the history of specific files in specific streams.
- Open the editor on the JUnit Examples project area.
- Click on the Process Configuration tab.
- Select Team Configuration/Operation Behavior in the Configuration pane.
- Expand the Operation Behavior pane to see the Source Control/Deliver Phase 2 (server) row.
- Click in the cell in the Source Control/Deliver Phase 2 (server) row and the Everyone column.
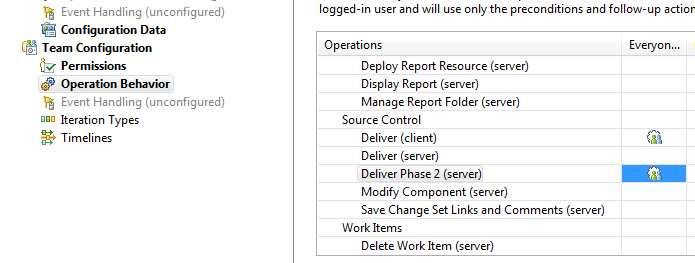
Figure 26: Deliver Phase 2 (server)
- In the pane that appears under the table, ensure that Preconditions and follow up actions are configurated for this operation is checked.
- Click the Add button beside the Precondition table and select Restrict Changes to Items.
- In the widgets that appear, click the Add button beside the Matches changes are: table and expand the JUnit Example component and the JUnit Examples project in order to select the .project and .classpath files.
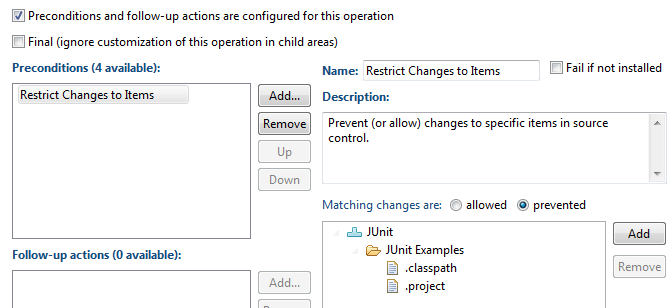
Figure 27: Restrict Changes to Particular Items
Scenario: Prevent Add, Rename and Move of Java Files
When you are dealing with a large number of files, explicitly listing they ones that can’t be changed becomes impractical. Instead, you can use the ‘Restrict Changes by Item Name’ advisor. It controls modifications of files based on their name, meaning that you can limit changes to specific file types.
- Click the Add button beside the Precondition table again and select Restrict Changes by Item Name.
- In the Components pane, add the JUnit Examples component.
- In the Rules pane, click the prevent option.
- In the Rules pane, click Add Rule to add a rule to match Java files.

Figure 28: Restrict Changes by Item Name
- The dialog to add a rule also allows you to pick the types of changes to match. Select the options for add, move and rename.
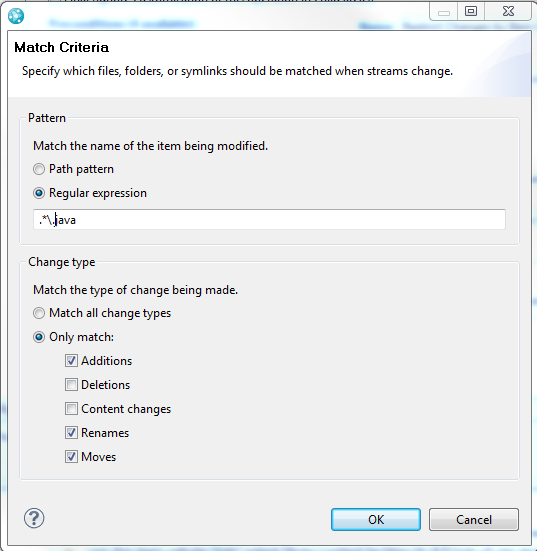
Figure 29: Restrict Changes by Item Name Dialog
Discussion
The above two restrictions will prevent the changes to the .project and .classpath files and the addition, move or rename of *.java files for everyone. We can use the same advisors associated with specific roles to re-enable the ability for users with a matching role in the project or team area.
Conclusion
In this article we’ve demonstrated many ways to read and write protect source control with varying degrees of accessability. Each method comes with its own strengths and weaknesses, but as we’ve seen, there are many different scenarios and reasons why source control should have restricted permissions. Some methods will work better than others and these examples work well for the simplified scenarios. Depending on the dynamics of your team and the stage in your development cycle you might use variations or combinations of these examples. Remember that the purpose of permissions is not to make development harder but to make it easier.
© Copyright 2011 IBM Corporation