
Getting Started with Planning in Rational Team Concert 4.0
The Agile Planning component is a lightweight tool that helps you with planning and executing development iterations. Since planning grounds on work items it is interactive and live – change a work item and it changes the plan, change a plan and it changes work items.
This article will help you get started using the Rational Team Concert Agile Planning tooling. It will introduce the Plan editor with its pages, the My Work view, Load & Progress Bars, and how to setup your Work Environment.
Introduction
Agile Planning embodies a set of practices to development software. One is to work in fixed-length time-boxes called iterations or sprints. Typically they last two to six weeks and at the end there is measurable increment to the product. Planning an iteration is simple: From all the things that must be done (aka Backlog), select those that are most important and can be contained in the upcoming iteration. Then break down the work into smaller tasks and assign it to individual team members.
The Agile Planning tool assists you doing this by several means:
- Plans are accessible to everyone in the team – Be transparent.
- Plans reflect the team’s position and direction – Know when you are about to fail.
- Plans are live as they ground on work items – No unnecessary planning artifacts to be taken care of.
Prerequisites
We recommend to read the following documents:
Further, we assume that a Jazz server has been set up and that you are connected to a Project Area. The quickest way to get started is the Rational Team Concert JUnit Example Project wizard.
Plans
For your team the plan is an information hub. It shows all planned work items, aggregates progress and load information, points out connections to other teams and their plans, allows to create and compare plan snapshots, and helps to capture free-form information in wiki-style pages.
Creating a Plan
Some projects create default plans during initialization, but you can also create plans manually. To do so, select a plan type from the Plans menu. This will open an empty plan editor which asks you for a name, an owner, and an iteration. Details about plan types and inclusion of all execution items explained here, but for now go ahead, press save, and the plan will load.
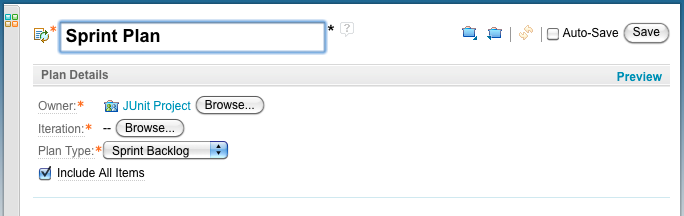
A plan can always be changed. Click the name to change it; select Edit in the Plan Details section to alter its owner and iteration. After saving the contents of the plan it will update accordingly.
The Plan Editor
The plan editor is organized in pages: Planned Items, Links, Snapshots, Dashboard, and Notes. Above these pages it shows details about the plan. Such as load and progress and details about the plan configuration.
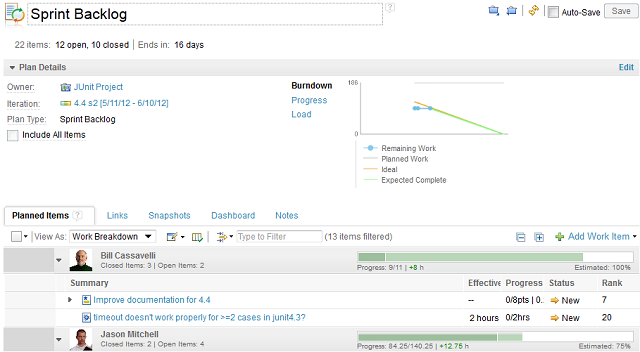
Planned Items Page
The planned items page shows all work items that belong to a plan. Why a work item is on the plan is explained in this section, but in a sentence: A work item belongs to a plan when it is planned for the iteration the plan is created for and when it is filed against a category that is associated with the project or team owning the plan.
It helps to think of the planned item page as a sophisticated query result view. Sophisticated because it allows for different views onto the same set of work items, and also allows for creation and modification of such.
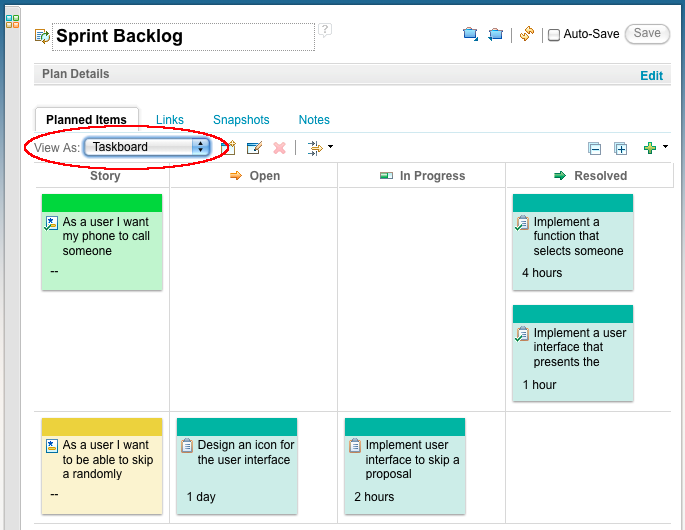
Plan Views
Naturally, the planned items come as a flat list that lacks sorting, filtering, or any further contextual information. Plan views allow to work task-oriented by applying various styles, groupings, sorting, and filters to the planned items page. For instance, viewing the planned items as Ranked List shows all unresolved work items sorted by their rank. The same set of items can be viewed as sticky notes when using the Taskboard plan view. Every project comes with a set of built-in plan views that can be selected from the View As menu.
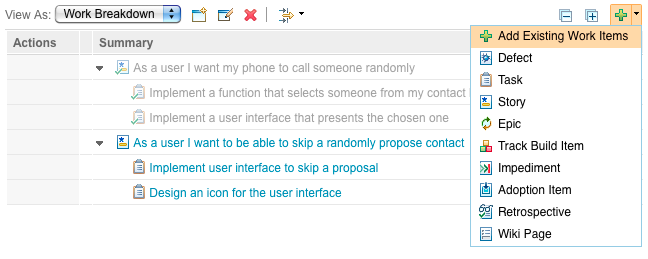
Adding & Managing Work Items
To add a work item to a plan you have to alter its Planned For and Filed Against attributes to match what has been configured for the plan. To make a work item show up on a plan, you can either:
- Create it straightaway in the planned items page by executing the Add Work Item action.
- Select an existing work item using the Add Existing Work Item action.
- Open a work item in the Work Item Editor and modify it so that the team area and target iteration match the plan.
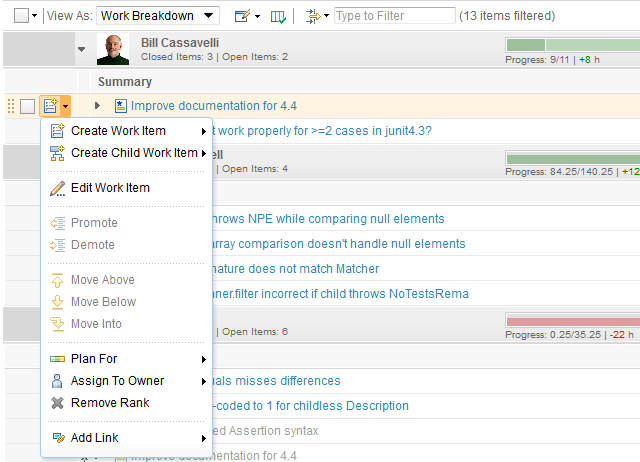
All work items on the planned items page allow for in-place editing. Change a displayed attribute by selecting it, use the context menu, or drag and drop items. Some examples: Select the summary of a work item and get an editor to change it. Drop a work item onto another one to make it a child; drag a work item above to rank it as more important. In addition, work items can also be changed using the edit action – it will open an in-place work item editor.
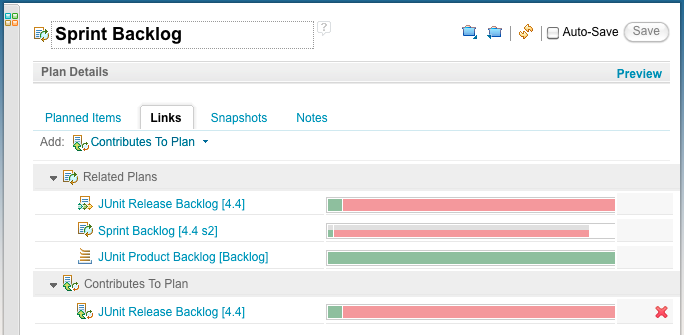
Links Page
The links page shows various links to and from the current plan. Along with the relation, progress and a rich hover is available. The following scenarios are supported:
- Link development plans across project areas
- Link development plans with requirements collections in Rational DOORS Requirement Professional
- Link development plans with test plans in Rational Quality Manager
Snapshots Page
The snapshot page is to create, manage, and compare plan snapshots. A snapshot is a record of the current state of a plan. It contains all work items, which state they are in, their estimates, their story points, computed end date, and progress.
Snapshots are very useful to figure out what has changed over the course of one iteration or release. Some methods like Scrum are very particular about immutable sprints. Take a snapshot at the beginning of the iteration, continuously check if you are drifting, and start corrective actions.
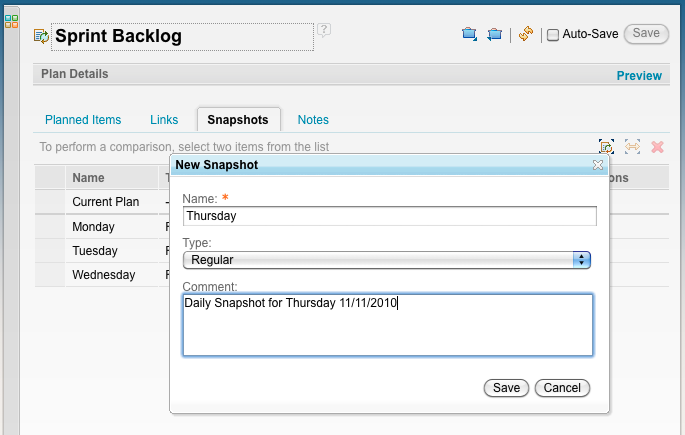
To create a new snapshot select the Take Snapshot action and enter a name. This will create a new snapshot of your current plan. All snapshots are presented in an overview when opening the snapshots page. In there you can edit and delete existing snapshots. The current state of the plan will always be shown as it represents what you are seeing on the Planned Items page now.
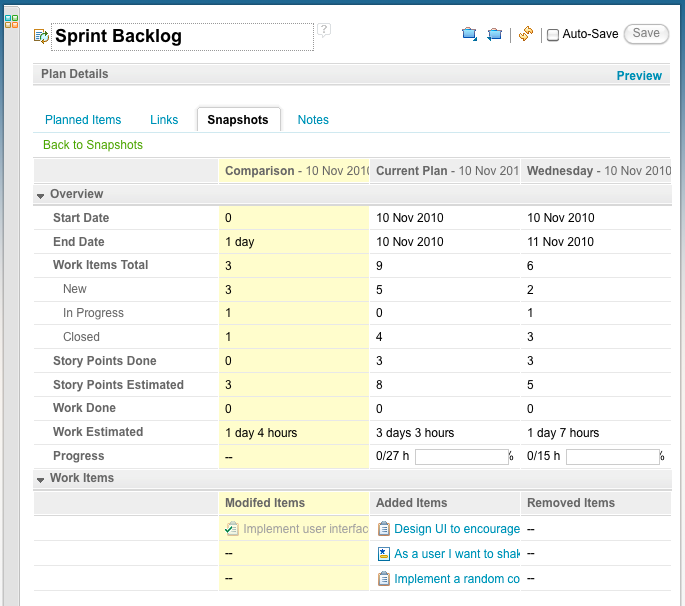
Snapshots can be compared to the current plan or to other snapshots. To do so, select two snapshot and select Compare Snapshots. It will show a side-by-side comparison and the delta between both. This way it’s easy to see what work items have been added to the plan, if estimates have changed, how many items have been completed, and how many items are in progress now.
Dashboard Page
The dashboard page allows you to create and customize a dashboard for your plan. When this tab is selected for the first time on a new plan, a message is displayed explaining that no dashboard is associated with the plan yet. Simply save the plan and the dashboard will be created. You can now take advantage of the variety of viewlets available for your plan’s dashboard.

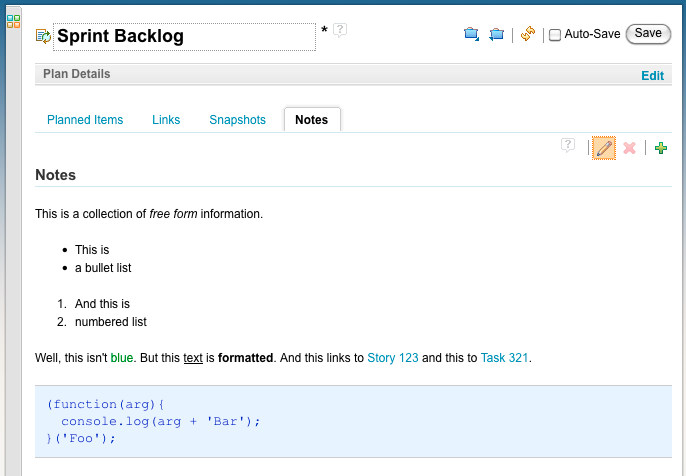
Notes Page
The notes page provides an artifact-aware text editor to capture unstructured information. It features a wiki-syntax which supports commonly used commands for headings, text styles, links, listings, and tables. For reference check the quick guide below. You can also link to RTC artifacts like work items, plans, and contributors. For instance, typing [[Defect 123]] will create a link to that work item.
More Pages
Plans allow you to add new pages. Use them to capture additional information such as a test plan, discussions, etc. Select the Add Page button  in the local tool bar to create a new attached page.
Wiki Syntax Reference
Attached pages are edited using the Wikicreole wiki-syntax. A quick reference is provided below; for more details visit the Wikicreole webpage.
= Heading 1 == Heading 2 === Heading 3 ... ====== Heading 6 | Heading 1Heading 2Heading 3…Heading 6 |
* Bullet 1 ** Bullet 1.1 *** Bullet 1.1.1 |
|
# Numbered 1 ## Numbered 1.1 ### Numbered 1.1.1 |
|
**bold**, //italic//, __underline__, --strike-through-- | bold, italic, underline, strike-through |
red##text colour##, ##background colour##blue, yellow##text & background color##blue | text colour, background colour, text & background colour |
[[Defect 9]] | Defect 9 |
[[Defect 9|Click here!]] | Click here! (Work Item link with custom label) |
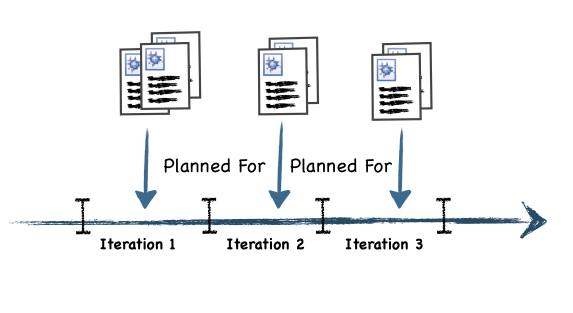
What makes a Work Item appear on a Plan?
Plans are created for a team or project area, which is called the owner of a plan, and an iteration. These two attributes allow us to figure out what work items belong to a plan. This is because work items can be Planned For an iteration, and because work items are Filed Against categories – which in return belong to a team or project area.
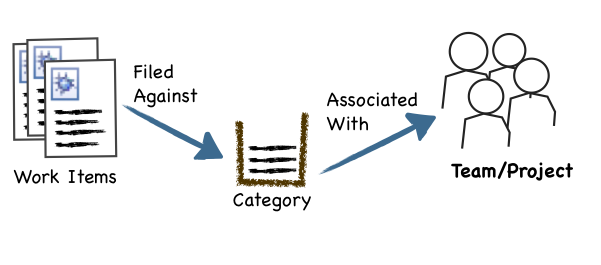
This also means: No categories, no planning. No iterations, no planning. Therefore make sure that your project area defines iterations and categories. New projects come with meaningful defaults, but if you want to start from scratch or make adjustments, check out the Project Area editor guide which explains how to setup categories and iterations.
Plan Item vs. Execution Item
Conceptually planning distinguishes between two types of work items: Plan Items and Execution Items. Work items of both types are shown on plans, but their defaults and presentation differs. So what makes these types different?
- Plan Items
- Such work items are used for higher level planning. A typical example for a plan item in the agile space are Stories and Epics. Typical for plan items is that they are not estimated in real time (hours) but in an abstract notion like Story Points, T-Shirt sizes, Gummy bears, etc.
- Execution Items
- An Execution Item is a small piece of work like a Task or Defect. Often, execution items are the result of breaking down Plan Items into ‘executable’ chunks of work. They typically can be estimated in hours and are assigned to a person in the team. When looking at it as a tree, plan items are roots and execution items are leaves.
Include All Items
By default a plan contains all work items that are planned for the plan’s iteration and belong to the plan’s owner. This also applies to work items that belong to a hierarchy of iterations or team, e.g. a work item belongs to a team which is a sub-team of the plan’s owner. Imagine a complex project with teams of teams and iterations as leaf of (release)-iterations. In such a scenario plans can become confusing because they may contain a lot of items.

If that is the case you can exclude Execution Items that are planned for past iterations or belong to sub-teams. This might help you to ensure the right level of detail and also helps to reduce load time. To do so, open the Plan Details, select Edit and uncheck the Include All Items checkbox.
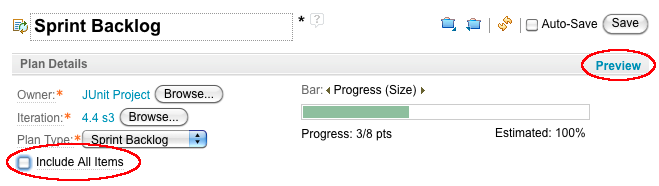
Plan Types
In addition to the owner, iteration, and item inclusion you can also select a Plan Type when creating or editing a plan. Every project comes with a set of plan types and their purpose is to prime the plan editor with typical Plan Views. This is to support task-oriented work. A Sprint Backlog calls for different plan views than a Product Backlog. Because of that, different plan views (e.g. Taskboard for Spring Backlogs and Ranked List for Product Backlog) are associated with each plan type.Load & Progress Bars
The Agile Planning tooling features two different kinds of bars: Progress Bars and Load Bars. They provide information about the work load of team members, help to distribute incoming work, and help to track the progress on different work item groups.- Load Bars
Load Bars show how much work is assigned to a user and whether she is likely to complete her assigned work or not. Work load information is displayed in the Team Load section, the owner groups of the Planned Items page, and the My Work view.
A load bar shows the following information:
- The ratio of remaining work time and upcoming work (horizontally)
- The percentage of estimated open work items (vertically)

The load bar in the picture above shows a situation where the upcoming work exceeds the remaining work time. The user is overbooked by 13 hours, resulting in a partly red bar. The status label shows the corresponding numbers: ‘101 hours of upcoming work versus 88 hours of remaining work time’. All work items have been estimated (100%).
- Progress Bars
Progress Bars reflect the progress of a team, a user, or other grouping elements (work item tags, work item categories, etc.). They can be found in the plan header and on the group elements of the planned items page.
A progress bar shows the following information:
- The ratio of resolved and total work, and, if iteration information and work assignment are available, a projection of the earlier ratio onto the ratio of spent work time versus total work time (horizontally)
- The percentage of estimated open work items (vertically)

The picture above shows a progress bar with projection. It is read as follows: ’24 out of 59 work hours are done’ and, taking into account the total and spent work time, ‘you are ahead by 4 hours’ (visualized by the bright green rectangle). Again, all work items are estimated (100%).
In both bars the percentage of estimated open work items is visualized. This is because load and progress bars derive their information from work item estimates. For example, upcoming work is the sum of estimates of all open work items. The same is true for progress bars and resolved work. Hence, the more work items are estimated, the more accurate these values are. To visualize the importance of estimates, the percentage of estimated open work items is drawn as a fill level. A bar grows in height, revealing more of the actual load or progress information, when more work items are estimated.
For more information see: Explaining Progress and Load Bars, and why estimating your Work is important.
Team Load Section
The Team Load section is part of the Team Dashboard view and provides information about the work load of a team for an iteration. Its purpose is to reflect the individual work load of each team member and assist in distributing work among team members.
Open and Configure the View
The default layout of the Team Dashboard view already includes the Team Load section. When customizing other Team Dashboard layouts, the Team Load section can be added from the view menu. Use the Sections > Team Load context menu action. To show the Team Dashboard view, you can either switch to the Work Items perspective or choose Window > Show view > Team Dashboard.
Configuring the Team Load section is easy. Drag a team area or an plan onto the Team Load section, or choose a team area and an iteration using the configuration dialog.
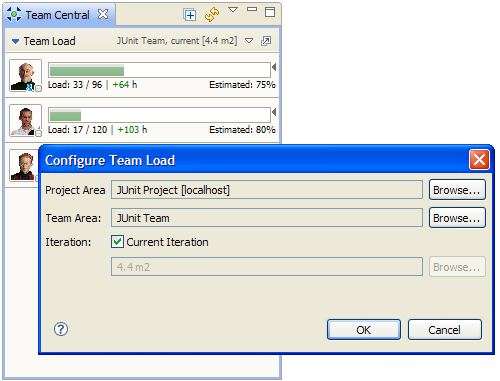
Note that you can either explicitly set an iteration (e.g. 4.4 m2) or configure the Team Load section to stick to the current iteration. When dropping a team area, the current iteration is used, when dropping a plan, the plan’s team area and iteration is used.
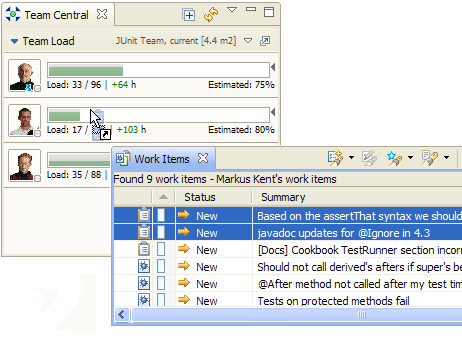
Distributing Work among Team Members
If you are a team lead, you can use the Team Load section to distribute work items among your team members. It does not only tell you the work load of each team member, you can also assign work items to a user by dragging them onto the corresponding bar. Use the different ‘Show’ context menu actions to query the work items assigned to a particular user or to list her recent or current work. Furthermore, from the section’s open action  you may open or create a corresponding plan.
The My Work View
We saw that the Plan editor assists a team in planning work for a sprint or even a product. In contrast, the My Work view assists an individual developer who works on one or more sprints, e.g. development and maintenance.
In particular, the My Work view helps you organizing your work:
- By providing a view on all the work items you own.
- By assisting you in creating and maintaining reasonable personal plans for the current sprints.
- By putting your current work plan at your fingertips while you are working.
- By showing your newly assigned work in an inbox.
- By keeping you up-to-date, showing changes to owned work items.
- By helping you find relevant work items using a powerful filter mechanism.
- By offering an easy way to create tasks for yourself – always in context.
- By managing work items targeted for future iterations.
- By making your work plan automatically visible to the team.
Open and Configure the View
The view is available by default in the Java perspective. Additionally, it can be found in the Work Items category of the Show View menu.
The My Work view is scoped to a project area. If you are connected to more than one project area, you need to select one before being able to use the view. In case you have only one repository connection, it will be selected by default. You can always change the project area context later, use Select Project Area… from the view’s setting menu. Other than that, no configuration is necessary.
While it is not necessary to create plans in order for the My Work view to work, plans and this view are closely related. The contents of your My Work view will automatically be visible to the team using the relevant plans.
Basics
The My Work view consists of three sections:
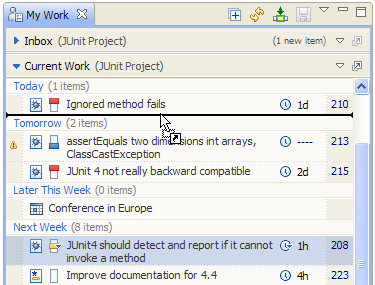
- Inbox: Work items that were newly assigned to you by someone else show up in this section.
- Current Work: Work items planned for a current iteration are shown in this section. The planning can be refined by specifying the sequence with which you intend to resolve your work items.
- Future Work: Work items planned for a future iteration as well as incomplete work items planned for a past iteration are shown in this section.
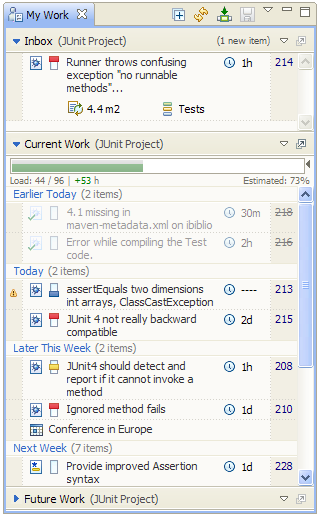
The My Work view shows a concise label for each work item, including only the most important information such as its work item type, its summary and the work item id. To open a work item in the work item editor, double-click the work item, press enter while it is selected, or click the work item ID next to the summary.
It is possible to edit some of the work item’s attributes, such as the estimate, the priority and others, directly inside the My Work view. Changes applied to work items within the My Work view, including estimating and planning, will be automatically saved after a short delay if the modified work item is not being modified in another editor. By deselecting Automatically Save Changes in the view’s menu, no changes are saved automatically anymore. All modified work items in the My Work view can be saved at any time by pressing the save button in the view’s tool bar.
Planning the Current Work
The My Work view helps you planning a current sprint. It allows to specify the order with which work items are resolved. You can think of your incomplete work items as a working list where you start at the top and work your way through to the bottom. At any time you can insert new work at any position in your working list, rearrange the order or remove work.
By estimating work items, you enable the My Work view to calculate the projected time you will be able to start working on any work item in your working list and the time you will be completing it. The planned time is calculated by accumulating the estimates of the preceding work with respect to your working hours and absences. When adding new work items into your working list, the planned time of the inserted and subsequent work items are updated immediately.
If you choose not to estimate work items, a default estimate of zero work hours per work item is assumed. This, of course, reduces the accuracy of your plan considerably; this is why the My Work view warns you about planned but not estimated work items.
You can estimate work items directly within the My Work view. Clicking on the estimate icon ![]() will pop up a menu with a set of predefined estimates and a More… action to specify the estimate in a dialog. Alternatively, you can estimate work items in the Work Item or Plan editor.
will pop up a menu with a set of predefined estimates and a More… action to specify the estimate in a dialog. Alternatively, you can estimate work items in the Work Item or Plan editor.
Managing your work, such as adding, rearranging or removing work items, is possible by using Drag’n’Drop or the Plan for context menu action.
Inbox
Work items that are newly assigned to you by someone else are first shown in the Inbox section. This section helps you to be aware of new incoming work.
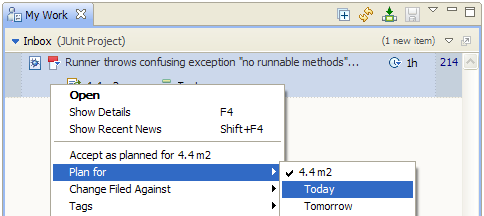
Just select Accept in order to accept the work and show it in the Current Work or Future Work section, depending on which iteration the work item is currently planned for.
See Making best use of the My Work view for a more detailed discussion about the My Work view.
Configuring your Work Environment
We have already seen how plans are created and managed using the Plan editor, how the Team Load section is used to load balance the work between team members and how the My Work view is used to plan your individual work. Until now, we have employed the Agile Planning tooling using some reasonable assumptions about your teams work capacity and yours as well. If not otherwise configured, all agile planning tools use a standard work week consisting of five days per week with a working time of eight hours per day and a fixed work end time.
In order to improve the accuracy of your planning activities, the User editor provides several features to better describe the way you work.
Scheduled Absences
Creating and managing scheduled absences helps the agile planning tools in automatic planning of work items during the current iteration:

The Plan editor shows the scheduled absences in Planned Time group mode. The My Work view shows the scheduled absences in the Current Work section.
Work Days
Besides scheduled absences, the User editor allows you to customize your work days as well. This is particularly useful if you only work part-time or have an otherwise non-standard work week.
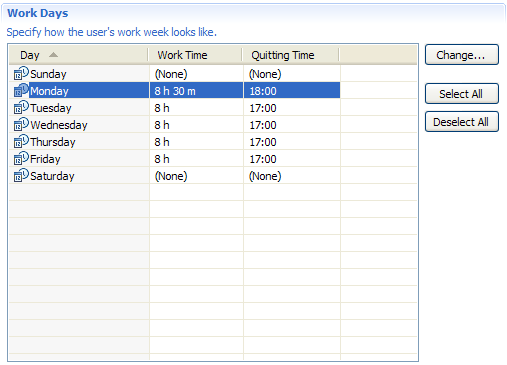
Having your work days specified in the User editor helps to further improve the planning accuracy.
Work Assignments
Most developers do not only work for one team, they work in different teams and possibly on different development lines as well. The Agile Planning tooling offers the user to exactly specify work resources assigned to a particular team and development line combination in the web UI user editor:
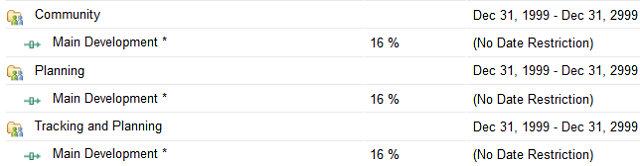
The User editor will automatically distribute your work resources evenly over all team areas and development lines you are working on. If the distribution does not match your actual assignments, you can redistribute among the work assignments.
Work Location
You can also specify time zone and regional settings to match your current work location:

This information will help the Agile Planning tooling to use correct calendar information while planning your work.
Scheduled absences, work assignments and work week specifications are accounted in the entire Agile Planning tools, including the Plan editor, the My Work view and the Team Load section.
You can configure the work environment using the Rational Team Concert development environment or the web ui.
Customizing the Agile Planning Tooling
The Agile Planning tooling can be customized in several ways. Learn more about it by reading the article Planning Customization.
Copyright © 2012 IBM Corporation