Easing into Jazz Source Control
In this article, we are going to present a way of using the Jazz Source Control (SCM) Eclipse integration in a way that is familiar to Eclipse users who have used the Eclipse integration of other SCM systems such as CVS or SVN. We will start off by presenting workflows that can be controlled from an Eclipse resource view like the Project Explorer or the Package Explorer. We will then discuss what makes Jazz SCM different then systems like CVS and SVN and describe how to make user of the of Jazz SCM through the Pending Changes view.
Table of Contents
- Introduction
- Prerequisites
- Saving Work using SCM
- Working in a Team
- Understanding Jazz SCM Workspaces
- The Next Step
Introduction
Eclipse users who are familiar with the Eclipse integration for repository tools, such as CVS and SVN, often have a hard time understanding how to use the Jazz SCM tooling in Eclipse. This is due, in a large part, to how Jazz SCM differs fundamentally from traditional repository tools. In this article, we present a way of working with Jazz SCM within the Eclipse based client that is similar to the workflow used for other Eclipse based repository tools such as CVS and SVN. However, the workflows we present are not the ideal workflow for Jazz SCM so we will also discuss what makes Jazz SCM different than these other repository tools and then present the workflow that we feel better makes use of the Jazz SCM capabilities.
Prerequisites
The examples presented in this article assume that the following setup has already been performed.- An RTC server is installed and configured.
- A user has been created and assigned a Developer license.
- A project area has been created using the Simple Team Process and our user has been added as a member of that team and been assigned the Team Member role.
- The user has installed the Eclipse client.
If you need to perform any of the above steps, a good starting point is Getting Started with Rational Team Concert: A Deployment Guide.
Saving Work using SCM
In this section, we are going to show some basic workflows for sharing work with a team. These workflows will involve working from a resource view such as the Packages Explorer of the Java Development Tools (JDT). What we will show is:- Sharing a new project in a stream
- Making changes to the content of a stream
Sharing a Project to a Stream
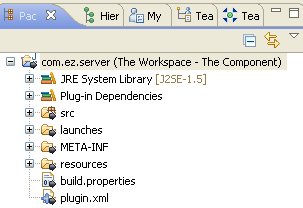
To start off, we need to have something to share. Emily is our example user and she has created a project for a simple web server. In this section we’re going to show how she can make this project available to her team mates through her team’s stream.
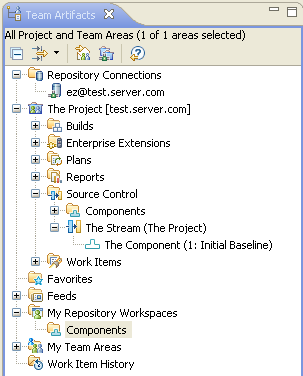
When using the RTC Eclipse client, the first thing you need to do when you want to share new work is to launch the client and create a new Jazz Repository Connection from the Team Artifacts view by clicking on the Create a Repository Connection link. After you have added the connection, you will want to choose Manage Connected Project Areas from the context menu of the location in order to connect to your project area. Once you have done this, the Team Artifacts will look something like this:
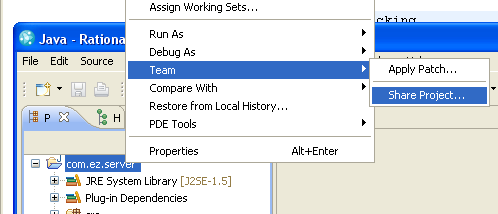
Now lets assume that Emily has a project in her client workspace that she would like to upload to the RTC server. Uploading a project for the first time is done using the Team/Share menu action.
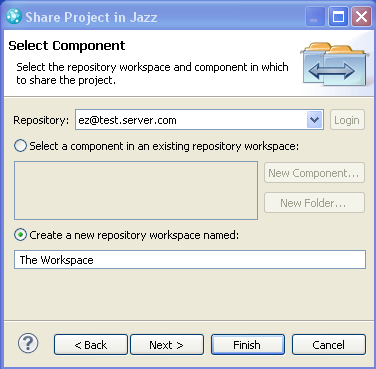
After choosing Jazz Source Control as the provider on the first page of the wizard, Emily then needs to enter a remote workspace name. We’ll talk more about the remote workspace later in the article.
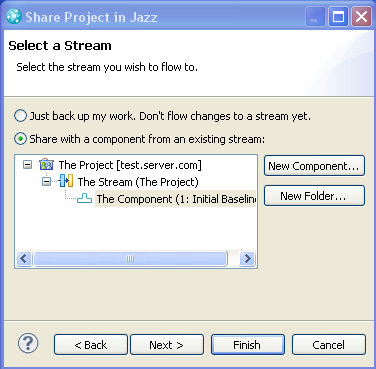
Once the workspace name is entered, Emily can click Next and indicate that she wants the changes to end up in the stream and component of her team.
After clicking Finish, the changes will be in Emily’s remote workspace but they will not be in the stream. This is indicated by the outgoing change indicators in the Packages Explorer.
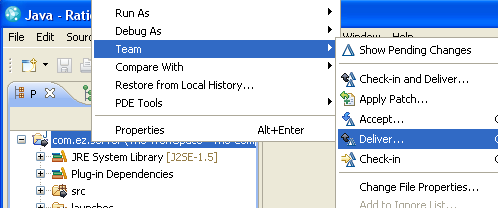
To put the changes in the stream to make them available to other team members, Emily needs to deliver the changes to the stream. This can be done using the Team/Deliver action available from the context menu of the project.
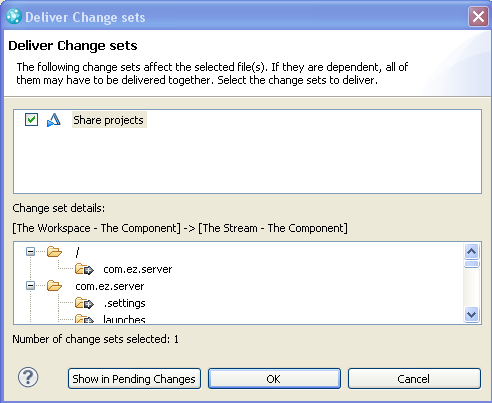
Emily can inspect the changes she is delivering and can make them available to her team mates through the stream by clicking OK.
Once the project is delivered to the stream, the members of Emily’s team can now load and work on the project as well. However, before we show how to do that, we will show how Emily can make some further changes.
Making Changes in a Stream
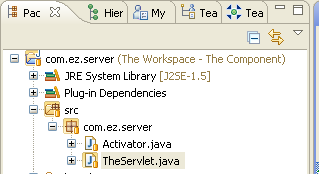
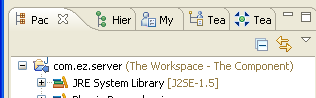
Now that Emily has shared the project, she wants to make a few changes. She has edited the class TheServlet and saved it. As we see in the following screenshot, the class and its containing package, source folder and project are decorated with a yellowish background indicating that there are changes locally that have not been uploaded to the server.
Emily can make those changes available to her co-workers in their stream using the Team/Checkin and Deliver action which is available from the context menu of the changed file or any of its containing folders. This action will open the following dialog that allows Emily to associate a comment with the changes being delivered.
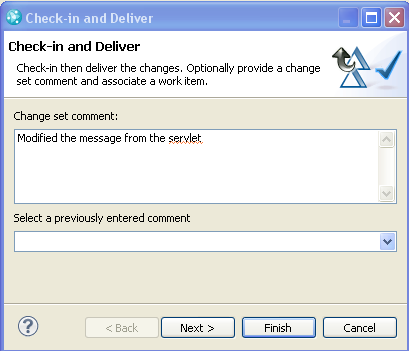
One of the powerful features of Jazz SCM is the ability to link changes made in SCM to a related work item. By clicking Next, Emily is presented with a wizard page that allows her to associate a work item with the changes she is delivering.
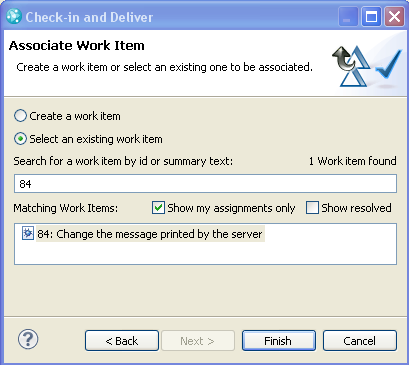
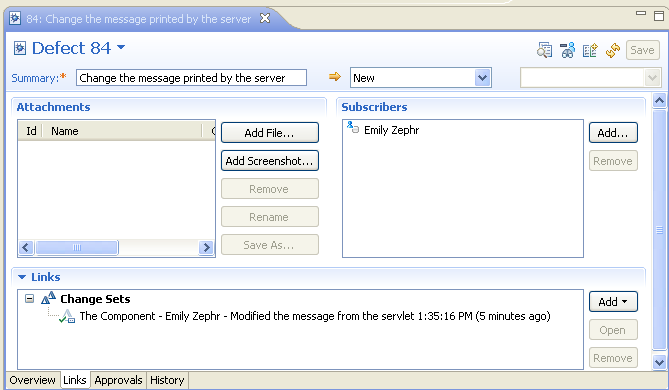
By associating a work item with her change, not only will Emily see that link in the history of the stream but the link will also be present in the work item itself. This means that anyone who views the work item can easily navigate to the changes that were made as part of that work.
Working in a Team
In this section, we are going to look at how to work with other team members using the actions available from a resource view like the Packages Explorer. We are going to present the following:- Loading content from a stream
- Accepting changes made by others
- Dealing with conflicts
Loading from a Stream
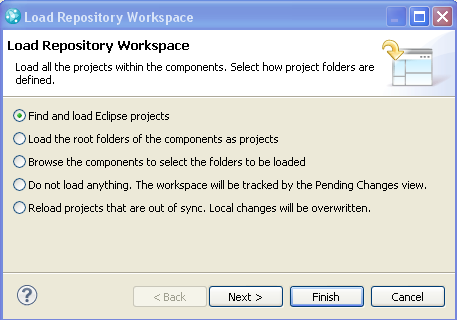
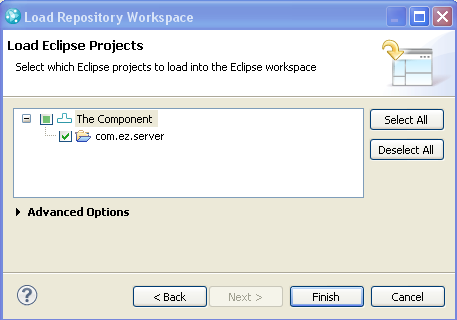
Bob wants to work on the project that Emily created. To do so, he needs to create his own workspace as Emily did. When Bob clicks Finish in the New Workspace wizard, he is prompted to load the contents of the workspace. On the first page of the Load wizard, Bob indicates that he wants to load Eclipse projects
He can just click Finish at this point but clicking Next will show what content will be loaded.
As indicated above, Bob was prompted to load the workspace when he created it. To load an existing workspace, you can select Load from the context menu of the workspace in the Team Artifacts view.
Accepting Changes from Team Members
Let’s assume that after Bob loaded the project, he made some changes and delivered them in the same manner that Emily did. Emily can see that there are incoming changes in the Packages Explorer because the changed resources and their parent folders and projects are decorated with a blue incoming change arrow.
Emily now wants to accept those changes, which she can do in the Packages Explorer using the Team/Accept action from the context menu of the project. This will open a dialog that allow here to see what changes are incoming.
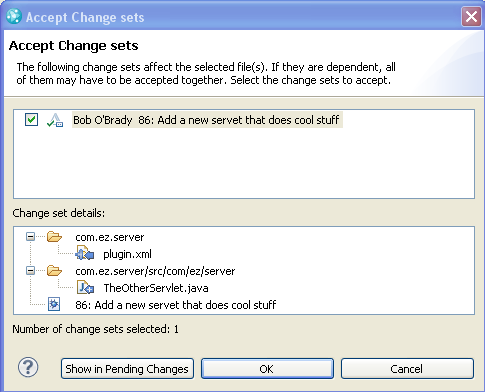
By clicking OK, she can accept all the incoming changes. If there are multiple incoming change sets, she can decide to accept only a subset of the those changes. However, this is not always possible if multiple change sets affect the same file. In most cases, she would just accept all the incoming changes.
What would happen if Emily had made changes of her own before accepting Bob’s changes? As long as the changes that Emily made are not in the same files as the changes Bob made, the accept will go smoothly. However, it is still recommended that Emily check-in her changes before accepting the changes from Bob. If she did have local changes that were not checked-in, she would get the following prompt when she accepted Bob’s changes.
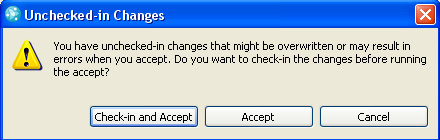
The advantage of checking in the changes is that a copy of Emily’s changes will then be uploaded to the server. This means that they are backed up in case anything goes wrong. For instance, if Emily had made a change in one of the files Bob changed, Bob’s changes would overwrite Emily’s. By checking in her changes, Emily will ensure that her changes will not be lost in this way and any conflicting changes can then be resolved, as described in the next section. Because of this, it is considered a best practice to always check in changes before accepted changes from the stream.
Dealing with Conflicts
One issue that needs to be addressed is how to handle cases where multiple team members need to edit the same file. There are basically two ways to deal with the situation: one is coined pessimistic while the other is called optimistic.
Pessimistic Approach
Using the pessimistic approach of handling concurrent edits to the same file by multiple team members means that only one team member is allowed to make changes to a particular file at any given time. Other team members need to wait until those changes are delivered before they make their changes. To support this workflow, a Team/Lock action is provided on files that will lock the file in the stream so that other team members will know that someone else is editing that file.
When a team member locks a file, the file is decorated appropriately in the Packages Explorer or any other resource based view.
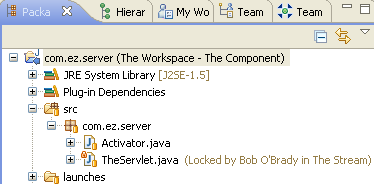
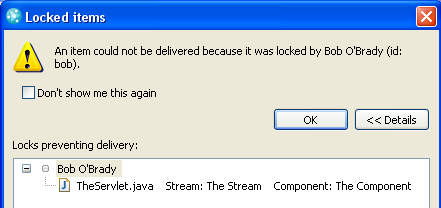
Also, delivering a change to a locked file will result in a prompt indicating that the file is locked by another user.
However, when Bob delivers the change to the file he has locked, he will get prompted to unlock the file. If, instead of delivering the change, he decided to discard it, he could use the Team/Unlock action to release the lock on the file so other team members could edit the file.
In this way, a team can ensure that only one team member is making changes to a particular file at any given time.
Optimistic Approach
The optimistic approach to handling concurrent edits assumes that actual conflicting edits are relatively rare and team members will be able to merge conflicting changes safely when they occur. It turns out that, even if multiple users do makes changes to the same file at the same time, the tooling can, more often than not, automatically merge the changes because they occur in different sections of the file. For those cases where the concurrent edits touched the same part of the file, a compare editor can be used to manually combine or merge the conflicting changes.
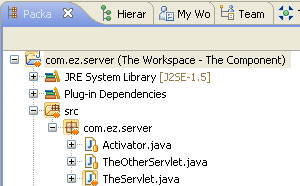
Let’s assume that Emily and Bob are making changes to the same file. If Bob delivers his change, Emily will see that there is an incoming change that conflicts with the changes she has made, as indicated by the red two-way arrow decoration that appears on the file in her Package Explorer.
If Emily tries to Checkin and Deliver her change, her changes will be checked in but she will get a message prompt indicating that her change cannot be delivered until she accepts Bob’s change and resolves the conflict. When she accepts Bob’s change, she will get the following prompt, indicating that a conflict occurred.

If she chooses to auto resolve the conflicts, the operation will attempt to merge the change automatically. However, if she chooses to resolve manually or if the operation couldn’t merge the change automatically, then the conflicts will need to be resolved from the Pending Changes view.

Emily will have several options for resolving the conflict. Here’s what the context menu of the conflicting file looks like:
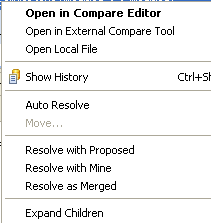
Using these actions, Emily can:
- Keep her changes and throw away Bob’s using Resolve with Mine
- Throw away her changes and keep Bob’s using Resolve with Proposed
- Attempt an automatic merge of the changes using Auto-Resolve
- Open the changes in a compare editor using Open in Compare Editor
- If she has edited the file and is happy with the contents, she can indciate that the conflict is handled using Resolve as Merged
Opening a compare editor would result in the following editor:
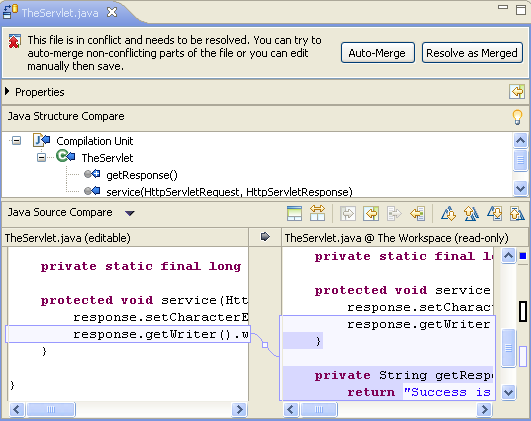
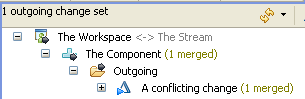
It turns out that Emily’s and Bob’s changes do not conflict so she could simply have chosen to auto-resolve. She can do this from within the Compare editor by clicking on the Auto-Merge button. Once she does this, the conflict will be resolved and she can deliver her change. The Pending Changes view will then indicate that Emily’s change set contains a merge.
Although the optimistic approach to handling concurrent edits can be used in many circumstances, there are situations when it is not recommended. Some of these include:
- when the file is a binary file, since conflicting changes to binary files are difficult, if not impossible, to merge correctly.
- when the file is used to generate other files, since the merging of conflicting changes would require a merge or rebuild of all generated files.
- When the content of a file, while text, is complicated enough that it is not easily understood without the proper tooling to interpret it.
Understanding Jazz SCM Workspaces
One of the ways that Jazz SCM differs from traditional SCM systems like CVS and SVN is through the use of what is referred to as a repository workspace. In Jazz SCM, users can have one or more repository workspaces which represent their own personal work area on the server. As we saw in the examples presented in this article, when a user wants to make some changes in the RTC Eclipse client, they will load the contents of one of their repository workspaces into their Eclipse workspace and the changes they make need to be checked into a user’s repository workspace before they can be delivered to a stream.
The following shows the relationship between Emily’s Eclipse workspace, her repository workspace, and the stream that her team uses.

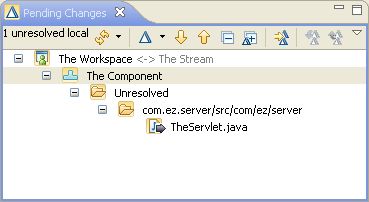
Her Eclipse workspace manages the code she has loaded onto her local filesystem so she can makes changes, test, etc. When Emily makes some changes to her code, the changed files will appear under the Unresolved node in the Pending Changes view.
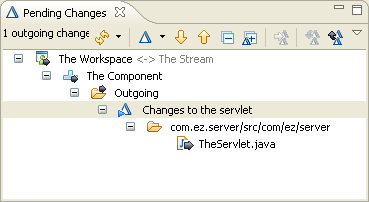
In the example for section Making Changes in a Stream, we showed how Emily can deliver her unresolved changes to a stream using the single action Check-in and Deliver. However, she could instead choose to only check them in using the Check-in action if she wanted to have her changes backed up on the server but did not want to make them available to her team members through the team’s stream. She can choose when and how often she does this but there is no reason not to do it fairly often and she will definitely need to do it before she accepts any changes from the stream, as illustrated in section Accepting Changes from Team Members. Another advantage of checking in changes before they are to be delivered to the stream is that she can add a comment to the change set that contains the changes and she can also associate a work item with those changes, if she desires.
Once she has completed working on a particular unit of work and wants to make that available to her team, she can then deliver the changes to the stream.
As you can see, having a repository workspaces provides some benefits, some of which are:
- you have a backup of your work.
- other members of your team have access to your work-in-progress
- you can make associations between your current work and other articfacts on the server (e.g. work items)
Also, repository workspaces are an essential part of some of the main multi-stream workflows supported by Jazz SCM as described in the article Multiple Stream Development.
The Next Step
In this article, we presented some simple workflows for using Jazz SCM and introduced some of the basic concepts that differ from other SCM systems. Some additional articles you may find helpful are:
- Getting Started with Jazz Source Control gives an overview of the SCM tooling and how to use it.
- Multiple Stream Development describes how to work in a multi-team environment where each team has its own stream.
- Loading Content from a Jazz Source Control Repository talks about different ways to load content into to your local file system from Jazz SCM.
- Jazz Source Control – Resolving Conflicts walks through some senarios involving conflicting changes.
- Comparing concepts between ClearCase UCM and RTC is a useful resource for those who are familiar with UCM.
Some of the articles were written for RTC 2.0 but the concepts still apply to RTC 3.0.
About the author
Michael Valenta is a member of the Jazz SCM development team. Prior to that, he worked on the Eclipse open source project.
Copyright © 2012 IBM Corporation