Cool “Hidden” Features in Rational Team Concert: Part 2
A few weeks ago, Cool “Hidden” Features in Rational Team Concert: Part 1 was published. It highlighted a number of “hidden” features in Rational Team Concert (RTC) that, for whatever reason, are somewhat difficult to discover. They often can only be found by accidentally stumbling upon them in the product itself, or by chance in the documentation.
This article (the second of two) aims to briefly discuss another half-dozen or so such features in RTC. Again, it is likely that you know of a few of these, but I suspect that most people are not aware of all of them. If you have ideas for others to include in a potential future article, please email them to me at garymu@us.ibm.com.
Applying Work Item Attribute Changes to Existing Work Items
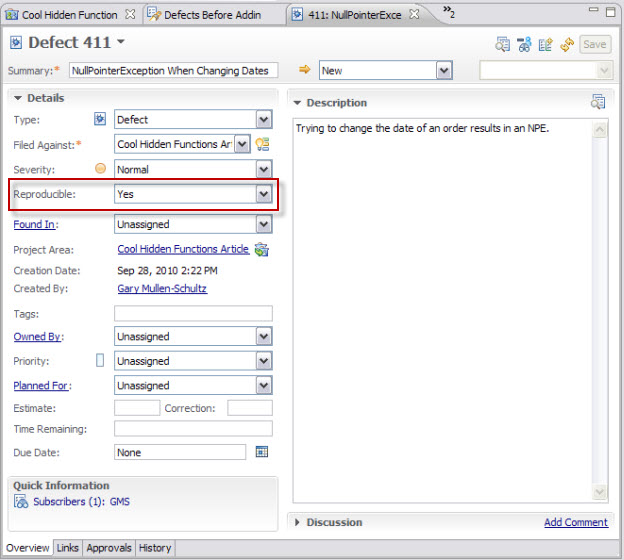
Let’s say you’re halfway through a project, and want to add a new field to a defect. In our case, developers want to know whether a defect is reproducible or not.
Adding a new, custom Reproducible attribute with possible values of Yes or No is pretty easy, and well described in the online help text. But what about the dozens, if not hundreds, of defects that were created before you add this new attribute? How do we get the Reproducible attribute added to them?
Fortunately, RTC has a built-in feature called Synchronize Attributes that makes it possible to apply your changes to a defect’s “shape” to previously-created work items.
The following screen shows a new defect that we created containing the Reproducible attribute:
However, we still have defects that didn’t contain this new attribute when they were created. We need to make sure that it gets added to all our defects.
Note: Make sure you set a default value for all newly-added attributes whenever possible so that older work items which undergo synchronization get initialized appropriately.
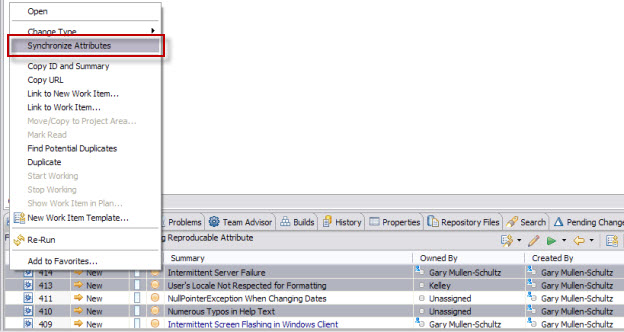
The first thing to do is to create a work item query that identifies the work items to update. Unfortunately, there is not a “direct” way to do this. It’s possible using the query editor to find work items in which a certain attribute exists, but not where that attribute doesn’t exist. This leaves us with at least a couple good options:
- Create two queries: one that finds all (in our case) defects, and another that finds all defects containing the Reproducible attribute. “Subtract” those in the second query from those in the first (manually).
- Create a query that finds all defects created before the day when you added the attribute to defects.
Once you have created and executed your query strategy, highlight those needing the attribute to be added as shown in the following screen shot:
All defects should now contain the Reproducible attribute, set to its default value.
E-Signatures
The History tab of a given work item shows all changes made to that artifact. The information shows what was changed, who changed it, and when.
This is clearly very valuable in understanding what happened in the life of a given work item from cradle to grave. But for some customers, especially those that are part of highly-regulated industries, this just isn’t sufficient. They need not just history and permission scoping on the creation and changes made to work items, but for each individual to acknowledge via electronic signature (“e-signature”) that the changes to a work item’s state were made intentionally and with forethought. That’s where the e-signature capability comes in.
It’s important to note that only state changes (for example, New to In Progress) and approvals are able to be enforced via e-signature at this time.
To configure a work item type to require an e-signature, perform the following in the Eclipse client (this currently cannot be done via the browser interface):
- In the Team Artifacts view, right-click the project area and select Open.
- In the Project Area Editor, click the Process Configuration tab. Expand Project Configuration -> Configuration Data -> Work Items. Click Types and Attributes.
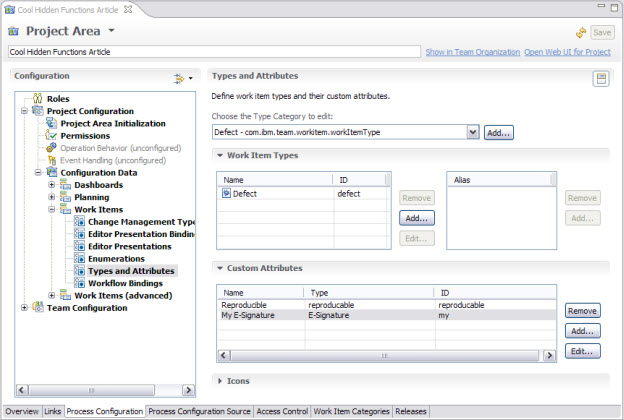
- Select the work item type category for which you want to enforce e-signature, such as Defect. In the Custom Attributes section, click Add. Enter a name for the electronic signature attribute, such as My E-Signature. Select E-Signature in the Type field. Click OK. Click Save to save the project area. This is shown in the following screen shot:
- Click Editor Presentations (two rows above Types and Attributes). In the Editor Presentations list, expand Approvals. Select Approvals (layout slot: <None>). Click Add Presentation. Select My E-Signature (my) in the Attribute field. Click OK. Click Save to save the project area. The result of these actions is shown in the following screen shot:

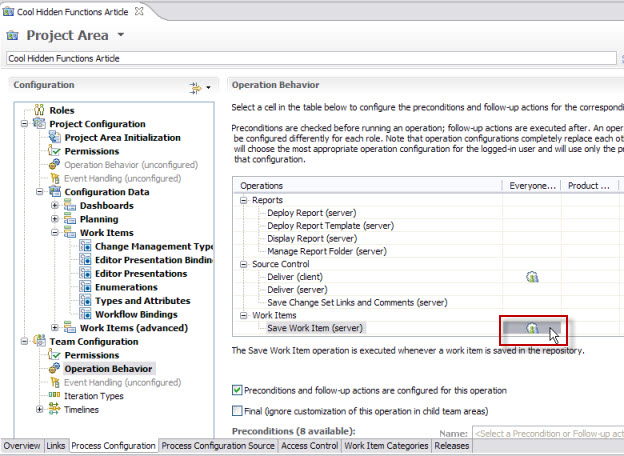
- We now need to add the operation to enforce e-signature behavior. Expand Team Configuration and select Operation Behavior. In the Operations grid, click the cell in the Save Work Item row for the role for which you want the e-signature requirement to apply. In the following screen shot, we are applying the e-signature operation to everyone:
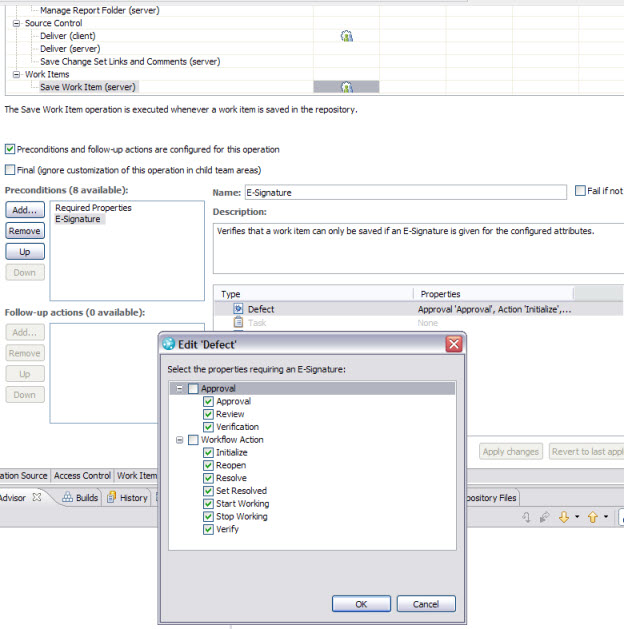
- In the Preconditions section (scroll down), click Add Select E-Signature and click OK. In the Type table, select the appropriate work item type (in our case, Defect), that contains the e-signature attribute. Click Edit. Select the approval and state change types for which you want to apply the e-signature precondition. In the screen shot below, we have chosen to enforce e-signature for all approval and state changes:
- Click Save to save the project area. Now, any time a user changes the state or approval process for a defect, it will be necessary to provide an e-signature.
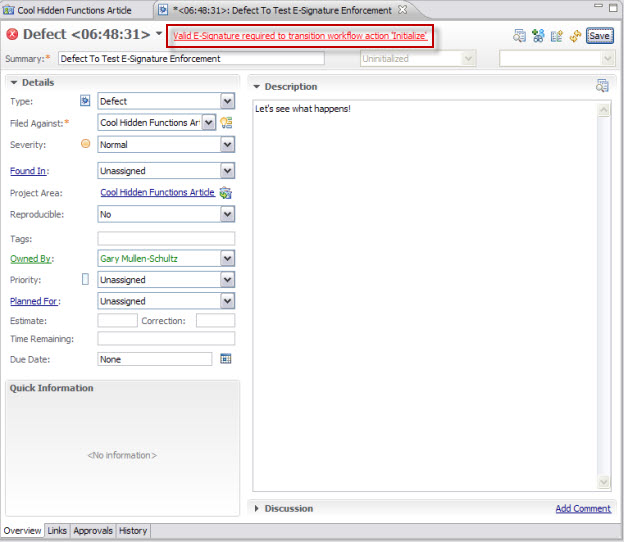
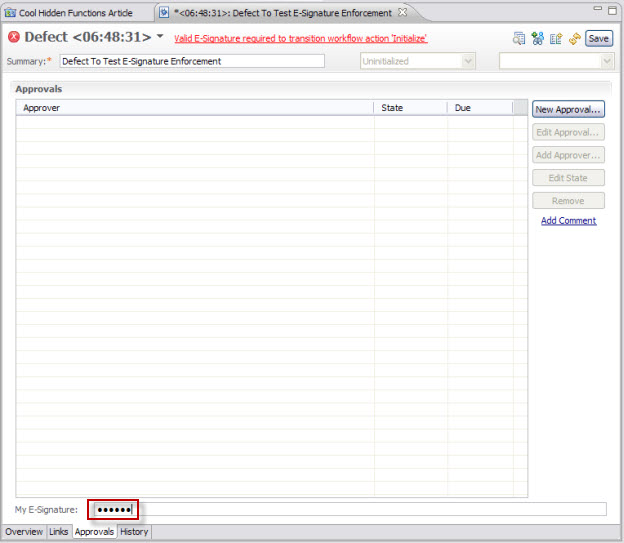
Let’s see how this works. Create a new test defect, filling in the required fields. Click Save. You should notice that even the creation of a work item results in a state change, and that an e-signature is required! This is shown in the following screen shot:
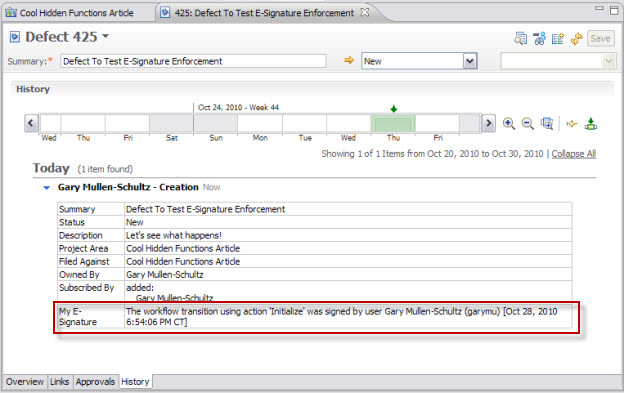
Switch to the History tab. You should see an entry detailing your defect creation, as well as a section specifying exactly who provided an e-signature, and why.
That’s it! You’ve now configured e-signature support for defects, and should be able to do the same for other work item types as needed.
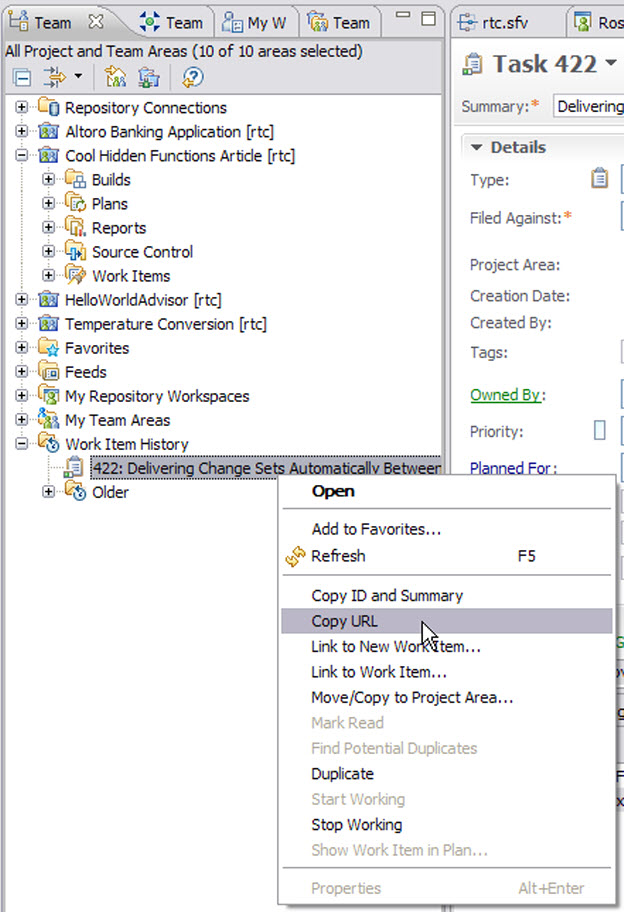
Copy URL on Most Artifacts
Since all client-to-server interactions in RTC, whether we are talking about the Eclipse-based client, the Visual Studio client, or a browser, take place across HTTP (or HTTPS), many artifacts maintained in RTC can be accessed directly via URL. In fact, RTC provides a simple mechanism to get the URL of many artifacts with a simple right click of the mouse.
For example, let’s take the simple case of a work item. There are several ways to get the URL for a given work item. The following diagram shows a way to get it from the Team Artifacts view:
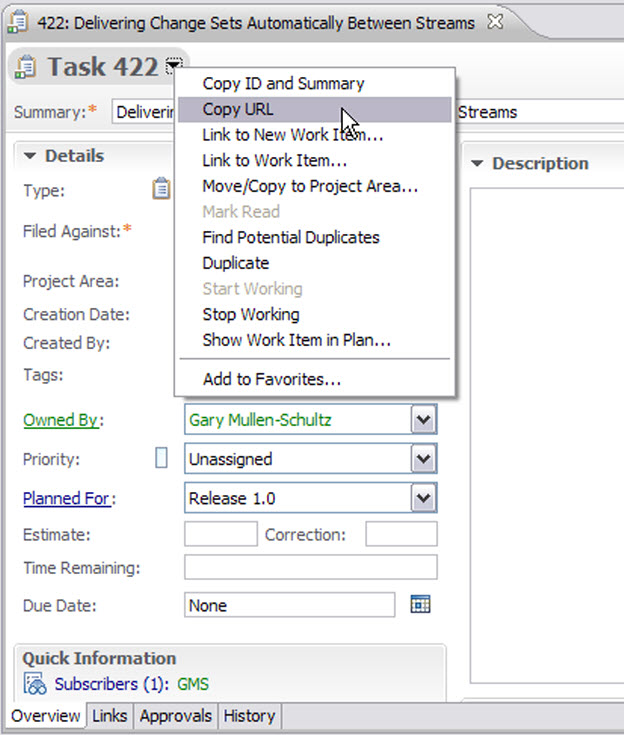
The following screen shot shows how to perform the same action from the work item itself:
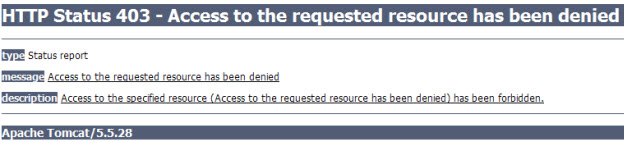
Standard RTC authentication and authorization of course apply. Just because someone has access to an artifact’s URL doesn’t mean they can get to that artifact without going through proper security.
For example, entering the artifact’s URL (in our case, https://rtc:9443/jazz/resource/itemName/com.ibm.team.workitem.WorkItem/422) into Firefox first results in the standard RTC login display. If the user has a valid user ID, but does not have access to the given artifact, he or she will receive a screen similar to the following:
Go and experiment with different kinds of RTC artifacts! This is a handy and convenient way to quickly point a colleague (via chat, email, etc.) to a specific item inside RTC.
Delivering Change Sets Automatically Between Streams
Most RTC customers just use the provided build functionality to perform traditional build activities: creating JARs, EARs, WARs, etc. Many also execute JUnit tests during the build process, and perhaps even mix in some .NET and other (System z, i, p) build activities as well.
RTC provides many Ant tasks to allow for these, and many more, activities to be performed. For example, for a remote build server to be able to execute a build against a given RTC server, it must be able to retrieve the necessary source code (from a specific workspace repository, stream, etc.).
One often-ignored capability that this provides is the ability to automate the promotion of code changes from one level to another. For example, customers often have multiple streams in a given project that correspond to various stages of their development cycle. This technique is well described in this article. It’s common for developers to share code in a “Development” stream, which may have a flow target of a “QA” stream. That “QA” stream in turn may feed into a “Deployment” stream. Appropriate security is built around each stream so that, for example, a developer is not authorized to move a code change into the “QA” or “Deployment” streams; only a “BuildMeister” is able to do that.
The following XML snippet shows how an Ant target can be created that can be used to move code from one stream to another. This snippet needs access to the SCM.EXE executable, which is traditionally shipped in the $TEAM_CONCERT_CLIENT_ROOT/scmtools/eclipse& directory.
<target name="deliver"> <!-- Update the build progress in Jazz by starting a new build activity. --> <startBuildActivity activityIdProperty="deliverActivityId" parentActivityId="${distributedActivityId}" label="Delivering change sets..." buildResultUUID="${buildResultUUID}" repositoryAddress="${repositoryAddress}" userId="${userId}" password="${password}" /> <exec executable="${scm.home}/scm.exe"> <arg value="deliver" /> <arg value="-r" /> <arg value="${jazz.url}" /> <arg value="-u" /> <arg value="${userId}" /> <arg value="-P" /> <arg value="${password}" /> <arg value="-v" /> <arg value="-s" /> <arg value="${source.stream}" /> <arg value="-t" /> <arg value="${target.stream}" /> </exec> <!-- Complete the deliver build activity. --> <completeBuildActivity activityId="${deliverActivityId}" buildResultUUID="${buildResultUUID}" repositoryAddress="${repositoryAddress}" userId="${userId}" password="${password}" /> </target> The snippet above simply delivers the contents of a specified stream into a second stream. These values are set as properties. They can be specified in the build.xml file itself, or passed in via the build definition, or even via the “Request Build” dialog itself. Properties specified in the Request Build dialog override all other properties; those in the build definition override any contained in the build.xml file.
In our case, we are are assuming that some global properties (userId, password, etc.) are already available to the build.xml file. Those unique to promotion from stream to stream are listed below:
<property name="jazz.url" value="https://rtc:9443/jazz" /> <property name="scm.home" value="C:Program FilesIBMTeamConcertscmtoolseclipse" /> <property name="source.stream" value="Cool Hidden Functions Development Stream" /> <property name="target.stream" value="Cool Hidden Functions Deployment Stream" />
Invoking the deliver target results in the following output being logged in the build log (this comes from the SCM.EXE program because we passed the verbose (-v) parameter in to it at execution time as you can see in the snippet above).
deliver: [exec] Delivering changes from "Cool Hidden Functions Development Stream" into "Cool Hidden Functions Deployment Stream" [exec] Baselines to flow: [exec] Component "Build" baseline 38 - "Cool Hidden Features Article Team Build_20101018-1609" [exec] Comment: Snapshot created by automated build
As you can see, our deliver target moved all contents from the “Cool Hidden Functions Development Stream” into the “Cool Hidden Functions Deployment Stream.” This allowed us to easily automate the movement of code from one level to another.
Thanks to Jose Miguel Ordax Cassa for providing this snippet.
Flow Diagrams
As we just discussed in “Delivering Change Sets Automatically Between Streams,” it’s quite common to have multiple streams representing different levels in our development process. Usually, most of these streams have not only other streams flowing into them, but also one or more repository workspace. Visualizing the flow relationships between streams and repository workspaces can be difficult.
Fortunately, RTC provides a feature called Flow Diagrams. This makes it possible to get a graphical representation of the relationships between all these artifacts.
In our example we will have three streams: one for development, one for QA, and one for deployment. The development stream has multiple repository workspaces flowing into it, belonging to the developers writing and sharing code. The QA and deployment streams each have a single build workspace associated, used by the team’s Buildmeister.
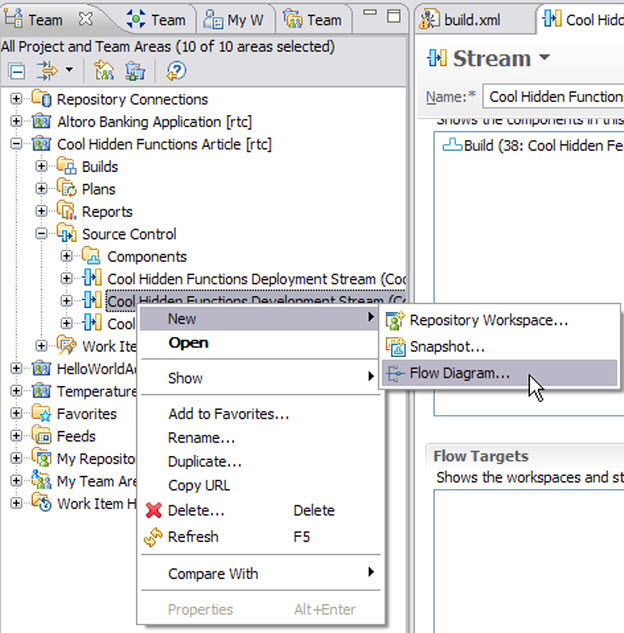
To create a slow diagram simply right-click on one of the streams (we’ll use the development stream), and select New -> Flow Diagram… as shown below:
This will bring up a screen similar to the following:
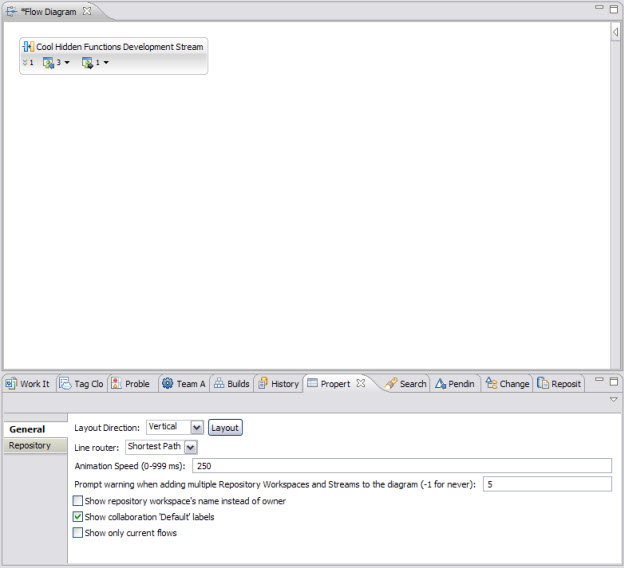
As you can see, there are some properties that can be configured in the bottom Properties pane. Depending on how you manage ownership of your repository workspaces, you may find it helpful to check the Show repository workspace’s name instead of owner checkbox.
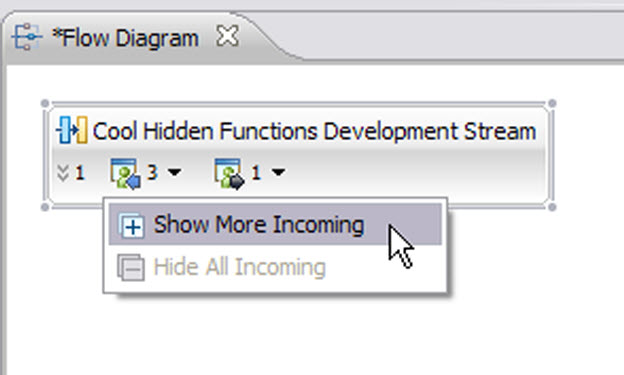
Hovering over the icons in the development stream shows some interesting information. We can see from the icon that the middle icon ( ) can be expanded to show all incoming streams and repository workspaces, and the right icon (
 ) all outgoing. Click the down arrows and then both Show More Incoming and Show More Outgoing as shown here:
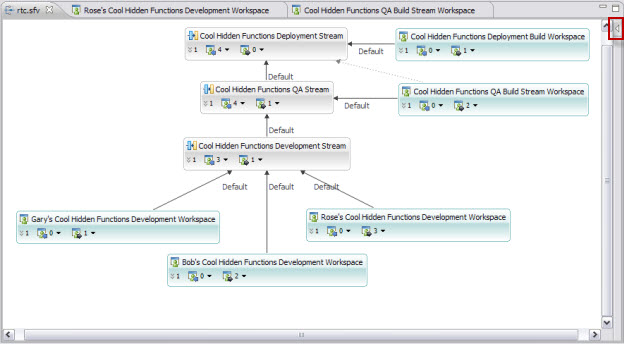
After showing all incoming and outgoing for all streams, and then right-clicking on the background and selecting Layout (and moving nodes around a bit), we get a diagram similar to the following:
You are now free to save your flow diagram off to disk with File -> Save. You can also save the flow diagram as an image by selecting File -> Save Image….
Note that by clicking the left-facing arrow at the top-right part of the Flow Diagram screen (highlighted in a red box in the preceding image) you can get a palette as shown here:
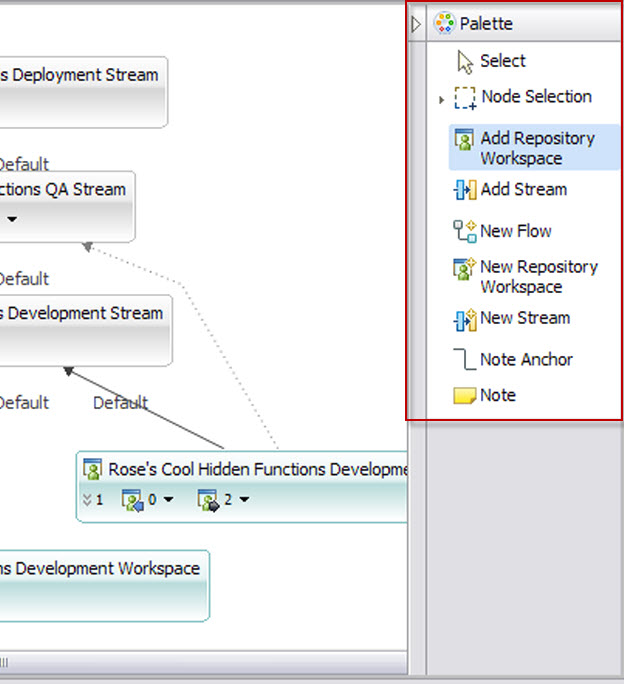
This allows you to manually modify your flow diagram by adding new streams, repository workspaces, relationshops (flow targets), etc. Note that changes made outside the flow diagram editor (e.g., you change the flow target of the QA stream) are not reflected in your flow diagrams.
For more information
- Rational Team Concert – Cool “Hidden” Features, Part 1
- Customizing Work Items
- Requiring E-Signatures
- Multiple Stream Development
Gary L. Mullen-Schultz is a Certified IT Specialist for IBM. He has extensive experience with System i, Java, the Blue Gene and RoadRunner supercomputer projects, and more recently Rational Team Concert and the other Jazz-based solutions. Gary works for IBM in Minneapolis, Minnesota. He is the universe’s biggest Twins fan, and loves the Hold Steady. Gary can be contacted at garymu@us.ibm.com.
© Copyright 2010 IBM Corporation