Getting Started with Planning in Rational Team Concert 2.0
Summary
The Agile Planning component provides a new way to assist you with planning and executing development iterations. Because planning is based on work items targeting certain iterations, planning becomes interactive, live, and fun.
Introduction
Teams following agile software development methods typically divide their release schedule into a series of fixed-length development iterations of two to six weeks. Planning involves scheduling the work to be done during an iteration or release and assigning individual work items to members of the team. To be effective and to reflect the team’s position and direction, plans need to be accessible to everyone on the team and to change dynamically over the course of the iteration. The Agile Planning component provides tools to assist you with planning and execution of software projects ranging form a full development release to a single iteration.
The approach is simple: Plans are derived from work items matching certain criteria. Considering plans as a set of work items gives the following useful characteristics:
- Plans are live:
- Changing work items changes the plan. Closing a work item marks the work item as done on the plan, without need for further explicit actions.
- Changing the plan changes the corresponding work items and vice versa, or creates new ones.
- Plans have a flexible structure. A plan can easily be regrouped (e.g by owner, work item category, tag, …), filtered, and sorted.
- Plans are available to everybody on the team.
The purpose of this document is to help you get started using the Rational Team Concert Agile Planning tooling and its user interfaces like the Plan editor, the My Work view, the Team Load section, and the Work Environment page of the User editor.
Prerequisites
We strongly recommend to read the following documents first:
This document also assumes that a Jazz server has been set up and you have access to it. Because work items exist only in the context of a Project Area , you have to connect to an existing Project Area before creating any work item. You can use the Rational Team Concert JUnit Example Project wizard to create a sample database. To do so follow the steps in the Setting up the Rational Team Concert JUnit Example Project.
Plan Items versus Execution Items
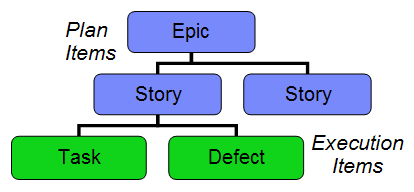
Conceptually Agile Planning distinguishes between two categories of work items: Plan Items are work items that are relevant for higher level planning. In Scrum Epics and Stories are plan items. In contrast, Execution Items are work items which are planned for a single iteration and have work assigned. In Scrum Defects and Tasks are execution items. If plan and execution items are arranged in a tree to describe a work break down structure then plan items typically appear at the root of a tree and execution items build the leaves of that tree.
What makes a Work Item appear on a Plan
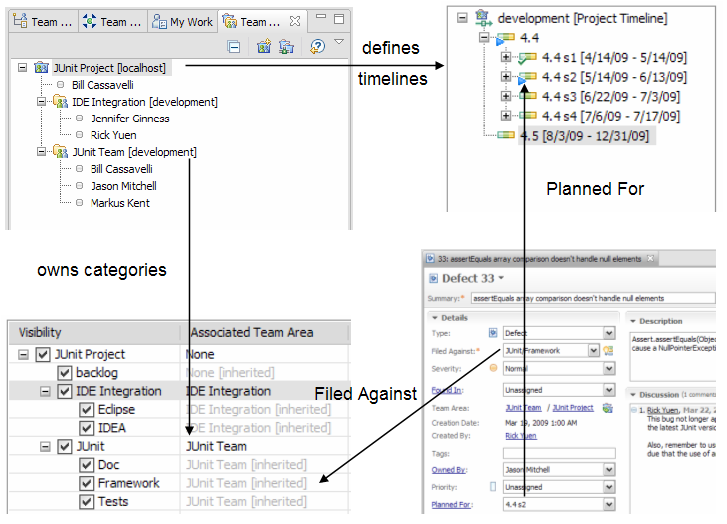
As noted in the introduction plans in Rational Team Concert are a live view onto a set of work items already existing in the system. Plans are created for a team or project area, which is called the owner of a plan, and an iteration. The iteration of a plan is mapped to the work item Planned for attribute. The team or project area is used to compute the set of work item categories that the work items contained on the plan must match by having its Filed Against attribute set to one of these categories. The image below illustrates this behaviour.
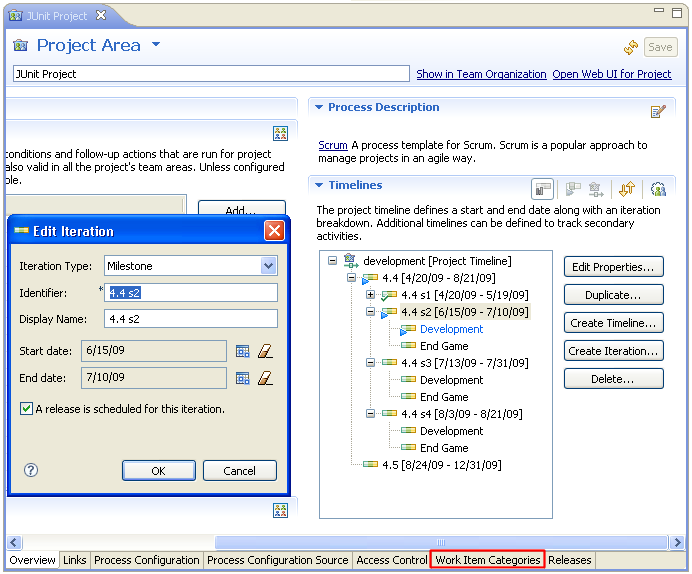
So it is essential that the process area owning a plan defines meaningful iterations and categories. Use the Project or Team Area editor, to define iterations and work item categories. The picture below shows how to define a sequence of iterations with corresponding start and end dates. The Work Item Categories page of the same editor allows you to define work item categories.
See also the sections Project Area Editor and Specifying Start and End Dates for Iterations in the Getting Started with Jazz Project Areas and Process document.
Plan Types
A typical project is structured into a number of teams and has a release timeline which is broken up into several iterations. Sprint Backlogs are used to plan and track the work happening in a single iteration for a single team. The plan therefore lists all plan and execution items associated with the Team Area / Iteration tuple. However, plans are also needed to plan and track the work that happens across a release or across a team hierarchy. In contrast to sprint backlogs, these plans should provide a higher level overview about what’s happening in a project. These plans therefore list plan items only, no execution items. Agile planning is using plan types to distinguish these different calls on plans. In RTC 2.0 the following plan types are available when using the Scrum process template (the corresponding names for the Open Up process template are put in parenthesis):- Sprint Backlog (Iteration Plan): Includes all plan and execution items for a single team area and a single iteration. It is used to plan and track the detailed work that is happening.
- Product Backlog (Project Release Plan): Includes all plan items for an entire project with its constituent teams across all iterations of a release. It is used to plan and track the work on a higher level across the project.
- Team Backlog (Team Release Plan): Includes all plan items and backlog execution items for a single team across all iterations of a release. It is used to plan and track the work in a higher level, but for a single team only.
- Scrum of Scrums (Project Iteration Plan): Includes all plan items for an entire project with its constituent teams for a single iteration. It is used to plan and track the work on a higher level across the project for a single iteration.
Creating a New Plan
- From the Java perspective, switch to the Team Artifacts view
- Expand the current project area an select the Plans item
- To launch the
New Planwizard, select New > Plan in the context menu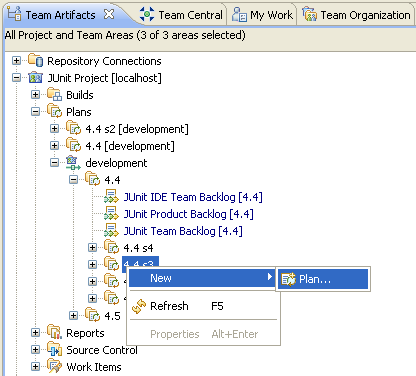
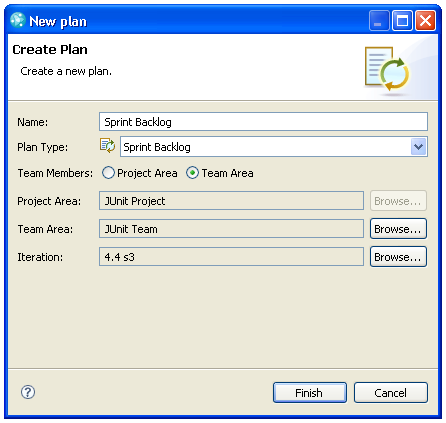
- The New Plan wizard helps you to create plans of different types. Choose the plan type to be used. Select the project area and team area to specify who owns the plan. Choose an iteration to define which work items belong to the plan.
In the picture below a Sprint Backlog for the JUnit team area for the sprint S3 is created.
- Press Finish to create the plan. The newly created plan will open after creation, however it is always accessible via the Plan folder in the Team Artifacts view.
The table below shows typical Plan setups for the four supported plan types:
| Sprint Backlog | Product Backlog |
 | 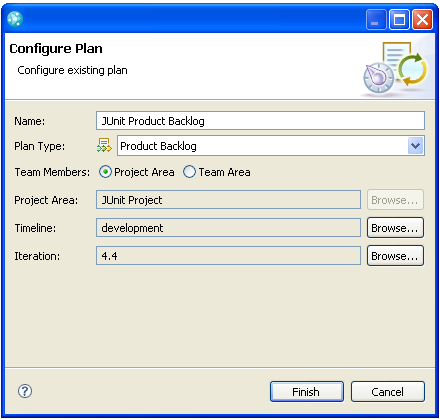 |
| Team Backlog | Scrum of Scrums | 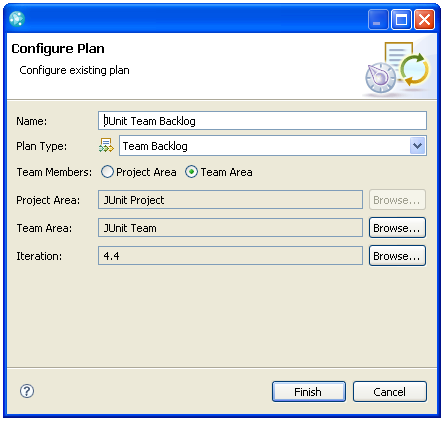 | 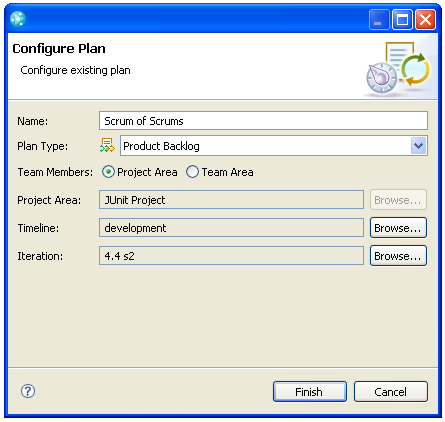 |
| Click the image to see an enlarged version of it. | |
Note that you may create a plans for iterations without start or end dates. However, without start and end dates it cannot determined if the team working on the plan is ahead or behind its scheduled work.
The Plan Editor
The plan editor provides support to manage three different kinds of information:
- Context information like important dates or high level dependencies to other components. This information is captured on the Overview page in an unstructured way using an artifact-aware text editor. Users can include links to work items, plans or work item queries. Other information relevant for a plan like test plans or retrospectives can be captured on additional attached pages.
- The actual work in terms of work items planned for this iteration. Planning the work is done using the Planned Items page.
- Progress information to see if the team is on track and will hit the iteration target. The plan progress can be tracked using the progress bar in the plan editor’s header or the progress bars in group folders. In addition a progress trend can be seen using the Charts page.
To open a plan, double click on it in the Team Artifacts view or choose Open from its context menu. The picture below shows the Overview page of JUnit component’s 4.4 plan:
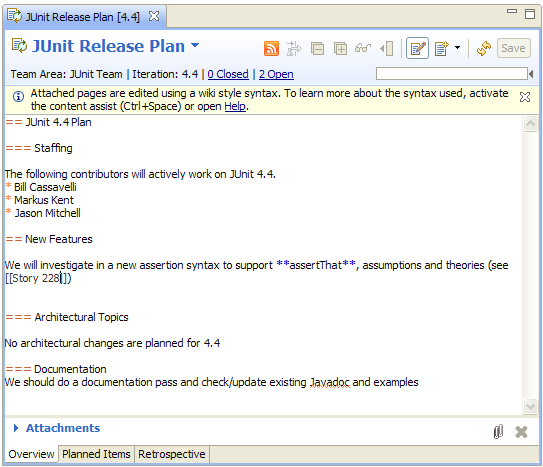
Overview Page
The Overview page provides an artifact-aware text editor to capture unstructured information. To edit the Overview page, turn it into edit mode by pressing the Edit button ![]() in the local tool bar. The editor supports a wiki-syntax which supports commonly used commands for headings, text styles, links, listings and tables. For reference check the following quick guide, the text editor’s content assist (
in the local tool bar. The editor supports a wiki-syntax which supports commonly used commands for headings, text styles, links, listings and tables. For reference check the following quick guide, the text editor’s content assist (Ctrl+Space), or the Wikicreole webpage.
= Heading 1 == Heading 2 === Heading 3 ... ====== Heading 6 | Heading 1Heading 2Heading 3…Heading 6 |
* Bullet 1 ** Bullet 1.1 *** Bullet 1.1.1 |
|
# Numbered 1 ## Numbered 1.1 ### Numbered 1.1.1 |
|
**bold**, //italic//, __underline__, --strike-through-- | bold, italic, underline, strike-through |
red##text color##, ##background color##blue, yellow##text & background color##blue | text color, background color, text & background color |
[[Defect 9]] | Defect 9 |
[[Defect 9|Click here!]] | Click here! (Work Item link with custom label) |
Additionally, artifact links are created by dropping a work item, plan or work item query onto the editor. Alternatively, work item links can be created by enclosing their name and id in double square brackets, or by using the Insert Work Item Link action from the context menu. To create a new work item, select some text and run the Extract Work Item action. This will create a new work item having a summary containing the selected text. The target iteration and category are set according to the plan.
Planned Items Page
The Planned Items page lists all work items that match the team area and iteration specified for the plan, e.g. all work items in the JUnit team area targeted for 4.4 m2:
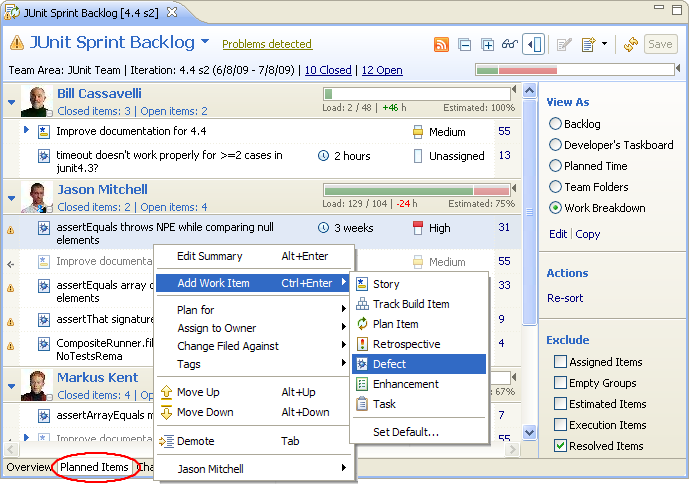
Adding Work Items
Strictly spoken a work item cannot be added to plan, but you can alter its Planned For and Filed Against attributes to match the plan query. To make a work item show up on a plan, you can do the following:
- Alter a work item in the Work Item editor so that the team area and target iteration match the plan’s target iteration
- Drag a work item form the Work Items or the Team Artifacts view onto the plan
- Create new work items directly in the Planned Items page by either executing the Add Work Item action from the context menu or by pressing
Ctrl+Enterwhen an element is selected. This will create a new work item below the current selection.
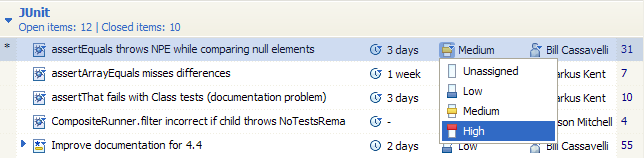
Managing Work Items
The Planned Items page also supports in-place editing of work items. To change the work item type, estimate, priority or owner of a work item click on the corresponding icon. A context menu pops up offering the appropriate values to set. To edit the summary of a work item, press Alt+Enter or select Edit Summary from the context menu. In addition, work items can be assigned to a different iteration, category or owner using similar actions from the context menu.
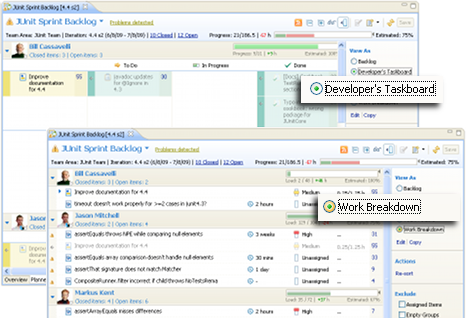
In order to support different tasks in planning, the Planned Items page can be viewed using different presentations. We call such a presentation Plan Mode. Navigate to the View As-section and select how you want the plan to be presented. Rational Team Concert comes with a set of plan modes that corresponds to typical tasks in an agile project.
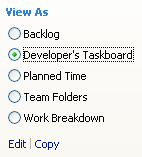
Depending on the selection, the planned items pages is rendered as a flat list, hierarchical structure, or task board. Further, different sorters and filters come into play, as well, as different group structures. What columns you see and how work items are coloured depends on the plan mode as well.
Out of the box each plan type comes with a set of plan modes that address typical scenarios in an agile project. The Backlog, for instance, shows all open work items as a flat list and sorts them by priority. Prioritisation of your work items is done by simply dragging and dropping them around. Even the order within a group of items of the same priority is persisted. Showing a flat list instead of a hierarchy allows you to assign different priorities across all levels of work items. You are likely to have one most important child task for every story and some follow-up tasks which are nice to have. In contrast, the Work Breakdown shows parent-child relation chips as hierarchy. This eases the decomposing of larger work items into smaller work units and provides a better overview. Simply drag and drop work items onto each other to create a hierarchy. Your Daily Scrum will become a lot more fun when using the Developer’s Taskboard. It arranges all work items as cards on a board with multiple columns. Each columns corresponds to a work item state. This allows for a quick overview and management of work items that are Todo, In Progress, or Done.
Charts Page
Depending on the used process the Charts page shows a chart of the done work. For a project following the Scrum process the chart is a burn down chart, for a project following the Agile process the chart plots closed versus open work items.

Note that this page may not be available, depending on your license and the Jazz server edition being used.
Additional Pages
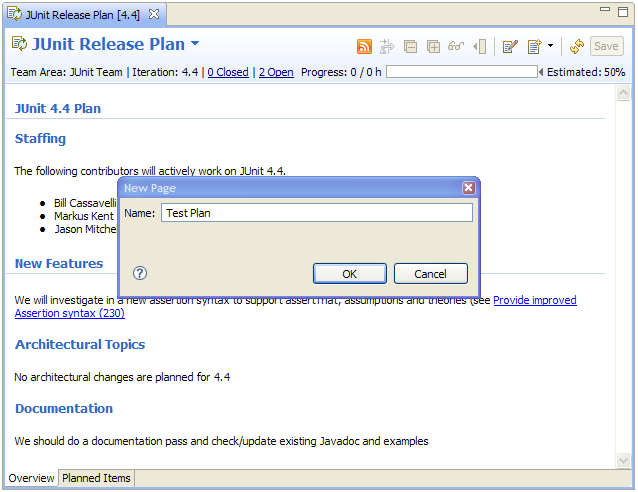
To capture additional information such as a test plan you can add additional pages to an plan. Press the Add Page button ![]() in the local tool bar to create a new attached page. These pages provide the same editing capabilities as the Overview page does. The picture below shows the JUnit plan and the dialog to create a new attached page to capture a test plan.
in the local tool bar to create a new attached page. These pages provide the same editing capabilities as the Overview page does. The picture below shows the JUnit plan and the dialog to create a new attached page to capture a test plan.
Progress and Load Bars, and why estimating your Work is important
The Agile Planning tooling features two different kinds of bars: Progress Bars and Load Bars. They provide information about the work load of team members, help to distribute incoming work and help to track the progress on different work item groups.-
Load Bars show how much work is assigned to a user and whether she is likely to complete her assigned work or not. Work load information is displayed in the Team Load section, the owner mode of the Plan editor and the My Work view. A load bar shows the following information:
- The ratio of remaining work time and upcoming work (horizontally)
- The percentage of estimated open work items (vertically)

The load bar in the picture above shows a situation where the upcoming work exceeds the remaining work time. The user is overbooked by 13 hours, resulting in a partly red bar. The status label shows the corresponding numbers: ‘101 hours of upcoming work versus 88 hours of remaining work time’. All work items have been estimated: Estimated: 100%.
-
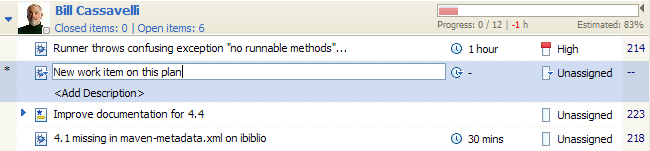
Progress Bars reflect the progress of a team, a user, or other grouping elements (work item tags, work item categories, …). They can be found in the plan header and on the group elements of the planned items page. A progress bar shows the following information:
- The ratio of resolved and total work, and, if iteration information and work assignment are available, a projection of the earlier ratio onto the ratio of spent work time versus total work time (horizontally)
- The percentage of estimated open work items (vertically)

The picture above shows a progress bar with projection. It is read as follows: ’24 out of 59 work hours are done’ and, taking into account the total and spent work time, ‘you are ahead by 4 hours’ (visualized by the bright green rectangle). Again, all work items are estimated (Estimated: 100%).
In both bars the percentage of estimated open work items is visualized. This is because load and progress bars derive their information from work item estimates. For example, upcoming work is the sum of estimates of all open work items. The same is true for progress bars and resolved work. Hence, the more work items are estimated, the more accurate these values are. To visualize the importance of estimates, the percentage of estimated open work items is drawn as a fill level. A bar grows in height, revealing more of the actual load or progress information, when more work items are estimated. For more information see: Explaining Progress and Load Bars, and why estimating your Work is important.
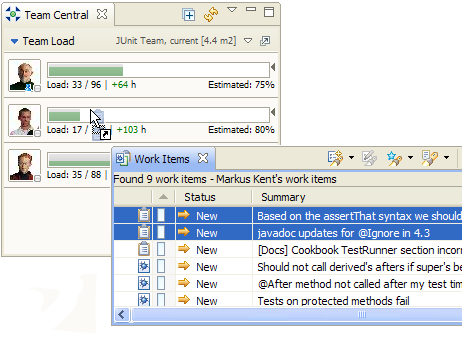
Team Load Section
The Team Load section is part of the Team Central view and provides information about the work load of a team for an iteration. Its purpose is to reflect the individual work load of each team member and assist in distributing work among team members.
Open and Configure the View
The default layout of the Team Central view already includes the Team Load section. When customizing other Team Central layouts, the Team Load section can be added from the view menu. Use the Sections > Team Load context menu action. To show the Team Central view, you can either switch to the Work Items perspective or choose Window > Show view > Team Central.
Configuring the Team Load section is easy. Drag a team area or an plan onto the Team Load section, or choose a team area and an iteration using the configuration dialog.
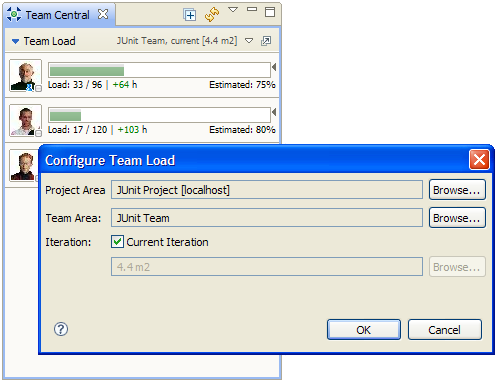
Note that you can either explicitly set an iteration (e.g. 4.4 m2) or configure the Team Load section to stick to the current iteration. When dropping a team area, the current iteration is used, when dropping an plan, the plan’s team area and iteration is used.
Distributing Work among Team Members
If you are a team lead, you can use the Team Load section to distribute work items among your team members. It does not only tell you the work load of each team member, you can also assign work items to a user by dragging them onto the corresponding bar. Use the different ‘Show’ context menu actions to query the work items assigned to a particular user or to list her recent or current work. Furthermore, from the section’s open action  you may open or create a corresponding plan.
The My Work View
We saw that the Plan editor assists a team in planning work for a sprint or even a producd. In contrast, the My Work view assists an individual developer who works on one or more sprints, e.g. development and maintenance.
In particular, the My Work view helps you organizing your work:
- By providing a view on all the work items you own.
- By assisting you in creating and maintaining reasonable personal plans for the current sprints.
- By putting your current work plan at your fingertips while you are working.
- By showing your newly assigned work in an inbox.
- By keeping you up-to-date, showing changes to owned work items.
- By helping you find relevant work items using a powerful filter mechanism.
- By offering an easy way to create tasks for yourself – always in context.
- By managing work items targeted for future iterations.
- By making your work plan automatically visible to the team.
Open and Configure the View
The view is available by default in the Java perspective. Additionally, it can be found in the Work Items category of the Show View menu.
The My Work view is scoped to a project area. If you are connected to more than one project area, you need to select one before being able to use the view. In case you have only one repository connection, it will be selected by default. You can always change the project area context later, use Select Project Area… from the view’s setting menu. Other than that, no configuration is necessary.
While it is not necessary to create plans in order for the My Work view to work, plans and this view are closely related. The contents of your My Work view will automatically be visible to the team using the relevant plans.
Basics
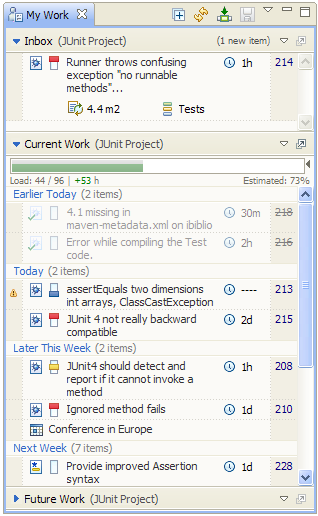
The My Work view consists of three sections:
- Inbox: Work items that were newly assigned to you by someone else show up in this section.
- Current Work: Work items planned for a current iteration are shown in this section. The planning can be refined by specifying the sequence with which you intend to resolve your work items.
- Future Work: Work items planned for a future iteration as well as incomplete work items planned for a past iteration are shown in this section.
The My Work view shows a concise label for each work item, including only the most important information such as its work item type, its summary and the work item id. To open a work item in the work item editor, double-click the work item, press enter while it is selected, or click the work item ID next to the summary.
It is possible to edit some of the work item’s attributes, such as the estimate, the priority and others, directly inside the My Work view. Changes applied to work items within the My Work view, including estimating and planning, will be automatically saved after a short delay if the modified work item is not being modified in another editor. By deselecting Automatically Save Changes in the view’s menu, no changes are saved automatically anymore. All modified work items in the My Work view can be saved at any time by pressing the save button in the view’s tool bar.
Planning the Current Work
The My Work view helps you planning a current sprint. It allows to specify the order with which work items are resolved. You can think of your incomplete work items as a working list where you start at the top and work your way through to the bottom. At any time you can insert new work at any position in your working list, rearrange the order or remove work.
By estimating work items, you enable the My Work view to calculate the projected time you will be able to start working on any work item in your working list and the time you will be completing it. The planned time is calculated by accumulating the estimates of the preceding work with respect to your working hours and absences. When adding new work items into your working list, the planned time of the inserted and subsequent work items are updated immediately.
If you choose not to estimate work items, a default estimate of zero work hours per work item is assumed. This, of course, reduces the accuracy of your plan considerably; this is why the My Work view warns you about planned but not estimated work items.
You can estimate work items directly within the My Work view. Clicking on the estimate icon ![]() will pop up a menu with a set of predefined estimates and a More… action to specify the estimate in a dialog. Alternatively, you can estimate work items in the Work Item or Plan editor.
will pop up a menu with a set of predefined estimates and a More… action to specify the estimate in a dialog. Alternatively, you can estimate work items in the Work Item or Plan editor.
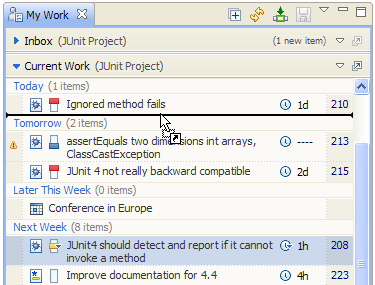
Managing your work, such as adding, rearranging or removing work items, is possible by using Drag’n’Drop or the Plan for context menu action.
Inbox
Work items that are newly assigned to you by someone else are first shown in the Inbox section. This section helps you to be aware of new incoming work.
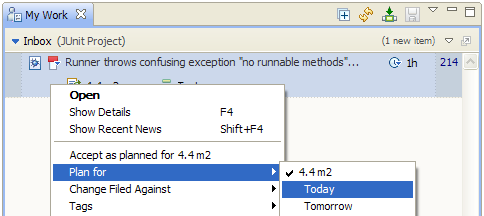
Just select Accept in order to accept the work and show it in the Current Work or Future Work section, depending on which iteration the work item is currently planned for.
See Making best use of the My Work view for a more detailed discussion about the My Work view.
Configuring your Work Environment
We have already seen how plans are created and managed using the Plan editor, how the Team Load section is used to load balance the work between team members and how the My Work view is used to plan your individual work. Until now, we have employed the Agile Planning tooling using some reasonable assumptions about your teams work capacity and yours as well. If not otherwise configured, all agile planning tools use a standard work week consisting of five days per week with a working time of eight hours per day and a fixed work end time.
In order to improve the accuracy of your planning activities, the User editor provides several features to better describe the way you work.
Scheduled Absences
Creating and managing scheduled absences helps the agile planning tools in automatic planning of work items during the current iteration:
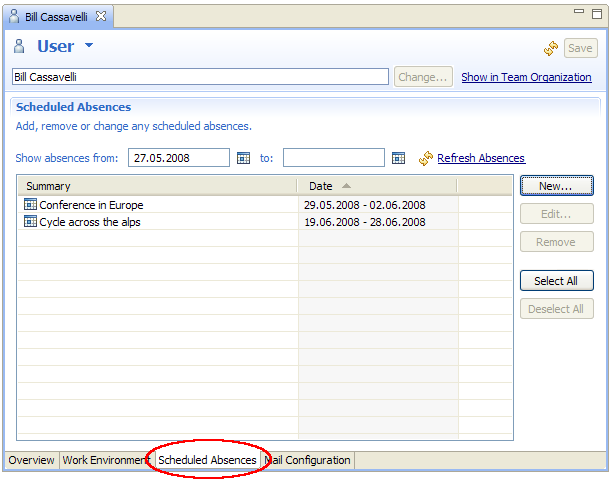
The Plan editor shows the scheduled absences in Planned Time group mode. The My Work view shows the scheduled absences in the Current Work section.
Work Days
Besides scheduled absences, the User editor allows you to customize your work days as well. This is particularly useful if you only work part-time or have an otherwise non-standard work week.
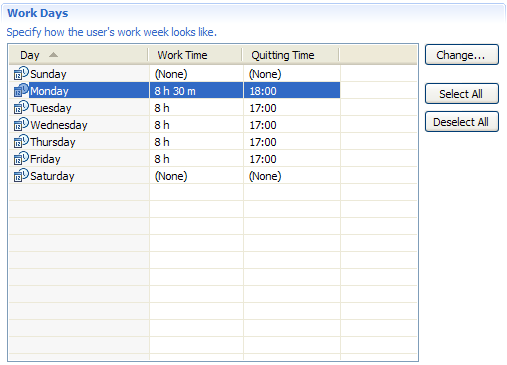
Having your work days specified in the User editor helps to further improve the planning accuracy.
Work Assignments
Most developers do not only work for one team, they work in different teams and possibly on different development lines as well. The Agile Planning tooling offers the user to exactly specify work resources assigned to a particular team and development line combination:
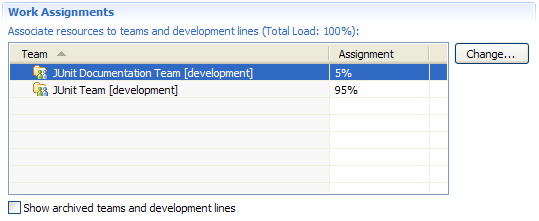
The User editor will automatically distribute your work resources evenly over all team areas and development lines you are working on. If the distribution does not match your actual assignments, you can redistribute among the work assignments.
Work Location
You can also specify time zone and regional settings to match your current work location:
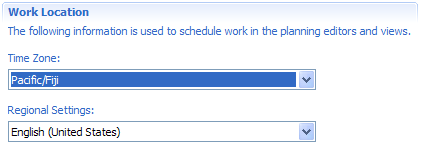
This information will help the Agile Planning tooling to use correct calendar information while planning your work.
Scheduled absences, work assignments and work week specifications are accounted in the entire Agile Planning tools, including the Plan editor, the My Work view and the Team Load section.
You can configure the work environment using the Rational Team Concert development environment or the web ui.
Planning in the Rational Team Concert Web UI
The Agile Planning tooling provides a web user interface which can be used to browse and edit plans without having Rational Team Concert installed. The Agile Planning web user interface is the preferred place if you would like to:
- Quickly get an overview about all currently relevant plans
- Work with a plan (including the Overview page and other attached patches) without having to start Rational Team Concert
- Tracking overall progress over several teams and development lines
For details about the agile planning web ui see the articel Planning in the Web UI.
Customising the Agile Planning Tooling
The Agile Planning tooling allows to be customised in several ways. Learn more about it by reading the article Planning Customization.