Improved Gap Handling for SCM
In this article, we present features that were added in RTC 4.0.5 and RTC 5.0 to improve the handling of gaps that are encountered during an accept. We will first give some background into why gaps occur. Then we will present how these features help deal with gaps in the Eclipse and Visual Studio for Microsoft clients as well as the SCM CLI (command line interface). We then finish off with an explanation of some of the conflicts that can occur when merging change sets with gaps.
Table of Contents
- Introduction
- Accepting Change Sets With Gaps
- Dealing with Conflicts
- Conflicts vs. Gaps When Accepting
- Dealing with Gaps using the CLI
- “Filling the Gap” using the CLI (Available in RTC 5.0)
- Merging conflicts after a cross component move
- Other Helpful Information
Introduction
Jazz SCM represents a group of related changes as a change set. Once a change set is delivered to a stream, the changes are immutable. This allows change sets to be accepted by other users, merged with any change sets that may have been done in parallel and delivered to other streams. The advantage of representing a group of changes in this way is that it provides improved traceability by allowing you to associate a work item with a change set to provide an understanding of why the fix was made. You can also query whether the change set is present in a particular stream or set of streams in order to determine whether the feature or fix represented by the change set is in a particular release.
Prior to RTC 4.0.5, there was a case where this traceability was lost. When a change set was being accepted, the operation could only be performed if the repository workspace has all the change sets that the change set being accepted depended on. If one or more of these change sets were missing, the change set could not be accepted. This condition is referred to as a gap. Previously, if this occurred, the user was offered the ability to apply the changes as a patch which resulted in the creation of a new change set. Although the end result of the patching operation is the desired result, the traceability of the changes was lost.
In the rest of this article, we will present the improvements in gap handling that have been delivered as part of RTC 4.0.5. This new workflow not only improves the merge of change sets with gaps but also provides links between change sets in order to support traceability.
Videos:
The following videos show the feature that was added in RTC 4.0.5 but not the feature that was added in RTC 5.0. In RTC 5.0 we added the ability to accept all the change sets that fill the gap. Screenshots of the UI for this 5.0 feature can be seen in the section Accepting when a Gap is Encountered (In RTC 5.0).- Backport of a single change set (In Eclipse)
- Backport of a single change set (In Visual Studio)
- Backport of multiple change sets (In Eclipse)
- Backport of multiple change sets (In Visual Studio)
What is a Gap?
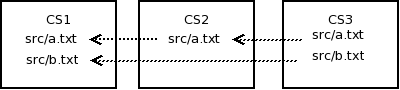
In RTC SCM, change sets that are delivered to a component in a stream (or accepted into a component in a repository workspace), can build on top of previously delivered (or accepted) change sets. For example, the following figure shows 3 change sets that build upon each other in a sequential manner.
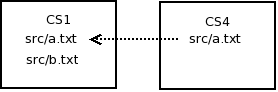
It is often the case that there are multiple developers working on a code base within a component and these developers will, on occasion, be working within the same file. Let’s assume that Mike made the changes in change set CS2 and change set CS3 above while Zoe made the parallel change in change set CS4 in the following figure.
RTC SCM has been designed to accommodate this type of parallel development in a way that preserves the traceability of the changes made by both developers. Let’s assume that Zoe delivered her changes to the team stream. Mike would then accept these incoming changes, resulting in a conflict of file a.txt. Since Mike did not complete his change set CS3, he is able to resolve the conflict in CS3. After delivering his changes, the history of the component in the stream would look like the following figure.
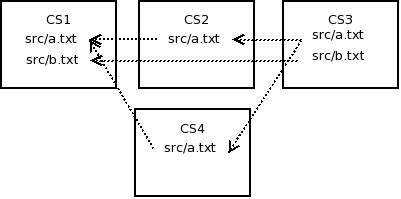
In the above case, all the change sets from Mike and Zoe are included in the team stream with change set CS3 containing a merge of the conflicting changes of CS2 and CS4 for file a.txt.
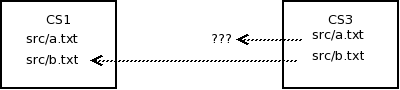
Where RTC SCM previously had issues was when accepting a change set into a history when the change set being accepted was built on top of another change set that is not present. The underlying history model of RTC SCM requires that the history for each file be a graph with all paths leading back to the new file state for any file. The following figure shows the case where change set CS3 is being accepted into a component that has change set CS1 in it’s history but is missing change set CS2. In this case, CS3 cannot be accepted as is because the change for file a.txt is missing it’s predecessor from CS2. We refer to this as a gap in the history of file a.txt because it is not possible to find a path from the a.txt change in CS3 back to the file creation.
To understand why it is important to be able to trace the history back to the initial state, let’s look at an example of what the content of the file a.txt may be.
Assume the following is the initial content for a.txt in CS1.
This line introduced in CS1
Then, CS2 adds a line and makes the content:
This line introduced in CS1 This line added in CS2 but not applicable everywhere
Finally, CS3 adds another line:
This line introduced in CS1 This line added in CS2 but not applicable everywhere This line added in CS3 and everyone wants it
So, if CS3 was accepted into the history despite the gap (by applying the end state of CS3), a.txt would have the above content, which also includes the undesired content from CS2.
When CS3 is accepted on top of CS1 however, we would want the following content that includes the line from CS1 and CS3 but not the line from CS2.
This line introduced in CS1 This line added in CS3 and everyone wants it
When are Gaps Encountered?
There are a few different workflows that can result in gaps.
- The most common workflow is backporting bug fixes from a current release stream to a previous release stream. In this workflow, it is not uncommon for the bug fix to be built on top of change sets that should not be backported.
- Another workflow that often encounters gaps is accepting change sets from a work item in order to review the changes. Gaps occur less frequently in this workflow since the developer and the reviewer are often working from the same stream, but it can still occur if the developer has additional changes in their repository workspace that have not been delivered to the stream.
- A third workflow that is common in some organizations is to mix and match features in a build by accepting change sets from the corresponding work items. It is not uncommon in this workflow for an unwanted dependency between features to be introduced because of the order the features are created.
How Were Gaps Handled in the Past?
Prior to RTC 4.0.5, when a gap was encountered during an accept or resume, the RTC client would offer to apply the changes as a patch. While this allowed the changes to be applied, there were a couple of disadvantages to this approach.
- There is no traceability from the change sets created from a patch and the original change sets.
- If there are multiple change sets being included, the resulting patch contains the changes for all the change sets, even if some could be accepted without a gap. This many-to-one relationship can make it hard to later identify all the change sets that were included in the patch change set.
- It is often the case that the gap occurs in only a subset of the files in the change set. Applying the changes as a patch will cause potential gaps for all the files being patched. For example, the file b.txt in our previous example did not have a gap.
How does Jazz SCM Handle Gaps Now?
The new gap workflow will, in essence, accept one change set at a time and, for each change set that contains a gap, create a new change set containing the equivalent changes. In addition, a link is maintained between the original, or source, change set and the resulting change set. This approach:
- Preserves traceability.
- Accepts change sets that can be accepted and only creates new change sets for those change sets with gaps in the history of one or more files or folders.
- Preserves the history in the new change sets for files that do not have gaps.
From our previous example, if CS3 was accepted on top of CS1, this would result in a new change set, CS3′, that contains a patched version of a.txt that includes the change from CS3 but excludes the content from CS2. It will also contain the same change to b.txt that was in the original change set CS3. This is shown in the following figure.
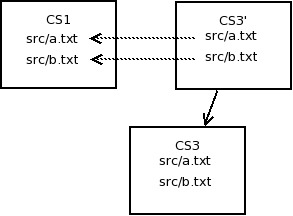
Also, a link would be created between CS3′ and CS3 so that there is traceability between the two change sets. Trying to locate CS3 in a stream would also consider CS3′ in the search.
Accepting Change Sets With Gaps
In this section, we will provide some examples of how to use this feature.Overview of the New Workflow
When an accept encounters a gap and the user chooses to proceed, the following occurs:
- Any change sets that can be accepted directly are accepted.
- The first change set that is blocked due to a gap becomes the source change set of the current merge.
- The remaining change sets are added to the merge queue for the component.
The user will then be presented with an editor that allows them to merge the changes from the source change set into a new resulting change set. The user will perform the following steps.
- Inspect the changes to merge.
- The accept will auto-merge as many changes as possible. The result is that the user may have a small number, or even no changes, that require manual merging.
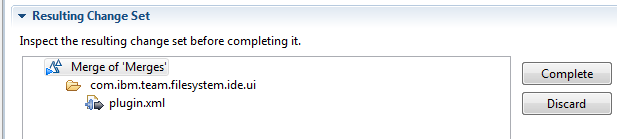
- Inspect the resulting change set to ensure that the content was merged properly.
- Complete the resulting change set.
- The editor provides an option when completing the change set to create a link between the source and resulting change set in order to provide traceability between them.
- If there are additional change sets in the merge queue, the user will trigger the re-accept of those change sets.
- The remaining change sets may accept cleanly, requiring no additional merging.
- If another gap is encountered, the process will be repeated.
The following sections show some examples of this new workflow in action.
Accepting when a Gap is Encountered
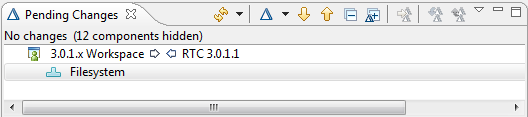
To illustrate this feature, we will assume that the change sets being accepted are being backported from the 4.0 development stream of RTC to the 3.0.1.1 maintenance stream. The developer performing the backports, who we’ll refer to as Matt, has set up a repository workspace, named “3.0.1.x Workspace”, that flows with the “RTC 3.0.1.1” stream.
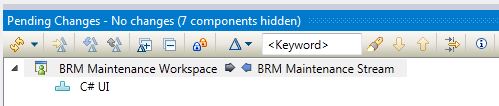
We will show the screenshots for a parallel example using the VS client. The streams, work items and files involved will be different but the concepts will be the same.
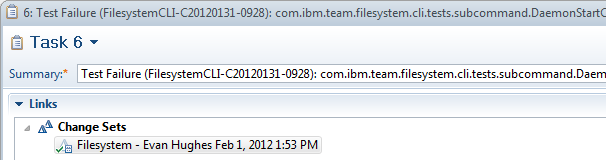
For his first backport, Matt has been asked to backport a fix that is associated with task 6. He begins the backport by opening the work item and switching to the Links tab. He then selects the change set that was created by Evan and chooses the Accept action from the context menu of the change set.
For our VS client example, we are accepting the change set from defect 168.

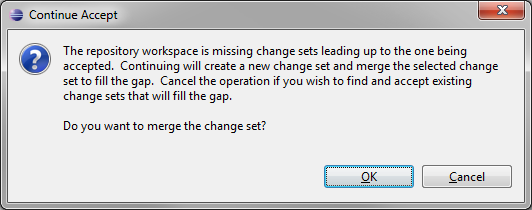
It turns out that the fix depends on other change sets in the 4.0 stream so the change set cannot be accepted due to a gap. This results in the following prompt.
Accepting when a Gap is Encountered (In RTC 5.0)
In RTC 5.0, a slightly different dialog would be shown to the user than the one shown above. The dialog for the RTC Eclipse client is shown below.
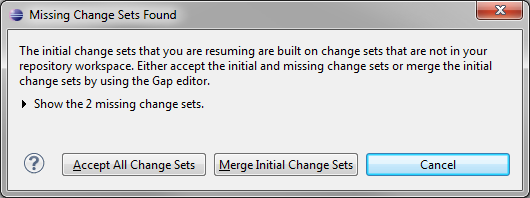
This dialog allows the user to either accept all the change sets (which include the initially selected change sets and all the change sets in the gap), or to continue and merge the initial change sets. If the user is curious about which change sets fill the gap, they can click on the label “Show the 2 missing change sets.” resulting in the following dialog:

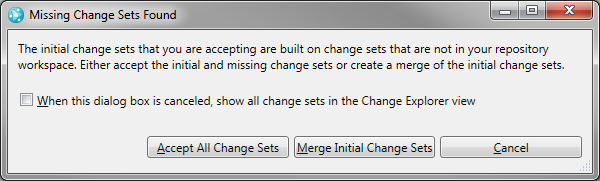
The dialog for the RTC Visual Studio client is shown below. For both clients, if the user wants to explore all the change sets in the Change Explorer view (which provides context menu actions and the ability to re-accept a subset of the gap filling change sets), they can check the checkbox called “When this dialog box is canceled, show all change sets in the Change Explorer view” and then cancel the dialog.
The Gap Editor
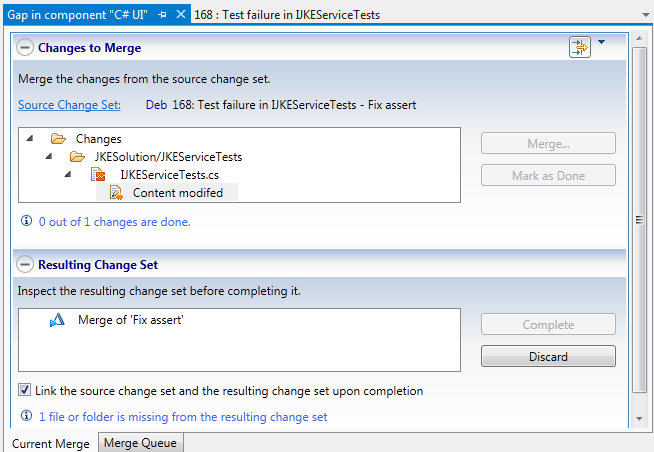
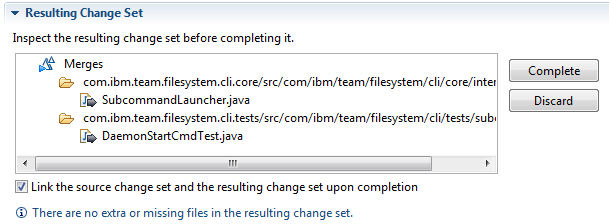
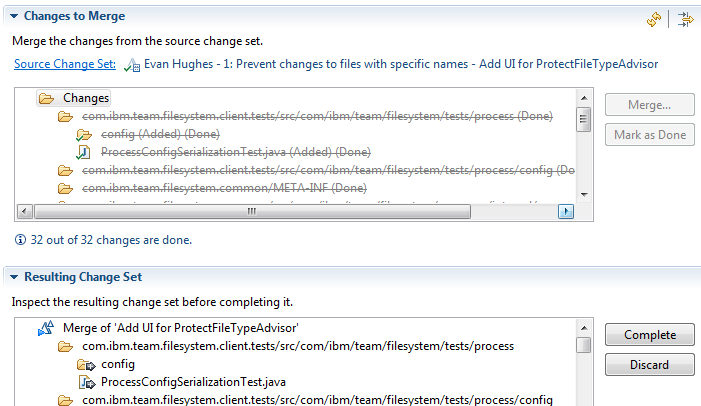
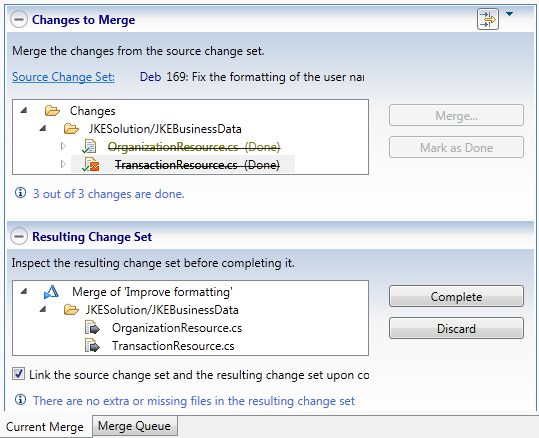
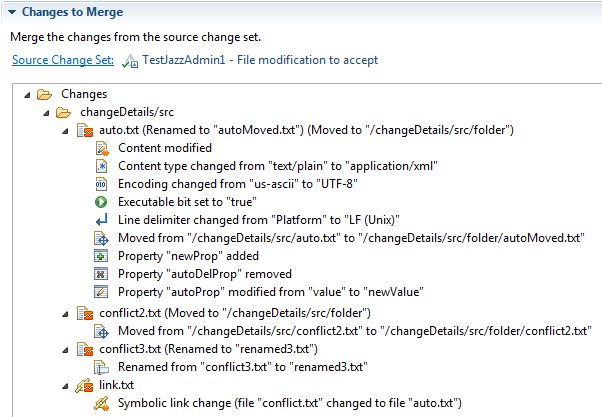
If Matt clicks the OK button in the “Continue Accept” dialog (or the Merge Initial Change Sets button in the dialog shown in RTC 5.0) it will open up the Gap editor. The Gap editor, shown in the image below, has two main sections:
- Changes to Merge: This section shows the changes from the source change set that need to be merged into the resulting change set.
- Resulting Change Set: This section shows the new resulting change set.
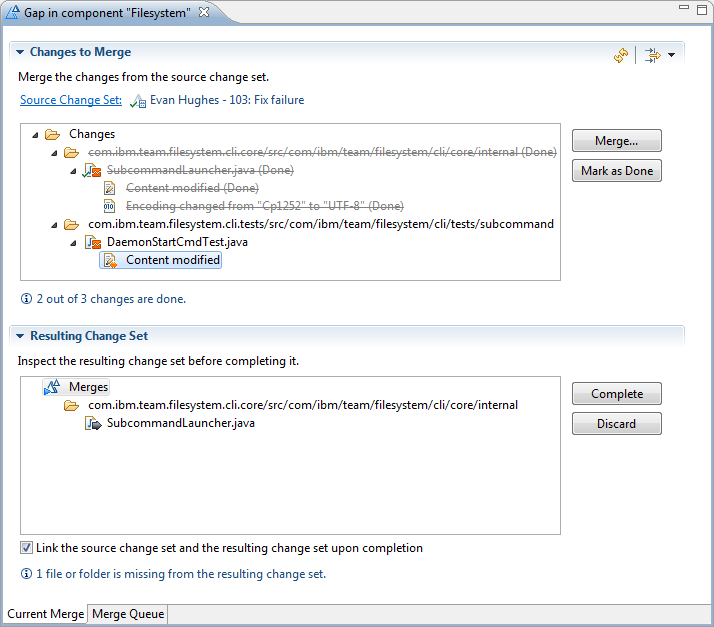
As you can see in the Changes to Merge section, the change set that is being backported contains two file changes, both of which have a gap.
- The file SubcommandLauncher.java has two change details, a content change and an encoding change, both of which could be auto-resolved. You can see that the changes for the file has been marked as done in the Changes to Merge section and a corresponding change has been checked-in to the resulting change set.
- The file DaemonStartCmdTest.java has only a content change but this change can not be auto-resolved so there is no corresponding change in the resulting change set yet. The next section will describe how to manually resolve this change.
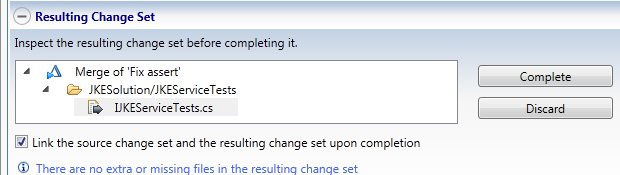
In our VS client example, IJKEServiceTests.cs has a content change that is in conflict.
Merging Changes
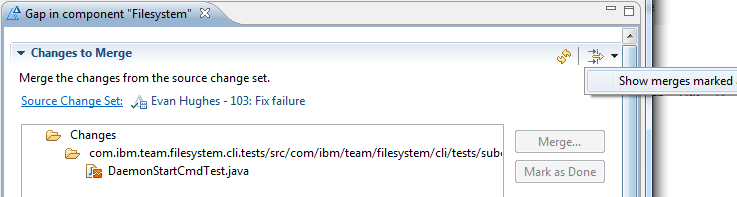
Before we show how to merge conflicts, it is worthwhile to mention that the Changes to Merge section can be filtered to only show the remaining changes. The section has a filter toolbar drop down menu from which you can check or uncheck the option to show the changes that have already been merged, as shown in the following screen shot. By unchecking the option, you end up with only the unmerged changes shown in the section.
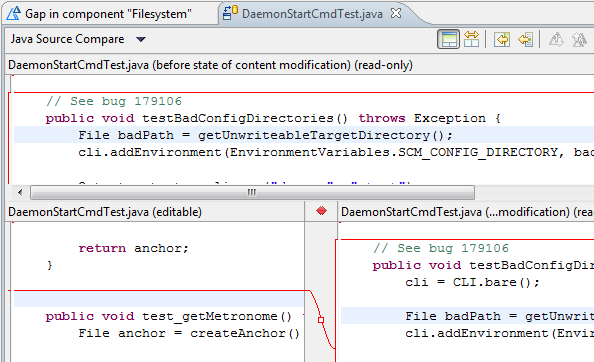
Resolving a content conflict in the Gap editor is similar to resolving a content conflict resulting from an accept. You can open a compare editor by double clicking on the change in the Gap editor. In our example, shown in the following screen shot, the file in question has a test method that was added in the gap and then modified in the change we are porting.
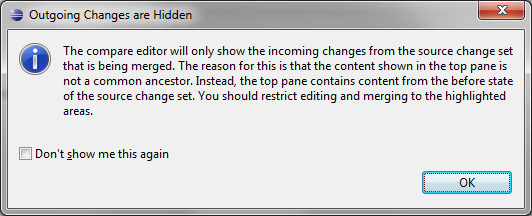
It is important to note that the compare editor for performing merges from the Gap editor only shows incoming changes and conflicts. The reason for this is that the content shown in the “ancestor” pane is not a common ancestor. Instead it is the content from the before state of the incoming change. Any differences between the local content of the file and the content from the before state of the change are not relevant when merging the content change and, hence, are hidden. It is important when merging these changes to only merge or edit content that is within the highlighted area except in rare circumstances. For this reason, the following prompt is shown when opening a compare from the Gap editor.
The compare editor in our example shows the following conflict.
After we merge the conflict in the compare editor and save, we can return to the Gap editor. When the compare editor is saved, the change is automatically checked into the resulting change set. All that remains is to select the change and click the Mark as Done button to indicate that the change has been merged.
Completing the Resulting Change Set
Once all the changes are merged, you typically want to inspect the changes in the resulting change set before completing the backport. The Resulting Change Set section shows all the changes in the resulting change set and allows you to open a compare editor on the changes in order to inspect any text changes.
Inspecting the result in the VS client is much the same.
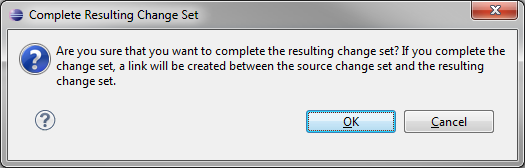
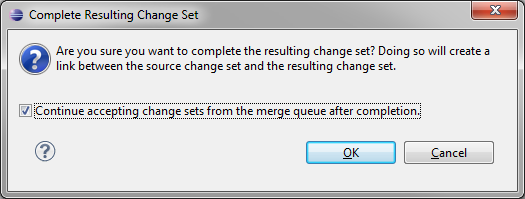
Once you are happy with the result, you can click the Complete button. If the option to create a change set link is checked, the following prompt is shown to confirm the complete. If the user chooses to proceed, the new resulting change set will be linked to the original source change set.
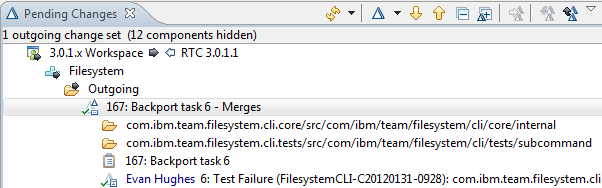
You can see in the following screenshot that our new outgoing change set has an overlay in the upper right hand corner of its icon to indicate that the change set is linked to a source change set.
The Merge Queue
It is often the case that a work item will have multiple change sets for the same component. The following screen shot shows task 1 which has 5 change sets attached.
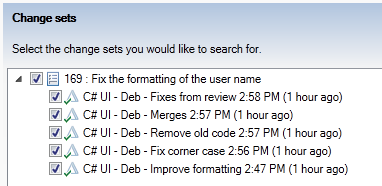
In our VS client example, defect 169 is the fix with multiple change sets that we are backporting.
When Matt accepts these change sets into his 3.0.1.x workspace, he encounters a gap and proceeds to the Gap editor. The following Gap editor screen shot shows that all the changes auto-merge. Matt looks at each change and notices that only one change has a gap while all the others do not. When changes do not have gaps or conflicts, that means they can be applied as is, preserving the state, or version identifiers, which increases the likelihood that subsequent change sets will accept without a gap. Matt may want to inspect the change in the resulting change set corresponding to the file with the gap in order to ensure that the content merge occurred properly.
In this particular case, Matt would be prompted with the dialog shown below. This indicates that all the changes auto-merged and that he should inspect the changes in the resulting change set before completing the merge.
Our VS client example also encounters a gap on the first change set being accepted.
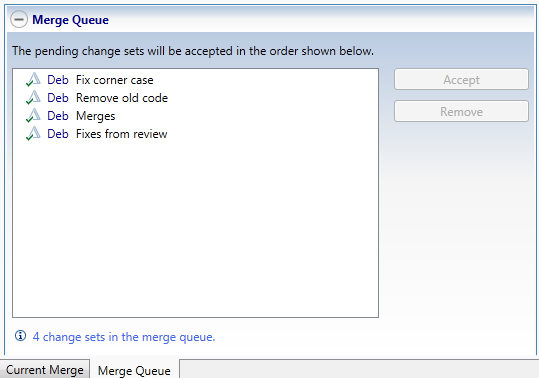
Since the first change set being accepted had a gap, the other change sets were added to the Merge Queue which is shown on the Merge Queue tab of the editor. These change sets can be re-accepted once the gapped change set currently being merged is completed.
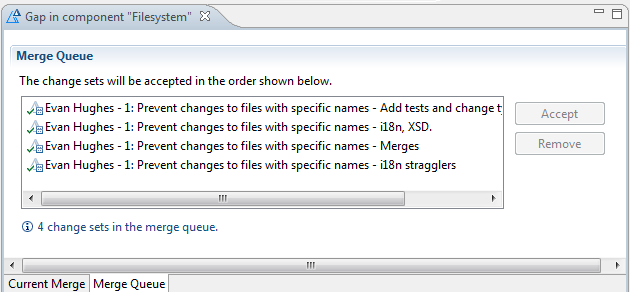
Similarly, the VS client example shows the remaining change sets in the merge queue:
After inspecting the resulting change set, Matt determines that the new change set is good and clicks on the Complete button. As in the previous backport, he will be prompted to confirm the creation of the change set link. There is also a checkbox in the prompt which allows change sets in the merge queue to be automatically accepted after completion. This option is checked by default.
In this example, the next change set in the merge queue does not have a gap, and so it accepts cleanly into the repository workspace. Since the change set accepted cleanly, an attempt to accept the next change set in the merge queue is performed. This next change set, one with a comment of “Merges”, has a gap and thus becomes the source change set of the Current Merge page in the Gap editor.
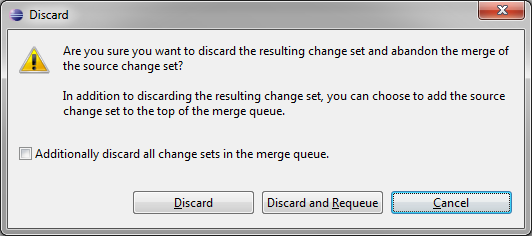
It turns out that this change set is a merge of other work that happened in 4.0 and is not applicable to 3.0.1.1. The change set had a comment of “Merges” and was a good clue that this was the case. As a result, Matt decides to discard this change set. Clicking the Discard button results in a prompt with the option of discarding the change set outright or adding it back to the merge queue. Matt chooses the option to discard since he does not want to port the change set.
After discarding the change set, there is no source change set in the Gap editor so the text in the Changes to Merge section indicates that there is more work to accept from the merge queue. There are hyperlinks to either initiate the accept or switch to the Merge Queue tab. For our example, Matt will choose to initiate an accept which results in the final change set being accepted without any gaps.

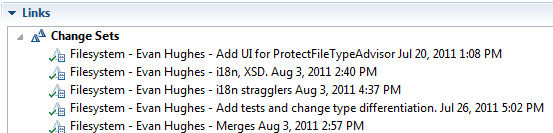
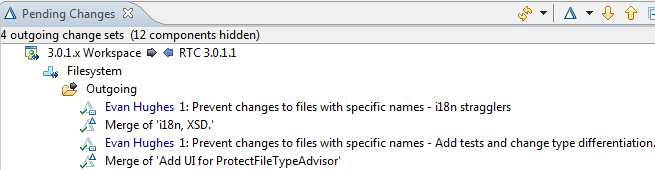
The final result of this backport is that two change sets had gaps and required a new change set to be created, while two others accepted cleanly. The result being the following change sets in Matt’s Pending Changes view. Matt then delivers the changes to the “RTC 3.0.1.1” stream.
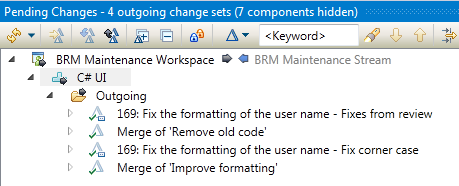
Our VS client example also has 2 change sets that accepted cleanly and 2 that had gaps.
Locating Change Sets
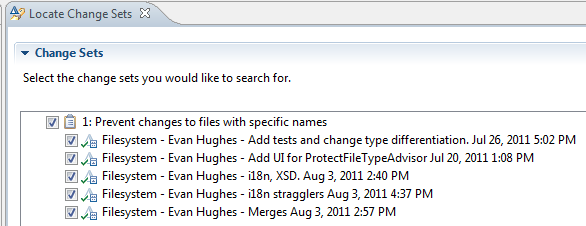
When it is time to verify that the proper changes were backported, Matt opens the Locate Change Set editor from the work item with the original change sets.
The same holds true for the VS client.
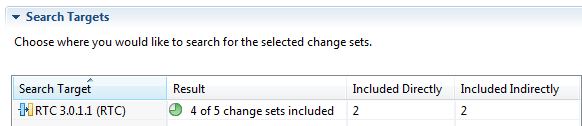
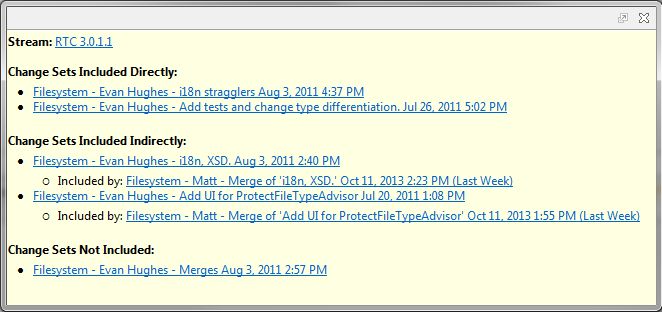
When he indicates that he wants to search in the “RTC 3.0.1.1” stream, the result is an indication that 2 of the changes sets are included directly and 2 others are included indirectly by change set links. The 5th change set was the merge which was not applicable to be backported.
Again, in our VS client example, we have the same result.
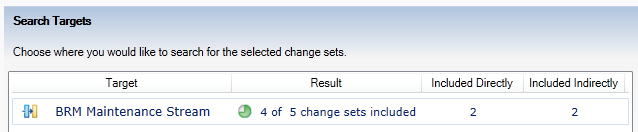
Matt can get a better idea of which change sets are included and which are not by hovering over the pie icon in the search result entry. The screenshot below shows which change sets are included directly and indirectly and also indicates that the “Merges” change set is not included.
Exploring Change Sets
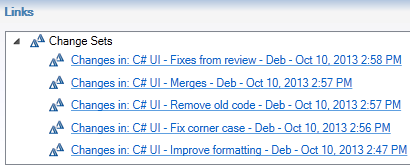
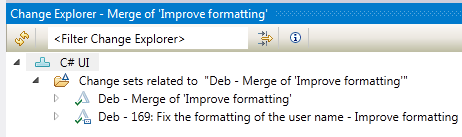
Invoking the Related Artifacts –> Open Related Change Sets context menu action on a set of change sets which contain links will open the Change Explorer view in a mode which shows the original change sets and any change sets that are related to that change set via change set links. This is shown in the figure below.

Again, in our VS client example, we have the same capability.
Dealing with Conflicts
In the above examples, the only conflicts that were encountered were content changes. However, there are many different properties of files and folders that can be in conflict. These conflicts fall into two categories:
- Structural Conflicts
- Detail Conflicts
Regardless of the type of conflict encountered, the Merge button in the Gap editor will present a dialog to the user that describes the conflict in more detail and present the options for resolving the conflict.
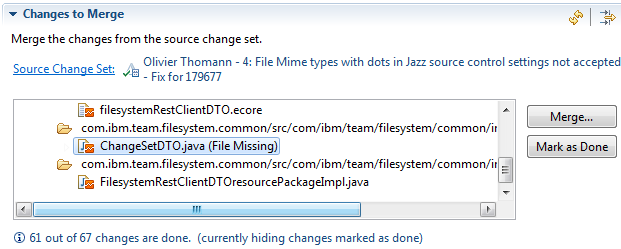
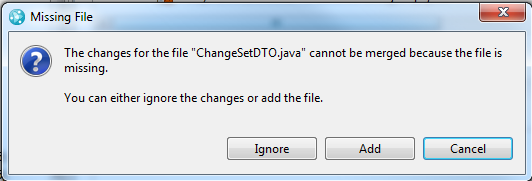
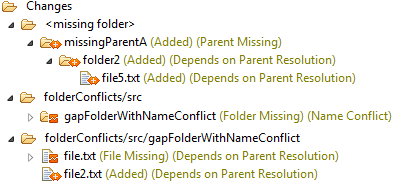
The file ChangeSetDTO.java in the above screenshot represents a modification to a file. However, the file in question is not present in the component so the change is flagged with the “(File Missing)” label decoration. To resolve the conflict, the user can either add the file to the component or ignore the change. Clicking on the Merge button shows the following dialog which presents these two options.
The following sections describe the two types of conflicts in more detail. Keep in mind that, regardless of the conflict type, clicking the Merge button will present you with the options on how to resolve the conflict.
Structural Conflicts
A structural conflict is a conflict between verisonables. Examples of this include conflicting adds, missing files, missing parent folders, name conflicts as well as changes that depend on the resolution of other changes that themselves have structural conflicts. When describing the different structural conflicts in the sections below, we will use the term “resource” to denote “file or folder” since many of the structural conflicts can occur for either a file or a folder.
Resource Missing

A resource missing conflict occurs if a resource modification appears in the source change set but the corresponding resource does not exist in the target repository workspace. In this case, the user can either:
- Ignore the change from the Merge dialog or by using Mark as Done.
- Add the resource from the Merge dialog or by using Overwrite from the context menu.
Add Conflict

An add conflict occurs if the change set has an addition of a resource but the same resource already exists in the component. In this case, the user can either:
- Ignore the change using Mark as Done
- Add the the resource from the Merge dialog or by using Overwrite from the context menu.
- If the resource is a file, perform a two way compare of the file contents
Please note the following about an add conflict:
- An overwrite of a file will delete the conflicting file from the component.
- Undoing the conflict in the Changes to Merge section will only remove the added file and will not add back the original content. To add back the original file, perform an undo of the delete in the resulting change set
Name Conflict


A name conflict occurs if the change set is either missing a resource or has an addition of a resource but the target workspace has another resource with the same name. It can also occur if a resource is renamed, but another resource exists with the same name. In this case, the user can either
- Ignore the change using Mark as Done
- Add the the resource from the Merge dialog or by using Overwrite from the context menu.
Please note the following about a name conflict:
- An overwrite of a file will delete the conflicting file from the component.
- Undoing the conflict in the Changes to Merge section will only remove the added file and will not add back the original content. To add back the original file, perform an undo of the delete in the resulting change set
- When performing an overwrite of a folder name conflict, the folder structure from the source change set is merged with the conflicting folder structure in the target component. This is done by keeping the existing folders and adding any children of the incoming conflict to the existing folder. Any conflicting files in the target folder will be overwritten by incoming files.
Deleted but Modified or has a Gap

A resource that has been deleted in the source change set may have a modification in the target workspace or may have a gap. In both of these cases, the user can either:
- Ignore the change from the Merge dialog or by using Mark as Done.
- Delete the the resource from the Merge dialog or by using Overwrite from the context menu.
Folder Deleted but has Children

The source change set may contain the deletion of a folder for which there are still children in the target workspace. In this case, the user can either:
- Ignore the change from the Merge dialog or by using Mark as Done.
- Delete the the folder and all it’s children from the Merge dialog or by using Overwrite from the context menu.
Parent Missing


A missing parent structural conflict occurs if the change set is either missing a resource or has an addition of a resource but the resource’s parent does not exist in the target workspace. It can also occur if a resource is moved but the destination folder does not exist in the target workspace. In this case, the user can either:
- Ignore the change from the Merge dialog or by using Mark as Done. This will ignore the change and any dependent changes.
- Choose a new parent for the resource from the Merge dialog or by using Set Parent from the context menu.
Dependend on Parent Resolution
There is another type of structural conflict in which the changes for the resource cannot be applied, or are blocked, on some changes to the parent resource. In these cases the recommended approach is to always complete the changes on the parent resource first as it will auto-resolve these blocked changes. In the rare case that you do not want to include the changes to the parent resource, you can use the Set Parent Folder… context menu action on the blocked child resourse to move it to another parent.
Change Detail Conflict
Modifications to a file or folder in a change set are represented in the Gap editor as one or more change details under the file or folder entry in the Changes to Merge section. The following types of change details can occur:
- content
- content/mime type
- encoding
- executable bit
- line delimiter
- move/rename
- symbolic link
- user property
Conflicts can occur for change details. For example, if the starting value for a property change does not match the value of the property in the target file before the change is applied, it is flagged as a conflict. Also, if a content change is not auto-mergeable, it will appear as a conflict. As with structural conflicts, these conflicts can be handled using the Merge button or by using either Overwrite or Mark as Done directly. Also, user property changes can be opened in a compare editor since the value of a property can contain multiple lines.
Conflicts vs. Gaps When Accepting
It is possible, when performing an accept with a gap, or when accepting from the merge queue, that some of the change sets are accepted without a gap but one or more of the changes in those change sets cause conflicts. When this occurs, the first change set with a gap is added to the start of the merge queue with the rest of the remaining change sets. The user will need to resolve the conflicts in the Pending Changes view and complete the change set containing the merges. They can then open the Gap editor from the context menu of the component in the Pending Changes view and click Accept on the Merge Queue page of the editor (or from the link in the description on the Current Merge page) in order to accept the change set with the gap and continue with the merge.
Dealing with Gaps using the CLI
In the following 2 sections, we will walk you through the same example we used for the Eclipse client but we will use the SCM CLI instead.
CLI – Single Change Set Example
For this CLI example, we are using the same work items and change sets we used for the Eclipse example. We accept the change set as normal but we add the –queue-merges keyword to indicate that we want to merge any change sets that have gaps.
>scm accept -r server -c _TBlXkU0FEeG_C43XlhdJ0Q --queue-merges Repository: https://jazzdev.torolab.ibm.com:9443/jazz/ Workspace: (1865) "3.0.1.x Workspace" Component: (1884) "Filesystem" Current Merge: (1946) ----$ Evan Hughes "No comment" 01-Feb-2012 01:53 PM Changes: -Gm (1947) /com.ibm.team.filesystem.cli.tests/src/com/ibm/team/filesystem/cli/tests/subcommand/DaemonStartCmdTest.java -C- (1948) Content modified $Gm (1949) /com.ibm.team.filesystem.cli.core/src/com/ibm/team/filesystem/cli/core/internal/SubcommandLauncher.java $C- (1950) Content modified $A- (1951) Encoding changed from "Cp1252" to "UTF-8" Change sets: (1946) ----$ Evan Hughes "No comment" 01-Feb-2012 01:53 PM Changes: ---c- com.ibm.team.filesystem.cli.coresrccomibmteamfilesystemclicoreinternalSubcommandLauncher.java ---c- com.ibm.team.filesystem.cli.testssrccomibmteamfilesystemclitestssubcommandDaemonStartCmdTest.java Work items: (1952) 6 "Test Failure (FilesystemCLI-C20120131-0928): com.ibm.team..." (1953) 103 "Fix failure" Following components have change sets that require merge after accept: 3.0.1.x Workspace - Filesystem Run 'scm resolve current-merge' or 'scm set current-merge' or 'scm list merge-queue' or 'scm show status' to work with the merge queue.
In the output above, there is a section that describes the current merge. The $ in the status codes for the SubcommandLauncher.java file indicate that the two changes for that file auto-resolved. The lack of the indicator for DaemonStartCmdTest.java indicates that the content change for that file must be manually resolved. The mechanism used to resolve conflicts in the CLI is known as “in place markers”. The following command will merge the content change and generate the appropriate “in place markers” in the file.
>scm resolve current-merge 1884 -w 1865 -c 1948 --in-place-markers Files that have content conflicts have been modified to include conflicted regions.
We would then edit the file using a text editor and check-in the changes.
>scm checkin com.ibm.team.filesystem.cli.tests/src/com/ibm/team/filesystem/cli/tests/subcommand/DaemonStartCmdTest.java
The final thing we want to do is indicate that we are done merging the file. We do this by using the resolve current-merge command with the –mine parameter which means we want to use the currently checked in version of the file. It is worthwhile to note that if you wanted to take the remote value without doing a merge, you could use the –proposed options but, as in the Eclipse example, you run the risk of overwriting local content so you should use caution when using this option.
>scm resolve current-merge 1884 -w 1865 -c 1948 --mine
Once we have done that, we can complete the merge, just as we did in the Eclipse example.
>scm set current-merge -w 1865 1884 --complete
CLI – Multiple Change Sets Example
Now we’ll replay the multiple change set example by accepting the change sets from the CLI with the –queue-merges option. The first change set becomes the current merge and the others are places on the merge queue, which is show using the list merge-queue command.
>scm accept -r server -c _X5kLE7LyEeCecpaQPLj_tA _TwmTobkeEeCOOo3JDid0KQ _SylY8b4QEeCh0ITMJSRDWQ _4T8JgbfFEeCecpaQPLj_tA _eqJQEb4AEeCh0ITMJSRDWQ --queue-merges >scm list merge-queue -w 1865 1884 Current Merge: (1897) ----$ Evan Hughes 1 "Prevent changes to files with specific names" - "> Changes: &Gm (1898) /com.ibm.team.filesystem.rcp.ui.workitems/plugin.xml $C- (1955) Content modified $Cm (1900) /com.ibm.team.filesystem.common/META-INF/MANIFEST.MF $C- (1956) Content modified ..... Merge Queue: (1944) ----$ Evan Hughes 1 "Prevent changes to files with specific names" - "> (1941) ----$ Evan Hughes 1 "Prevent changes to files with specific names" - "> (1945) ----$ Evan Hughes 1 "Prevent changes to files with specific names" - "> (1943) ----$ Evan Hughes 1 "Prevent changes to files with specific names" - ">
Because all the changes auto-resolve, we can complete the merge and then indicate that we want to resume processing the merge queue.
>scm set current-merge -w 1865 1884 --complete >scm resume merge-queue -w 1865 1884 Current Merge: (1941) ----$ Evan Hughes 1 "Prevent changes to files with specific names" - "> Changes: $Gm (1927) /com.ibm.team.filesystem.ide.ui/plugin.xml $A- (1971) Content modified ... Merge Queue: (1945) ----$ Evan Hughes 1 "Prevent changes to files with specific names" - "> (1943) ----$ Evan Hughes 1 "Prevent changes to files with specific names" - ">
We can see that one change set accepted cleanly from the merge queue and the next one had a gap where all changes auto-resolved. We then repeat the process.
>scm set current-merge -w 1865 1884 --complete >scm resume merge-queue -w 1865 1884 C:Usersmichaeldevcliworksb>scm list merge-queue -w 1865 1884 Current Merge: (1945) ----$ Evan Hughes 1 "Prevent changes to files with specific names" - "> Changes: -Gm (1927) /com.ibm.team.filesystem.ide.ui/plugin.xml -C- (1992) Content modified Merge Queue: (1943) ----$ Evan Hughes 1 "Prevent changes to files with specific names" - ">
This change set was the one from our example that contained merges that we didn’t want to backport. We can use the set current-merge with the –abort option to discard the merge.
>scm set current-merge -w 1865 1884 --abort
We can then resume processing to accept the final change set which comes in without a gap.
>scm resume merge-queue -w 1865 1884 All change sets in the merge queue have been accepted into your workspace.
We can then use the locate command to find which change sets on the work item are included directly and which ones are related through a change set link.
C:Usersmichaeldevcliworksb>scm locate -r server -w 1883 --workitems 1 --include-related -v (1883) "RTC 3.0.1.1" (2 of 5) (2 of 5 related) (1943) ----$ Evan Hughes 1 "Prevent changes to files with specific names" - "i18n stragglers" 03-Aug-2011 04:37 PM (1944) ----$ Evan Hughes 1 "Prevent changes to files with specific names" - "Add tests and change type differentiation." 26-Jul-2011 05:02 PM (1897) S---$ Evan Hughes 1 "Prevent changes to files with specific names" - "Add UI for ProtectFileTypeAdvisor" 20-Jul-2011 01:08 PM Related: (1970) M---$ Matt "Merge of 'Add UI for ProtectFileTypeAdvisor'" 11-Oct-2013 01:55 PM (1941) S---$ Evan Hughes 1 "Prevent changes to files with specific names" - "i18n, XSD." 03-Aug-2011 02:40 PM Related: (2002) M---$ Matt "Merge of 'i18n, XSD.'" 11-Oct-2013 02:23 PM
“Filling the Gap” using the CLI (Available in RTC 5.0)
The feature of automatically finding and accepting the change sets which fill the gap, as mentioned in the Accepting when a Gap is Encountered (In RTC 5.0) section, is also available in the CLI.
For the command line interface, a new list subcommand called missing-changesets is added. Two new options, accept-missing-changesets and resume-missing-changesets, are added to the accept and resume commands respectively. If a gap is found, the missing changes sets required to fill the gap are automatically included in the accept and resume operations.
The relevant ‘help’ command output is shown below:
scm help list Help for: scm list Purpose: Lists items. You can list different items, as specified by subcommands. Aliases: ls Usage: scm list [subcommand] [args] Use scm help list [subcommand] to get detailed help for a list subcommand Subcommands: ... missing-changesets - List the additional change sets required to accept in order to avoid merging the change sets specified. ...
scm help list missing-changesets Help for: scm list missing-changesets Purpose: List the additional change sets required to accept in order to avoid merging the change sets specified. Aliases: list missing-cs, list missing Usage: scm list missing-changesets [-w/--workspace <arg>] [-s/--summarize-changes] [-r/--repository-uri <arg>] [-u/--username <arg> -P/--password <arg> | --certificate <arg> -P/--password <arg> | --smartCard -u/--username <arg>] [-j/--json] [-v/--verbose] [selectors...] selectors - List of change sets to specify. Options: -r, --repository-uri <arg> - The URI that specifies the location of the repository. -u, --username <arg> - The username for the repository. -P, --password <arg> - The password for the repository. --certificate <arg> - The file that contains the user's login certificate. --smartCard - Uses the connected smart card for authentication. -j, --json - Enables JSON output. -v, --verbose - List each missing change set and all changes for each. -w, --workspace <arg> - The workspace or stream, as specified by its name, alias, or UUID. -s, --summarize-changes - List a summary of only the additional changes by the missing change sets.
scm help accept Help for: scm accept Purpose: Accepts changes into a repository workspace and also downloads the changes to the sandbox if the operation was run from within the sandbox location. The changes to accept can be scoped in one of four ways: all changes in a workspace (default), all changes in a set of one of more components (using --components), all changes in one or more baselines (using --baseline), or a specific set of changes (by specifying the change set aliases, or UUIDs). Usage: scm accept [-r/--repository-uri <arg>] [-u/--username <arg> -P/--password <arg> | --certificate <arg> -P/--password <arg> | --smartCard -u/--username <arg>] [-j/--json] [-v/--verbose] [-d/--directory <arg>] [-N/--no-local-refresh] [-i/--in-place-markers] [--no-merge] [--accept-missing-changesets] [--flow-components] [-o/--overwrite-uncommitted] [-q/--queue-merges] [-s/--source <arg>] [-t/--target <arg>] [-b/--baseline | -C/--components | -c/--changes] [selectors...] selectors - An optional list of items to accept. Options: ... --accept-missing-changesets - Automatically find change sets that are required to avoid merging and accept them in addition. ...
scm help resume changeset Help for: scm resume changeset Purpose: Resumes change sets into a workspace from the stored suspended set that is on the server. Aliases: resume cs Usage: scm resume changeset [-r/--repository-uri <arg>] [-u/--username <arg> -P/--password <arg> | --certificate <arg> -P/--password <arg> | --smartCard -u/--username <arg>] [-j/--json] [-v/--verbose] [-d/--directory <arg>] [-N/--no-local-refresh] [-i/--in-place-markers] [--no-merge] [-o/--overwrite-uncommitted] [-q/--queue-merges] [--resume-missing-changesets] [-t/--target <arg>] <changes...> changes - An optional list of change sets to resume. To specify the change sets, use alias or UUID[@repo]. Options: ... --resume-missing-changesets - Automatically find change sets that are required to avoid merging and resume them in addition. ...
Merging conflicts after a cross component move
RTC SCM supports the ability to move a folder from one component to another while preserving the history of the moved files. This is done using the Team/Move in Repository Workspace action. This can cause challenges in multi-stream development if content is moved in one stream and then changes are made to the moved content in another stream that does not contain the move change. In RTC 5.0.2, the ability to move the conflicts to another component was added to the CLI. In RTC 6.0, this capability was added to the Eclipse and Visual Studio clients.
Merging conflicts after a cross component move in Eclipse or Visual Studio Client (Available in RTC 6.0)
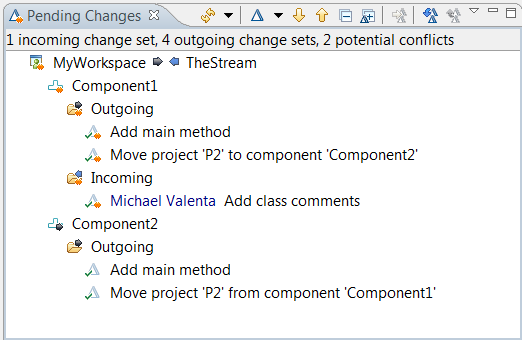
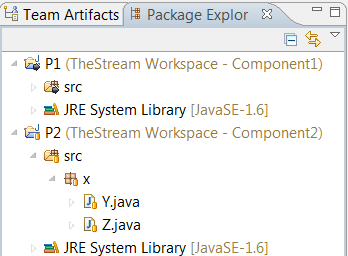
In the following screenshot, we can see that project P2 was moved from Component1 to Component2 in the user workspace and there is an incoming change from TheStream that touches files in both P1 (un unmoved folder) and P2. There have also been additional changes made, as indicated by the outgoing Add main method change sets in both components.
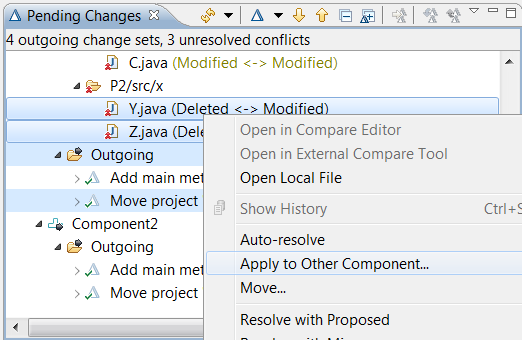
After we accept the incoming change sets, we end up with some conflicts as shown in the following screenshot.

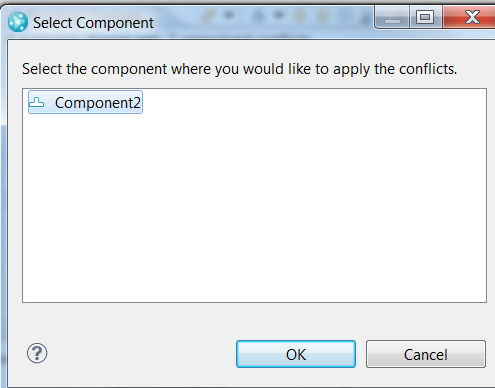
The conflicts to the files Y.java and Z.java in P2 cannot be applied to Component1. Instead, they should be applied to Component2. We can select them and choose Apply to Other Component… from the context menu.
We know that P2 was moved to Component2 so we choose that as the target component.
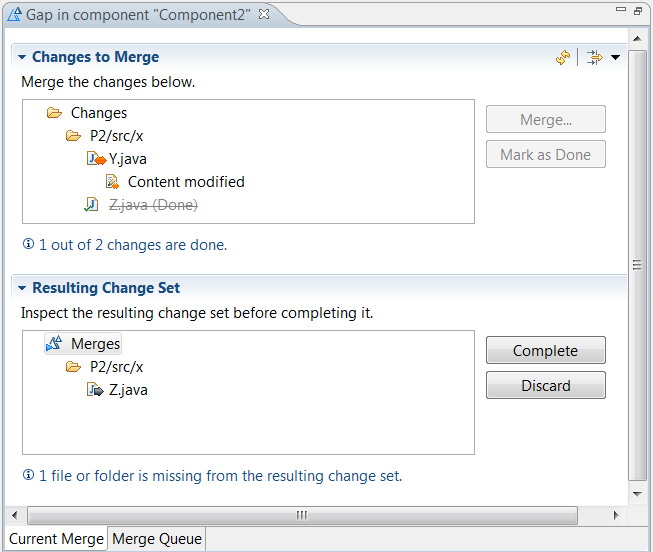
The conflicts are applied using the Gap editor as shown below. The changes to the file Z.java auto-resolved while the changes to Y.java need to be manually merged.
After the conflicts have been resolved in the Gap editor, we would complete the process using the Complete button in the editor. After that, we need to go back to the original conflicts and resolve them appropriately. In this case, where the move is in our workspace, we want to use Resolve with Mine since we want to keep the state of the files in our workspace for Component1.
For the case where the move is incoming from the stream, the workflow is a bit different. The following screenshot shows an example of the conflicts that result from accepting a cross component move.
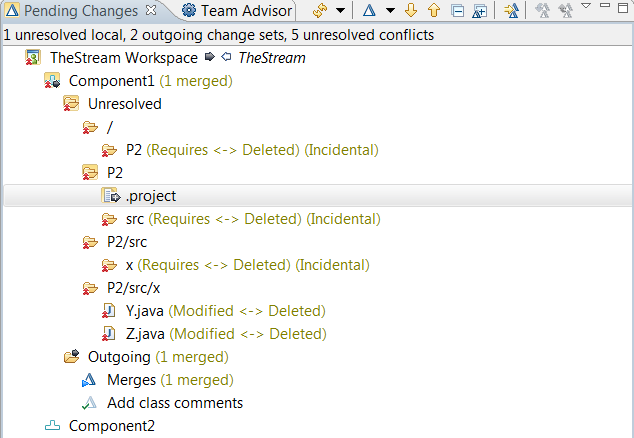
Because there are conflicts on some of the moved files, the removal of the files and their containing folders from Component1 is delayed until the conflicts are resolved. You can see above that there are conflicts on the Y.java and Z.java files as well as incidental conflicts on the folders that contain those files. The following screenshot shows the Packages Explorer which still contains the conflicted files and the containing folders including project P2 from Component1.
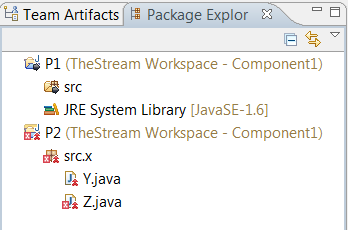
When we apply the conflicts to Component2 we want P2 from Component2 to be loaded so that any content conflicts can be auto-resolved if possible. To make this possible, we want to delete P2 from the Packages Explorer and then load P2 from Component2 resulting in what is shown in the following screenshot.
Now we can select the conflicts on Y.java and Z.java and apply them to Component2 using the Apply to Other Component… action. We can also select the incidental conflicts but that is not required. Once we have resolved the conflicts in the Gap editor and completed the merge, we would select the conflicts in Component1 and choose Resolve with Proposed in order to accept the state of these files from the stream.
Merging conflicts after a cross component move using the CLI (Available in RTC 5.0.2)
The following CLI output for the status command shows our example where project P2 was moved from Component1 to Component2 and there is an incoming change that adds class comments from TheStream that touches files in both P1 (un unmoved folder) and P2. There has also been changes made since then, as indicated by the outgoing Add main method change sets in both components.
>scm show status Workspace: (1564) "MyWorkspace" <-> (1565) "TheStream" Component: (1566) "Component1" Baseline: (1567) 2 "v1" Outgoing: Change sets: (1568) ----$ "Add main method" 19-Sep-2014 11:43 AM (1569) ----$ "Move project 'P2' to component 'Component2'" 19-Sep-2014> Incoming: Change sets: (1570) ----$ "Add class comments" 19-Sep-2014 11:44 AM Component: (1571) "Component2" Baseline: (1572) 1 "Initial Baseline" Outgoing: Change sets: (1573) ----$ "Add main method" 19-Sep-2014 11:43 AM (1574) ----$ "Move project 'P2' from component 'Component1'" 19-Sep-20>
When we perform the accept, the accept result shows us that the incoming changes touched 2 files in P1 and 2 files in P2 and also indicates that conflicts occurred.
>scm accept Accepting changes: Repository: https://server:9443/jazz/ Workspace: (1564) "MyWorkspace" Component: (1566) "Component1" Change sets: (1570) ---#$ "Add class comments" 19-Sep-2014 11:44 AM Changes: -#-c- P1srcabC.java ---c- P1srcabD.java -#-c- P2srcxY.java -#-c- P2srcxZ.java Following workspaces still have conflicts after accept: MyWorkspace Run 'scm resolve conflict' or 'scm show conflicts' or 'scm show status' for help in resolving the conflicts. Problem running 'accept':
Running the status command shows us that we have 2 conflicts that could not be auto-resolved. These 2 conflicts are (Deleted <-> Modified) conflicts which indicates that the files have been modified in the change set but are no longer present in the target component.
>scm show status Workspace: (1564) "MyWorkspace" <-> (1565) "TheStream" Component: (1566) "Component1" Baseline: (1567) 2 "v1" Conflicts: C-- (1575) /P2/src/x/Y.java (Deleted <-> Modified) C-- (1576) /P2/src/x/Z.java (Deleted <-> Modified) Outgoing: Change sets: (1577) -*--@ "Merges" 19-Sep-2014 11:49 AM (1568) ----$ "Add main method" 19-Sep-2014 11:43 AM (1569) ----$ "Move project 'P2' to component 'Component2'" 19-Sep-2014> Component: (1571) "Component2" Baseline: (1572) 1 "Initial Baseline" Outgoing: Change sets: (1573) ----$ "Add main method" 19-Sep-2014 11:43 AM (1574) ----$ "Move project 'P2' from component 'Component1'" 19-Sep-20> >scm show status -C Workspace: (1564) "MyWorkspace" <-> (1565) "TheStream" Component: (1566) "Component1" Baseline: (1567) 2 "v1" Conflicts: C-- (1575) /P2/src/x/Y.java (Deleted <-> Modified) C-- (1576) /P2/src/x/Z.java (Deleted <-> Modified) Outgoing: Change sets: (1577) -*--@ "Merges" 19-Sep-2014 11:49 AM Changes: ---c- P1srcabC.java (1568) ----$ "Add main method" 19-Sep-2014 11:43 AM Changes: ---c- P1srcabC.java (1569) ---#$ "Move project 'P2' to component 'Component2'" 19-Sep-2014> Changes: --d-- P2 --d-- P2.classpath --d-- P2.project --d-- P2.settings --d-- P2.settingsorg.eclipse.jdt.core.prefs --d-- P2src --d-- P2srcx -#d-- P2srcxY.java -#d-- P2srcxZ.java Component: (1571) "Component2" Baseline: (1572) 1 "Initial Baseline" Outgoing: Change sets: (1573) ----$ "Add main method" 19-Sep-2014 11:43 AM Changes: ---c- P2srcxY.java (1574) ----$ "Move project 'P2' from component 'Component1'" 19-Sep-20> Changes: --a-- P2 --a-- P2.classpath --a-- P2.project --a-- P2.settings --a-- P2.settingsorg.eclipse.jdt.core.prefs --a-- P2src --a-- P2srcx --a-- P2srcxY.java --a-- P2srcxZ.java
What we want to do is apply the changes to Component2. We do this using the move option (-m) of the resolve conflict command. The example below uses aliases for the 2 conflicts (1575, 1576).
>scm resolve conflict -m Component2 1575 1576 Current Merge: Changes: $Cm (1575) /P2/src/x/Y.java $C- (1578) Content modified $Am (1576) /P2/src/x/Z.java $A- (1579) Content modified No merge queue. Conflicted items have been successfully resolved.
In our example, the change to file Y.java is an auto-resolvable conflict and the change to file Z.java is not a conflict at all but resolves cleanly. Using the status command with the options to show all changes (-C) and show resolved changes in the current merge (–xcurrentmerge) we can see that there were two changes in the current merge that have been merged into the resulting change set (alias 1580)
>scm show status --xcurrentmerge -C Workspace: (1564) "MyWorkspace" <-> (1565) "TheStream" ... Component: (1571) "Component2" Baseline: (1572) 1 "Initial Baseline" Current Merge: Target: (1580) >---@ "Merges" 19-Sep-2014 12:00 PM Changes: $Cm (1575) /P2/src/x/Y.java $C- (1578) Content modified $Am (1576) /P2/src/x/Z.java $A- (1579) Content modified Outgoing: Change sets: (1580) >*--@ "Merges" 19-Sep-2014 12:00 PM Changes: ---c- P2srcxY.java ---c- P2srcxZ.java ...
Since we are happy with our merge, we complete the current merge for Component2 for MyWorkspace.
>scm set current-merge --complete -w MyWorkspace Component2 All change sets in the merge queue have been accepted into your workspace.
While the move option of the resolve conflicts command does apply the conflicting changes to another component, it does not remove the conflicts from the source component so we finish up by resolving those conflicts with what is in the workspace using the checked-in (-c) option.
>scm resolve conflict -c 1575 1576 Conflicted items have been successfully resolved.
The status command now shows that the current merge is no longer present and our new change set is outgoing.
>scm show status Workspace: (1564) "MyWorkspace" <-> (1565) "TheStream" Component: (1566) "Component1" Baseline: (1567) 2 "v1" Outgoing: Change sets: (1577) -*--@ "Merges" 19-Sep-2014 12:05 PM (1568) ----$ "Add main method" 19-Sep-2014 11:43 AM (1569) ----$ "Move project 'P2' to component 'Component2'" 19-Sep-2014> Component: (1571) "Component2" Baseline: (1572) 1 "Initial Baseline" Outgoing: Change sets: (1580) ----$ "Merges" 19-Sep-2014 12:04 PM (1573) ----$ "Add main method" 19-Sep-2014 11:43 AM (1574) ----$ "Move project 'P2' from component 'Component1'" 19-Sep-20>
The above steps work well for change sets that contain changes to files that span multiple components. However, it is possible that a change sets modifies one or more files and all those files have been moved to another component. In this case, it is not necessary to accept the change set into Component1 in order to then move all the conflicts to Component2. Instead, you can apply the change set directly to Component2 by adding it to the merge queue. The following command shows how to add the change set (alias 1570) from Component1 to the merge queue of Component2 in MyWorkspace.
>scm set merge-queue --add 1570 -w MyWorkspace Component2
Once the change set is added to the queue, you can start the processing of the change set using the resume merge-queue command
>scm resume merge-queue -w MyWorkspace Component2
Other Helpful Information
External Compare Tools
The conflicts that occur when applying a gapped change set differ in nature from normal conflicts in the sense that the common ancestor is not known. Instead, the before contents for the change with the gap is used as the ancestor for the comparison. In the Eclipse compare editor, outgoing changes are not shown so the user will only see the incoming changes. However, it has been observed that the three pane approach taken by the Eclipse compare editor is not ideal for merging more complicated conflicts. For gapped conflicts, it has been found that the four pane approach taken by external merge tools such as Clear Case Merge, KDiff3, and several other readily available compare tools is preferable. For this reason, it is recommended that an external compare tool be used for these more complicated conflicts.
Removal of Change Set Links
Change set links are part of the change set model. Generally, once they are created, they should not be removed. However, there may be case where you want to remove them. There is an action in the Eclipse client that can be enabled using the system property -Dcom.ibm.team.filesystem.ide.ui.gap.actions.showRemoveChangeSetLinksAction=true. Once enabled, selecting a change set will remove all links related to that change set. That is, if the change set is an original, all change sets derived from it will have the link removed. If the change set was derived from an original all links from that original will be removed. Removing links should be safe in most cases, however, if the change set has been replicated using distributed SCM, the links will need to be removed from all repositories containing the change set. It should also be noted that the link removal action does not update any views in the client so these views will need to be manually refreshed after the links are removed.
About the author
Michael Valenta is a member of the Jazz SCM development team and was the feature team lead for this feature. Prior to that, he worked on the Eclipse open source project.
Copyright © 2013, 2015. IBM Corporation