Debugging attribute customization scripts – an example
JavaScript Attribute Customization questions come up in the jazz.net/forum relatively often. Wanting to use them makes sense — it’s a powerful and simple way to improve the way you work. Do you think that Time Remaining should be set to zero when a task is closed? Rational Team Concert doesn’t do that automatically because perhaps not everyone wants that (and it’s difficult to undo default behaviors). But you can make it happen. Attribute customizations (along with other features for customizing the product) are there to help you fit it to your team’s needs.
I think the question often comes up in the forum because there isn’t a simple end-to-end example illustrating the various aspects of being successful with scripted attribute customizations: creating appropriate attributes, configuring them correctly, establishing appropriate dependencies and, often, how to investigate (debug) when things don’t seem to be working. This article is intended to provide that example.
Warnings: (1) You need to accept responsibility for what you do to your system. If you write some poorly performing JavaScript that is invoked on every work item save/retrieve, all of your users will suffer and there’s nothing IBM Rational can do to help you. If you find yourself writing a lot of scripted customizations, you could be headed for performance issues. If you are doing something involved, consider writing a server-side contribution in Java. (2) Support for debugging in clients varies. Depending on your environment, scripted customizations may be more difficult for you. (3) There are limitations in the WorkItem JavaScript API, some of which are noted below by reference, some of which you may discover on your own, especially if you ignore the references and just dive in. This article actually uncovers one of those seams and has to work around it (as part of the example).
Good material about attribute customizations already exists. These references are valuable and worth bookmarking if you will be working in this area often. This article will refer to some of these rather than repeating them.
- Info center topics on Customizing Attributes Depending on when you read this, topics can get reorganized. If this link doesn’t go to a useful page, just search the RTC help on “customizing attributes”.
- Jazz.net article on Customization of Work Items in Rational Team Concert
- Jazz.net wiki page on Attribute Customization This has some important information about the JavaScript API and the sorts of things you can and cannot safely do from it.
- Process Enactment Workshop for CLM 2012, Lab 5 A larger treatment of the topic, updated in 2013
Preconditions
The material presented was tested on RTC 4.0.3 and RTC 4.0.5 though should be pertinent to RTC 4.x with the understanding that screen captures may differ slightly between versions. I use the default Scrum template as the starting point. At least one step will require you (or someone working with you) to have JazzAdmin access in order to change the setting to enable process attachment scripts. You will need ProjectAdministrator or ScrumMaster access rights to the project in order to perform the attribute customizations. It’s very simple to install an RTC instance on your own computer (where you have all the privileges you decide to grant yourself) for testing and I highly recommend doing that. You will need to use the Eclipse client for some of the customizations as they are not yet available in the web client.
Overview
It is my intention to present as simple an example as possible to illustrate the things you need to know how to do, which include:
- Create attributes
- Create attribute customizations
- Configure attributes with customizations
- Test/investigate/debug script customizations in a browser and on the server
To explore the value of debugging the script in the browser, the first version of it will have at least one syntax error — don’t correct it ahead of time or portions of the explanation won’t work (you are coding along with me, right?). While a Calculated Value attribute customization is used to illustrate the various debugging approaches, the approaches can be used with any of the scripted customization types.
Application Requirement
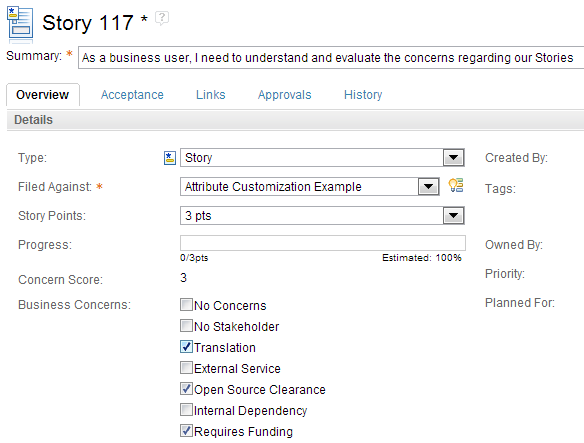
Your team has a variety of concerns they want to track for Story work items. The user should be able to tick checkboxes in the Story work item to indicate the areas that may need to be addressed. Your team wants to score stories based on their collection of concerns so that Stories above a certain score can be easily identified (this could be as simple as a count of the number of concerns). These Stories may be high risk or need some extra attention from the Product Owner. It should look something like this:
Design
The list of concerns is easy: add an attribute to a Story work item type that uses an enumeration of the concerns (so we’ll also need to create an Enumeration). But queries do not work (yet) with synthetic attributes, so you can’t say where number of items checked is greater than 3. To handle this, we’ll add another attribute to hold the score for the concerns (which will start as just the number of items selected). This will be a Calculated Value attribute customization and we’ll use a small snippet of JavaScript code to count the items and set the value. Whenever the list of items changes, it’ll update the value.
Activity List
Here are the specific things we need to do in roughly the order they need to be done:
- Enable Process Attachment scripts — little point in proceeding if we can’t do this
- Create an Enumeration for Business Concerns (with special tweaks)
- Create an Attribute for Business Concerns on the Story Work Item
- Create an Attribute for Concern Score on the Story Work Item
- Create a Calculated Value Attribute Customization for Concern Score
- Configure the Concern Score attribute to use the customization
- Add Editor Presentations to the Story work item for the new attributes
- Test it
- Fix it
- Improve it
Since we need to use the Eclipse client for the Attribute Customization, we’ll use it for all of the customizations. It’s easier to test in the web client, so we’ll do our debugging there. Towards the end you’ll need both your clients open as we pop between them to finish the work.
Enable Process Attachment Scripts
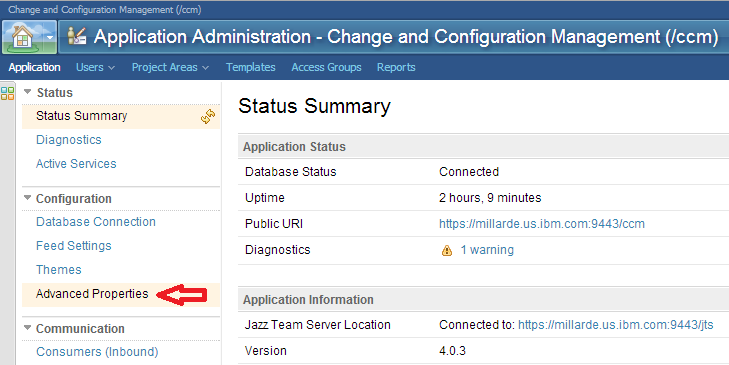
From the web UI, you or someone with JazzAdmin credentials needs to manage the CCM application. Note that this change is for all project areas, not just yours.

You will arrive on the Status Summary section, change to the Advanced Properties section:
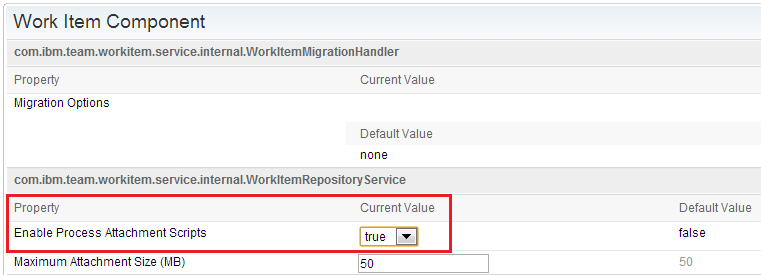
On the Advanced Properties page, scroll way down to the Work Item Component section (the sections are organized alphabetically by name). Change Enable Process Attachment Scripts value to true (or simply confirm that it is set to true).
If you made a change, scroll back to the top and save it. You can close the web client for now.
Create an Enumeration for Business Concerns
Switch to the Eclipse client, login and connect to the project area as needed. Open the process configuration tab for the project area (right click the project area and choose Open) then open Project Configuration > Configuration Data > Work Items > Enumerations.
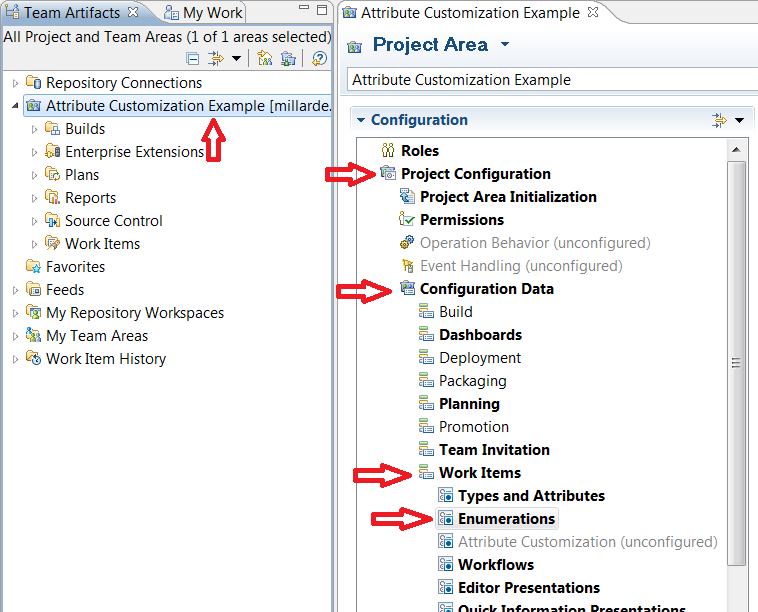
In the Enumerations section, select Add… and name the new enumeration BusinessConcernsEnum (with a matching ID in lowercase, at least that’s my typical convention).
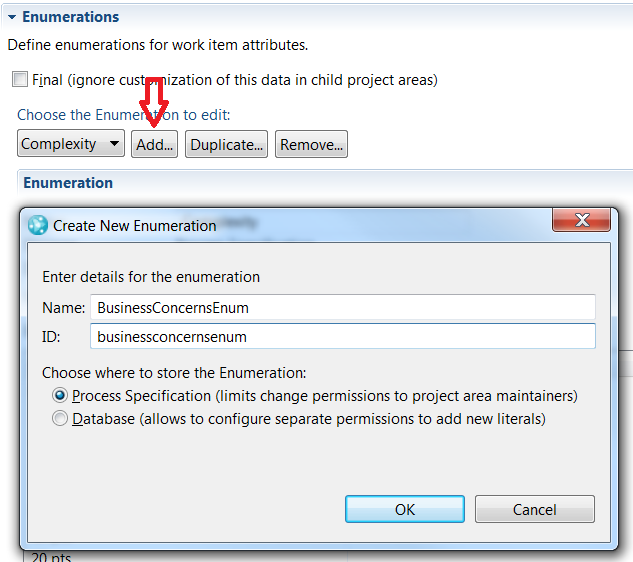
Add these items to the enumeration [No Concerns, No Stakeholder, Translation, External Service, Open Source Clearance, Internal Dependency, and Requires Funding] and configure “No Concerns” as both the default and unassigned literals (the external value is not required for this example, assign icons if you wish):

Special tweak: RTC will use simple literals for the enumeration that look like this: businessconcernsenum.literal.l14. That works, but if you want more useful values to interrogate in your scripts, you can change these to anything you want as long as you do it before the enumeration gets used. Otherwise, any work items created before you made the change will have invalid values. So do it now or let it go. While this step is optional, if you skip it, you will have to use the less meaningful value in your scripts later.
At the bottom of the Project Area editor, click the Process Configuration Source tab, then type Ctrl-F (for Find) and find businessconcern. This will locate the section added to the process specification for the new enumeration.

We’ll provide a different value for id that helps us understand what it is for. Match the id value to the name, replacing spaces with periods, prepending with "bc." and typing everything in lowercase.

Save the changes (not required but I prefer to save periodically).
Create an attribute for Business Concerns on Story
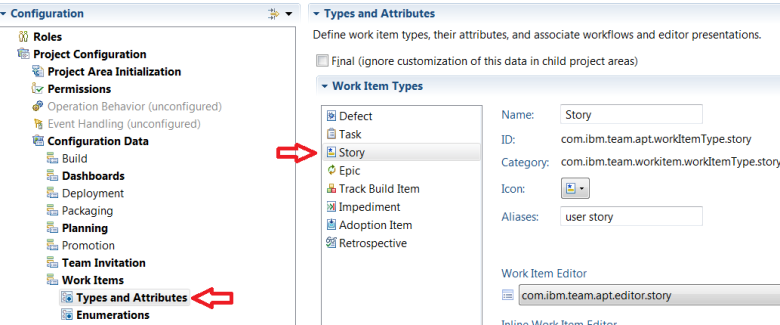
Switch back to the Process Configuration tab and change to the Types and Attributes section for Work Items. Choose the Story work item type:
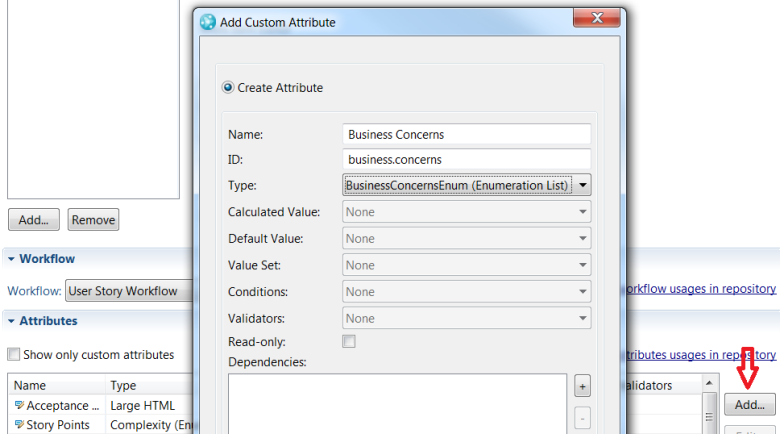
Scroll down to the Attributes section and click Add… Fill in Business Concerns for the name and business.concerns for the ID and select BusinessConcernsEnum (Enumeration List) for the Type (since we want to display a series of checkboxes rather than a drop down). Click OK.
Create an attribute for Concern Score on Story
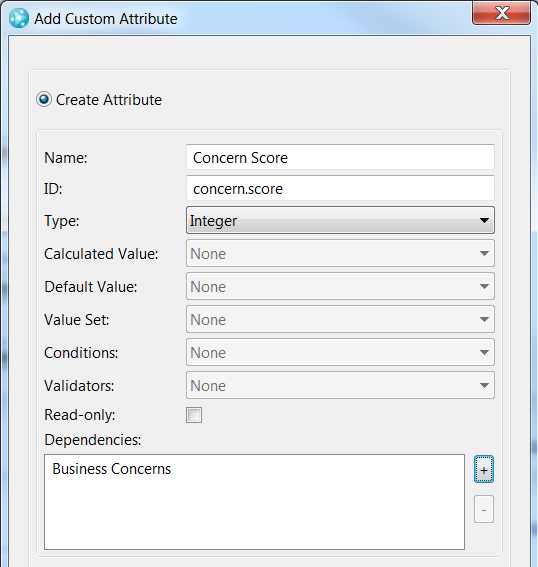
Similarly, add Concern Score with ID concern.score, type Integer and set a dependency on Business Concerns. We can’t set the Calculated Value provider for it since we haven’t made it yet.
Create calculated value attribute customization for Concern Score
In the Configuration Data > Work Items section, click on Attribute Customization, then Calculated Values then click the Add… button near the bottom of the editor or use the context menu. Name it Concern Score – CV and set the Provider to Script Based Calculated Value. Click OK.
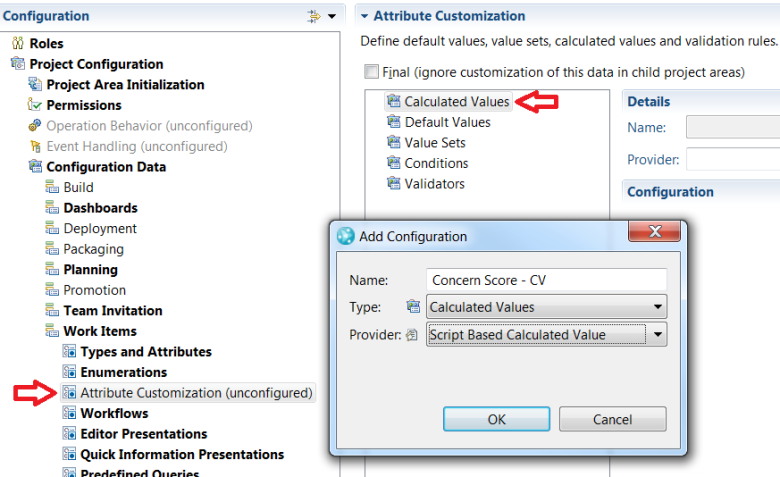
You can use the Fill in example link to get a starter script with the correct structure (each of the attribute customization types has a different one). Since this is your script, you can remove the copyright info. Change the dojo.provide and dojo.declare (it’s important that these match) to something else that should be unique (I’ll use edu.millard.ConcernScore.ValueProvider). We’re going to calculate the concernScore, so set that as the return value and add a var statement that initializes it to 0. Here’s what it looks like so far:
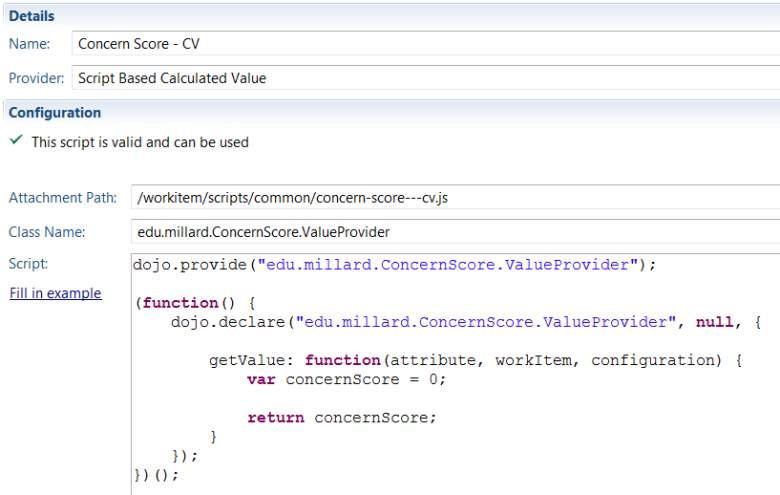
[If I were developing this rather than explaining it, I’d likely set the default value to 42, go wire this up as we will in the next step, and go test it. Realistically, we’ve done way too much work without testing at this point.]
Before continuing, let’s take a quick tour of what we have. The dojo.provide/dojo.declare (you don’t need to know much dojo to write these sorts of scripts) name our script. Since this is a Calculated Value customization, the function that is called is getValue(). It is called with arguments for the attribute it is attached to (the id value from our configuration), a reference to the workitem (so we can interrogate other attributes) and additional configuration data (that we don’t need and haven’t configured — see the references above to learn more). There is an Attachment Path (that tells the system where to find it) and a class name that matches our provide/declare value.
Let’s add some code to help us calculate the score. For now use the bolded lines below (yes, there’s an error, that’s on purpose, leave it in for now):
dojo.provide("edu.millard.ConcernScore.ValueProvider"); (function() { dojo.declare("edu.millard.ConcernScore.ValueProvider", null, { getValue: function(attribute, workItem, configuration) { var concernScore = 0; var concernsSelected = workitem.getValue("business.concerns"); concernScore = concernsSelected.count; return concernScore; } }); })(); The new lines get the list of values that were checked, then gets the number of items in the list (or initial cut at a score). Save your progress.
Configure customization on Concern Score attribute
Go back to Types and Attributes and select the Story work item type then scroll down and double click the Concern Score attribute to edit it. The Calculated Value option now has a working drop down with our Concern Score – CV entry. Select it then click OK. Notice that the Attributes table now shows the attribute customization.

Add Editor Presentations on Story work item
We can’t see attributes the editor does not present to us. They exist on the Story work item type at this point and if we started adding stories, they’d be there, they’d just all be empty or carry their default value. Navigate to Work Items > Editor Presentations then choose the com.ibm.team.apt.editor.story presentation and open the Overview and Details sections. We’ll add our attributes to the first part, so click on Work Progress then Add Presentation… (so that we add the new items after Work Progress). Choose Concern Score as the first attribute, set its Kind to Integer, set Read Only to True and leave the other fields at their default values and click OK. It is important that the presentation be read-only as we don’t want the user entering a value that we are recalculating.
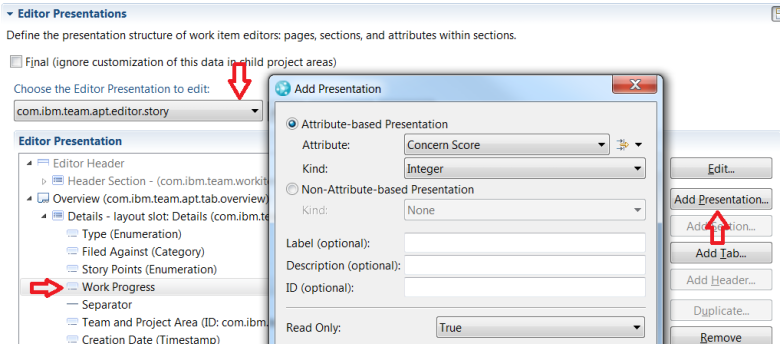
Similarly add a presentation for Business Concerns and set its Kind to Checkbox Enumeration List. Click OK and Save your changes.
Test it
Open your browser (I’ll use Chrome here, but provide details for other browsers at the end) and navigate to your project area. We’re going to add a new Story, but first we want to enable our development tools and put the system in debug mode.
Use either the menus to open Tools > Developer Tools or the Ctrl-Shift-I shortcut to open Chrome Developer Tools. To put your browser session in debug mode for RTC, add ?debug=true to the URL before the hash-sign (#), like this: https://millarde.us.ibm.com:9443/ccm/web/projects/Attribute%20Customization%20Example?debug=true#action=com.ibm.team.dashboard.viewDashboard
And refresh the page. The first thing you may notice is that your page loads slower (it’s the cost of debugging). Rather than use its normal minification process, the ?debug=true flag loads most scripts with their full source so you can find and debug them. Once you have added this to the URL, RTC remembers it and adds it to the URL for all links you click within the application (until you remove it or close this browser window). If you are doing this with a remote server, expect it to be really slow.
In the developers tools section, switch to the Sources tab and hit Ctrl+O to get a list of scripts. It’s a long list, so rather than scroll around looking for our script, type concern into the box at the top of the list to filter it. Click on our script to open it.
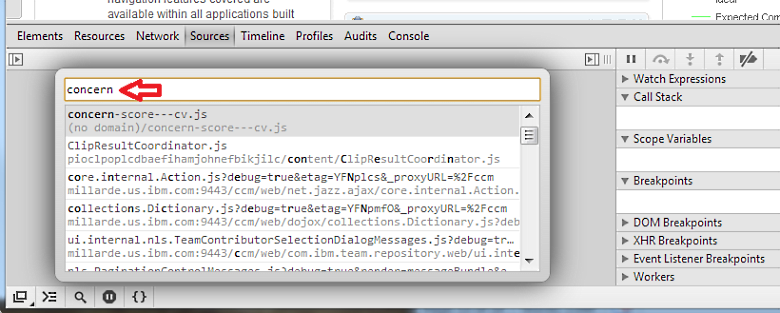
Click on the line number for line 12 to set a breakpoint there.

Use the Work Items menu of the application to create a new Story. If all has gone well so far, you’ll see our new Concern Score and Business Concerns attributes on the page. If you don’t, you need to review the article and figure out what you missed. Fill in the required fields and then click on one of the Business Concerns checkboxes (let’s use Requires Funding). Again, if all has gone well, you’ll see the page get grayed out and the debugger will show a breakpoint on the line we selected. Scroll down or use the twisty to close the Call Stack and get to the Scope Variables section. Cool, ain’t it?
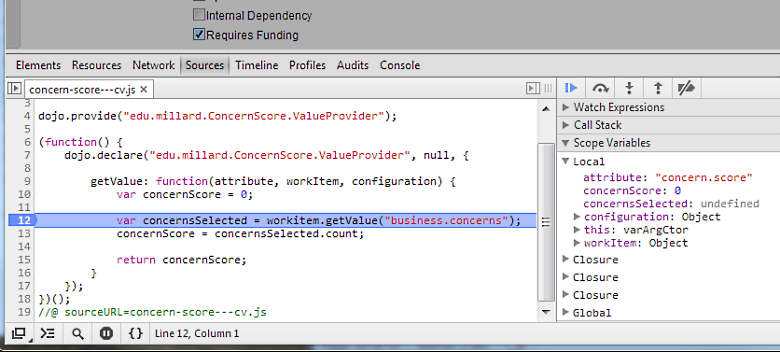
You can see that the attribute handed in is concern.score, the ID for the attribute we are trying to set and the workItem is an object. Use the Step Over link (the dot with the arrow arced over it) or F10 to step forward a line.
Oops. That doesn’t look right.
Fix it (and test it and fix it…)
Using the Scope Variables panel, click open e, the exception object to see what’s wrong.
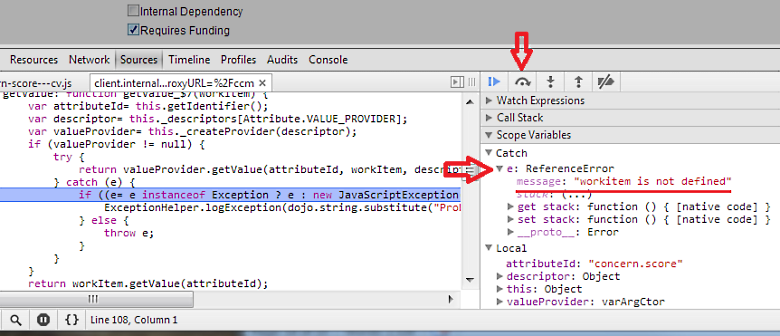
Oh, it’s supposed to be workItem, not workitem. Pop back into your Eclipse client and fix it and save. Tell the debugger to resume and it returns to your editor. The Concern Score is, understandably, not updated. We need to refresh the page to get the new version of the script we just fixed. Tell the browser it’s okay to reload — we don’t care about these changes.
Repeat the steps above until you get to the breakpoint again. Clicking the Step Over this time does not throw an exception and we move onto the next line and can see from the Scope Variables panel that we now have a value for concernsSelected.
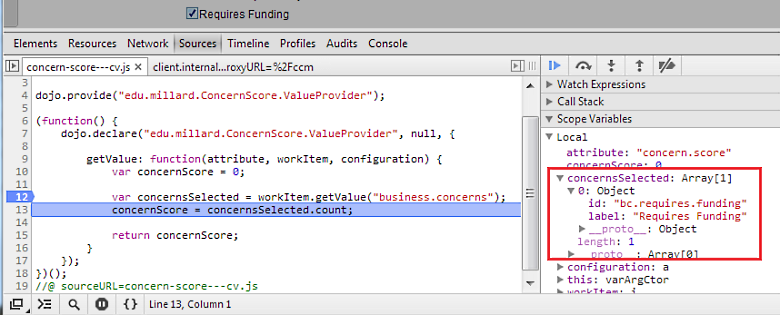
Here is one place where the debugger really shines: I don’t recall anywhere in the documentation I’ve visited that explains what workItem.getValue() returns when you call it on an enumeration that allows multiple values to be selected. For that matter, the wiki article listed above says enumerations return one value (which is no longer the case). Using the debugger we can see that it returns an Array of Objects and we can peek in to see the structure and content of the array. We’ll use that data later.
So let’s step over the next line and see what the score is. What?! concernScore is undefined? It should be 1, the length of the array! Oh, wait, we typed concernsSelected.count. It’s supposed to be concernsSelected.length. Note that no exception was thrown for this. Good luck finding this sort of mistake if you don’t have a debugger (or don’t know how to use it).
Back to the Eclipse client, fix it up and then refresh the browser again. We’ll get this.
And we do. As you click concerns and resume from the debugger, the Concern Score updates each time.

Cool. Now save the work item. Argh! Looks great in the browser, but Concern Score changes to a different value on save! After some experimentation, it turns out that while we get an array of objects in JavaScript on the client (perhaps tied to our choice of an Enumeration List as the editor presentation), we get a string with delimited values on the server side — so concernsSelected.length means something completely different between the client and server. Horsefeathers!
Server-side debugging with console.log
Since the point of this article is understanding how to debug this stuff, what I did to figure this out was change the script to include some console.log() statements to help understand what’s going on. It’s an effective, if old-school, way to debug and in situations like this, about your only choice. If you read way to the bottom of the wiki article mentioned above, you’d know that the output of such statements can be found in the server-side log at JazzTeamServer/server/tomcat/work/Catalina/localhost/ccm/eclipse/workspace/.metadata/.log or a similar location if you are not using Tomcat (though as mentioned, it makes a lot of sense to test this stuff in a local instance on your machine).
I changed getValue() to read:
getValue: function(attribute, workItem, configuration) { var concernScore = 0; var concernsSelected = workItem.getValue("business.concerns"); console.log("type of concernsSelected is: " + typeof(concernsSelected)); console.log("concernsSelected: "); console.log(concernsSelected); concernScore = concernsSelected.length; console.log("number of concerns is " + concernScore); return concernScore; } The output is visible in the browser console when operating on the client:
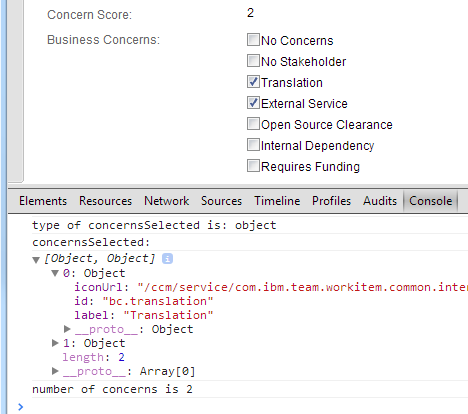
And looking in the server-side log shows this output after clicking Save:
!ENTRY com.ibm.team.rtc.common.scriptengine 1 0 2013-11-11 18:16:12.892 !MESSAGE LOG: type of concernsSelected is: string !ENTRY com.ibm.team.rtc.common.scriptengine 1 0 2013-11-11 18:16:12.895 !MESSAGE LOG: concernsSelected: !ENTRY com.ibm.team.rtc.common.scriptengine 1 0 2013-11-11 18:16:12.897 !MESSAGE LOG: |bc.translation|bc.external.service| !ENTRY com.ibm.team.rtc.common.scriptengine 1 0 2013-11-11 18:16:12.899 !MESSAGE LOG: number of concerns is 36
That’s unfortunate. On the chance it is also a defect, I filed Defect 289792.
Improve it
So, what to do? Now that what’s going on is clear, the obvious fix is to check the type of the attribute returned to the script and react accordingly. It’s not the prettiest answer, but if you need to get this done now, it may be all you’ve got.
What I’d really like to do is weight the concerns (beyond just counting them). Translation, for example, is pretty well understood and simply needs to be managed (similar with Internal Dependencies). On the other hand, relying on an External Service or dealing with Open Source Clearances may involve lawyers and depending on what we find out may become a totally blocking issue. So those things should add to our concern more than the easier items.
Since the enumeration values are fixed, we can use a string match to identify the concerns that cost more. We’d rather not code the counting logic two different ways, so when typeof(concernScore) is an object, we’ll make a string that is similar to our server-side string value, then compute against that.
Fast-forwarding to the end, here is the final script that works sufficiently on both the client and server, returning the correct value no matter where it is executed:
dojo.provide("edu.millard.ConcernScore.ValueProvider"); (function() { dojo.declare("edu.millard.ConcernScore.ValueProvider", null, { getValue: function(attribute, workItem, configuration) { var concernScore = 0; var concernsString = ""; var concernsSelected = workItem.getValue("business.concerns"); if (typeof(concernsSelected) == "object") { concernsString = concernsSelected.map(function(item) { return item.id; }).join("|"); } else concernsString = concernsSelected; //ugly if statement, but sufficient for our purpose if (concernsString.indexOf("bc.no.concern") !== -1) concernScore += 0; if (concernsString.indexOf("bc.no.stakeholder") !== -1) concernScore += 2; if (concernsString.indexOf("bc.translation") !== -1) concernScore += 1; if (concernsString.indexOf("bc.external.service") !== -1) concernScore += 3; if (concernsString.indexOf("bc.open.source") !== -1) concernScore += 3; if (concernsString.indexOf("bc.internal.dependency") !== -1) concernScore += 1; if (concernsString.indexOf("bc.requires.funding") !== -1) concernScore += 2; return concernScore; } }); })(); Testing with this script, the value gets set correctly on the client and matches the value calculated on the server. That wraps up our tour of attribute customization script debugging. If you have questions, you can ask them in the comments below or in the jazz.net/forum (please send me a link to the forum post via my email below).
Addenda: Other browsers
Sometimes you don’t have the luxury of using Chrome. Hopefully you can use Firefox with the Firebug add-on (getfirebug.com). Both of these tool sets will allow you to debug similarly to what is shown above. If you must use Internet Explorer or Firefox without Firebug, at least as of the publication date, you will have to use console.log() style debugging on the client. Neither Firefox nor Internet Explorer recognize the attribute customization script as its own “file”, so you cannot locate or debug through it but it still runs and works.
David Karam (@dskaram), one of the RTC Work Items developers, shared this on the tap-dev mailing list regarding this issue:
The way scripts are loaded on the Web is that a call is made via ScriptProviderClient#fetchProviderScripts. The scripts are pulled in as text and then injected into an eval statement. Eval statements normally do not cause the evaluated script to be available anywhere in the debugger. To work around that, there is an informal “convention” whereby developers can add an “//@ sourceUrl= ‘file.js'” and then the evaluated script will be available in a file of its own. ( http://blog.getfirebug.com/2009/08/11/give-your-eval-a-name-with-sourceurl/ )
Firefox/Firebug samples
Firefox with Firebug looks a little different than Chrome, though the capabilities are similar. For locating the script, rather than the popup filter window Chrome uses, you click on the scripts drop-down (which usually drops up) in the top bar of the debug window, then you can enter the name of your script in the filter box at the top, until the lists gets short enough that you can choose your script.
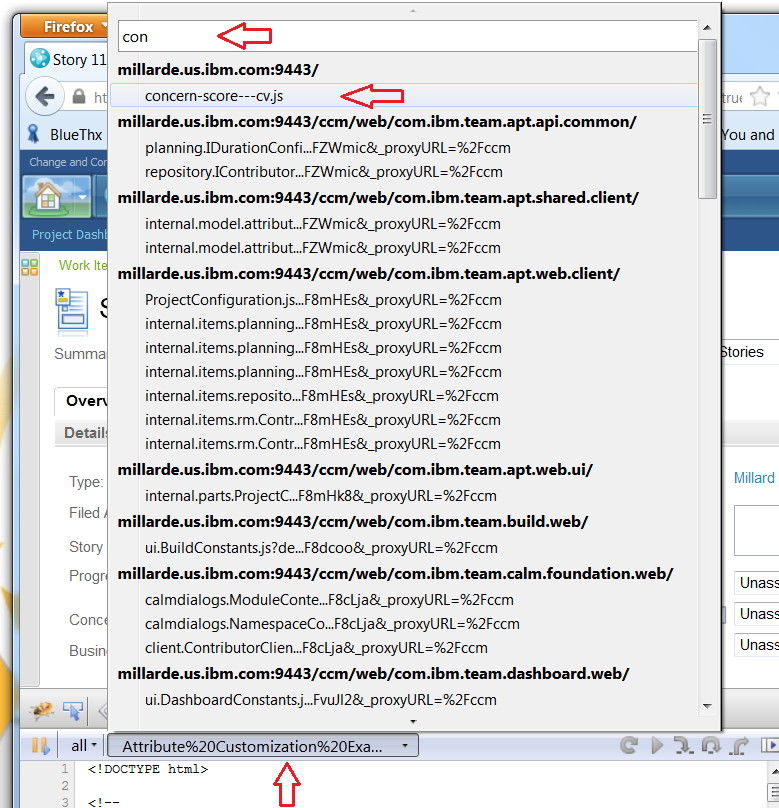
The debugger itself is organized a bit differently, but you can see the standard debugging buttons, a red dot as the breakpoint indicator and the yellow triangle pointing at the next line to execute. The Watch window show your variables and allows you to inspect them.

Careful with datetime
As we’ve shown, your scripts run more than once, even for the same change. Most of the time when working with a Calculated Value customization, this shouldn’t matter — it should always calculate the same value. What it does mean is that if you are doing anything with time values (say you want to capture the time at which some value changes), it will be different than what you see on the client as the script will run again on the server. You also need to be careful with formats on dates and times, so be sure to check the wiki article for details.
For more information
- For more customization ideas, see my developerWorks piece Get Ready to Sprint with Rational Team Concert
Acknowledgements
Many thanks to Kevin Garsjo (@kgarsjo) of the RTC Tracking and Planning team for his technical review
About the author
Millard Ellingsworth lives in the hills west of Portland, Oregon, where he works on developing the IBM Rational Collaborative Lifecycle Management community, improving how teams work together to build software that matters. During the small pockets of free time that leaves him, he divides his attention between playing golf, noodling on the guitar, woodworking, and tinkering with node.js development. You can follow him on Twitter as@millard3 and on Google+. He can be contacted at millarde@us.ibm.com.
© Copyright 2013 IBM Corp.