
Rational Team Concert Source Control FAQ
General Questions
- A picture is worth a thousand words. What does the Source Control model look like?
- What’s a resource?
- It sounds expensive to have streams and repository workspaces keep copies of all files?
- I’m used to CVS/SVN, so I understand checkout and update, but what do load, unload, accept, and deliver mean?
- How do I enforce unique component names?
Making Changes
- I modified a file. How do I deliver it to my team?
- How do I accept incoming changes from my team?
- Sometimes I have outgoing change sets that I didn’t write. What’s going on?
- How do I share a file that’s ignored by default?
- How do I deliver changes to an ignored resource?
- How do I move a resource to another component without losing history?
- Can I deliver changes to a different repository?
- Why does Accept sometimes just work, and sometimes asks me to create a patch?
Discarding Changes
- I want to stop working on a change set and do something else. How do I get the change set out of my workspace?
- I want to permanently get rid of an outgoing change set in my workspace. How do I get rid of an undelivered change set?
- How do I remove a change set from a stream?
Finding Changes
- I discarded a change set I was working on, but I really need it back again. How can I find it?
- We deleted a file a while ago. How do I restore it?
- I loaded/accepted changes and lost my unchecked in changes. How can I get them back?
- I don’t see changes for files that I modified outside of Eclipse.
- How do I know if my change set is in a release? in a build?
Going back in time
- How do I roll back a component in my workspace or stream to a known configuration?
- New in RTC 6.0.4: How do I roll back a repository workspace or stream to a previous state?
Permissions
- I don’t want other teams to see our stream
- I don’t want other teams to see our component
- What are the different visibility settings available for streams, workspaces and components?
- How does a project area affect the visibility of source control artifacts such as streams, workspaces or components?
Managing streams
- How do I automatically deliver changes to a stream after a green build?
- How do I manually track and deliver changes between streams?
- How do I remove a component from a stream?
Dealing with multiple servers
- How do I flow changes between two servers?
- What is the difference between a work item and a change request?
- How do I link a change set to a change request from a different RTC server?
Loading content
Troubleshooting
- My sandbox is out of sync with my repository workspace. How did that happen? What should I do?
- I want to share a project but I got an error about the encoding not matching the contents.
- I can’t autoresolve conflicts on non-XML and non-Java files. Help!
- I’ve deleted a snapshot but it still shows as an outgoing change. How do I delete a snapshot?
A picture is worth a thousand words. What does the Source Control model look like?
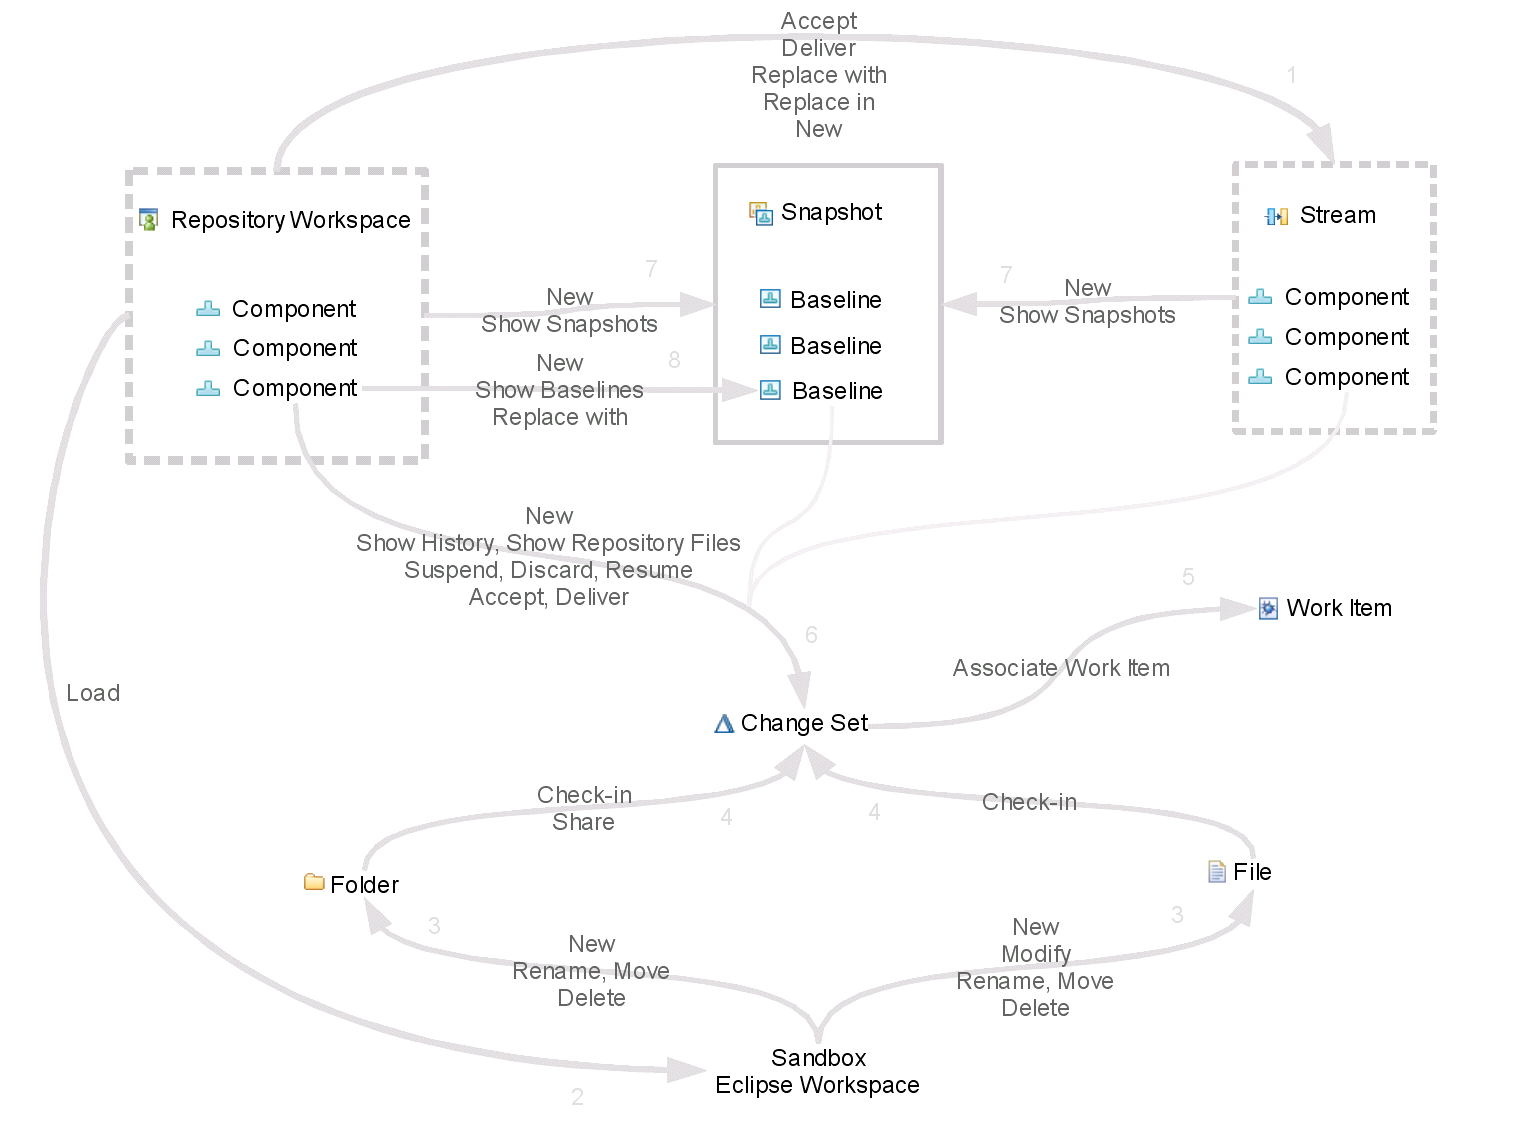
The above diagram is an overview of how Source Control artifacts relate to each other. We use dotted lines to represent the Repository Workspace and the Stream. The resources represented by these two objects typically vary in time. On the other hand, the Snapshot is in some ways like a frozen state of a Repository Workspace or Stream. As such, it is represented with a bold line.
- Components, baselines and change sets can flow between a Repository Workspace and a Stream through Accept, Deliver, Replace with, Replace in
- A Repository Workspace is typically loaded into a Sandbox. An Eclipse Workspace acts as the default Sandbox
- Resources in a sandbox can be created, edited or refactored through the client IDE or other native editors.
- Resources added, modified, renamed or deleted can then be stored in (or removed from) a Repository Workspace by doing a check-in into a Change Set that belongs to a particular Component in the Repository Workspace. Eclipse projects or other top folders that are not shared are not tracked by Source Control. After they are shared, subsequent changes made inside these folders can also be checked-in.
- A Change Set describes one or multiple resources that were added, modified, renamed, moved or deleted. It is commonly associated to a Work Item that describes why these changes were done.
- Both Repository Workspace, Stream, Snapshot represent a list of components in a particular state (configuration). In all three cases, it is possible to navigate through the files and folders they currently represent using Show Repository Files.
- A Snapshot represents a frozen state, so actions such as Suspend, Discard, Resume, Accept, Deliver, Show History don’t apply. But it is possible to create a Repository Workspace or a Stream from a Snapshot.
- A Repository Workspace represents resources from multiple components that are typically loaded into a developer’s machine. Suspend, Discard, Resume, Accept, Deliver can be used to set the Repository Workspace in the desired configuration by going back in time or by flowing Change Sets to and from other Streams.
- A Stream is similar to a Repository Workspace. Whereby a Repository Workspace is owned and used by a single developer, multiple developers will flow (accept, deliver) changes to the same stream to collaborate. A Stream cannot be loaded directly, you must create a new Repository Workspace from that Stream instead.
- When a Repository Workspace or a Stream represents a useful state (e.g. after a milestone, release or a green build), it is convenient to capture such state by creating a new Snapshot. It is then possible to create a new Repository Workspace or Stream from a Snapshot, for example to return to an old build. Show Snapshots makes it easy to see the Snapshots owned by a Repository Workspace or a Stream.
- The state of a particular Component in a Repository Workspace or Stream can be stored in a Baseline. It is then very easy to bring back a different Baseline into a Repository Workspace or Stream, with Replace with, Replace in actions. A Snapshot is frozen, as such it represents an immutable list of Baselines, themselves representing components in a particular state.
This is just an overview. See Getting started with Jazz Source Control to go further.
What’s a resource?
Resource is a generic term we often use to describe either a file or a folder.
It sounds expensive to have streams and repository workspaces keep copies of all files?
In some documents about Rational Team Concert Source Control it sounds like each repository workspace and stream has a complete copy of all the files and folders in the repository. This is an oversimplification. Under the covers histories are shared and when creating a repository workspace from a stream, only the pointer to the stream’s history needs to be referenced. Then as new change sets are created in the repository workspace they are appended to a new history owned by the workspace.
I’m used to CVS/SVN, so I understand checkout and update, but what do load, unload, accept, and deliver mean?
Both CVS and Subversion use the terms checkout, commit, and update. In CVS/SVN:
- checkout downloads the content of the branch to your local computer,
- commit uploads your changes to the branch and makes them available for others, and
- update downloads the latest changes from the branch to your local computer.
In Rational Team Concert, a load is equivalent to checkout: it downloads the content of a repository workspace into your sandbox. When you want to remove the sandbox from your computer, you unload it. Unload is the same as deleting the SCM directories in CVS or Subversion.
A check-in in Rational Team Concert causes any changes in your local workspace to be uploaded to your repository workspace. The changes are only added to your repository workspace, so the rest of your team won’t know about them. Neither CVS nor Subversion have a similar operation.
A deliver adds the change sets in your repository workspace to a stream. The change sets are then available to the rest of your team. If you’re used to CVS/SVN, then you can think of this as a commit.
An accept is very similar to a CVS/SVN update. It inserts the new change sets from the stream into your repository workspace and updates your sandbox. Note that if you accept changes into a repository workspace that isn’t loaded, then the changes will only be added to the repository workspace. The next time you load the repository workspace, the changes will be available.
Checkout the Jazz Platform Quick Reference for more terminology explanations.
How do I enforce unique component names?
The default server setting for component names is to allow components with the same name. A JazzAdmin can change the setting in the Advanced Properties on the administration page in the web UI. It is called Encourage component names to be unique in the SCM section.
Making Changes
I modified a file. How do I deliver it to my team?
If you have modified file JUnit/src/junit/framework/Assert.java and want to make the change available to the rest of the team, follow these steps:
Assert.javashould be an unresolved change in the Pending Changes view.- To open the Pending Changes view. (You can type Ctrl-3, “vpc”, and Enter to show it)
- Expand the Unresolved folder of the component. The folder containing the file changed will be listed. Expand it and there should be a change representing
Assert.java.
- Select the outgoing change. Right-click and select Check-in and Deliver….
- In the Wizard, enter the comment you want on the change set.
- If there is no work item associated with the change click Finish, otherwise click Next and either pick an existing work item or create a new work item.
- Select the outgoing change. Right-click and select Check-in > New Change set.
- Expand the Outgoing folder to see your new change set. Expand the change set to see your change.
- To add a comment to the change set; select the change set, right-click and select Edit Comment.
- To associate a work item with the change set; select the change set, right-click and select Associate Work Item…
- Finish your other changes. To check them in, select the changes, right-click and select Check-in > and pick your new change set.
- When your changes are complete, select the change set, right-click and select Deliver
The change will be added to the stream you have configured to flow your changes to. Other developers will be able to accept the change from there.
How do I accept incoming changes from my team?
If you are working with other people, you will eventually see incoming change sets. They are shown under the Incoming node of the Pending Changes view.
- Open the Pending Changes view.
- Examine the incoming change sets inside the Incoming folder. Each change set contains a list of modified files, and work items.
- Right-click on the incoming folder and select Accept. If you only want to accept one change set, right-click on that change and select Accept.
The change will be added to your repository workspace. If you have the workspace loaded locally, then the changes will be applied to your sandbox as well.
Sometimes I have outgoing change sets that I didn’t write. What’s going on?
If you have accepted a change set into your workspace, and the change set is then discarded from the stream, the change set will be shown as outgoing. The Incoming folder shows change sets that the stream has but your repository workspace does not have. The Outgoing folder shows change sets that your repository has but the stream does not.
What has happened is someone removed a change set from the stream by replacing the component in the stream with a baseline that doesn’t contain the change set.
To simply discard all the outgoing change sets; select the component, right-click and select Replace With > Latest from <your stream>. This will copy the streams configuration to your repository workspace and remove the unwanted change sets.
If you have some change sets that you want to keep, just discard only the unwanted change sets. Select the change sets that you didn’t write, right-click them and select Discard…. If you can not discard the change sets because it would introduce a gap, it means that you have started to build on top of the changes that have now been removed from the stream. You have a couple of options. You can effectively remove the change set from the stream by reversing it. The alternative option is to create a patch for your work, discard all the outgoing change sets by replacing with the latest from your stream, then apply the patch containing your work.
The Pending Changes view is verbose about these differences between the repository workspace and the stream. To avoid causing this problem for other users, when you want to remove a change set from a stream, use the reverse action.
How do I share a file that’s ignored by default?
Rational Team Concert ignores two types of files by default: resources ending in .class, and everything contained in the bin directory of the project root.
If you want to share a .class file, you have to remove the *.class pattern from the global ignore list. To do so:
- Edit or create the the file
.jazzignorein the root of your project. The file is a standard Java properties file. - Add the line
core.global.ignore=
to the .jazzignore file. If the linecore.global.ignorealready exists, remove the pattern*.classfrom it. - Save the
.jazzignorefile.
This will cause files ending in .class to be checked-in to the repository workspace by default.
If you want to share the contents of your bin directory, then you have to remove the pattern bin from your root .jazzignore file.
- Select the directory
binin the project root. - Right-click
and select Team > Remove from Ignore List.
This will share the contents of bin.
How do I deliver changes to an ignored resource?
If some resource, for example junit_tests.launch, is ignored, but you want it to appear in a change set, follow these steps:
- Unignore the file (in the Navigator view, select the resource, right-click and select Team > Remove from Ignore List).
- Open the Pending Changes view, and find
junit_tests.launchin the Unresolved folder. It should co-exist with a change to the.jazzignorefile. - Check-in the change to
junit_tests.launchwith any other changes you want it to co-exist with. - Deliver the change set(s).
- Select the
.jazzignorefile in the Unresolved folder. Right-click and select Undo. By undoing the.jazzignorefile change,junit_tests.launch will become ignored again.
.jazzignore file should accidentally get checked-in during the development of your changes, follow these steps:- Move the
.jazzignorechange to a change set all by itself. Select the change, right-click and select Move > New Change set. - Do not deliver this change set when you deliver your changes.
- Once your changes have been delivered; select the change set, right-click and select Discard….
How do I move a resource to another component without losing history?
Projects can be moved easily from one component to another.
- Check-in all local changes
- Close any open change sets containing changes to any resources within the project to be moved. New change sets will be created for the move so any existing change sets must be closed.
- Select the project, right-click and select Team > Move in Repository Workspace…. This will open a window that allows you to pick another component to move the project to. You can expand the component to pick another folder to move to within it.

Once the move is complete, you will have 2 change sets. One in the original component and one in the component moved to. The change set in the original component will have all deletes. The change set for the target component will have all adds. This is because in essence they are being deleted from one component and added to another component. Since the move was done through Team > Move in Repository Workspace…, the change sets are “linked” and there will be a continuity of an item’s history across components.

You can see for yourself prior to even delivering that the history has been preserved. Select one of the resources moved and show its history, you will see all the change sets for the entire lifetime of the resource. The resource’s history is not lost.

Suppose you want to move just a few files or sub-folders within a project to another component. If you move them using the regular file/folder move re-factoring, you will end up with delete and add changes (delete from the original component, add to the new component). But because the move was not done through Team > Move in Repository Workspace…, the change sets will not “linked” and you will not be able to easily see the history of the file prior to the move.
Since we don’t want to move a whole project, we need to be a little creative with the move. The idea is to create a new temporary project to hold the items to be moved to the other component. We then move the new project to the other component. Once the move is completed, we move the items to their desired home and delete the temporary project created.
- Create a new project and share it into the component that contains the items to be moved.
- Using Eclipse’s re-factoring, move the items that are to be moved to another component into the new project
- Check-in all local changes
- Close any open change sets containing changes to any resources within the project to be moved. New change sets will be created for the move so any existing change sets must be closed.
- Select the new project, right-click and select Team > Move in Repository Workspace…. This will open a window that allows you to pick another component to move the project to.
- Once the move in repository is completed, select the items in the new project. Use Eclipse re-factoring move them to the desired location in the other component. Check-in all the changes
- Select the new project that was created for the purposes of the move. Right-click and select Team > Delete from Repository Workspace….
Can I deliver changes to a different repository?
Yes. Since RTC 3.0, you can flow changes and baselines between different RTC servers. See Flow changes cross repositories with Rational Team Concert.
Why does Accept sometimes just work, and sometimes asks me to create a patch?
Accepting a change set will work when all previous change sets it depends on are present in your repository workspace. When one of those change sets is missing then there is a gap in history. RTC SCM prevents an accept from completing in this scenario. There are two options to get the change into your repository workspace:
- Accept the change sets that will fill the gap. This may be as simple as accepting all incoming changes if the change set you want is in your incoming changes.
- Accept the change set and select the option to accept as a patch. This will create changes that you can merge into your Eclipse workspace and check-in. A new change set would be created that will not depend on the change sets that would fill the gap.
For more information about plans for better gap handling, see 170658: [CCM] Remove Gap limitation on accept and discard.
Discarding Changes
I want to stop working on a change set and do something else. How do I get the change set out of my workspace?
Rational Team Concert allows you to temporarily remove a change set from your workspace by suspending it. At some point in the future, you can resume the change set and continue working on it. To suspend a change set;
- Open the Pending Changes view, and select the outgoing change set you want to suspend.
- Right-click on the change set and select Suspend
The change set will be removed from your Outgoing changes node, and put into the Suspended node associated with the component.
When you want to start working on the change again, you can resume it. You can resume it into the same workspace as you suspended it from or in a different one of your workspaces.
- Open the Pending Changes view, expand the Suspended folder under your component and select the suspended change set you want to resume.
- Right-click on the change set and select Resume
The change set will return to your Outgoing changes node.
Note: A suspended change set can conflict with changes in your workspace. When that happens, you will be asked to resolve the changes after you resume.
Note: If you have open change sets modifying the same resources as an open change set being resumed, you will be told about an overlap. Only 1 open change set can contain changes for a resource. The resume will allow you to close the change set being resumed. If you don’t want to do that, you can suspend the change set(s) that overlap and then re-attempt the resume.
I want to permanently get rid of an outgoing change set in my workspace. How do I get rid of an undelivered change set?
Outgoing change sets can be discarded, which will remove the modifications from the workspace. If the change set is associated with a work item, then the change set can be re-accepted from that work item; otherwise, you can search for the change set.
- Open the Pending Changes view, and select that change set in the Outgoing folder.
- Right-click on the change send select Discard.
How do I remove a change set from a stream?
To remove a change set from a stream you can create a new change set that reverses it. To reverse a change set, the changes made in the change set are first undone. Then the reversing changes are checked into a change set that can be delivered to the stream.
- Open the History view on the component that contains the unwanted change set.
- Find the change set you want to reverse in the History view.
- Right-click on the change set and select Reverse. This will create a set of patches that can be applied to your sandbox to reverse the changes made by the change set.
- In the Pending Changes view, expand the Pending patches folder to see all the reversal changes. You can examine them in detail by double clicking on them.
- When you are ready to apply the changes to your sandbox, select the “
Reverse:” patch (or individual changes), right-click and select Merge into Workspace. This will merge the changes into your sandbox. - If a file has changed significantly since change set being reversed, you may encounter conflicts in merging the changes. In that case you will need to merge the changes in manually in the compare editor. Double click on the file to open the compare editor. Manually merge in the changes in the compare editor. Once you have manually merged the changes, you can select the change within the Pending Patch folder, right-click and select Remove from view.
- Check-in the changes into your sandbox into a new change set. Ideally you will associate the new change set with the same work items as the change set being reversed and include the comment that the change set is a reversal.
- Deliver the change set containing the reversal to the stream.
You can also discard a change set from the stream by replacing the component’s configuration with a baseline that does not contain the change set. However, when a change set is discarded from a stream in this manner, it will appear as an outgoing change set for anyone who has already accepted it. It will also cause problems for anyone who has since built on top of that change set.
- Open the History view on the component that contains the unwanted change set.
- Find the change set you want to remove in the History view.
- Right-click on the change set and select Discard. You will not be able to discard a change set that incorporated merges. If there are other change sets that have built additional changes upon the resources changed in this change set, you will not be able to discard it due to gaps. In these situations, you will need to follow the steps above to create a reversal change set.
- In the Pending Changes view, the change set that was discarded will be shown as incoming from the stream again.
- Create a new baseline. Select the component that has the change set to be discarded, right-click and select New > Baseline. You will be told that there are incoming change sets that will not included in the baseline, this is ok. Ideally, you will provide information in the baseline label and/or description identifying that you are discarding a change set.
- Replace the stream’s component configuration with the new baseline. Select the component, right-click and select Replace in <your stream>. You will be asked to confirm you want to replace the contents in your stream. Just before the replace takes place, a baseline of the stream’s component will be created. That baseline will contain the change set being discarded. That baseline will be associated with the stream’s component allowing you to later compare to it, or even replace the component in your workspace with it.
Finding Changes
I discarded a change set I was working on, but I really need it back again. How can I find it?
If the change set you discarded was associated with a work item, you can get it back from the work item. Open the work item and on the links tab in the links section, you will see the change sets associated with the work item. Select your change set and from the context menu (right-click) select accept to accept it back into your workspace. You could also just open it in the Change Explorer by double clicking on it.If the change set is not associated with a work item, you will need to search to find it.
- In the Pending Changes view, click on the triangle in the top right hand corner of the menu bar.
- From the drop-down menu choose Search for Change sets….

- This will present a dialog that allows you to specify details about the change set you want to search for. You will want to fill in the component it was for, but not the workspace (because it doesn’t belong to any workspace, it is discarded). Also fill in Current User as the creator and if possible the time frame in which it was created. This will help narrow down the results.
- The change sets found that meet the criteria will be shown in the Search view.
- Select your discarded change set, right-click and select Accept from the context menu.
We deleted a file a while ago. How do I restore it?
First you need to find the change set that deleted the file. Reverse the change set and apply the addition of the file that was deleted. Because Rational Team Concert keeps track of resources based on identity, once the file is restored, you can show the history of it and see the full history of it including the changes made to it prior to the deletion. This is much better than trying to copy and paste the contents in a new file as that would not maintain the history.- To find the change set, in the Pending Changes view, click on the triangle in the top right hand corner of the menu bar.
- From the drop-down menu choose Search for Change sets….
- In the dialog presented, provide as much detail as possible regarding the component, workspace and time frame in which the change set was created. At the bottom of the dialog there is a section for searching for a change set with a particular type of change. Search for the deletion change and specify the name of the file you are interested in. For example if Markus was searching for the Logo.java file that had been deleted from the JUnit component of his workspace, he would fill in the following search criteria.

- The change sets found that meet the criteria will be shown in the Search view.
- Select the change set that deleted the file, right-click and select Reverse from the context menu. This will create a set of patches for all the changes in that change set.
- In the pending changes view, expand the Pending patches folder to see all the reversal changes. Find the file you want to restore. It will be an addition patch.
- Select the addition, right-click and select Merge into Workspace. This will restore the file into your sandbox.
- Select the remaining changes in the Pending patches folder, right-click and select Remove from view to ignore the other changes that were in the change set.
- Check-in the restored file into a change set and deliver when ready.
I loaded/accepted changes and lost my unchecked in changes. How can I get them back?
Accept, suspend, resume and other operations that manipulate the files and folders within a loaded workspace on disk ask you if you want to check in your pending changes. It is always a good idea to do that. Sometimes you may not, or you may re-load your workspace resulting in un-checked in changes being removed. You can get them back though either from Eclipse’s local history or from Source Control’s backup shed. For full details see See Finding Lost Content.
I don’t see changes for files that I modified outside of Eclipse.
I edited some files using another tool than Eclipse (for example: used other software to do word processing, prepare presentations or make spreadsheets). The changes I made do not show up in the unresolved folder in the Pending Changes view.
Sometimes we need to use software other than what is in Eclipse to make changes to files. However, if Eclipse doesn’t know about a resource being changed, then Rational Team Concert SCM doesn’t know about it either. If the changes are not detected, then the local changes will not be shown in the Pending Changes view. There are configuration options for Eclipse which will make working with external tools much easier and prevent the accidental loss of changes. See Using the RTC Eclipse client with other Tools for full details.
How do I know if my change set is in a release? in a build?
Releases are usually considered important points in time and it is recommended that snapshots or baselines are created to capture the configuration at that point in time. That way you can re-create the configuration later. Sometimes separate streams are used to track changes for other releases. Team builds will create a baseline for the configuration being built. See the Multi-stream development tutorial for more details.If you know what snapshot or stream represents a release or the build baseline, you can determine if your change set is within that configuration.
- Select your change set. The change set might be shown in the Work Item Editor links, the History view, the Pending Changes view, the Change Set Search results pane or the Change Explorer.
- Right-click and select Locate Change Sets… from the context menu.
- In the editor that opens, you can specify search targets for the streams, repository workspaces, or snapshots you want to search. You can also add additional change sets to search for.
- When the search is complete, you will be told if the change set was found. If it was found, you will have the opportunity to see it in the history view.
Going back in time
How do I roll back a component in my workspace or stream to a known configuration?
Select that component in the workspace or stream editor (or in the pending changes view) and Replace With…. You can pick a baseline that represents a former configuration of that component in this workspace, or a former configuration of that component in a different workspace or stream.
How do I roll back a repository workspace or stream to a previous state?
The Operation History view supports rolling back the contents of an entire workspace or stream to a previous point in time.
In the Rational Team Concert client for Eclipse IDE and the Rational Team Concert client for Microsoft Visual Studio IDE, right-click a stream or workspace and select Show > Operation History. The Operation History view shows the list of operations performed in the selected stream or workspace. To rollback the stream or workspace to the state that it was in when a specific operation was performed, right-click the operation and select Rollback.
Alternatively, you can select Replace in Workspace or Stream to select a different repository workspace or stream and have it rolled back to the state that it was in when the selected operation was performed.
Permissions
I don’t want other teams to see our stream
Open the stream in the stream editor. Set the owner to your team area (Owned by: attribute). Set the visibility to that team area (Visibility: attribute).
The stream is now only visible to members of your team area (and its child team areas if it has any).
I don’t want other teams to see our component
Select the component in the Team Artifacts view. Use Change Owner… to set the owner to your team area, and check Restrict to members of this team area and its child team areas.
The component is now only visible to members of your team area (and its child team areas if it has any).
What are the different visibility settings available for streams, workspaces and components?
Stream
- A stream can be visible to only members of a team area. The owner and visibility of the stream must be set to that team area.
- A stream can be visible according to the access control defined in a particular project area. The owner can either be that project area or a team area under that project area. The visiblity must be set to that project area.
Workspace
- A workspace can be visible to everyone in the repository. Its visibility is set to public.
- A workspace can be visible to only its owner. Its visibility is set to private.
- A workspace can be visible according to the access control defined in a particular project area. Its visibility is set to that project area.
Component
- A component can be visible to everyone in the repository. It is owned by a contributor and its visibility is set to public.
- A component can be visible to only its owner. It is owned by a contributor and its visibility is set to private.
- A component can be visible to only members of a team area. It is owned by that team area and its visibility must be set to that team area.
- A component can be visible according to the access control defined in a particular project area. The owner can either be that project area or a team area under that project area. The visibility must be set to that project area.
How does a project area affect the visibility of source control artifacts such as streams, workspaces or components?
A project area contains a tab named Access Control. It defines how read access is granted to resources whose visibility is defined by this project area. Streams, workspaces and components can have their visibility set to a particular project area. In that case, they will be governed by the rules defined under the Access Control tab of that project area.
Managing streams
How do I automatically deliver changes to a stream after a green build?
Open the build definition. Select Edit Configuration / Post build / Post build Deliver. This adds a Post-build Deliver tab to the build definition. Select a target stream as indicated in that new page and save the definition.
The next time the build successfully completes, the target stream will contain all its changes.
Note. Personal builds do not trigger the post build deliver.
How do I manually track and deliver changes between streams?
Select a stream and Show > Pending Changes. The Pending Changes view now tracks the changes between that stream and its current flow target. If the stream has no flow entries, you must first set one through its stream editor – select a stream the changes get usually accepted from or delivered to.
Note. You cannot change the flow target of a stream from the Pending Changes view. You must use the stream editor to add flow entries and set the default/current one.
Note: You can create baselines directly on a stream from within the Pending Changes view. You can deliver and accept changes or baselines that do not introduce conflicts. Use a repository workspace to accept changes that introduce conflicts and do the appropriate merges.
How do I remove a component from a stream?
Open the stream. Select the component and remove it. Save the stream. Any repository workspaces flowing to the stream will see the component as an incoming removal. Accepting the component removal will remove the component from the repository workspace.
Alternatively, the component can be removed from a repository workspace flowing to the stream. It will appear as an outgoing component removal. Delivering will remove the component from the stream.
Dealing with multiple servers
How do I flow changes between two servers?
See Flow changes cross repositories with Rational Team Concert
What is the difference between a work item and a change request?
A work item belongs to an RTC server. A change request can happen to be an RTC work item or it can be used to describe a ClearQuest change record or any similar artifact exposed by a product that supports OSLC-CM.
How do I link a change set to a change request from a different RTC server?
See Configure project areas for the administrative portion.
Then as a user, select the change set (in the Pending Changes view, History View or Change Explorer), bring up the popup menu and pick Related Artifacts > Associate Change Request. You can then pick up the service provider the change request belongs to, and then pick the change request itself.
Loading Content
How do I load the same content multiple times?
This requires you to load the content in a different sandbox. The steps are outlined in the Loading Content from a Jazz Source Control Repository in Rational Team Concert 4.0 article. There are multiple ways to load the same content multiple times into a different sandbox:
- Load outside of the Eclipse workspace
This does not create Eclipse projects for the folders that are loaded. Your content will not show up in Package Explorer. You can still manage changes from Pending Changes view. - Load the component root folder
This allows you to load the component root folder as an Eclipse project so that you can use the IDE to move/rename files while preserving history. - Load the folder
This allows you to select the folders in the component to load and give them a different name if you wish. Loading with a different name allows you to have the project in Eclipse. This is different than loading the component root because this allows you to choose which folders in the component will be loaded as Eclipse projects.
Troubleshooting
My sandbox is out of sync with my repository workspace. How did that happen? What do I do?
Rational Team Concert can detect when changes have been made to a component in your repository workspace but have not been reflected in your local workspace. Once it has been detected that things are out of sync, you will be given suggestions on how to reload your workspace to get back in sync.How did it happen?
Typically things get out of sync when you perform an action that involves updating the configuration of a component in your repository workspace but before the sandbox is fully updated, the action is cancelled or fails unexpectedly. Most actions involving changes or conflicts affect the component configuration (for example, accept, discard, suspend, resume, resolving conflicts, undoing checked in changes, etc.). It can also happen if you are loading the workspace but prior to all the content being loaded it is cancelled or fails. A less common case is when you have the same repository workspace loaded in multiple sandboxes and you perform actions that modify the configuration of the repostiory workspace via one of the sandboxes (the other sandboxes will become out of sync).What should you do?
- If you don’t have any unresolved changes awaiting check-in, it is simple.
- If you have unchecked in changes…
I want to share a project but I got an error about the encoding not matching the contents.
Basically, there is a text file that Rational Team Concert attempted to read when checking in the project contents that it could not because the content does not adhere to the encoding rules. The error message should provide you with the name of file that caused the problem.
Within Eclipse, you have a default encoding for text files. To see what it is, from the toolbar select Windows > Preferences… > General > Workspace. If this is not the encoding for most of your text files, you should change it here. When working within a team you should decide upon a common encoding that you and your team will use. That encoding should also be available on the server (for annotate to work well). You will need to communicate with the rest of your team what the encoding is.
Eclipse also allows you to override an individual file that has an encoding that is different from all the rest. To do this, select the file in the package explorer (or navigator) view. Right-click and select Properties… > Resource to open the properties browser. You can now change the Text file encoding. We have found that the ISO-8859-1 encoding to be the most tolerant of special characters. You should check-in the .settings file with the file whose encoding was changed.
Once the encoding is set, you should re-attempt to check-in the project.
I can’t autoresolve conflicts on non-XML and non-Java files. Help!
It is only possible to auto-resolve conflicts on file types that Rational Team Concert considers to be text. If you attempt to auto-resolve a conflict on a non-text file you will see a dialog with the text:
None of these conflicts could be auto-resolved. You will have to merge them manually. The tooltip on each type of conflict provides explanations about the conflict and how to resolve them.or:
Some of these conflicts could not be auto-resolved. You will have to merge them manually. The tooltip on each type of conflict provides explanations about the conflict and how to resolve them.
To avoid these problems, you can tell Rational Team Concert to treat the conflicted file types as text:
- Open Window > Preferences > General > Content Types.
- In the Content Types pane, select Text.
- Click the Add… button beside the File Associations pane.
- Enter the extension of the file type (such as
*.htmlfor HTML files), and click OK. - Click OK in the preferences dialog.
Rational Team Concert will now consider files ending with the given extension to be text. You can now auto-merge that file type.
I’ve deleted a snapshot but it still shows as an outgoing change. How do I delete a snapshot?
A snapshot is a collection of baselines. If there is no baseline describing the component’s configuration, one will be created with the same name as the snapshot. If you created a snapshot of your repository workspace, there may be outgoing baselines for the components that did not have a baseline to describe its configuration. These baselines are not deleted when deleting a snapshot and do not represent the snapshot. The same goes for incoming baselines created by a snapshot. Deleting the snapshot will not make the incoming baselines disappear. The easiest option is to accept or deliver the baselines or replace them if the configuration of the baseline is not what you want.
Copyright © 2012, 2017 IBM Corporation