Loading Content from a Jazz Source Control Repository in Rational Team Concert 4.0
The clients provide flexibility in choosing the part of a repository workspace to be loaded and where on disk it should be loaded. In addition, the RTC client used also influences how items are to be loaded so that they are recognizable by that tooling provided by the client. For example Eclipse works with projects, Visual Studio works with solutions, Command line works with the file system.
This article presents several ways to load content from a Jazz Source Control repository using the Eclipse-based Rational Team Concert (RTC) client and the Source Control command line client (SCM CLI). Loading content using the client for the Visual Studio IDE is not covered in this article but will be covered in a future article.
We start by first defining some terms and how to load with the basic scenarios. Then expand to describe the less common but still desirable cases.
Table of Contents
- Load Terminology
- Basic Load Scenarios
- Advanced Load Scenarios
- Creating load rules
- Loading Nested Shares
- Loading Eclipse Projects preserving the repository folder structure
- Loading outside of Eclipse
- Loading outside of Eclipse and later bringing projects into Eclipse
- Loading previously deleted content
- Loading the Component Root Folder
- Loading a Folder More Than Once
- Loading a Single File
- Loading into a specific folder structure
- Loading part of an Eclipse project
- Loading one or more files with dependencies (IBM Developer for IBM Enterprise Platforms only)
- Loading using the Source Control Command Line Client
- Loading using the ISPF Client
- Editing Content Outside of the RTC Eclipse Client
- Summary
Load Terminology
There are a few terms that are used within this document and within the clients. The terms are also overloaded, so hopefully this will help to clarify things.Workspace
Workspace is an overloaded term when working with the Eclipse client. There is the “Repository Workspace” which is your copy of a Stream. This is the place where your checked in changes go. It is your own private area to back up your changes until you are ready to make them available to others. It is persisted on the server and a copy of it usually loaded into a Sandbox. There is also the “Eclipse Workspace” which describes the area on disk that Eclipse uses to hold projects (code you may be working on). To summarize, the Eclipse Workspace is a place on disk for files/folders; the Repository Workspace is a place on the RTC server preserving versions of files/folders/symbolic links. When we use the term “workspace” we try to qualify it so it is clear which one we are speaking about, but we sometimes forget.Sandbox
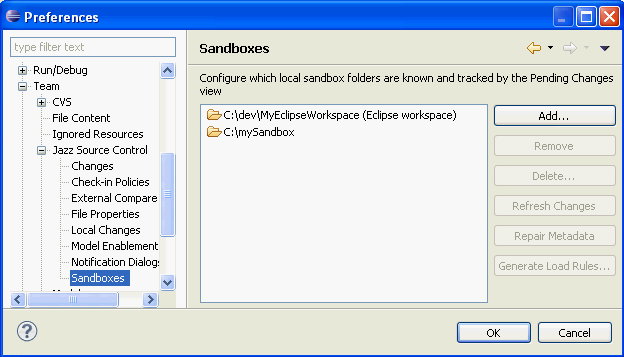
A sandbox is the root directory under which contents of a repository workspace will be loaded onto disk. A sandbox contains a set of “shares”. It may also have other contents outside of a share which are not under source control. If you are using the Eclipse Client, the sandbox will default to be the same directory as the Eclipse Workspace. Note this is just the default, you can pick another directory to be your Sandbox. Also with the Eclipse and CLI clients, you can work with more than 1 sandbox at a time if you want.You can see the sandboxes that are currently in use by your RTC client on the Team > Jazz Source Control > Sandboxes preference page. From that page, you can perform various management tasks such as adding new sandboxes, removing a sandbox from the list of known sandboxes or deleting the sandbox entirely. In the example below, there are 2 sandboxes being used by the client. One of them happens to be the Eclipse Workspace.
Share
A share is the top level item (file, folder, symbolic link) in a Repository workspace that has been loaded into a Sandbox. If a share is a folder, its contained children will be under Jazz Source Control. If you are using the Eclipse client, often the folder containing the “.project” file describing an Eclipse project is a share. But as we get into more advanced scenarios, you will see that the share is independent of the Eclipse Project.The term share can also be used as a verb (meaning it is a little overloaded). When you initially put a collection of files and folders under Jazz Source control, you use the Share action (which brings up the Share Wizard). The share action is done on the item you want to be a share in your sandbox. We will also use the expression to “share your changes with others” when talking about delivering changes to a stream.
Project
In the RTC client, there is the Project Area that describes the permissions and process to be applied to artifacts. In RTC’s Eclipse client, there are Eclipse Projects that represent logical groupings of source code. Then often in a organization there is the use of the term Project to describe a group of people working together on a task or product. Usually when talking about Projects in the loading context, we are talking about Eclipse projects.Basic Load Scenarios
This section describes the basic load scenarios. These are the ways most teams load their repository workspace. The basic scenarios are:- Loading Eclipse projects into an Eclipse workspace
- Loading folders that are not Eclipse projects into an Eclipse workspace
- Reloading folders when they have become out-of-sync with the repository workspace
- Using a load rule that describes what to load from a repository workspace and where it goes within the sandbox
Loading Eclipse Projects
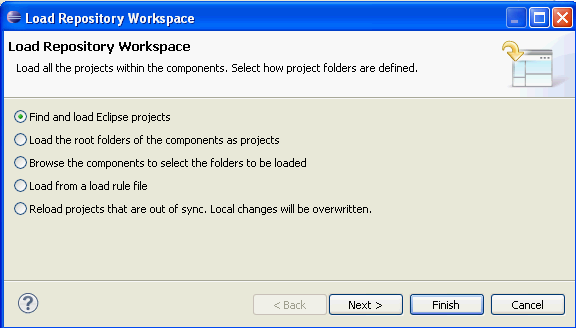
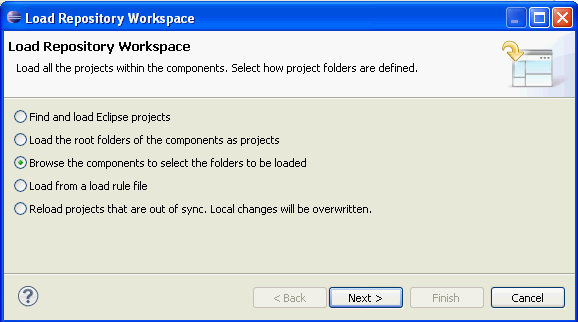
The most straight forward load scenario is the loading of Eclipse projects into an Eclipse workspace. An Eclipse project is a folder that contains a .project file that configures the folder to be a project in an Eclipse workspace. Choosing the Load action from the context menu of a workspace or component entry in the Team Artifacts view will open the Load wizard. The first page, shown below, allows you to specify what type of load to perform. The default option is Find and Load Eclipse Projects which is the option we want for this scenario.
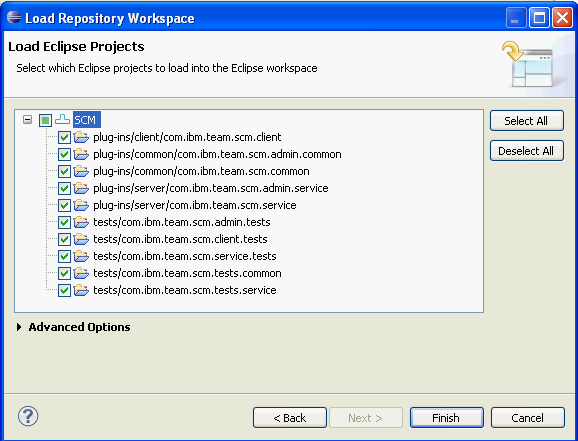
You can click Finish on the first page to load all the projects in the selected workspace or component. If you want to see what will be loaded and where it will be loaded click Next instead. The subsequent page, shown below, shows you a flat list of folders, grouped by component, that contain a .project file.
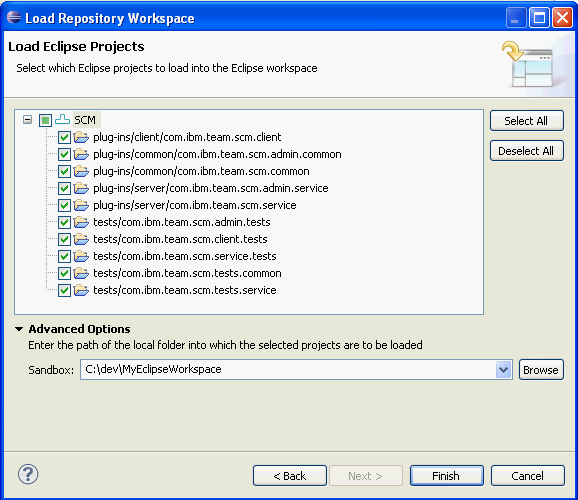
You can expand the Advanced Options setting to see where the contents being loaded will go. As a default, the last sandbox loaded into will be chosen as the default. If this is the first load, the Eclipse Workspace will be chosen as the default. You can choose another location as well. The following screen shot shows these options. When Finish is clicked, the selected projects will then be created and loaded as subfolders in the specified sandbox directory.
Loading Folders as Eclipse Projects
In some cases, you will want to load folders that are not Eclipse project folders and hence do not contain a .project file. This can happen for several reasons including:
- The folder you want to load is a subfolder of an Eclipse project folder but you only need the content within the subfolder loaded.
- You have imported data from another SCM system and you want to start working with the content inside RTC’s Eclipse client.
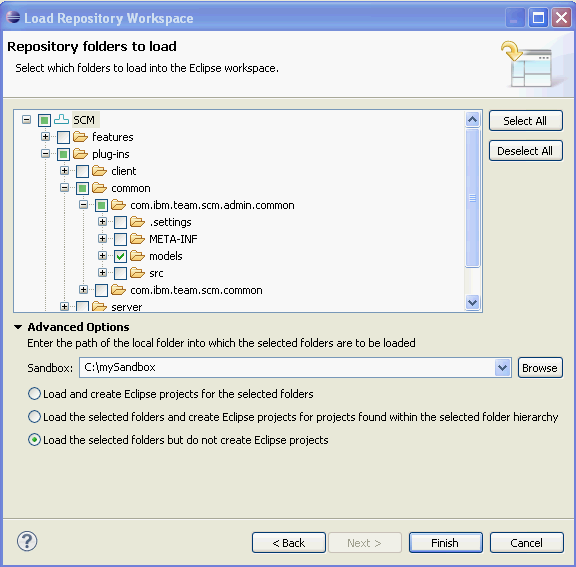
When loading a folder into an Eclipse workspace, you would choose the Browse the components to select the folders to be loaded option on the first page of the Load wizard as shown above. On the second page, shown below, you can then select one or more folders to be loaded into the Eclipse workspace. Once you have chosen the folders expand the Advanced Options section and choose the option to Load and create Eclipse projects for the selected folders.
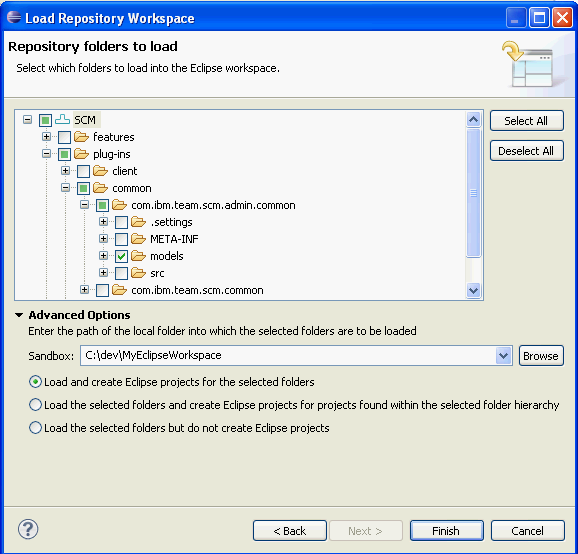
In this screen shot, the models folder is selected and will be loaded into the Eclipse Workspace as a project named models. Because the folder is not an Eclipse project already, the load operation will end up creating a new .project file within the folder which will show up as an Unresolved addition in the Pending Changes view. You can choose to check-in this change or ignore it, depending on whether you want the folder to be treated as an Eclipse project in future loads.
Reloading Out-of-sync Shares
The sandbox can become out of sync with the repository workspace due to a couple of reasons:
- The repository workspace is loaded multiple times and changes have been checked in or accepted from another client session.
- An error was encountered during an operation (e.g. Accept) that modifies both the sandbox and repository workspace.
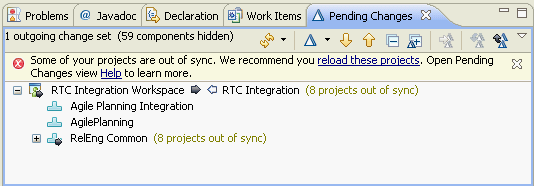
When the sandbox becomes out of sync with the repository workspace the Pending Changes view will indicate there are shares out of sync, as shown below.
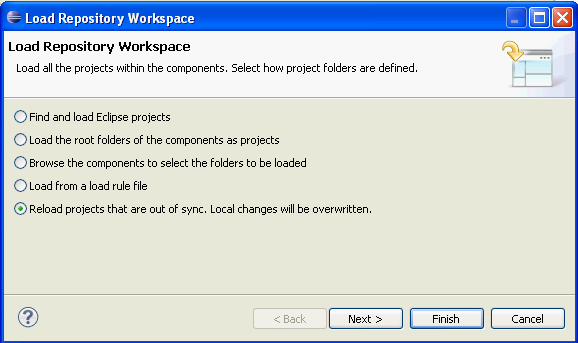
Clicking on the Reload out of sync link in the Pending Changes view will open the Load wizard with the Reload option chosen by default. When you reload, any pending local changes will be overwritten with the contents in the repository workspace. You may want to capture your pending local changes as a series of patches prior reloading.
The reload option will be selected by default and clicking Next will then allow you to select which folders to reload. As you can see in the following screen shot, all the shares from the RelEng Common component are out of sync and need to be reloaded. Clicking Finish will reload these folders and bring them back in sync.

This reload just brings the shares that are on disk back into sync with the contents of the repository workspace. Normally this is all that is necessary. However, if when you went out of sync, there was the addition of new items that would normally result in a new shares being loaded into the sandbox, you may not have those items. What you can do is load the way you normally load, choosing everything you would normally load. You will be presented with the Confirm Overwrite page (because a number of these items are already in the sandbox). Click Deselect All to un-check everything. Then click Select All New to get the new items. Also click Select Out of Sync to get any of the items that are out of sync updated.
Loading with Load Rules
Sometimes another member of your team has decided what items should be loaded and where they should go in a sandbox. To make it easier (and less error-prone) for you to achieve the same setup, they may supply 1 or more load rules to load up your sandbox. The Loading with Load Rules article contains full details on the format and usage of load rules. In order to load from a Load Rule, you need to know where your Load Rule is. It could be in the workspace you are loading, or it could be in a file on disk. If for some reason the load rule file is not in the workspace you are loading, we would recommend you load the file first onto disk and then proceed from there.
Start the Load Wizard by selecting the repository workspace or a component within a repository workspace that you want to load. On the first page of the load wizard select the Load from a load rule file option.

After clicking Next, you will be presented with the page shown below. It allows you to specify where the load rule you want to use is. If the load rule is on disk, choose the Local Load Rule File option and enter the path to the file. If the load rule is within the repository workspace, choose the Remote Load Rule File option and click the Browse button to find it within the repository workspace being loaded. In the advanced options you can specify the sandbox to load into. Options on whether to create projects are not presented because the load rule itself contains that information.

Preserving File Timestamps
When loading files using RTC 6.0.3, the user can now specify that they would like the timestamp from the file in the repository to be used as the timestamp on disk. In the Eclipse client, this option is available in the Load wizard in the Advanced section of the project or folder selection page, as shown in the following screenshot.

for the CLI, the user can specify the –preserveTimestamps or -t option when using the scm load command
Advanced Load Scenarios
In this section, we will describe several load scenarios that are supported, but not always required/used by everyone.
Creating Load Rules
Once you have your sandbox loaded in the way that it makes the most sense for your team to work, you might want to share that information with your team. One way would be to write a document telling everyone step by step what to do. That can be error prone though especially if the setup involves advanced scenarios or more than one use of the load wizard. Another way of sharing the setup information would be to create a load rule and share that with your team. You can even check in and deliver the rule to your stream so that everyone can always use the latest version.
The scenarios described by this article can be expressed within a load rule.
The first step is to load your workspace into your sandbox based on how it should be setup. Then to generate a load rule, go to the Sandbox preference page. Select the sandbox you want to generate the load rule for and then click Generate Load Rules…

In the Generate Load Rule File dialog, you can specify the name of the file(s) where the load rule(s) should be stored and where to save them. Typically only 1 load rule will be generated, but if you have more than 1 repository workspace loaded into your sandbox, you will have more than 1 load rule. If you put it within your sandbox under a share, you can easily check it in later.

The Eclipse project creation policy settings correspond to the load wizard advanced options. You can describe whether projects are to be created for the folders loaded that contain the “.project” files, whether to create projects for the folders loaded, or to treat the load as a load of items outside of Eclipse. If you want to have different project creation policies within a sandbox, you will want to split up your rule into more than one load rule file. Consider generating it multiple times and then editting it down. For full details on load rule file contents, its strongly suggested that you read the Loading with Load Rules article.
[New for RTC 6.0] Loading Nested Shares
There are times when you want your loaded content to have a file layout that differs from the layout in the repository. Consider the case that you have 3 projects in the repository:

Normally (as described above) when you load these projects into your Eclipse workspace, each remote folder is loaded as a top-level folder in the sandbox. But, for example, you may be using an external build tool that requires the layout on the filesystem to be nested rather than flat. The RTC client now allows you to load nested shares – which gives you the flexible layout that you desire.
In our case above, let’s say the com.ibm.team.client.ui is our top-level project. We’ll load that with the regular Load… operation as described above and it will appear at the top-level in our Eclipse workspace. But for the com.ibm.team.client folder we will use the Load As… wizard and specify the location to be contained within the first project.

And then we will load the com.ibm.team.common folder as a child contained inside the com.ibm.team.client folder.

The end result will be your folders are nested in your workspace (and on the file-system), and your external build tool can work its magic.

You may notice that the top-level com.ibm.team.client.ui folder is a true Eclipse project (contains a source folder and has a proper build path pointing to the JRE) but the nested com.ibm.team.client and com.ibm.team.common folders are only regular folders and not Eclipse projects. This is due to a limitation in Eclipse which states that projects can only be at the top-level and cannot be nested. Therefore if your subfolders are, for instance, Eclipse Java projects in the repository they will only be regular folders in your Eclipse workspace. This may or may not be an issue for you depending on which tools you are using to develop, build, etc your code.
Also note that Nested Shares can also be used in conjunction with Load Rules as described above.
Loading Eclipse Projects preserving the repository folder structure
We covered how to load Eclipse projects where just the projects get loaded. But what if the Eclipse project is actually within a deeper folder structure in the component and you want to have that structure on disk as well as the projects in Eclipse. For example if your component has the following contents and you want the “plugin-ins” and “client” folders within your sandbox along with everything they contain and you want the com.ibm.team.scm projects within Eclipse.

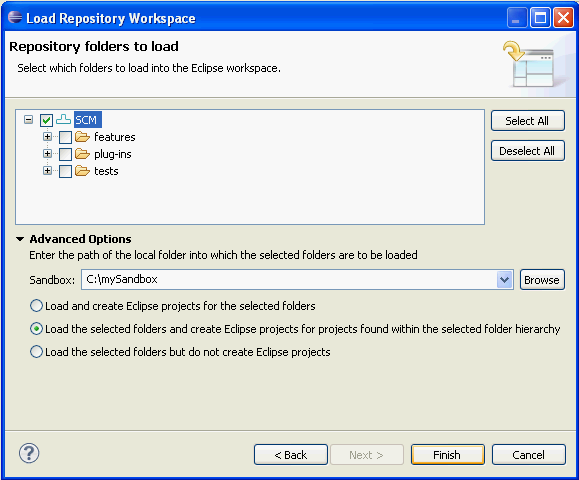
On the first page of the wizard, choose the Browse the components to select the folders to be loaded option. Click Next to be presented with the choice of folders to load.
On the second page shown below, the folders chosen are the ones to be in the sandbox. In the Advanced options section, select the Load the selected folders and create Eclipse projects for projects found within the selected folder hierarchy option. Clicking Finish will result in the load of the plugins folder and the import any projects found during the load into Eclipse. Notice in this example, the sandbox is in this case not the Eclipse Workspace. This is just to point out that Eclipse supports projects that are not within the Eclipse Workspace and that the choice of sandbox to load into is yours.

Loading outside of Eclipse
By loading “Outside of Eclipse”, what we mean is loading items into the sandbox but not having Eclipse Projects created for any projects found. On the first page of the wizard, choose the Browse the components to select the folders to be loaded option. Click Next to be presented with the choice of folders to load.
The folder selection page shown below has an advanced options section that allows you to specify whether to create Eclipse projects or not. The following wizard page has the Load the selected folders but do not create Eclipse projects option selected so the “models” folder will be loaded as a subfolder of C:mySandbox but no Eclipse projects will be created.
When content is loaded outside of Eclipse, it does not appear in many of the views in the RTC Eclipse client (e.g. Project Explorer). However, these files are on the local disk and can be modified using other tools. The RTC Eclipse client is configured primarily for users that use Eclipse as their development environment. There are a number of settings related to refreshing, detecting changes and backing up contents. It is very strongly recommended that if you are loading items outside of Eclipse projects you also read:
- Using the RTC Eclipse client with other Tools article to learn about refreshing the pending changes view, how to detect changes automatically, and other useful tips.
- Finding Lost Content with Rational Team Concert.article to configure the backup shed so un-checked in changes are not lost accidentally.
Loading outside of Eclipse and later bringing projects into Eclipse
Why would you load outside of Eclipse and then later decide to bring the projects into Eclipse? There are a few use cases that we know about where people have done this.
- You have a large number (say 100) Eclipse projects in your component, but when you do development, you only need to have a few of them in Eclipse to work on (for performance/simplicity reasons).
- You chose to do the load with scripts using the Command Line Interface (CLI) but want to edit some projects within Eclipse..
- You have a sandbox that is already loaded and you want to now use it with your current Eclipse session. Note the general rule is that a sandbox can only be used by a single client (especially Eclipse) at a time.
- You want to load only a portion of an Eclipse project
The first step is to import the desired projects into Eclipse. Eclipse provides an Import > Existing Projects into Workspace action to do this. Once the projects are imported, you will want to let the RTC Eclipse client know about them so that you have full SCM functionality. If you don’t do this, changes made using Eclipse editors will not be immediately detected as local changes. Moves will also not be tracked. To have the RTC Eclipse client aware of them, you need to share them. Select the Eclipse Projects imported and perform the Share Action. You will want to share them under the Jazz Source Control.
The Share wizard will detect that the Eclipse projects are already under Jazz SCM control and will show a page indicating that the project is already shared within the sandbox but not configured. If there are other projects that you did not select, but are shared and not configured for Eclipse, you can click Next and include them as well.
In the example below, the contents of the SCM component were loaded outside of Eclipse and 3 of the Eclipse projects were imported into Eclipse. The com.ibm.scm.admin.common project was selected and the Share action performed on it. Jazz Source Control was chosen as the repository type. The Share wizard indicates the project is already within the repository and provides some details about the share. It also indicates that there are some additional projects in Eclipse that are in the same situation. They are shared but not configured in Eclipse for Jazz Source Control. Clicking Next will allow you to select com.ibm.team.scm.admin.service and com.ibm.team.admin.tests projects to be configured as well.

Loading previously deleted content
When deleting project from an Eclipse Workspace, the content is not deleted from disk by default.
If projects have been removed from an Eclipse workspace in this manner, then these projects can still be managed as if they were loaded outside of Eclipse.
When not working with the projects outside of Eclipse, then it is easy to forget that they still exist on disk. If the the projects are then reloaded from Jazz Source Control, there will be a prompt to overwrite the files on disk.

Reloading these projects does not automatically add them back to the Eclipse Workspace. They can be added to the Eclipse Workspace by using the Import > Existing Projects into Workspace action.
Loading the Component Root Folder
A Jazz/RTC component has a root folder that can contain files and folders. Very similar in concept to the “/” or “c:/” directories on some file systems. The folder has no name and is known the root folder. Typically, the component contains a set of folders under the root folder and it is these folders that are loaded as shares in the sandbox. However, it is possible to load the component root as a share root as well. There are a couple of reasons you may want to do this, which include:
- You may have imported data from another SCM system which resulted in files located at the root of the component
- You may want to have root level folder additions picked up automatically without the need to explicitly share the folders.
It is worthwhile to expand on the second point. Consider a component C that contains two top-level folders F1 and F2. If you load F1 and F2 as share roots and then create a new folder F3, you will need to perform a Team > Share Project action on the new folder for it to be shared. However, if you loaded the component root folder as C and then created a child folder F3 of C, you could simply check in the change and F3 would become another top level folder in component C.
There are two ways to load a component root folder. The first is to select the Load folder option in the Load wizard and check the component itself instead of another folder. For convenience, the component checkbox in the Load wizard is a tri-state checkbox that has the states unselected, select all children, and select the component itself. If you select the component itself, the component will be loaded as a folder with the same name as the component.
The other way to load a component is to choose Load As on the component entry in a Repository workspace in the Team Artifacts view. When this option is chosen, you can provide a custom name to the folder that will contain the component.
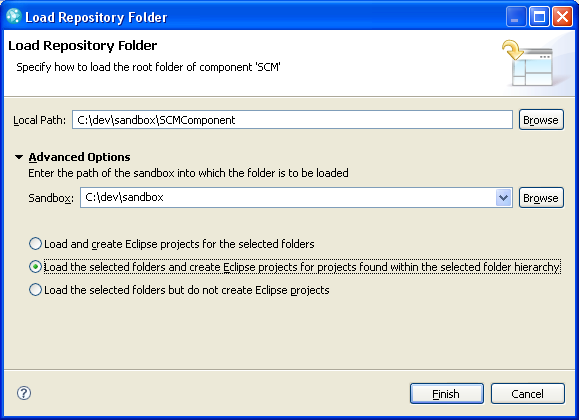
In both of these load cases, you can choose policy for creating Eclipse projects or not.
Loading a Folder More Than Once
In some cases, it is desirable to have different versions of the same content loaded at the same time. This is possible under certain conditions. There are basically two ways to load the same folder more than once:
- Load the folder into different locations on disk.
- Load the folder using a different name.
RTC now has support for both of these methods of loading but there are some restrictions:
- RTC does not support loading content from the same workspace and component into the same sandbox multiple times. However, you can load the same content from two different workspaces into the same sandbox.
- You cannot load different versions of the same folder into an Eclipse workspace as projects unless a different name is used for each project. This is an Eclipse restriction.
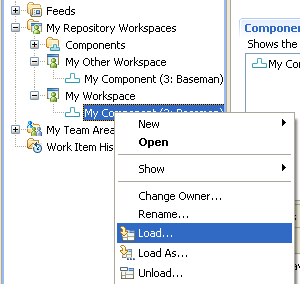
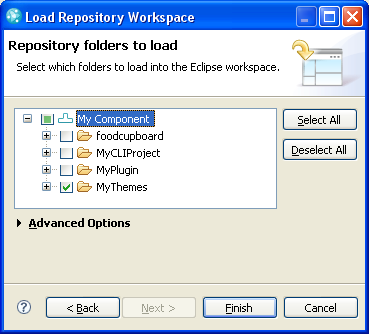
In this scenario, we will load two versions of the same folder into our Eclipse workspace. You may want to do this so you can browse or test both versions at the same time. We will first load the folder MyThemes from component My Component in workspace My Workspace. The first step is to select Load on the component in the Team Artifacts view.
In the Load wizard, we then indicate that we want to load folders and, on the next page, we select our folder.
Once we have the folder loaded once, we want to load it again using a different name. To do so, we must first show the folders of the component, located in another workspace, in the Repository Files view.
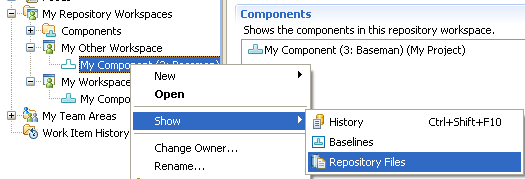
From there, we can choose Load As on the folder.

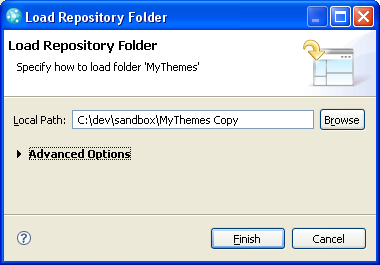
We then enter an alternate name for the folder and load it.
We can now see that the folder is loaded twice.
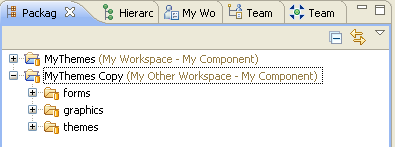
Now that we have two versions of the folder loaded, we can work with either version.
Loading a Single File
In some cases, you may want to make a change to a single file in the repository without loading any other content. This is possible by using Load As in the Repository Files view. To populate the Repository Files view, you can perform a Show > Repository Files action on a Workspace or Component in the Team Artifacts view. You can thin drill down to the desired file and choose Load As from the content menu. This result in the following dialog.
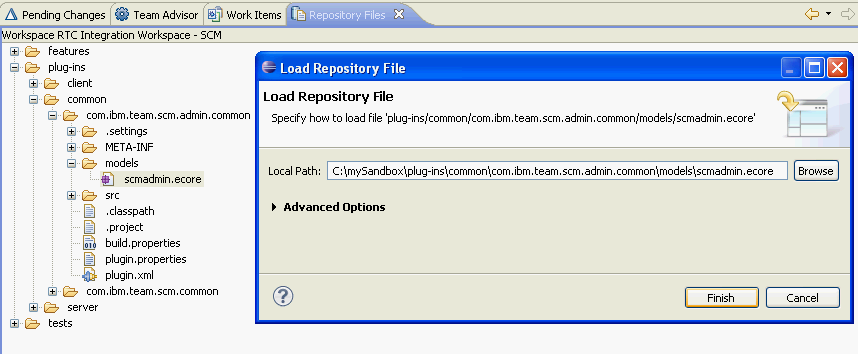
In this dialog, you can use the same file name as the name in the repository or specify a different name. You can also place the file in a folder or folder hierarchy within the chosen sandbox. This gives you some flexibility in arranging the content on disk.
By default the local path is the repository path to the item within the sandbox. The folders along the path to the item are not shared. The path to the item can not be a shared folder (if it is, it will be considered an overlap error situation). The individual file that is being loaded will be considered the share. This means any new files created under the folders in the hierarchy containing the file will not be considered local changes. If you add any new files, you will need to share them using the CLI (or consider loading the folder instead of the file).
Once the file is loaded, you can modify the file and check changes in. However, keep in mind that, unless the file is within an Eclipse project, you will need to manually refresh the pending changes, as described in section Loading Folders Outside of the Eclipse Workspace.
It is worthwhile to note that when using Load As to load a file or a folder, the file or folder does not need to be placed at the repository path of the item within the sandbox. The image below shows the build.xml file normally in the scripts folder being loaded into the buildScripts folder within the sandbox.
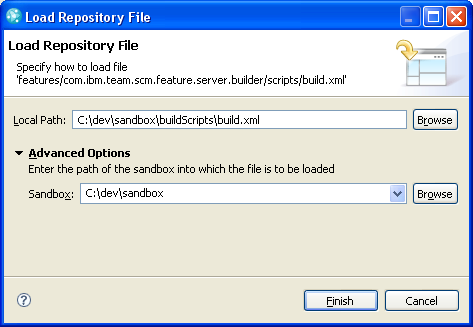
The ability to load content into unshared subfolders or subtrees within a sandbox is provided in order to give a bit more flexibility when loading content.
Loading into a specific folder structure
Suppose you have a repository workspace containing components C1, C2, C3 and C4. These components have folders below them that are to be loaded into a specific directory structure. You may of organized your source into these components as a way of managing access to them or reusing them. Now you need to have them loaded in a way not reflected by the basic load scenarios in order to build it.
Robotics
├── bionic (from component C1)
│
├── schematics (from component C2)
│
├── packages
│ ├── apps
│ │ ├── Bluetooth (from component C3)
│ │ ├── Browser (from component C4)
│ │ ├── Calculator (from component C4)
│ │ ├── EmergencyInterrupt (from component C3)
To do this, you will need to use the Load As option on each of the individual folders. From the Team Artifacts view, you would select the repository workspace you want to load and choose the show the Repository Files view of the workspace.
Next you will select each individual folder of interest to be loaded and specify exactly where in the sandbox it should go. Remember that the path leading to the folder being loaded is not shared.
The bionic folder in component C1 is loaded in the sandbox below the Robotics folder

The schematics folder in component C2 is loaded in the sandbox below the Robotics folder

The Bluetooth folder in component C3 is loaded in the sandbox below the Robotics/packages/apps folder

The EmergencyInterrupt folder in component C3 is loaded in the sandbox below the Robotics/packages/apps folder

The Browser folder in component C4 is loaded in the sandbox below the Robotics/packages/apps folder

The Calculator folder in component C4 is loaded in the sandbox below the Robotics/packages/apps folder

You can see the pattern of the loads being performed here. After loading each individual folder, you can see that this can be perhaps a little tedious, especially if you have many components and many folders. Once you are part way, what you might want to do is generate a load rule and then edit it to include the rest of the components and folders. Read the article on load rules first though. Then load with the hand-crafted load rule. Once it all looks good, make the load rule available to your team.
Loading part of an Eclipse project
Suppose that you have an Eclipse project containing thousands of files and folders, but you only want to load a small subset of the project. You want the project definition as defined in the repository workspace plus a few files and folders within the project itself
To do this, you need to have an understanding of the Eclipse project type that you are working with and the project metadata files it might require beyond the .project file.
What you would do is load the files you need including the .project file and any project metadata files. Once loaded you would import the project and configure for use in Eclipse.
As an example suppose you wanted to load com.ibm.team.website Eclipse project from your repository workspace in order to work on New and Noteworthy web pages. However there are a lot of content in this project that are unnecessary for your task and you don’t want to load them. Below is the repository files view of the component containing the content to load.

From the Repository Files view, you would select the .project file and use Load As… The default local path that will include the folder containing the .project file. After ensuring the location matches where in the sandbox the contents should go, click Finish to load. Note that this is an individual file being loaded onto disk and will not result in an Eclipse project being created.

Next repeat this step for the other project metadata files such as the .classpath file.

Once all the project metadata files have been loaded, using Eclipse, import the the project into Eclipse. Now Eclipse is aware of the project, but it is not configured for RTC SCM. At this point you should share the project so it will be configured.

Once the project is created and configured, you finish up by loading just the individual files, folders, symbolic links that you need. In this case the New and Noteworthy file will be loaded using Load As… from the repository files view.

If you frequently partially load portions of the project, you may want to generate a load rule for the Eclipse project prior to loading the New and Noteworthy folder. When generating the load rule, the Eclipse project policy would be to create Eclipse projects for projects found during the load. Using the load rule the next time to load the project would reduce the steps required.
Loading one or more files with dependencies (IBM Developer for IBM Enterprise Platforms only)
With z/OS and IBM i projects, you can easily locate and load one or more individual files into your Eclipse workspace. Optionally, you can also choose to load one or more of your selected files’ dependency files. Selecting individual files to load is sometimes referred to as sparse loading.
The source code data collection service available with an IBM Developer for IBM Enterprise Platforms license scans source files and collects dependency data to be used during the dependency build process. This source code data can be queried to identify a file or list of files in the repository based on user-configurable criteria. Query results are listed in the Source Code Data view, from which one or more files can be selected for loading.
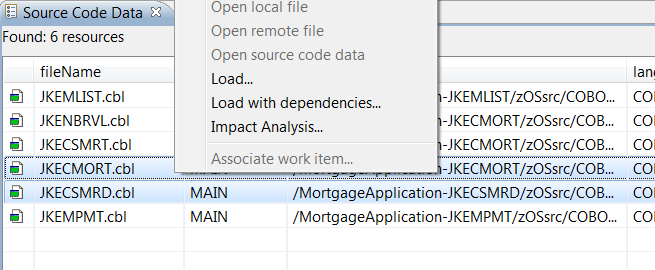
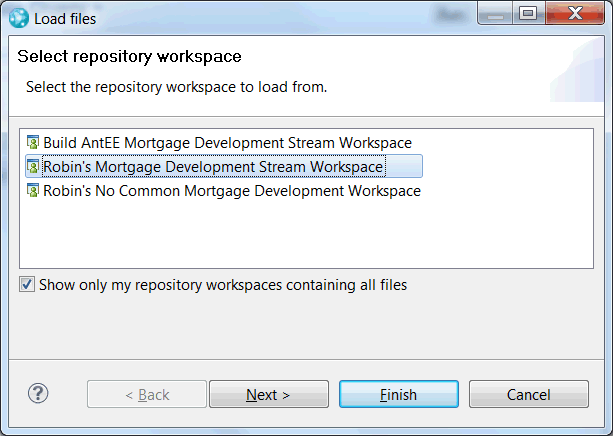
The Load… option opens the Load files wizard, which first prompts you to select a repository workspace from which to load the files. By default, only your repository workspaces containing all of the files you chose to load are displayed
The Repository files to load page opens with the files you chose pre-selected. You can select additional files to load, as well as de-select one or more of the files you originally selected.
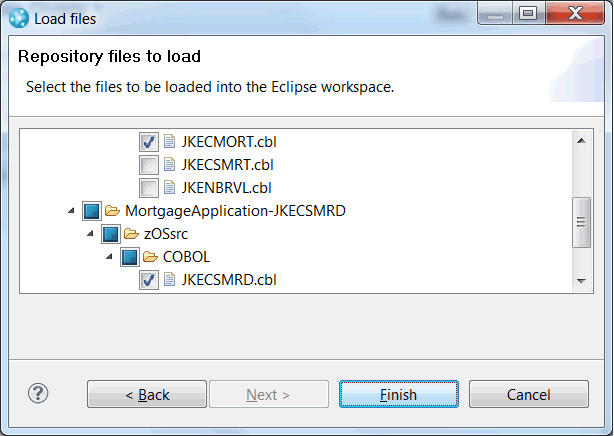
The Load with Dependencies menu option will also pre-select the source files that match the dependency data for the files you are loading. For example, if you choose Load with Dependencies for Foo.cbl, and Foo.cbl includes a copybook named Bar, any copybooks named Bar will be pre-selected in the Repository files to load page. To exclude any irrelevant versions of Bar.cpy, you can apply a search path by providing a language definition and dependency build definition (used to resolve build properties) on the first page of the Load with dependencies wizard.

Just as we saw in the Loading a Single File section above, the folder structure is not shared when you sparse load a file. As a result, limitations apply as described in the Information Center under Loading files from the source code data view.
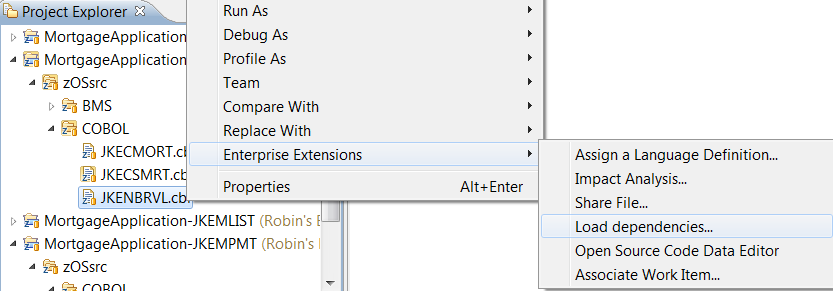
Two other paths available for sparse loading your files include performing an Impact Analysis and sparse loading the files that are returned in the Source Code Data view, or triggering the Enterprise Extensions>Load dependencies… action that is available in the context menu of a source file.
Loading using the Source Control Command Line Client
RTC provides an scm command line tool for providing access to Source Control operations from the command line. The executable is available in the jazz/scmtools folder of the RTC Zip install. The basics of loading are described below. You should look at the help for the commands to discover additional options.
Help
To get help to find out the commands
> scm help
To get help on a specific command. This gives you an idea of all the options that are available for load.
> scm help load
If the command has a subcommand on it, you can also get help on that. This gives help on the loadrules subcommand of create.
> scm help create loadrules
Logging in
To login, you would use the following command where username and password are your credentials and local is an alias that can be used in future commands to identify your repository more easily.
> scm login -n local -u username -P password -r https://localhost:9443/jazz
Listing repository workspaces
Once you are logged in, you can search for the workspace or component or folder you want to load. To list the workspaces, you would use the following command.
> scm list workspaces -r local (1009) "My Other Workspace" (1000) "My Workspace"
Loading the entire repository workspace
You can then load a workspace by name or, as we show below, you can load the workspace using the unique identifier that was associated with the workspace by the client. We choose to load My Workspace by using its identifier 1000.
> scm load -r local 1000
The above command would load all the folders in the components contained in the workspace as top level folders in the current directory.
Loading specific folder within a component in the repository workspace
If you just wanted to load the MyThemes folder, you could do the following.
> scm load -r local 1000 "My Component/MyThemes"
Again, 1000 identifies the workspace and the first segment of the path is the component name and the subsequent segments represent the path within the component.
Loading a folder under a directory structure in the sandbox
If you wanted to load the MyThemes folder, but wanted it under the MyModels directory within the sandbox (as opposed to directly under sandbox), you could use the -t option to specify the target.
> scm load -r local 1000 -t MyModels "My Component/MyThemes"
If you also wanted MyThemes to be loaded as OurThemes instead, you would use the -a option to specify the alternate name.
> scm load -r local 1000 -t MyModels -a OurThemes "My Component/MyThemes"
Loading the component root folder
If you wanted to load the component roots of a repository workspace
> scm load -r local 1000 -i "My Component"
Loading from a load rule
The CLI also supports the use of load rules that describe what to load from a repository workspace and where to place it withing the sandbox. To load from a load rule, specify the rule and the repository workspace to load. You can also restrict the rule to a component within the repository workspace.> scm load -r local -L roboticsLoadrules.loadrule "Source Control Workspace" "SCM"
This will load the “SCM” component of the “Source Control Workspace” based on what the load rule “loadrules.txt” specifies. For convenience, you could also store the load rules in a file in the repository and use the -R option to reference the remote file instead of -L.
Generating a load rule
If you have a sandbox loaded (it may have been loaded through any of the RTC clients), load rule(s) can be created to describe what is loaded in the sandbox. The load rule can then be re-used by other team members or even yourself to load the sandbox again.
> scm create loadrules -r local -f roboticsLoadrules c:mySandboxRules
This will generate the load rules for the current sandbox and put them in c:mySandboxRules. The prefix of the load rule will be roboticsLoadrules. The files will have .loadrule qualifier. Typically only 1 load rule will be generated unless you have multiple workspaces loaded in your sandbox. If you want to restrict the generation of the load rule to a particular workspace, you can use the -w option.
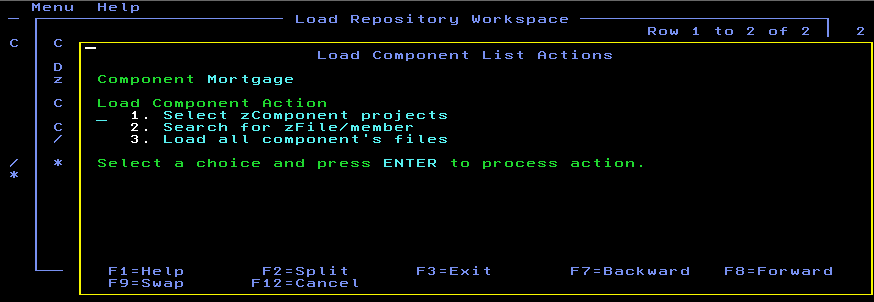
Loading using the ISPF Client
The ISPF client allows users to interact with Rational Team Concert using a familiar green screen interface. Source files can be loaded from the repository to sandbox MVS data sets for viewing and editing, and they can be loaded at the component, project, folder, or file level.
With the search option, you have the ability to locate your file(s) by name, type, project, and path.
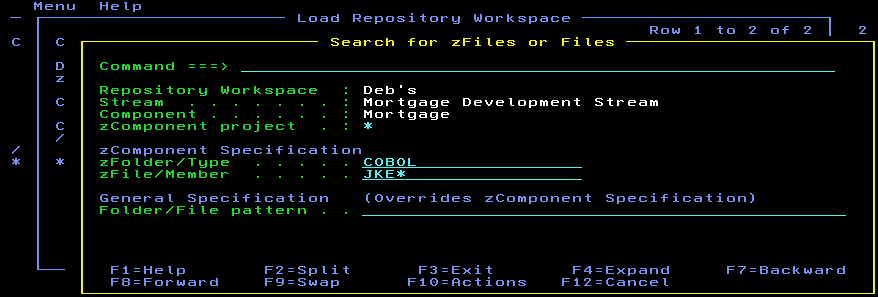
The search returns all matching artifacts in the repository, which can then be individually selected for loading to your MVS sandbox.
Editing Content Outside of the RTC Eclipse Client
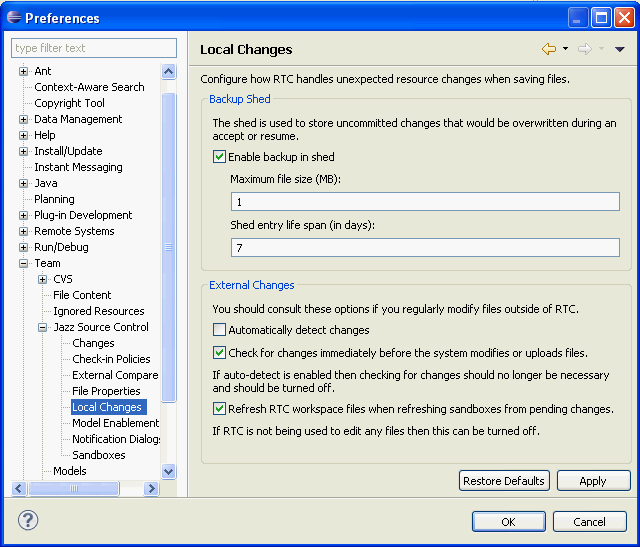
The RTC rich client has buit-in support for editing many types of files and there are plug-ins available for several other file types as well. However, it is not uncommon to use the RTC client only for SCM related operations and to use other tools to edit your files. When files are edited using the RTC client, there is built in support which notifies the SCM client that the files have been edited. This allows the SCM views and operations to have up-to-date information about the files in your sandbox. When you edit files using other editing tools, you will want to make sure that the SCM client has up-to-date information about the file system before any operations are run.
The Team/Jazz Source Control/Local Changes preference page has a number of configuration options that allows you to enable auto-refresh during SCM operations. This option is not enabled by default since it does add a bit of overhead to each operation but it is recommended to turn this option on if you regularly edit files with tools other than the RTC client. You should also enable the backup shed on the same preference page as this will ensure that any file being updated gets backed up to the shed before the new content is written out. This is done to ensure that your changes are not inadventently overwritten and lost by an SCM operation.
Summary
Loading in RTC Eclipse client is very flexible. You can load the component root, or any item within it. Items can be loaded at the root of the sandbox or within a directory structure which is not under source control within the sandbox. Contents can be loaded within Eclipse or outside it. The details of a load can be captured in a load rule and used later to load other repository workspaces the same way.
If you are using RTC 3.0.1 or earlier some of the scenarios described in this article are not available. You may want to consult the Loading Content article for releases 2.0 through 3.0.1.
About the authors
The Jazz SCM Team is comprised of the folks who write and use the wizards and tools for loading repository workspaces.
Robin Yehle is a member of the Jazz Jumpstart team. The Jazz Jumpstart team is a worldwide group of development specialists who bring new and advanced Jazz-based technologies to customers. Robin can be contacted at ryehle@us.ibm.com.
Copyright © 2017 IBM Corporation