
IBM Rational DOORS Next Generation
Definition � Management � Analysis
Rational DOORS Next Generation 4.0.1 New and Noteworthy
The Rational DOORS Next Generation installer enables you to install the Jazz Team Server and several applications and client tools. See each section below for new and noteworthy information for each component.
- Requirements Management 4.0.1
- Jazz Foundation (Jazz Team Server) 4.0.1
- Change and Configuration Management 4.0.1
- Quality Management 4.0.1
New in Requirements Management 4.0.1
Rational® DOORS Next Generation 4.0.1 is the first general availability release of the product. For more information about the product, see this introductory blog post and the Rational DOORS Next Generation project page.
New in Change and Configuration Management 4.0.1
- All Downloads page
- Tracking and planning
- Jazz source control
- Selecting change sets from a work item (Client for Microsoft Visual Studio IDE)
- Change Summary view for reviewing change sets (Eclipse client and Client for Microsoft Visual Studio IDE)
- Details pane for reviewing changes (Eclipse client and Client for Microsoft Visual Studio IDE)
- Gap detection when reviewing changes (Eclipse client and Client for Microsoft Visual Studio IDE)
- Forcing baselines to be created during snapshot creation (Eclipse client, Client for Microsoft Visual Studio IDE, and command-line interface)
- Comparisons (diffs) between snapshots and other items (command-line interface)
- Comparisons (diffs) between baselines and other items (command-line interface)
- Scoping comparisons (diffs) by component (command-line interface)
- Property comparisons (diffs) (command-line interface)
- Viewing and updating workspace properties (command-line interface)
- Viewing and updating workspace flow targets (command-line interface)
- Viewing and updating component properties (command-line interface)
- Viewing and updating baseline properties (command-line interface)
- Viewing and updating snapshot properties (command-line interface)
- Process
- Client for Microsoft Visual Studio IDE
- ISPF client
- Dependency build and promotion
- Deployment
- ClearQuest Importer
- ClearCase Bridge
- Reporting
- User assistance
- Reference topics for new SCM commands
- Help for new SCM view: Change Summary
- Help for exporting to CSV-formatted files in the ClearQuest Import wizard
- Help for specifying a template for team invitations
- Help for exporting process templates from project areas in the web client
- Help for defining a pattern for translator output names
- Help for working with build results in the ISPF client
- Help for integration with release of Lotus Sametime 8.5
All Downloads page
New server download for getting started
Starting in Rational Team Concert 4.0.1 M4, a new server download is available from the All Downloads page. This download contains everything you need to set up and run a Rational Team Concert server on Windows or Linux operating systems, including Apache Tomcat, the Jazz Team Server application, the Change and Configuration Management (CCM) application, and trial keys. Download and extract the files, and follow the steps in the server setup wizard.
Tracking and planning
Improved planning web UI performance
The performance of the Rational Team Concert planning web UI is improved for working with a large number of planned items. For plans with hundreds of planned items, loading times should be at least 25% faster. Many server-side optimizations were implemented as part of this effort, and tracing support was added to help profile the performance of the planning web UI.
Auto scrolling in plans
When you drag items to rank or move them in a plan, the screen now automatically scrolls when the cursor is at the bottom or top of the plan. With this improvement, you no longer have to manually drag the scroll bar, and you can move items across large plans.

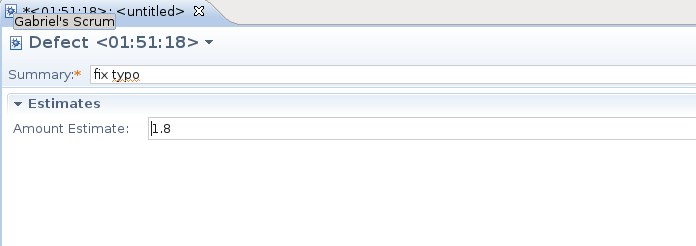
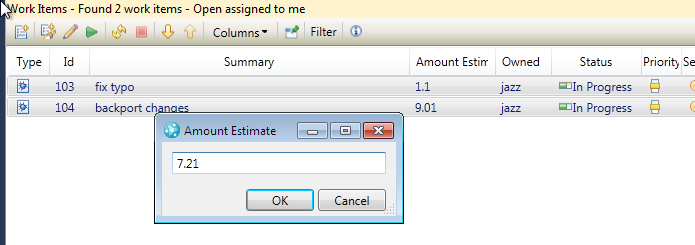
Work item support for "decimal" type custom attributes
You can now add "decimal" type custom attributes to your work items. After you add an attribute to the editor, you can view and edit decimal numbers in the work item editor. You can also perform bulk edits on a decimal attributes by using the query results view.
This image shows how to add a new "decimal" type attribute:

In the Eclipse client, you can edit a decimal attribute by using the Work Item editor, as this image shows:
This image shows the bulk editing of a decimal attribute by using the Client for Microsoft Visual Studio IDE:
Jazz source control
Selecting change sets from a work item (Client for Microsoft Visual Studio IDE)
In the Work Item editor in the Client for Microsoft Visual Studio IDE, you can select the associated change sets that you want to open or accept. To select one or more change sets, press Ctrl and click the change set or change sets.
Change Summary view for reviewing change sets (Eclipse client and Client for Microsoft Visual Studio IDE)
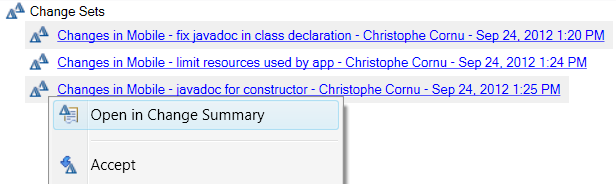
After a bug is fixed, ask one of your peers to review your changes. You can either mention the reviewer in the work item that you resolved, or set an approval. The reviewer is notified and can open the associated change sets.

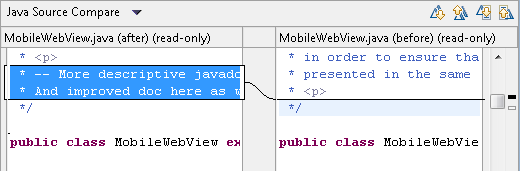
Then, the reviewer can then go through every file that was modified and open a compare editor to view the combined changes for that file.
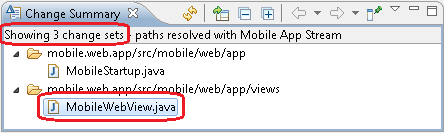
In the previous example, the reviewer double-clicked the MobileWebView.java file to open a compare editor that shows how the selected change sets combine to modify that file.
The Change Summary view might look familiar because it is based on the Change Explorer in Show Files mode. The previous Change Explorer view supported two modes: "Show files" mode, which focused on file changes, and "Show change sets" mode, which focused on comparing sources such as streams and workspaces. In 4.0.1, "Show files" mode has richer capabilities, such as the Details pane, and is in the Change Summary view.
The following table shows the differences between the Change Summary view and the Change Explorer modes:
| Workflow | View used in 4.0.1 | View used in 4.0 and earlier | Artifacts shown |
|---|---|---|---|
| Review change sets | Change Summary | Change Explorer in "Show files" mode | Files and folders that are affected by selected change sets |
| Compare workspaces, streams, snapshots, or baselines | Change Explorer | Change Explorer in "Show change sets" mode | Change sets, such as change sets from source streams that are not in the target stream and vice versa |
Details pane for reviewing changes (Eclipse client and Client for Microsoft Visual Studio IDE)
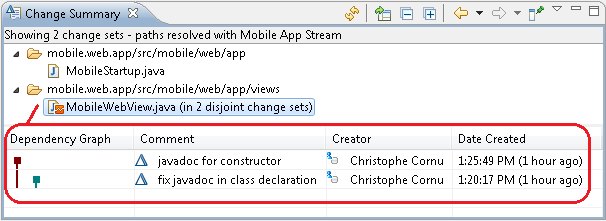
In certain situations, viewing the combined changes from the various change sets does not provide a clear picture. For example, a reviewer might want to understand which individual change sets modified the file MobileWebView.java. To review detailed changes, from the Change Summary menu, click Show details pane, as the next image shows.
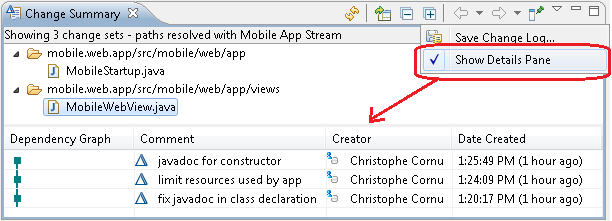
In the previous example, the MobileView.java file was modified by all three change sets that Christophe created. Each change set has a comment, which explains the purpose of each change set. The dependency graph shows the ordering of the change sets. To gain a progressive idea of how the whole bug was fixed, a reviewer can double-click each row to inspect each change.
Gap detection when reviewing changes (Eclipse client and Client for Microsoft Visual Studio IDE)
Developers are often asked to review the changes that are associated to a work item. If change sets are missing, the new Change Summary view detects inconsistent situations automatically.
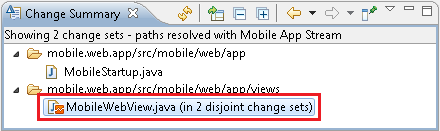
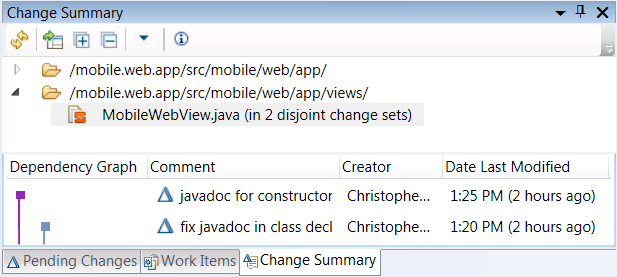
In the previous example, the reviewer selected the change sets that are associated with the work item to review and clicked Open. The Change Summary view shows which files are modified by those change sets. The MobileWebView.java file is flagged with a red square and the following description: in 2 disjoint change sets.
As the next image shows, if the reviewer decides to double-click this element, a prompt opens:
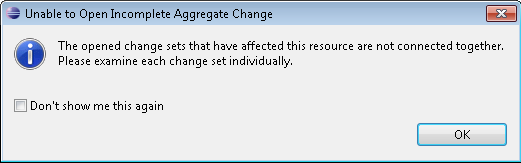
The MobileWebView.java file is modified by two change sets that are not related to each other because they refer to unrelated versions of the MobileWebView.java file. In this case, the Details pane opens automatically and shows the change sets that have a gap. The dependency graph is disconnected, as shown by the broken green and red graphs.
In the work item, the reviewer can ask the developer if he or she has forgotten to associate a change set with the work item. In this case, the developer associated a change set with a different work item by mistake. After the developer moved the change set to the correct work item, the reviewer could review the three change sets together correctly.
Note: In certain situations, disjointed change sets are expected and perfectly valid. For example, disjointed change sets are expected when a developer has to check in multiple change sets intertwined with deliveries from other team members. In that case, the reviewer must review each disjointed change set by using the Details pane.
Before 4.0.1, the Details pane did not exist. Disjointed changes were represented as multiple nodes in the Change Explorer view with no identifier as to which change set they originated from. In 4.0.1, the Change Summary pane and the Details pane provide more comprehensive information in these situations, making code review both efficient and safe.
Instead of a Details pane, Rational Team Concert client for Microsoft Visual Studio IDE provides the Change Summary view, as illustrated in the next image. This feature was jointly developed in 4.0.1 by a feature team that worked simultaneously to develop the server, the Eclipse client, and the Client for Microsoft Visual Studio. In earlier releases, different component teams were responsible for adopting new features, usually in different milestones.
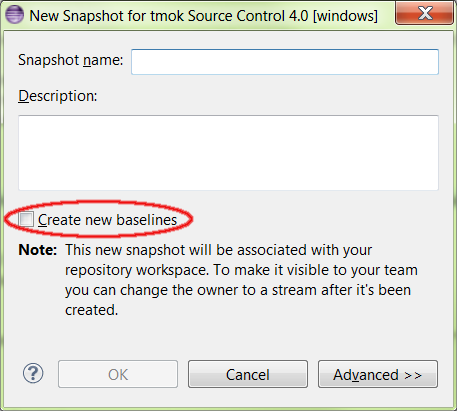
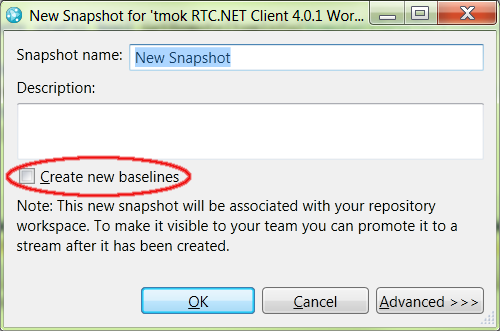
Forcing baselines to be created when creating a snapshot (Eclipse client, Client for Microsoft Visual Studio IDE, and command-line interface)
When you create a snapshot, the Client for Microsoft Visual Studio, Eclipse client, and command-line client now support the creation of new baselines in components that do not have changes. You can create a snapshot where all of the baselines have the same name.
The Eclipse client has a new snapshot window:
The Client for Microsoft Visual Studio IDE also has a new snapshot window:
The command-line client has a new option that forces baseline creation when you create a snapshot.
Usage:
lscm create snapshot -f >workspace<
Comparisions (diffs) between snapshots and other items (command-line interface)
You can compare the state of an artifact in a snapshot with its state in a workspace, stream, or another snapshot.
Usage:
lscm diff snapshot
			<snapshot-selector> [workspace|stream|snapshot][before-selector]

 lscm diff <workspace |stream|snapshot> <after-selector>
			[snapshot] [snapshot-selector]
Comparisons (diffs) between baseline and other items (command-line interface)
You can compare the state of an artifact in a baseline with its state in a component, workspace, stream, snapshot, or other baseline.
Usage:
lscm diff baseline
			<baseline-selector>
			[workspace|stream|snapshot|baseline] [before-selector]

			lscm diff <workspace |stream|snapshot|baseline> <after-selector>
			[baseline] [baseline-selector]
If a baseline is specified by name, you must specify the component that is associated with the baseline by using the new -c/--component option.
Scoping comparisons (diffs) by component (command-line interface)
The new -c/--component command-line option was added to the diff command. You can use the new option to scope the list of artifacts that are to be evaluated by the diff command.
This information is from lscm help diff:
-c [--component] arg - The component(name,
			alias, or UUID) to select when comparing workspaces, streams,
			snapshots, or baselines. This is required when you specify a baseline
			by name, it is optional otherwise.
Property comparisons (diffs) (command-line interface)
The new -S/--show command-line argument has been added to the diff command. You can use -S/--show to display the difference in properties between two states of an artifact. Differences in user-defined properties will be displayed for all types of artifacts. For file artifacts, in addition to the user-defined properties, any differences in the built-in file properties, such as jazz.executable, jazz.mime, and jazz.line-delimiter, are also displayed.
This information is from lscm help diff:
-S [--show] arg - Indicates whether to
			display the differences in contents, properties or both. Use "c" to
			display the differences in contents and "p" to display the differences
			in properties.
By default, when the -S option is not specified, only the differences in contents are displayed.
			> lscm diff file -S cp folder1\ContentAndPropertyDiff.txt
			diff -u -N folder1/ContentAndPropertyDiff.txt folder1/ContentAndPropertyDiff.txt
			--- folder1/ContentAndPropertyDiff.txt  2012-08-03 14:44:47.000000597 +0530
			+++ folder1/ContentAndPropertyDiff.txt  2012-08-03 14:47:55.000000965 +0530
			@@ -1,2 +1,3 @@
	 		Demonstrate content and property diff

			+Add, delete and modify properties
			\ No newline at end of file
			Properties:
			+AfterStateProp          - Value3
			-BeforeAndAfterStateProp - Value2
			+BeforeAndAfterStateProp - Value21
			-BeforeStateProp         - Value1
The diff output has a new Properties section that displays the difference in properties:
- +AfterStateProp - Value3: Indicates that the AfterStateProp property is present only in the after state of the specified file.
- -BeforeAndAfterStateProp - Value2 and +BeforeAndAfterStateProp - Value21: Indicate that the value of the BeforeAndAfterStateProp property was modified in the after state of the specified file.
- -BeforeStateProp - Value1: Indicates that BeforeStateProp property is present only in the before state of the specified file.
Viewing and updating workspace properties (command-line interface)
You can now view and update workspace properties, such as name, owned by, visibility, and description.
Usage:
scm workspace propertylist >workspace...<

			scm workspace propertyget >property-name< >workspace...<

			scm workspace propertyset >property-name< >property-value<
			>workspace...<
View and update workspace flow targets (command-line interface)
Usage:
scm list flowtargets >workspace< scm workspace
			add-flowtargets >workspace< >target-workspace...< scm
			workspace remove-flowtargets >workspace<
			>target-workspace...< scm workspace flowtarget >workspace<
			>target-workspace<
Examples:
- Add flow targets:
> lscm workspace add-flowtargets TestWorkspace1 TestStream1 TestStream2 -r lo
			Successfully added the flow targets.
- List flow targets:
> lscm list flowtargets TestWorkspace1 -r lo
			(1352) "TestStream1" (default) (current)
			(1353) "TestStream2"
- Set the default flow target:
> lscm workspace flowtarget TestWorkspace1 TestStream2 --default -r lo
			Successfully updated the flow target.
- View flow target details:
> lscm workspace flowtarget TestWorkspace1 TestStream2 -r lo
			(1353) "TestStream2" (default)
			All components flow from/to this flow target.
- Update the flow target to flow to a specific component:
> lscm workspace flowtarget TestWorkspace1 TestStream1 -C TestComp2  -r lo
			Successfully updated the flow target.
- View scoped flow target details:
> lscm workspace flowtarget TestWorkspace1 TestStream1 -r lo
			(1352) "TestStream1" (scoped) (current)
			The following components flow from/to this flow target:
  			(1351) "TestComp2"
- Set the description property of a workspace:
> lscm workspace propertyset description "This is a test workspace" TestWorkspace1 -r lo
			Workspace property was successfully set.
- List the properties of a workspace:
> lscm workspace propertylist TestWorkspace1 -r lo
			(1349) "TestWorkspace1"
  			Repository: https://localhost:9443/jazz/
  			Owned by: (1355) "ADMIN"
  			Visibility: Private
 			Description: This is a test workspace
Viewing and updating component properties (command-line interface)
You can now view and update component properties, such as name, owned by, and visibility.
Usage:
scm component propertylist >component...<

			scm component propertyget >property-name< >component...<

			scm component propertyset >property-name< >property-value<
			>component...<
Examples:
- List the properties of a component:
> lscm component propertylist TestComp2 -r lo
				(1351) "TestComp2"
 				Owned by: (1355) "ADMIN"
 				Visibility: Private
- Set the property of a component:
> lscm component propertyset ownedby TestJazzUser1 TestComp2 -r lo
				Component property was successfully set.
- Get the property of a component:
> lscm component propertyget ownedby TestComp2 -r lo
				(1351) "TestComp2"
				(1359) "TestJazzUser1"
Viewing and updating baseline properties (command-line interface)
You can now view baseline properties, such as name and description.
Usage:
scm baseline propertylist >baseline<
 scm
			baseline propertyget >property-name< >baseline<
 scm
			baseline propertyset >property-name< >property-value<
			>baseline<
Examples:
- List the properties of a baseline:
> lscm baseline propertylist TestBaseline1 -c TestComp1 -r lo
					Name: (1364) "TestBaseline1"
					Description: Test baseline 1 description
- Set the property of a baseline:
> lscm baseline propertyset description "New baseline - Sept 25th 2012" TestBaseline1 -c TestComp1 -r lo
					Baseline property was successfully set.
- Get the property of a baseline:
> lscm baseline propertyget description TestBaseline1 -c TestComp1 -r lo
					New baseline - Sept 25th 2012
Viewing and updating snapshot properties (command-line interface)
You can now view and update snapshot properties, such as name and description.
Usage:
scm snapshot propertylist >snapshot<
 scm
		snapshot propertyget >property-name< >snapshot<
 scm
		snapshot propertyset >property-name< >property-value<
		>snapshot<
Examples:
- List the properties of a snapshot:
> lscm snapshot propertylist TestSnapshot1 -r lo
				Name: (1368) "TestSnapshot1"
				Description: Test snapshot 1 description
- Set the property of a snapshot:
> lscm snapshot propertyset description "New snapshot - Sept 25th 2012" TestSnapshot1 -r lo
				Snapshot property was successfully set.
- Get the property of a snapshot:
> lscm snapshot propertyget description TestSnapshot1 -r lo
				New snapshot - Sept 25th 2012
This information is from lscm help diff:
-S [--show] arg - Indicates whether to
			display the differences in contents, properties or both. Use "c" to
			display the differences in contents and "p" to display the differences
			in properties.
By default, when the -S option is not specified, only the differences in contents are displayed.
			> lscm diff file -S cp folder1\ContentAndPropertyDiff.txt
			diff -u -N folder1/ContentAndPropertyDiff.txt folder1/ContentAndPropertyDiff.txt
			--- folder1/ContentAndPropertyDiff.txt  2012-08-03 14:44:47.000000597 +0530
			+++ folder1/ContentAndPropertyDiff.txt  2012-08-03 14:47:55.000000965 +0530
			@@ -1,2 +1,3 @@
			 Demonstrate content and property diff

			+Add, delete and modify properties
			\ No newline at end of file
			Properties:
				+AfterStateProp          - Value3
				-BeforeAndAfterStateProp - Value2
				+BeforeAndAfterStateProp - Value21
				-BeforeStateProp         - Value1
The diff output has a new Properties section that displays the difference in properties:
- +AfterStateProp - Value3: Indicates that AfterStateProp property is present only in the after state of the specified file.
- -BeforeAndAfterStateProp - Value2 and +BeforeAndAfterStateProp - Value21: Indicate that the value of BeforeAndAfterStateProp property was modified in the after state of the specified file.
- -BeforeStateProp - Value1: Indicates that BeforeStateProp property is present only in the before state of the specified file.
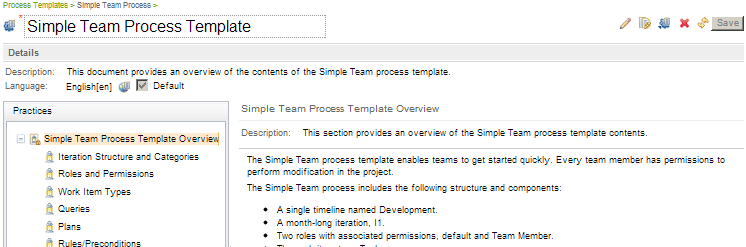
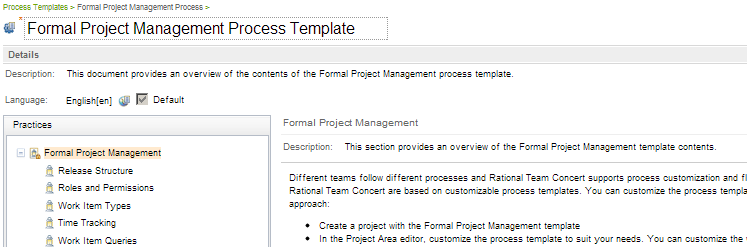
Process
Editable process descriptions for Simple Team, Scrum, and Formal Project Management Process templates
The Simple Team, Scrum, and Formal Project Management Process templates are now bundled with new process descriptions that can be edited using the Process Authoring capability. You can access the new process descriptions from both the Eclipse client and web client.

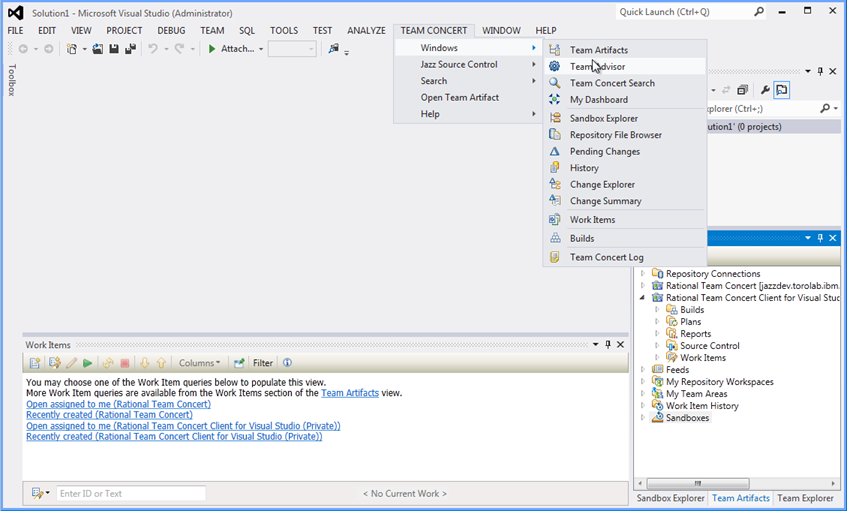
Client for Microsoft Visual Studio IDE
Support for Microsoft Visual Studio 2012
Rational Team Concert can now support Microsoft Visual Studio 2012. The following image shows what the Help page looks like when Rational Team Concert is installed:
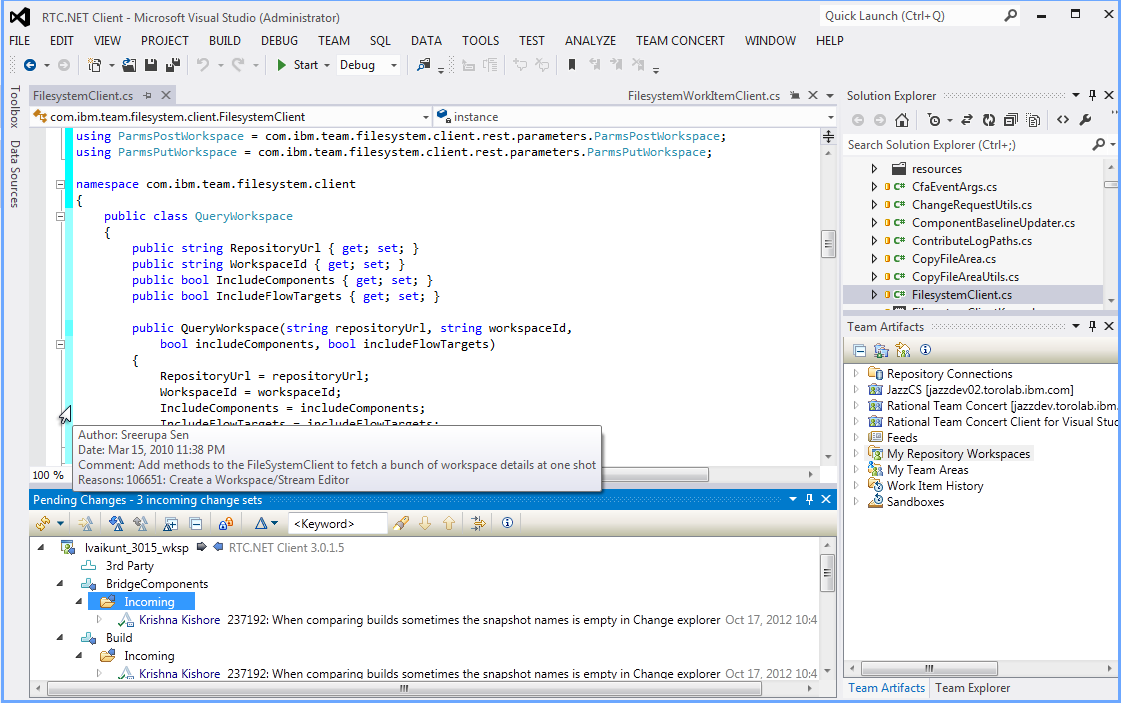
The next image shows the Solution Explorer with a shared solution in Microsoft Visual Studio 2012. The image also shows the Pending Changes view, along with an annotated file:
Component editor
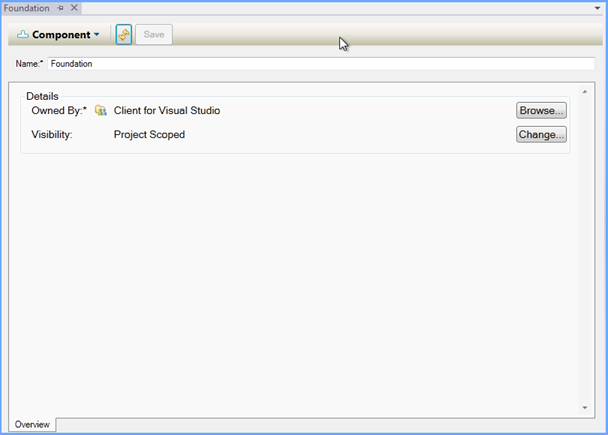
A component editor is now included in the Client for Microsoft Visual Studio IDE. You can use the editor to change the name of a component, the component owner, or its visibility.
This image shows the Component Editor when the Client for Microsoft Visual Studio IDE is installed:
Work items
The work item editor now includes a quick information section. The section provides links to subscribers, change sets, and builds.

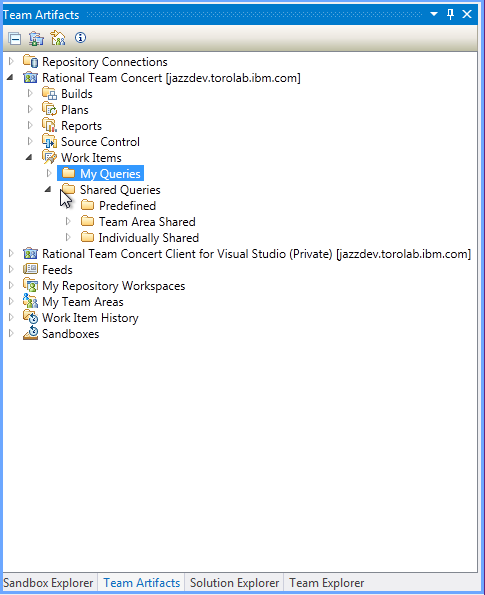
In the Team Artifacts view, the folders in the Shared Queries folder are reorganized. In addition, the performance of expanding the folders in the Shared Queries folder is improved.
The work items editor now supports static text and small HTML presentation types, as the next images show:


Sandbox Explorer
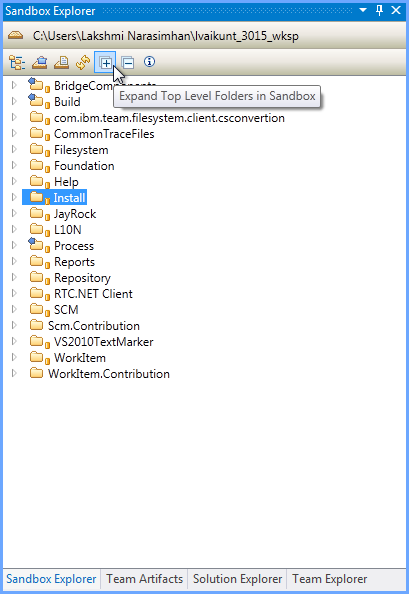
The Sandbox Explorer has a new toolbar. From the toolbar, you can generate load rules, collapse or expand all folders, and open a solution from the current sandbox.
ISPF client
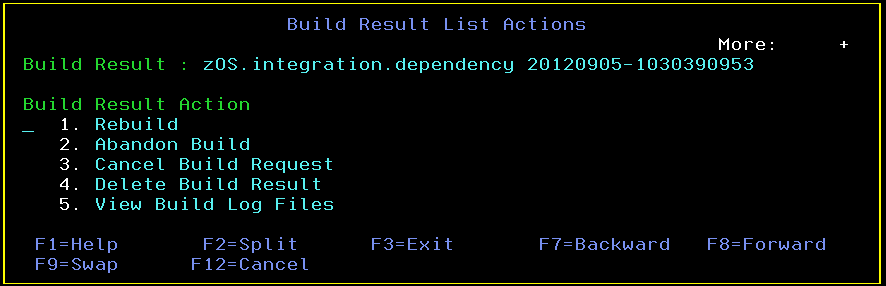
Build result management in the ISPF client
You can now use the ISPF client to abandon a build, cancel a pending build request, delete build results, and view the log files for a build.
Dependency build and promotion
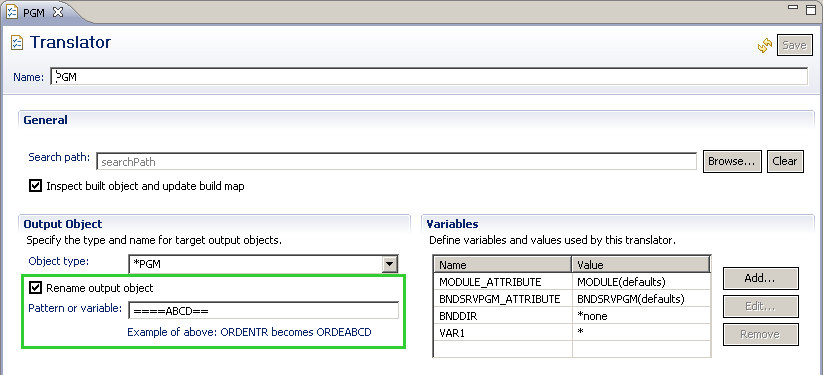
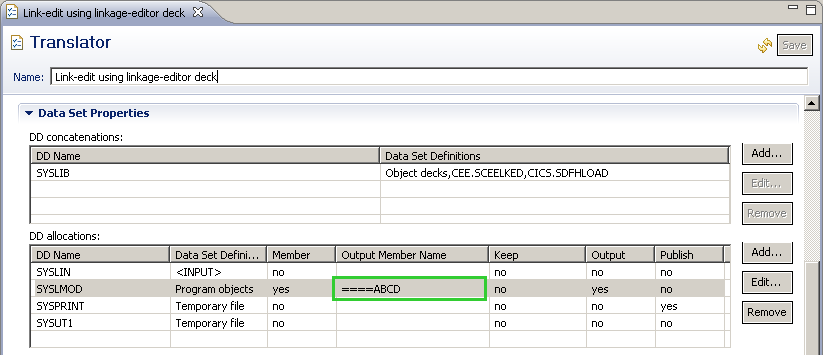
Overriding translator output names
In the translator editor, you can now specify a pattern or a variable to override the names of the outputs. During a dependency build for z/OS® and IBM® i, the pattern is applied to the input name to generate a new output name, as the next images show.
Deployment
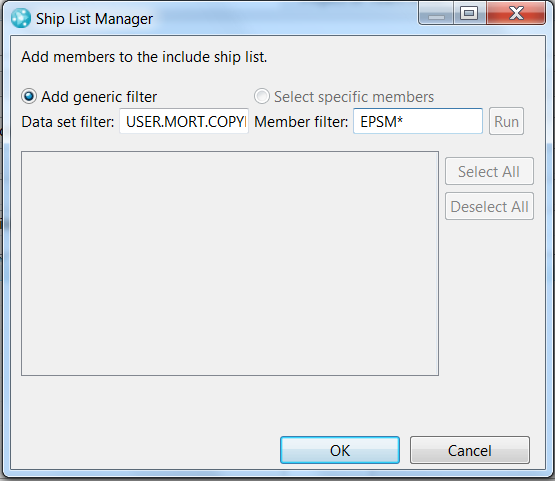
Filters for ship list members in z/OS package definitions
In the Package Definition for z/OS, in the Ship List Manager window, you can add a generic member filter with a partial member name and wildcard. All members that match the specified filter are packaged.
ClearQuest Importer
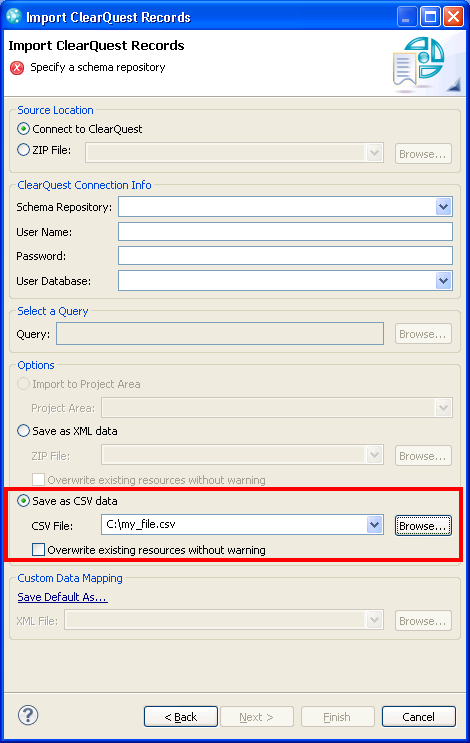
Export of Rational ClearQuest records as comma-separated values (CSV) files
With the ClearQuest Import wizard, you can export your Rational ClearQuest® records to a comma-separated values (CSV) file. You can then import the Rational ClearQuest records to Rational Team Concert by using work items from the CSV importer. This feature is useful if you want to update work items that you imported from Rational ClearQuest after the related Rational ClearQuest records changed. Although the ClearQuest-Rational Team Concert Importer does not currently support updates, you update after an initial import by using this new feature.
ClearCase Bridge
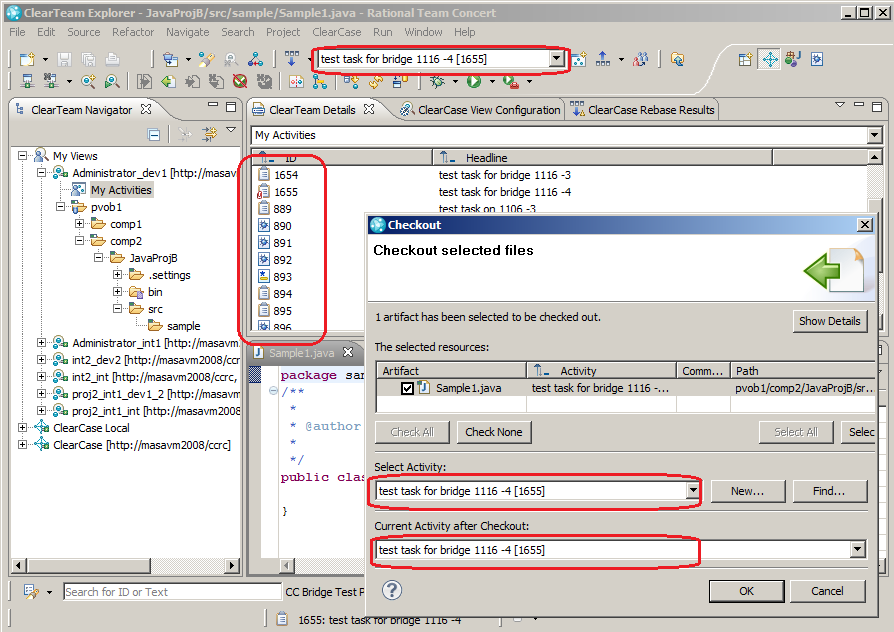
Task-centric ClearTeam Explorer User Interface and Site-wide Configuration for UCM
The task-centric user interface of ClearTeam Explorer provides another seamless integration of Rational Team Concert with Rational ClearCase. The My Activities view of ClearTeam Navigator now shows work items, rather than the UCM activities, that are assigned to you. You can open work items from there by double-clicking. Or you can select Work On from the work item to make it the current one in your ClearCase view. The drop-down boxes on the common dialogs (such as Checkout, Checkin, and Add to source control) also display work items instead of UCM activities. Selecting a work item in the dialog automatically creates a UCM activity and associates it. You no longer need to manually associate UCM activities with work items. The traceability of ClearCase assets by Rational Team Concert work items is now a built-in capability.
In addition, the integration can now be enabled for each UCM stream basis. In the earlier version, individual developers could turn off the integration in the preference page. But in this new version, there is no exception to skip the integration when it is configured for the UCM stream that you work with. Rational ClearCase administrators or project managers are assured that every source code change is traceable by work items through the automatically enforced association between UCM activity and work item. For the stream configuration, you can configure what is displayed in the My Activities view by specifying a work item query. Note that the configuration of the integration is inherited by any child or descendant streams unless you set a different configuration.
Please refer to Configuring the IBM Rational ClearCase Change Management Interface (CMI) for the UCM-RTC integration for more information on configuring stream integrations.
This feature is only available with Rational ClearCase 8.0.0.5 or later.
Enhanced ClearTeam Explorer integration for base ClearCase
You can now choose a work item to associate base ClearCase versions from the ClearTeam Explorer common dialogs, such as Checkout, Checkin, and Add to source control . The ClearCase versions in the dialog are automatically associated to the work item during the operation.
This feature is only available with Rational ClearCase 8.0.0.5 or later.

Reporting
ETL for change management type binding data
Change management type-binding data is now loaded into the data warehouse. After the data is in the data warehouse, the information is used by the reports that report on Defect type work items. The data is stored in the following data warehouse table: RIODS.REQUEST_TYPE_BINDING.
The Defect Backlog and Defect Recovery Rate reports use the new change management type-binding data from the data warehouse to decide which work item type is the Defect type.
Recovery checkpoints for data warehouse ETL
When you migrate a repository to the new data warehouse, the initial ETL can take a long time to run because it needs to rebuild the trending and the historical data for the repository since its creation date. This initial ETL must complete successfully, or the server tries to run the ETL until it is complete. By default, each retry starts from the beginning.
To avoid running the ETL from the beginning, you can break the initial ETL into 50-day chunks. To set the ETL into chunks, set the "Break-down Initial Load" Advanced Team Server Property to true. If the load after each chunk finishes successfully, on the Reports Admin UI, an entry is created on the Data Collection Job Status page.
To have the ETL ignore large custom attributes, set the "Ignore Large Custom Attributes" Advanced Team Server Property to true.
Data warehouse ETL changes
These data warehouse ETLs were added:
- Repository: Stores statistics and counters about the Jazz repository
- License: Stores the licensing statistics
- APT: Stores team capacity data for both project and team areas
These data mart ETLs are disabled because they are replaced by the previously mentioned data warehouse ETLs:
- Common
- Repository
- License
- APT
Improved Rational Reporting for Development Intelligence integration
The Rational Reporting for Development Intelligence integration and workflow in the web UI has improved, especially for handling report parameters.
User assistance
Reference topics for new SCM commands
This release includes new commands for getting and setting properties of source control artifacts, such as baselines, components, and workspaces. For more information, see scm command-line reference.
Help for new SCM view: Change Summary
You can use the new Change Summary view to review changes to files and folders and view information about individual change sets that modified a file or folder. You can also use the Change Explorer view to compare change sets in different workspaces, streams, snapshots, or baselines. For more information, see Reviewing changes in change sets.
Help for exporting to CSV-formatted files in the ClearQuest Import wizard
From the ClearQuest Import wizard, you can now export records to comma-separated-value (CSV) files. You can then use the Work Item Importer to create work items from the contents of the CSV files. For more information, see Migrating Rational ClearQuest records to work items.
Help for specifying a template for team invitations
In the administrative web user interface, you can now use a template to specify the content of email messages that are sent to users when you invite them to join a project area or team area. For more information, see Specifying team invitation content in a template.
Help for exporting process templates from project areas in the web client
The administrative web user interface now includes support for exporting process templates from project areas. For more information, see Exporting process templates.
Help for defining a pattern for translator output names
For Enterprise Extensions builds and source control, you can now use patterns to control the naming of translator outputs. For more information, see Translator pattern output rules.
Help for working with build results in the ISPF client
The ISPF client includes new actions for abandoning, canceling, and deleting builds, and for viewing build log files. For more information, see Viewing build results.
Help for integration with releases of Lotus Sametime 8.5
This release adds support for integrating Rational Team Concert with releases of Lotus® Sametime® 8.5. For more information, see Connecting to local Sametime applications.
New in Quality Management 4.0.1
- Speeding up test creation and maintenance
- Capturing images for manual tests and other rich text editors
- Editing test artifacts in table views
- Enhanced progress bars
- Generating test execution records from a list
- Using test plans to filter test cases in the table view
- Custom categories for test data
- Ability to select iterations during test execution with data pools
- Selecting data pool records when constructing test scripts and test cases
- Test case categories in Test Case Execution Records view
- Team area column
- Building the right tests with requirement-driven testing
- Meeting regulatory requirements through advanced customization
- Gaining insight with new reporting and dashboard options
- Integrating your test automation frameworks with Rational Quality Manager
Speeding up test creation and maintenance
Capturing images for manual tests and other rich text editors
The 4.0.1 release supports two approaches to capturing images to use in manual tests. The first approach is the same screen capture capability for work items, which is a Java Web Start application that opens from your browser when you start to insert an image into a script. The feature enables you to capture an image with a configurable size and then mark up the image before you insert it into a manual test step. See the image below for the icon in the script editor to insert screen captures.

In the second approach, which is specific to Mozilla Firefox, you insert images from your clipboard into manual script steps. In this approach, you can use your favorite tool to capture an image, copy it to your clipboard, and then paste it from the clipboard into your script step.
Editing test artifacts in table views
Many testers have used spreadsheet programs for test tracking and expect similar functionality from Rational Quality Manager. The 4.0.1 release has new editing capabilities directly in the table views, which enables you to change most fields directly in the table, as shown in the image below for Browse Test Cases.

Enhanced progress bars
The 4.0 release introduced progress bars, which you could use to quickly run a query and to track your progress toward validating a deliverable. In version 4.0.1, you can also see your progress based on priority to ensure that you complete all high-priority testing and that your team is focused on the right areas. In addition, version 4.0.1 has support to track progress against custom categories.

Generating test execution records from a list
In many cases, you might not be able to run a test in the current iteration, or you might need to repeat regression tests for tests that failed in a prior iteration. A new shortcut makes it easy to run test execution record filters, such as "result", and then copy these filters to a new iteration.

Using test plans to filter test cases in the table view
In earlier 4.0.1 releases, you could filter test case execution records by test case categories. Now, test plans were added to the test case table views so you can quickly see which test plans a test case belongs to, find orphan test cases, and so on. In addition, you can filter the list of test cases by test plan.

Custom categories for test data
Categories are a good way to organize data so that you can quickly and efficiently find what you are looking for, especially if you have a large number of data pools. For example, you might want to add a "type" category to easily locate a specific kind of test data.

Ability to select iterations during test execution with data pools
Customer feedback has expressed that data pools would be more useful if a single, large data source could cover different aspects of testing. The 4.0.1 release addresses this problem in two ways. When you run a test that has an associated data pool, a new run option is available, as shown below.

If you select the Select Records from Test Data check box, a dialog box opens that you use to select the rows to iterate over while running the test. The test data records that you can filter are displayed. Only the selected rows are used during that run. Step results include the test data that was used, which provides traceability into which data was actually used when running a test.
Based on your process settings, you can override this record selection criteria before starting a test execution, which allows for more flexible test data at run time.

Selecting data pool records when constructing test scripts and test cases
In the 4.0.1 release, you can select records from the data pool when you construct test scripts and test cases. With this approach, you can use the same test script in multiple test cases but vary the data, which allows for more reuse.
You can define record selection criteria based on the columns that are available in the test data. After you define this criteria in the test script, you can override it at the test case level.

Test case categories in the Test Case Executi0n Records view
Being able to see test results in specific test case categories is important for tracking progress and results against specific goals. For example, you might want to see your results for a specific product (captured in a category) from test cases that span multiple test plans.

Team area column
The 4.0 release included support for scoping test artifacts to team areas, but you could not view that data in tables. Now, you can sort, query, and bulk update this important data.

Building the right tests with requirement-driven testing
Tracking requirements covered by a test case in a test plan
When a test plan is linked to a requirement collection, it is often useful to see which test cases are linked to the requirements in that collection. The Requirement Collection Links section of a test plan now provides a Coverage view that you can use to quickly determine which requirements are covered by a test case in the test plan, and which are not covered.

Improved link labels between Rational DOORS and Rational Quality Manager
When a requirement in Rational DOORS is linked to a test case or test script step in Rational Quality Manager, the label of the link is now easier to understand.
Improved Requirement Collection Links section
Several usability improvements were introduced into the Reconcile Requirements feature in the Requirement Collection Links section. The panels were simplified and you can now generate test cases directly from the table view.

Viewing requirements covered by child test plans
When you reconcile a master test plan, you can now see which requirements are already covered by its child test plans. This feature is only supported if Rational Quality Manager is integrated with a requirements provider (for example, Rational Requirements Composer or Rational DOORS) using the Open Services for Lifecycle Collaboration (OSLC) specification.

Ability to see back link status in traceability view
In certain cases, a test artifact might contain links to remote requirement and change management artifacts that do not contain links back to the test artifact. When this occurs, an icon now indicates that the back link is missing from the remote artifact, and if needed, you can create the back link. You can enable this feature from the List View settings in the User Preferences window.

Meeting regulatory requirements through advanced customization
Several new features in this release support regulatory environments.
Ability to control state transitions of artifacts based on the state of formal reviews
With the addition of the Required Approvals precondition, you can customize the requirements for state transition with the number and role of the approvers, as well as other attributes.

Automatic state transitions
You can now enable automatic state transitions by using the new Approval Trackings feature. This feature allows the customization of an automatic trigger to change the test artifact state based on the state of the formal review approvals.
![]()
Auto-locking
Test artifacts can now be automatically locked from editing based on the test artifact state.

Approval group precondition
You can now set a new precondition that prevents further modifications to an approval group after that group is completed.

Approval group archiving
The management of approval groups was improved with the ability to archive and copy any existing approval groups. Archived groups are still visible, but are not evaluated by any process preconditions.

Precondition for manual test execution
One aspect of process customization is the configuration of process advisors, which are configurable policy checks that are invoked when running certain operations. The 4.0.1 release provides a new precondition for running manual tests: Require an Actual Result for Script Steps. This precondition is configurable through the new web UI for preconditions and follow-up actions.
After you set the precondition, it is enforced when you run a manual script or edit a result. If the condition is not satisfied, you are prompted and unable to commit the result.
![]()
This precondiiton gives you better control over what is captured when you run a test. Note the three configurable options to enforce the actual result: Failed, Blocked, and All steps.

Gaining insight with new reporting and dashboard options
Adoption of new schema changes for Rational Reporting for Development Intelligence 2.0.1
To adopt new data warehouse schema changes for Rational Reporting for Development Intelligence 2.0.1, Rational Quality Manager updated the .xdc file and provided a new ODS job in the 4.0.1 release. Now, if you use Rational Insight, you should start to run the jobs under the Build and JobStreams/Jobs/RQMJobs/RQM4_Jobs/RQM4.0.1_Jobs folder in Data Manager to populate ODS data into the data warehouse database.
Here are some of the new features:
- Reports can include test case counts of a test suite result for each test case execution status.
- Reports can include points deferred and points permfailed of a test suite result.
- Reports can include detailed information about a lab resource in a test case result.
- Reports can include the customized test priority for a test plan.
- Reports can include the creation date, estimate, and customized test priority of a test case.
- Reports can include the creation date, estimate, and customized test priority of a test suite, and the execution owner of each test suite element in a test suite.
- Reports can include the estimate, time spent, and customized test priority of a test case execution record or a test suite execution record.
Master-child test plan relationship support for BIRT reports
Rational Quality Manager supports a master-child relationship between test plans and, in previous releases, this relationship could not be evaluated in BIRT reports. In previous releases, all test plans were listed in the Test Plan parameter prompt, and there was no difference between a master plan and the child plans.
To clarify the test plan relationships, test plans are now organized and sorted in a tree view by the master and child relationship. If some test plans have several child plans, all these child plans are listed under this master plan. Another parameter is added to control whether the master-child relationship is evaluated. The default value is No, to make the default behavior consistent with previous releases. The report parameter prompt is shown below.

Reviewing test status for a project across multiple milestones
With this enhancement, you can see only the result from the most recent iteration of all similar test case execution records (TCERs). In this case, two TCERs are similar if they have the same test plan, test case, and configuration but different iterations. In the example below, you can see that two test cases contain a total of five TCERs. Test case 1 contains three similar TCERs and test case 2 contains two similar TCERs.

In version 4.0, running the "Execution Status using TCER Count" report yields the following output.

Note that there are a total of five results with no way to distinguish which results are from the most recent iteration. It is impossible to know from this output the current state of testing for the similar TCERs.
In 4.0.1, a parameter named "Most Recent Iteration Only" was added to some of the reports. If you select Yes for this parameter, the output of the report shows only the result from the most recent iteration of similar TCERs. Note that only the passed results from the most recent iterations are included in the report below. These include iteration s3 of test case 1 and iteration s2 of test case 2.

When the master-child plan relationship is not enabled, as in the default setting, the report works as it did in previous releases. When you set the "Evaluate Test Plan Master-Child Relationship" parameter to Yes, the report rolls up child test plans artifacts as part of the selected master plan, and shows the total status by master plan, as shown below.

Java ETL logging enhancement
In 4.0.1, the ETLs log the following additional time measurements so that you can gain more insight about the execution of each individual Java ETL:
- Time Inserting: The time for inserting the data into the data warehouse
- Time Updating: The time for updating the records
- Time Fetching Data: The time for fetching the response XML from the REST API
- Time Looking Up: The time for looking up the data in the data warehouse
- Time Running: The time for inserting the data into the data warehouse
In the following example, timings are shown for the RQM4StateGroupETL, which takes 0 ms for inserting, 590 ms for updating, 41 ms for looking up, 711 ms for fetching, and 1069 ms for running the whole ETL job.

Integrating your test automation frameworks with Rational Quality Manager
OSLC automation service provider
Version 4.0.1 provides a preview implementation of an Open Services for Lifecycle Collaboration (OSLC) automation service provider. For more information see the OSLC automation specification. The sample OSLC client at the Eclipse Lyo project contains a sample automation adapter that demonstrates how to register a test tool with the Rational Quality Manager server, poll for work, upload attachments, and post a test execution result. Information about the Eclipse Lyo project, including how to obtain the OSLC sample client, is available at Eclipse Lyo.
Using Apache Ant for running tests
In Rational Quality Manager, you can run test scripts by using test case execution records (TCERs) or test suite execution records (TSERs). You can trigger the test run manually through the web UI or through a command line interface. Usually, the automated triggering of a run is required in response to a new test target, such as a new software build.
Many such automation harnesses are written using Apache Ant. In version 4.0.1, two Ant tasks were added to allow you to submit test case execution records or test suite execution records for execution. This addition lets you use tools that are written in Ant to submit test execution requests from within their native environment.
You can find detailed usage information at the wiki that describes the Rational Quality Manager Execution Tool.
Rational Quality Manager test automation adapter API
In most cases, the default test adapters combined with the flexibility of the command line adapter is adequate. If you need a more richly featured integration with your test automation framework, you can use the Rational Quality Manager test automation adapater API. For more information, see the wiki and the information center.