Planning with Rational Team Concert 3.x
Abstract
The RTC planning component has been redesigned and enhanced for the 3.x release. The Web UI has been greatly enhanced to make planning easier, address customer requests and integrate into the enhanced web navigation framework that RTC 3.x provides. This article shows what’s new in RTC 3.x planning and how to use the new agile and traditional planning capabilities. The capabilities described below are also available for the current releases.
Table of Contents
Overview
New Navigation Framework
Creating and Configuring Plans
Customizing Plan Modes
Working with Plans
Traditional Planning with RTC
Agile Planning Enhancement
Overview
Rational Team Concert has provided planning based upon live work item data since the first version. Initially many planning capabilities were only available in the RTC Eclipse Client. Over the last couple of releases, many capabilities where brought into the Web UI. With 3.x, the Web UI for planning exceeds the capabilities in Eclipse for the first time. All of the descriptions below focus on the Web UI, except where called out otherwise.
RTC planning was initially designed to address requirements, especially for agile projects. Many companies since then have adopted Agile techniques in some areas. However, many customers have also expressed the need for more traditional planning support. One of the more frequent requests is for Gantt charts capable of taking dependencies between work items into account. Starting with this release, RTC provides the first version of planning capabilities to address these needs.
New Navigation Framework
The planning component’s Web UI for RTC 3.x as been redesigned to provide various new capabilities as well as enhancements to make planning easier and more efficient.
Web Navigation
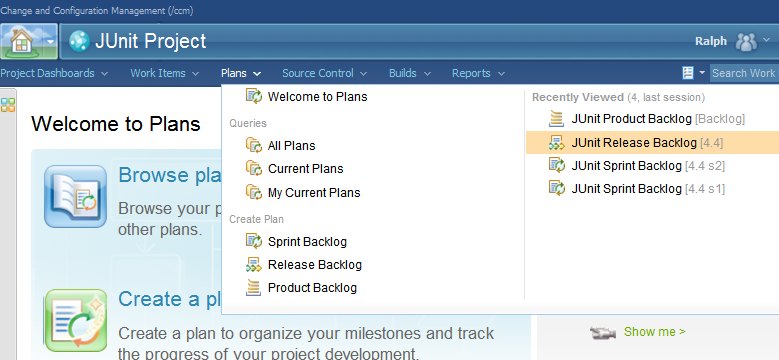
The planning component now integrates nicely with the new web navigation framework. Along with a complete UI re-design, to fit the new Team Concert Web UI, the left navigation side-bar was removed. The search functionality is now accessible via the global search control. This allows users to search for plans in a manner that is similar to searching for work items. The plans component menu now displays recently viewed plans, lets you run queries and also allows creating plans.
Help Hovers
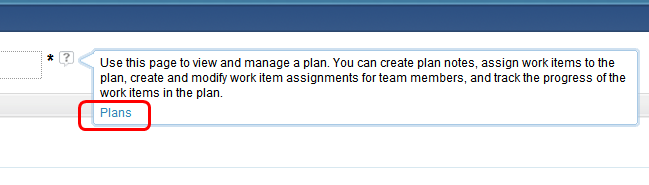
The planning component provides context sensitive help hovers in the Web UI. The hover will show a short explanation for key elements of the UI. If more information is available, the hovers will provide a link to the Infocenter help topic.
Creating and Configuring Plans
The creation and configuration of plans has also been redesigned. It is now easier to rename a plan just by clicking into the name, and changing it.
In addition, it is now easier to create and configure a plan in the Web UI. A new Plan Details section, allowing users to review and edit the configuration details, is provided on the plan.
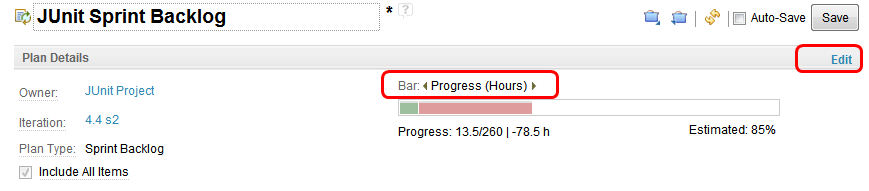
Initially the Plan Details section is collapsed, providing more space for planning. A double click on the Plan Details section header expands it or collapses it. While expanded, the plan details section shows the plan’s report bar and provides an overview of the plan’s configuration settings. The edit link on the plan details section header opens the plan configuration details for editing.
It is also possible to toggle through the available Load and progress Report views directly on the bar in the Plan Details.
Customizing Plan Modes
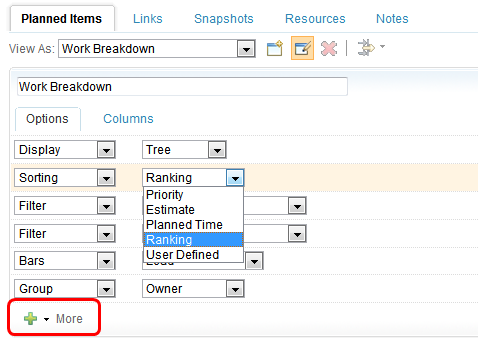
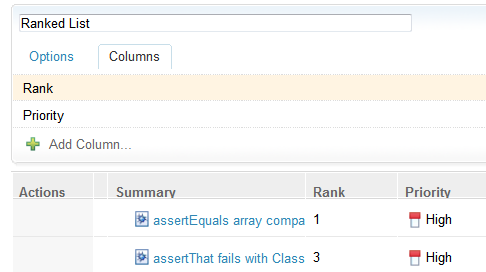
Editing of the different views in plans, also referred to as plan modes, has been redesigned to be much easier and require less screen space. Lists of radio-buttons and check-boxes where replaced by a slim row-based UI. Every row now represents one aspect. Do you want your plan to be shown as tree? Simply select Display: Tree. You want a flat list? Remove Display-row. The same applies for filters, sorting, and grouping. You can easily add aspects. The button provided also indicates which aspects are still available to add. Columns can be configured on their own tab.
Rank column
The Plan View editor now exposes the Rank of the work item as selectable for columns. It can be added to a Plan View showing the Rank for every plan item. Dragging and dropping while sorting by ranking will update the ranks so that it is easier to see what’s most important.
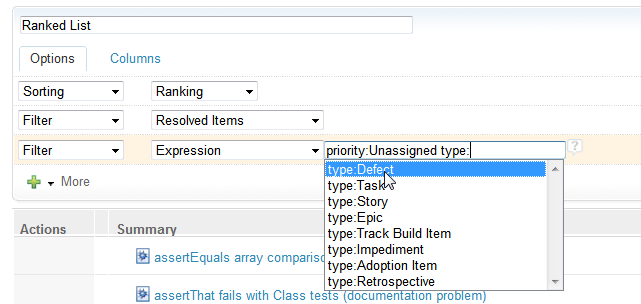
Express yourself
We added a new filter that selects work items by a quick query expression. In the example below, the ‘Work Breakdown’-view will not show Defects that have no Priority assigned.
You can add several rules into one row separated by blank. To help you type quick query expressions, we added a content assist. Put your cursor over the input field to activate it. Scroll up and down or use the mouse pointer to select the expression. The expression will evaluate to true if all terms evaluate to true.
You can learn more about quick queries in the Advanced Options section of the Effective planning guide.
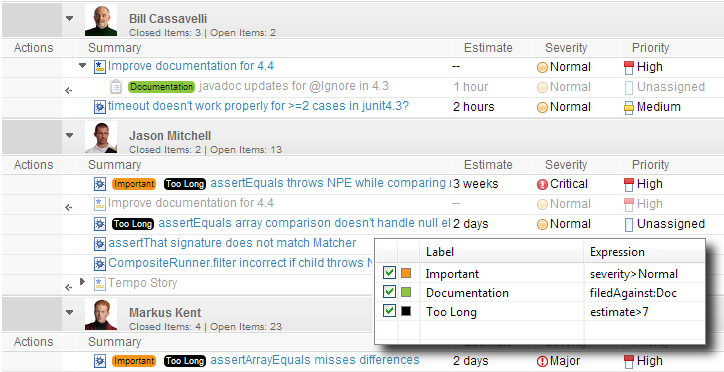
Colorize
Colorize rules are now very simple to use in the plan view editor in the Web UI. There is a content assist that helps you define a quick query expression, and there is an easy to use color picker. Select the drop down indicator to select a color, and select the label to change it.
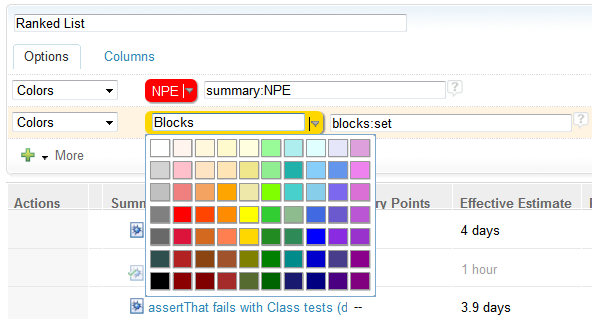
Work items that match colorize rules now show a visual indication before the summary, rather than underlying the whole row with the respective color. This reduces visual noise and allows displaying more than one matching rule. This feature is also supported in the RTC Eclipse Client.
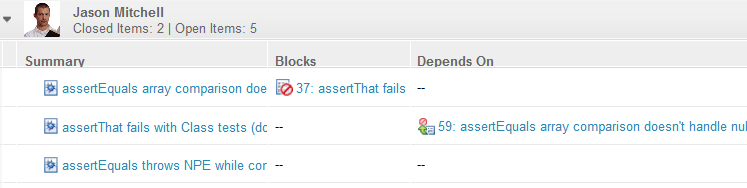
Artifact Links in Plans
Users frequently requested the ability to see work item links in plans. A common example is making it easy to understand if one work item is blocked by another. Now plans allow you to show artifact links in the Web UI, as well as in the Eclipse UI. In the plan view editor select any link and add it as column – that can be a classic Rational Team Concert link or links that point to CLM artifacts. To disclose more information simply hover over a link on the plan. The hover shows detailed resource information, or a summary of multiple linked artifacts.
Working with Plans
Several enhancements have been made to make working with plans much more efficient and easy. These are highlighted below.
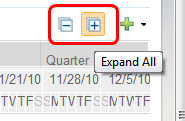
Expand All and Collapse All
You can now expand and collapse the complete hierarchy of a plan in the Web UI. This is only a small detail but it makes working with complex hierarchical plan views so much easier.
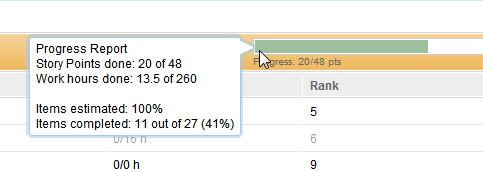
Changing Group Report Bars
The Web UI now supports changing the report bar for groups simply by clicking on it.
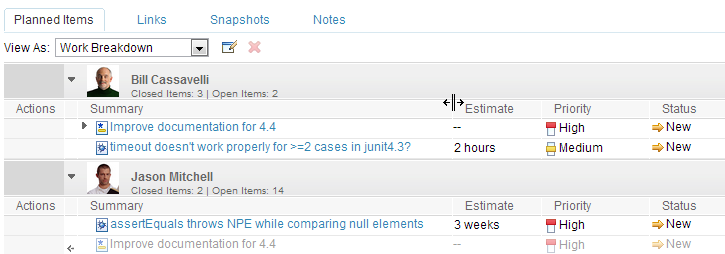
Column Headers
The planned items page now includes headers for columns in the Web UI. This has been frequently requested by many users, and it makes reading the plan much easier. The columns can also be resized using drag & drop. Simply hover over the column separator.
Drag and Drop
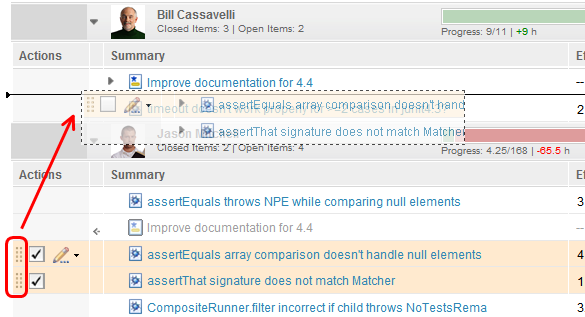
The Drag and Drop support in the Web UI has been enhanced to support multiple work items, and to provide a better feedback. The drag handle has been moved into the Actions column, to prevent from accidentally dragging an item. To drag and drop multiple elements select the items to drag, then use one of the items drag handles to drag and drop.
For better feedback, the items being dragged are now shown right with the mouse cursor. The feedback also clearly indicates if an item will be moved before, after, or as a child of an element.
Please note that it depends on the plans view mode if drag and drop is enabled. In flat view modes, hierarchy is not supported. In views where the sorting is set to calculated attributes such as planned time, drag and drop has also no effect. A special icon shows that the drop operation is not available.
Gantt Chart and Road Map View Navigation
There are several ways to adjust the range presented. Use the buttons to zoom, use drag and drop to size the range. The view can also show the iteration structure for a given area, to help in understanding the impact of a schedule.
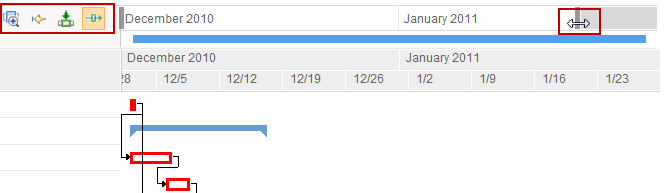
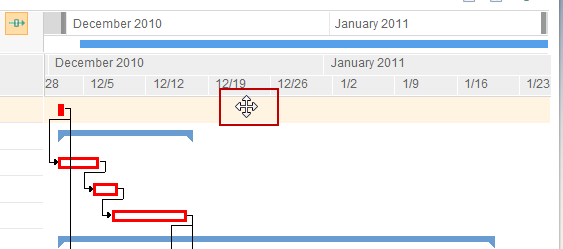
Drag and drop will also allow users to move the presented time window. Click on an empty area and drag to the left or right to move the presented area.
You can also change the estimated time directly on the view. Point to the rear border of the bar symbol, press the right mouse button and drag the end of the bar. Please note: due to Defect 129761, the drag cursor does not show up when hovering over the graphic it shows up once you start dragging.

Plan Links
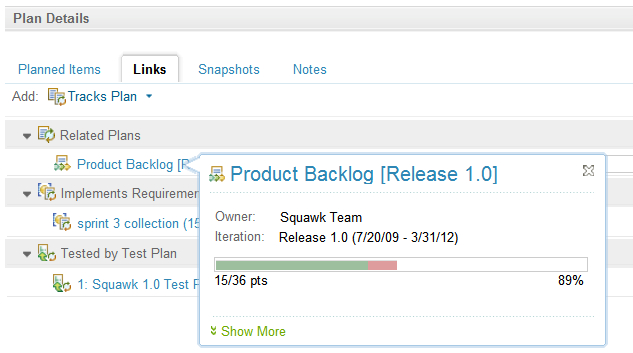
The Plan editor in the Web and in the Eclipse UI contains a new tab that shows plan links. This allows to link plans for easier navigation. The following links are supported:
- Link development plans across project areas
- Link development plans with requirements collections in Rational Requirements Composer
- Link development plans with test plans in Rational Quality Manager
An association between the project areas is required to be able to create plan links between projects. The plan links tab also calculates and shows the plans related due to a shared team area hierarchy or timeline.
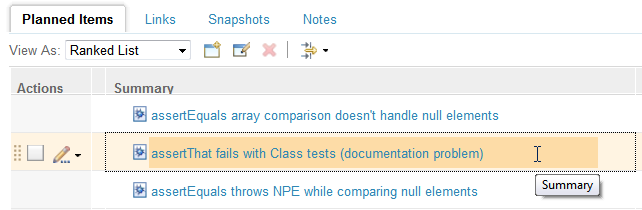
Edit summaries on the fly
Summaries are now so much easier to edit. Simply click next to the summary and it becomes editable. After you’re done editing, you can press Enter, or click somewhere else, in order for the change to occur. This works as long as you see the text edit cursor  and the summary does not show as a link.
Keyboard navigation support
The tab and the shift+tab key allow users to navigate the plan in the Web UI for better accessibility. In addition the Web UI was enhanced to make editing items on the plan easier. Once the planning area is selected, for instance a group or a work item, you can navigate using the cursor keys. Cursor-Right and Cursor-Left changes the selected column. The Cursor-Up and Cursor-Down key select the column in the work item, above or below. You can use SPACE to select or deselect the current work item for later use in an action. You can use the ENTER key to start editing a column value.
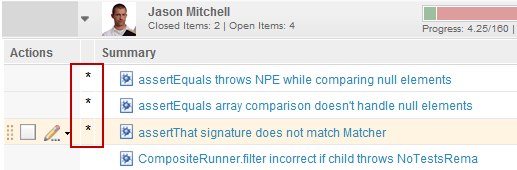
One Save on Multiple Changes
The persistence model behind the plans has been enhanced to allow multiple changes without the need to save them immediately. Unsaved changes are represented in the Web UI by an asterisk. The option to automatically save changes is still available for convenience.
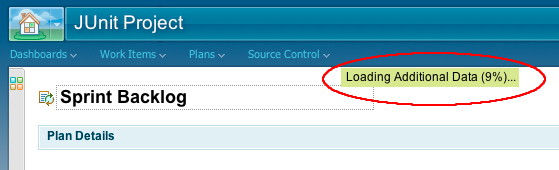
Performance Improvements
Sometimes plans are huge and loading them takes a really, really long time. A reason for this taking so long is that whenever you open a plan it needs to be prepared for everything you could possibly do with it. For instance, for all team members all absences are loaded, the work time is loaded, the scheduled times are computed, etc. This takes some time and you can enjoy the result when you work with the Planned Time view mode. But what if you don’t? Then all that work and waiting was for nothing. Therefore, plans now do only what you asked them to do. Instead of doing everything upfront we load data and do fancy computations on demand.
Please note that for the Web UI, web browser performance has an impact too. We strongly suggest using the latest supported web browser version for best performance.
Risk Management
Work item functionality and planning have been extended with basic risk management. The traditional planning template provides a work item type called Risk, with some new presentation and automation to calculate the risk’s exposure based on its probability, impact and precision.
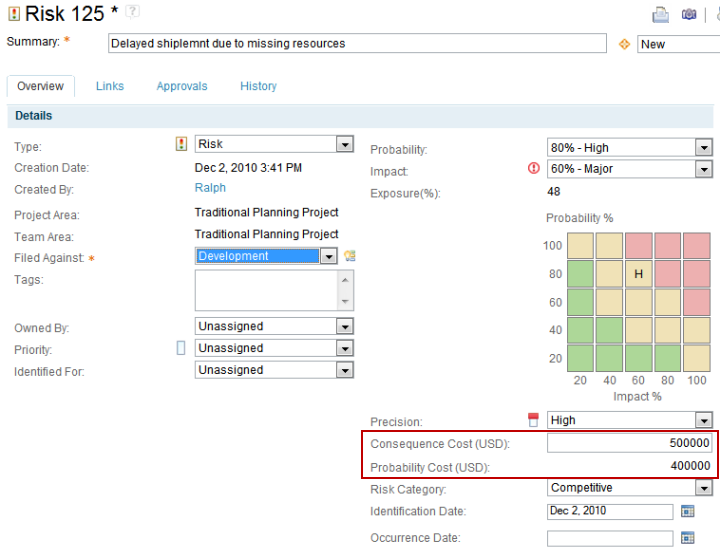
Together with the planning component, the cost of the risk can be calculated. To use the financial risk calculation with the planning component, it needs to be configured in the planning section of the process customization data.

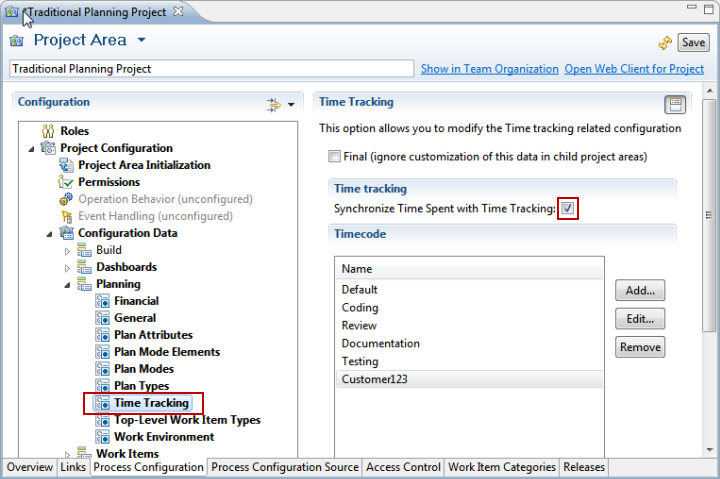
Time Tracking
The planning component, in conjunction with the work items component, now allows basic time tracking on time codes. The time codes can be configured in the planning process customization data. The time tracking also allows users to synchronize the time used in time tracking to be cumulated as the time spent attribute of the work item. When this option is checked the time spent can only be set using the time tracking user interface.
For time tracking, work items have been enhanced with an additional tab that allows users to add time entries for hours worked. The resolution of time entries is currently by hour. To enter time entries the user must be the owner of the work item.
Plan Snapshots
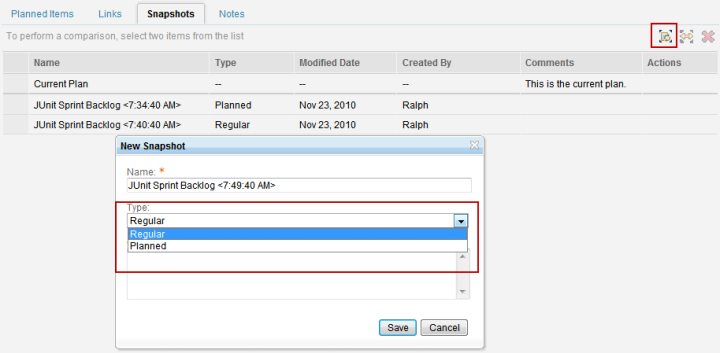
Plans are created from live data and reflect the current status. This is great, and it allows you to adjust the plans while working to get the deliverable ready. Unfortunately, it does not help you with the nagging questions you get from outside of your team: How did the plan change and what is the impact of it? RTC 3.x now introduces Snapshots on plans, to help you in answering these questions. Snapshots are only available in the Web UI.
You can create a snapshot of a plan at any time You can provide a name, a comment and a type for the snapshot. The snapshot types available for your use depends on the process template the project areas is based upon. In the traditional planning template, the snapshot type planned helps to distinguish the snapshot currently communicated as planned, from the other snapshots. It is only possible to have one planned snapshot at any time. When creating another snapshot with type planned, the current snapshot of type planned changes to the type regular. It is possible to create any number of snapshots of type regular.
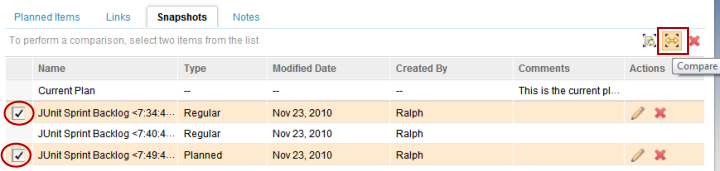
The snapshot view provides the capability to edit snapshots. You may want to provide a better comment for snapshots that are interesting and should be preserved, or to change the type. You can also delete snapshots that are not needed anymore to reduce the footprint.
Snapshots can also be compared from here. Select the snapshots to compare with each other and launch the comparison.
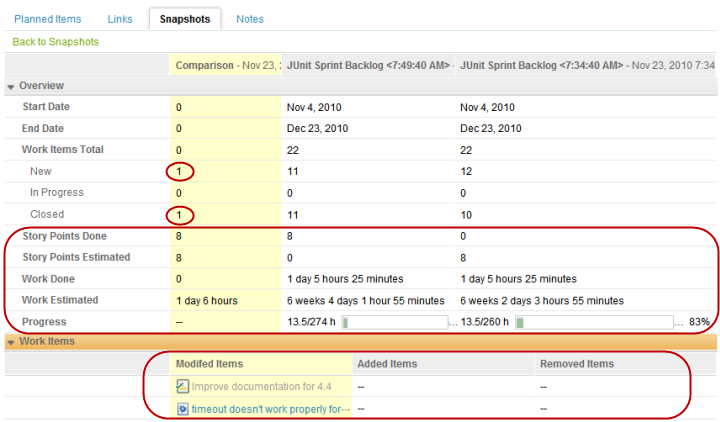
The comparison view comes up and provides the user with information about the changes between the two plan snapshots. In the comparison below, one work item changed its state from new to closed. The associated story points are marked as done, and the estimated effort changed by one day and 6 hours. Below the comparison overview, where a detailed list of work item changes is also provided.
Traditional Planning with RTC
The traditional planning support is provided with the Formal Project Management process template. To use it, you need to create a project based upon this process template. For production usage, especially if you customize the process, it is recommended that you create a new process template derived from the templates shipped with RTC. The process template should have your own unique process ID. This prevents you customized template from being overwritten if you redeploy the templates shipped with RTC later.
The easiest way to do get your own work item template with your own ID is by exporting the customized process template and then importing it. In the import process, during the duplicate ID message, select change identifiers and provide a new identifier such as com.mycompany.process.formal.v1 and a descriptive name. This can be done in both the Web UI and in the Eclipse Client using the Process Template administration.
The template can then be used to create a new project to get used to the formal project management with RTC.
A project created from the Formal Project Management Template provides the Phase Plan and Release Plan plan types. Both plan types include the traditional planning capabilities. By default, plans of both plan types will show the work items planned for the iteration and the sub iterations that are configured. Both plan types provide specialized view modes. The Work Breakdown and Schedule view provides an overview about the work breakdown structure and the resulting schedule, including the Gantt chart. The phase plan only shows the work items planned for one phase. The Release Plan will show the work items grouped by iteration or phase. This helps users in scheduling work items to be implemented in a specific iteration or phase, and provides an overview about the what is planned to be done in which iteration.
By default the plans show only top level work items. This helps by reducing the amount of data, and provides a better overview about the important tasks. The plans can be configured to also show execution items.
You can edit the plans using both the Web UI and the Eclipse Client. If you want to use the new Gantt chart capabilities you have to open the plan in the Web UI. The Gantt chart view is only provided in the Web UI. The Eclipse UI will only show the work item attributes of the view.
Import Project Plans
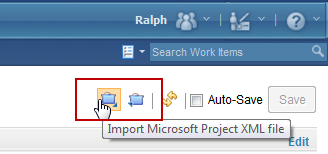
The planning component now supports importing and exporting of project plans. Import and export of plans is only supported in the Web UI. The import uses the Microsoft Project XML file format.
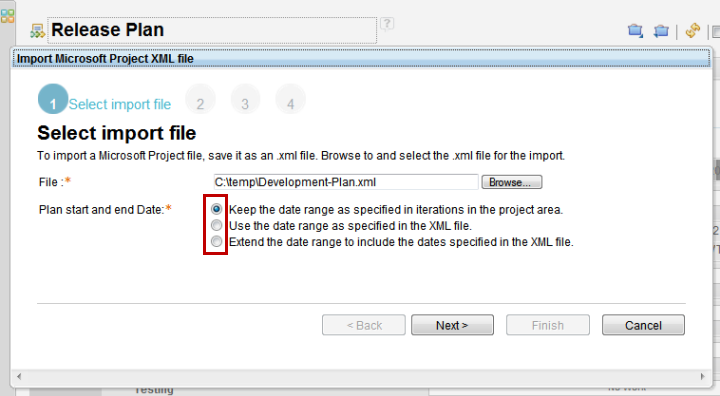
First select the file to import. You have several options of how to handle the plan dates during the import. You can keep the dates specified in your timeline. The import will then change all dates to be relative to when the import happens. If the XML file provided contains dates you want to keep, you can select that you want to use the data provided in the XML file. You can also choose to let the import extend your current timeline to fit the plan into it.
The next step provides the option to map the task types of the external plan to the work item types available in your project area. The external summary task should be mapped to a top level work item type. The external task should be mapped against an execution item type.

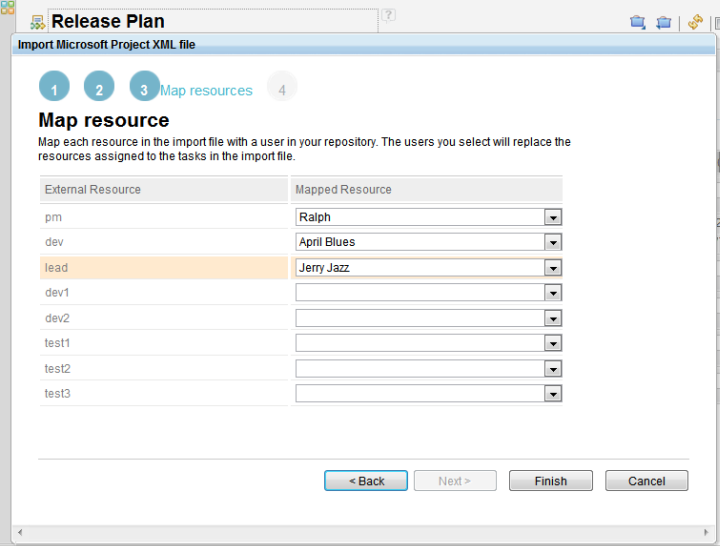
In this step you can map external resources used in the plan to resources from the Jazz Team Servers user list. The mapped resources will automatically be assigned to the imported tasks. Tasks that are not mapped will remain without owner. Please note: the users will not be added to the project. For users assigned to imported tasks, the planning component will provide information that these resources need to be added to the project or an enclosed team.
Selecting Finish will start the import process, which will finish with a summary.
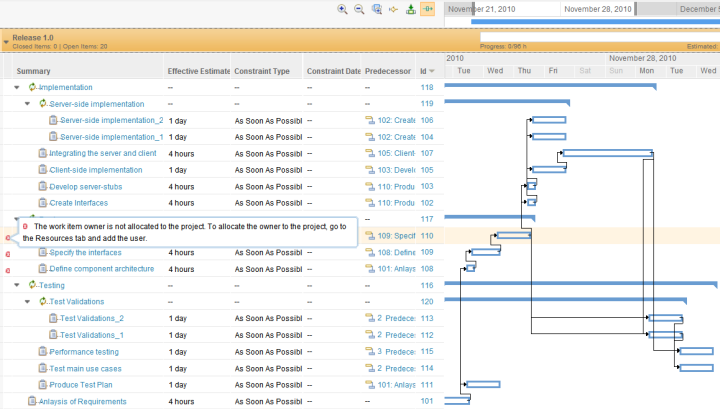
You can now see the imported tasks in the plan. The image below shows some assigned owners not being part of the project. This can be fixed by adding the resource to the project later.
Repeated importing results in duplicate work items
The import process currently can not detect tasks and update work items that already have been imported. Importing the same or a slightly modified plan several times will not result in updated tasks, but will result in the tasks being created multiple times. Once a plan has been imported, you should only work in RTC.
Exporting Planning Data
You can export your current plan as Microsoft Project 2008 project XML file, in order to share it with users that don’t have access to RTC.
Critical Path
The traditional planning component calculates the critical path and highlights all work items on the critical path. It also calculates the projected completion time.
Resources
You can add and remove resources to the plan and modify the date ranges for resources on the plan. You need to have at least the Project Admin role to be able to add users to a plan. Adding a user adds the person to the process area the plan belongs to.
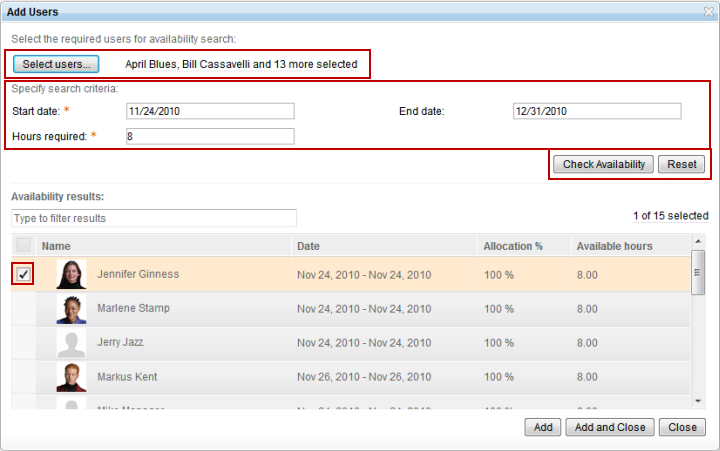
When adding resources it is possible to select several users and search for availability in a specific date range, with a specific availability threshold. The search returns users with sufficient availability. After selecting the desired users they can be added to the plan.
Adding resources to the plan will also add the resource to the project, in case the resource is not on the project already. The users added to the project will have no role assignment initially, which is presented in an information area that also provides a link to the project administration pages, where the roles can be assigned.

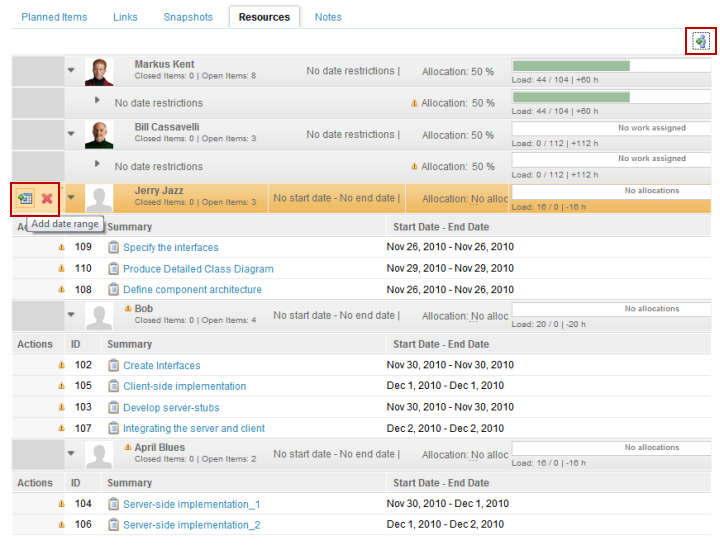
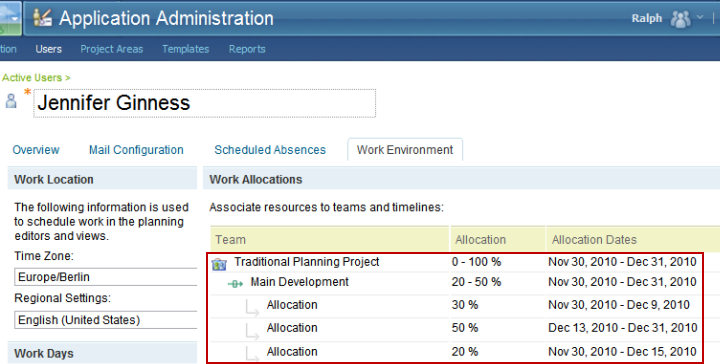
Resources can be added for the duration of the whole project with a specific rate of availability. It is also possible to add resources for specific date ranges.

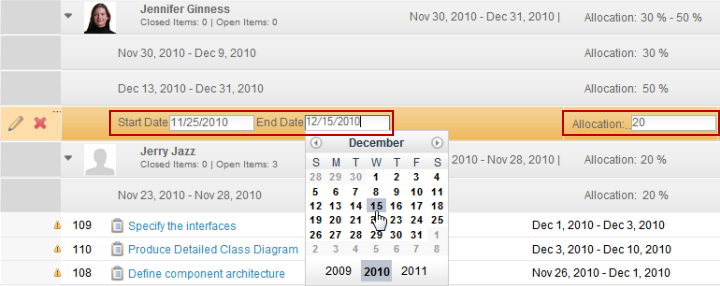
First add a date range. The date range needs to be specified. The specification includes start and end date as well as the allocation in percent. Please note that you must enter the end date before you will be able to select a future start date. All dates after the current end date will be unavailable for selection. During the save operation the date range gets checked for over-allocation of the resource.
Allocations can also be edited and removed later. The allocations will be automatically reflected at the user configuration in the CCM application. Changes to the allocations here will be reflected back in the plan. Only a project administrator can modify the allocations. By default the users are blocked from editing their own allocations by a setting in the Work Environment section of the Planning Process Configuration Data. This setting can be changed to give users the permission to change their own work allocations.
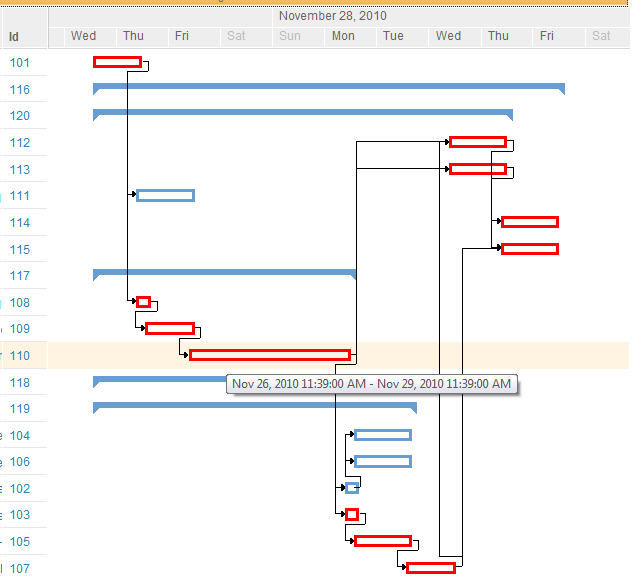
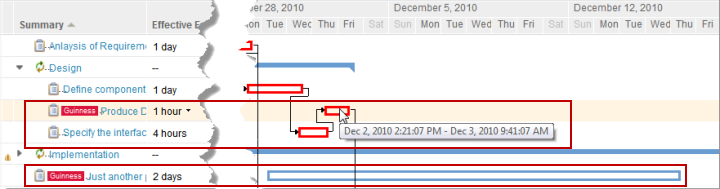
Information about the allocation of the task owner and the task being the critical path is used for scheduling the work. A task planned to take a day (8 hours) will stretch to three days when assigned to a resource allocated for 33% of a full 8 hour day. The start date for such a task will be in an allocated period and might stretch to another allocation period if not finished within the first period. Tasks on the critical path will be scheduled as soon as possible and preempt available time over tasks not on the critical path.
The tasks marked with Guinness below show the effect. The 2 day task at the bottom starts as soon as the owner is available. It stretches over several days because of a 30% availability. The task on the critical path is scheduled with all available time as soon as possible. Because of the resource’s 30% availability and a late start, it stretches into the next day. After completion, the prior task is scheduled again. Due to a gap in the availability from December 9th to December 16th it stretches out to December 16th.
Snapshots
Snapshots help to understand how plans change over time. The basic functionality is shared across all process templates. In traditional planning snapshots have additional functionality.
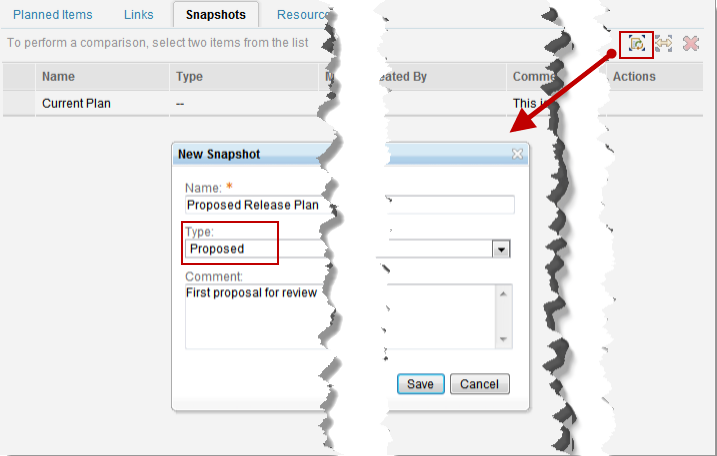
If you are satisfied with the plan after some initial planning, take a plan snapshot to capture the current task start and end dates as proposed.
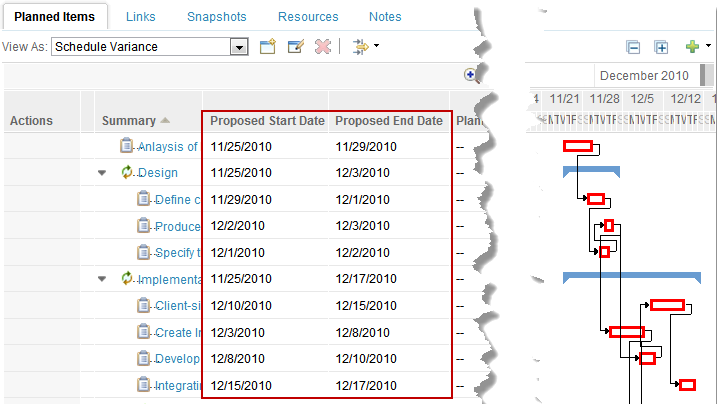
The proposed start and end dates are now set in the planned items. The easiest way to review the dates is in the Schedule Variance plan mode.
Typically the plan would be refined iteratively until it reaches a state that is satisfactory. During this process snapshots of the type Proposed can be used to capture the latest proposed state of the plan. The planning component only maintains one snapshot of type Proposed. Creating a new snapshot of type Proposed changes the current snapshot of type Proposed to the type Regular. This allows keeping the older snapshot for reference, and to allow comparing two snapshots to gain a better understanding of the changes in the plan. Additional snapshots of type Regular can be created any time to keep the state of a plan for later reference.
Once the plan reaches a state that is acceptable to start with, you can create a special snapshot of type Planned. Creating this snapshot also sets the planned start and end dates to the dates calculated in the plan. While taking the snapshot, it is also possible to let it update the iteration dates for the configured iteration. This only works if the start and end dates are within the start and end dates of any enclosing iteration. Otherwise you will have to modify the timeline manually to fit the schedule.
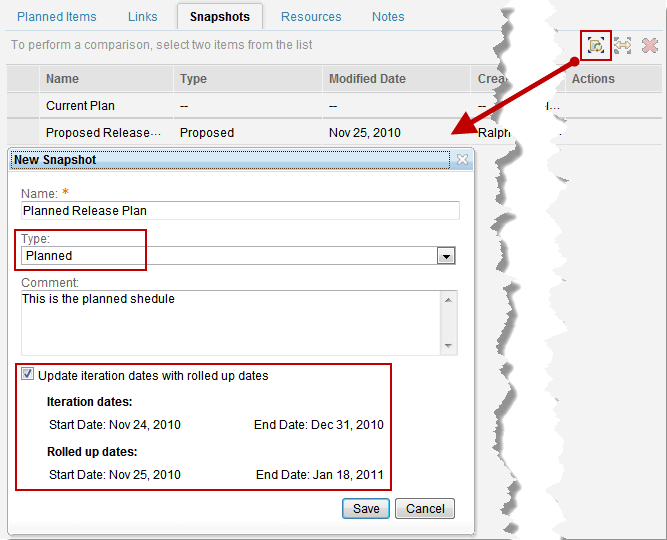
You can create another snapshot of type Planned, should the plan change. Only one snapshot of type Planned can exist at any time.
The easiest way to review the proposed and planned start and end dates is in the Schedule Variance plan mode.
Agile Planning Enhancement
The agile planning support has not changed that much, except most of changes above also apply to the agile planning. A good article about agile planning can be found here.
Road map view
The agile planning component provides a Road map view instead of the Gantt Chart view. To display the Road map view add the Scheduled Time attribute to your view mode.

The Road map view is only available in the Web UI. It provides the same drag and drop support described above. In addition it shows blocking dependencies between work items graphically.

Schedule Risk Assessment
The schedule risk assessment calculation now calculates the completion probability of stories by taking the risk of the implementing tasks into account. Furthermore, the risk indication is shown using a new visual style.
The schedule risk assessment calculation can now be enabled in every sprint plan by simply adding the “Completion Probability” column.
For more information
- Effective Planning with Rational Team Concert 3.0
- Getting Started with Planning in Rational Team Concert 3.0
- Customizing a process template for formal project management
- Customizing the Agile Planning tools in Rational Team Concert 3.0
- Progress Bars, Load Bars, and the importance of estimating your work in Rational Team Concert 3.0
- Using the My Work view in Rational Team Concert 3.0
- Getting Started with Planning in Rational Team Concert 2.0.0.2
- Planning in the Web UI with Rational Team Concert 2.0.0.2
- Effective Planning with Rational Team Concert 2.0.0.2
About the author
Ralph Schoon is a member of the Jazz Jumpstart tem. He can be contacted at ralph.schoon@de.ibm.com.
Copyright © 2012 IBM Corporation