Effective Planning with Rational Team Concert 4.0
This article focuses on the Planned Items page of the plan editor. It outlines best practices and reveals tips and tricks that come handy for anyone. For a general overview of the other pages see this article Getting Started With Agile Planning.
Terminology
This document assumes that you are working with a Scrum based project. Some concepts and terms described in this document are specific to Scrum and might not be available in projects based on process templates other than Scrum. Further, the plan views described in this document are the default plan views for Scrum based projects. If you have migrated your database from a previous version of RTC or changed the plan views manually, different plan views might be available or might show different information – depending on the actual configuration.
If you are still working with Rational Team Concert 2.0.0.2, you might want to check out the previous version of this document.
General Information
You can expand the plan editor's header (labeled Plan Details) by clicking on it. This reveals the team area and iteration the plan is configured for, as well as the plan type.
On the right side, you can find information about your plan's progress. For example, in a Sprint plan, you can find its burndown chart in this section; while in Release plans, burndown and team velocity charts can be found. You can also switch between its progress, both in hours as well as story points, and the overall work load. By hovering over the progress and load bars, detailed informations can be revealed.
See Progress Bars, Load Bars, and the importance of estimating your work on how to read the diagram. The bar diagrams are live: try adding or changing a work item to see them update in response.

Working with the Planned Items
By creating a plan for a specific team (or project area) and an iteration, a set of work items is implicitly selected from the repository, depending on the Plan Type. These work items are loaded and displayed in the Planned Items page when opening a plan. Every work item is represented as a row showing a concise summary which allows for a quick overview and in-place editing.
Tip: You can drag and drop columns to sort them, only in plan edit view. The Action, Marker and Summary columns can’t be sorted.
Tip: You can resize the columns by dragging the vertical edges of each column in the header.
Tip: Hover the mouse over a work item's value to see the column name.
The Planned Items page provides different views, called plan views. The active plan view can be selected in the View As drop down at the top of the Planned Items page. Depending on the active plan view, selected attributes are shown for each work item, work items are automatically integrated into logical groups, the parent-child relations are outlined, sorting is applied, and work items deserving special attention are highlighted.
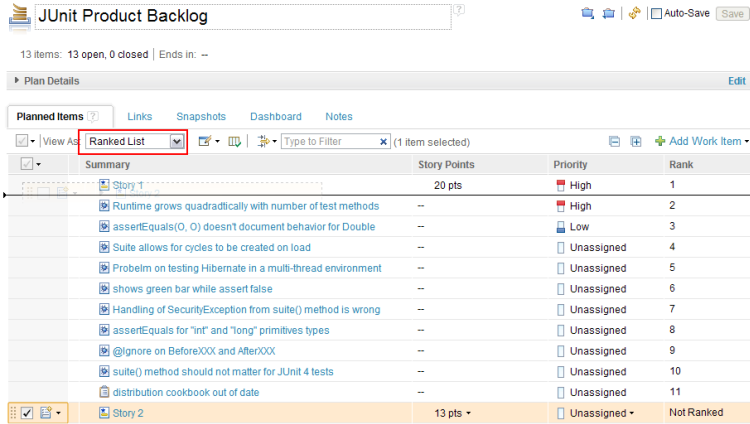
Furthermore, some plan views define filters, therefore not all work items might be shown on the plan. This typically applies to plan views that focus on the work ahead, such as the Ranked List, and resolved work items. You can easily check how many work items are filtered out directly above the items themselves.
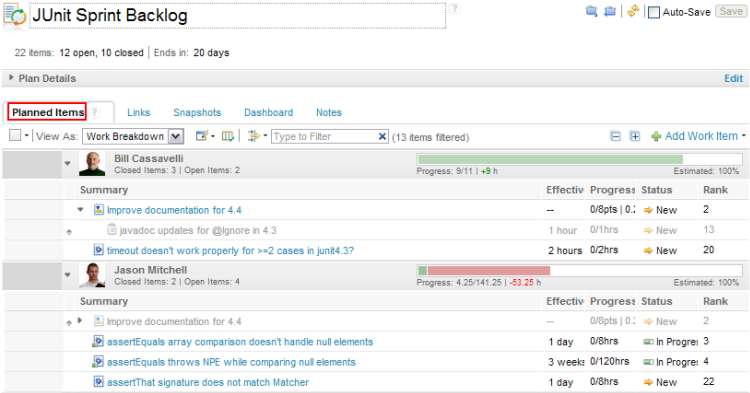
However, sometimes the opposite is true as well: Work items integrated into logical groups are shown more than once on a plan if a parent work item does not belong to the same logical group as one of its children. Each work item is assigned to exactly one group, its primary group, where it is normally shown. All other occurrences of that work item are shown grayed out and decorated with an arrow icon in the leftmost column in order to indicate that this is not the work items primary group. Hover over the icon to see why this is the case.

In the example above, the work items with the rank 13 and 7 (visible in the rightmost column) are shown twice. This is because work item with the rank 13 is a child of work item with the rank 7 and – due to different owners – both belong to a different primary group.
Editing Work Items
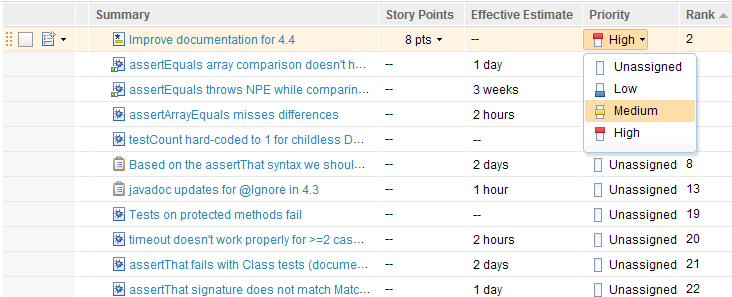
The plan editor also allows modifying most attributes in-place, e.g. click the priority value to see a menu allowing you to choose a new value.
Tip: The work items summary can be edited by clicking to the right of the summary.
Tip: Use the context menu in the first column to change additional properties, such as the owner or the iteration the work item is planned for.
Properties of a work item not shown in-line, such as the description, can be viewed and edited by choosing Edit Work Item under the context menu located in the first column of each work item. This opens up an lightweight work item editor.

Alternatively, you can always click a work item's summary to open it in the Work Item editor.
Creating Work Items
The Planned Items page is the perfect place to create a lot of work items at a time.
Note: Newly created work items will, at least, inherit the team area and iteration from the plan.
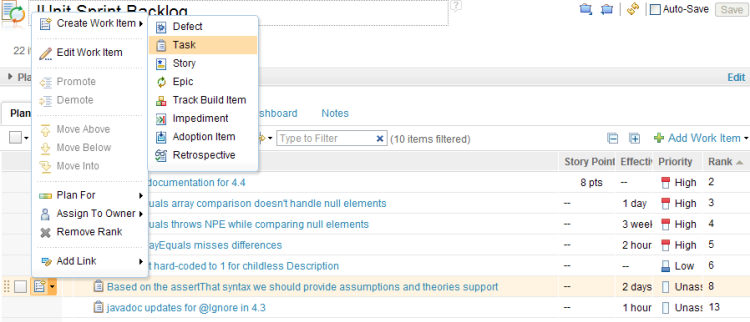
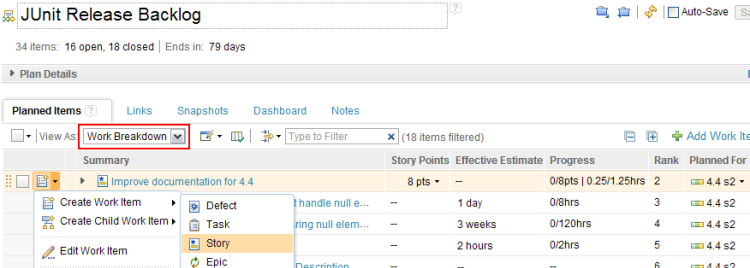
The fastest way to create a work item in a plan is to simply use the Create Work Item button, located in the first column of every work item. Click it, select a work item type, and a new work item will be created as a sibling below.
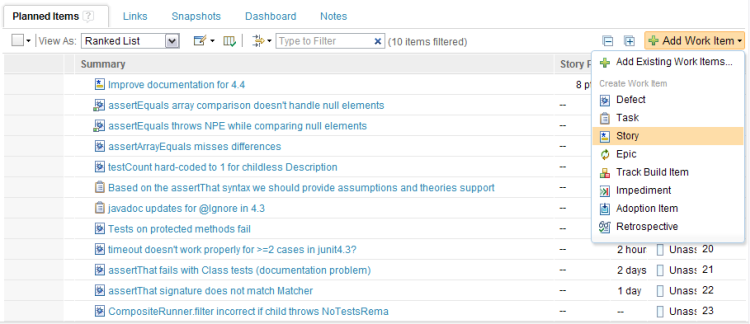
You can also use the Add Work Item action on the top of the planned editor page to create a work item. This is especially useful to add a work item to an empty plan. Additionally, you can add an already existing item to a plan, where the category and iteration will be modified so that the work item will be part of the plan.
If you are in a plan mode which displays the hierarchy relationships between the work items in a tree-like fashion, you also have the Create Child Work Item option in each work item's context menu, which will create a new work item and set its parent to the work item in context.

Re-arranging / Moving Work Items
Work items can be moved within the plan. Depending on the active plan mode, the move modifies the respective work item's attributes, changes the parent children relationship and so on. For example, moving work items in a Sprint Backlog plan's Work Breakdown to a different owner group changes the Owned By attribute of the work item. Likewise, when moving a work item up or down while the Ranked List plan mode is active, changes are applied to the work item's Rank and Priority attributes.
This can be achieved in different ways. The doted area in front of every row allows to grab an item, drag it and then drop at the desired position. Depending on the plan view, you can insert the dragged item between existing items, you can drop it on a work item to make it a child of the work item where you dropped it or you can drop it on a group to set the respective attribute value to the group value. If multiple work items are selected using the checkbox, the drag operation applies to all selected items. Note that not all move modifications are valid in all plan views: the mouse cursor will indicate if you can drop an item.
You can also drag items onto the reference cell to create a new relation. For instance add the ‘Affected by Defect’ column and drop work items onto it. There are many drag sources: Other plans, the work items opened in the Eclipse or Web client, URL from chat windows etc.
Alternatively, items can be re-arranged using the context menus: first select the item(s) to be moved via the checkbox, then use the context menu of where you want to move the item to either insert above, below or to make it a child. You can also put an item in a group by selecting the Move Into action on a group. These actions are only available when at least one item is selected and the move request is valid, which depends on the plan view.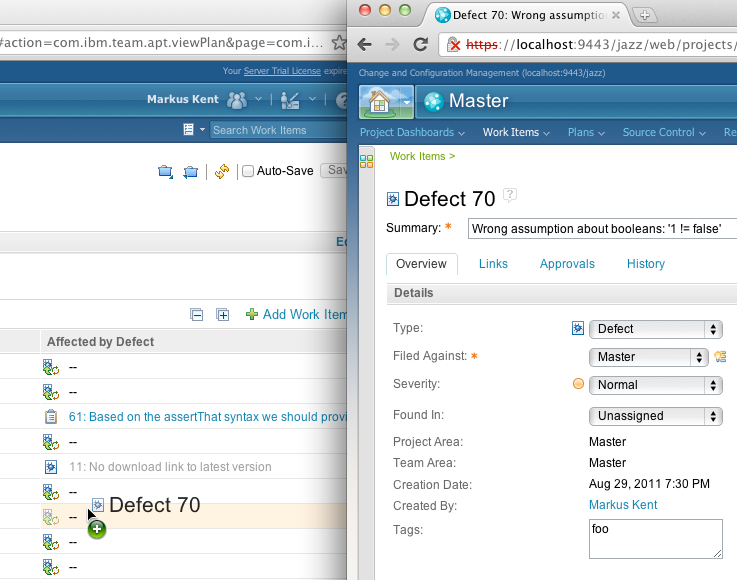
As a shortcut, work items can be promoted and demoted directly using their respective context menu. Promoting and demoting work items modifies the parent-child links. While demoting causes the work item to reside one level lower, promoting causes the work item to appear one level higher. This action is only available in plan views that outline the parent-child relationship and if no other work items are selected.
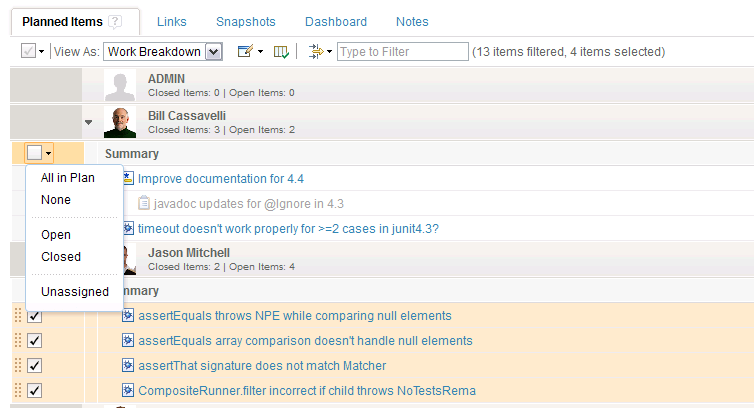
The plan has a check box to manage selection of multiple items which has three states:
- All in Plan selected – checked in black
- Some elements selected – checked in gray / faded
- No elements selected – unchecked
Tip: You can select the entire hierarchy by selecting a work item, while pressing the Alt key.
Tip: The checkbox is disabled if all the items in the plan are filtered.
Using the Keyboard
The plan can be navigated using the keyboard with the arrow keys. Use the arrow up and arrow down key to select a row. Hitting the Return key opens the selected work item. Refer Shortcuts in Rational Team Concert.Saving Changes
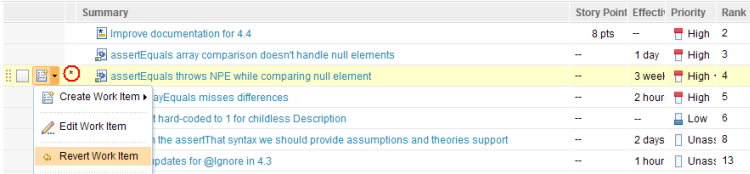
Work items modified within the plan editor are decorated with an asterisk. When saving a plan, all modified work items will be saved. Changes to a single work item can be made undone using the Revert Work Item action in the context menu.
Tip: To review the changes before saving, enable the Unchanged Items filter by selecting the check box under the Filter icon ![]()
Note: While modifications to work items can be made at any time, you can only save the changes the process specification allows you to.
Tip: You can tell the plan to save all the changes you made right away. To do so, check the Auto Save checkbox in the plan header.
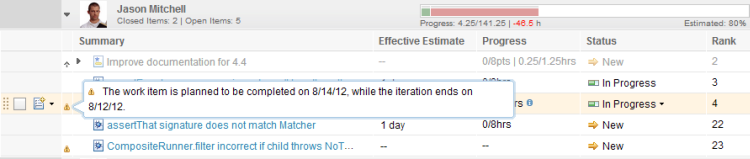
Potential Plan Problems
While working with plans, potential problems are detected and annotated. These problems include, but are not limited to, missed deadlines and work items that probably won't be completed in a sprint.
Note: The specific planning problems, which are detected by the plan editor, can be enabled and disabled using the Plan Check option in the Plan View configuration. To enable a Plan Check in a Plan View, edit the view using the context menu and choose the More option to enable a plan check into your view.
Release Planning
When planning a product release, product owners execute a top-down approach by writing down epics and stories, then assigning the stories to the individual sprints to be implemented. The complexity of these plan items is measured using an abstract size, pre-configured to Story Points. Among other things, this complexity information is used to roll up the complexity of higher level plan items and to calculate the progress information for Size progress information.
The product owner creates a plan per team- or project area, targeted for the release iteration to be tracked.
Note: The Release Backlog icon  identifies release backlog plans.
The Planned Items page of Release Backlog plans offer five predefined plan views, each designed to assist in common release planning tasks.
Work Breakdown
The Work Breakdown plan mode is the perfect place to sketch and write down epics and stories planned for the product release, as well as to define the plan items' complexities.
The parent-child relationships between work items are reflected in the plan's tree structure. Therefore, these relationships are easily changed by promoting and demoting work items. Additionally, the complexity values of child work items are automatically rolled up to the parent.
The work items are sorted by their respective rank, which allows to defined their relative priorities while placing them on the plan. More information about the rank can be found in the Ranked List section below.
Note: Whenever work items are sorted by their rank, the relative sort order applies to all other plan views and even plans. For example, whenever a work item is ranked higher than another, it will always be shown before the other work item – provided that the two work items are shown as siblings – regardless of the plan or plan mode you are looking at.
Tip: Mouse users can use the context menu to create work items, drag and drop them between existing items to rank. In order to demote and promote work items using the mouse, drag and drop work items on the new parent work item.
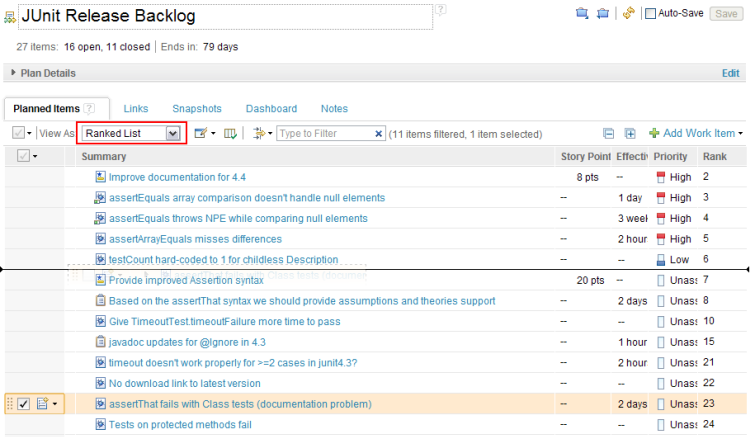
Ranked List
The Ranked List plan mode provides a simple way to rank unresolved work items, by defining an order which describes the relative priority among the plan items. While the ranking information is the same as in the Work Breakdown plan mode, the Ranked List displays all work items as a flat list, omitting the parent-child links. This allows to define a ranking among all items on the plan and not only the ones with the same direct parent work item.
Similar to the Work Breakdown, the complexity and estimate is shown for each plan item and execution item, respectively.
Tip: Use the same mouse and keyboard gestures to edit the plan as in the Work Breakdown mode. Note that in this mode, the parent-child links cannot be changed.
Note: The Priority attribute is used as a coarse grained ranking value only. Each work item can be assigned to a relative position among the visible sibling work items of the same priority.
Note: Work items that were assigned a new priority outside of the plan editor are shown at the end of the respective priority group.
Iterations
After the plan items are created, estimated and ranked, the Iterations plan mode helps to distribute and plan the stories for the sprints.
While the plan items outline the parent-child relationship sorted by the work item's rank, similarly to the Work Breakdown plan mode, they are now integrated in logical groups, depending on each plan item's Planned For attribute.
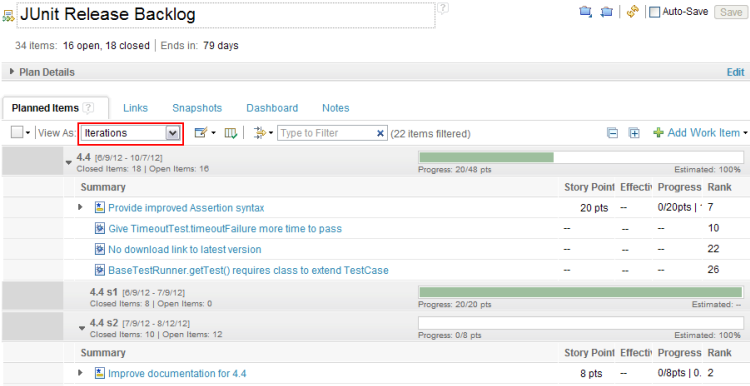
Tip: Use drag & drop to easily reassign one or more plan item to a sprint. Drop the plan items on the iteration group to preserve the previously defined rank or drop it to a specific position if the rank needs to be re-adjusted.
Tip: Click the progress bar on a group to toggle between progress based on hours or complexity.
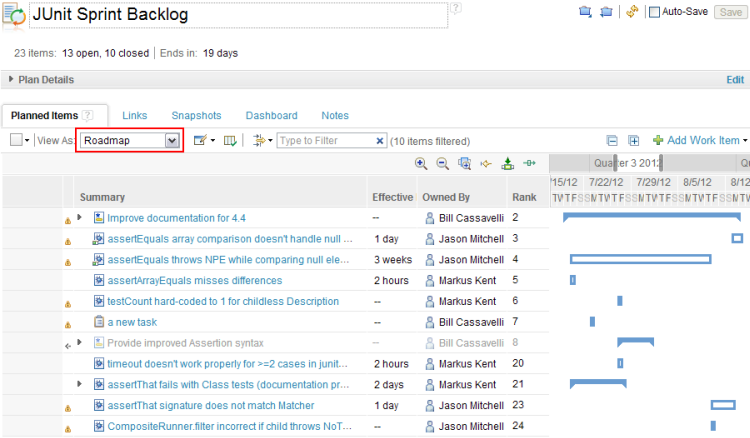
Roadmap
The Roadmap plan mode provides you with a view which enables you to view your workload schedule among team members. It basically is a Gantt Chart representation of the all the work associated with the plan. Plan and execution items are depicted as bars.
The length of the execution bars depends on amount of estimated time needed to finish the work item. Plan item bars run from the beginning of the first execution item until the end of the last execution item.
Plan items which are broken down into execution items are shown as solid bars whereas the ones without associated execution items are depicted as hollow bars. Execution items which are associated with a plan item are shown as hollow bars and if there is no plan item associated with an execution item, no bar is shown for that execution item.
Note: If a plan item is not associated with an execution item, they run throughout the iteration that they have been planned for.

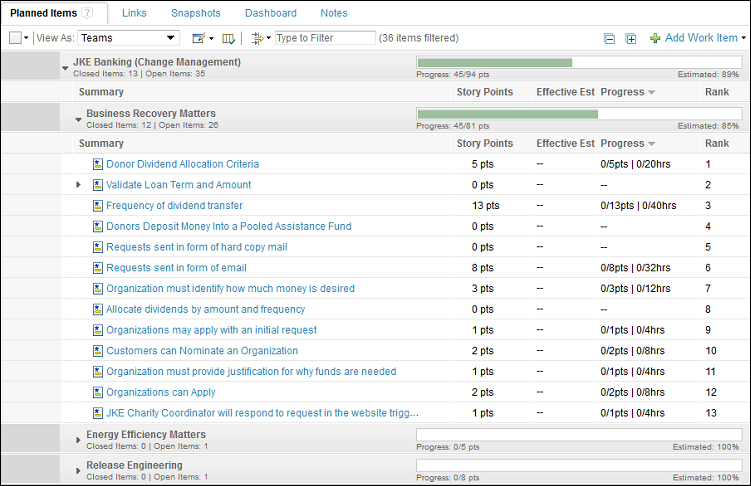
Teams
The Teams plan mode is similar to the Work Breakdown mode except that here you can group the work items by Team Areas.
This view allows you to track the progress of the individual teams and the parent-child relationships between work items are reflected in the plan's tree structure. Therefore, these relationships are easily changed by promoting and demoting work items. Additionally, the complexity values of child work items are automatically rolled up to the parent.
The work items are sorted by their respective rank, which allows to defined their relative priorities while placing them on the plan. More information about the rank can be found in the Ranked List section below.
Sprint Planning
Prior to the execution of every sprint, each team creates its own plan targeted for the sprint. These plans contain all execution items and stories planned for the sprint. In contrast to release plans, sprint plans require the work items to be estimated in working hours. Progress and work load information are calculated, based on the estimates.
Note: The Sprint Backlog icon  identifies sprint backlog plans.
When opened for the first time, a plan only contains work items that have the Planned For attribute set to the respective sprint and are owned by the team. Normally, these work items include the stories previously assigned to the sprint in the Release Backlog plan.
Work Breakdown
The Sprint Backlog's Work Breakdown plan mode is similar to the one found in the release backlog, except that work items are integrated in groups by their respective owners.
Exactly as for release plans, the Work Breakdown plan mode is the perfect place to create and estimate the task work items implementing the stories.

Note: Each team member's progress or work load is shown on the right side of the respective group element. You can toggle the information shown by clicking on the bar diagram. For more information read Progress Bars, Load Bars, and the importance of estimating your work.
Tip: You can change the bar diagram to show the work load by default by setting the Bars option in the View Mode configuration.
Ranked List
The Ranked List plan mode of Sprint Backlog plans allows prioritizing all work items planned for the sprint exactly as it is possible in the release plans.

Taskboard
The Developer's Taskboard plan mode is the best place for the daily scrum. Each row represents a story together with all its child tasks. The story itself is shown in the first column, while the subsequent columns represent the work item states of the implementing tasks: by default Open, In Progress and Resolved.
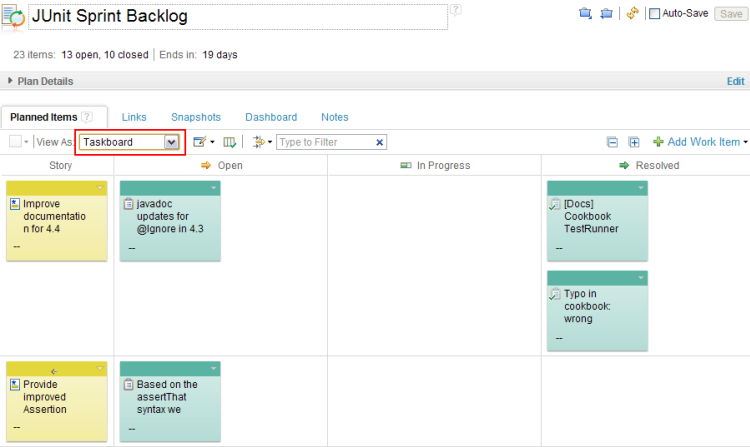
The colors of the sticky notes represent the work item's type and state:
- Tasks
- Defects
- New stories
- Stories in progress
- Implemented stories
- Done stories
- Invalid and deferred stories
Tip: To change the state of a work item, simply drag and drop it in another column, in the same row.
Tip: You can resize the state columns by dragging the vertical edges of a column in the header.
Note: The taskboard can be customized to show the stories in-line with the other work items as well as additional state columns can be shown. Read the Customizing Planning article for details of how to do it.
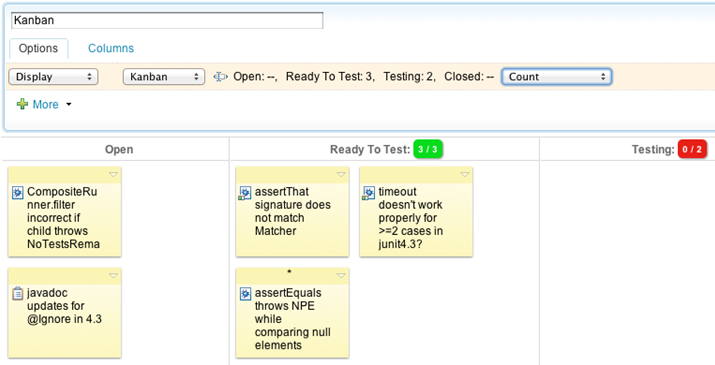
Kanban
You can configure your view to use Kanban as display type and define limits. By default, limits use Count, but you can choose Complexity or Estimates as well. Deviations from the ideal are shown as a small box in the column header. The further your goal is away, the more red the box gets.
Benefits:
- Allow teams to set “work in process” limits and visualize the flow of work.
Where is capacity available? Are the desired limits exceeded? - Helps to optimize the ideal flow of work through the system using a “pull” model.
For example: “Idle” resources creates inefficiency, you can encourage testing to focus their efforts to address the work backlog in the “ready to test” state below.
Planned Time
The Planned Time plan view offers a view on each developer's personal plan. Each team member can easily visualize its past and upcoming work items, as well as the proposed schedule, based on personal sequencing, ranking order, and iteration dates.

Roadmap
Similarly to Planned Time, the RoadMap plan view allows you to vizualise a proposed schedule, only offering a broader perspective than Planned Time. The work items are no longer grouped by Owner, but have instead an extra column indicating that same attribute. They also appear sorted by Rank. This view provides you with an overall look on the plan's items and their dedicated time, always keeping their Rank in focus.
Product Backlog
Work items which are not yet planned for a release or sprint iteration can be managed in a Product Backlog. The product backlog plan needs to be created once per team, targeted for the iteration marked as Backlog Iteration.
Note: The Product Backlog icon  identifies product backlog plans.
Note: To learn more about the backlog iteration and how to configure it, read Customizing Planning.
Tip: Use the Related Plans links in the Links tab to quickly navigate between the current release and sprint backlog plans as well as to the product backlog plan.
Work Breakdown
The Product Backlog's Work Breakdown plan view is identical to the one found in the release backlog. The execution items are filtered by default.

Ranked List
The Ranked List plan view of Product Backlog plans allows prioritizing work items of the product backlog.
Manage Plan Views
Plan Views are a collection of view setting for plans. They define whether a plan is rendered as tree, as taskboard, or as flat list. They also specify which filters are used, how work items are sorted and grouped, what kind of progress in computed, or if colors should be used.
Every process template of Rational Team Concert comes with a set of plan views. They are designed to support best practices but you may have further or more specific needs. Because of that you can modify existing plan views and create new ones.
Next to the currently selected plan view name, you can find a dropdown menu in which you can create, modify and delete plan views. Creating and editing a plan will expand the plan configuration view. There are rows for each configuration aspect, such as filters and sorting. To remove an aspect hover over it and select the remove action on the right. To add new aspect use the More action at the bottom.
Note: Newly created plan views are private to the team and apply to the current plan type. For information on how to promote a plan view for the use by other teams read Customizing Planning.
Tip: Checking the Set this view as default checkbox will make the plan editor open the current plan in the selected view, by default.
Options
A plan can have combinations of several configuration aspects, which modify the way it is presented to you.| Display | By setting the display option plans are either rendered as a taskboard or tree. Without this option plans are shown as flat list. |
| Sorting | Defines how work items are sorted. If omitted, work items are sorted by creation date. |
| Filters | Many filters can be defined to limit the work items that are shown. Note that even though an item is filtered it remains on the plan. You can always check how many items are filtered, above the plan itself. Most filters refer to an attribute or state (eg. filter Resolved Items) but the Expression Filter allows to define a quick query by which plans are filtered. |
| Groups | This option allows to select an attribute by which work items are grouped. For instance, group by owners to triage work, or group by tags to see hotspots. |
| Colors | Colors allow you to colorize work items based on their matching of a quick query expression. |
| Bars | Allows you make groups show either progress or load bars. Note that load bars only work when group by owner or planned time is enabled. For progress bars, you may chose between progress based on hours or complexity. |
| Plan Checks | Plan checks analyze your plan and flag potential misplanning. For example, there could be a conflict between the schedule and the desired completion date of an item, or a mismatch or priorities, etc. |

Columns
Columns can easily be added to, removed from and organized in a plan view, via the Columns configuration tab.
To add a column, simply press the Add Column button, located at the bottom of the configuration view. To remove one, hover over the desired column and press the Remove button, on the right side.
Columns can also be moved and resized. You can organize the order of the columns in the plan, using the Up and Down arrow buttons, located on the right of each column row. Finally, you can specify the relative widths of each columns by simply clicking over the column's specified width and typing your new desired value.
Tip: Notice the Set Column Adjustments As Default icon, next to the edit plan views icon. You don't always have to type in the column's widths values one by one. You can resize the columns manually using drag and drop over their headers, directly in the plan. Finally, by pressing this button the column's widths values will be updated as default values for the current plan view. One final click on Save, and you're good to go.
Validate a Plan
The Progress and Load bars, located above your plan, aggregate different aspects of it and let you know whether your plan is healthy or not (see this article for details). Such aggregated information is helpful to assess the iteration as a whole, but it does not provide an assessment for specific work items. Estimation of such always comes with a level uncertainty and it is important to quickly know when a certain work item is about to fail. There might be many reasons for this, such as the developer in charge of an aspect overseeing it, estimates being adjusted many times, new unforeseen new tasks appearing, etc.
To assess individual work items, add the Completion Probability column to plan views. This will run a simulation and color work items according to the calculated probability of completion: a color gradient from white to red indicates very probable to won't happen.

The following aspects are considered when the completion probability is computed: Effective Estimate, Minimal Estimate, Maximum Estimate, and Schedule Sequence (after what items is this item planned). For stories with children, the worst child-probability is taken.
Tip: To re-run the simulation select the Refresh button in the header of the plan editor.
Customizing the Agile Planning Tools
While Rational Team Concert comes with pre-configured support for many processes, most aspects of the Agile Planning Tools can be configured. Read the Customizing Planning article to learn more.
Copyright © 2012 IBM Corporation