Install CLM on WebSphere Application Server single server and IBM HTTP Server with IBM UrbanCode Deploy 
Authors: LaraZiosi Build basis: IBM Collaborative Lifecycle Management 5.0.0, IBM UrbanCode Deploy 6.1.0.3, IBM WebSphere Application Server 8.5.5.2
Page contents
- Introduction
- Process design principles
- Detailed process design
- Process to install Install Installation Manager
- Process to install a product
- Application Process to configure WebSphere Application Server for CLM
- Process to create the WebSphere Application Server profile
- Process to create the WebSphere Application Server profile
- Process to create the WebSphere Application Server profile
- Process to run JTS setup
- References
This article shows an examplar IBM UrbanCode Deploy process that can be used to automate the installation and setup of IBM Collaborative Lifecycle Management on a single server. The process also automates the installation and configuration of IBM WebSphere Application Server, and of a reverse proxy based on IBM HTTP Server.
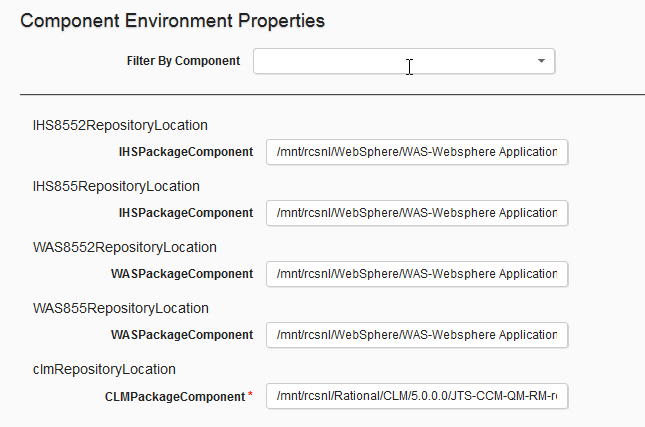
and the following Component Environment properties, that refer to the Installation Manager Repositories from which to install CLM, WebSphere Application Server and IBM HTTPS Server.
 The script contained in the step Install Installation Manager as root or user contains:
The Uninstall process contains only one shell step with this code:
 Process to Install CLM:
 Step to Execute Response File to install CLM:
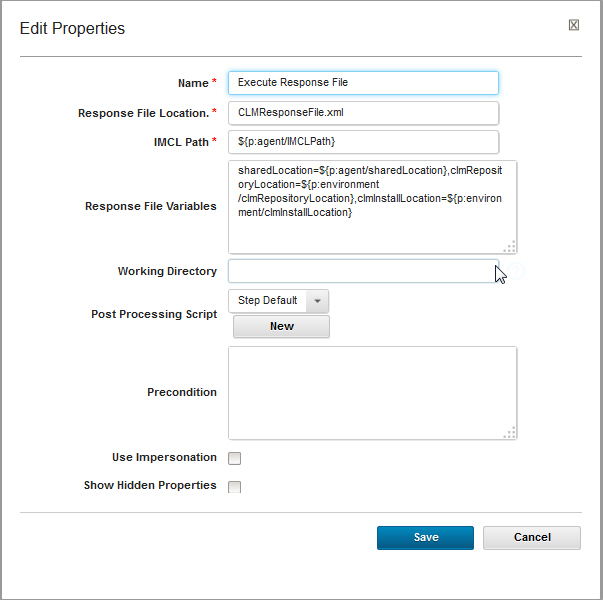 The Step to Execute Response File to install CLM takes the following Response File variables:
 The step to invoke manageprofile.sh to create a WAS profile looks as follows:
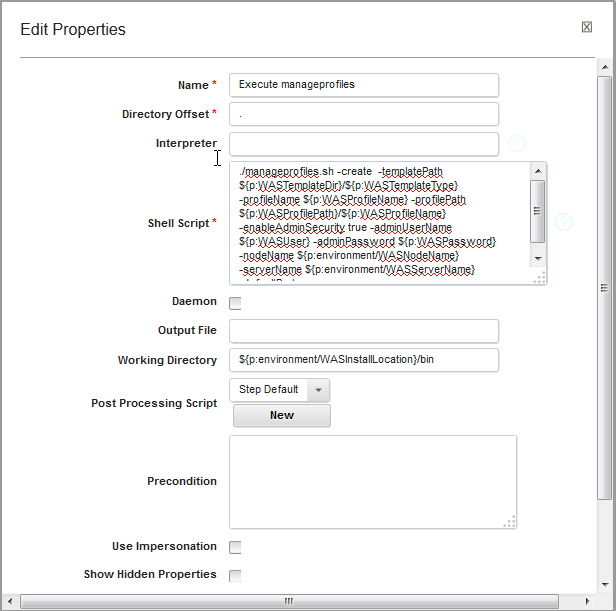 The code of the step is as follows:
Introduction
Topology
There are three machines in this topology:- VM1: contains the installation of IBM UrbanCode Depoy server and one agent used for version imports
- VM2: contains the installation of IBM WebSphere Application Server, IBM Collaborative Lifecycle Management and one agent
- VM3: contains the installation of IBM HTTP Server and one agent
Prerequisites
IBM UrbanCode Deploy processes can only be imported on exactly the same server version and plug-ins. The attached Application process was developed on this configuration:- IBM UrbanCode Deploy 6.1.0.3
- Installation Manager Plug-in 2
- IBM WebSphere - Application Deployment Plug-in 73
- IBM Installation Manager 1.8.0
- IBM WebSphere Application Server 8.5.5.2
- IBM CLM 5.0.0
- Oracle 11g
How to use this process
To use this process, proceed as follows:- Make sure that you have installed the exact versions of the plugins named above
- From the Application page in UrbanCode Deploy, import the Application JSON file
- Add two agents to the Application Environment
- Add the following components to the agent on VM2:
- InstallationManagerComponent
- CLMPackageComponent
- WASPackageComponent
- OracleDriver
- WASProfile
- WASCompleteConfigForCLM
- JTSSetup
- Add the following components to the agent on VM3:
- InstallationManagerComponent
- IHSPackageComponent
- Unzip the attached workspace.zip so to create the directory
/workspace
. If you want to change this path, you will have to adjust it in the Configuration tab of each component. - Download the IBM Installation Manager 1.8.0 installer and copy it to:
/workspace/InstallationManager/1.8.0/agent.installer.linux.gtk.x86_1.8.0.20140902_1503.zip
- Import versions of all the components
- Set up the following Environment variables:
| LDAP.password | |
| LDAPJazzAdmins | |
| LDAPJazzDWAdmins | |
| LDAPJazzGuests | |
| LDAPJazzProjectAdmins | |
| LDAPJazzUsers | |
| OraclePassword | |
| WASNodeName | WASNode01 |
| WASPassword | |
| WASUser | wasadmin |
| WASProfileName | AppSrv01 |
| WASServerName | server1 |
and the following Component Environment properties, that refer to the Installation Manager Repositories from which to install CLM, WebSphere Application Server and IBM HTTPS Server.
Process design principles
Root and user installations
This process assumes that identity of the user that runs the UrbanCode Deploy Agent indicates the wish to install IBM Installation Manager and all the products as that user. This process therefore supports only root installation (using the commandinstallc) or user installation (using the command userinstc) of IBM Installation Manager. Installation Manager Group installation is not supported. For these reasons, also UrbanCode Deploy impersonation is not supported by this process.
The process defines the default installation directories of all products at runtime, based on whether the agent runs as root or as user.
Automating WebSphere Discovery and Topology Discovery
The Plugin WebSphere - Application Deployment offers two steps, called!WebSphere Discovery and !WebSphere Topology Discovery.
They are designed to be used interactively, rather than from a process. Their behavior is described in this Knowledge Center page: Importing resources from WebSphere Application Server.
One key feature of this plugn is that it relies on configuring Resource Roles, described here: Application Deployment for WebSphere plug-in - Roles.
In the normal interactive usage, you would manually invoke the discovery of the topology of a WebSphere Cell, which would create a number of Resources in the Resource Tree, for all Nodes, Clusters, Servers. Then you would manually place components in the correct scope, and by virtue of the Resource Role, those components would inherit all the parameters required to connect to WebSphere Application Server from that scope.
When you attempt to automate this task, you cannot manually place the Components on the Resources, since the Resources do not yet exist (they will be discovered will running the process). This issue can be solved by dynamically creating new Resources of type Component in the correct location in the Resource Tree and then invoking the execution of an Application process that invokes processes of those Components. A disadvantage of this approach is that the versions of those dynamically mapped Components are not visible to the user that invokes the process, as they are selected at runtime.
Detailed process design
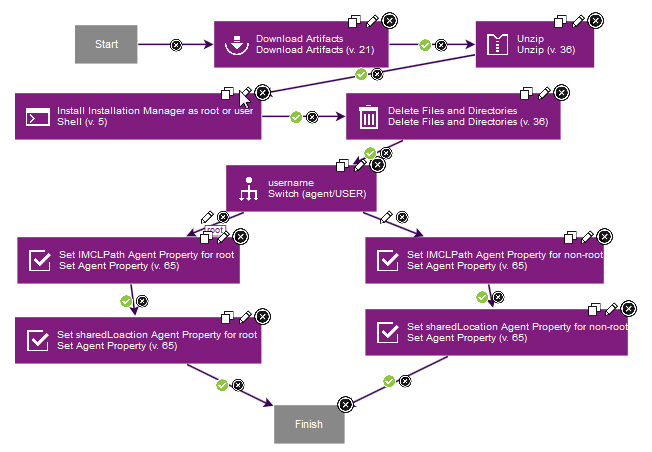
Process to install Install Installation Manager
The Component process to install Installation Manager looks as follows:
The script contained in the step Install Installation Manager as root or user contains:
chmod u+x -R *
user=${p:agent/USER}
if [ "$user"  == "root" ]; then
./installc -log InstallationManagerInstallation.log -acceptLicense
more InstallationManagerInstallation.log
else
./userinstc -log InstallationManagerInstallation.log -acceptLicense
more InstallationManagerInstallation.log
fi
The chmod command is required because the unzip step does not preserve the execute bit of the files contained in the archive.
The predefined variable agent/USER is used to determine whether to install as root or as normal user.
A switch command based on the value of the same variable is also used to set two properties on the agent, as follows:
| Type of user | Variable name | Variable value |
| root | IMCLPath | /opt/IBM/InstallationManager/eclipse/tools/imcl |
| user | IMCLPath | ${p:agent/HOME}/IBM/InstallationManager/eclipse/tools/imcl |
if [ "${p:agent/USER}" == "root" ]; then
cd /var/ibm/InstallationManager/uninstall
./uninstallc
else
cd ${p:agent/HOME}/var/ibm/InstallationManager/uninstall
./uninstallc
rm -rf ${p:agent/HOME}/var
rm -rf ${p:agent/HOME}/etc
rm -rf ${p:agent/HOME}/IBM
fi
Process to install a product
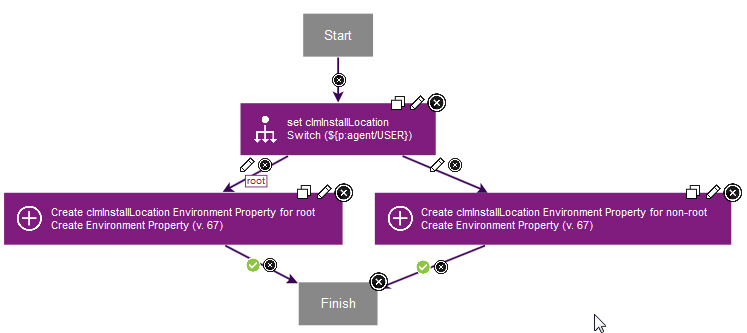
The processes to install the products are all similar, so only the example processes for CLM are shown below. The installation directories of the products are different, based on whether Installation Manager is installed as root or normal user. These installation directories are required by multiple components (for example, when configuring WebSphere Application Server for CLM, you need to know the CLM installation location). It is therefore interesting to store these installation directories as Environment variables. The process that creates an Environment variable does not get access to its value in subsequent steps, because a new version of the Environment is created when a property is added, and that version of the environment is not available to the yet to the currently running process. Therefore the process is split in two: the first Component process sets the Environment variables, and the second Component process actually installs the product using those variables. Process to prepare variables for installing CLM:
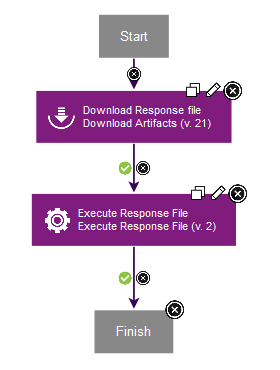
Process to Install CLM:
Step to Execute Response File to install CLM:
The Step to Execute Response File to install CLM takes the following Response File variables:
sharedLocation=${p:agent/sharedLocation},clmRepositoryLocation=${p:environment/clmRepositoryLocation},clmInstallLocation=${p:environment/clmInstallLocation}
These variables must be declared in the Response File that you use, according to the Installation Manager Knoweldge center topic: Response File variables
The uninstall process just runs a different response file, which contains the uninstall command for the profile that was previously installed.
Application Process to configure WebSphere Application Server for CLM
The Application process to configure WebSphere Application Server for CLM is shown below:Process to create the WebSphere Application Server profile
The process to create the WebSphere Application Server profile contains a shell step that runsmanageprofiles.sh.
The step to invoke manageprofile.sh to create a WAS profile looks as follows:
The code of the step is as follows:
./manageprofiles.sh -create -templatePath ${p:WASTemplateDir}/${p:WASTemplateType} -profileName ${p:WASProfileName} -profilePath ${p:WASProfilePath}/${p:WASProfileName} -enableAdminSecurity true -adminUserName ${p:WASUser} -adminPassword ${p:WASPassword} -nodeName ${p:environment/WASNodeName} -serverName ${p:environment/WASServerName} -defaultPorts
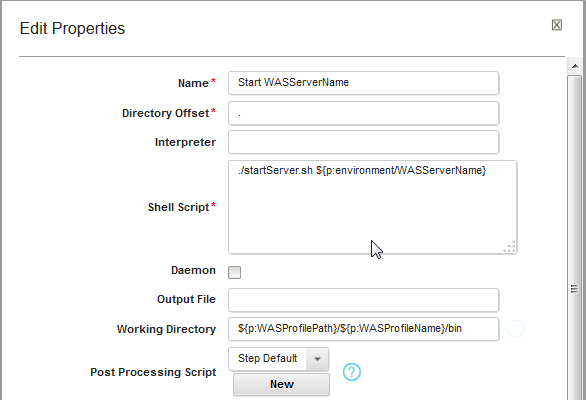
Although the Application Deployment plugin has a plugin to start WebSphere Application Server, we cannot easily use that step yet, because we have not yet performed the Discovery and Topology Discovery. Therefore the step to start WAS uses the known variable environment/serverName to start the server with the command startServer.sh.
The step to start WAS without using the Application Deployment plugin is shown below:
Process to create the WebSphere Application Server profile
Process to create the WebSphere Application Server profile
Process to run JTS setup
References
Related topics: Installing, upgrading, and migrating, Deployment web home
External links:
Additional contributors: FrancoisPanaget, Natarajan Thirumeni
Contributions are governed by our Terms of Use. Please read the following disclaimer.
Dashboards and work items are no longer publicly available, so some links may be invalid. We now provide similar information through other means. Learn more here.