Getting to earlier revisions of EWM Attribute Customization Scripts
A guide to getting to know whether attribute customization scripts can be source-controlled and if so how to go about it.
Dinesh Kumar B
Last updated: 3 May 2021
Build basis: CLM 6.0.5 and later
In IBM Engineering Workflow Manager (EWM), script-based Attribute Customization is accomplished by using Dojo Scripts. These scripts are created and modified in the EWM Eclipse Client and stored directly in the repository. Currently, as of version 7.0.3, after modifying and saving a script, there is not a feature to go back to previous version or a feature to look at the historic versions of the script. Any accidental modifications followed by a Save can lead to trouble.
In this article you will find some approaches to create points of reversal, to safely revert to an earlier revision/state of that script. A different EWM product capability is used in each of the three approaches presented in this article. The EWM capabilities that are used are:
In this article you will find some approaches to create points of reversal, to safely revert to an earlier revision/state of that script. A different EWM product capability is used in each of the three approaches presented in this article. The EWM capabilities that are used are:
- Revert, Save As, and Load Buttons on the Script editor window
- Extracted Process Templates
- Repodebug Service
There are some limitations in each of these approaches, please read through to understand the limitations well before picking a particular approach.
Now, let us look at each of these approaches/methods in detail.
Method 01: Using Save As and Load Buttons
The screen capture below shows the “Load…”, “Save As…” and “Revert” buttons on the Script Editor window under a certain Provider:

Use the below navigation to reach to this window:
Open Project Area in EWM Eclipse Client > Switch to Process Configuration Tab > Under Configuration Section > Expand Project Configuration > Configuration Data > Work Items > Attribute Customization.
Now, lets look at what each of these buttons mean and how to build a sort of versioning of scripts by using them.
You can use “Revert“ to undo changes to the script until the Process Configuration is saved. It is important to know that there is no separate “Save” option for the script content to persist. Saving the Process Configuration saves the script.
“Load…” replaces current script content with a Dojo script content from a saved file.
“Save as…” saves current script content (Dojo script) to a file.
The first approach uses the “Save as…” and “Load…” capabilities to establish a sort of local versioning.
Here are the steps
1. Before you make a change to the script that is untested and appears to be risky, especially before saving the Process configuration, use the “Save As…” button to save a copy of earlier content to local file system. You can examine these scripts in any text editor.
2. Continue with the Save of Process Configuration to persist the script changes.
3. To go back to a previous version or state, click Load > Browse and navigate to the saved copy and then click Open. The script code is replaced with the one from the copy.
Saving often gives you more save points for reversal. It is important to keep in mind is to save the files with an extra identifier, for example, version number of that script. Saving to a shared drive, allows multiple contributors to work with the versions of the scripts.
Versioning can be made better by using any Source Control system on the locally saved scripts file.
High-level steps to use RTC/EWM Source Control for these scripts are outlined below. Below steps assumes you are aware of how to start by using EWM Source Control for sources that are maintained as an Eclipse Project :
- Create an Eclipse project with Script sources. Note that these Script sources were obtained by using the “Save As…” button.
- Create a Stream with a new Component to contain the Script sources.
- Share the Eclipse project into the component.
- Users working with the Scripts create a Repository Workspace against this Stream::Component
- Load the Repository Workspace into a local Sandbox.
- Use this Sandbox as target to perform the “Save as…” and “Load…” operations from the Attribute Customization Script Editor window.
- Once you are ready with a good set of modifications, “Save as…” to the sandbox location.
a. Overwrite the existing file. Unlike stated before, it is important to overwrite the existing file here to ensure, we can track the changes to the script as a change to the versioned controlled file.
b. Overwrite triggers a change in Eclipse Client Pending Changes view. If it does not, refresh the Project from Project or Package Explorer view.
Screen capture below shows an unresolved change appearing in the Pending Changes View when the “Refresh Sandbox” option is used after an overwrite of the script, in its sandbox:
c. Deliver the changes to the component to persist this version change. - Other users working with the scripts, will now be able to accept the changes and use it when working with that script. They will now use “Load…” from their sandbox.
Method 02 : Using Extracted Process Templates
As mentioned before, the changes to the Script are saved when we save the Process Configuration. The Process Configuration can be Extracted and when extracted, it still resides in the EWM Repository. An extracted process template contains the state of the customizations of the Project Area from the time extract was performed. These extracted process templates also hold references to attribute customization scripts stored in the repository, as they were, when the extract was done.
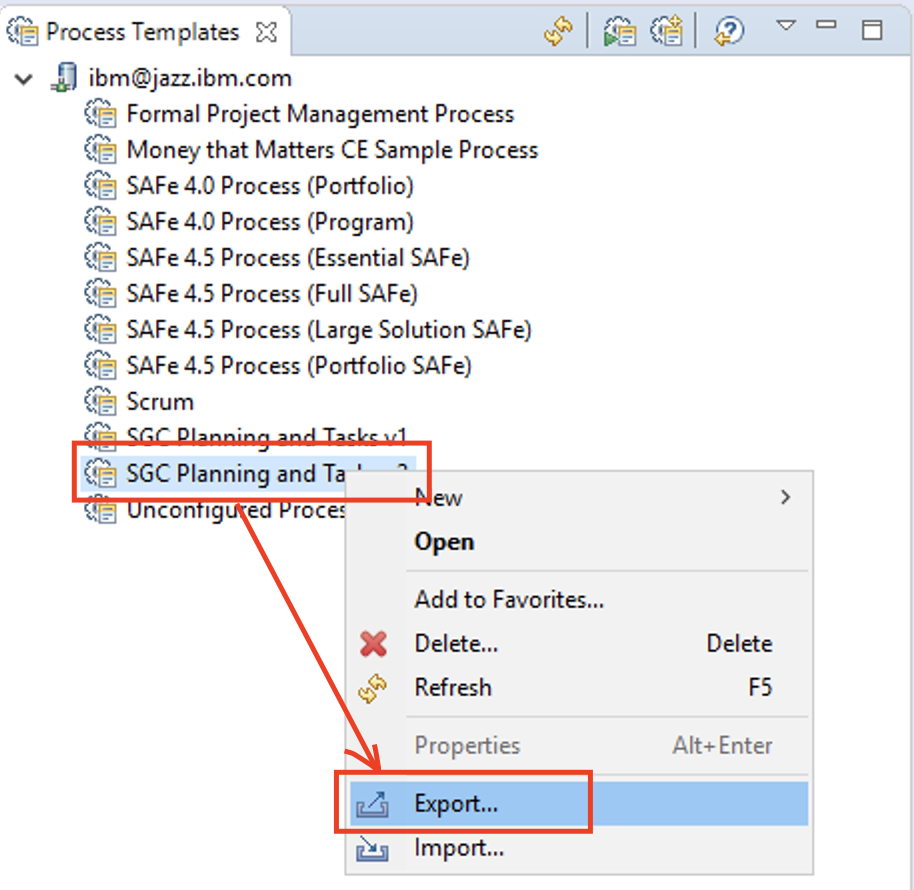
Screen capture showing “Extract Process Template…”, obtained by performing a right click on the Project Area node in the Team Artifacts View :

Screen capture showing the Process Templates View with two extracted templates corresponding to “SGC Planning and Tasks”. They are labeled v1 and v2 to indicate they were extracted at different points in time.

These extracted templates reside in the repository and can be exported into an archive that can reside on a local file system as well. An exported process template contains the attribute customization scripts from the point the correspond template was extracted.
Screen capture showing the Export option. It is obtained by right click on a specific process template. In the screen capture below, we are trying to Export “SGC Planning and Tasks v2“
The scripts in the exported templates are very hard to locate for normal user. So, we shall focus on using extracted templates in this Article.
If you want to use the attribute customization script from the time when the process template was extracted, you might do so by using the steps below:
1. Right click Repository Connection > Administer > Process Templates to open the Process Templates View that lists all the process templates in the repository.
2. Open an extracted process template that corresponds to an earlier version or state of the Project Area’s Process configuration.
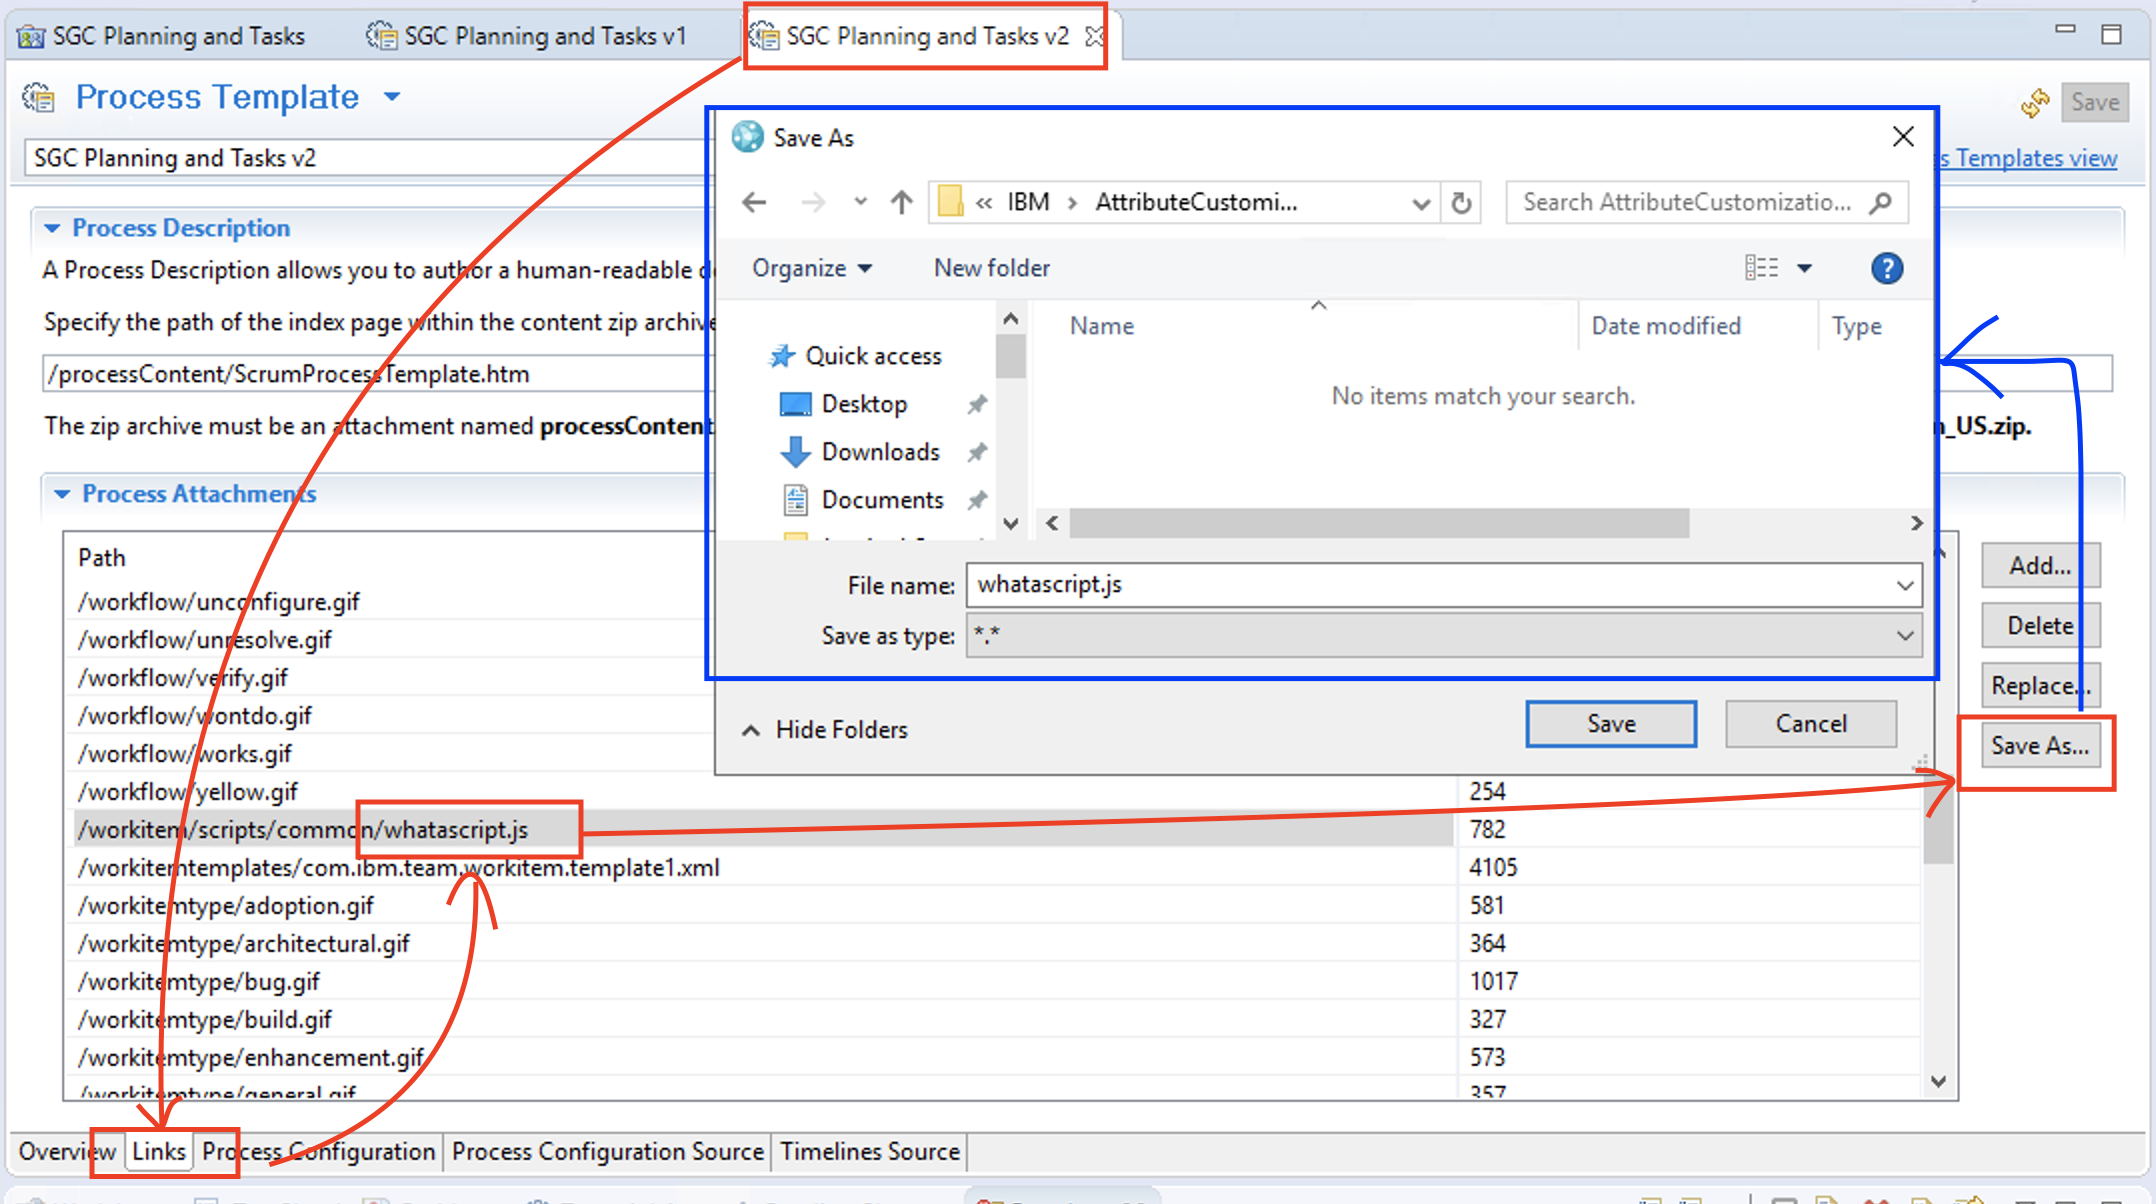
3. Switch to the Links tab > Process Attachments section > Find the script by its name (with a .js extension)
4. Select the script and then Save the script to a local file
5. Verify that the script is a good enough state of the script to revert to
6. If not, find an older extract of process template and explore the script there by using steps 2 to 5 above.
When you have found a script to revert to,
7. Switch to the Process Configuration of the active project area
8. Browse to the Script that needs to be updated / reverted
9. Click “Load…” and then select the appropriate file you saved in Step 4.
Method 03 : Using Repodebug Service
The administration capabilities in the web UI allows access to the repodebug service. The repodebug service provides extra debug capabilities such as services to access data in the repository that is usually not exposed in the UI. Use these services with caution. This service is accessible to Jazzadmins only and is not enabled by default. To enable it and setup user access, refer to the wiki link here
Three services of repodebug are needed to locate the current version of the attribute customization script and to navigate to the previous versions :
1. rawSql service to run SQLs against the application’s database.
2. rawItemState service to look content in the ITEM_STATES table
3. rawContent service to look content in the ITEM_CONTENTS table
Each of these services is reached by using URL of the form :
Now, let us see how to use these services together to locate a script from the Database. To start with, we need to know the name or Id of the script. The name of a script, within a project area, is known easily by using the Eclipse Client by navigating to the appropriate script customization, under Attribute Customizations section.
Once the name is known, we can start with the rawSql service to find the identifier that is used to reference the script in the Database.
1. Using repodebug/rawSql run the following SQL to get the STATE_ID (identifier representing a version of the script).
select STATE_ID, ITEM_ID, CONTEXT_ID, MODIFIED, MODIFIED_BY_ITEM_ID, PATH_COL from PROCESS.PROCESS_ATTACHMENT where PATH_COL like ‘/workitem/scripts/common/whatascript.js‘
This SQL is fetching us the details of a script named “whatascript.js”. While looking for your script, do not forget to prepend your script name with “/workitem/scripts/common/” before using it in the SQL.
Sample output:

STATE_ID in this output represents the latest version of your script. STATE_ID is important to proceed with next steps.
Some additional things to know about the query and its output:
- SQL uses Table and Column names from DB2 database. If you are using a different DB vendor, contact IBM Support for appropriate names to use.
- You might get multiple rows returned. This happens if you have used the same script name in multiple project areas. This might also happen if Process Template was extracted from this project area after the script was created.
- In cases where multiple rows are returned, use the CONTEXT_ID to match against the Project Area’s ITEM ID. To know the Project Area’s ITEM ID, use the Manage this Project Area and the browser URL have the ITEM ID at the very end. Here is a sample URL with the Project area’s item Id at its end:
- https://jazz.ibm.com:9443/ccm/admin#action=com.ibm.team.process.editProjectArea&itemId=_KLzQgNJ5EeqMbMksC7F-Vg
Once you have the STATE_ID, we are ready to use the rawItemState and rawContent services to get to the script content.
2. Use the STATE_ID with the rawItemState service to get the details of that version of the script. Some important entries that help with identifying previous versions are:
<predecessor> entry in the returned XML helps navigate to older versions of the script. If it is null, you have reached the first version of the script.
<modified> entry holds a timestamp indicating when that particular version was created, in other words, when the script was updated/modified. You can use <modified> time as your guide, if you are interested in the script content from a particular time.
<contentId> is a reference to the actual script content.
Screen capture shows STATE_ID being used to extract the state information through rawItemState service :

3. To navigate back through older versions of the script, use the Id value from <predecessor> tag with the rawItemState service. At any point, if <predecessor> tag shows up as <predecssor xsi:nil=”true”/>, you have reached the oldest/initial version of the script.
4. To view the contents of that version of the script, use <contentID> with rawContent service
Screen capture shows using the contentId with rawContent service to get the hyperlink to the actual script content. This screen capture also shows the pop-up that appears when you click “content” hyperlink:
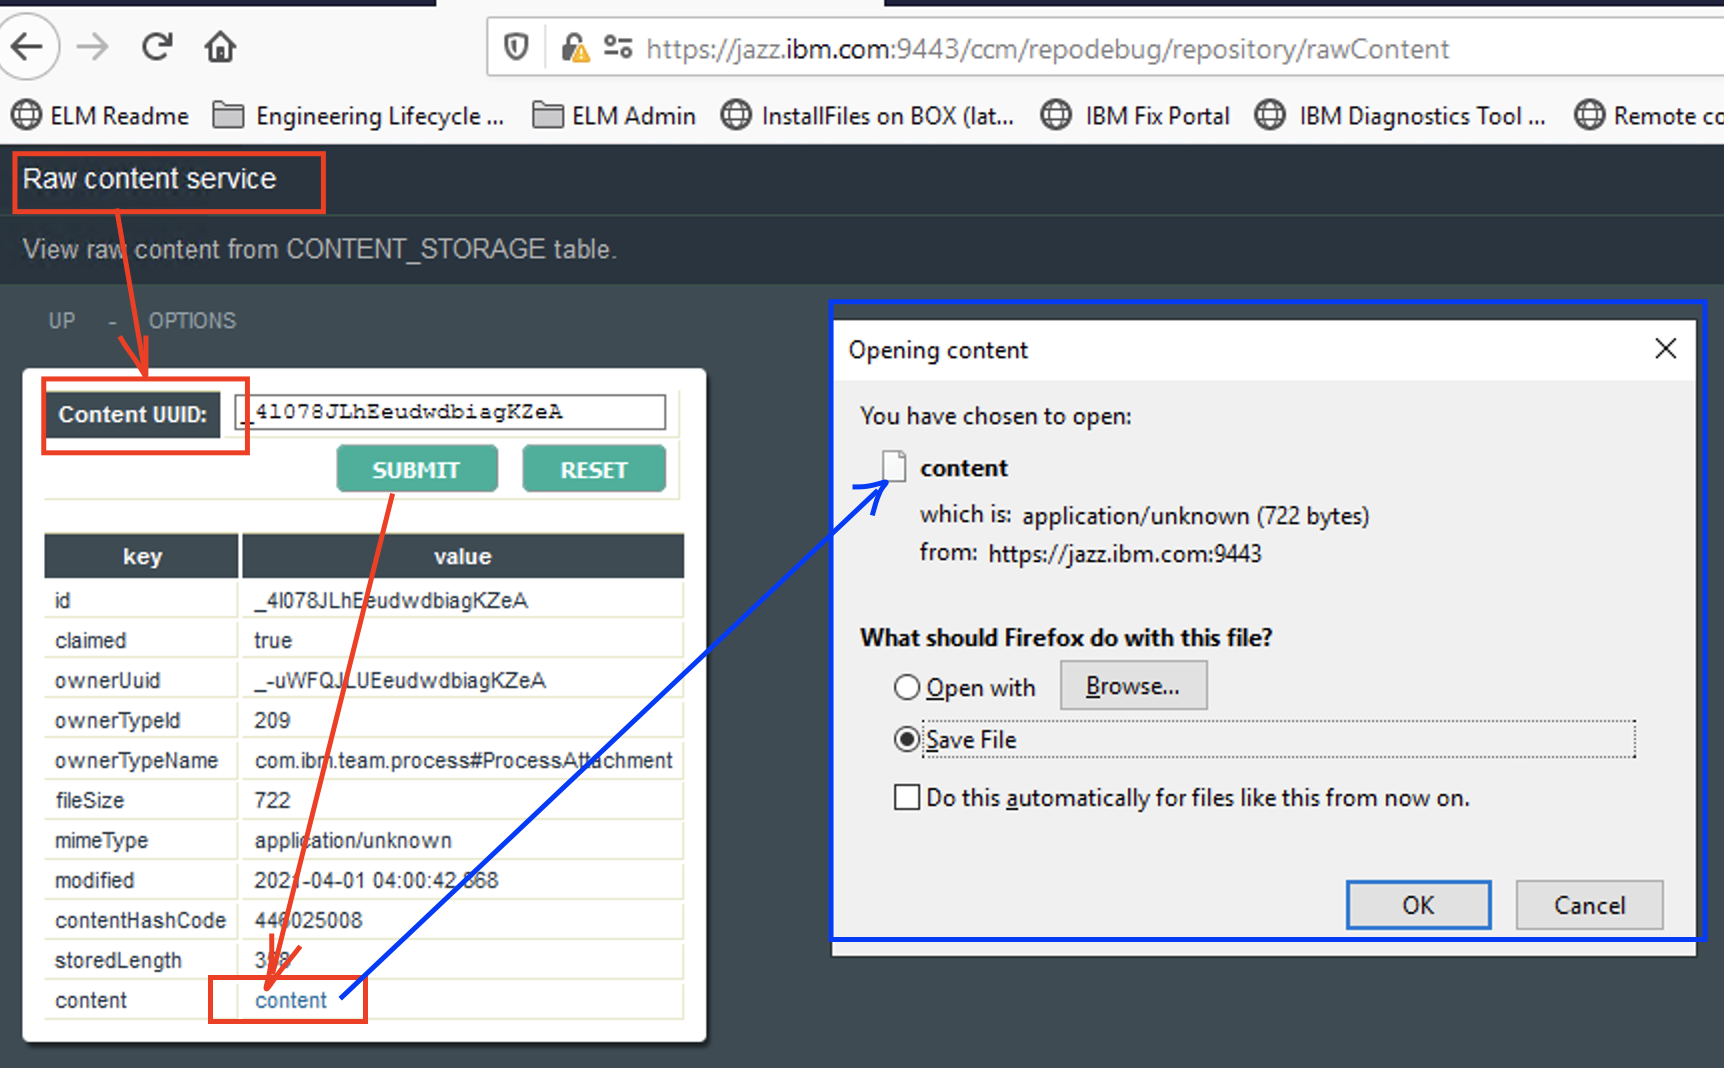
5. Resulting page has a hyperlink that is named “content”. Click it to download the textual form of that version of the Script content.
The above three show how to reach to an older version of an attribute customization script.
The first and second methods help you establish a sorts of versioning or a source control strategy. We also saw how to use that strategy later to reach specific versions of your Dojo scripts.
The third method uses the fact that scripts are already stored in the RTC/EWM repository as different states and using an admin service to access them. I would like to leave you with a word of caution with this Repodebug based approach. Use Repodebug approach if the other approaches are not feasible to set-up and use. Repodebug is usually only to be used under guidance from IBM Support.
Additional References
About the Author
Dinesh Kumar B is a Master Certified IT Specialist, working as a SoftWare Advisory Team member in CLM/ELM Support for over 10 years. He specializes in Engineering Workflow Management / Rational Team Concert and Jazz Foundation. He also provides Deployment Guidance, and guidance on extending the product functionalities using Product and/or REST and OSLC APIs.