Passing variables and temporary data sets between TSO/ISPF translators
Customers using Engineering Workflow management (EWM) Enterprise Extensions to drive their z/OS builds always have a requirement to have language definitions that contain multiple translators. More than likely they will be passing temporary data sets between those translators. The classic example of this is a temporary object deck generated by a compile to DD SYSLIN, that is then passed as input to SYSLIN in the link-edit translator. This is never an issue. However, problems arise when the user needs to have a translator that uses the TSO/ISPF Gateway, for example to call a REXX exec that performs some customer specific task.
The issue with the TSO/ISPF gateway is that it runs in a separate address space to the main build Ant task. EWM Dependency builds needs to start ISPF by running program IKJEFT01, and this starts in a new address space, similar to when a user signs into a system. To this end, the ISPF team provided a utility called the TSO/ISPF Gateway. The problem with EWM builds starting the TSO/ISPF Gateway is that any temporary data sets allocated in the main build Ant address space are not available in the TSO/ISPF gateway address space. The same also applies for any Ant or environment variables that are created in the main build address space, they are also not usable in the TSO/ISPF Gateway address space.
This article will look at solutions to address both of these restrictions.
Passing temporary data sets to REXX execs using the TSO/ISPF Gateway
If your REXX exec utilizes ISPF services then you have no other option but to call the TSO/ISPF Gateway, and as such, will not be able to use any temporary data sets allocated in previous translators. If you do try and use a temporary data set from a previous translator, in your TSO/ISPF Gateway translator REXX, you may get an error similar to this:<ISPF-COMMAND> ISPSTART CMD(EXEC 'DOHERTL.Y.ID535993.EXEC') NEWAPPL(ISR) NEST NESTMACS </ISPF-COMMAND><ISPF><![CDATA[allocation failed: dd=SYSLIN, rc=-21JAZZ_TRANSLATOR_RETURN_CODE = 24ISPD117 The initially invoked CLIST ended with a return code = 24]]></ISPF>
This is because the REXX we generate to call the TSO/ISPF Gateway expects a physical data set to be allocated, so we generate a bad allocation for the temporary data set to pass to bpxwdyn, and this is the line that causes the failure.rc = BPXWDYN("null")
However, the solution for this problem is to use a physical data set in the previous translator, that can then be read by the TSO/ISPF gateway translator. Our use case is to compile a program, writing the object out to a “temporary” physical data set, then running a 2nd translator that appends a NAME binder control card, then calling the binder to perform the link-edit. The TSO/ISPF Gateway translator could then delete that data set if it has finished with it, but in our example, we need to use the SYSLIN as input to the binder, so in this case we will need to have a final translator that deletes the “temporary” physical data sets. Let’s look at the translators and sample code for this scenario.
COBOL compile and Link-edit language definition
The language definition has a COBOL compile, a REXX exec to add the extra binder control card, a link-edit translator and a final step to delete the permanent “temporary” data set. 
COBOL compile translator using a physical yet temporary SYSLIN
This is a standard COBOL Compile translator where we direct the SYSLIN DD to a physical sequential data set. The data set name will be made up of the resource prefix of the build along with the member name being built and a suffix of TEMPOBJ. Data set definitions can use a property in the definition, so we are using ${member} which will get resolved in the language definition. You can see above, in the language definition Properties that member is resolved to the system property @{source.member.name} at the time that the language definition runs. This is the data set definition that defines the temporary file:
Let’s look at the DD Allocations in the translator. As this is essentially a temporary data set that we will delete, we don’t have any additional options specified for it, such as Output. We don’t specify Keep as it is not a real temporary data set.
TSO/ISPF Gateway translator to add the extra binder card
Our example doesn’t actually use TSO or ISPF services, as I wanted to use the same REXX example for this, and the next solution. But as we are calling the REXX through the TSO/ISPF Gateway, we could utilize TSO and/or ISPF service APIs if we wished.
The translator for the REXX exec makes the required allocations to run the ADDLINK1 REXX exec, as well as the required allocations needed for our REXX exec. This allocation is SYSLIN, which is the same allocation we made in the previous COBOL compile step. We pass the name of our REXX, and any parameters required to the TSO/ISPF Gateway when we call the translator. 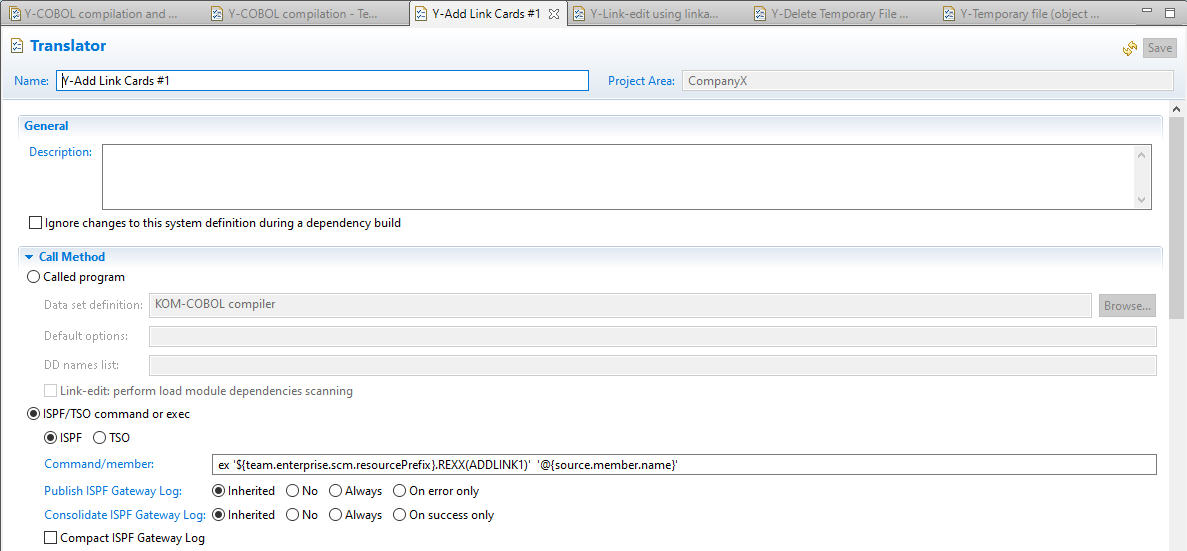
…and the allocations. 
Now let’s look at the REXX. It is just a simple example where we take the input parameter and use that to create the NAME control card, then append that at the end of the temporary SYSLIN./* REXX */ parse arg member If member = 'AMXNBRV2' Then name = 'T4100' Else name = member lct = ' NAME 'name'(R)' "EXECIO * DISKR SYSLIN (FINIS" QUEUE lct "EXECIO * DISKW SYSLIN (FINIS"Exit
There could be more elaborate logic here, or some lookup, as we have all the TSO or ISPF services available to us.
Link-Edit translator
This is a standard link-edit translator, where we allocate the SYSLIN DD to the temporary object deck from the previous steps.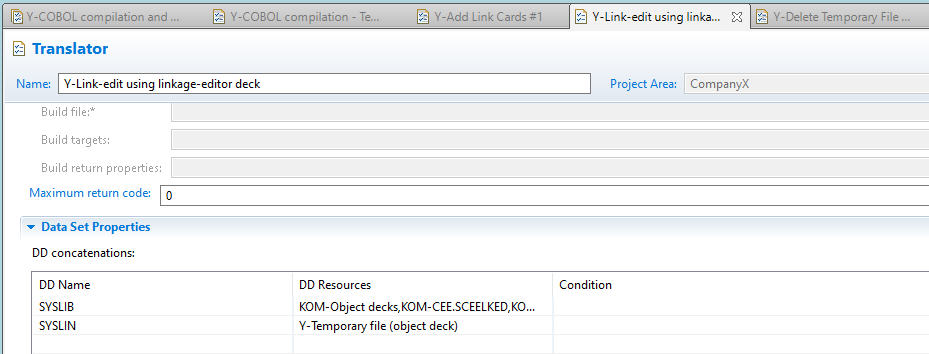
Delete temporary Object data set translator
The final step in the language definition is to clean up by deleting the temporary data set we had to physically allocate. As the data set has a fixed pattern, made up of the resource prefix of the build along with the member name being built and a suffix of TEMPOBJ, we can construct a IDCAMS DELETE command. Using IDCAMS, we can avoid calling the TSO/ISPF Gateway to perform the delete as there is always an additional overhead in calling the TSO/ISPF Gateway.
We specify the IDCAMS DELETE in in stream content to DD SYSIN:
Passing temporary data sets to REXX execs using IRXJCL
There is another option, that will allow you to use real temporary data sets allocated by previous translators. That is to use IRXJCL which is used to run a REXX exec in MVS. You can read about IRXJCL in the TSO/E REXX programming services guide. There are however limitations with IRXJCL. It cannot be used to call ISPF services or many of the TSO services. However, if your REXX exec is being used to read a file, perform some functions on the data in the file, then write the file out, there are still a number of TSO/E REXX commands you can use, for example EXECIO. The instructions about what you can use are documented here. Let’s use the same scenario as the previous example.
COBOL compile and Link-edit language definition
The language definition is basically the same as the previous example, however, in this case we will be using temporary data sets between all the steps so do not require the final delete step. 
COBOL compile translator using a temporary SYSLIN
This is a standard COBOL Compile translator where we direct the SYSLIN DD to a temporary data set. The data set definition is a standard temporary data set utilizing VIO:
Let’s look at the DD Allocations, and we can see we specify Keep, to pass the temporary data set to the next step.
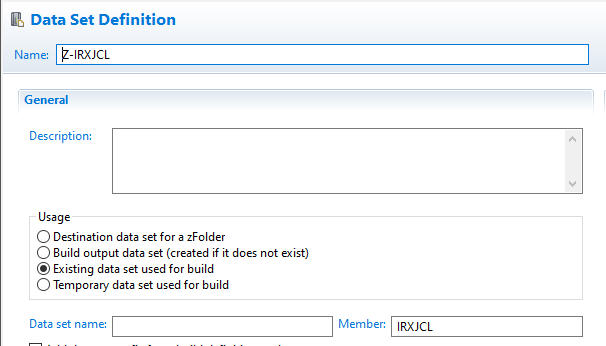
IRXJCL translator to add the extra binder card
We define the IRXJCL data set definition as an existing data set. On our system it is loaded from SYS1.LPALIB which is in LPA, so we don’t need to specify a data set name.
The translator for IRXJCL makes the required allocations to run the IRXJCL program, as well as the required allocations needed for our REXX exec. The allocation our REXX exec uses is SYSLIN, which was passed through from the compile step. We then pass the name of our REXX, and any parameters required, to IRXJCL when we call the translator. 
…and the allocations. Notice we specify Keep on the SYSLIN allocation as we will pass the temporary through to the binder.
The REXX exec, ADDLINK1, that we are calling is the same as in the previous solution. There could be more elaborate logic here, or some lookup, but as mentioned before, there are limitations as to what services or APIs you can call from IRXJCL.
Link-Edit translator
This is a standard link-edit translator, where we allocate the SYSLIN DD to the temporary object deck from the previous steps.
When we run the build we will see one allocation for SYSLIN to the temporary object in the first translator:* [antz:mvsexec] [1] 2020-09-11 05:24:45,223 CRHTC1659I bpxwdyn: alloc dd(SYSLIN) dsn(&&TEMPOBJ) tracks space(5,5) unit(vio) new msg(1)
SYSLIN is left allocated through the three translators that use it, then at the end of the language definition we will see the free:* [antz:mvsexec] [1] 2020-09-11 05:24:46,353 CRHTC1662I ZOS.ddExists: SYSLIN - true* [antz:mvsexec] [1] 2020-09-11 05:24:46,353 CRHTC1659I bpxwdyn: free dd(SYSLIN) msg(1)
Passing Ant variables to TSO/ISPF Translators
We had a couple of customers who required a solution, such that, after the compile of a module, a REXX translator was run that did some sort of look up in an internal table. From that table the name of the load module was retrieved, based on the name of the source being compiled. That load module name was then used to generate a NAME card for the link-edit that was appended after the object deck in the link-edit. For example, the name of the program being compiled was AMXNBRV2, but the load module name needed to be T4100, so a NAME T4100(R) card is generated to pass to the binder.
Normal expected EWM solution
In EWM we can handle this situation by using translator variables that allow a different output member name to be used. This is done by:
- In the Link-Edit Translator create a translator variable. Let’s call it LOADMOD for arguments sake. Give it a value of * which signifies the default name, which is the input member name being built.
- In the SYSLMOD allocation go to the Output Tab and make sure the SYSLMOD has “Save data set as Output” selected.
- In the SYSLMOD allocation go to the “Other Properties” tab and select “Apply Pattern to Member Name” and click the Browse button. You should have the LOADMOD variable available for selection. Save the Translator.
- Load the project that contains the file, in the example above, AMXNBRV2, and click on the source file and select Properties. Then go to the Enterprise Extensions pane. You should see the LOADMOD variable there with a value of *. Click Edit, and give it a value of TEST1, or whatever it should be called.
In the above scenario, EWM will create only one load module and the build map entry will point to the alternatively named load module, in this example T4100.
However, the customer was worried that as programmers would have to enter the alternate load module name manually as an override to the translator variable, it may not get set, causing issues. Plus, the developers may not be aware of the alternate load module name, so they wanted to continue using their look up method.
Problem when customer tried to implement using their generated link card
In the EWM translator that does the link-edit, the customer appended the generated link cards, after the object, but they leave the member name in the SYSLMOD as “same as input”. This causes 2 load modules to be generated AMXNBRV2 and T4100, which is not ideal. However the bigger problem is the build map contains the name of the load module named in SYSLMOD, AMXNBRV2, which is actually not the load module name that needs to be packaged. That should be T4100, s o packaging is therefore incorrect.
Solution using the link-edit lookup with Ant variables
There is a way to achieve this and keep the process automated. However, it required some minor changes to the customers link card generation REXX as well as a new translator to load ant variables for use by EWM. Let’s look at the different parts.
COBOL Compile and Link-edit Language Definition
This is the language definition we used for the test:
Apart from the normal compile and link-edit steps, we see a step to generate the link card using the look up and we can also see the extra translator that will load the Ant variables. The COBOL compilation translator is just a normal translator that writes the object deck out, in out example to a physical data set. It could also have used a temporary object deck as we looked at previously. So let’s take a look at the link card creation translator and the Load Ant Variables translator.
Create Link Cards (LCT) Translator
To simulate the customers look up process of creating link cards I run a small REXX. The customer also runs a REXX to generate their link edit cards. So my REXX exec can be split into two parts, the part that simulates the customers process, and the part that will be required to set the value of an Ant variable. Let’s look at the translator invocation of the REXX: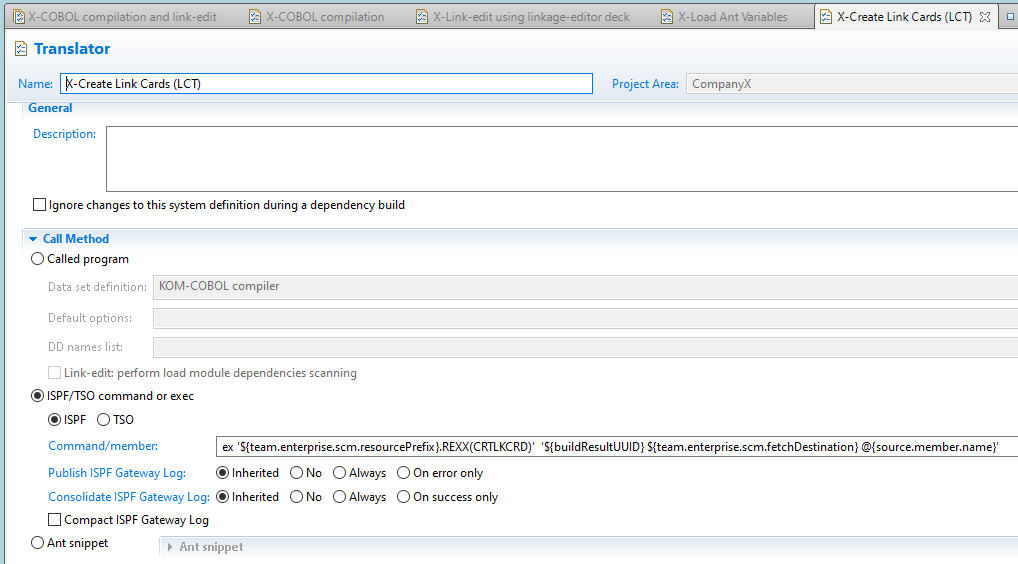
The main thing to notice is I am passing three properties to the REXX exec:
| ${buildResultUUID} | The buildResultUUID contains the UUID of this build, so is unique, and available to us. We will use this value to create a temporary file that will contain the Ant variable that will hold the load module name. |
| ${team.enterprise.scm.fetchDestination} | This is the load directory where EWM will load the xml files. We will also use this as the temporary location for our generated Ant property files. |
| @{source.member.name} | The member name being built. |
In my test I have a single DD for the generated LCT cards:
Let’s look at my REXX:
* REXX */

  parse arg buildUUID FetchDest member

  If member = 'AMXNBRV1' Then
    name = 'AMXNBRV1'
  Else
    name = 'T4100'

  Address ISPEXEC "QBASELIB OUTCARD ID(OUTCARD)"

  lct.  = ''
  lct.1 = ' NAME 'name'(R)'
  lct.0 = 1

  "EXECIO * DISKW OUTCARD (STEM lct. FINIS)"

  prop.1  = "ldMod="name
  prop.0 = 1
  propFile = FetchDest"/"buildUUID"-"member".properties"
  Address syscall "writefile (propFile) 755 prop."
  If rc = 0 Then
  Do
    Say 'Setting Load Module name to : 'name
    Say 'Writing property file : 'propFile
  End
Exit
We can see the three parameters that we pass in, the UUID, Fetch Destination and the member name being processed. The first part of the REXX sets the NAME parameter and writes out the member. In the customers case these 4 lines of code would be where there module lookup process would be. For my test I made a fairly simplistic assignment. The next 5 lines set the binder control card NAME option, and write it out to the allocated OUTCARD DD. The last 9 lines before the Exit are the important section that sets the ant variable. We set an Ant variable, called ldMod, to the name of the module as set in the module look up. The variable has to be 5 characters or less, due to some internal EWM processing relating to Translator variables only allowed to be 8 characters or less. When we reference the variable, it will be with ${ldMod}, which becomes 8 characters.
We then create a properties file in a builds fetch destination directory. Alternatively, /tmp could be used. The properties file is unique, because it has the buildResultUUID and the member in the name.
When this step runs, we will have a file in the zFS that looks something like this: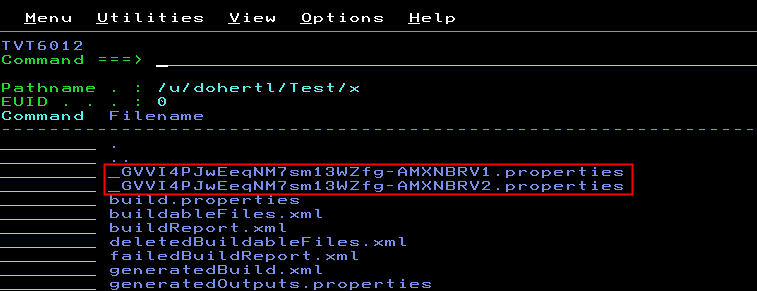
Normally, on completion of the build, these files would be deleted, but I left them there for documentation reasons. The file contents look like this:
Load Ant Variables Translator
The new translator is one that will load the Ant variables into the address space of the main build and make them available for the subsequent link-edit translator. This translator uses an Ant Snippet to load the variables and then delete the file, thus cleaning up. You will notice in the snippet we are using a namespace of ac which is pointing to the Ant-contrib project. We have to use the var task from Ant-contrib as the variables will otherwise be immutable. EWM includes the Ant-contrib project in it’s build environment. Here is the relevant part of the translator:

For ease of cut/paste here is the snippet:
<sequential>
   <ac:var file="${team.enterprise.scm.fetchDestination}/${buildResultUUID}-@{source.member.name}.properties"/>
   <delete file="${team.enterprise.scm.fetchDestination}/${buildResultUUID}-@{source.member.name}.properties"/>
</sequential>
The directory the Ant snippet is pointing to must match the directory used by the REXX to write the properties files. We can see that we point to the location where the properties file is created, as before /tmp could be used.
Link-Edit Translator
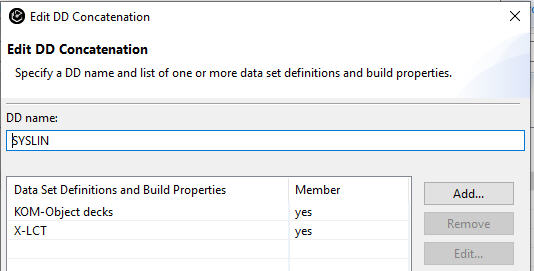
Let’s look at the main parts of the link-edit translator. The first part creates a concatenation for SYSLIN that concatenates the specific Object deck with the generated link-edit NAME card:
The next thing we need to do is create a translator variable that the SYSLMOD DD can use. In our example we call it LOADMOD and we give it a value of the ant property ${ldMod} that will be set in the previous translator.
Now we need SYSLMOD to use that translator variable, so in the Other Properties, for the SYSLMOD allocation, we apply a pattern to the member name, and click Browse… to find the LOADMOD translator variable:
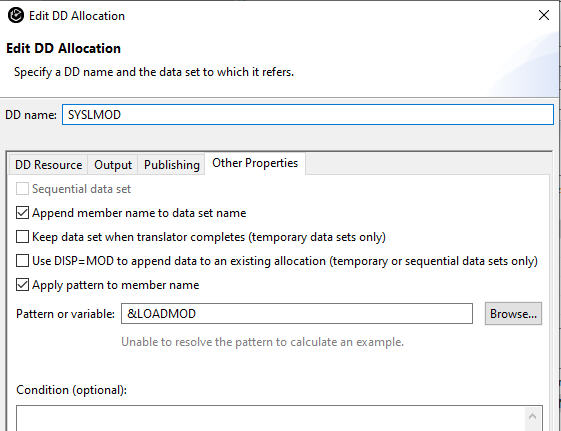
Such that the allocations look like this:
Running the Build
Now when we run the build, the language definition will not only generate the LCT cards, but will also create the properties file. The Ant Snippet translator will load the variables, and the link-edit will use the Translator variable to ensure the build map entry is correct and only one load module, with the correct name, is created.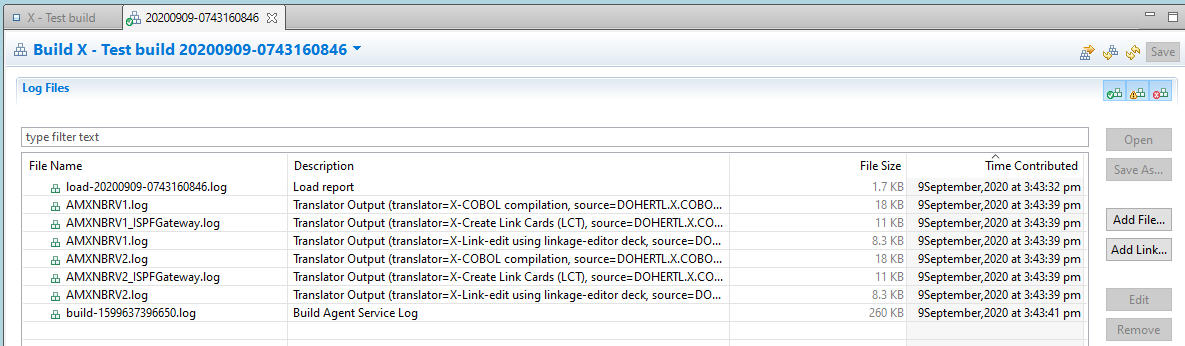

About the author
Liam Doherty is a Senior Software Engineer and RTC Enterprise Extensions architect in Perth, Australia. He has 38 years of experience with the MVS™ operating system, both with IBM and other customers. Initially an application programmer in PL/I, IMS™, CICS, and DB2, he moved into more technical support roles such as IMS DBA, CICS System programmer, and SCLM Administrator before spending much of his career as a DB2 DBA. On moving to Perth, he took up a role at IBM that focused on SCLM and the SCLM additional products, both from an architectural perspective and a customer facing support perspective. He was also one of the developers on SCLM Developer Toolkit. For the past 11 years he has worked on the Rational Team Concert product in both an architecture and development role, focusing on the z/OS extensions, and in particular the RTC ISPF Client. He attends the SHARE technical conference twice a year in the US to give presentations on RTC, ISPF, SCLM and REXX.
Nicolas Dangeville is a STSM, technical lead for Rational Team Concert Enterprise Extensions. He has driven the architecture of RTC-EE since its beginning. Nicolas is involved with several customers to adopt RTC-EE when migrating from other mainframe SCM systems. Prior to that role, Nicolas was an architect in the Pacbase team. Nicolas has worked for IBM for 30 years.
© Copyright IBM Corporation 2020