A solution for Enterprise Promotion using EWM
During a recent customer engagement, I had a requirement to investigate configuring EWM to handle source and binary promotion in a similar way to the customers existing system. The solution we came up with, using out-of-the-box facilities in EWM, seemed interesting enough to write this article.Customers existing SCM and Build setup
The customer, in their previous source control system, had a 3-tier hierarchy consisting of Unit, Test and Prod levels. Their developers would edit the code in the Unit data sets, run a compile, perform unit testing, then promote to the Test level of the hierarchy. A build would not be performed at the Test level, however integration/system testing would be performed at that level. Once tested, the code would then be promoted to Prod, where it would be rebuilt again for production. 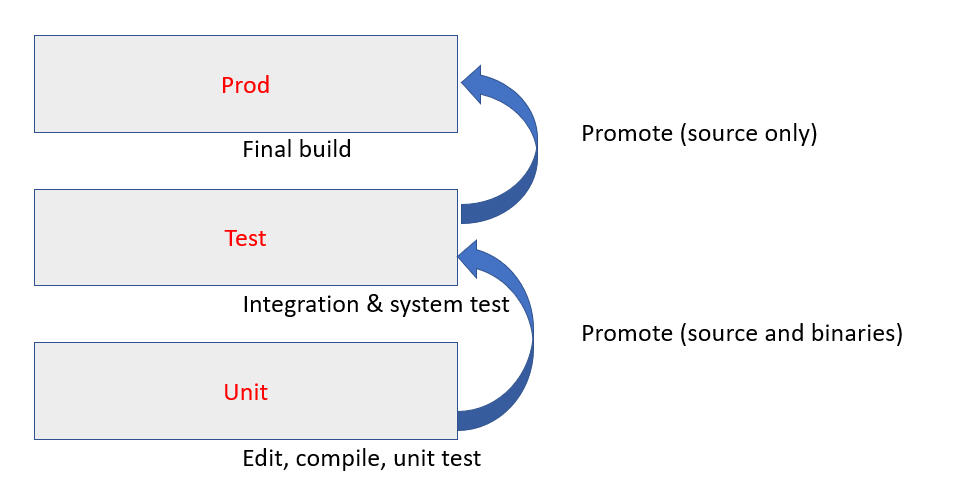
The reason for doing the rebuild at Prod is that the z/OS compilers offer different compile time options such as TEST, for debug, and OPTIMIZE to run load modules optimized. This differs to, say Java, where debug options are changed at runtime. As such, there is a reason to rebuild higher in the hierarchy to ensure load modules are created with OPTIMIZE, for example, or maybe just to ensure debug options, like TEST, are turned off.
Initial EWM Setup
In EWM we set up three streams to replicate the customers existing hierarchy:
In addition a Dependency based Build definition was created for each of the streams:
The customer wanted to run builds in the same way they previously did. Such that changes were made by the developer, then checked in and delivered to to the Unit Stream. Normally in EWM, a developer would run a personal build using their repository workspace, perform unit tests and then deliver. This customer did not want to use personal build, but was using the Unit stream as the development build sand box. So, the work flow that the customer requested was as follows:
- Developer makes changes in Unit, checks in code and delivers to the Unit stream. To do this they must have a workitem assigned to the changeset.
- Developer requests a Unit build.
- Once the build finishes the developer tests their code changes.
- Developer then sets up their workitem approvals. They cannot set the status of the workitem to Resolved and promote to the Test stream until the workitem is approved.
- A promotion is requested from Unit to Test once the workitem is approved and status is Resolved. Check the workitem is resolved before promoting.
- Integration/System testing happens at the Test level and once complete, the workitem status gets changed to Verified.
- A promotion is requested from Test to Prod, where on completion a production build is automatically scheduled.
In addition to this work flow, deletions from the sand box data sets had to also successfully occur as part of the promotion.
This article will go into depth on the set up required to handle the above work flow and requirements.
Work items are required to deliver the code to the stream
There is a default precondition in the project template we used in EWM to achieve this. It stops the deliver of a work item unless the changeset that changes the code has a workitem associated with it. In the Project areas process configuration tab, open the Operation Behavior in the Team Configuration. Then scroll down to the Source Control operation. in the Deliver (Client) operation there will be an icon showing there are available preconditions or follow-up actions. By clicking it, you will see the currently assigned preconditions and follow-up actions. Clicking the Add button, will allow you to see the other available preconditions or follow-up actions. 
Either a workitem or comment is required, however as the customer is going to be performing workitem promotion, we changed the default to say a workitem is required.
To set a work item to resolved, approvals must be made
The next precondition to be set up is the one to stop the setting of a certain status in a work item, unless required approvals are set. In the following example I have only set this up for defects. But if you were using custom work items with a number of different states between open and resolved, you could have different levels of approvals required if you wish. In our example we are using the standard work flow provided with EWM, so we go from New → In Progress → Resolved → Verified.
Again, in the Project areas process configuration tab, open the Operation Behavior in the Team Configuration. Then scroll down to the Source Control operation. in the Save Work Item (Server) operation there will be an icon showing there are available preconditions or follow-up actions, if configured already. If not, ensure the checkbox Preconditions and follow-up actions are configured for this operation is checked, then click Add… and select Required Approvals from the list. By clicking it, you can set what the required approvals are for each work item type. You can see, in our example, that to go to Resolved status we have a requirement to have three approvals. One each of Approval, Review and Verification. 
To set the required approvals for a particular state, click on the state, for example, Resolved, and then select Edit. You will be presented with a screen to set the required types of approval.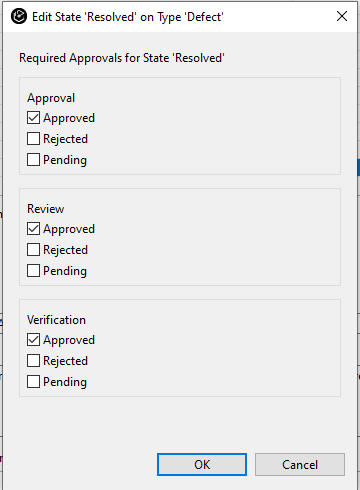
If you want to set rules on the number of each of those approvals, there is a different precondition in the Deliver (Client) operation. For the different types of approval you can set how many of each role is required before the approval will be set to Approved. 
To promote a work item, it must be in Resolved state
There is a promotion precondition that allows us to say a work item cannot be promoted unless that type of work item is in a certain state. In the Project areas process configuration tab, open the Operation Behavior in the Team Configuration. Then scroll down to the Promotion operation. In the Promote Work Item (Server) operation there will be an icon showing there are available preconditions or follow-up actions, if configured already. If not, ensure the checkbox Preconditions and follow-up actions are configured for this operation is checked, then click Add… and select Require Work Item States from the list:
Once you select the Require Work Item States precondition you can now configure it to require a certain state before a promotion is allowed. In our example we say that to promote from Unit to Test using that promotion definition, the defect must be in Resolved state: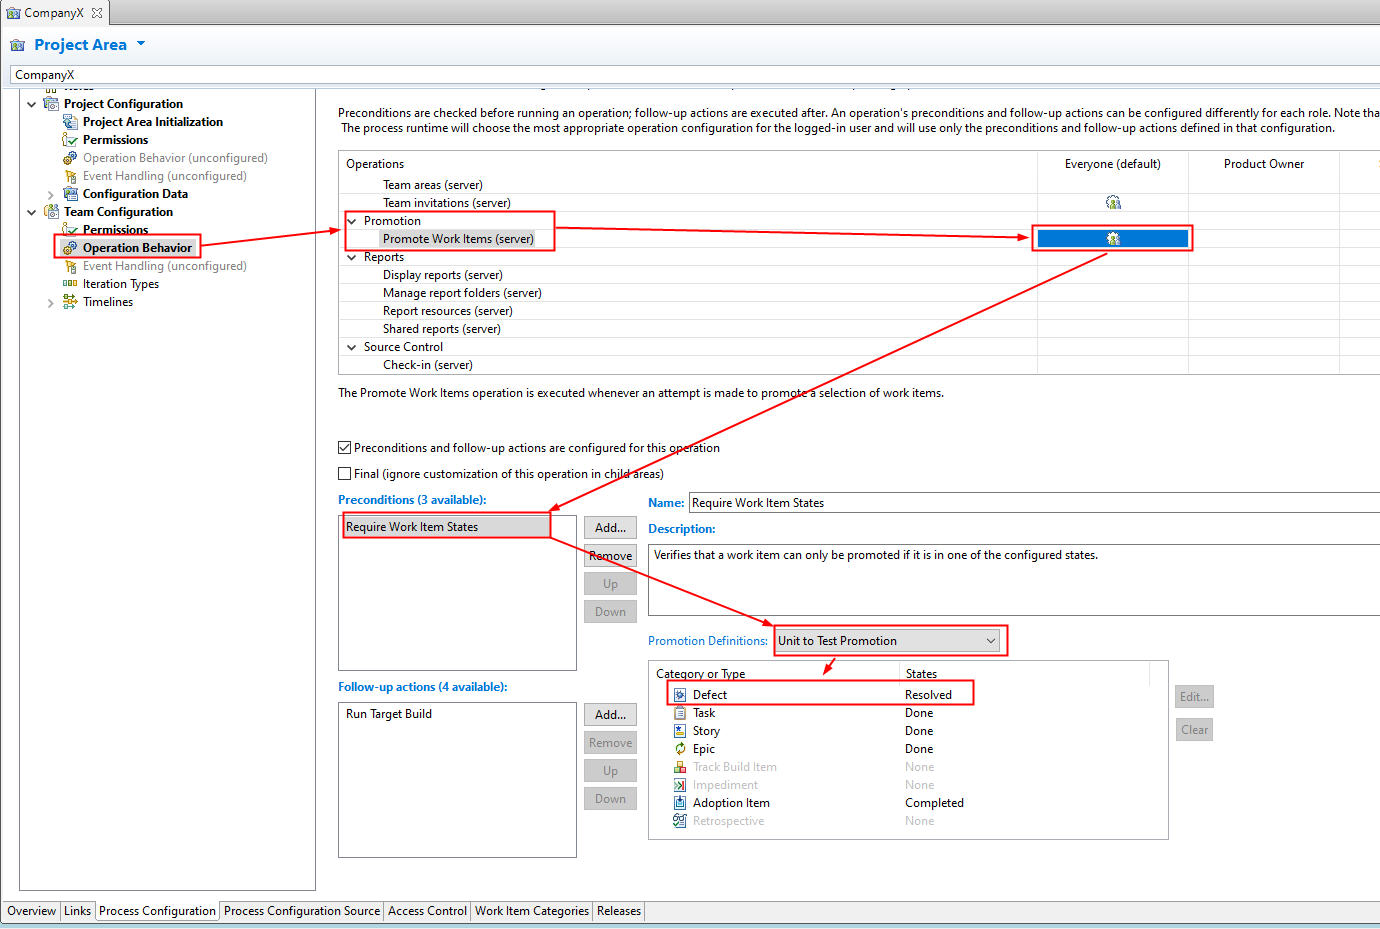
For our set up we also wanted some different behavior on the Test to Prod promotion in that the workitem had to be in a Verified state. You can set up default behavior or promotion definition specific behavior. We chose the latter. 
So, using a combination of the these preconditions, we can ensure that work items cannot be promoted unless they are in a Resolved and approved state for Unit to Test and Verified state for Test to Prod.
How does EWM report the precondition failures
Let’s look at how EWM reports these precondition failures.
Assign a work item to a changeset and deliver the code
We already knew that we could not deliver our changeset without attaching a workitem. In our example, we can deliver the changeset while the work item is in “In Progress” status.
So, our workflow from here is to deliver the code, run a Unit build and then test the code. Once we have tested the code, we request that it be promoted to the next stream. So we set up the promotion of the workitem using the following settings: 
We can run a preview build first as this will tell us if the promotion is good to go from an SCM perspective. If it is not, for example because we have failed the precondition we will get a failure. In addition we can view the output for a more detailed report: 
If we try to just run the promote, we will also get the following failure which stops the promote from happening: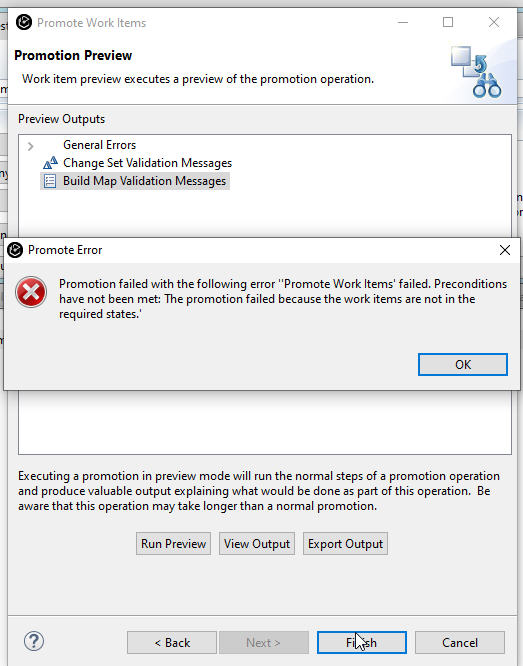
Change the state of the work item to Resolved
First thing we try and do is go into our workitem and change the state to Resolved from In Progress. But that fails with the following errors:
In our Work Item precondition we said that we needed to have Approval, Review and Verification types to be in an Approved state. They were not, so we must add approvals to our work item and get the work item approved:
So once all of the approvals are set to Approved, when we change the status to Resolved, saving the work item works: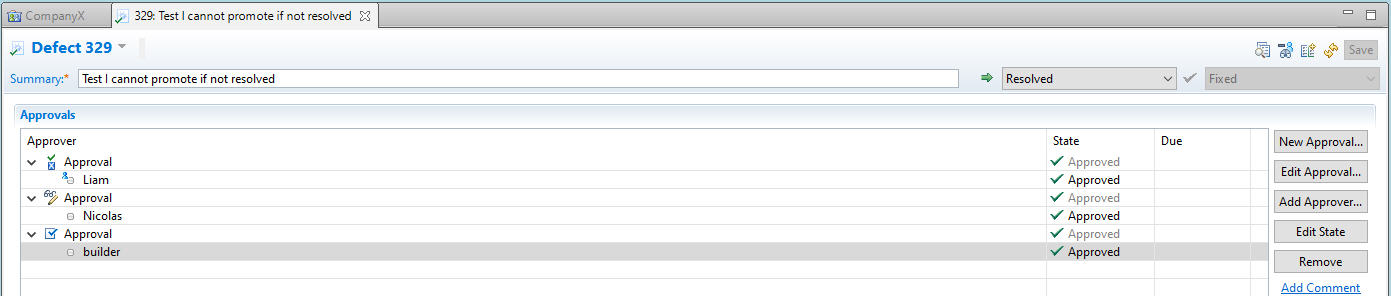
Request a promotion from Unit to Test
We can now return to our promotion and request a work item promotion. Because the work item is in a Resolved state the promotion now works:
Similarly for the promotion from Test to Prod, we will need to ensure that the work item is in Verify state. The promotion will fail in the same way if it is not. We could require additional approvals to go into Verified state, but the customer did not require that.
Promotion of source and binaries between the different streams
So, we have looked at the conditions that drive the work flow of the deliver, build and promotions. But we should take a look in more detail at the promotion definitions and what this customer wanted to achieve. To recap, they wanted to build at the Unit Stream level, promote to Test stream level without a build, and then promote to Prod stream level with a build. This required some different set up in the promotion definitions.
Unit to Test Promotion Definition
This promotion definition is defined to promote both the source and outputs. What this means is through the streams we will promote the source, and then in the build output sandbox data sets we promote the binaries, or build outputs. This is because at the Test level we are not going to rebuild the outputs. This option is set in the promotion definition.

If you don’t want the user to be able to change these options, you can restrict in the permissions in the process configuration as shown below:
Test to Prod Promotion Definition
For the test to Prod promotion we only need to promote the source to the Prod Stream. this is because we are going to trigger a build at the end of promotion, to rebuild at Prod. We will cover the triggering of the builds in the next section. So, the promotion definition fro test to Prod differs in that we specify only to promote the source: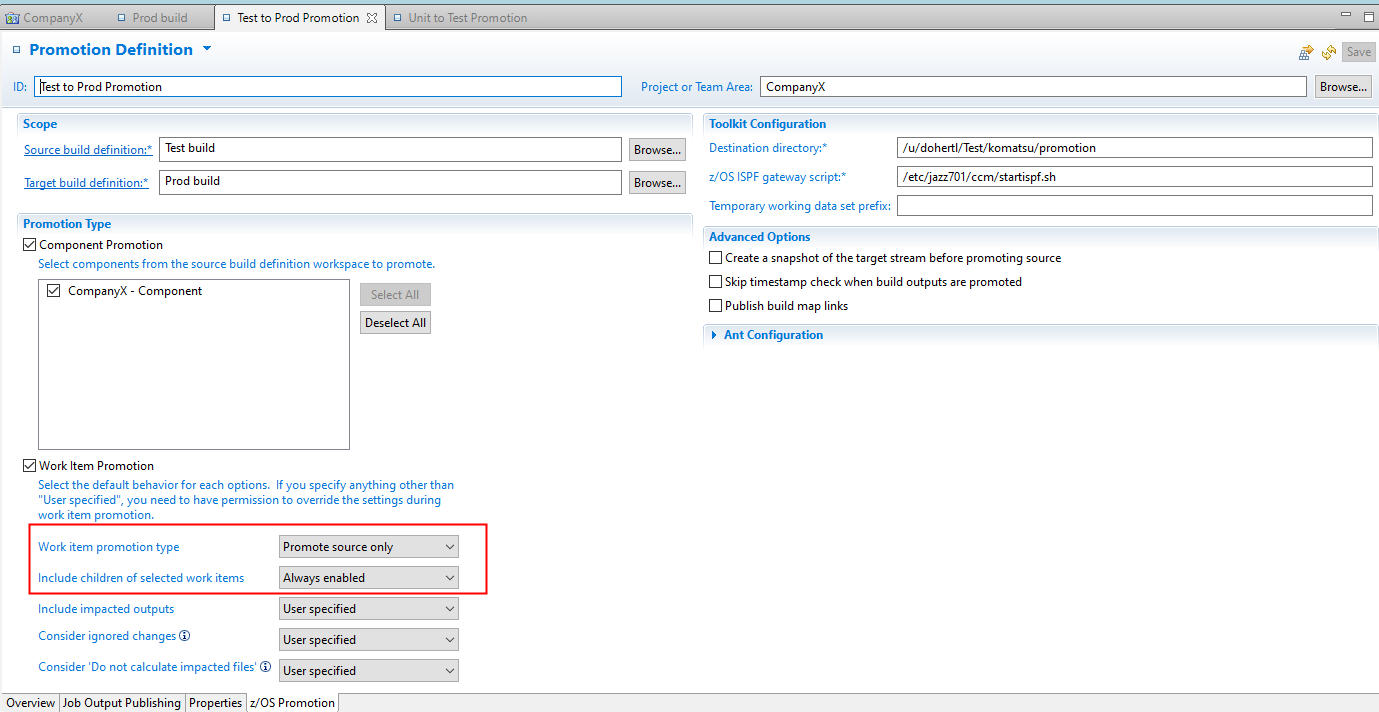
Automatically scheduling builds on completion of Promotion
The final part of the set up was the triggering of the builds after the promotions have run. As discussed right at the beginning of the article, we have build definitions required for all three levels, Unit, Test and Prod. We need these such that promotion knows the Sandbox data sets to target for promotion. However, even though we don’t want to do a build at the Test level, we still need to trigger the Test build. Not to build the source, but to handle any deletions that may occur. We will cover deletions later in the article. For now let’s look at what is required to trigger the build post promotion.
Once again, the functionality we require is handled, out-of-the-box, by a precondition or follow-up action in the operation behavior, in this case a follow-up action. As before, in the Project areas process configuration tab, open the Operation Behavior in the Team Configuration. Then scroll down to the Promotion operation in the Promote Work Items (Server) operation there will be an icon showing there are available preconditions or follow-up actions. By clicking it, you will see the currently assigned preconditions and follow-up actions.
Note : If the icon is not visible then make sure the checkbox Preconditions and follow-up actions are configured for this operation is checked.
in the Follow-up actions click the Add… button, select the Run Target Build follow-up action and click OK. We can now configure which promotions run a target build once complete. We don’t need to specify the build definition to run as that is derived from the Target build specified in the promotion definition itself. We are just specifying that a build should be run. For the Unit to Test promotion, we still need to run the build, but as the promotion definition promotes source and outputs, nothing will be rebuilt. Remember, we are running this build to process deletions, if any. So, for this request, we are not interested in impacted files:
For the Test to Prod promotion we are going to run a rebuild and are only promoting the source, so for this one we are not interested in impacted files: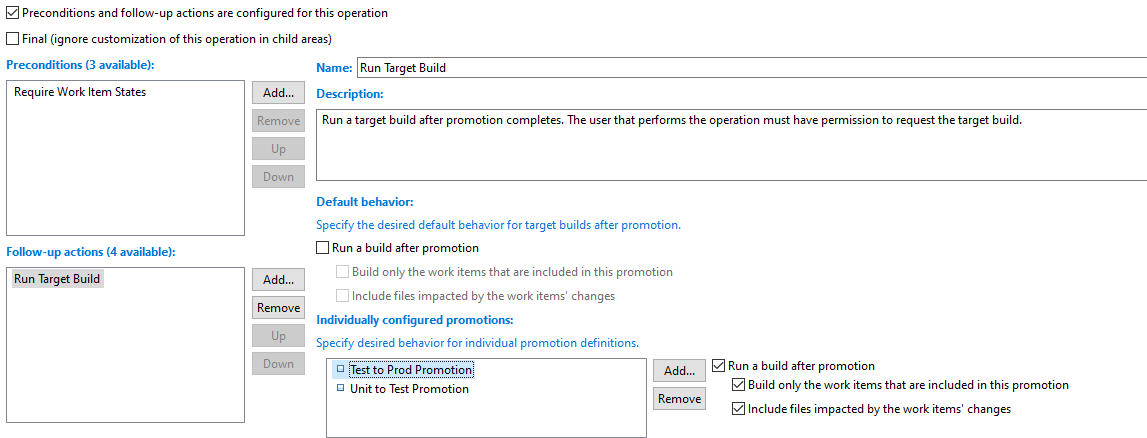
We have now successfully covered all seven bullets in the customers work flow listed at the top of the article.
Handling deletions as part of the promotion process
It is rare, but not unheard of, to want to delete a part from the SCM. Source control systems don’t like deletions as deleting a file is removing evidence. EWM does handle the deletion, and remember, the evidence will still be there in the changeset history. But deletion becomes more complex when you have a build sandbox on z/OS to try and keep in sync with the SCM. In our example set up we have 3 streams:
- Unit – With build
- Test – Without build
- Prod – With build
Test is the issue with deletion, because there is technically no build, and currently Promotion in EWM does not handle deletions. So currently, everything that is a generated output that is promoted to Test, will stay there. But as mentioned earlier, we can fix this by triggering a build at the Test level.
It should be noted, however, that this set up was specific for this customer requirement. The true version of the source is always in the SCM, not in the sand box data sets. EWM will only load and rebuild the source when it is changed and delivered to the stream. At that point, EWM will load the latest version of the source into the sandbox data set. It does not really matter that deleted parts exist in the sandbox data sets. However, this customer wanted the sandbox data sets to be kept in sync with the SCM, which is why we have this solution for deleted source parts.
Deleting Outputs
Deleting outputs is controlled by the Delete obsolete outputs option in the z/OS Dependency Build definition. In z/OS Dependency Build tab, in the General options tab, ensure Delete obsolete outputs is selected for all the build definitions, Unit, Test and Prod. When a deletion is part of a build you will see this in the build log:
deleteBuildMaps:
Published 1 contributions including Extended in background thread
[antz:deleteBuildMaps] [1] 2020-07-16 05:20:36,922 Deleting build maps and output binaries that are associated with deleted buildable files.
[antz:deleteBuildMaps] [1] 2020-07-16 05:20:36,933 Deleting 1 build maps.
[antz:deleteBuildMaps] [1] 2020-07-16 05:20:36,946 Deleting the build map that is associated with file "KOMNBRV3.cbl"
[antz:deleteBuildMaps] [1] 2020-07-16 05:20:36,954 Deleting 1 obsolete output files.
[antz:deleteBuildMaps] [1] 2020-07-16 05:20:36,965 CRHTC1661I ZOS.dsExists: 'CUSTOMER.PROD.OBJ(KOMNBRV3)' - true
* [antz:deleteBuildMaps] [1] 2020-07-16 05:20:36,987 The output file CUSTOMER.PROD.OBJ(KOMNBRV3) has been deleted.
That covers deletion of the outputs when a build is run. So, Unit and Prod are covered, because an actual build of the source is done, but what about Test? As we have set up the Unit to Test promotion to trigger the Test build, the Test build will run. But, it will not build anything, because you have promoted Source and outputs. However, the Test will now handle the deleting of obsolete outputs.
Deleting source from the sandbox data sets
Deletion is a tricky business. If the build has something to do, for example a new part is created or a part is changed, then we will go though the Load phase of the build. If we go through the load phase, then we will also delete, from the sandbox data sets, the source modules that have been deleted. The problem is when the only thing that has changed is a deletion. Currently with our set up, the build will run, but it will say it has nothing to do. So, the question is, how do we trigger the load phase in all cases.
For Test this is not an issue, as there should be no source code in the sandbox data sets, unless, at some point, a full build was run. Remember we
are promoting Source and Outputs. Source means in the SCM, and outputs means in the Sandbox data sets.
For Unit and Prod check the Load workspace to the resource prefix at the beginning of the build:
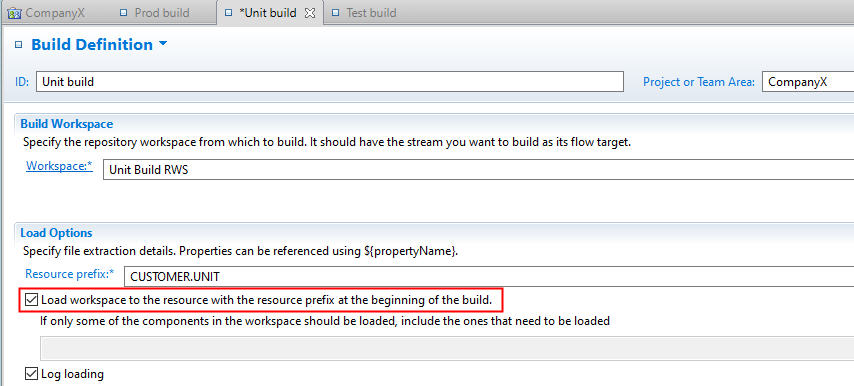
The problem with this is it will probably load too much, and that will take time. So you need to add a not very well documented build property team.enterprise.build.dependency.trustInputs and set it to true: 
You can read about it here : https://jazz.net/wiki/bin/view/Main/EEBuildPropertiesExplained
This will allow the load to run a bit quicker, and in which case it will allow the deletion of the source parts from the sandbox data sets.
Conclusion
This was probably not a unique requirement that this customer had, which is the reason for writing the article. However, the definitions and options we have documented can also be used in different other different scenarios. For example:
- If rebuild is required at every level. This would involve making the promotion definition promote Source and Outputs at all levels
- If rebuild not required at any level. This would involve making the promotion definition promote Source only at all levels
- If rebuild required at Test. This is a more common scenario. At Unit the debug options might be used, so at the integration/system test level there is a rebuild to turn the debug options off and maybe turn on some optimization options. Then the promote to prod is a Source and Outputs promotion.
Hopefully this article gives you an insight into EWM’s extensive out-of-the-box preconditions and follow-up actions, as well as the promotion capabilities should you continue to use a multi-tiered development environment.
About the author
Liam Doherty is a Senior Software Engineer and RTC Enterprise Extensions architect in Perth, Australia. He has 38 years of experience with the MVS™ operating system, both with IBM and other customers. Initially an application programmer in PL/I, IMS™, CICS, and DB2, he moved into more technical support roles such as IMS DBA, CICS System programmer, and SCLM Administrator before spending much of his career as a DB2 DBA. On moving to Perth, he took up a role at IBM that focused on SCLM and the SCLM additional products, both from an architectural perspective and a customer facing support perspective. He was also one of the developers on SCLM Developer Toolkit. For the past 11 years he has worked on the Rational Team Concert product in both an architecture and development role, focusing on the z/OS extensions, and in particular the RTC ISPF Client. He attends the SHARE technical conference twice a year in the US to give presentations on RTC, ISPF, SCLM and REXX. dohert@au1.ibm.com.
Nicolas Dangeville is a STSM, technical lead for Rational Team Concert Enterprise Extensions. He has driven the architecture of RTC-EE since its beginning. Nicolas is involved with several customers to adopt RTC-EE when migrating from other mainframe SCM systems. Prior to that role, Nicolas was an architect in the Pacbase team. Nicolas has worked for IBM for 28 years.
© Copyright IBM Corporation 2020