Implementing the ‘Remote Development Line’ pattern using Jazz SCM
This article describes how a development project can implement the Remote Development Line pattern. A simple summary of this pattern is that you have a local team that “owns” the software and a remote team that contributes code to the local codebase under the watchful eye of the local team.
Installing Rational Team Concert
The first step is to install Rational Team Concert. At the end of this topic, we will discuss how to use process permissions to help ensure that remote changes are verified. Process permissions only work with the Standard Edition Installation but the rest of the steps should work with any Jazz install. Follow the steps to install the Jazz server and create an administrator user for yourself.
Setting up the JUnit Project example
To simplify things for ourselves, we’ll base this tutorial off of the JUnit Project example that ships with RTC. The example is described in detail in the online documentation but the basic instructions for setting up the example are:
- Start the RTC client.
- Create a repository connection to https://<hostname>:9443/jazz using your administrator user account.
- Choose File>New>Example… from the main menu, choose Team Concert Example Project Setup and follow the wizard through to create the artifacts for the example.
Once the project is set up, you should give all the users Developer licenses as described in the example documentation. In addition, give the build user a Build license through the Admin Web UI.
How a Team works with Jazz
Before we talk about the specifics of the Remote Development Line pattern, we want to describe the basic single team setup in Jazz.
- A team consists of a team leader and one or more contributors.
- In Jazz, teams are represented by a Team Area.
- The Team Area appears in the Team Artifacts view and can be opened and edited.
- Teams want to isolate their work from other teams on the project.
- In Jazz, this is done using a Stream.
- Streams appear under the Streams node of the Team area in the Team Artifacts view.
- Each team member does their work in a personal Workspace.
- Workspaces appear under the My Repository Workspaces node in the Team Artifacts view.
- In Jazz, the user’s local workspace exists locally and is mirrored by a repository workspace on the server. Think of this as having your private work backed up on the server.
- After a user makes changes locally, they can Check-in their changes to their repository workspace.
- Once they have verified their changes, they can Deliver them from their workspace to the team stream.
In the JUnit example, there is a JUnit Team that consists of 3 members: 1 team lead (Bill) and 2 contributors (Markus and Jason). This team owns the JUnit Stream. If you log in as bill (password is also bill), you will see that Bill has a workspace that flows to the JUnit stream. We’ll use this team to be the local team that owns the codebase.
Creating a Remote Team and Stream
Now that we understand how teams are organized in Jazz, we can create a second team that represents our remote development team. Like our local team, this team will need a team area which we will name JUnit Remote Team, and a stream which we will name JUnit Remote. We will also create users to represent the remote team members.
To create a new Team Area named JUnit Remote Team, follow these steps (you will need to log in with your administrator user to do this):
- Select New>Team Area… from the context menu of the JUnit Project node in the Team Artifacts view.
- Enter JUnit Remote Team as the name of the team (and add a summary if desired) and click Finish.
- In the Team Area editor, click the Create… button to create a user (e.g. Riena E. Mote with id remote). Make Riena a member of JazzUsers repository group.
- Assign the user a Developer license on the last page of the wizard
- Create other users as desired. For testing at the end of this article, create Fred. A. R. Away with id faraway.
- The new users will have passwords set to their id by default.
- Assign Riena the teamlead and contributor roles using the Process Roles… button. Add the contributor role to Fred.
- In RTC 2.0 teamlead is renamed Product Owner.
- In RTC 2.0, add the JUnit Remote Team to the development Timeline in the top right area of the editor.
- Add a Work Item category by choosing Manage Categories from the context menu of the Work Item Categories entry in the Artifacts section of the editor. (The Artifacts section is in the Links page in RTC 2.0)
- In the Project Area editor, click Add Category… to add a new work item category named JUnit Remote.
- Select the new category in the left pane and the JUnit Remote Team in the right pane and click Associate.
- Save the Project Area editor and the Team Area editor (note that, due to a refresh issue, you may need to close and reopen the Team Area editor to see the new work item category).
After we are done these steps, the editor for the remote team should look something like Figure 1:
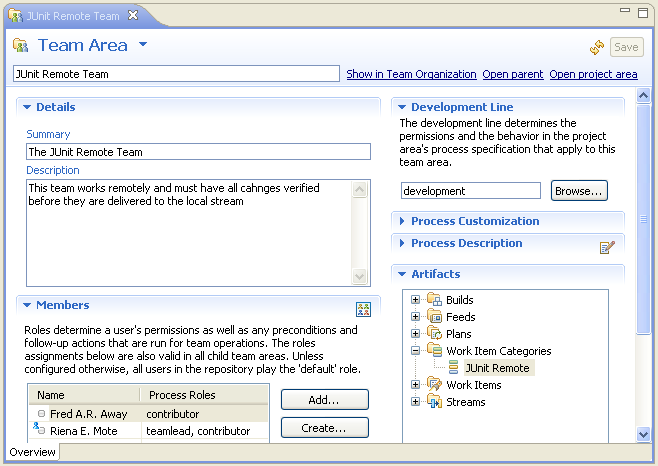
Figure 1: The Remote Team Area
Once your team is created, you will want to create a stream for the team. To create a new stream:
- Select New Stream… from the Streams node under the JUnit Project node in the Team artifacts view.
- In RTC 2.0, select New > Stream from the Source Control node.
- Enter JUnit Remote as the name and set the owner to JUnit Remote Team.
- Add the JUnit component from the JUnit stream to the JUnit Remote stream.
- Click Add… to add a component.
- Select Component in another repository workspace or stream and click Next.
- Select the JUnit stream and click Next. If you don’t see the stream appear, you can start typing “JUnit” in the filter field until it appears.
- Select the JUnit component and click Finish.
- Save the stream editor.
Once you have completed these steps, you will have a second team with their own stream whose contents match the JUnit stream. The Team Artifacts view should look the same as Figure 2. Note that the My Team Areas node in the Team Artifacts view will only show team areas that contain the logged-in user.
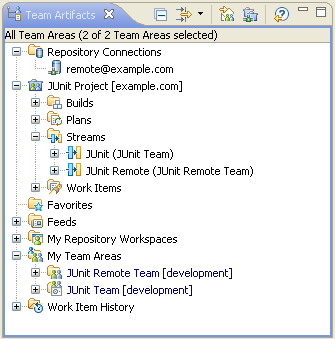
Figure 2: The Remote Stream in the Team Artifacts View
Delivering Changes Between Teams
With the basic team setup described above, both teams can work and deliver changes to their respective streams. At some point, changes made by the local team need to be adopted by the remote team. Similarly, changes made by the remote team need to be verified and adopted by the local team. At this stage, it is worth mentioning that the JUnit example doesn’t have any permissions defined that prevent cross-team delivery of changes. Currently, without permissions, the teams can freely deliver to their counterpart’s streams as well! We will configure the permissions to restrict stream modification to team members but, before we apply permissions, we need to take a closer look at how changes can be shared between streams.
In Jazz, there are two ways to do this:
- The user responsible for integration can use a workspace to flow changes between the two streams.
- The integration can be performed through an integration stream.
We will explore each of these in more detail in the following subsections.
Using a Workspace to Share Changes Between Teams
One way to share changes would be for one of the local users (who we’ll refer to the integrator) to create a workspace off of the local stream and then change the flow target to the remote stream and accept all changes from there (resolving any conflicts that occur). That user would then have a workspace that contained the latest local and remote changes. The integrator could then review the changes from the remote team and perform any automated or manual tests on the code to ensure validity. Once validity is determined, the integrator would baseline the component and deliver the local changes to the remote stream and then deliver the remote changes to the local stream (by changing the flow target of the workspace back to the local stream).
Using a workspace to share changes is simple, but it isolates the changes being integrated into a private workspace owned by the integrator. Other team members cannot easily see what exactly is being integrated and, more importantly, the build system cannot be used effectively. At the same time, it requires the integrator to be a member of both teams so that the approved changes can flow to both the local and remote streams.
Using a Stream to Share Changes Between Teams
Another approach is the create an integration stream in which to put the new local and remote changes. The process for populating the integration stream can be similar to the one described in the previous section in the sense that an integrator could pull the local and remote changes into their workspace and then flow the changes into the integration stream. Once the changes are in the integration stream, any code reviews can be performed by any local team member (not just the integrator) and automated tests can be run through the Jazz build system. Once the remote code has been reviewed and the automated tests have passed, the changes can flow to both the local and remote streams.
A variation on this approach could be made such that each team decides what to deliver to the integration stream. A member of the local team would be responsible for delivering changes to the integration stream when they are deemed ready. Similarly, a member of the remote team could deliver remote changes to the integration stream once they are ready. Each team could also decide when they adopt changes from the other team. For instance, the remote team may adopt changes from the local team as soon as they are pushed to the integration stream while the local team may hold off on adopting remote changes until the automated tests succeed and the required reviews are performed. As for the reviews, they could be performed either before or after the remote code is delivered to the integration stream depending on the process decided on the project leaders.
Using an integration stream has advantages. As was mentioned previously, because the changes are in a stream, anyone who has access to that stream can see what changes are there. Also, the build support in Jazz can be used to run scheduled builds on the stream to ensure the validity of the content. One can even envision using additional streams in the process. For example, the integration stream may just be a staging area were changes are put as often as desired and continuous builds are run to ensure that the changes integrate but the code is never intended to be assembled and run. An additional stable stream could then be used to push changes that are going to be included in a usable package (whether it be a released product, a beta or a demo).
Creating an Example Integration Stream
For our example, let’s create a stream name JUnit Integration in the same way we created the JUnit Remote stream except that, for the time being, we’ll set the owner of the stream to the local JUnit team. We’ll also add the JUnit component from the JUnit stream to the integration stream. We will use this stream to integrate remote and local changes.
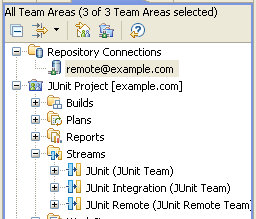
Figure 3: The Integration Stream
Builds
Now that we have our integration stream set up, let’s look at how we can use the build engine to run our builds. The JUnit example includes the definition of a junit build and the documentation for the example describes how to run the build. When developing using Jazz, it is a good practice to have a least one build definition for each stream. In this section, we show how to use the build engine to run the build continuously on our development streams and at scheduled intervals on our integration stream.
Our first step will be to modify the existing junit build to run continuously as in Figure 4 using the following steps:
- Select Open Build Definition from the context menu of the junit build in the Team Artifacts view.
- Click on the Schedule tab.
- Enable the scheduled build.
- Enter 60 minutes as the interval.
- Save the Build editor.
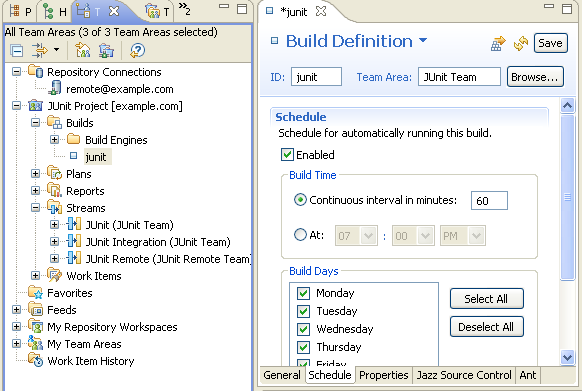
Figure 4: The JUnit Build Definition
Our next step will be to create a build for the remote stream that has the same characteristics as the build for the local stream. To do this, we need to log in as the build user (password build for the JUnit example) and create a workspace off of the JUnit Remote stream. If you haven’t done so already, first give the build user a build license. We can then create a remote.junit build definition. Here are the steps we need to take:
- Log in as the build user in the RTC client.
- Select New Repository Workspace… from the context menu of the JUnit Remote stream.
- Enter JUnit Remote Build Workspace as the name and click Finish.
- Choose not to load any projects when prompted.
- Select New Build Definition from the context menu of the Builds node in the Team Artifacts view.
- Select JUnit Remote Team as the team area for the build.
- Choose the option to copy an existing build and choose the junit build.
- In the Build editor, enter remote.junit as the build ID.
- Click on the Jazz Source Control tab and change the selected workspace to the JUnit Remote Build Workspace. You will be prompted to ensure that the workspace is owned by the proper user. It is since we created it using the build user.
- Save the editor. You will be prompted about not having a build engine to run the build. We will start and configure a build engine later in this section.
Figure 5 shows the build editor for the remote.junit build looks like after we save it.
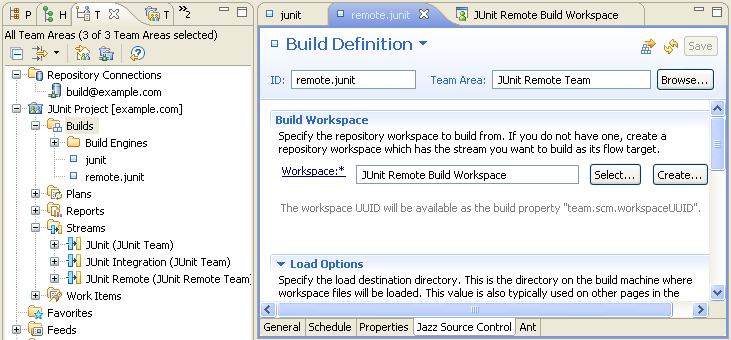
Figure 5: The Remote JUnit Build Definition
Finally, we want to create a workspace (as the build user) off of the JUnit Integration stream and create a build for this workspace as we did for our remote stream. However, this time, schedule the build to run every day at a fixed time, the idea is that the local and remote teams know they can push their changes before that time each day and, once the build finishes, they know they can pull in the changes from the integration stream into their team stream. Figure 6 shows the schedule set for 7 a.m. each day.
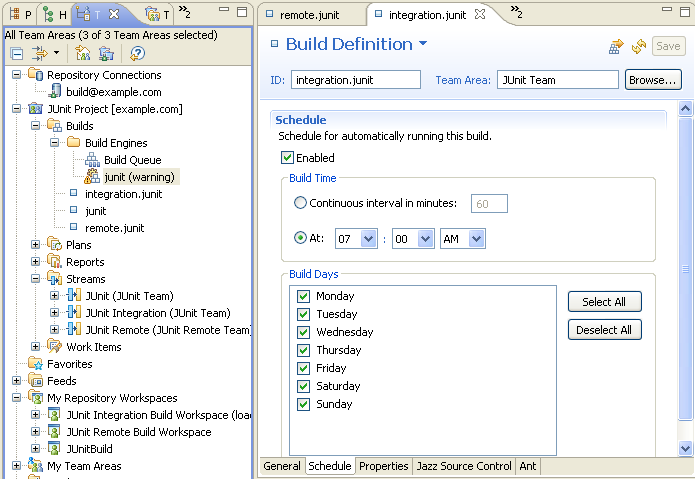
Figure 6: The Integration JUnit Build Definition
The above screenshot shows our build definitions and their corresponding workspaces. It also shows a build engine that was created as part of the example with a decoration that indicates that there is a problem with the engine. You can open the build engine and the warning at the top indicates that the engine is not running, as shown in Figure 7.
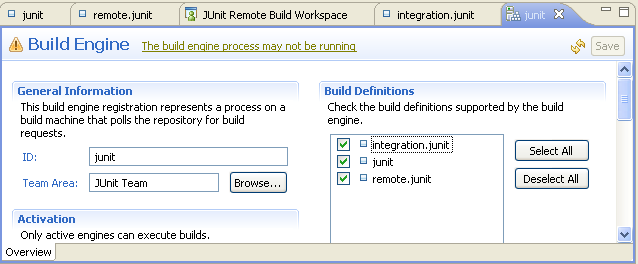
Figure 7: The Build Engine
To start the engine, follow the instructions in the JUnit project builds section of the JUnit example documentation. You can also see that our two new builds appear and are not configured to be run by this engine. Check them off and save the editor so all the builds can be run by our engine. In reality, you would probably want to have multiple build engines so that the different runs do not interfere with each other.
Process and Permissions
The final topic we will discuss is tailoring the process specification to enforce the validation of remote changes. A process specification can be associated with project areas and team areas. Team areas within a project area inherit the process specification from the parent area but can also tailor it to their needs. Similarly, team areas can be arranged hierarchically and a child team area inherits the specification from its parent as well.
The particular part of the process we are trying to enforce is the need to have changes made by the remote team verified by the local team before they are accepted. To that end, we want to change the permissions of the SCM deliver operation such that only users with the proper role can deliver and, furthermore, that changes from our remote site require validation before they are delivered.
For our example, there are three main steps we need to take to set up our process:
- We will restrict permissions on the SCM operations.
- We will adjust our project, team and stream structure in order to better support the process we want.
- We will then adjust our process specifications to accommodate our needs.
Restrict Permissions for SCM Operations
The first step is to modify JUnit project process so that each team only has permission to work on the streams they own. To accomplish this we need to:
- Open the JUnit Project editor using the context menu on the JUnit Project in the Team Artifacts view.
- Select the Process Configuration tab.
- Select the Team Configuration/Permissions node in the Configuration tree.
- Modify the permissions of the Source Control operations.
- Switch the Permissions table to Show all actions and roles mode.
- Uncheck Source Control for everyone.
- Check Source Control for contributor and teamlead.
- Save the editor.
Figure 8 shows the result of this. It also shows that the Process permissions have been restricted to the teamlead only. There are probably other permissions you would want to change but we won’t go into the details here.
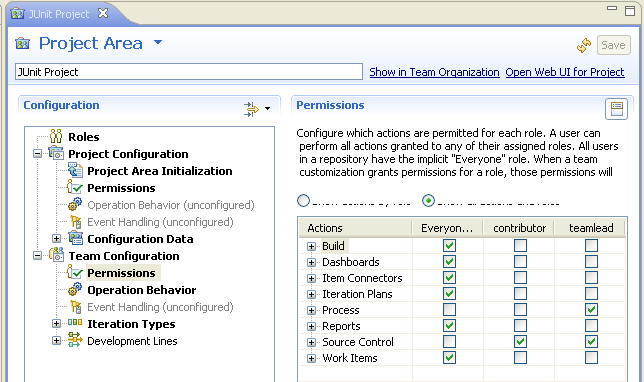
Figure 8: The JUnit Project Process Configuration
With these changes, only users with either the contributor or teamlead role can deliver changes to a stream owned by that team. However, users without those roles still have read access to the content of a stream, they just can’t deliver changes to a stream. The implications of this for our example are that the remote team cannot deliver changes to the local stream and our local team members cannot deliver changes to the remote stream.
Adjust the Team Structure
Unfortunately, the current permission settings also mean that the remote team cannot deliver changes to our Integration stream since it is owned by the local team. To get what we want, we need to create another team, which will call the JUnit Integration Team, and change the owner of the JUnit Integration stream to be that team. We can then add local and remote users that perform integration duties to this team.
The nice thing about Jazz is that changing this organization is simple:
- Log in as bill or your admin user.
- If you restricted the Process permissions to be teamlead only above, you need to be the teamlead to perform the changes we need to make.
- Create a JUnit Integration Team the same way we created the remote team.
- Add Bill as a teamlead.
- Add users from the local and remote teams to the integration team. For example, add Markus and Riena to represent their respective teams’ integrators.
- Open the JUnit Integration stream and change the owner to the JUnit Integration Team.
We now have a separate integration team so that the local and remote streams are isolated but the integrators for both teams can push changes to the integration stream.
Place Additional Requirements on Remote Contributors
Finally, we want to place additional requirements on changes that are delivered to the integration stream by remote users. It turns out that there are conditions that apply to everyone when delivering changes to a stream. These checks include no unused imports, no compile errors and having a work item associated with the changeset being delivered. We want to add an additional check for remote users, requiring that all changes delivered to the integration stream have been approved by the teamlead and reviewed by a contributor. However, we only want to have these restrictions apply when a remote team member is delivering changes to the integration stream. We don’t want these restrictions to apply when local users are delivering to the integration stream and we don’t want additional restrictions to apply when a remote or local user is delivering changes to a stream owned by their team.
To accomplish this, we will create a new role to identify a remote team member. To create a new role named remotecontributor and enable Source Control for that contributor, perform the following steps:
- Open the JUnit Project and select the Process Configuration tab.
- Click on the Roles node in the Configuration section.
- Click on the Create a new role toolbar button. The button looks like a man with a ‘+’ symbol.
- Enter remotecontributor as the name of the role.
- Modify the permissions of the Source Control operations.
- Switch the Permissions table to Show all actions and roles mode.
- Check Source Control for remotecontributor.
- Save the editor.
Once you have added the remotecontributor role, change any remote members of the integration team to have the remotecontributor role instead of the contributor role as shown in Figure 9:
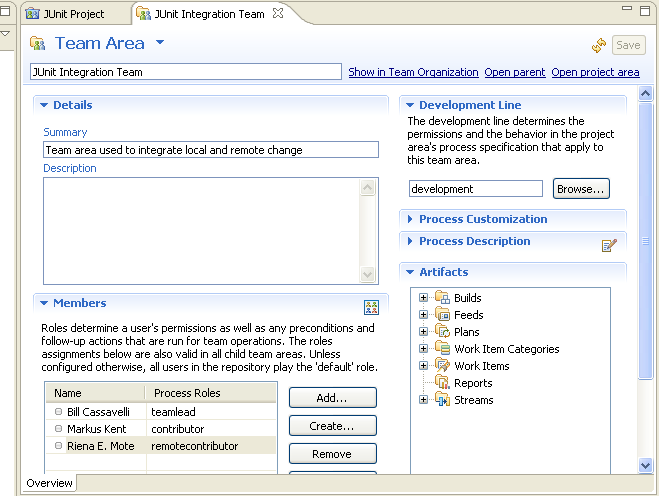
Figure 9: Creating Remote Contributors
We then need to change the behavior of the delivery for remotecontributors so that work item approvals are required.
As bill or the admin user, in the Process Configuration tab of the JUnit Project editor:
- Select Team Configuration/Operation Behavior.
- Click in the cell at Source Control/Deliver (client) and remotecontributor.
- In the UI controls under the table, enable the Preconditions and follow-up actions are configured for this operation checkbox.
- Add the Require Work Item Approval precondition and indicate that approval by 1 teamlead and review by 1 contributor is required.
Figure 10 shows the results of following these steps:
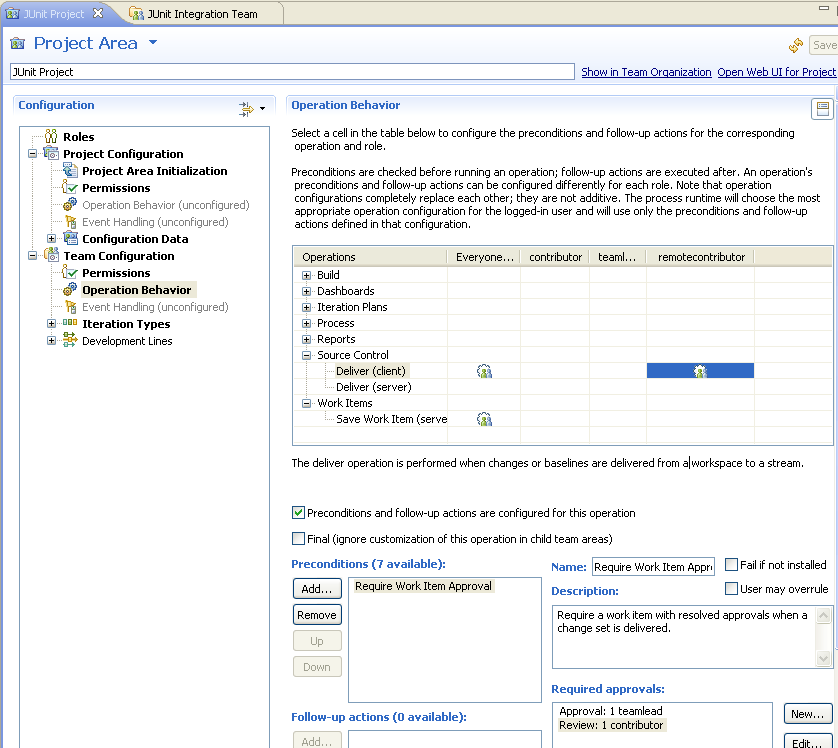
Figure 10: Customizing Operation Behavior
Testing It Out
We now have many users with different types of roles that behave differently due to the process specifications:
- Jason: a local user who is not the integrator.
- Markus: a local user who is also an integrator.
- Bill: a local user who is the team lead.
- Fred: a remote user who is not the integrator.
- Riena: a remote user who is also an integrator.
Here is a brief description of a scenario that allows you to test our process configuration.:
- Log in as a user to test.
- Create a workspace off of the JUnit stream and load the projects.
- Make a change, and choose Check-in and Deliver….
- Press Next to skip the comment and follow the wizard to create a work item for the change.
- As Jason, Markus or Bill, the changes will be delivered to their stream.
- As Fred or Riena, they cannot deliver because they do not belong to the JUnit Team.
- Repeat steps 2 and 3 using the JUnit Remote stream
- As Fred or Riena, the changes will be delivered to their stream.
- As Bill, the changes will be delivered because he is a teamlead on the JUnit Project level.
- As Jason, Markus, they cannot deliver because they do not belong to the JUnit Remote Team.
- Change the flow target to the JUnit Integration stream and deliver.
- As Riena, A message will be shown in the Team Advisor view that the required approvals are missing.
- As Markus or Bill, the changes will be delivered.
- As Fred or Jason, they cannot deliver because they do not belong to the JUnit Integration Team.
- As Riena, Open the work items for the change and, on the Approvals tab:
- Create a New Approval with type Approval and add Bill as the approver.
- Create another approval with type Review and add Markus as the reviewer.
- Log in as Bill and Markus and provide the required approvals.
- Log back in as Riena and deliver.
- The deliver should succeed since the work item has the required approvals
Conclusion
In this article, we’ve described how to set up individual teams to share changes using a stream and also how to use an integration stream to enable multiple teams to share changes together. We have also shown how to set up builds to ensure that the integration remains free of breaking changes. Finally, we have illustrated one way to use the process capabilities in Jazz to support the Remote Development Line patterns by requiring that remote users have their changes verified before delivering to the integration stream.
© Copyright IBM Corporation 2019