Adding a check-in participant to Rational Team Concert source control
In Rational Team Concert (RTC) 6.0.4, the ability to associate preconditions and follow-up actions to the SCM check-in operation was added. In this article, we provide an example of how to contribute a follow-up action SCM check-in. Our example is based off of the participant example that is provided in the Rational Team Concert Extensions Workshop. However, instead of configuring the follow-up action using a user interface (UI), we show how you can configure the operation by using SCM custom attributes. The output of our example follows the same pattern as the RTC Extensions Workshop example and is available for download.
Table of Contents
- Introduction
- Check-in participant extension structure
- Defining our participant
- Data available to check-in participant
- Our check-in participant behavior
- Defining and setting custom attributes
- Conclusion
- References
Introduction
In release 6.0.4, the ability to associate preconditions and follow-up actions to the SCM check-in operation was added. The following subsection outlines the preconditions that are available out-of-the box in release 6.0.4. The rest of the article focuses on how you can add your own participant to the check-in operation.
Out-of-the-box check-in preconditions
The following new server-side preconditions are available for source control check-in operations, and you can set them in either the Eclipse client or web client:
- Restrict File Size: This precondition prevents users from checking in files that exceed a specified size limit.
- Restrict Check-in of Resources with the Same Name: This precondition prevents users from checking in a resource if another resource in the same location has the same name, even when the capitalization differs. Because Windows systems ignore capitalization and Linux systems do not, this precondition can help avoid conflicts in projects where developers use both platforms.
- Restrict Check-in Based on Specified MIME Types and Encodings: This precondition prevents users from checking in files if the MIME type or encoding are not permitted for the project area. Currently, you can only set this precondition by using the Eclipse client.
- Restrict Check-in based on number changes in a change set: This precondition ensures that the number of changes in each change set does not exceed the value that you specify. For details about setting preconditions, see Setting preconditions and follow-up actions.
Adding our own check-in follow-up action
In addition to using the out-of-the box preconditions, we can define our own check-in operation participants. In this article, we focus on adding a follow-up participant to the check-in that triggers a personal build on the workspace of the user that performed the check-in. To implement our participant, we made use of the example participants from the Rational Team Concert Extensions Workshop. However, instead of using a UI to configure the participant, we make use of Source Control custom attributes.
Check-in participant extension structure
To define and install our extension, we create a set of java bundles that can be deployed to our server. This procedure is described in the Rational Team Concert Extensions Workshop. For our example, we follow the same process as the workshop, so that readers may need to familiarize themselves with the content of the workshop before proceeding. Here is a summary of what we did:
- We created two plug-ins to contain our code: a common bundle and a services bundle. The name of our bundles are net.jazz.rtcext.scm.extensions.common and net.jazz.rtcext.scm.extensions.service
- We defined a component using the com.ibm.team.repository.common.components extension point. The id of our component is net.jazz.rtcext.scm.extensions
- We defined an IScmExtensionsConstants interface in our common plug-in to contain any constants we define.
- We defined an operation participant for the new com.ibm.team.scm.server.commit operation using the com.ibm.team.process.service.operationParticipants extension point.
- We implemented the participant by using the same build code from the RTC Extensions Workspace and SCM custom attributes to configure how the build is triggered.
- We followed the steps in the workspace to define our feature plug-in, build the update site and deploy the feature to our server.
The rest of this article focuses on how we defined and implemented the check-in operation participant and also presents the API available for check-in participants.
Defining our participant
To define our participant, we use the following xml in the plugin.xml file of the net.jazz.rtcext.scm.extensions.service plug-in.
   <extension point="com.ibm.team.process.service.operationParticipants">
      <operationParticipant
            class="net.jazz.rtcext.scm.extensions.service.BuildOnCommitParticipant"
            id="net.jazz.rtcext.scm.extensions.service.buildOnCommit"
            name="Build on Check-in"
            operationId="com.ibm.team.scm.server.commit">
         <extensionService
               componentId="net.jazz.rtcext.scm.extensions"
               implementationClass="net.jazz.rtcext.scm.extensions.service.BuildOnCommitParticipant">
            <prerequisites>
               <requiredService interface="com.ibm.team.repository.service.IRepositoryItemService"/>
               <requiredService interface="com.ibm.team.scm.common.IScmService"/>
               <requiredService interface="com.ibm.team.build.internal.common.ITeamBuildService"/>
               <requiredService interface="com.ibm.team.build.internal.common.ITeamBuildRequestService"/>
            </prerequisites>
         </extensionService>
         <description>
            When changes are committed to a change set, a personal build will be requested on the users workspace.
         </description>
      </operationParticipant>
   </extension>
The above extension is similar to the extension that is used for the work item participant from the RTC Extensions Workshop. We have highlight the following main differences:
- We use our component “net.jazz.rtcext.scm.extensions”.
- We contribute the participant to the check-in operation using operationId=“com.ibm.team.scm.server.commit”.
- We define our own class “net.jazz.rtcext.scm.extensions.service.BuildOnCommitParticipant” to implement our follow-up action.
- We add a requirement on the main source control related service: “com.ibm.team.scm.common.IScmService”
The definition of our class for the participant is:
	package net.jazz.rtcext.scm.extensions.service;
	...
	public class BuildOnCommitParticipant extends AbstractService implements IOperationParticipant {

		@Override
		public void run(AdvisableOperation operation, IProcessConfigurationElement element,
			IParticipantInfoCollector collector, IProgressMonitor monitor)
				throws TeamRepositoryException {
			...
		}
		...
	}
In the next section, we present the API that is available to the participant and, following that, we present how we use this API, in combination with custom attributes, to implement our participant.
Data available to check-in participant
In this section, we summarize the information that is available to the check-in participant.
In the SCM API, the check-in operation is known as a commit. Hence, that is the term used in the code. The data available to the participant is provided in the operation data associated with the operation that is passed to the participant’s run method. The data is in the form of an object that implements the com.ibm.team.scm.common.process.ICommitOperationData interface. An example of how it can be access is:
	if (operation.getOperationData() instanceof ICommitOperationData) {
		ICommitOperationData data = (ICommitOperationData) operation.getOperationData();
	}
The ICommitOperationData interface has the following basic methods for accessing information about the check-in:
- getWorkspace():IWorkspace Returns the workspace into which the changes are being checked in.
- getComponent():IComponent Returns the component in the above workspace into which the changes are being checked in.
- getItems():List<ICommitItem> Returns a list of objects that describes how each versionable item that is affected by the check-in.
- getItem(UUID itemId):ICommitItem Returns the commit item for the versionable with the given id.
- getAffectedChangeSets():Collection<IChangeSetHandle> The check-in operation can affect multiple change sets, so this method returns all affected change sets.
- getChangedItemIds(IChangeSetHandle changeSetHandle):Collection<UUID> Returns the items ids of the versionables that are checked in to the given change set.
For the workspace and component, these are the full objects, so you have access to the name of the item and other attributes. From this, you can also see that each invocation of the participant is scoped to a single workspace and component.
The com.ibm.team.scm.common.process.ICommitItem interface has the following basic methods for accessing information about each versionable being changed:
- getChangeType():ChangeType An enumeration that describes the type of change. The values are ADD_TYPE, MODIFY_TYPE, MOVE_RENAME_TYPE, DELETE_TYPE, REVERT_TYPE, UNDO_TYPE, UNDO_MERGE_TYPE,MARK_AS_MERGED_TYPE which correspond to the types of operations that can be input to the IScmService#batchCommit service method.
- getBeforeStateHandle():IVersionableHandle The handle to the before state of the versionable or a null if the change resulted in the addition of the item.
- getAfterStateHandle():IVersionableHandle The handle to the after state of the versionable or a null if the change resulted in the removal of the item.
When looking at specific items that were impacted by the check-in, you might want to know more details on the specific item or you might want to know what the path of the item in the workspace is. There are two methods on ICommitOperationData related to fetching the items.
- cacheStates(Collection<IVersionableHandle> versionableHandleList) This method can be called to fetch and cache the full items for the provided state handles with the data object. The reason for this is to ensure that fetching is done in a performant way and that any fetched items can be reused between multiple participants.
- getCachedState(IVersionableHandle versionableHandle): IVersionable get the full item for a versionable that was previously cached. It is useful to note that IVersionable is the super interface of IFolder and IFileItem which are the filesystem objects you may be more familiar with.
The paths for the items are not always pre-calculated but they can be accessed through the getResolvedPaths() method of ICommitOperationData which returns an object of type IResolvedPaths. This object gives you access to the before path, or the path of the item before the checked-in changes are applied, and the after path of the item.
Our check-in participant behavior
The following points summarize the behavior we want.
- Determine the build to run based on the component.
- Run a personal build on the user’s workspace if certain files are changed
- The trigger can be the file name, the file path, or a custom attribute of the file.
Determining what build to run
We want to associate the build to run with the component. We can do this using SCM custom attributes. The following code shows how we can access the “net.jazz.rtcext.scm.extensions.buildId” custom attribute to determine what build should be run.
	Map<String, Object> customAttributes = commitData.getComponent().getCustomAttributes();
	String buildId = (String)customAttributes.get("net.jazz.rtcext.scm.extensions.buildId");
We simply access the component associated with the commit data and then access the custom attributes of that component. We’ll look at how to define and set the custom attribute later in the article.
Requesting the build
If a build is required, we want to use the workspace from the commit data as the target for a personal build. The code to accomplish this can look like the following:
	// Get the build definition for our buildId
	ITeamBuildService buildService = getService(ITeamBuildService.class);
	IBuildDefinition buildDef = buildService.getBuildDefinition(buildId);

	// Create the build property to set the workspace
	IBuildProperty userWorkspaceIdProperty = BuildItemFactory.createBuildProperty();
	userWorkspaceIdProperty.setName(IJazzScmConfigurationElement.PROPERTY_WORKSPACE_UUID);
	userWorkspaceIdProperty.setValue(commitData.getWorkspace().getItemId().getUuidValue());

	// Request a personal build on that workspace
	ITeamBuildRequestService brService = getService(ITeamBuildRequestService.class);
	IItemsResponse response = brService.requestBuild(buildDef,
				new IBuildProperty[] { userWorkspaceIdProperty}, null,
				true, true);
The above code uses the workspace from the commit data to create a build property that is used to request a build on the user’s workspace. The requestBuild call also sets the personalBuild boolean argument to true.
Testing changes to determine if a build is required
To test whether a build is required, we want to look at all the changed items and determine if any of the changed items were files. For any changed files, we want to fetch the full item of the file, so we can access the name of the file so that we can test it against the name pattern. Like the build id, we store the file pattern as a custom attribute on the component.
	// Obtain the file pattern to match from the custom attributes of the component
	Map<String, Object> customAttributes = commitData.getComponent().getCustomAttributes();
	String fileNamePattern = (String)customAttributes.get("net.jazz.rtcext.scm.extensions.fileNamePattern");

	// We want to loop through all the items that are being committed to see if there are any files
	List<IVersionableHandle> toCache = new ArrayList();
	for (ICommitItem commitItem : commitData.getItems()) {
		// We are only interested in file changes
		IFileItemHandle fileHandle = getFileHandle(commitItem);
		if (fileHandle != null) {
			// We found a file so record the file so we can fetch the item to determine the name
			toCache.add(fileHandle);
		}
	}

	// If there are no files changed, we don't need a build.
	if (toCache.isEmpty()) {
		// No build required
		return false;
	}

	// We need to prime the state cache will all the items we may need.
	// We do it this way so we can get them all in one fetch.
	commitData.cacheStates(toCache);

	// Loop through the files to see if any require a build.
	for (IVersionableHandle versionableHandle : toCache) {
		IVersionable versionable = commitData.getCachedState(versionableHandle);
		if (Pattern.matches(fileNamePattern, versionable.getName())) {
			// A build is required
			return true;
		}
	}
For completeness, the getFileHandle method looks something like this:
	private IFileItemHandle getFileHandle(ICommitItem commitItem) {
		// The commit item has the before state, or the state that is already in the workspace,
		// and the after state, which is the state that will be in the workspace after the commit.
		if (commitItem.getAfterStateHandle()  == null) {
			// There is no after state so use the before state as the file handle, if it is a file
			if (commitItem.getBeforeStateHandle() instanceof IFileItemHandle) {
				return (IFileItemHandle) commitItem.getBeforeStateHandle();
			}
		} else if (commitItem.getAfterStateHandle() instanceof IFileItemHandle) {
			// We have an after state so return that as the state we care about
			return (IFileItemHandle) commitItem.getAfterStateHandle();
		}
		return null;
	}
Defining and setting custom attributes
In our example, we are using custom attributes on the component to configure our commit participant. Custom attributes need to be defined in the process configuration of the project area that owns the component. Once the custom attribute is defined in the project area, it can be set on artifacts owned by the project area using the SCM CLI.
Defining custom attributes
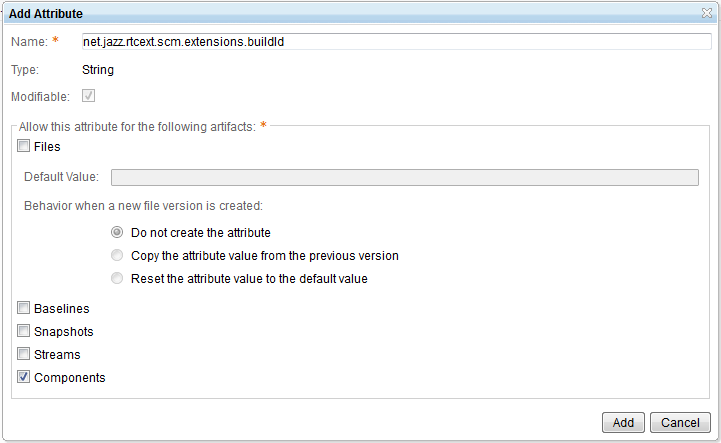
Custom attributes are defined using the project area editor in the Web client. The Eclipse project area editor does not support the specification of custom attributes. To add a custom attribute definition, perform the following steps:
- Navigate to the project area admin Web client.
- Click on the Source Control/Attribute Definition link in the menu bar at the left side of the page.
- Click on the Add button on the right side of the page above the attribute table header.
- Specify the attribute id and select Component. Click Add.
- Save the project area.
The following screenshot shows the Custom Attribute Add dialog with the id for our buildId custom attribute being specified for components.
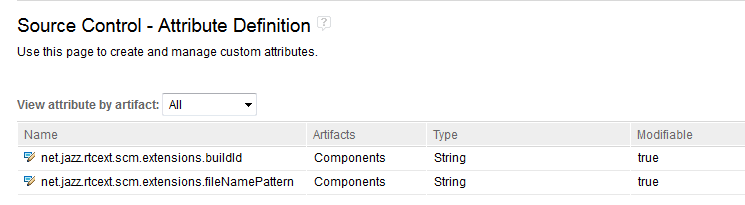
We then add our fileNamePattern attribute, resulting in the following definitions:
Setting custom attributes
Custom attributes are set using the CLI. Here is an example of how you could set the buildId attribute for the component named MyComponent.
scm set custom-attribute -C "MyComponent" -r https://server:9443/ccm "net.jazz.rtcext.scm.extensions.buildId" "main.build"
There is currently no UI in Eclipse or the web client for setting the value of custom attributes. There is API available to set custom attributes, but that is beyond the scope of this article.
Custom attributes on files
As you can see above, the artifacts that support custom attributes are stream, baselines, snapshots, components, and files. Accessing and setting the custom attributes works the same way for all these artifacts, except for files. Custom attributes on files have the following differences:
- Custom attributes on files can be defined to propagate to the next version of the file when the file changes.
- Accessing the custom attributes for a file version is done using the API IScmService#fetchCustomAttributesForVersionable.
- Setting the values for files can still be done using the CLI, but the easiest way to do this is to load the file into a sandbox.
To illustrate the above examples, we present a simple example.
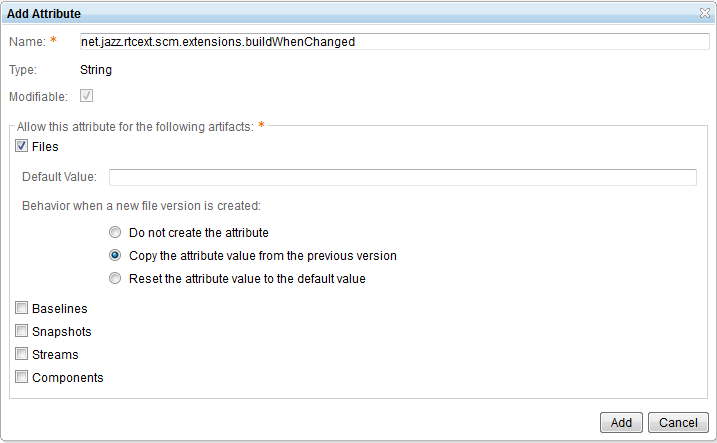
The following screenshot shows the definition of the net.jazz.rtcext.scm.extensions.buildWhenChanged custom attribute for files. We have specified that this attribute does not have a default value and that any values are propagated to new versions of the file.
We can set the custom attribute of a file using the CLI, as illustrated in the following example, which sets the net.jazz.rtcext.scm.extensions.buildWhenChanged property of the file P1/src/a/b/C.java to true. Note that this command is issued in the sandbox folder that contains the loaded files.
scm set custom-attribute -r local net.jazz.rtcext.scm.extensions.buildWhenChanged true P1/src/a/b/C.java
To access the custom attributes on the files to determine if a build is required when a particular file changes, we can use code similar to that shown below.
	IScmService scmService = getService(IScmService.class);

	// We want to test the before states for the custom attributes because we are in the middle of a commit
	// and the custom attribute may not be available on the after state yet.
	IVersionableHandle[] versionablesArray = getBeforeStates(commitItems);

	// Fetch the attributes for all our files together in a single query
	ICustomAttributeList[] attributesForVersionables = scmService.fetchCustomAttributesForVersionable(versionablesArray, null);

	// The input versionables array and output custom attributes array will be the same size and have corresponding entries
	for (int i = 0; i < attributesForVersionables.length; i++) {
		ICustomAttributeList attributeList = attributesForVersionables[i];
		IVersionableHandle versionableHandle = versionablesArray[i];

		// Check the attribute on each file to determine if a build is required
		Object buildWhenChanged = attributeList.getCustomAttributes().get("net.jazz.rtcext.scm.extensions.buildWhenChanged");
		if (buildWhenChanged != null && buildWhenChanged.equals("true")) {
			return true;
		}
	}
Conclusion
In this article, we presented an example of how to contribute a participant to the SCM check-in operation and we also illustrated how to set and access custom attributes on SCM components and files. Our example is based on the participant example that is provided in the Rational Team Concert Extensions Workshop and is available as net.jazz.rtcext.scm.extensions.zip. Using this information, you can write your own commit operation participants and also use custom attributes to configure your participants or to provide other capabilities on top of RTC SCM.References
- Operation Behavior (preconditions and follow-up actions)
- Rational Team Concert Extensions Workshop
- The RTC SDK is about to change in 6.0.3
- Creating custom attributes
About the author
Michael Valenta is currently the component lead of the Jazz SCM development team. Prior to that, he worked on the Eclipse open source project.
Copyright © 2017. IBM Corporation