Rational Team Concert: Operation History feature
Introduction
Rational Team Concert version 6.0.4 introduced the Operation History feature. This feature provides an Operation History view, which you can use to see all actions that resulted in changes to the contents of a repository workspace or stream, grouped by action. The feature offers useful functions such as comparing workspace or stream contents at different points in time, and rolling back an entire stream to an earlier point in time. The Operation History view and actions can help make managing your resources easier and more intuitive.
Operations
Operations are any actions that result in changes to the contents of a component in a repository workspace or stream. The following actions are examples of operations:
- Adding, removing, or replacing a component in a workspace
- Delivering changes to a stream
- Accepting change sets or baselines into a workspace
- Creating a baseline of a component
- Creating a snapshot of a workspace or stream
- Creating or closing a change set
- Checking in a file to a change set
- Suspending or discarding change sets in a workspace
Operations often group several change sets into a conceptual unit. For example, delivering 30 change sets to four different components in the same delivery is a single operation. It can be easier to track issues or to understand what happened to a workspace or stream by using the new operation-centric Operation History view instead of the change-set-centric History view.
Showing the Operation History view
Menu actions to show the Operation History view are available in the Pending Changes view, the Team Artifacts views, the workspace editor, and the stream editor in the Eclipse and Visual Studio clients.
You can open the operation history for a workspace or stream to show all components in the workspace, or you can show only the operations on a subset of components. The Operation History feature is also available in the web, Windows Shell, and command-line clients.
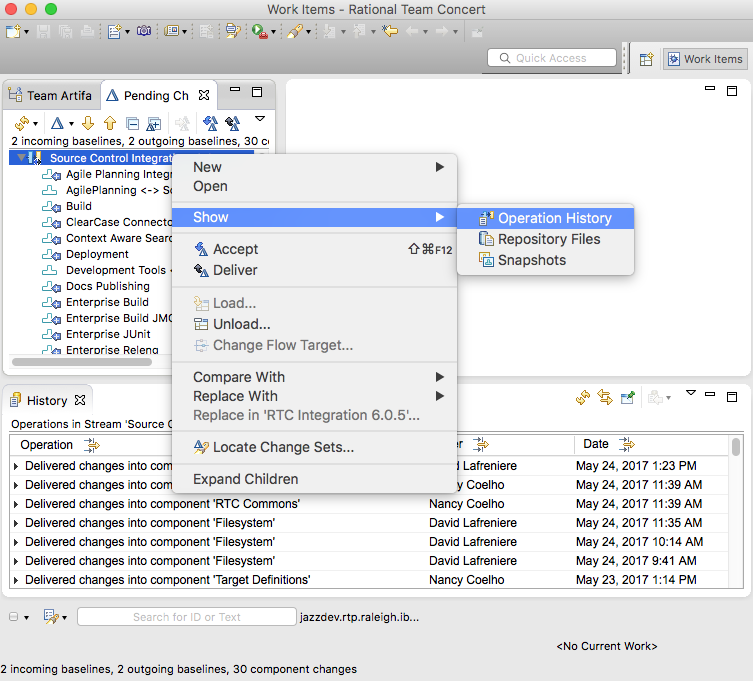
Figure 1: The Show > Operation History menu in the Pending Changes view
Filtering operations
You can filter the Operation History view by user, date range, and operation type. To access the different filter dialog boxes, you click the column name or filter icon in the column header to filter. You can use multiple column filters at the same time.
Use the user filter to filter on all users, the currently logged-in user, or a specific user. By default, the operations for all users are displayed.

Figure 2a: User filter dialog box
Use the date filter to select all dates or to specify a date range. To specify an open-ended range, specify only one of the before or after dates. The default is to show operations for all dates.

Figure 2b: Date filter dialog box
The operation type filter works slightly differently than the user and date filters. By default, check-in and create-change-set operations are excluded from the view. Typically, people are interested in the final change set state, not the intermediate file check-ins. Often, displaying all check-in and create-change-set operations clutters the view and provides little additional value. However, if you need to see these operations, you can use this filter to add them to the view.

Figure 2c: Operation type filter dialog box
Expanding operation details
Each entry in the Operation History view provides a summary of the operation, who performed it, and the date is was performed. You can expand individual operations to show additional details.
If you created a baseline, you see the baseline. If you accepted changes into multiple components, you see the list of components and the change sets that were accepted into each one, as well as the source of the change sets if applicable. If you replace a component, the changes sets and baselines that were added or removed are shown.
If an operation includes a large number of baselines or change sets, the details list is truncated. The last detail in the list states whether the result set is truncated. To view the full set of changes, you can open the change explorer by selecting the operation summary and clicking Open Change Explorer from the context menu.
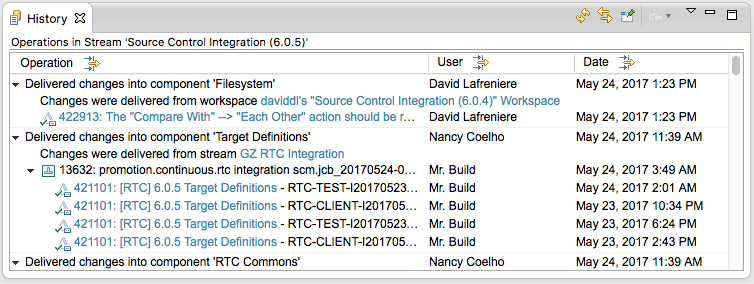
Figure 3: Expanding and viewing change details in the Operation History view
Performing actions on operations
The Operation History feature enables you to perform several useful actions on operations in the Eclipse, Visual Studio, and command-line clients. Some of these actions are not available in the web or Windows Shell clients.
Rollback action
You can use the rollback action to restore a workspace or stream to a state at a particular point in time.
To roll back an operation in the Operations History view, you select the operation to roll back to and then click Rollback on the context menu. The rollback action restores the workspace or stream to the state it was in at that point in time.
To reverse a delivery, you select the operation immediately before the delivery and roll back to that point. This action is an easy way to undo a mistake or get your workspace back to a previously stable state.
The rollback operation is also available when you view the operation history of a single component. In this case, performing a rollback only rolls back that particular component, even if the operation you are rolling back to contained changes to multiple components.
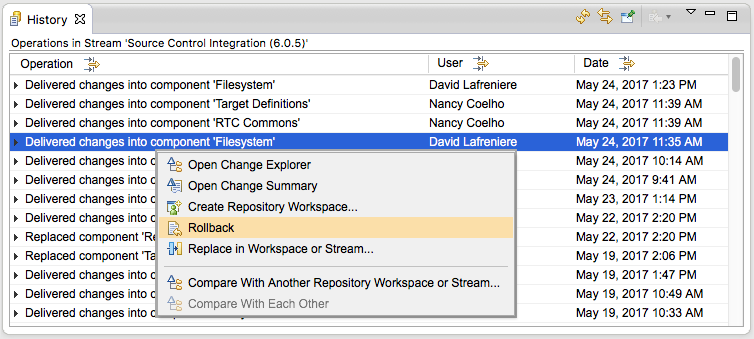
Figure 4: The Rollback menu item
Rolling back to operations that contain active change sets
When you perform a rollback operation on a repository workspace, the operation might include active change sets. Subsequent operations could introduce additional changes to the change set until the change set is finally closed. If you roll back to an operation that contains active change sets, the rollback operation creates new change sets that contain only the changes that existed in the active change sets at the point in time of operation you are rolling back to. The new change sets do not contain any changes that occurred to the change set in subsequent operations.
Depending on your development process, you might need to associate the new change sets created by the rollback operation with relevant work items.
Replace In action
A Replace In action that is similar to the Rollback action is available on operations. Instead of rolling back the current workspace or stream to the selected point in time, the Replace In action prompts you to select a target workspace or stream. The Replace In action makes the state of the target workspace or stream match the state of the current workspace or stream at the point in time of the selected operation. The current workspace or stream remains unchanged.
This action is similar to the existing Replace With > Latest from and Replace In actions that are available for workspaces, streams, and components. The Replace In action in the Operation History view sets the target workspace state to the same state as the source workspace at the time of the operation, while the older actions set the target workspace state to the current state of the source workspace.
Comparing operations
To view the changes introduced by an operation, select the operation and click the Open Change Explorer or Open Change Summary context menu items. This action is equivalent to comparing an operation to the previous operation in the Operation History view.
You can compare a workspace at different points in time by selecting any two operations and clicking the Compare With Each Other context menu item. This comparison shows all change sets and baselines that were added or removed from the workspace by any of the operations between the selected points in time.
To compare your workspace at a particular point in time to the current state of another workspace or stream, select an entry in the Operation History view and click the Compare With Another Repository Workspace or Stream context menu item. You are prompted for the workspace or stream to compare the current operation with. The comparison is made against the current state of the selected target workspace or stream.
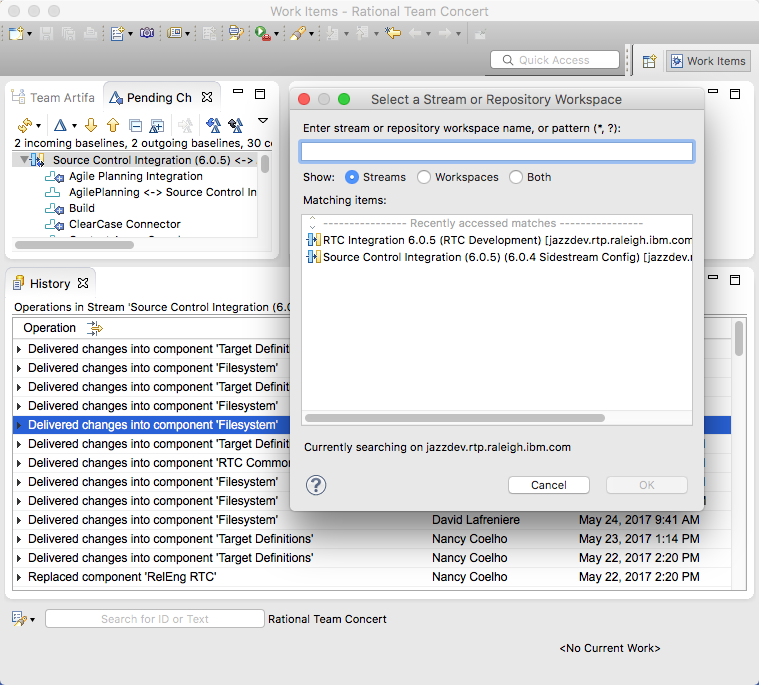
Figure 5: The “Compare With Another Repository Workspace or Stream” prompt
Creating a new repository workspace
To create a new repository workspace from a source workspace at an arbitrary point in time, select an operation in the Operation History view and click Create Repository Workspace on the context menu. This action creates a new repository with content that matches the source workspace at the point in time of the selected operation. You are prompted for the name of the new workspace before it is created.
Similar to the rollback and replace actions, if the source operation contained active change sets, new change sets are created that include only the changes up to the point in time of the selected operation.
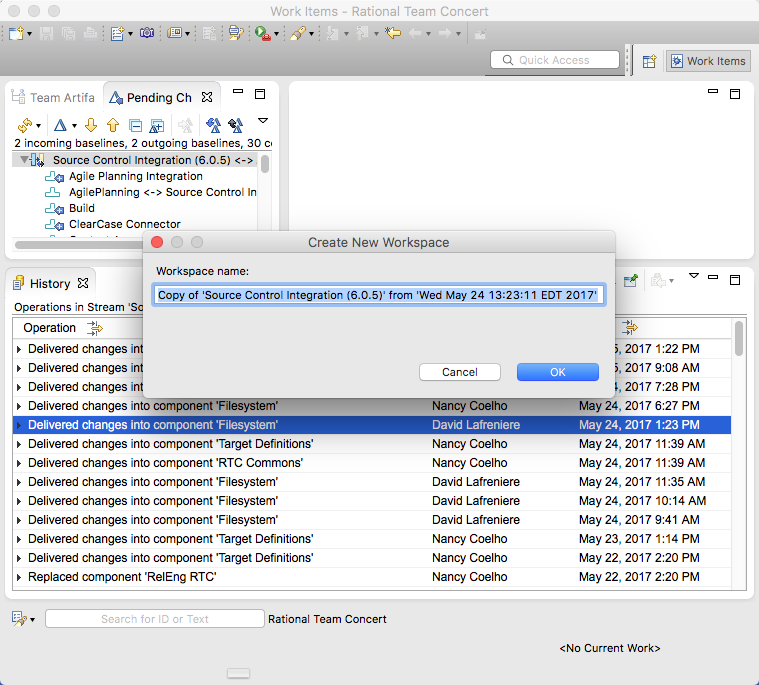
Figure 6: The “Create Repository Workspace” prompt
Client support
The Operation History feature is also available in other Rational Team Concert clients.
Visual Studio
The Visual Studio client provides the same functionality as the Eclipse client. The Show > Operation History menu items are available in most of the same locations: the Team Artifacts view, the Pending Changes view, and the workspace and stream editors.
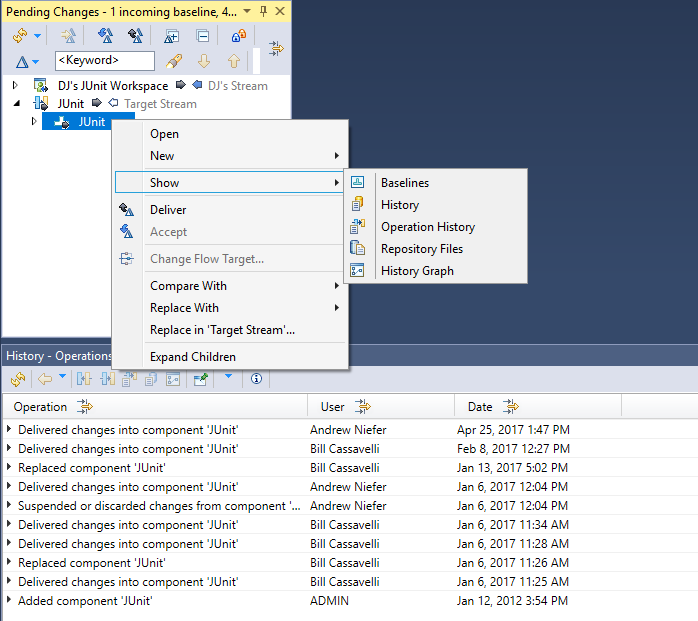
Figure 7: The Visual Studio client
Windows Shell
The Operation History view is available in the Window Shell client through menu actions in the Manage Artifacts view and the Pending Changes view.
The Windows Shell only supports the Create New Workspace and Rollback actions.
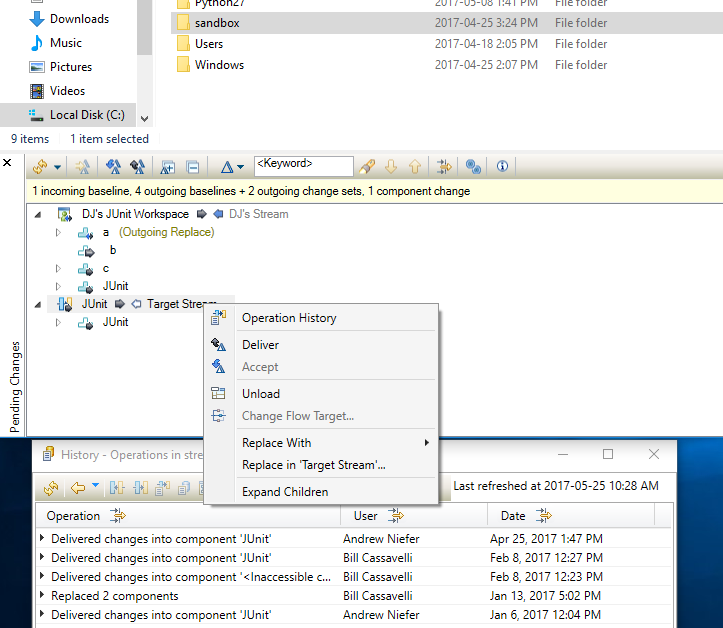
Figure 8: The Windows Shell client
Command-line client
The command-line client has commands to perform most of the actions that are available in the Eclipse and Visual Studio clients.
You can use the show operations command to show the operation history for a workspace or stream.
C:\jazz\scmtools\eclipse> scm show operations -r ella 1313
Stream: (1313) "JUnit" <-> (1323) "Target Stream"
  (1324) Delivered changes into component "JUnit" Andrew Niefer 25-Apr-2017 01:47:33 PM
  (1325) Delivered changes into component "JUnit" Bill Cassavelli 08-Feb-2017 11:27:35 AM
  (1326) Delivered changes into component "<Inaccessible component>" Bill Cassavelli 08-Feb-2017 11:23:59 AM
  (1327) Replaced 2 components Bill Cassavelli 13-Jan-2017 04:02:28 PM
  (1328) Delivered changes into component "JUnit" Andrew Niefer 06-Jan-2017 11:04:40 AM
  (1329) Suspended or discarded changes from component "JUnit" Andrew Niefer 06-Jan-2017 11:04:39 AM
  (1330) Removed component "Third" Bill Cassavelli 06-Jan-2017 10:38:39 AM
  ...
To see more information about each operation, you can specify the -v/–verbose argument. Similar to other command-line client operations, you can specify the -j/–json argument to receive the output in JSON format rather than formatted text.
C:\jazz\scmtools\eclipse> scm show operations -r ella 1313 --verbose
Stream: (1313) "JUnit" <->(1323) "Target Stream"
  Operation: (1324) Delivered changes into component "JUnit"
  Performed by: Andrew Niefer on: 25-Apr-2017 01:47:33 PM
    Component: (1334) "JUnit"
      Change sets:
        (1335) 25-Apr-2017 01:47:32 PM  <No Comment>

  Operation: (1325) Delivered changes into component "JUnit"
  Performed by: Bill Cassavelli on: 08-Feb-2017 11:27:35 AM
  Changes were delivered from workspace "Stream History Workspace"
    Component: (1334) "JUnit"
      Change sets:
        (1336) 08-Feb-2017 11:27:35 AM 7734: [Server] Find snapshot information to show in operation summary/details <No Comment>
  ...
To create a new workspace by using the command line, you can use the scm create workspace command. To specify which operation history reference to use, you use the –historyRef argument.
C:\jazz\scmtools\eclipse> scm create workspace -r ella --historyRef 1327 "My workspace name"
Workspace (1345) "My workspace name" successfully created.
To roll back a workspace, or components in a workspace, you can use the scm set component command on the command line to specify which components to replace.
C:\jazz\scmtools\eclipse" scm list components -r ella 1345
Workspace: (1345) "My workspace name"
  Component: (1334) "JUnit"
C:\jazz/scmtools\eclipse" scm set component -r ella 1345 historyRef 1325 1334
Set component command completed successfully.
Web client
When you view source control artifacts in a web browser, you can see the operation history for workspaces and streams on a new tab on the main workspace or stream pages. Similar to the Eclipse and Visual Studio clients, you can expand operation summaries to show details. When possible, the details include links to open or compare relevant source control artifacts.
Other actions such as Rollback, Replace In, and Create New Workspace are not available in the web client.
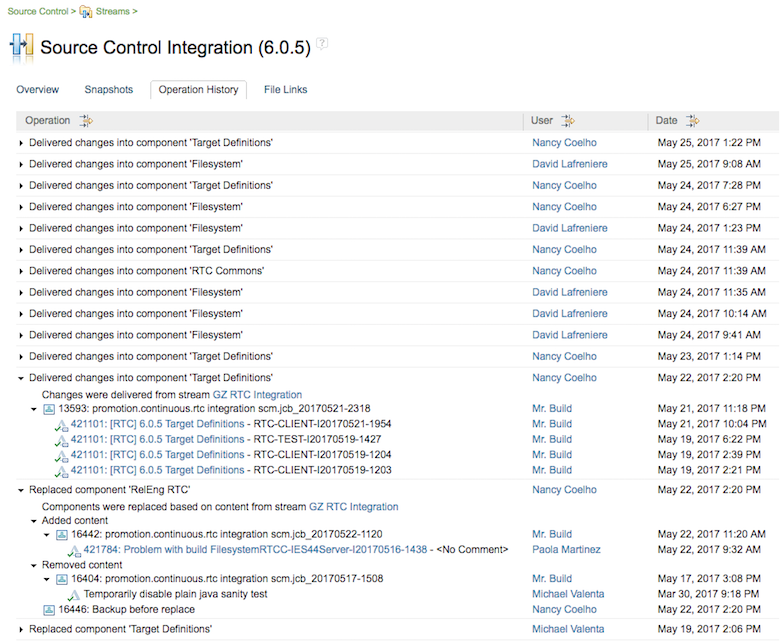
Figure 9: The web client
Sample scenarios
Rolling back an unwanted delivery
Previously, if you mistakenly delivered unwanted changes, you would have to go through every component in the stream and inspect the recent history to determine which changes to discard from the stream.
The Operation History feature makes identifying unwanted changes much easier. Now, if you deliver unwanted changes, you only need to open the operation history for the stream, select the operation from the view immediately before the unwanted deliver operation, and then select the Rollback action from the context menu. The stream is rolled back to the point in time just before the unwanted delivery.
To roll back an unwanted delivery:
- Find the stream and click Show > Operation History.
- Find the deliver operation that introduced the problem.
- Select the operation before the unwanted delivery.
- Right-click the operation and click Rollback.
Restoring a deleted component
If a component is mistakenly deleted from a workspace or stream, you can use the command-line interface scm add component -s command to restore the deleted component.
Previously, the -s argument could only accept a workspace or stream as a seed for the added component, and the component would be restored to the current state for the component in the provided seed. With the Operation History feature, the -s argument can also accept an operation history reference as the seed. Therefore, you can add a component back with a state that matches the state of any operation.
To restore a deleted component:
- Use the show operations command to locate the operation that was performed immediately before the component removal. The -m/–maximum argument might be required to return a list long enough to include the component deletion. You can also use the –before or –after arguments to narrow the results. You should also consider using the -c/–checkin argument to ensure that you see all the operations. This action is especially important if the operation that immediately precedes the component deletion is a check-in. If you don’t specify -c/–checkin, you might roll back further than you intend.
C:\jazz\scmtools\eclipse> scm login -r https://ella.ottawa.ibm.com:9443/jazz -n ella -u aniefer
Logged in to https://ella.ottawa.ibm.com:9443/jazz

C:\jazz\scmtools\eclipse> scm show operations -r ella "JUnit"
Stream: (1012) "JUnit" <-> (1056) "Target Stream"
  (1370) Delivered changes into component "JUnit" Andrew Niefer 25-Apr-2017 01:47:33 PM
  (1347) Delivered changes into component "JUnit" Bill Cassavelli 08-Feb-2017 11:27:35 AM
  (1348) Delivered changes into component "Second" Bill Cassavelli 08-Feb-2017 11:23:59 AM
  (1349) Replaced 2 components Bill Cassavelli 13-Jan-2017 04:02:28 PM
  (1350) Delivered changes into component "JUnit" Andrew Niefer 06-Jan-2017 11:04:40 AM
  (1351) Suspended or discarded changes from component "JUnit" Andrew Niefer 06-Jan-2017 11:04:39 AM
  (1352) Removed component "Third" Bill Cassavelli 06-Jan-2017 10:38:39 AM
  (1353) Delivered changes into component "JUnit" Bill Cassavelli 06-Jan-2017 10:34:05 AM
  (1354) Delivered changes into component "Third" Bill Cassavelli 06-Jan-2017 10:28:52 AM
  (1355) Delivered changes into component "Second" Bill Cassavelli 06-Jan-2017 10:28:49 AM

There are more operations available. Use the --maximum option to return more operations.
- After you locate the component delete operation, note the alias for the operation immediately before the removal. In this example, the alias for the removal is 1352 and the preceding operation is 1353.
- Use the show operations command on the component delete operation to get the alias of the deleted component. When you perform the show operations command on a single operation as opposed to a workspace or a stream, the -v/–verboseflag is implied.
C:\jazz\scmtools\eclipse> scm show operations -r ella 1352 Stream: (1012) "JUnit" <-> (1056) "Target Stream" Operation: (1352) Removed component "Third" Performed by: Bill Cassavelli on: 06-Jan-2017 10:38:39 AM Component: (1039) "Third" Baseline: (1379) 5 "Backup before drop" - Use the scm add component command to add the component with the component alias and history reference alias from step 2 as the seed.
C:\jazz\scmtools\eclipse> scm add component -r ella -s 1353 "JUnit" 1039
Following components successfully added:
  (1039) "Third"
Note:
- The add command can add several components at one time.
- The add command accepts either names, UUIDs, or aliases for most arguments; however, history references only have UUIDs and aliases.
- UUIDs for history references are slightly longer than UUIDs for other elements.
- The add command can only add components that are not already in the workspace. If you want to roll back an existing component to another point in time, use the scm set component command, which also accepts history references.
- In Rational Team Concert 6.0.4, you must use the command-line interface to restore a deleted component to a point in time specified by an operation. This action is scheduled to be available in the Eclipse and Visual Studio clients in a later release.
Finding all the work items for a delivery
A common practice near the end of a release is to track and announce every change that is being delivered to the production stream. This task is often performed by using the Change Log feature. However, the Operation History feature makes this task easier because each delivery to a stream is a single operation in the Operation History view. You no longer have to browse the history of individual components.
To find all the work items for a delivery:
- Find the production stream in the Team Artifacts view, Pending Changes view, or Stream editor.
- Click Show > Operation History for the stream.
- Find the deliver action that you want to describe.
- Right-click the action and click Open Change Explorer.
- From the drop-down menu, select Save Change Log.
- Select your options and save the log.
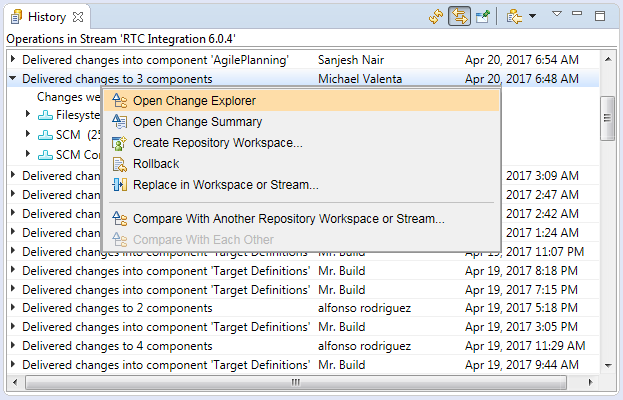
Figure 10: Open Change Explorer
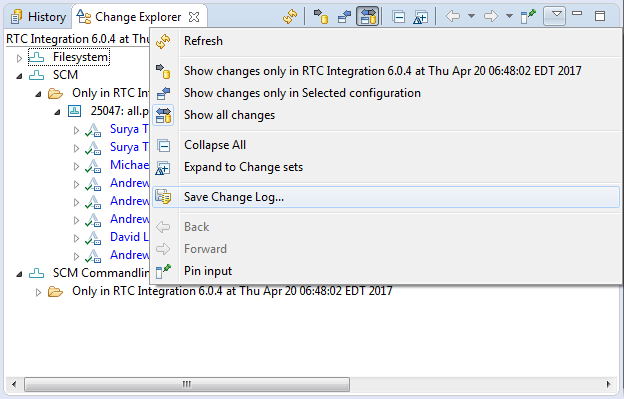
Figure 11: Save Change Log
Summary
The Operation History feature that is available in Rational Team Concert 6.0.4 and later not only provides an alternative way to see the history of your workspaces and streams, it also provides another mechanism for backing up and recovering from errors that happen during the typical development cycle.
Related information
- Viewing the operation history of a workspace
- Story 404161: Show full stream operation history
- Story 404162: Rollback a stream/workspace to a specific operation in history
- Story 404167: Compare a stream/workspace to a specific operation in history
- Story 404169: Allow creating a new workspace or stream based on a specific operation in history
About the authors
DJ, Andrew, and Dean work on the Source Control Management (SCM) team for Rational Team Concert, and are based in the Persistent Systems lab in Ottawa, Ontario, Canada.
© Copyright IBM Corporation 2017