Automated Test Deployment with the Rational solution for Collaborative Lifecycle Management – Part 2
Things have changed in the Rational solution for Collaborative Lifecycle Management (CLM). The new architecture and new licenses of the release 3.0 software provides an even tighter integration across the disciplines. Teams can benefit from these changes.
This article describes how the test community can benefit from the development features provided by Rational Team Concert (RTC). Next to the planning and defect management, we can now utilize other features of RTC like code management and the build engine. This becomes especially important when customers go beyond the level of self contained scripts and use the power of object oriented programming and maximize code reuse. The technical tester will appreciate this approach.
A successful test depends on the deployed application and the deployed test. This approach gives full control over the deployment of test scripts. The development is done by the team sharing resources and code. Deployment of test ware is done via automation in a fully controlled way.
The chosen approach is described with Rational Functional Tester (RFT), but it’s equally valid for Rational Performance Tester (RPT), Rational Tester for SOA Quality or other Eclipse based products.
We assume basic knowledge of installation and usage of the CLM portfolio and RFT.
All of these are provided as examples and to give you a jump start. Things are often different in a production environment and this information has to be adapted to that environment.
Introduction
This article describes the technical steps to setup an environment for concurrent automated test development and delivery. These steps are examples and should be changed accordingly. After implementation of these steps there are two types of builds available:
- Personal Build – To validate the code written in the context of the project. (E.g. junit test can be implemented, code checkers and validation of dependencies)
- Integration Build – To integrate the code supplied into the build.
Both types of build are discussed at the end of this document.
- Module 0 – General Preparation
General preparations like project, environment, users and licenses, sandboxes, streams and components. - Module 1 – Build Engine
Actions needed to define a Build Engine - Module 2 – Build Master
Actions needed to define the working environment for the Build Master - Module 3 – Test Engineer
Action needed to define the working environment for the test engineer. - Module 4 – Automation
The hidden gem of the story.
Module 0 – General Preparation
Installation
For this scenario we install the following products:
- A Jazz server
Rational Requirements Composer
Rational Team Concert
Rational Quality Manager
Appropriate users and licenses - A Build Engine
Jazz Build Toolkit from RTC-full
Rational Functional Tester
RTC-client as a plug-in - A client machine
Rational Functional Tester
RTC-client as a plug-in
A supported browser e.g. Firefox or Internet Explorer - A RFT agent machine
Rational Functional Tester
For demonstration purposes this can be done on one machine, but for production these applications are deployed on various servers and clients.
It’s allowed to install Rational products on multiple computers. The usage is bound by an appropriate license and authorization. The licenses needed in our scenario are RQM Quality Professional and a RTC Developer license.
In some occasions organizations will not install products on the Build Engine. All needed software should be loaded from the (source) code server. That means that a serious number of (non-)binary files are loaded before actually starting the compilation. Because RTC manages all the needed code, an old situation can be re-created.
To keep it simple, we choose for the option to install RFT on the build server to overcome this problem. Clearly you have to administer which RFT releases are used.
Users and Roles
This process is collaboration of multiple roles. We’ve identified the following roles and users:
Role | User | Sandbox | Repository Workspace (Public) | Licenses | Comments |
|---|---|---|---|---|---|
| Build Master | buildmaster | C:AutoQbuildmastersandbox | Build Master Workspace | RTC Developer | The person responcible for the build and build-scripts. |
| Build Engine | build | C:AutoQbuildsandbox | Build Engine Workspace | RTC Build System | The userid which does the actual execution of the integration build. |
| Tester | tanuj | C:AutoQtanujsandbox | Test Stream Workspace | RQM Quality Professional, RTC Developer | A tester using RQM, RFT and RTC to create test ware and automated tests |
The sandbox of the tanuj user is the workspace area created and used by Rational Functional Tester with the embedded Rational Team Concert plugin.
Jazz Project
We have created a sample Project area called AutoQ. This project area consist out of RRC, RTC and RQM. Add the various users to the AutoQ with sufficient rights and correct process roles.
When starting the Eclipse client with one of these users you have to connect to this Project Area – AutoQ.
Creation of Sandboxes
Create the directories:
C:AutoQbuildmastersandbox C:AutoQbuildsandbox C:AutoQtanujsandbox
Take care that you switch to the right workspaces when restarting the Eclipse client or RFT.
Define Shared Resource Location
Define a shared resource location for the test scripts to be executed.
Where: Rational Quality Manager
Userid: tanuj
- Access RQM via the browser, logon as tanuj
- Select Admin > Manage Project Properties
- Select Shared Resource Locations
- Select Add Resource Locations
Use: C:RFTSHARED
Make sure you have the correct rights to read and write on these locations.
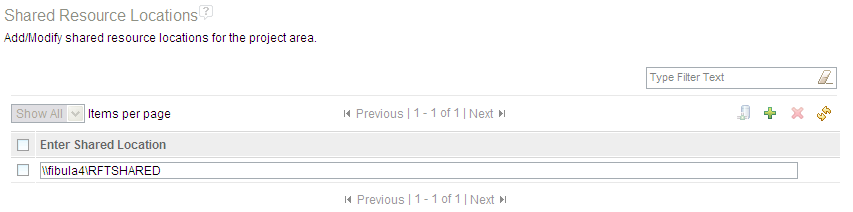
Figure 1: Definition of Shared Resource Location.
Initial Work Items
To deliver code you must have Work Items attached. This way you can ‘trace’ the change. Create two work-items for the current sprint.
Where: Eclipse Client Work Items perspective – Team Artifacts View
Userid: buildmaster
- Start the Eclipse client using
the C:AutoQbuildmastersandbox workspace,
with the buildmaster user,
connected to the AutoQ project. - Create work item “Change Build Source” – assigned to buildmaster
- Create work item “Change Test Source” – assigned to tanuj
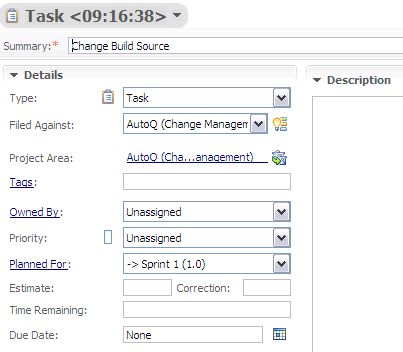
Figure 2: Initial Work Items planned for current sprint
Creation of Test Stream and Components
The code we use will be part of the Test Stream. In this stream there will be two components:
- Build Sources Component – Containing all the sources for the build
- Test Sources Component – The actual test ware sources and files
The following steps are to define this structure:
Where: Eclipse Client Work Items perspective – Team Artifacts View
Userid: buildmaster
- Start the Eclipse client using
the C:AutoQbuildmastersandbox workspace,
with the buildmaster user,
connected to the AutoQ project. - On Source Control use contextual Menu New > Stream
- Enter the name Test Stream
- At the Components pane New
- Enter the name Build Sources Component
- Select OK
- At the Components pane New
- Enter the name Test Sources Component
- Select OK
- Select Save
Module 1 – Build Engine
This module will focus on the creation of the Build Engine Workspace on the server.
Creation of Build Engine Workspace
The Build Engine Workspace is the repository workspace of the build user. This workspace will be used when running a integration build.
Where: Eclipse Client Work Items perspective – Team Artifacts View
Userid: build
- Start the Eclipse client using
the C:AutoQbuildsandbox workspace,
with the build user,
connected to the AutoQ project. - Contextual Menu on My Repository Workspaces
- Select New > Repository Workspace…
- Expand AutoQ (flow with it)
- Select Test Stream
- Key in Build Engine Workspace
- Select Next
- Select Next
- Select Public
You can always change the visibilty to Private when this is more applicable. - Select Next
- Select Finish
- Select Finish to load
Module 2 – Build Master
The build environment is maintained by the Build Master. The definitions are done in RTC. The files needed for a build are maintained by RTC is a separate component.
- Build Engine – Build Engine definition in RTC.
- Build Definition – How the builds are run.
- Build.xml – The actual ANT build script.
- Properties file – Some definition of external variables.
Creation of Build Master Workspace
The Build Master Workspace is the repository workspace of the buildmaster user. This workspace will be used when running a integration build.
Where: Eclipse Client Work Items perspective – Team Artifacts View
Userid: buildmaster
- Start the Eclipse client using
the C:AutoQbuildmastersandbox workspace,
with the buildmaster user,
connected to the AutoQ project. - Contextual Menu on My Repository Workspaces
- Select New > Repository Workspace…
- Expand AutoQ (flow with it)
- Select Test Stream
- Key in Build Master Workspace
- Select Next
- Select Next
- Select Public
You can always change the visibilty to Private when this is more applicable. - Select Next
- Select Finish
- Select Finish to load
Creation of Build Engine
The Build Engine is the machine doing the actual build. In this machine an ‘agent’ program is started. It listens to the RTC server if builds are requested. The actual execution of the build is done by the build user.
To create a Build Engine
Where: Eclipse Client Work Items perspective – Team Artifacts View
Userid: buildmaster
- Start the Eclipse client using
the C:AutoQbuildmastersandbox workspace,
with the buildmaster user,
connected to the AutoQ project. - Contextual menu on Build Engines folder
- Select New Build Engine
- Select Next
- Key in for ID: AutoQ (Change Management) engine
- Select Finish
- Select Save
On the Build Engine a agent program must be started. This is defined in a small script. The goengine.bat is the file with the following contents.
set EngineName="AutoQ (Change Management) engine" title Build Engine: %EngineName% set PATH=%PATH%;"C:Program FilesIBMTeamConcertBuildbuildsystembuildengineeclipse"; color 0C cls jbe -vm "C:Program FilesIBMTeamConcertjdkbinjava" -repository https://<server>:9443/ccm -engineId %EngineName% -userId build -pass build -sleeptime 10*NOTE1: I’m not using a encrypted password-file here. It’s possible.
*NOTE2: Replace <server> by your own fully qualified name.
Start the goengine.bat agent program in the directory C:AutoQbuildstart. By refreshing the Build Engine in the Eclipse client, the message The Build Engine process may not be running should disappear.

Figure 3: The Build Engine message that the machine may not be running.
Creation of Build Definition
Additionally a Build Engine Definition is created in RTC to make the external machine known in RTC.
A Build Definition in RTC defines how RTC will handle and initiate the build on the Build Engine.
Where: Eclipse Client Work Items perspective – Team Artifacts View
Userid: buildmaster
- Contextual menu on Builds folder
- Select New Buid Definition…
- Select Next
- Key in for ID: AutoQ (Change Management) build
Keep the Ant – Jazz Build Engine selected. - Select Next
- Select Jazz Source Control
- Select Next
- Select Next
- Select Finish
Complete the Build Definition with
- In the Overview-tab:
- In the Supported Build Engines pane – Select Edit
- Select the AutoQ (Change Management) engine
- Select OK
- In the Schedule-tab:
If you wish you can repeatingly start a builds.
- In the Jazz Source control-tab:
- In the Build Workspace pane – Select Select
- Key in *
- Select Build Engine Workspace (Build)
- Select OK
- Select OK to the useful warning message
- In the Load Options pane – Select Create
- Enter Load directory: C:AutoQbuildloaddir
- Select Delete directory before using
- In the Accept Options pane
- Select Accept latest changes …
Important – accept newest changes.
- Select Build only if …
Important – create only a build when changes are supplied. - In the ANT-tab:
- In the Build File and Targets pane – Create
- Enter Build file C:AutoQbuildloaddirBuild Projectbuild.xml
We will create it later.
- In the Ant Configuration pane
- Ant arguments -verbose
Maximize messages for debugging. - Java home C:/Program Files/IBM/SDPRFT82/jdk
Important! Use the right, if possible the same Java as supplied with RFT. RTC-java is probably an other level. Furthermore the pointed directory might be different for your installation. - Select Save to the Build Definition
Creation of build.xml script
The build.xml (fixed filename) is the hart of the actual build process. It defines which ANT steps are executed.
Where: Eclipse Client – Java perspective
Userid: buildmaster
- Start the Eclipse client using
the C:AutoQbuildmastersandbox workspace,
with the buildmaster user,
connected to the AutoQ project. - When needed switch to the Java perspective.
- Create General Project Build Project
The RTC-control will be added later. - Create new file build.xml
This file-name is important. - Ctrl-Space
- Double click the build-template
- Insert the echo message line like
<target name="default" depends="depends" description="description"> <echo message="Build Started" /> </target>
- Save the file
The current location of the build.xml is at
C:AutoQbuildmastersandboxBuild Projectbuild.xml
The provided script is a starting point and should be adapted to the needs of the organization by the Build Master.
Several things are done by this build:
- Get variables and general tasks
- Clears directories
- Loads latest and greatest source files
- Compiles
- ZIP the results
- Publish links and other related files
- IF it’s an succesful integration build
- It tags it “ready_for_use”
- Copies the workspace files to the final shared location
The complete example build.xml file can be found here.
Creation of Properties Script
In the similar manner we have to create the build-global.properties file. This enables to re-use the script with different properties (e.g. for a different release of RFT).
Where: Eclipse Client – Java perspective
Userid: buildmaster
- Create new file build-global.properties
A sample content can be:
## company=IBM Nederland author=Marc build.xml=build.xml jazztasks.xml=C:/Program Files/IBM/TeamConcertBuild/buildsystem/buildtoolkit/BuildToolkitTaskDefs.xml zipfile=rftoutput.zip env.IBM_RATIONAL_RFT_ECLIPSE_DIR=C:/Program Files/IBM/SDPRFT82 env.IBM_RATIONAL_RFT_INSTALL_DIR=C:/Program Files/IBM/SDPRFT82/FunctionalTester/bin jar.jdk=C:/Program Files/IBM/SDPRFT82/jdk/jre/lib/vm.jar;C:/Program Files/IBM/SDPRFT82/jdk/jre/lib/annotation.jar;C:/Program Files/IBM/SDPRFT82/jdk/jre/lib/beans.jar;C:/Program Files/IBM/SDPRFT82/jdk/jre/lib/java.util.jar;C:/Program Files/IBM/SDPRFT82/jdk/jre/lib/jndi.jar;C:/Program Files/IBM/SDPRFT82/jdk/jre/lib/logging.jar;C:/Program Files/IBM/SDPRFT82/jdk/jre/lib/security.jar;C:/Program Files/IBM/SDPRFT82/jdk/jre/lib/sql.jar;C:/Program Files/IBM/SDPRFT82/jdk/jre/lib/ibmorb.jar;C:/Program Files/IBM/SDPRFT82/jdk/jre/lib/ibmorbapi.jar;C:/Program Files/IBM/SDPRFT82/jdk/jre/lib/ibmcfw.jar;C:/Program Files/IBM/SDPRFT82/jdk/jre/lib/rt.jar;C:/Program Files/IBM/SDPRFT82/jdk/jre/lib/charsets.jar;C:/Program Files/IBM/SDPRFT82/jdk/jre/lib/resources.jar;C:/Program Files/IBM/SDPRFT82/jdk/jre/lib/ibmpkcs.jar;C:/Program Files/IBM/SDPRFT82/jdk/jre/lib/ibmcertpathfw.jar;C:/Program Files/IBM/SDPRFT82/jdk/jre/lib/ibmjgssfw.jar;C:/Program Files/IBM/SDPRFT82/jdk/jre/lib/ibmjssefw.jar;C:/Program Files/IBM/SDPRFT82/jdk/jre/lib/ibmsaslfw.jar;C:/Program Files/IBM/SDPRFT82/jdk/jre/lib/ibmjcefw.jar;C:/Program Files/IBM/SDPRFT82/jdk/jre/lib/ibmjgssprovider.jar;C:/Program Files/IBM/SDPRFT82/jdk/jre/lib/ibmjsseprovider2.jar;C:/Program Files/IBM/SDPRFT82/jdk/jre/lib/ibmcertpathprovider.jar;C:/Program Files/IBM/SDPRFT82/jdk/jre/lib/ibmxmlcrypto.jar;C:/Program Files/IBM/SDPRFT82/jdk/jre/lib/management-agent.jar;C:/Program Files/IBM/SDPRFT82/jdk/jre/lib/xml.jar;C:/Program Files/IBM/SDPRFT82/jdk/jre/lib/jlm.jar;C:/Program Files/IBM/SDPRFT82/jdk/jre/lib/javascript.jar;C:/Program Files/IBM/SDPRFT82/jdk/jre/lib/ext/CmpCrmf.jar;C:/Program Files/IBM/SDPRFT82/jdk/jre/lib/ext/dnsns.jar;C:/Program Files/IBM/SDPRFT82/jdk/jre/lib/ext/dtfj-interface.jar;C:/Program Files/IBM/SDPRFT82/jdk/jre/lib/ext/dtfj.jar;C:/Program Files/IBM/SDPRFT82/jdk/jre/lib/ext/gskikm.jar;C:/Program Files/IBM/SDPRFT82/jdk/jre/lib/ext/healthcenter.jar;C:/Program Files/IBM/SDPRFT82/jdk/jre/lib/ext/ibmcmsprovider.jar;C:/Program Files/IBM/SDPRFT82/jdk/jre/lib/ext/ibmjcefips.jar;C:/Program Files/IBM/SDPRFT82/jdk/jre/lib/ext/ibmjceprovider.jar;C:/Program Files/IBM/SDPRFT82/jdk/jre/lib/ext/ibmkeycert.jar;C:/Program Files/IBM/SDPRFT82/jdk/jre/lib/ext/IBMKeyManagementServer.jar;C:/Program Files/IBM/SDPRFT82/jdk/jre/lib/ext/ibmpkcs11impl.jar;C:/Program Files/IBM/SDPRFT82/jdk/jre/lib/ext/ibmsaslprovider.jar;C:/Program Files/IBM/SDPRFT82/jdk/jre/lib/ext/ibmxmlencprovider.jar;C:/Program Files/IBM/SDPRFT82/jdk/jre/lib/ext/jaccess.jar;C:/Program Files/IBM/SDPRFT82/jdk/jre/lib/ext/JavaDiagnosticsCollector.jar;C:/Program Files/IBM/SDPRFT82/jdk/jre/lib/ext/JawBridge.jar;C:/Program Files/IBM/SDPRFT82/jdk/jre/lib/ext/jdmpview.jar;C:/Program Files/IBM/SDPRFT82/jdk/jre/lib/ext/localedata.jar;C:/Program Files/IBM/SDPRFT82/jdk/jre/lib/ext/rational_ft_bootstrap.jar;C:/Program Files/IBM/SDPRFT82/jdk/jre/lib/ext/xmlencfw.jar; jar.rftmain=C:/Program Files/IBM/SDPRFT82/FunctionalTester/bin/rational_ft.jar jar.rft=C:/Program Files/IBM/IBMIMShared/plugins/com.ibm.rational.test.ft.util_8.1.1.v20110309_0553.jar;C:/Program Files/IBM/IBMIMShared/plugins/com.ibm.rational.test.ft.corecomponents_8.1.1.v20110519_1709.jar;C:/Program Files/IBM/IBMIMShared/plugins/com.ibm.rational.test.ft.autbase_8.1.1.v20110224_0707.jar;C:/Program Files/IBM/IBMIMShared/plugins/com.ibm.rational.test.ft.playback_8.1.1.v20110526_1417.jar;C:/Program Files/IBM/IBMIMShared/plugins/org.eclipse.tptp.platform.models_4.6.100.v201005271112.jar; jar.rftto=C:/Program Files/IBM/IBMIMShared/plugins/com.ibm.rational.test.ft.domain_8.1.1.v20110531_1419.jar;C:/Program Files/IBM/IBMIMShared/plugins/com.ibm.rational.test.ft.clientbase_8.1.1.v20110609_1200.jar;C:/Program Files/IBM/IBMIMShared/plugins/com.ibm.rational.test.ft.domain.html.dojo.testobjects_8.1.1.v20101014_1440.jar;C:/Program Files/IBM/IBMIMShared/plugins/com.ibm.rational.test.ft.domain.testobjects_8.1.1.v20101014_1440.jar;C:/Program Files/IBM/IBMIMShared/plugins/com.ibm.rational.test.ft.html.sapwebportal.testobjects_8.1.1.v20101014_1440.jar;C:/Program Files/IBM/IBMIMShared/plugins/com.ibm.rational.test.ft.sdk_8.2.0.v20101014_1440.jar;C:/Program Files/IBM/IBMIMShared/plugins/com.rational.test.ft.sap_8.1.0.v20101014_1440.jar;C:/Program Files/IBM/IBMIMShared/plugins/com.rational.test.ft.siebel_8.1.0.v20101014_1440.jar;C:/Program Files/IBM/IBMIMShared/plugins/com.rational.test.ft.wpf_8.1.0.v20101014_1440.jar;
The complete build-global.properties file can be found here. You can get the corresponding jar-files from the properties of the RFT project. Open Java Build Path, Libraries tab and open the hierarchy. You will note that the numbering V2011.. will change for every RFT release.
Share the Build Project
All test-build ware is brought under control of RTC. This enables to have multiple people improving these scripts and data.
You might have to add the Package Explorer to your Functional Test perspective.
Where: Eclipse Client – Java perspective
Userid: buildmaster
In the Package Explorer
- Contextual menu on root of the Build Project
- Select Team > Share Project
- Select Jazz Source Control
- Select Next
- Select Build Sources Component
- Select Next
- Select Finish
Directly the pending changes are populated with the files from the project.
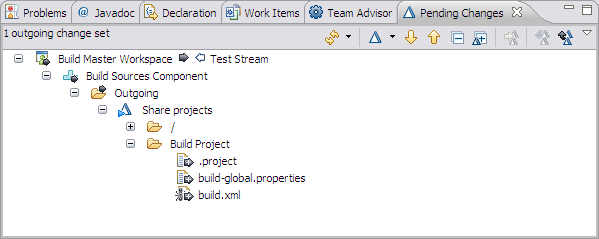
Figure 4: Initial Pending Changes for the Build Stream. - Contextual menu on Share Project > Deliver
This will work only for initial share. Follow on deliver actions must have associated work item.
Module 3 – Test Engineer
This scenario assumes that there are multiple test engineers working on code. Each test engineer has it’s own sandbox (local workspace). Works on his tasks as planned and assigned in RTC. Also the task for changes and updates to test scripts are processed in the same way as the ‘normal’ coding changes.
The test engineers are working independent from the Build Engineers.
In this case we use the user tanuj as used in the various Rational demonstrations. Make note that tanuj needs a RTC Developer license to do the development of code maintained by RTC.
Create Test Stream Workspace
This workspace is the server work area for the tester. It’s also the area where the build engine runs the personal build. This means this area must be PUBLIC!
Where: Eclipse Client Functional Test perspective – Functional Test Projects
Who: tanuj
- Start Rational Functional Tester
the C:AutoQtanujrftsandbox workspace,
with the tanuj user,
In the Work Items Perspective, connected to the AutoQ project. - Contextual Menu My Repository Workspaces
- Select New > Repository Workspace
- Expand AutoQ
- Select Test Stream
- Keyin name Test Stream Workspace
- Select Next
- Select Next
- Select Public
Having the visibility set to pulic enables the build user to run a your private build in this workspace. - Select Next
- Select Finish
- Select Finish to load
Share the Test Project
You might have to add the Package Explorer to your Functional Test perspective.
Where: Eclipse Client Functional Test perspective – Functional Test Projects
Who: tanuj
- Start Rational Functional Tester
the C:AutoQtanujrftsandbox workspace,
with the tanuj user,
In the Work Items Perspective, connected to the AutoQ project. - Create the TestProject project
No space allowed in naming! - Create your smoke test called Script1
Where: Eclipse Client Functional Test perspective – Package Explorer View
Who: tanuj
In the Package Explorer
- Add the Package Explorer view to the RFT Eclipse IDE
Window > Show View > Package Explorer - Contextual menu on root of the RFT project TestProject
- Select Team > Share Project
- Select Jazz Source Control
- Expand Test Workspace
- Select Test Sources Component
- Select Next
- Select Next
- Select Finish
Directly the pending changes are populated with the files from the project.
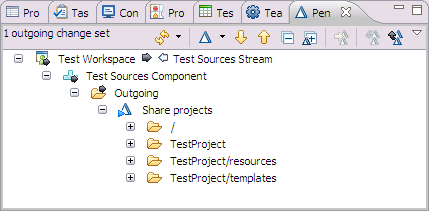
Figure 5: The very important Pending Changes view in the Eclipse client. Here we can see which changes we have created and which incomming changes are done by others. - Contextual menu on Share Projects Deliver
Usefull to know is that it’s normal to have RTC manage only code and not binaries of code like class files!
Check in the code
Check in the code means copy the code to your personal server side repository-workspace. This way you can initiate a private build request to validate the code.
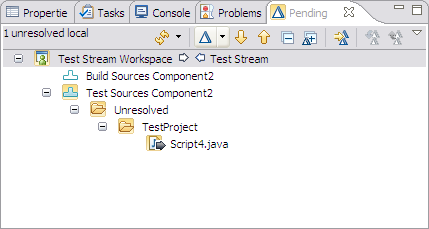
Figure 6: Checking of the code in pending changes view.
Complete the code
Completing means that you finalize and close a change-set. No new changes can be added to this set.
Run a Personal Build
A personal build is done on the server side with server side settings based on the users repository workspace. It will not impact the build status (e.g. on fail).
When code is checked-in we can request a personal build.
- Select Build Options twisty
- Select Personal Build
- Select your Repository Workspace
- Select Submit
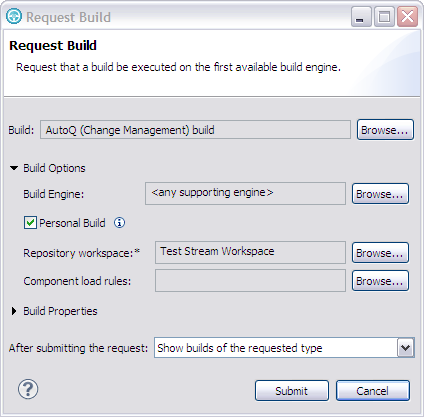
Figure 7: Request for a personal build.
Definition of a Test Case and Test Script
Where: Browser to RQM
Who: tanuj
When the Integration Builds are run the test scripts are available in the shared location. We can import the scripts from the shared location:
- Select Construction > Import Test Scripts
- Select Browse
- Double Click TestProject
- (Multi)Select the scripts
- Select Import
Now you can create Test Cases on the traditional way with these imported Test Scripts.
Scheduling a Test
The final piece of automation is the schedule running of automated tests. In RQM 3.0 we have the ability to schedule a test execution triggered by time of finishing of a build.
Where: RQM Web interface
Who: Testmanager
- Menu Execution
- Select Create Execution Schedule
- Fill in the appropriate values
- Select the test steps to be added to the schedule.
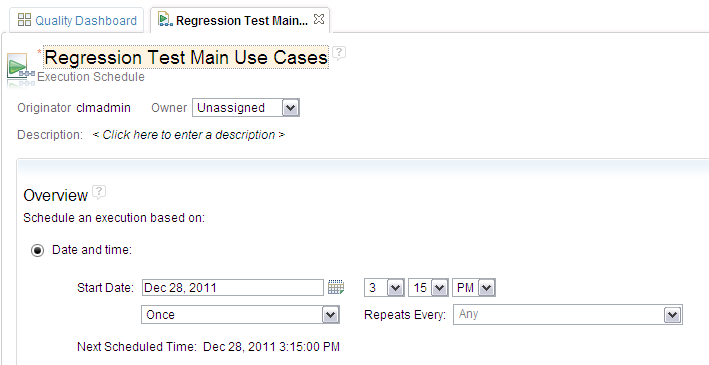
Figure 8: A Execution Schedule definition in RQM.
Because the initiation is done by the server, there is no need to keep the browser with the RQM access open. One can close and go home. Or continue working with other activities and when the dashboard is updated, one can interrogate the test results based on the latest updated automated tests.
Module 4 – Automation
Essential for the parallel development, scalability, gathering of metric and many other aspects is the level of automation Rational can provide across the disciplines. Again this is just a sample and can be seen as a starting platform. Other levels of automation can be obtained by utilizing Rational BuildForge technology combined with Rational Quality Manager Test Lab Manager.
A total different level of automation is the gathering of metrics or the generation of complete status documents based on the information available in the Jazz environment, covering all disciplines.
Let’s focus back on this first level of automation.
Run a Integration Build
The integration build is the build which integrates all the work of all testers and developers. The build will load all components, compile the sources and deploy these results to a shared location. The build will generate a log-file, which will be available via the RTC user interface.
One can start a build interactively or using a scheduled build.
- Interactive
In the periode of developing the build code one can request an integration build by the “request build” icon in the Build view.

- Scheduled
In the build definition, in the schedule-tab the Build Master can specify when the integration build has to start. This can be at a high frequency. An actual build will only be run when changes are supplied (when proposed settings are done in de build definition).

Figure 9: The RTC Schedule of a build to start a build at certain moments in time.
Because the build script is nothing else than a simple echo it probably will work. Replace the build.xml with the provided example.
Where: Eclipse Client Work Items perspective – Team Artifacts View
Who: buildmaster
Creation of RQM-RTC link
A feature unique to the Rational tool set is the awareness of builds. A user or a process can act on the changing status of a build. Defects and logs can reference specific build.
RTC builds can be made visible in RQM. This is documented here. When a build has completed it can trigger consecutive builds for testing. When such a build is complete a test execution can be initiated.
For more information
- Automated Test Deployment with the Rational solution for Collaborative Lifecycle Management – Part 1
- Software Test Engineering with IBM Rational Functional Tester
- Build Introduction
- Rationa Team Concert Features (including build)
- Build Examples
- IBM Rational CLM Documentation
- Creating Build Engines
- Typical Build Setup
- SCM Commandline interface
- Table mapping of licenses (Scroll down).
- http://ant.apache.org/manual/
- Marc van Lint’s own precense on the web
Table of references
Various names, acronyms are used throughout these two articles. Here’s a quick list of them.
Name | What |
|---|---|
| Jazz Project | The Jazz Project Name Name: AutoQ |
| Stream | An artifact that holds the master copy of a source file base; it is a server based object used for sharing files within a team. |
| Repository workspace | A workspace that holds a developer’s private copy of the source file base; it is a server based personal space where local file changes are checked into, and changes from and to the target stream are accepted and delivered. |
| Component | A grouping of related artifacts in a stream or repository workspace. A component can contain any number of folders and files. Streams and repository workspaces are partitioned in components. |
| Change set | A repository object that collects a related group of file, folder, and component modifications so that they can be applied to a flow target (workspace or stream) in a single operation. |
| Sandbox | An area on a file system where a developer can modify and test source code in isolation, before returning it to the source control component and sharing it with other developers. A sandbox can have one or more repository workspaces loaded at any time. It can be an eclipse workspace. An eclipse workspace can consist of componentns of several loaded repository workspaces. More… |
| Build Engine | The machine running the build process Name: AutoQ (Change Management) engine |
| Build Engine Workspace | Repository workspace of the build user |
| Build Project | Build Project in the Eclipse environment |
| Test Stream | A stream is a repository object that includes one or more components. Name: Test Stream More… |
| Build Sources Component | … Name: Build Sources Components More… |
| Test Sources Component | The container where the Eclipse project is stored in |
| Personal Build | A build which does not influence the build results. It runs on personal files on the repository workspace. |
| RRC | Rational Requirements Composer |
| RTC | Rational Team Concert |
| RQM | Rational Quality Manager |
| RFT | Rational Functional Tester |
About the author
Marc van Lint started in 1986 at IBM as a schoolar. He was active for 18 years in the Product Lifecyle Management branch of IBM. In 2005 he continued his career at IBM Rational. His prime focus was to achief Quality in the software delivery process at the various customers. He presents his visions to customers and help them to implement their improvements. He contribues frequently to the community by publishing and maintaining his own website. He’s co-author of the IBM Press book “Software Test Engineering with IBM Rational Functional Tester – The Definitive Resource”.
He can be contacted at marc_van_lint@nl.ibm.com.
Copyright © 2012 IBM Corporation