Build Artifacts Publishing Using HTTP Servers
Summary
Rational Team Concert (RTC) and the Jazz Build Engine (JBE) provide continuous integration through build and build result publishing. The build results are part of the Jazz object model and are as consequence, tightly integrated into the development workflow. The build result views provide all the essential capabilities to assess published results including compiler and unit test results. It is also possible to upload build output data, publish links and results using the Jazz Build System Toolkit Ant tasks. This all comes with automation for pruning build results and preserving results for builds that are considered to be deliverables.
The ‘out of the box’ build integration provided by RTC and JBE provides a good, simple to use, solution. It is even able to fulfill more advanced requirements asked for by users. As discussed below it could be an issue uploading a huge amount of build output such as the binaries and libraries. It would also be an advantage to be able to access and back up the build output easily. Another common request is to be able to publish and access custom HTML reports.
This is easy enough achieved by publishing the data using a web server. ‘How easy’ is discussed in this article.
However the approach does come with a price. While happily running and publishing builds, storage capacity is filled up with data. The Jazz Build System does automated maintenance and pruning off its own data, but it can not help with cleaning up the space on a remote disk used in this approach. The subsequent article Automated Build Output Management using the Plain Java Client Libraries will show how to address this and get the best of both worlds.
Current Situation
It is possible to use Ant tasks to publish build data. One example is uploading files and other build artifacts using the artifactFilePublisher Ant task.
The image below shows a resulting build result presented in the Eclipse UI. The build result has the deployable application attached. It is marked as a release deliverable and therefore excluded from pruning, except if the ‘deletion allowed’ check box is set by a role with the required permission.
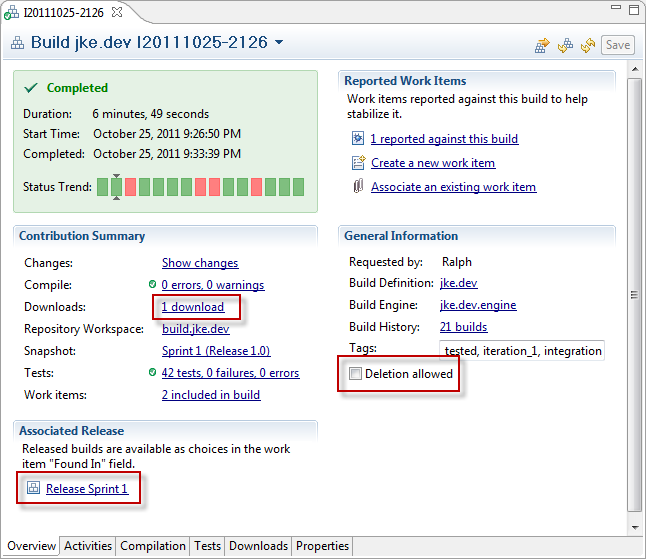
There are a few drawbacks with this approach:
- The files are uploaded and stored in the repository. For big files, this means a lot of bandwidth is required. The repository size will grow with the uploaded data.
- To access the content the uploaded file needs to be downloaded.
- Attached files, such as HTML pages will need to be downloaded to be opened.
Solution Outline
The solution described in this article is to publish the build output using a HTTP server.
- Instead of uploading the data to the RTC build result, HTML Links to the build output are created during the build and published to the build result.
- This can be enhanced later by creating and linking additional HTML pages such as an index or HTML reports created during the build as well.
This article focuses on publishing the build output created during builds using the Apache™ HTTP server. Any other HTTP server, for example the IBM™ HTTP Server would work. The same concepts can be used with other tools that provide HTML links such as Rational Asset Manager.
Test Environment Setup
The easiest way to follow the article is to set up a small test server in a virtual machine or on a personal machine following the guidance below.
The article was created on a Windows system. The content of this article however can be used in different environments. The article does not provide all the installation details. Please refer to the documentation for details for your system. Some links to the related documentation are provided below. Install locations are kept abstract using <Product_installDir> markups. It is necessary to map file names, locations and URL’s according to the test environment.
To have a more realistic scenario this article assumes the following distributed topology:
The CCM application (RTC) is installed with public URL https://clm.example.com:9443/ccm.
The Jazz Team Server (JTS) is installed with public URL https://clm.example.com:9443/jts but can be set up on a different machine with a different public URL.
The Jazz Build Engine (JBE) is installed on a machine using a host name alias
dev_build.example.com. This build engine is started and has the build engine ID:jke.dev.engine.The example allows for an optional additional Jazz Build engine on another machine for example using a host name alias
prod_build.example.com. This build engine can be started and used with the build engine ID:jke.production.engine.

It is possible to simulate all this on one machine by providing the required host name alias entries in the machine’s host file.
This complex set up was deliberately chosen because it raises questions such as how to handle several build machines.
Download Rational Team Concert, the Build System Toolkit and the RTC Client for Eclipse IDE from here and install it on the test system(s). Guidance for setting up Rational Team Concert can be found here. Follow the links from there. You need to register to http://Jazz.net in order to download the tools and follow the article.
Start the servers required to run Rational Team Concert and run the setup providing the public URLs. For the purpose of this article, it is required that at least the CCM application and the Jazz Team Server (JTS) are set up and running.
The article uses the Money that Matters sample also referred to as MTM that is shipped with the product to make it easy to reproduce. You can deploy the sample on test systems using the help in the Infocenter and the help in the Team Wiki.
When deploying the MTM sample it is essential to make sure to follow the guidance and assign the required licenses to the administrative user before creating the sample, to make sure the Money that Matters works.
Set up the Money That Matters sample project using the Lifecycle Project Administration application at https://clm.example.com:9443/admin/web#/sample.
Start the Jazz Build Engine with the build engine ID:jke.dev.engine and make sure it works. Please refer to the help in the Wiki for details. The startup command will look similar to:
jbe -repository https://clm.example.com:9443/ccm/ -userId build -pass build -engineId jke.dev.engine -sleepTime 3
Since the Jazz Build Engine is used, make sure the build user has a ‘Rational Team Concert – Build System License’ assigned and permissions to access the data of the project.
Implement the solution
Locate the Build Output Root Folder
To be able to publish the build artifacts, it is necessary to determine where the builds are located on disc. In the Money that Matters sample this is defined in the build definition. Open the jke.dev build definition.

On the the build definition’s Jazz Source Control tab select the Load Options section. The Load directory option specifies the location where the source files are loaded.
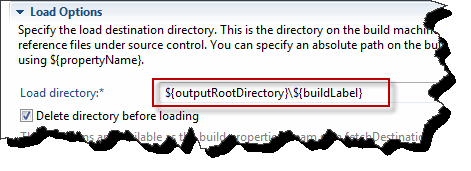
In the case above the data is loaded into a folder with the name specified by the buildLabel property underneath the folder specified by the property outputRootDirectory.
The property outputRootDirectory is defined in the Properties Tab of the build definition.

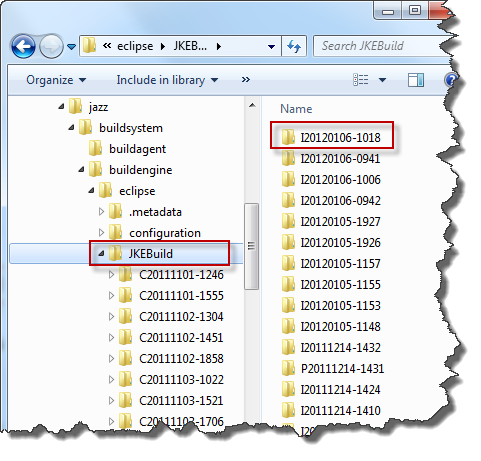
The value of outputRootDirectory is JKEBuild. Without a leading / this specifies a relative location. In this case the data is loaded into a location relative to the Jazz Build Engine executable. For a given install folder <JBE_installDir> this is typically <JBE_installDir>/buildsystem/buildengine/eclipse. The way this is set up the build output folders will all reside in a unique build output root folder with the path <JBE_installDir>/buildsystem/buildengine/eclipse/JKEBuild. Each build output folder will have a name composed of the buildLabelPrefix and the build label.
This can be confirmed running a build and checking the folder. It should look similar to the image below:
Install and Configure Apache™
To publish the build data it is sufficient to publish the folder <JBE_installDir>/buildsystem/buildengine/eclipse/JKEBuild. To publish, the HTTP server needs to have access to this file system folder.
Install the Apache™ HTTP server on the machine that hosts the JBE build engine that has the engine ID: jke.dev.engine. Apache™ is provided as download for several platforms with the required documentation. During the set up it is necessary to provide the required information such as the desired host name dev_build.example.com.
To publish the folder that contains the build results with Apache™ locate the configuration file httpd.conf, it is typically stored in the folder <Apache_installDir>/conf.
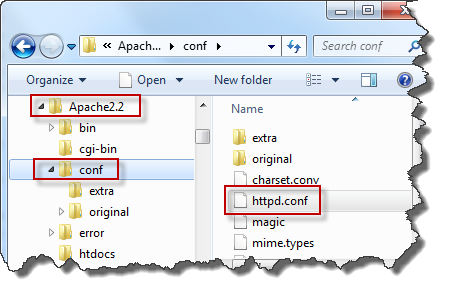
Open the file with a text editor.
Locate the entry DocumentRoot. This entry defines the root folder for publishing for this Apache™ instance. The default folder is <Apache_installDir>/htdocs. This must be replaced by the path to the parent folder containing all the individual build result folders. Change the Value to <JBE_installDir>/buildsystem/buildengine/eclipse/JKEBuild

The Directory entry is also essential to what is published. Locate the Directory entry that is not dealing with just the root '/' and replace the path with the same path as above.

Save the changes to the httpd.conf file.
httpd executable and test everything works as expected. The httpd executable is typically located in <Apache_InstallDir>/bin. Make sure Apache™ starts up successfully and try to open http://dev_build.example.com:8080/. It should be possible to see the build folders like in the image below and you should be able to click the links to open the individual build output folders.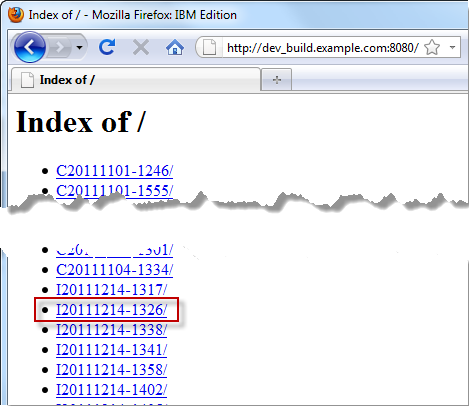
Adjust the Build Engine Definitions
Now that it is possible to access the build output by HTTP, it is necessary to refine the build process to publish the desired links to the build result in RTC.
Each build engine could run on a different machine and potentially have a different root URL that applies for each build created on it. To allow minimal maintenance of build definitions, it’s a good idea to make the URL configurable using a property.
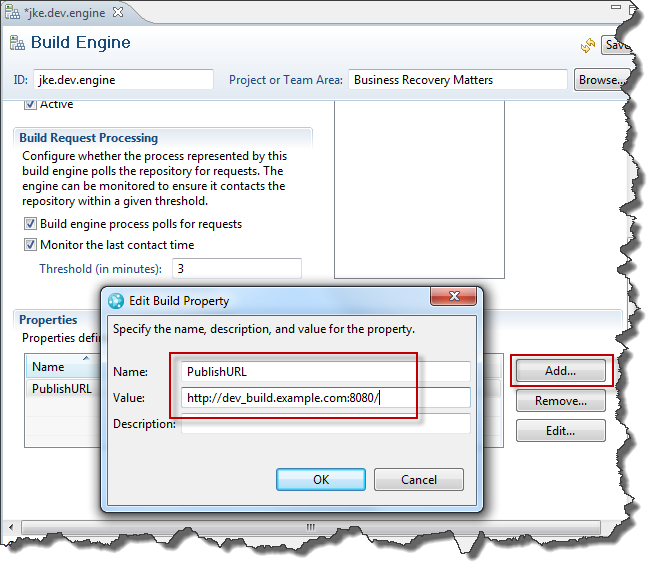
Open the Build Engine definition for jke.dev.engine in the Eclipse client. In the Properties section add a new property named PublishURL with the correct value for the machine this build engine runs on. In the context of this article it is http://dev_build.example.com:8080/.
Adjust The Ant Build Script build.xml
The MTM sample uses Ant for building. The build process is controlled by an Ant script that is called after loading the source code to disk. This script also does the publishing of the build results and artifacts.
This file needs to be changed to publish the links to the data now available via HTTP. In order to do that it is necessary to create a repository workspace for a stream and load it to disk to be able to access the script in the RTC Eclipse client.
Create and load a repository workspace for the JKE Banking Integration Stream. Locate the build.xml in the project JKEBuildScripts in the folder sample.jke.build and open the file in an editor.
This file controls the Ant build process. To make it easier to create a URL create a property that contains the URL to the build output folder. This is done by locating the block with the property definitions and adding a new calculated property with name ”resultURLPrefix” and value "${PublishURL}${buildLabel}".
<property name="resultURLPrefix"The image below shows the resulting change.
value="${PublishURL}${buildLabel}"/>

Depending on the build engine specific property PublishURL, this property now contains the URL to the build output folder for the specific build. For example for build I20111214-1317 on the build machine running jke.dev.engine the value is http://dev_build.example.com:8080/I20111214-1317.
What is missing now, is publishing the links instead of the file. The upload and publishing is done near the end of the build.xml file. Locate the artifactPublisher Ant task. This task is located right before the task definitions for the Jazz Build System Toolkit Ant tasks.
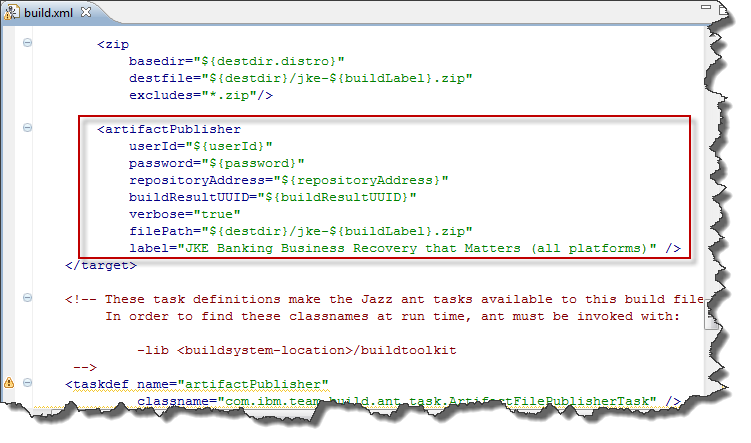
Instead of uploading the files, the idea is to attach a HTTP link to where the build results are located. In order to do that, it is necessary to use a different task with slightly modified properties.
- Change the task to artifactLinkPublisher
- Change the property filePath to localFilePath
- Add a url property with the value url=“${resultURLPrefix}/build/jke-${buildLabel}.zip”
- Optional: it is possible to modify the label to be more more specific.
<artifactLinkPublisher
    userId="${userId}"
    password="${password}"
    repositoryAddress="${repositoryAddress}"
    buildResultUUID="${buildResultUUID}"
    verbose="true"
    localFilePath="${destdir}/jke-${buildLabel}.zip"
    label="jke-${buildLabel}.zip - JKE Banking Business Recovery that Matters (all platforms)"
    url="${resultURLPrefix}/build/jke-${buildLabel}.zip" />
The screenshot below shows the result of the change.

To test the change made to the
build.xml, check in the pending changes. The changes can now be used in a personal build. Run a personal build for this repository workspace using the jke.dev build definition to check the change is working properly.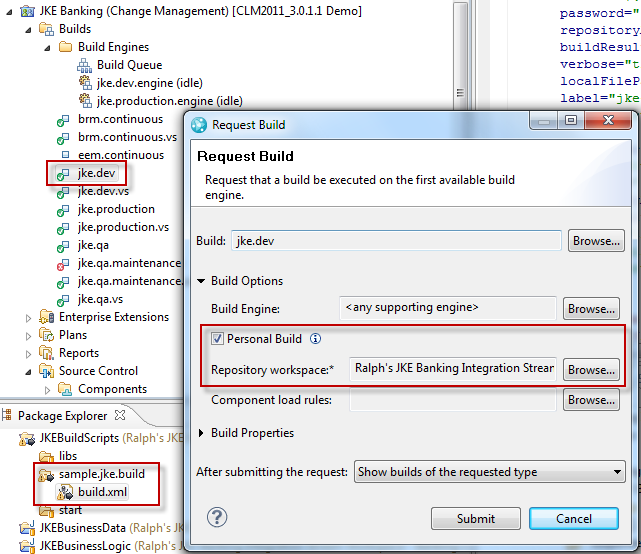
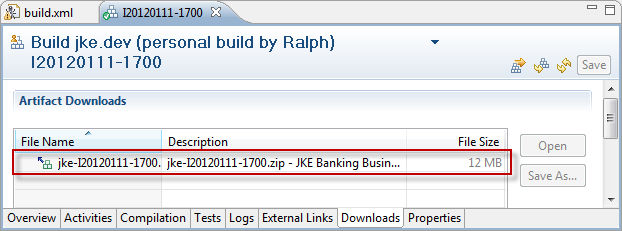
Now the build output is no longer uploaded to the build result. A link is provided instead that allows to download the file with the Eclipse client or from the Web using a browser.
Publishing More Data
In addition to providing the download link, it would be beneficial to provide additional links for example to the build output folder or to HTML pages with build details. This can be done using the linkPublisher Ant task.
build.xml file just between the recently modified artifactLinkPublisher task and the closing </target> element.<linkPublisher
userId="${userId}"
password="${password}"
repositoryAddress="${repositoryAddress}"
buildResultUUID="${buildResultUUID}"
verbose="true"
label="Build Result: JKE Banking Business Recovery that Matters (all platforms)"
url="${resultURLPrefix}/" />
The image below shows the task integrated in the build.xml file.

After saving and checking in the change, a personal build for the jke.dev build definition, the result now shows an external link that leads to the build output folder.
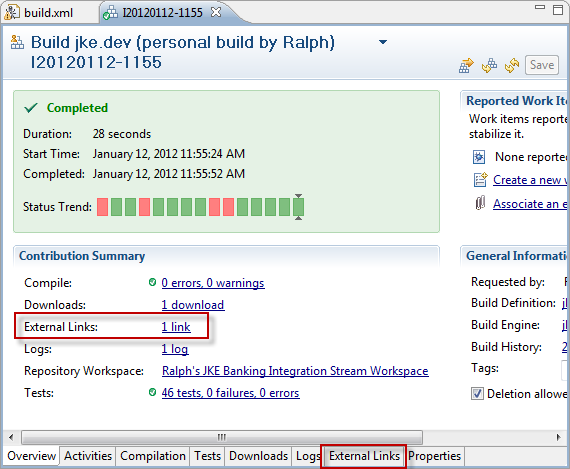
The link opens up the build output folder in the browser and allows access to all the content as shown below.
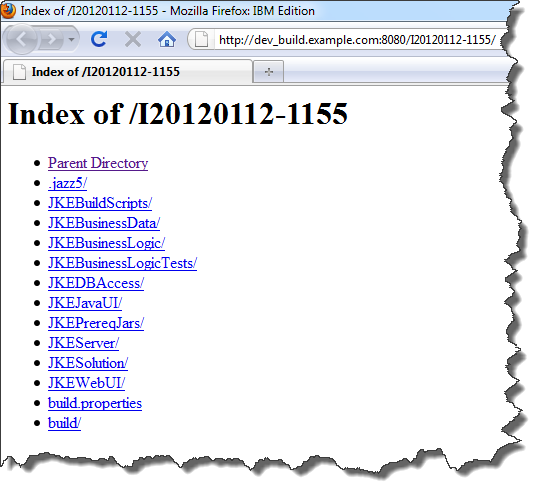
index.html with some details of the build and links to the original folder.After this work has been done it is necessary to deliver the changes to the stream. After that, future public builds provide the modified build results. To provide this capability for the other streams it is necessary to distributed the changes to all streams. In addition it is necessary to add a new property named PublishURL with the correct value for publishing location for each build engine.
Enterprise Considerations
As always, it makes sense to plan before deploying such solutions. In general, a machine dependent URL is not a good approach. Plan on using proxies and/or network storage to keep the URL stable and independent from hardware.The Money That Matters sample publishes different build types into the same folder. It would make sense to keep different folders for different build types and definitions.
Also make sure to understand security implications of publishing the builds and running a HTTP server.
Publishing the build output using FTP or other file transfer protocols would simplify downloading to other machines e.g. for testing. The resulting links could also be published to the build results. The Apache™ HTTP server provides an FTP module that can be compiled and deployed.
Summary
The article shows how easy it is to make build output accessible using an HTTP server and how to publish links to this data in RTC build results. There are several advantages with this approach:The footprint of uploaded data in the repository is reduced.
It makes it also possible to create and publish static HTML pages like statistics and reports along with the build, while keeping all the data in one location.
Data needed for audits and other regulatory compliance reasons can be accessed independently from the RTC application even on a file system level and be included into a separate independent backup.
The solution so far has only one major drawback: It uses storage space and has, so far, no mechanism to delete and manage the data automatically. How this challenge can be solved will be addressed in the subsequent article Automated Build Output Management Using the Plain Java Client Libraries.
For more information
- Getting Started with Rational Team Concert: A Deployment Guide
- Tutorial: Building with Jazz Team Build
- Continuous integration using Rational Team Concert
- Continuous Integration Best Practices with Rational Team Concert
- How I Learned to Stop Worrying and Love Personal Builds
- Motivations behind the design of Jazz Team Build
- Using the SCM Command Line Interface in builds
- Packaging and deploying the build output into a runtime environment
- Apache™ HTTP Server project
- Automated Build Output Management Using the Plain Java Client Libraries
About the author
Ralph Schoon is a member of the Jazz Jumpstart team. The Jazz Jumpstart team is a worldwide group of development specialists who bring new and advanced Jazz-based technologies to customers. Please direct feedback and comments to ralph.schoon@de.ibm.com .
Copyright © 2017 IBM Corporation