Creating a Linked Defect from a Work Item Editor Toolbar Action
Summary
This article presents an example of how to add a Web Action to the Work Item Editor Toolbar based on the wiki article Work Item Web UI Internal Customizations: Actions and Policies. The particular use case described shows how to automate the creation of a linked draft Defect Work Item at just the click of a button.
- Adding the Action: extension plug-in structure
- Draft Linked Defect: generating the resource url
- Putting it All Together
Introduction
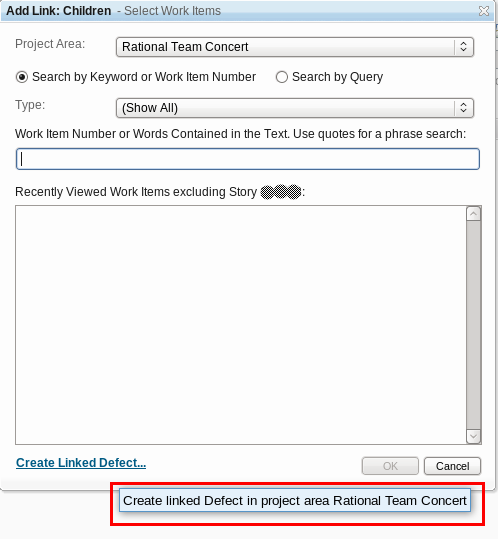
Linking Work Items allows users to express the inherent relationships of the artifacts representing work performed in the different stages of a development effort. The IBM Rational Team Concert link wizard provides the user with filtering and searching capabilities to locate the Work Item the user wants to link to. In addition, a feature in the wizard allows the option to create a new draft Work Item that is already linked. The link type to be used is the one chosen and the Work Item type that will be created is the fist that appears under the Work Item Web menu.
In this article we will show how to automate this behavior in a Web Action in the Work Item Editor Toolbar, creating a sample extension while using the mechanism available for this internal customization. The steps we are going to follow are:
- Creating the extension that will add the action to the menu toolbar
- Explore how this linked Work Item feature works, and what built in features we can use
- Write a simple dojo class for the example automation, and review how it will look and work
Adding the Action
The first step in this customization process is to build the infrastructure so as to provide the custom Web Action with the described capability. We have to create an Eclipse Plug-in project and define an extension of com.ibm.team.workitem.web.editorToolbarAction. For our sample code, the Plugin id defined is net.jazz.example.workitem.web.
The normal procedure for declaring the extension and its associated information would be to use the Eclipse wizard available in the Plug-in Manifest Editor. However, note that given the nature of this internal customization, there is no schema associated with it in the RTC SDK:
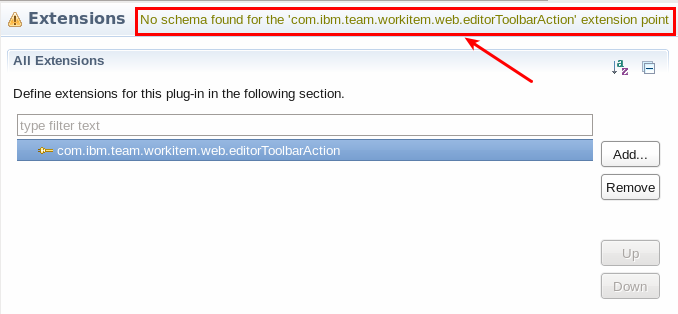
For this reason, we will need to specify the extension details directly in the plugin.xml file, using the plugin.xml tab of the Plug-in Manifest Editor (for further information about the meaning and syntax of the different attributes and their possible values, review References).
Here is the plugin.xml file for the article example:
<plugin> <extension point="net.jazz.ajax.webBundles"> </extension> <extension point="com.ibm.team.workitem.web.editorToolbarAction"> <action action="net.jazz.example.workitem.web.ui.LinkedDefectEditorToolbarAction" iconContext="net.jazz.example.workitem.web" iconUri="images/Bubble.gif" iconDisabledUri="images/Bubble.gif" id="linked.defect" label="Add Related Defect"> </action> </extension> </plugin>
The net.jazz.ajax.webBundles has to be added to mark the plug-in as a web component.
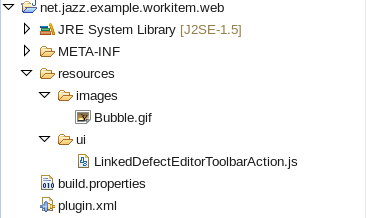
It is also important to note that the action declaration defines the dojo resource that will implement our action, and the module declaration is rooted by the eclipse Plug-in ID. The folder structure and needed files are to be placed under a resources folder in our plug-in project.
Let’s take a look at our sample project structure:
And the basic skeleton of the sample dojo class implementing the action is:
dojo.provide("net.jazz.example.workitem.web.ui.LinkedDefectEditorToolbarAction"); //$NON-NLS-1$ dojo.require("com.ibm.team.workitem.web.ui2.internal.action.AbstractAction"); //$NON-NLS-1$ (function() { dojo.declare("net.jazz.example.workitem.web.ui.LinkedDefectEditorToolbarAction", com.ibm.team.workitem.web.ui2.internal.action.AbstractAction, { run: function(parms) { // Fill with code to be executed by the action } }); })(); What we have done so far is enough to add a new Work Item Editor Toolbar Action. In the rest of the article we will review some of RTC internals to complete the article’s automation example.
Draft Linked Defect: generating the resource url
Now that we have the structure in place, how does the linked Defect feature we want to automate work? When we click on the Create linked Defect option from the link wizard, a new draft Work Item is generated in the web client. This is achieved by the generation of a url for a draft Work Item with parameters that determine, among other things, that this resource is linked, the link type and the associated Work Item.
For example, clicking on the link highlighted in the Introduction will generate a draft linked Defect Work Item as result of a url with the following format:
https://<RTC Server URI>/web/projects/Rational%20Team%20Concert#action=com.ibm.team.workitem.newWorkItem &type=defect&projectAreaItemId=<Project Area UUID>&ts=1324422452000 &addLinkedItemId=<Related Work Item UUID>&addLinkType=com.ibm.team.workitem.linktype.relatedworkitem &addLinkIsSource=true&addLinkedProjectAreaItemId=<Project Area UUID>
The generation of a url with the previous pattern will do the trick, but instead of coding it from scratch we will use the same javascript class that the wizard uses. This class is com.ibm.team.workitem.web.client.util, and the function we want to use is:
getNewWorkItemUri2: function(parms) { parms.typeId = parms.typeId || parms.typeName; // typeName is deprecated var suffix = parms.typeId ? "&type=" + parms.typeId : ""; if(parms.tempId) { suffix = suffix + "&ts=" + parms.tempId; } else { suffix = suffix + "&ts=" + this.getUniqueId(); } if(parms.addLinkType && parms.addLinkedItemId && parms.addLinkedProjectAreaItemId) { suffix = suffix + "&addLinkedItemId=" + parms.addLinkedItemId + "&addLinkType=" + parms.addLinkType + "&addLinkIsSource=" + (parms.addLinkIsSource == true) + "&addLinkedProjectAreaItemId=" + parms.addLinkedProjectAreaItemId; } return this._basicPrefix + "newWorkItem" + suffix; } Putting it All Together
In this last part of the article we are going to enrich our custom action so the desired automation is built using the introduced internal dojo class. The scenario our customization is modeling is a shortcut action to open a Defects children of Story Work Item. The following code is a very simple example of how to achieve this:
dojo.provide("net.jazz.example.workitem.web.ui.LinkedDefectEditorToolbarAction"); //$NON-NLS-1$ dojo.require("com.ibm.team.workitem.web.ui2.internal.action.AbstractAction"); //$NON-NLS-1$ dojo.require("com.ibm.team.workitem.web.client.util"); //$NON-NLS-1$ (function() { // WorkItem Types list of entities that for which the actions apply var workItemEnabledType = "com.ibm.team.apt.workItemType.story"; // Link Type to use var linkType = "com.ibm.team.workitem.linktype.parentworkitem"; // WorkItem Type to generate var workItem2Gen = "defect"; var WorkItemUtil = com.ibm.team.workitem.web.client.util; dojo.declare("net.jazz.example.workitem.web.ui.LinkedDefectEditorToolbarAction", com.ibm.team.workitem.web.ui2.internal.action.AbstractAction, { constructor: function() { // Calculate current Project Area and Work Item Type this._currentWIType = new String(this.workingCopy.getValue({ path: "attributes.workItemType.id"})); this._currentPArea = new String(this.workingCopy.getValue({ path: "attributes.projectArea.id"})); }, run: function(parms) { // Generate the required arguments object var args = { newWorkItemProjectAreaItemId: this._currentPArea, typeName: workItem2Gen, addLinkIsSource: false, addLinkType: linkType, addLinkedProjectAreaItemId: this._currentPArea, addLinkedItemId: this.workingCopy.getItemId() } // Get the draft resource url var url = WorkItemUtil.getNewWorkItemUri2(args); // Redirect to the generated resource window.location = url; }, isEnabled: function() { // Our action is to be only enabled in the Story Work Item and when no change in "on-fly" return !this.workingCopy.isNew() && !this.workingCopy.isChanged() && (this._currentWIType==workItemEnabledType); }, isVisible: function(parms) { // The action is visible just in Story Work Item return this._currentWIType==workItemEnabledType; } }); })(); It is now time to check our custom action, how it looks when integrated in the Work Item, and how our automation shortcut behaves. Provisioning our plug-in to the RTC server and getting an already created Story Work Item:
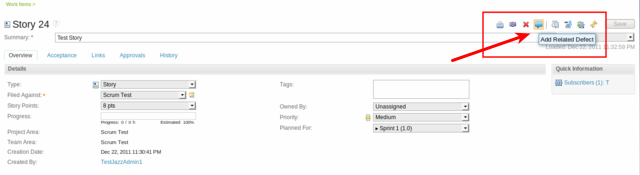
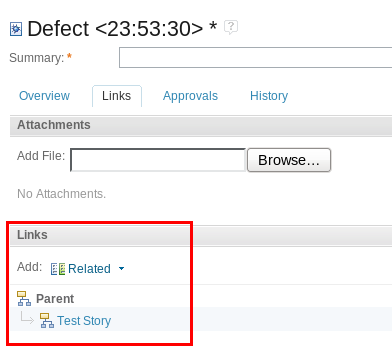
Clicking on our new action will generate a draft Defect which parent is our Story Work Item.
That’s it! We have showed how to provision a new Work Item Editor Toolbar Action to RTC and we have also explored one of the internal behaviors of the Web client as an example automation for a toolbar item.
References
- Article Sample Plugin Project
- Work Item Web UI Internal Customizations: Actions and Policies
- Rational Team Concert 3.0.1 Extensions Workshop
Copyright © 2011 IBM Corporation