Reporting on Rational Software Architect Design Manager Models Using BIRT
The Design Manager 3.0 extension for Rational Software Architect includes the ability to produce Business Intelligence Reporting Tools (BIRT) reports on shared models, including comments and links. This article demonstrates how to use these built-in report designs with UML and BPMN models. It also demonstrates how to modify the designs, including how to extend relevant XPath functions to customize the appearance of comments and links.
Introduction
The Design Manager 3.0 extension for Rational Software Architect provides teams with the ability to collaborate more effectively by providing a central location for sharing designs and by enabling easy access by stakeholders to designs through a Web client.
One feature of RSA DM is the ability to produce Business Intelligence Reporting Tools (BIRT) reports on these shared models, including the comments and links added through desktop and Web clients. RSA DM 3.0 is compatible with RSA 8.0 or newer, with limited BIRT support on older RSA versions. Although RSA DM also provides a Rational Publishing Engine (RPE) reporting solution, BIRT reports are a familiar reporting standard for many customers. These BIRT reports can be used to capture a snapshot of a model’s evolution, including all comments and links provided by stakeholders. The RSA DM 3.0 BIRT reporting functionality focuses on Unified Modeling Language (UML) and Business Process Modeling Notation (BPMN) models.
This article demonstrates how to use the built-in BIRT report designs to produce basic reports, including comments and links, for UML and BPMN models stored in a central repository. It also demonstrates how to modify the included designs, and how to extend relevant XPath functions in order to customize the appearance of comments and links in the final report.
Setup
This article assumes that you have some knowledge of using RSA (with the RSA DM extension) with UML or BPMN models, as well as limited familiarity with BIRT reports. Readers already familiar with BIRT will be able to use their expertise to produce more complicated reports. This article also assumes that you have some knowledge of Java programming and HTML mark-up; these two skills are necessary to customize the XPath functions beyond what is demonstrated by our examples.
The RSA DM BIRT reports must be generated using a desktop client. Ensure that the following features have been installed as part of RSA:
- UML modeling and/or BPMN modeling
- Architecture reporting (UML) with BIRT and/or Architecture reporting (BPMN) with BIRT
- Plug-in Development Environment (PDE) (for creating a plug-in with your own XPath functions)
- Design Manager 3.0 extension for RSA. Note that RSA DM 3.0 is compatible with RSA 8.0 onwards, with limited BIRT support on older RSA versions.
You will also need access to an RSA DM server, populated with appropriate models. In your RSA workspace, ensure that you have created a Design Repository Connection targeting your server.
Features of BIRT reporting in RSA DM
The Design Manager extension for RSA provides new features with respect to BIRT reporting:
- The ability to browse for models accessible through the design repository connections. We call these models ‘repository models’ vs. ‘workspace or file system models’ or ‘local models’.
- New XPath functions, which retrieve the RSA DM comments or RSA DM links associated with a repository model and display them in HTML format. These XPath functions can be extended in order to customize the resulting output.
- New built-in reports, using these XPath functions, which can be used to report on a repository model, including its comments and links. We call these reports ‘repository reports’ to distinguish them from the existing built-in reports.
Note that ‘repository models’ and ‘repository reports’ are separate concepts. It is possible to generate an existing (i.e., older) report targeting a repository model. In this case, the details of the model (e.g., diagrams, elements, documentation, etc.) are accessible, just as they would be for a workspace or file system model. Likewise, it is possible to generate a repository report targeting a workspace or file system model. In this case, any reference to “comments” or “links” will be ignored, since the local model will not contain any such elements.
This new functionality applies to both UML and BPMN models. For the purposes of this article, we will focus on UML models.
Using built-in reports with repository models
Design Manager 3.0 adds several new built-in reports designed for UML or BPMN models. These reports are accessible through the Report Configurations dialog.
- Ensure that your RSA workspace has a valid design repository connection, connected to a server with UML models.
- In the Modeling perspective, select Run > Report > Report Configurations from the menu.
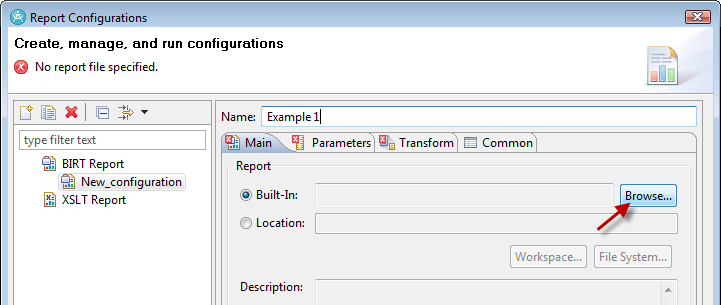
In the Report Configurations dialog that appears, you can create, manage, and run various report configurations.
- The left panel should show BIRT Report as a category. Select this category and click the New button to create a new report configuration. Rename the new configuration “Example 1”.
- Ensure that the Built-in radio button is selected and click Browse to see the built-in reports.
- In the Select Built-In Report dialog that appears, expand the Sample UML Model Reports category. The built-in reports targeting UML models are displayed. The new reports for repository models are:
- UML Repository Report, similar to the original UML Model Metric Report.
- UML Repository Diagram Report, similar to the original UML Model Diagram Report.
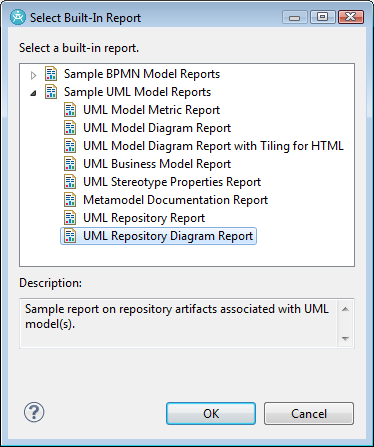
- Select the UML Repository Diagram Report. This is the report we will use for our examples. There are a couple of points to note:
- There is a similar BPMN Repository Diagram Report, targeting BPMN repository models.
- Any of the built-in reports could be chosen in this step. As discussed earlier, older reports can be used with repository models.
- Click OK.
Back in the main Report Configurations dialog, the Report Data > Data Sources pane now shows Main model.
- Click that Main model entry in the Data Sources pane.
- When the Add button next to the Instance Models pane becomes enabled, click it.
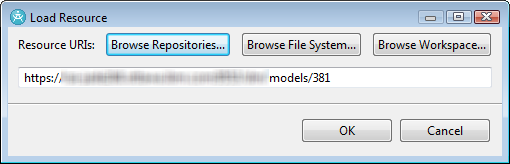
The Load Resource dialog appears.
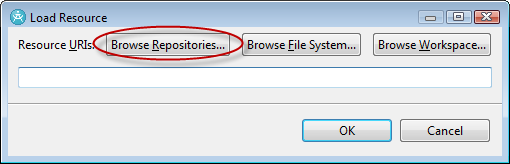
Readers familiar with running BIRT reports will recognize the original Browse File System and Browse Workspace buttons. The RSA DM extension contributes the new Browse Repositories button. This button is used to browse for models accessible through the available design repository connections.
- Click the Browse Repositories button.
The Select Resource dialog appears. It shows all projects available through the available design repository connections.
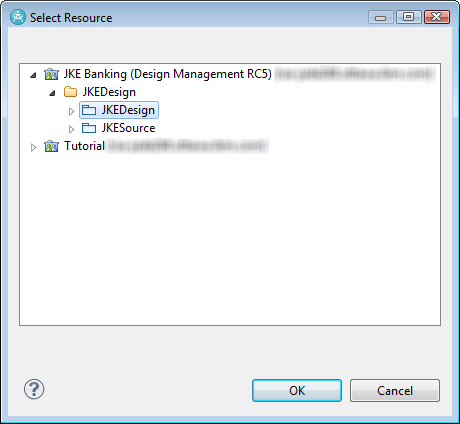
- Navigate to a suitable model. For this example, we navigate to a UML model. Note that it is possible to select more than one model in this step (e.g., by using Ctrl + Click).
- Click OK.
The Load Resource dialog reappears. It now shows the URI of the selected model.
- Click OK.
Focus returns to the Report Configurations dialog. The selected instance model is now shown in the Instance Models pane.

- At this point, you can customize the location of the generated report, as well as its format. For this example, we will use the default location and HTML format. Other supported formats are Microsoft® Word (DOC), Adobe® Reader (PDF), Postscript® (PS), Microsoft PowerPoint (PPT) and Microsoft Excel (XLS).
- Click Apply to save the changes to this report configuration.
- Click Report.
The report is generated. Because we have chosen the HTML format, the report is automatically opened in our default Web browser.

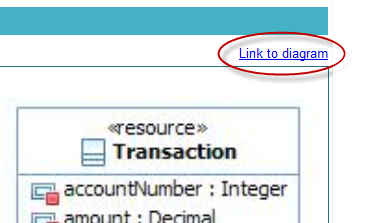
The UML Repository Diagram Report differs from the older UML Diagram Report in three ways:
- Every diagram of the UML instance model is accompanied by a clickable link. Clicking on this link will navigate to the Web client version of this diagram. Note: if the navigation results in a blank page, try logging onto the Web client in a different browser tab/window and then click on the link.
- The comments associated with each diagram are displayed in HTML form. By default, these comments are formatted in the following manner:
- Top-level comments are listed in the order returned by the server; this tends to be reverse-chronological order but is not guaranteed.
- Replies are nested under the original comment.
- Each comment shows the date/time of the comment, followed by the author name. This is followed by the comment subject (in bold) and then the comment body.
- If a drawing has been added to the comment, the phrase “a drawing was added” is appended to the comment. Note that there is no way to display these drawings in a BIRT report; navigate to the Web client to see the drawings.

- The links associated with each diagram are displayed in HTML form. By default, these links are formatted in the following manner:
- Links are grouped by type.
- Each link shows the date/time of the link, followed by the Author name. This is followed by the clickable link. If there is a title, that is used as the text of the link. Otherwise, the URL is used.

XPath functions
Two custom XPath functions are included as part of RSA DM; one to retrieve the comments for an element, the other to retrieve the links for an element. As demonstrated above, each function formats the output as an HTML-formatted string.
String getCommentsHTML(xpath)
This function takes an XPath expression and returns an HTML-formatted string representing the RSA DM comments associated with the input.
- Arguments:
- xpath: An XPath expression, e.g., “.”
- Result:
- An HTML-formatted string. This string can be displayed effectively using a DynamicText control.
- Application:
- On the Column Mapping page, use the function as a column query.
- Example:
- When used in a data set where the row query filters for all Class elements of a UML diagram, this example returns a String representing the repository comments of each Class:
getCommentsHTML(.)
String getLinksHTML(xpath)
This function takes an XPath expression and returns an HTML-formatted string representing the RSA DM links associated with the input.
- Arguments:
- xpath: An XPath expression, e.g., “.”
- Result:
- An HTML-formatted string. This string can be displayed effectively using a DynamicText control.
- Application:
- On the Column Mapping page, use the function as a column query.
- Example:
- When used in a data set where the row query filters for all Class elements of a UML diagram, this example returns a String representing the repository links for each Class:
getLinksHTML(.)
Customizing XPath functions
The getCommentsHTML and getLinksHTML XPath functions return comments as HTML-formatted strings. While there is no way to customize that output directly, it is possible to extend these functions in order to customize the output.
At a high level, to perform this type of customization, we:
- Create a plug-in project to hold new the new XPath functions.
- Create the new XPath functions by extending the RSA DM XPath functions.
- Deploy the new plug-in.
- Create a new report design, using a current repository report as a template.
- Edit the report design to use the new XPath functions.
- Test the new functions by previewing the report.
Creating new plug-in
To create a new Plug-in Project:
- In RSA, select File > New > Other from the menu.
- In the wizard, select Plug-in Project. Click Next.
- Enter a project name, e.g., CustomizedFunctions. Click Next.
- Click Finish.
- If prompted, open the Plug-in Development perspective.
- The editor will display the plug-in’s Overview details. Note the tabs at the bottom of the editor; we will be making changes using several of these tabs.

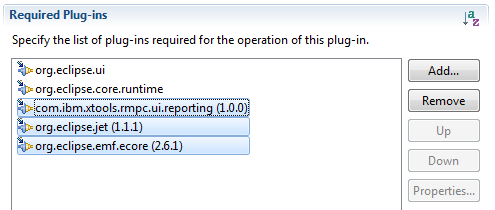
- Navigate to the Dependencies tab. Add the following dependencies:
- com.ibm.xtools.rmpc.ui.reporting
- org.eclipse.jet
- org.eclipse.emf.ecore
- Save the changes.
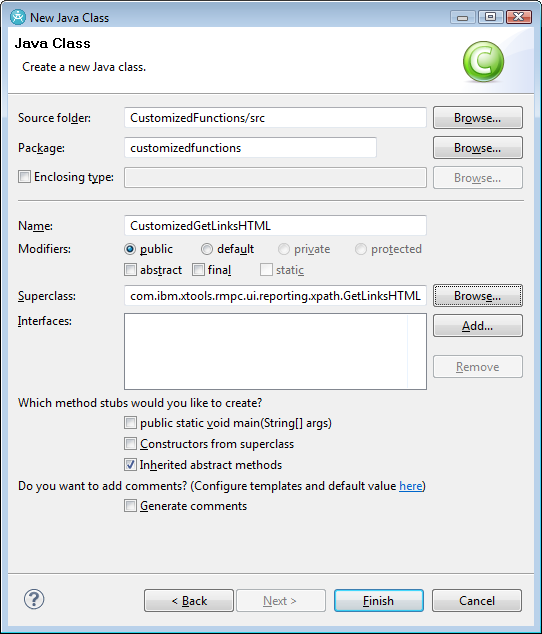
- In the Package Explorer, navigate to the src/customizedFunctions package. Create a new class called CustomizedGetCommentsHTML, extending com.ibm.xtools.rmpc.ui.reporting.xpath.GetCommentsHTML.

- Save the new class. We will discuss the methods for the new class in the next section.
- Create a new class called CustomizedGetLinksHTML extending com.ibm.xtools.rmpc.ui.reporting.xpath.GetLinksHTML.
- Save the new class. We will discuss the methods for the new class in the next section.
- Navigate to the Extensions tab.
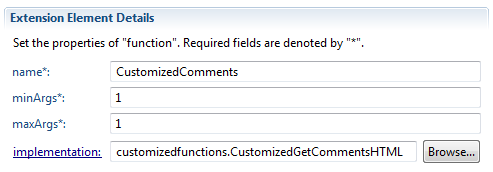
- For each new class created, create an extension on the org.eclipse.jet.xpathFunctions extension point. For the Extension Element Details:
- Choose a memorable name, e.g., CustomizedComments; this will be used in the report design later.
- minArgs should be 1.
- maxArgs should be 1.
- The implementation will be one of the new classes just created.


Extending RSA DM XPath functions
Now that the new plug-in has been set up, we can customize the actual XPath functions. To do this, we override one or more methods in each of our new classes.
Extending GetCommentsHTML
There are three methods in GetCommentsHTML that can be overridden:
protected String getComments(EObject)
This method provides a string representation of the RSA DM comments associated with a particular eObject. The default representation is to list all root comments and include nested replies. The string is marked up with HTML tags, such as <br/>, <b>, etc.
Override this method to change the overall structure of the response. Some helpful tips are:
- Create a RepositoryConnection from the incoming eObject and use that to retrieve root comments (getRootComments()) or all comments (getComments()) for the specific eObject.
- Use the getCommentLine() method (in this class) to retrieve a string representation of a particular comment.
- Use the getNestedReplies() method (in this class) to retrieve a string representation of the nested replies to a particular comment.
protected String getCommentLine(RepositoryConnection, Comment)
This method provides a string representation of a particular comment from a particular repository. By default, the comment includes the date/time of the comment, the author name, comment subject and comment body. Plus, if a comment has a sketch associated with it, that fact is indicated.
Override this method to modify the representation of the comment line. Some helpful tips are:
- The Comment public methods can be used to retrieve specific information about a comment. Useful methods in the Comment class are:
- getBodyText() to retrieve the body of the comment
- getCreated() to retrieve the created date/time of the comment
- getCreatorUri() to retrieve the creator URI of the comment
- getModified() to retrieve the modified date/time of the comment
- getSubject() to retrieve the subject (or title) of the comment
- hasSketch() to determine if the comment has an associated sketch
- Use repository.getAuthor(comment) to retrieve the author name of the comment.
protected String getNestedReplies(RepositoryConnection, Comment)
This method provides a representation of a nested list of replies to a particular comment in a particular repository. By default, the replies are nested, using the HTML tags <ul>, <li>, etc. Recursion is used for the nesting.
Override this method to change the representation of nested replies. A helpful tip is:
- Use repository.getReplies(comment) to retrieve the collection of replies to a comment.
Example
By overriding one or more of these methods, it is possible to customize your XPath functions in various ways. For instance, the following customizations could be performed:
- Instead of showing the comments nested with their replies, list all comments in chronological order, by their date of modification. Or date of creation. Or in reverse-chronological order. Or by author.
- List only the root comments (top level), without any of the replies.
- List only those comments whose subject or body text contains a key phrase. This XPath function could be further customized to allow an additional argument for the phrase.
- Format the comments: instead of showing the modified date/time, author, etc., list exactly which fields are interesting to you.
In fact, the possibilities for customization are endless. For our example, we are going to customize the comments in the following ways:
- List all comments (not nested), sorted by Subject.
- For each comment listed, display the subject first, then the body. Follow this with the modification date/time (formatted in a specific fashion) and author name. Use a custom string to indicate that the comment has a sketch. Use color and font styles to distinguish between the various parts of the comment.
To perform this customization:
- In the CustomizedGetCommentsHTML class, add the following imports:
import java.text.DateFormat; import java.text.SimpleDateFormat; import java.util.ArrayList; import java.util.Collection; import java.util.Collections; import java.util.Comparator; import java.util.List; import org.eclipse.emf.ecore.EObject; import com.ibm.xtools.rmpc.ui.reporting.xpath.Comment; import com.ibm.xtools.rmpc.ui.reporting.xpath.GetCommentsHTML; import com.ibm.xtools.rmpc.ui.reporting.xpath.RepositoryConnection;
- Add the following methods:
protected String getComments(EObject eObj) { String commentString = ""; // Get the repository connection from the incoming eObject. RepositoryConnection repository = new RepositoryConnection(eObj); // Make sure the repository is connected if (repository.isConnected()) { // Retrieve all of the comments Collection<Comment> comments = repository.getComments(); // Turn this collection into a list List<Comment> commentsList = new ArrayList<Comment>(comments); // Using a custom comparator, sort the comments by subject. Collections.sort(commentsList, new Comparator<Comment>() { /** * This method compares two comments; it uses the subject as * the field for comparison. * * @param arg0 * First comment to compare * @param arg1 * Second comment to compare * @return -1 if arg0 < arg1, 0 if arg0 == arg1, 1 if arg0 > * arg1 */ public int compare(Comment arg0, Comment arg1) { return arg0.getSubject().compareTo(arg1.getSubject()); } }); // Get the string for each comment, separated by a blank line for (Comment comment : commentsList) { commentString += getCommentLine(repository, comment) + "<br/> <br/>"; } } return commentString; } protected String getCommentLine(RepositoryConnection repository, Comment comment) { // Use a DateFormat to format the modified date to our taste. DateFormat formatter = new SimpleDateFormat("dd MMM yy"); String commentString = ""; // Set up the comment string with the fields in the order we // like. Use colour/font to separate information. commentString += "<font color="blue">" + comment.getSubject() + "</font>" + "<br/>" + "<em>" + comment.getBodyText() + "</em>" + "<br/>" + formatter.format(comment.getModified()) + " - " + "<b>" + repository.getAuthor(comment) + "</b>"; // Use different custom strings to indicate sketch or not. if (comment.hasSketch()) { commentString += "<br/>" + "[x] Sketch"; } else { commentString += "<br/>" + "[ ] Sketch"; } return commentString; } - Save the file. There should be no compile errors.
Extending GetLinksHTML
There are two methods in GetLinksHTML that can be overridden:
protected String getLinks(EObject)
This method provides a string representation of the repository links associated with a particular eObject. The default representation is to list all links, separated by type. The string is marked up with HTML tags, such as <br/>, <b>, etc.
Override this method to change the overall structure of the response. Some helpful tips are:
- Create a RepositoryConnection from the incoming eObject and use that to retrieve all available link types (getLinkTypes()) and all links of a particular type (getLinksOfType()).
- Use the getLinkLine() method (in this class) to retrieve a string representation of a particular link.
protected String getLinkLine(RepositoryConnection, Link)
This method provides a string representation of a particular link. By default, the link includes the date/time of the link, the author name and a clickable link. The text of the link is its title (if available) or its URL.
Override this method to modify the representation of the link line. Some helpful tips are:
- The Link public methods can be used to retrieve specific information about a link. Useful methods in the Link class are:
- getCreated() to retrieve the created date/time of the link
- getCreatorUri() to retrieve the creator URI of the link
- getDescription() to retrieve the description/title of the link
- getModified() to retrieve the modified date/time of the link
- getSource() to retrieve the source/origin/subject of the link
- getTarget() to retrieve the target/destination/object of the link
- getType() to retrieve the link type of the link
- isReadOnly() to determine if the link is marked read-only
- getHyperlink() to retrieve an HTML-formatted hyperlink for the link, in the form <a href=”target”>display string</a>
- getDisplayString() to retrieve a user-friendly display string for the link’s target; this string is based on the link type and whether or not it has a description/title
- Use repository.getAuthor(link) to retrieve the author name of the link.
Example
By overriding one or both of these methods, it is possible to customize your XPath functions in various ways. For instance, the following customizations could be performed:
- By default, links are grouped by type, but these types are not sorted. Sort the link types and then show the links.
- List the links all together, regardless of type.
- List only certain types of links.
- Format the links: instead of showing modified date/time, author, etc., list exactly which fields are interesting to you.
- Change the way the hyperlink is formatted: remove the hyperlink, change the hyperlink based on various criteria, e.g., link type, etc.
Again, the possibilities for customization are endless. For our example, we are going to customize the links in the following ways:
- List all the links by type, but sort the types alphabetically.
- Show both the URL and the display string for each link.
- Do not show the date/time or author of the link.
To perform this customization:
- In the CustomizedGetLinksHTML class, add the following imports:
import java.util.ArrayList; import java.util.Collection; import java.util.Collections; import java.util.Comparator; import java.util.List; import org.eclipse.emf.ecore.EObject; import com.ibm.xtools.rmpc.ui.reporting.xpath.GetLinksHTML; import com.ibm.xtools.rmpc.ui.reporting.xpath.Link; import com.ibm.xtools.rmpc.ui.reporting.xpath.LinkType; import com.ibm.xtools.rmpc.ui.reporting.xpath.RepositoryConnection;
- Add the following methods:
protected String getLinks(EObject eObj) { String linkString = ""; // Get the repository connection from the incoming eObject RepositoryConnection repository = new RepositoryConnection(eObj); // Make sure the repository is connected if (repository.isConnected()) { // Retrieve all of the link types Collection<LinkType> linkTypes = repository.getLinkTypes(); // Turn this collection into a list List<LinkType> typesList = new ArrayList<LinkType>(linkTypes); // Using a custom comparator, sort the links by type Collections.sort(typesList, new Comparator<LinkType>() { /** * This method compares two links; it uses the string * type of the link for comparison. * * @param o1 First link to compare * @param o2 Second link to compare * @return -1 if o1 < o2, 0 if o1 == o2, 1 if o1 > o2 */ public int compare(LinkType o1, LinkType o2) { return o1.getType().compareTo(o2.getType()); } }); // Iterate through the link types for (LinkType type : typesList) { Collection<Link> linksForType = repository.getLinksOfType(type); // If there are links for this type, show the header and the links if (!linksForType.isEmpty()) { linkString += "<b>" + type.getDisplayString() + "</b><br/>"; //Iterate through the links of that type linkString += "<ul>"; for (Link link : linksForType) { linkString += "<li>" + getLinkLine(repository, link) + "</li>"; } linkString += "</ul>"; } } } return linkString; } - Save the file. There should be no compile errors.
Deploy the plug-in
In order to make use of the customized XPath functions, the new CustomizedFunctions plug-in must be deployed. The plug-in can be exported in a suitable format by using the Export Wizard (available on the plug-in’s Overview tab).
For testing purposes, we are simply going to test this plug-in by launching an Eclipse application. In that separate application, we will create a new report using these XPath functions.
- Navigate to the CustomizedFunctions plug-in’s Overview tab. Click the Launch an Eclipse application link.
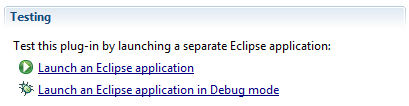
A second RSA instance will be launched.
- In that instance, make sure to create a Design Repository Connection targeting your RSA DM server. We will be testing the reports in this instance and need access to the server.
Note: the source code for our CustomizedFunctions plug-in is provided here. Simply import the zip file as a project into your RSA workspace.
Customize repository reports
To make use of our new customized XPath functions, we will make a copy of the built-in UML Repository Diagram Report and customize it.
Copying an existing report
- Switch to the Report Design perspective: from the menu, choose Window > Open Perspective > Other. If necessary, check the Show all checkbox. Select Report Design from the list and click OK.
- Open the Report Explorer view by selecting Window > Show View > Other. Navigate to the Reporting > Report Explorer view and click OK.
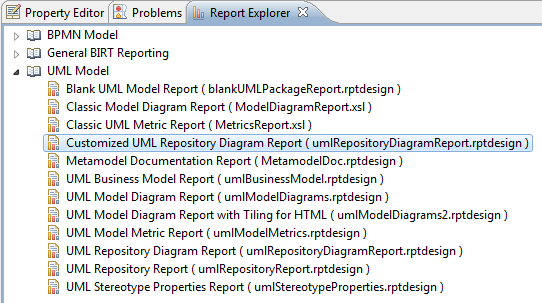
The Report Explorer view is populated with several built-in reports. Each report design is contained in a rptdesign file, the exact name of which is shown in parentheses after the name of the report.

- Select the UML Repository Diagram Report from the list in the Report Explorer view. Right-click and select Copy from the context menu.
- Click the UML Model entry in the Report Explorer view and select Paste from the context menu.
The Paste Report dialog appears, showing a name for the new report, copy_0_UML Repository Diagram Report, as well as a description of the report. The description is copied from the source report.

- Modify the name and description if you wish. For instance, rename the report to Customized UML Repository Diagram Report, and leave the description unchanged.
- Click Next.
The next page of the Paste Report wizard requires a location on your local file system where the report will be saved. When the page first appears, it shows an error: “The file cannot be saved in the specific location.” This is because you have not yet chosen a location.
- Use the Browse button and navigate to a location in your file system.
The dialog is now updated with the exact path name for the report (and its associated properties file).
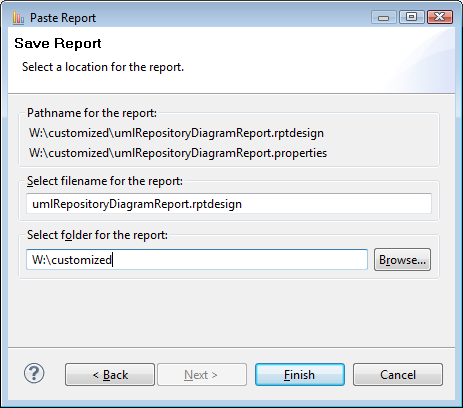
- Click Finish.
The new report will be listed with the other UML reports in the Report Explorer view.
- To start editing the new report, double-click on the new report in the Report Explorer view to open it.
Setting the data source
The data source used for the current report design is a standard UML data source; however, it currently has no instance models associated with it. In order to make the preview of the report more meaningful, assign an instance model (from a repository) to this data source:
- Navigate to the Data Explorer view.
- Expand the Data Sources folder to show the Main model entry.
- Right-click on Main model and select Edit from the context menu.
- Select the Models entry in the left panel.
- In the right panel, click the Add button beside the Instance models pane.
The Load Resource dialog appears. As discussed earlier, this dialog can be used to browse for instance models in the workspace, file system, or accessible through the available Design Repository Connections.

- Click the Browse Repositories button.
- In the Select Resource dialog, navigate to a suitable model. For instance, navigate to the same UML model used earlier when running the UML Repository Diagram Report. Note: if there are no repository models to choose from, make sure that your current workspace has a suitable design repository connection.
- Click OK to close the Select Resource dialog.
- Click OK to close the Load Resource dialog.
- Click OK to close the Edit Data Source dialog.
The data source for this report design now has the instance model associated with it. When you are done customizing this report, remember to remove this instance model before deploying the report design.
Using the new XPath functions
For the purposes of this tutorial, we are not interested in changing the report layout, adding or removing data sets, etc. It is possible to perform these types of customizations at this time; however, we are merely interested in making use of our new XPath functions. To do so:
- In the Data Explorer view, expand the Data Sets folder.
- Right-click on the All Diagrams data set and select Edit.
- In the Edit Data set dialog, select the Column Mapping in the left panel.
The All Diagrams data set retrieves all of the diagrams associated with the instance UML models. The right panel shows the column queries that are used.

Notice the last two column queries, which use the existing XPath functions for retrieving the RSA DM comments and RSA DM links from the instance model. We are going to edit these two queries, in order to refer to our new XPath functions.
- Click on the getCommentsHTML(.) query item in the table. The entry should become highlighted.
- Using the 54198Delete key, delete the contents of that cell.
- Type in the name of the new XPath function. Remember that the name of the function is the name used when defining the extension to the org.eclipse.jet.xpathFunctions extension point. In this case, the name of the new XPath function for getting comments is called CustomizedComments. Type CustomizedComments(.) in the cell.
- In the same manner, change the column query getLinksHTML(.) to CustomizedLinks(.).
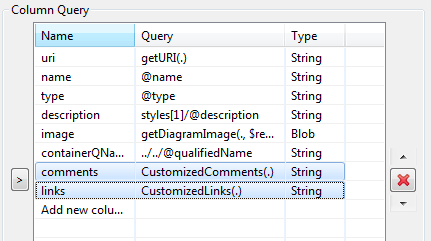
Because we are testing the new plug-in as a separate application, the two classes implementing these XPath functions are found, and no errors are shown in the Edit Data Set dialog. If the plug-in was not deployed properly (or there was a typo in the name), you would see an error in the Edit Data Set dialog, indicating that the function did not exist.
![]()
- Once the column queries have been modified, click OK.
Previewing the report
It is possible to preview the data set after changes have been made, but it is usually much easier to see the results by previewing the entire report.
- In the main editor window, navigate to the Preview pane.

- When prompted, accept the default parameters.
The report preview will be generated. Once the report is generated, you can compare the results of the new XPath functions with the originals provided with the RSA DM extension. The tables below show a comparison between the original output (on our instance model) and the output of the new functions.
| getCommentsHTML(.) | CustomizedComments(.) |
 |  |
| getLinksHTML(.) | CustomizedLinks(.) |
 |  |
Tips
The following tips may be useful when customizing your own reports:
- The XPath functions deliberately return strings of HTML-formatted text. To display this text, use the Dynamic Text element, and make sure to change the Content Type (Property Editor view, General tab) to HTML.
- If plain text is desired (for example, to create a report in spreadsheet form), you can customize the XPath functions and remove all HTML tags. In that case, the Dynamic Text element can be used, with Content Type set to plain. Alternatively, a Data element can be used.
Summary
The Design Management extension for RSA provides new built-in reports for both UML and BPMN models. These new reports can not only access models stored in a central repository, but can provide HTML-formatted output about the models’ RSA DM comments and links. By following the steps presented in this tutorial, you can launch these reports. In addition, you can create your own plug-in, with customized XPath functions, to produce comment and link info to suit your needs.
For more information
- Rational Software Documentation
- IBM Developer Works
- Design Management Project
About the author
Michelle L. Crane has a PhD is Computer Science from Queen’s University. Dr. Crane joined IBM in 2009 and has been employed in maintaining and enhancing Profile Tooling and the BPMN Modeler component of the IBM Rational Software Architect solution. More recently, she implemented the BIRT reporting component of the Design Manager. She can be contacted at craneml@ca.ibm.com.
Copyright 2011 IBM